Showing 103 items
matching surface finish
-
 Flagstaff Hill Maritime Museum and Village
Tool - Wood Plane, Late 19th to early 20th century
... in various shapes and sizes to achieve a flat and even finish ...A moulding plane is a specialised plane used for making the complex shapes found in wooden mouldings that are used to decorate furniture or other wooden objects. Traditionally, moulding planes were blocks of wear-resistant hardwood, often beech or maple, which were worked to the shape of the intended moulding. The blade or iron was likewise formed to the intended moulding profile and secured in the body of the plane with a wooden wedge. A traditional cabinetmakers' shop might have many, perhaps hundreds, of moulding planes for the full range of work to be performed. Large crown mouldings required planes of six or more inches in width, which demanded great strength to push and often had additional peg handles on the sides, allowing the craftsman's apprentice or other workers to pull the plane ahead of the master who guided it. John Moseley & Son: Records indicate that before 1834, the firm is listed at number 16 New Street, London and according to an 1862 advertisement the shop had been established in New Street since 1730, The Sun insurance records from the time show that John Moseley was the possessor of a horse mill in the yard of his premises, which means that some kind of manufacturing was taking place, as the mill would have provided power to run a saw or perhaps a grinding wheel so the probability is that he did not just sell tools, he made them as well. John Moseley died in 1828 and his will named his four sons: John, Thomas, William and Richard. To complicate matters he also had brothers with the same first names; brothers Richard (of Piccadilly) and William (of Peckham Rye) are named as two of the executors. Brother Thomas is not mentioned in this will, but became a minister and was one of the executors of brother Richard's estate when he died in 1856. From John's will, we also learn that, although the shop was in New Street, he resided in Lympstone, Devon. The family must have had a house in that county for quite some time as both sons Richard and William are baptised in Devon, although John and Thomas were baptised in London. In the 1841 and 1851 census records, we just find William in New Street, but in 1861 both William and Richard are listed there as toolmakers. That Richard was staying overnight at New Street was probably just accidental as in 1851 and 1871, we find him with his wife Jane and children in Clapham and Lambeth respectively. In 1851 Richard is listed as “assistant clerk cutlery warehouse” and in 1871 as “retired plane maker and cutler”. Although the actual place of work is not stated, one may assume he worked in the family business. 1862 is a year full of changes for the firm. In that year, William had a new property built at 27 Bedford Street. In the catalogue for the 1862 International Exhibition, 54 Broad Street (later 54-55 Broad Street) is listed for the first time, which may very well coincide with the split of the business into a retail and a wholesale branch. Around the same time, they must have moved from New Street to 17 & 18 King Street because their manufacturing premises had been pulled down to form the New Street from Cranbourne Street to King Street. In January 1865, William died and Richard continued the business. In 1867, the partnership he had with his son Walker and Thomas Elis Hooker, is dissolved. Richard continued tool-making at King Street and Bedford Street. Richard retired somewhere between 1867 and 1871, but the business continued. The business is taken over by W M Marples & Sons and tools continued to be made in London until 1904 when manufacturing relocated to Sheffield.A vintage tool made by a well-known company, this item was made commercially for firms and individuals that worked in wood and needed a tool that could remove large amounts of timber. These jack or dressing planes came in various shapes and sizes to achieve a flat and even finish to timber surfaces and came in many sizes. A significant tool from the mid to late 19th century that is still in use today with early models sought after by collectors. It gives us a snapshot of how furniture and other finishes were created on timber by the use of cutting-edged hand tools. Tools that were themselves handmade show the craftsmanship used during this time not only to make a tool such as the subject item but also the craftsmanship needed to produce a decorative or even finish that was needed for the finishing of timber items.Jack Plane metal body with rose wood filler.Mosley & Sons London No 2flagstaff hill, warrnambool, flagstaff-hill, flagstaff-hill-maritime-museum, maritime-museum, shipwreck-coast, flagstaff-hill-maritime-village, john moseley & son, jack plane, woodworking tool, carpenders tools, cabinet makers tools -
 Flagstaff Hill Maritime Museum and Village
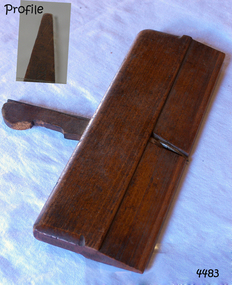
Tool - Moulding Plane, 1770-1809
... in various shapes and sizes to achieve a finish to timber surfaces ...The story of Christopher Gabriel born on April 2, 1746, in Falmouth England is a tale of a poor boy who made good. Shortly before he turned thirteen years of age in 1759 he was apprenticed to a local master carpenter, recorded as a Mr Barnicot the master trained his apprentice well as we can assume by Christopher's later successes. The apprenticeship ended in 1766 after seven years when Christopher reached twenty. Then in 1768, he relocated to London walking the two hundred miles from Falmouth carrying his possessions in a sack. He no sooner arrived in London when he met Alice Trowell who became his wife in March 1769. They set up house on Albermarie Street Clerkenwell and by the first of 1770, Gabriel had begun his business of plane making. It has been speculated that Gabriel took over the shop of John Cogdell aided with an investment from his in-laws of 131 pounds. He went on to prosper as a plane-maker and lumber merchant over the next forty years. His business did well and in 1774 Gabriel moved to a house in Golden Lane, London and 1779 moved again to a home in Ould Street London. By now Gabriel was making a name for himself and his business at this time was located at 32 Banner Street Golden Lane, the following year he purchased another home in Banner Street and 1793 purchased the house next door. At the time of his death in 1808, he owned twenty-seven houses and commercial building. Christopher Gabriel s descendants became quite prominent in England and his grandson, Sir Thomas Gabriel became the Sheriff of London and Middlesex in 1859 and the Lord Mayor of London 1866 and 1867. Gabriel was an extremely prolific plane-maker with a lot of examples made in the 18th century can still be found today. He made good quality tools and was an innovator of several new plane designs. A vintage tool made by a well-known plane-maker, this item was made commercially for firms and individuals that worked in wood and needed a tool that could give a decorative finish to timber. These planes came in various shapes and sizes to achieve a finish to timber surfaces and came in many sizes. A significant Christopher Gabriel plane from the mid to late 18th century that after 200 years can still be used today. Planes made by Gabriel are eagerly sought after by collectors. The tool gives us a snapshot of how furniture and other finishes were created on timber by the use of cutting edged hand tools. Tools that were themselves hand made shows the craftsmanship used during this time not only to make a tool such as the subject item but also the craftsmanship needed to produce a decorative or even finish that was needed for the finishing of timber items. Side Rabbet Plane Stamped Maker Gabriel (owner M Hobling).flagstaff hill, warrnambool, shipwrecked-coast, flagstaff-hill, flagstaff-hill-maritime-museum, maritime-museum, shipwreck-coast, flagstaff-hill-maritime-village, side rabbet plane, gabriel m hobling -
 Flagstaff Hill Maritime Museum and Village
Domestic object - Plate
The Process of Making Pottery Decorating, Firing, Glazing, Making, Technical There is a rhythm and flow to clay. It can’t be done all at once! Even the making process! It can take weeks to get everything done, especially if you can only work on your pottery once a week! Even though we have three hour classes, it’s often just not enough time! Here is an overview of some of the processes so you have a bit more grasp on some of the technical stuff! Step One – Design There are SO many ideas out there for making stuff in clay! From delicate porcelain jewellery, through to heavy sculptural work and everything in between. Deciding your direction is sometimes not that easy – when you first start, try everything, you will naturally gravitate to the style that you enjoy! The options and variations are endless and can get a wee bit overwhelming too! Check in with me before you start to ensure your ideas will work, what order you might do things, how you could achieve the look you are seeking and any other technical data required! Step Two – Making Clay is thixotropic. This means that as you work with it, the clay first gets sloppier and wetter, before is begins to dry in the atmosphere. For most things, you simply can’t do all parts of the project at once. An example of work order might look like: Get last weeks work out from the shelves Prepare clay for today’s work – roll your clay, prepare balls for throwing, make the first stage of a pinch pot) Clean up last week’s work and put it on the shelf for bisque firing Check that you have any glazing to do – and do enough of it that you will have time to finish your main project Do the next step of your next project – there might be a further step that can’t be complete immediately, in that case, wrap your work well and put onto the shelves. Letting your work rest for a while can really help keep your work clean and professional looking. Many things require bagging under plastic to keep it ready for work the next week – put your name on the outside of the bag so you can find your work easily. We have stickers and markers. Consider how you want to decorate your work – coloured slip can be applied at a fairly wet stage (remembering that it will make your work even wetter!). Trying to apply slip to dry clay won’t work! If you want to do sgraffito – you will need to keep the work leather hard (a state of dryness where you can still work the clay with a little effort and a little water and care). Step Three – Drying Most of the time your work can go into the rack uncovered to let it dry out for the following week. If you want to continue forming or shaping you will need to double bag your work – put your work on a suitable sized bat and put the bat in a bag so the base of the bag is under the bat, then put another bag over the top of the work and tuck the top of the bag under the bat. If you want to trim (or turn) your thrown work the following week, it should also be double bagged. If your work is large, delicate, or of uneven thicknesses, you should lightly cover your work for drying. When considering the drying process, bare in mind the weather, humidity and wind! The hotter and dryer, the faster things dry and work can dry unevenly in the shelves – this can lead to cracking – another time to lightly cover your work for drying. Step Four – Trimming and Cleaning Up Your work is dry! It is called greenware now and it is at it’s most fragile! Handle everything with two hands. I often refer to soft hands – keep everything gentle and with your fingers spread as much as possible. Try to not pick up things like plates too much, and always with both hands! Before your work can be bisque fired it should be “cleaned up”. You work won’t go into the kiln if it has sharp edges – when glazed, sharp edges turn into razor blades! Use a piece of fly wire to rub the work all over – this will scratch a little so be light handed. Use a knife or metal kidney to scrape any areas that require a bit more dynamic treatment than the fly wire offers! Finally, a very light wipe over with a slightly damp sponge can help soften and soothe all of your edges and dags! Trimming thrown work: If you are planning to trim (or turn) your thrown work (and you should be), make sure you bag it well – your work should be leather hard to almost dry for easiest trimming. Use this step to finish the work completely – use a metal kidney to polish the surface, or a slightly damp sponge to give a freshly thrown look. Wipe the sponge around the rim after trimming, and check the inside of the pot for dags! Trimming slip cast work: Usually I will trim the rims of your work on the wheel the following day to make that stage easier, however you will still need to check your work for lumps and bumps. Last but not least – check that your name is still clearly on the bottom of your work. Step Five – Bisque Firing When the work is completely dry it can go into the bisque kiln. The bisque kiln is fired to 1000°C. This process burns off the water in the clay as well as some of the chemically bound water. The structure of the clay is not altered that much at this temperature. Inside the bisque kiln, the work is stacked a little, small bowl inside a larger bowl and onto a heavy plate. Smaller items like decorations or drink coasters might get stacked several high. Consideration is paid to the weight of the stack and shape of the work. A bisque kiln can fire about one and a half times the amount of work that the glaze kiln can fire. The firing takes about 10 hours to complete the cycle and about two days to cool down. Once it has been emptied the work is placed in the glaze room ready for you to decorate! Step Six – Glazing Decorating your work with colour can be a lot of fun – and time consuming! There are three main options for surface treatment at this stage: Oxide Washes Underglazes Glazes Washes and underglazes do not “glaze” the work – It will still need a layer of glaze to fully seal the clay (washes don’t need glaze on surfaces not designed for food or liquid as they can gloss up a little on their own). Underglazes are stable colourants that turn out pretty much how they look in the jar. They can be mixed with each other to form other colours and can be used like water colours to paint onto your work. Mostly they should have a clear glaze on top to seal them. Oxides are a different species – the pink oxide (cobalt) wash turns out bright blue for instance. They don’t always need a glaze on top, and some glazes can change the colour of the wash! The glazes need no other “glaze” on top! Be careful of unknown glaze interactions – you can put any combination of glaze in a bowl or on a plate, but only a single glaze on the outside of any vertical surface! Glazes are a chemical reaction under heat. We don’t know the exact chemicals in the Mayco glazes we use. I can guess by the way they interact with each other, however, on the whole, you need to test every idea you have, and not run the test on a vertical surface! Simply put, glaze is a layer of glass like substance that bonds with the clay underneath. Clay is made of silica, alumina and water. Glaze is made of mostly silica. Silica has a melting point of 1700°C and we fire to 1240°C. The silica requires a “flux” to help it melt at the lower temperature. Fluxes can be all sorts of chemicals – a common one is calcium – calcium has a melting point of 2500°C, however, together they both melt at a much lower temperature! Colourants are metal oxides like cobalt (blue), chrome (green through black), copper (green, blue, even red!), manganese (black, purple and pink) iron (red brown), etc. Different chemicals in the glaze can have dramatic effects. for example, barium carbonate (which we don’t use) turns manganese bright pink! Other elements can turn manganese dioxide brown, blue, purple and reddish brown. Manganese dioxide is a flux in and of itself as well. So, glazes that get their black and purple colours, often interact with other glazes and RUN! Our mirror black is a good example – it mixes really well with many glazes because it fluxes them – causes them to melt faster. It will also bring out many beautiful colours in the glazes because it’s black colouring most definitely comes from manganese dioxide! Glaze chemistry is a whole subject on it’s own! We use commercial Mayco glazes on purpose – for their huge range of colour possibilities, stability, cool interactions, artistic freedom with the ability to easily brush the glazes on and ease of use. We currently have almost 50 glazes on hand! A major project is to test the interactions of all glazes with each other. That is 2,500 test tiles!!!! I’m going to make the wall behind the wheels the feature wall of pretty colours! Step Seven – Glaze (Gloss or sometimes called “Glost”) Firing Most of the time this is the final stage of making your creation (but not always!) The glaze kiln goes to 1240°C. This is called cone 6, or midrange. It is the low end of stoneware temperatures. Stoneware clays and glazes are typically fired at cone 8 – 10, that is 1260 – 1290°C. The energy requirement to go from 1240°C to 1280°C is almost a 30% more! Our clay is formulated to vitrify (mature, turn “glass-like”) at 1240°, as are our glazes. A glaze kiln take around 12 hours to reach temperature and two to three days to cool down. Sometimes a third firing process is required – this is for decoration that is added to work after the glaze firing. For example – adding precious metals and lustres. this firing temperature is usually around 600 – 800°C depending upon the techniques being used. There are many students interested in gold and silver trims – we will be doing this third type of firing soon! After firing your work will be in the student finished work shelves. Remember to pay for it before you head out the door! There is a small extra charge for using porcelain clay (it’s more than twice the price of regular clay), and for any third firing process! Once your work has been fired it can not turn back into clay for millennia – so don’t fire it if you don’t like it! Put it in the bucket for recycling. https://firebirdstudios.com.au/the-process-of-making-pottery/Ceramics have evolved over thousands of years.White earthenware dinner plate. Crazing evident all over.Backstamped ‘Made in England S LTD’flagstaff hill, warrnambool, shipwrecked-coast, flagstaff-hill, flagstaff-hill-maritime-museum, maritime-museum, shipwreck-coast, flagstaff-hill-maritime-village, ceramics, tableware -
 Flagstaff Hill Maritime Museum and Village
Domestic object - Plate, Johnson Bros
The Process of Making Pottery Decorating, Firing, Glazing, Making, Technical There is a rhythm and flow to clay. It can’t be done all at once! Even the making process! It can take weeks to get everything done, especially if you can only work on your pottery once a week! Even though we have three hour classes, it’s often just not enough time! Here is an overview of some of the processes so you have a bit more grasp on some of the technical stuff! Step One – Design There are SO many ideas out there for making stuff in clay! From delicate porcelain jewellery, through to heavy sculptural work and everything in between. Deciding your direction is sometimes not that easy – when you first start, try everything, you will naturally gravitate to the style that you enjoy! The options and variations are endless and can get a wee bit overwhelming too! Check in with me before you start to ensure your ideas will work, what order you might do things, how you could achieve the look you are seeking and any other technical data required! Step Two – Making Clay is thixotropic. This means that as you work with it, the clay first gets sloppier and wetter, before is begins to dry in the atmosphere. For most things, you simply can’t do all parts of the project at once. An example of work order might look like: Get last weeks work out from the shelves Prepare clay for today’s work – roll your clay, prepare balls for throwing, make the first stage of a pinch pot) Clean up last week’s work and put it on the shelf for bisque firing Check that you have any glazing to do – and do enough of it that you will have time to finish your main project Do the next step of your next project – there might be a further step that can’t be complete immediately, in that case, wrap your work well and put onto the shelves. Letting your work rest for a while can really help keep your work clean and professional looking. Many things require bagging under plastic to keep it ready for work the next week – put your name on the outside of the bag so you can find your work easily. We have stickers and markers. Consider how you want to decorate your work – coloured slip can be applied at a fairly wet stage (remembering that it will make your work even wetter!). Trying to apply slip to dry clay won’t work! If you want to do sgraffito – you will need to keep the work leather hard (a state of dryness where you can still work the clay with a little effort and a little water and care). Step Three – Drying Most of the time your work can go into the rack uncovered to let it dry out for the following week. If you want to continue forming or shaping you will need to double bag your work – put your work on a suitable sized bat and put the bat in a bag so the base of the bag is under the bat, then put another bag over the top of the work and tuck the top of the bag under the bat. If you want to trim (or turn) your thrown work the following week, it should also be double bagged. If your work is large, delicate, or of uneven thicknesses, you should lightly cover your work for drying. When considering the drying process, bare in mind the weather, humidity and wind! The hotter and dryer, the faster things dry and work can dry unevenly in the shelves – this can lead to cracking – another time to lightly cover your work for drying. Step Four – Trimming and Cleaning Up Your work is dry! It is called greenware now and it is at it’s most fragile! Handle everything with two hands. I often refer to soft hands – keep everything gentle and with your fingers spread as much as possible. Try to not pick up things like plates too much, and always with both hands! Before your work can be bisque fired it should be “cleaned up”. You work won’t go into the kiln if it has sharp edges – when glazed, sharp edges turn into razor blades! Use a piece of fly wire to rub the work all over – this will scratch a little so be light handed. Use a knife or metal kidney to scrape any areas that require a bit more dynamic treatment than the fly wire offers! Finally, a very light wipe over with a slightly damp sponge can help soften and soothe all of your edges and dags! Trimming thrown work: If you are planning to trim (or turn) your thrown work (and you should be), make sure you bag it well – your work should be leather hard to almost dry for easiest trimming. Use this step to finish the work completely – use a metal kidney to polish the surface, or a slightly damp sponge to give a freshly thrown look. Wipe the sponge around the rim after trimming, and check the inside of the pot for dags! Trimming slip cast work: Usually I will trim the rims of your work on the wheel the following day to make that stage easier, however you will still need to check your work for lumps and bumps. Last but not least – check that your name is still clearly on the bottom of your work. Step Five – Bisque Firing When the work is completely dry it can go into the bisque kiln. The bisque kiln is fired to 1000°C. This process burns off the water in the clay as well as some of the chemically bound water. The structure of the clay is not altered that much at this temperature. Inside the bisque kiln, the work is stacked a little, small bowl inside a larger bowl and onto a heavy plate. Smaller items like decorations or drink coasters might get stacked several high. Consideration is paid to the weight of the stack and shape of the work. A bisque kiln can fire about one and a half times the amount of work that the glaze kiln can fire. The firing takes about 10 hours to complete the cycle and about two days to cool down. Once it has been emptied the work is placed in the glaze room ready for you to decorate! Step Six – Glazing Decorating your work with colour can be a lot of fun – and time consuming! There are three main options for surface treatment at this stage: Oxide Washes Underglazes Glazes Washes and underglazes do not “glaze” the work – It will still need a layer of glaze to fully seal the clay (washes don’t need glaze on surfaces not designed for food or liquid as they can gloss up a little on their own). Underglazes are stable colourants that turn out pretty much how they look in the jar. They can be mixed with each other to form other colours and can be used like water colours to paint onto your work. Mostly they should have a clear glaze on top to seal them. Oxides are a different species – the pink oxide (cobalt) wash turns out bright blue for instance. They don’t always need a glaze on top, and some glazes can change the colour of the wash! The glazes need no other “glaze” on top! Be careful of unknown glaze interactions – you can put any combination of glaze in a bowl or on a plate, but only a single glaze on the outside of any vertical surface! Glazes are a chemical reaction under heat. We don’t know the exact chemicals in the Mayco glazes we use. I can guess by the way they interact with each other, however, on the whole, you need to test every idea you have, and not run the test on a vertical surface! Simply put, glaze is a layer of glass like substance that bonds with the clay underneath. Clay is made of silica, alumina and water. Glaze is made of mostly silica. Silica has a melting point of 1700°C and we fire to 1240°C. The silica requires a “flux” to help it melt at the lower temperature. Fluxes can be all sorts of chemicals – a common one is calcium – calcium has a melting point of 2500°C, however, together they both melt at a much lower temperature! Colourants are metal oxides like cobalt (blue), chrome (green through black), copper (green, blue, even red!), manganese (black, purple and pink) iron (red brown), etc. Different chemicals in the glaze can have dramatic effects. for example, barium carbonate (which we don’t use) turns manganese bright pink! Other elements can turn manganese dioxide brown, blue, purple and reddish brown. Manganese dioxide is a flux in and of itself as well. So, glazes that get their black and purple colours, often interact with other glazes and RUN! Our mirror black is a good example – it mixes really well with many glazes because it fluxes them – causes them to melt faster. It will also bring out many beautiful colours in the glazes because it’s black colouring most definitely comes from manganese dioxide! Glaze chemistry is a whole subject on it’s own! We use commercial Mayco glazes on purpose – for their huge range of colour possibilities, stability, cool interactions, artistic freedom with the ability to easily brush the glazes on and ease of use. We currently have almost 50 glazes on hand! A major project is to test the interactions of all glazes with each other. That is 2,500 test tiles!!!! I’m going to make the wall behind the wheels the feature wall of pretty colours! Step Seven – Glaze (Gloss or sometimes called “Glost”) Firing Most of the time this is the final stage of making your creation (but not always!) The glaze kiln goes to 1240°C. This is called cone 6, or midrange. It is the low end of stoneware temperatures. Stoneware clays and glazes are typically fired at cone 8 – 10, that is 1260 – 1290°C. The energy requirement to go from 1240°C to 1280°C is almost a 30% more! Our clay is formulated to vitrify (mature, turn “glass-like”) at 1240°, as are our glazes. A glaze kiln take around 12 hours to reach temperature and two to three days to cool down. Sometimes a third firing process is required – this is for decoration that is added to work after the glaze firing. For example – adding precious metals and lustres. this firing temperature is usually around 600 – 800°C depending upon the techniques being used. There are many students interested in gold and silver trims – we will be doing this third type of firing soon! After firing your work will be in the student finished work shelves. Remember to pay for it before you head out the door! There is a small extra charge for using porcelain clay (it’s more than twice the price of regular clay), and for any third firing process! Once your work has been fired it can not turn back into clay for millennia – so don’t fire it if you don’t like it! Put it in the bucket for recycling. https://firebirdstudios.com.au/the-process-of-making-pottery/Ceramics have evolved over thousands of years.A white earthenware side plate with a gadroon edge. Has water marks and chips on front.‘Johnson Bros England Reg No 15587’flagstaff hill, warrnambool, shipwrecked-coast, flagstaff-hill, flagstaff-hill-maritime-museum, maritime-museum, shipwreck-coast, flagstaff-hill-maritime-village, johnson bros, ceramics, tableware -
 Flagstaff Hill Maritime Museum and Village
Domestic object - Plate, Alfred Meakin
The Process of Making Pottery Decorating, Firing, Glazing, Making, Technical There is a rhythm and flow to clay. It can’t be done all at once! Even the making process! It can take weeks to get everything done, especially if you can only work on your pottery once a week! Even though we have three hour classes, it’s often just not enough time! Here is an overview of some of the processes so you have a bit more grasp on some of the technical stuff! Step One – Design There are SO many ideas out there for making stuff in clay! From delicate porcelain jewellery, through to heavy sculptural work and everything in between. Deciding your direction is sometimes not that easy – when you first start, try everything, you will naturally gravitate to the style that you enjoy! The options and variations are endless and can get a wee bit overwhelming too! Check in with me before you start to ensure your ideas will work, what order you might do things, how you could achieve the look you are seeking and any other technical data required! Step Two – Making Clay is thixotropic. This means that as you work with it, the clay first gets sloppier and wetter, before is begins to dry in the atmosphere. For most things, you simply can’t do all parts of the project at once. An example of work order might look like: Get last weeks work out from the shelves Prepare clay for today’s work – roll your clay, prepare balls for throwing, make the first stage of a pinch pot) Clean up last week’s work and put it on the shelf for bisque firing Check that you have any glazing to do – and do enough of it that you will have time to finish your main project Do the next step of your next project – there might be a further step that can’t be complete immediately, in that case, wrap your work well and put onto the shelves. Letting your work rest for a while can really help keep your work clean and professional looking. Many things require bagging under plastic to keep it ready for work the next week – put your name on the outside of the bag so you can find your work easily. We have stickers and markers. Consider how you want to decorate your work – coloured slip can be applied at a fairly wet stage (remembering that it will make your work even wetter!). Trying to apply slip to dry clay won’t work! If you want to do sgraffito – you will need to keep the work leather hard (a state of dryness where you can still work the clay with a little effort and a little water and care). Step Three – Drying Most of the time your work can go into the rack uncovered to let it dry out for the following week. If you want to continue forming or shaping you will need to double bag your work – put your work on a suitable sized bat and put the bat in a bag so the base of the bag is under the bat, then put another bag over the top of the work and tuck the top of the bag under the bat. If you want to trim (or turn) your thrown work the following week, it should also be double bagged. If your work is large, delicate, or of uneven thicknesses, you should lightly cover your work for drying. When considering the drying process, bare in mind the weather, humidity and wind! The hotter and dryer, the faster things dry and work can dry unevenly in the shelves – this can lead to cracking – another time to lightly cover your work for drying. Step Four – Trimming and Cleaning Up Your work is dry! It is called greenware now and it is at it’s most fragile! Handle everything with two hands. I often refer to soft hands – keep everything gentle and with your fingers spread as much as possible. Try to not pick up things like plates too much, and always with both hands! Before your work can be bisque fired it should be “cleaned up”. You work won’t go into the kiln if it has sharp edges – when glazed, sharp edges turn into razor blades! Use a piece of fly wire to rub the work all over – this will scratch a little so be light handed. Use a knife or metal kidney to scrape any areas that require a bit more dynamic treatment than the fly wire offers! Finally, a very light wipe over with a slightly damp sponge can help soften and soothe all of your edges and dags! Trimming thrown work: If you are planning to trim (or turn) your thrown work (and you should be), make sure you bag it well – your work should be leather hard to almost dry for easiest trimming. Use this step to finish the work completely – use a metal kidney to polish the surface, or a slightly damp sponge to give a freshly thrown look. Wipe the sponge around the rim after trimming, and check the inside of the pot for dags! Trimming slip cast work: Usually I will trim the rims of your work on the wheel the following day to make that stage easier, however you will still need to check your work for lumps and bumps. Last but not least – check that your name is still clearly on the bottom of your work. Step Five – Bisque Firing When the work is completely dry it can go into the bisque kiln. The bisque kiln is fired to 1000°C. This process burns off the water in the clay as well as some of the chemically bound water. The structure of the clay is not altered that much at this temperature. Inside the bisque kiln, the work is stacked a little, small bowl inside a larger bowl and onto a heavy plate. Smaller items like decorations or drink coasters might get stacked several high. Consideration is paid to the weight of the stack and shape of the work. A bisque kiln can fire about one and a half times the amount of work that the glaze kiln can fire. The firing takes about 10 hours to complete the cycle and about two days to cool down. Once it has been emptied the work is placed in the glaze room ready for you to decorate! Step Six – Glazing Decorating your work with colour can be a lot of fun – and time consuming! There are three main options for surface treatment at this stage: Oxide Washes Underglazes Glazes Washes and underglazes do not “glaze” the work – It will still need a layer of glaze to fully seal the clay (washes don’t need glaze on surfaces not designed for food or liquid as they can gloss up a little on their own). Underglazes are stable colourants that turn out pretty much how they look in the jar. They can be mixed with each other to form other colours and can be used like water colours to paint onto your work. Mostly they should have a clear glaze on top to seal them. Oxides are a different species – the pink oxide (cobalt) wash turns out bright blue for instance. They don’t always need a glaze on top, and some glazes can change the colour of the wash! The glazes need no other “glaze” on top! Be careful of unknown glaze interactions – you can put any combination of glaze in a bowl or on a plate, but only a single glaze on the outside of any vertical surface! Glazes are a chemical reaction under heat. We don’t know the exact chemicals in the Mayco glazes we use. I can guess by the way they interact with each other, however, on the whole, you need to test every idea you have, and not run the test on a vertical surface! Simply put, glaze is a layer of glass like substance that bonds with the clay underneath. Clay is made of silica, alumina and water. Glaze is made of mostly silica. Silica has a melting point of 1700°C and we fire to 1240°C. The silica requires a “flux” to help it melt at the lower temperature. Fluxes can be all sorts of chemicals – a common one is calcium – calcium has a melting point of 2500°C, however, together they both melt at a much lower temperature! Colourants are metal oxides like cobalt (blue), chrome (green through black), copper (green, blue, even red!), manganese (black, purple and pink) iron (red brown), etc. Different chemicals in the glaze can have dramatic effects. for example, barium carbonate (which we don’t use) turns manganese bright pink! Other elements can turn manganese dioxide brown, blue, purple and reddish brown. Manganese dioxide is a flux in and of itself as well. So, glazes that get their black and purple colours, often interact with other glazes and RUN! Our mirror black is a good example – it mixes really well with many glazes because it fluxes them – causes them to melt faster. It will also bring out many beautiful colours in the glazes because it’s black colouring most definitely comes from manganese dioxide! Glaze chemistry is a whole subject on it’s own! We use commercial Mayco glazes on purpose – for their huge range of colour possibilities, stability, cool interactions, artistic freedom with the ability to easily brush the glazes on and ease of use. We currently have almost 50 glazes on hand! A major project is to test the interactions of all glazes with each other. That is 2,500 test tiles!!!! I’m going to make the wall behind the wheels the feature wall of pretty colours! Step Seven – Glaze (Gloss or sometimes called “Glost”) Firing Most of the time this is the final stage of making your creation (but not always!) The glaze kiln goes to 1240°C. This is called cone 6, or midrange. It is the low end of stoneware temperatures. Stoneware clays and glazes are typically fired at cone 8 – 10, that is 1260 – 1290°C. The energy requirement to go from 1240°C to 1280°C is almost a 30% more! Our clay is formulated to vitrify (mature, turn “glass-like”) at 1240°, as are our glazes. A glaze kiln take around 12 hours to reach temperature and two to three days to cool down. Sometimes a third firing process is required – this is for decoration that is added to work after the glaze firing. For example – adding precious metals and lustres. this firing temperature is usually around 600 – 800°C depending upon the techniques being used. There are many students interested in gold and silver trims – we will be doing this third type of firing soon! After firing your work will be in the student finished work shelves. Remember to pay for it before you head out the door! There is a small extra charge for using porcelain clay (it’s more than twice the price of regular clay), and for any third firing process! Once your work has been fired it can not turn back into clay for millennia – so don’t fire it if you don’t like it! Put it in the bucket for recycling. https://firebirdstudios.com.au/the-process-of-making-pottery/Ceramics have evolved over thousands of years.Earthenware dessert plate, cream colour. Made by Alfred Meakin, England. Backstamped ‘Alfred Meakin England’. flagstaff hill, warrnambool, shipwrecked-coast, flagstaff-hill, flagstaff-hill-maritime-museum, maritime-museum, shipwreck-coast, flagstaff-hill-maritime-village, alfred meakin, ceramics, earthenware, kitchenware -
 Flagstaff Hill Maritime Museum and Village
Domestic object - Jug
The Process of Making Pottery Decorating, Firing, Glazing, Making, Technical There is a rhythm and flow to clay. It can’t be done all at once! Even the making process! It can take weeks to get everything done, especially if you can only work on your pottery once a week! Even though we have three hour classes, it’s often just not enough time! Here is an overview of some of the processes so you have a bit more grasp on some of the technical stuff! Step One – Design There are SO many ideas out there for making stuff in clay! From delicate porcelain jewellery, through to heavy sculptural work and everything in between. Deciding your direction is sometimes not that easy – when you first start, try everything, you will naturally gravitate to the style that you enjoy! The options and variations are endless and can get a wee bit overwhelming too! Check in with me before you start to ensure your ideas will work, what order you might do things, how you could achieve the look you are seeking and any other technical data required! Step Two – Making Clay is thixotropic. This means that as you work with it, the clay first gets sloppier and wetter, before is begins to dry in the atmosphere. For most things, you simply can’t do all parts of the project at once. An example of work order might look like: Get last weeks work out from the shelves Prepare clay for today’s work – roll your clay, prepare balls for throwing, make the first stage of a pinch pot) Clean up last week’s work and put it on the shelf for bisque firing Check that you have any glazing to do – and do enough of it that you will have time to finish your main project Do the next step of your next project – there might be a further step that can’t be complete immediately, in that case, wrap your work well and put onto the shelves. Letting your work rest for a while can really help keep your work clean and professional looking. Many things require bagging under plastic to keep it ready for work the next week – put your name on the outside of the bag so you can find your work easily. We have stickers and markers. Consider how you want to decorate your work – coloured slip can be applied at a fairly wet stage (remembering that it will make your work even wetter!). Trying to apply slip to dry clay won’t work! If you want to do sgraffito – you will need to keep the work leather hard (a state of dryness where you can still work the clay with a little effort and a little water and care). Step Three – Drying Most of the time your work can go into the rack uncovered to let it dry out for the following week. If you want to continue forming or shaping you will need to double bag your work – put your work on a suitable sized bat and put the bat in a bag so the base of the bag is under the bat, then put another bag over the top of the work and tuck the top of the bag under the bat. If you want to trim (or turn) your thrown work the following week, it should also be double bagged. If your work is large, delicate, or of uneven thicknesses, you should lightly cover your work for drying. When considering the drying process, bare in mind the weather, humidity and wind! The hotter and dryer, the faster things dry and work can dry unevenly in the shelves – this can lead to cracking – another time to lightly cover your work for drying. Step Four – Trimming and Cleaning Up Your work is dry! It is called greenware now and it is at it’s most fragile! Handle everything with two hands. I often refer to soft hands – keep everything gentle and with your fingers spread as much as possible. Try to not pick up things like plates too much, and always with both hands! Before your work can be bisque fired it should be “cleaned up”. You work won’t go into the kiln if it has sharp edges – when glazed, sharp edges turn into razor blades! Use a piece of fly wire to rub the work all over – this will scratch a little so be light handed. Use a knife or metal kidney to scrape any areas that require a bit more dynamic treatment than the fly wire offers! Finally, a very light wipe over with a slightly damp sponge can help soften and soothe all of your edges and dags! Trimming thrown work: If you are planning to trim (or turn) your thrown work (and you should be), make sure you bag it well – your work should be leather hard to almost dry for easiest trimming. Use this step to finish the work completely – use a metal kidney to polish the surface, or a slightly damp sponge to give a freshly thrown look. Wipe the sponge around the rim after trimming, and check the inside of the pot for dags! Trimming slip cast work: Usually I will trim the rims of your work on the wheel the following day to make that stage easier, however you will still need to check your work for lumps and bumps. Last but not least – check that your name is still clearly on the bottom of your work. Step Five – Bisque Firing When the work is completely dry it can go into the bisque kiln. The bisque kiln is fired to 1000°C. This process burns off the water in the clay as well as some of the chemically bound water. The structure of the clay is not altered that much at this temperature. Inside the bisque kiln, the work is stacked a little, small bowl inside a larger bowl and onto a heavy plate. Smaller items like decorations or drink coasters might get stacked several high. Consideration is paid to the weight of the stack and shape of the work. A bisque kiln can fire about one and a half times the amount of work that the glaze kiln can fire. The firing takes about 10 hours to complete the cycle and about two days to cool down. Once it has been emptied the work is placed in the glaze room ready for you to decorate! Step Six – Glazing Decorating your work with colour can be a lot of fun – and time consuming! There are three main options for surface treatment at this stage: Oxide Washes Underglazes Glazes Washes and underglazes do not “glaze” the work – It will still need a layer of glaze to fully seal the clay (washes don’t need glaze on surfaces not designed for food or liquid as they can gloss up a little on their own). Underglazes are stable colourants that turn out pretty much how they look in the jar. They can be mixed with each other to form other colours and can be used like water colours to paint onto your work. Mostly they should have a clear glaze on top to seal them. Oxides are a different species – the pink oxide (cobalt) wash turns out bright blue for instance. They don’t always need a glaze on top, and some glazes can change the colour of the wash! The glazes need no other “glaze” on top! Be careful of unknown glaze interactions – you can put any combination of glaze in a bowl or on a plate, but only a single glaze on the outside of any vertical surface! Glazes are a chemical reaction under heat. We don’t know the exact chemicals in the Mayco glazes we use. I can guess by the way they interact with each other, however, on the whole, you need to test every idea you have, and not run the test on a vertical surface! Simply put, glaze is a layer of glass like substance that bonds with the clay underneath. Clay is made of silica, alumina and water. Glaze is made of mostly silica. Silica has a melting point of 1700°C and we fire to 1240°C. The silica requires a “flux” to help it melt at the lower temperature. Fluxes can be all sorts of chemicals – a common one is calcium – calcium has a melting point of 2500°C, however, together they both melt at a much lower temperature! Colourants are metal oxides like cobalt (blue), chrome (green through black), copper (green, blue, even red!), manganese (black, purple and pink) iron (red brown), etc. Different chemicals in the glaze can have dramatic effects. for example, barium carbonate (which we don’t use) turns manganese bright pink! Other elements can turn manganese dioxide brown, blue, purple and reddish brown. Manganese dioxide is a flux in and of itself as well. So, glazes that get their black and purple colours, often interact with other glazes and RUN! Our mirror black is a good example – it mixes really well with many glazes because it fluxes them – causes them to melt faster. It will also bring out many beautiful colours in the glazes because it’s black colouring most definitely comes from manganese dioxide! Glaze chemistry is a whole subject on it’s own! We use commercial Mayco glazes on purpose – for their huge range of colour possibilities, stability, cool interactions, artistic freedom with the ability to easily brush the glazes on and ease of use. We currently have almost 50 glazes on hand! A major project is to test the interactions of all glazes with each other. That is 2,500 test tiles!!!! I’m going to make the wall behind the wheels the feature wall of pretty colours! Step Seven – Glaze (Gloss or sometimes called “Glost”) Firing Most of the time this is the final stage of making your creation (but not always!) The glaze kiln goes to 1240°C. This is called cone 6, or midrange. It is the low end of stoneware temperatures. Stoneware clays and glazes are typically fired at cone 8 – 10, that is 1260 – 1290°C. The energy requirement to go from 1240°C to 1280°C is almost a 30% more! Our clay is formulated to vitrify (mature, turn “glass-like”) at 1240°, as are our glazes. A glaze kiln take around 12 hours to reach temperature and two to three days to cool down. Sometimes a third firing process is required – this is for decoration that is added to work after the glaze firing. For example – adding precious metals and lustres. this firing temperature is usually around 600 – 800°C depending upon the techniques being used. There are many students interested in gold and silver trims – we will be doing this third type of firing soon! After firing your work will be in the student finished work shelves. Remember to pay for it before you head out the door! There is a small extra charge for using porcelain clay (it’s more than twice the price of regular clay), and for any third firing process! Once your work has been fired it can not turn back into clay for millennia – so don’t fire it if you don’t like it! Put it in the bucket for recycling. https://firebirdstudios.com.au/the-process-of-making-pottery/The form of the jug has been in use for many centuries.Stoneware jug. Two tone brown glaze with pierced lip behind spout. Spout chipped.None.flagstaff hill, warrnambool, shipwrecked-coast, flagstaff-hill, flagstaff-hill-maritime-museum, maritime-museum, shipwreck-coast, flagstaff-hill-maritime-village, jug, ceramic jug -
 Flagstaff Hill Maritime Museum and Village
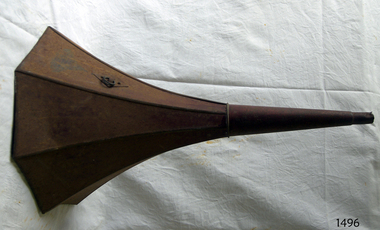
Audio - Phonograph Horn, Thomas A. Edison, Edison Laboratory, c.1909
This external horn is part of an Edison Fireside Phonograph made in c.1909. The horn was attached to the machine when in use. The rings on the side of the horn allowed the horn to be suspended above the machine. The narrow opening on the horn was attached to the sound outlet on the machine and the conical shape of the horn amplified the sound. The horn was suspended to allow a clear sound. This was done by attaching the ring fitted to the outside of the horn to a chain or chord, which in turn was attached to a curved wire fitted to the phonograph machine. The phonograph machine was invented by Thomas Alva Edison in the late 19th century. Edison adapted the idea used when sending messages over a telegraph machine. He patented the phonograph in early 1878. The phonograph was able to record sound and play it back sound. This amazing invention opened up a whole new world of entertainments, where wax cylinders of pre-recorded sound could be purchased with a wide variety of music and played over and over. The first wax cylinders were white and used a combination of bees' wax and animal fax or tallow. By 1892 Edison was using 'brown wax' cylinders that ranged from cream through to dark brown. The Edison Phonograph Company was formed in 1887 to produce these machines. He sold the company in 1855 to the North American Phonograph Company but bought that company in 1890. He started the Edison Spring Motor factory in 1895 and then the National Phonograph Company in 1896. In 1910 the company became Thomas A. Edison Inc. In 1898 Edison produced the Edison Standard Phonograph, the first phonograph to carry his own trade mark. He began mass producing duplicate copies of his wax cylinders in 1901 using moulds instead of engraving the cylinders. The wax was black and harder than the brown wax. The ends of the cylinders were bevelled so that the title's label could be added. The last phonograph machine to use an external horn was produced in 1912 due to the much more robust records being invented. In 1913 Edison started producing the Edison Disc Phonograph. The company stopped trading in 1929. [NOTE: a phonograph machine plays cylinders, a gramophone plays records]This Edison external phonograph horn is significant for its connection to the c.1909 Edison Fireside phonograph model. The phonograph machine brought a new era of music into the homes of everyday people but was only popular for a few decades due to the growing popularity of records, which gave a much higher quality sound and were more robust.Phonograph horn; open horn, a conical shape with the lower part flaring out. The horn's shape on the opening half is octagonal, made from eight joined sheets of metal with a scalloped finish at the opening. The narrow end is hollow and ready to fit onto a phonograph outlet. There are two rings attached together on the side of the horn, perhaps for storing on a hook. The inner surface of the horn has remnants of deep red paint. This horn is from the Edison Fireside phonograph. (There is a mark on the outside of the horn where the Edison brand would be)flagstaff hill, maritime museum, maritime village, warrnambool, great ocean road, shipwreck coast, gramophone, phonograph, music player, entertainment, audio equipment, edison, thomas a edison, horn, phonograph horn, amplifier, audio, sound recording, sound playback, phonograph machine, external horn, edison phonograph company, wax cylinders, edison spring motor factory, national phonograph company, thomas a. edison inc, phonographic cylinder, sound reproduction -
 Flagstaff Hill Maritime Museum and Village
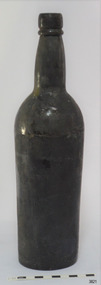
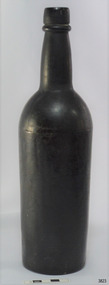
Container - Bottle, 1840s to 1878
This handmade black glass bottle was recovered between the late 1960s to early 1970s from the wreck of the sailing ship Loch Ard. The ship was wrecked in 1878 and its remains are located at Mutton Bird Island, near Port Campbell, Victoria and bottles of liquor were listed as part of the Loch Ard’s cargo. This bottle is now part of the John Chance collection. Black glass is one of the oldest bottle colours and dates back to the early 17th century. In the 1840s to late-1870s black glass bottles were mainly used for liquor and ale. All glass is made from silica, which is found in quartz sand. The naturally occurring sand has impurities, such as iron, that determine the colour of the glass. Residual iron leads to green or amber coloured glass, and carbon in the sand makes that glass appear as ‘black’. A strong light behind the glass will show its colour as dark green or dark amber. This handmade bottle appears to have been made in a dip mould, with the molten glass blown into a seamless shoulder-height mould to give the body a uniform symmetrical shape and size. After the body is blown, the glass blower continues blowing free-form (without the mould) to form the shoulder and neck, then the base is pushed up with a tool, and the finish for the mouth is added with his tools. The dip mould gives the body a slightly textured surface, with the free blown shoulders and neck being smoother and shinier. There is usually a line around the shoulder where the mould of the body meets the shoulder, and a lump or mark in the centre of the base, called a pontil mark, where the push-up tool was removed. The ship Loch Ard was built on the River Clyde in Scotland in 1873 for the prestigious Loch Line of colonial clipper ships, designed for the Australian run. It sailed from England on 1 March 1878 carrying 37 crew, 17 passengers and a diverse general cargo ranging from luxury items to bulk railway iron. On 1 June 1878, emerging from fog and hearing too late the sound of breakers against the tall limestone cliffs, the vessel struck the southern foot of Mutton Bird Island and sank in 23 metres of water. Of the fifty-four people on board only two survived, one young male crewman, Tom Pearce, and one young female passenger, Eva Carmichael. This bottle is historically significant as an example of liquor bottles imported into to Colonial Victoria in the mid-1800s to early-1900s. Its significance is increased by also being an artefact recovered by John Chance, a diver from the wreck of the Loch Ard and other wrecks in the late-1960s to early-1970s. Items that come from several wrecks along Victoria's coast have since been donated to the Flagstaff Hill Maritime Village’s museum collection by his family, illustrating this item’s level of historical value. The bottle is also significant for being part of Flagstaff Hill’s collection of artefacts from the Loch Ard, which is significant for being one of the largest collections of artefacts from this shipwreck in Victoria. The collection is significant for its association with the shipwreck, which is on the Victorian Heritage Register (VHR S417. The collection has additional significance because of the relationship between the objects, as together they have a high potential to interpret the story of the Loch Ard. The Loch Ard collection is archaeologically significant as the remains of a large international passenger and cargo ship. The Loch Ard collection is historically significant for representing aspects of Victoria’s shipping history and its potential to interpret sub-theme 1.5 of Victoria’s Framework of Historical Themes (living with natural processes). The shipwreck is one of the worst, and best known, shipwrecks in Victoria’s history.Bottle, black glass. Thick matt body, with slightly bumpy texture, areas with sheen, colour imperfections. Tooled cork-top finish with ring below, slightly bulged neck. Shoulder has some diagonal creases and a line where shoulder meets body. Body tapers inwards to base. Heel varies in width. Pushed up base has pontil mark. Base is uneven. Handmade, dip mould. No inscriptions.flagstaff hill, warrnambool, flagstaff hill maritime museum, maritime museum, shipwreck coast, flagstaff hill maritime village, great ocean road, shipwreck artefact, loch ard, mutton bird island, eva carmichael, tom pearce, john chance, bottle, black glass, antique bottle, bulge neck bottle, handmade, dip mould, mouth blown, pontil base, blown bottle, liquor bottle, ale bottle -
 Flagstaff Hill Maritime Museum and Village
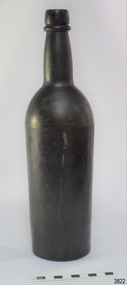
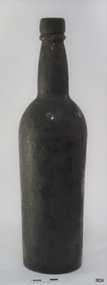
Container - Bottle, 1840s to 1878
This handmade black glass bottle was recovered between the late 1960s to early 1970s from the wreck of the sailing ship Loch Ard. The ship was wrecked in 1878 and its remains are located at Mutton Bird Island, near Port Campbell, Victoria and bottles of liquor were listed as part of the Loch Ard’s cargo. This bottle is now part of the John Chance collection. Black glass is one of the oldest bottle colours and dates back to the early 17th century. In the 1840s to late-1870s black glass bottles were mainly used for liquor and ale. All glass is made from silica, which is found in quartz sand. The naturally occurring sand has impurities, such as iron, that determine the colour of the glass. Residual iron leads to green or amber coloured glass, and carbon in the sand makes that glass appear as ‘black’. A strong light behind the glass will show its colour as dark green or dark amber. This handmade bottle appears to have been made in a dip mould, with the molten glass blown into a seamless shoulder-height mould to give the body a uniform symmetrical shape and size. After the body is blown, the glass blower continues blowing free-form (without the mould) to form the shoulder and neck, then the base is pushed up with a tool, and the finish for the mouth is added with his tools. The dip mould gives the body a slightly textured surface, with the free blown shoulders and neck being smoother and shinier. There is usually a line around the shoulder where the mould of the body meets the shoulder, and a lump or mark in the centre of the base, called a pontil mark, where the push-up tool was removed. The ship Loch Ard was built on the River Clyde in Scotland in 1873 for the prestigious Loch Line of colonial clipper ships, designed for the Australian run. It sailed from England on 1 March 1878 carrying 37 crew, 17 passengers and a diverse general cargo ranging from luxury items to bulk railway iron. On 1 June 1878, emerging from fog and hearing too late the sound of breakers against the tall limestone cliffs, the vessel struck the southern foot of Mutton Bird Island and sank in 23 metres of water. Of the fifty-four people on board only two survived, one young male crewman, Tom Pearce, and one young female passenger, Eva Carmichael. This bottle is historically significant as an example of liquor bottles imported into to Colonial Victoria in the mid-1800s to early-1900s. Its significance is increased by also being an artefact recovered by John Chance, a diver from the wreck of the Loch Ard and other wrecks in the late-1960s to early-1970s. Items that come from several wrecks along Victoria's coast have since been donated to the Flagstaff Hill Maritime Village’s museum collection by his family, illustrating this item’s level of historical value. The bottle is also significant for being part of Flagstaff Hill’s collection of artefacts from the Loch Ard, which is significant for being one of the largest collections of artefacts from this shipwreck in Victoria. The collection is significant for its association with the shipwreck, which is on the Victorian Heritage Register (VHR S417. The collection has additional significance because of the relationship between the objects, as together they have a high potential to interpret the story of the Loch Ard. The Loch Ard collection is archaeologically significant as the remains of a large international passenger and cargo ship. The Loch Ard collection is historically significant for representing aspects of Victoria’s shipping history and its potential to interpret sub-theme 1.5 of Victoria’s Framework of Historical Themes (living with natural processes). The shipwreck is one of the worst, and best known, shipwrecks in Victoria’s history.Bottle, black glass. Thick matt body, with slightly bumpy texture, areas with sheen, colour imperfections. Tooled cork-top finish with ring below, slightly bulged neck. Shoulder has a line where shoulder meets body. Body tapers inwards to base. Heel varies in width. Pushed up base has pontil mark. Handmade, dip mould. No inscriptions.flagstaff hill, warrnambool, flagstaff hill maritime museum, maritime museum, shipwreck coast, flagstaff hill maritime village, great ocean road, shipwreck artefact, loch ard, mutton bird island, eva carmichael, tom pearce, john chance, bottle, black glass, antique bottle, bulge neck bottle, handmade, dip mould, mouth blown, pontil base, blown bottle, liquor bottle, ale bottle -
 Flagstaff Hill Maritime Museum and Village
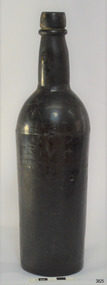
Container - Bottle, 1840s to 1878
This handmade black glass bottle was recovered between the late 1960s to early 1970s from the wreck of the sailing ship Loch Ard. The ship was wrecked in 1878 and its remains are located at Mutton Bird Island, near Port Campbell, Victoria and bottles of liquor were listed as part of the Loch Ard’s cargo. This bottle is now part of the John Chance collection. Black glass is one of the oldest bottle colours and dates back to the early 17th century. In the 1840s to late-1870s black glass bottles were mainly used for liquor and ale. All glass is made from silica, which is found in quartz sand. The naturally occurring sand has impurities, such as iron, that determine the colour of the glass. Residual iron leads to green or amber coloured glass, and carbon in the sand makes that glass appear as ‘black’. A strong light behind the glass will show its colour as dark green or dark amber. This handmade bottle appears to have been made in a dip mould, with the molten glass blown into a seamless shoulder-height mould to give the body a uniform symmetrical shape and size. After the body is blown, the glass blower continues blowing free-form (without the mould) to form the shoulder and neck, then the base is pushed up with a tool, and the finish for the mouth is added with his tools. The dip mould gives the body a slightly textured surface, with the free blown shoulders and neck being smoother and shinier. There is usually a line around the shoulder where the mould of the body meets the shoulder, and a lump or mark in the centre of the base, called a pontil mark, where the push-up tool was removed. The ship Loch Ard was built on the River Clyde in Scotland in 1873 for the prestigious Loch Line of colonial clipper ships, designed for the Australian run. It sailed from England on 1 March 1878 carrying 37 crew, 17 passengers and a diverse general cargo ranging from luxury items to bulk railway iron. On 1 June 1878, emerging from fog and hearing too late the sound of breakers against the tall limestone cliffs, the vessel struck the southern foot of Mutton Bird Island and sank in 23 metres of water. Of the fifty-four people on board only two survived, one young male crewman, Tom Pearce, and one young female passenger, Eva Carmichael. This bottle is historically significant as an example of liquor bottles imported into to Colonial Victoria in the mid-1800s to early-1900s. Its significance is increased by also being an artefact recovered by John Chance, a diver from the wreck of the Loch Ard and other wrecks in the late-1960s to early-1970s. Items that come from several wrecks along Victoria's coast have since been donated to the Flagstaff Hill Maritime Village’s museum collection by his family, illustrating this item’s level of historical value. The bottle is also significant for being part of Flagstaff Hill’s collection of artefacts from the Loch Ard, which is significant for being one of the largest collections of artefacts from this shipwreck in Victoria. The collection is significant for its association with the shipwreck, which is on the Victorian Heritage Register (VHR S417. The collection has additional significance because of the relationship between the objects, as together they have a high potential to interpret the story of the Loch Ard. The Loch Ard collection is archaeologically significant as the remains of a large international passenger and cargo ship. The Loch Ard collection is historically significant for representing aspects of Victoria’s shipping history and its potential to interpret sub-theme 1.5 of Victoria’s Framework of Historical Themes (living with natural processes). The shipwreck is one of the worst, and best known, shipwrecks in Victoria’s history.Bottle, black glass. Thick matt body, with slightly bumpy texture, areas with sheen, colour imperfections. Mouth has cork seal. Tooled cork-top finish with ring below, slightly bulged neck. Shoulder a line where shoulder meets body. Body tapers inwards to base. Heel varies in width. Pushed up base has pontil mark. White discolouration in a narrow line down the body. Handmade, dip mould. No inscriptions.flagstaff hill, warrnambool, flagstaff hill maritime museum, maritime museum, shipwreck coast, flagstaff hill maritime village, great ocean road, shipwreck artefact, loch ard, mutton bird island, eva carmichael, tom pearce, john chance, bottle, black glass, antique bottle, bulge neck bottle, handmade, dip mould, mouth blown, pontil base, blown bottle, liquor bottle, ale bottle -
 Flagstaff Hill Maritime Museum and Village
Container - Bottle, 1840s to 1878
This handmade black glass bottle was recovered between the late 1960s to early 1970s from the wreck of the sailing ship Loch Ard. The ship was wrecked in 1878 and its remains are located at Mutton Bird Island, near Port Campbell, Victoria and bottles of liquor were listed as part of the Loch Ard’s cargo. This bottle is now part of the John Chance collection. Black glass is one of the oldest bottle colours and dates back to the early 17th century. In the 1840s to late-1870s black glass bottles were mainly used for liquor and ale. All glass is made from silica, which is found in quartz sand. The naturally occurring sand has impurities, such as iron, that determine the colour of the glass. Residual iron leads to green or amber coloured glass, and carbon in the sand makes that glass appear as ‘black’. A strong light behind the glass will show its colour as dark green or dark amber. This handmade bottle appears to have been made in a dip mould, with the molten glass blown into a seamless shoulder-height mould to give the body a uniform symmetrical shape and size. After the body is blown, the glass blower continues blowing free-form (without the mould) to form the shoulder and neck, then the base is pushed up with a tool, and the finish for the mouth is added with his tools. The dip mould gives the body a slightly textured surface, with the free blown shoulders and neck being smoother and shinier. There is usually a line around the shoulder where the mould of the body meets the shoulder, and a lump or mark in the centre of the base, called a pontil mark, where the push-up tool was removed. The ship Loch Ard was built on the River Clyde in Scotland in 1873 for the prestigious Loch Line of colonial clipper ships, designed for the Australian run. It sailed from England on 1 March 1878 carrying 37 crew, 17 passengers and a diverse general cargo ranging from luxury items to bulk railway iron. On 1 June 1878, emerging from fog and hearing too late the sound of breakers against the tall limestone cliffs, the vessel struck the southern foot of Mutton Bird Island and sank in 23 metres of water. Of the fifty-four people on board only two survived, one young male crewman, Tom Pearce, and one young female passenger, Eva Carmichael. This bottle is historically significant as an example of liquor bottles imported into to Colonial Victoria in the mid-1800s to early-1900s. Its significance is increased by also being an artefact recovered by John Chance, a diver from the wreck of the Loch Ard and other wrecks in the late-1960s to early-1970s. Items that come from several wrecks along Victoria's coast have since been donated to the Flagstaff Hill Maritime Village’s museum collection by his family, illustrating this item’s level of historical value. The bottle is also significant for being part of Flagstaff Hill’s collection of artefacts from the Loch Ard, which is significant for being one of the largest collections of artefacts from this shipwreck in Victoria. The collection is significant for its association with the shipwreck, which is on the Victorian Heritage Register (VHR S417. The collection has additional significance because of the relationship between the objects, as together they have a high potential to interpret the story of the Loch Ard. The Loch Ard collection is archaeologically significant as the remains of a large international passenger and cargo ship. The Loch Ard collection is historically significant for representing aspects of Victoria’s shipping history and its potential to interpret sub-theme 1.5 of Victoria’s Framework of Historical Themes (living with natural processes). The shipwreck is one of the worst, and best known, shipwrecks in Victoria’s history.Bottle, black glass. Thick matt body, with slightly bumpy texture, areas with sheen, colour imperfections. Mouth has cork seal. Tooled cork-top finish with ring below, slightly bulged neck. Shoulder has a line with a long bump where shoulder meets body. Body tapers inwards to base. Pushed up base has pontil mark. Handmade, dip mould. No inscriptions.flagstaff hill, warrnambool, flagstaff hill maritime museum, maritime museum, shipwreck coast, flagstaff hill maritime village, great ocean road, shipwreck artefact, loch ard, mutton bird island, eva carmichael, tom pearce, john chance, bottle, black glass, antique bottle, bulge neck bottle, handmade, dip mould, mouth blown, pontil base, blown bottle, liquor bottle, ale bottle -
 Flagstaff Hill Maritime Museum and Village
Container - Bottle, 1840s to 1878
This handmade black glass bottle was recovered between the late 1960s to early 1970s from the wreck of the sailing ship Loch Ard. The ship was wrecked in 1878 and its remains are located at Mutton Bird Island, near Port Campbell, Victoria and bottles of liquor were listed as part of the Loch Ard’s cargo. This bottle is now part of the John Chance collection. Black glass is one of the oldest bottle colours and dates back to the early 17th century. In the 1840s to late-1870s black glass bottles were mainly used for liquor and ale. All glass is made from silica, which is found in quartz sand. The naturally occurring sand has impurities, such as iron, that determine the colour of the glass. Residual iron leads to green or amber coloured glass, and carbon in the sand makes that glass appear as ‘black’. A strong light behind the glass will show its colour as dark green or dark amber. This handmade bottle appears to have been made in a dip mould, with the molten glass blown into a seamless shoulder-height mould to give the body a uniform symmetrical shape and size. After the body is blown, the glass blower continues blowing free-form (without the mould) to form the shoulder and neck, then the base is pushed up with a tool, and the finish for the mouth is added with his tools. The dip mould gives the body a slightly textured surface, with the free blown shoulders and neck being smoother and shinier. There is usually a line around the shoulder where the mould of the body meets the shoulder, and a lump or mark in the centre of the base, called a pontil mark, where the push-up tool was removed. The ship Loch Ard was built on the River Clyde in Scotland in 1873 for the prestigious Loch Line of colonial clipper ships, designed for the Australian run. It sailed from England on 1 March 1878 carrying 37 crew, 17 passengers and a diverse general cargo ranging from luxury items to bulk railway iron. On 1 June 1878, emerging from fog and hearing too late the sound of breakers against the tall limestone cliffs, the vessel struck the southern foot of Mutton Bird Island and sank in 23 metres of water. Of the fifty-four people on board only two survived, one young male crewman, Tom Pearce, and one young female passenger, Eva Carmichael. This bottle is historically significant as an example of liquor bottles imported into to Colonial Victoria in the mid-1800s to early-1900s. Its significance is increased by also being an artefact recovered by John Chance, a diver from the wreck of the Loch Ard and other wrecks in the late-1960s to early-1970s. Items that come from several wrecks along Victoria's coast have since been donated to the Flagstaff Hill Maritime Village’s museum collection by his family, illustrating this item’s level of historical value. The bottle is also significant for being part of Flagstaff Hill’s collection of artefacts from the Loch Ard, which is significant for being one of the largest collections of artefacts from this shipwreck in Victoria. The collection is significant for its association with the shipwreck, which is on the Victorian Heritage Register (VHR S417. The collection has additional significance because of the relationship between the objects, as together they have a high potential to interpret the story of the Loch Ard. The Loch Ard collection is archaeologically significant as the remains of a large international passenger and cargo ship. The Loch Ard collection is historically significant for representing aspects of Victoria’s shipping history and its potential to interpret sub-theme 1.5 of Victoria’s Framework of Historical Themes (living with natural processes). The shipwreck is one of the worst, and best known, shipwrecks in Victoria’s history.Bottle, black glass. Thick matt body, with slightly bumpy texture, areas with sheen, colour imperfections. Mouth has cork seal, partly removed, with content remnants inside. Tooled cork-top finish with ring below, slightly bulged neck. Shoulder a line where shoulder meets body. Body tapers inwards to base. Heel varies in width. Base is uneven. Pushed up base has pontil mark. Handmade, dip mould. No inscriptions.flagstaff hill, warrnambool, flagstaff hill maritime museum, maritime museum, shipwreck coast, flagstaff hill maritime village, great ocean road, shipwreck artefact, loch ard, mutton bird island, eva carmichael, tom pearce, john chance, bottle, black glass, antique bottle, bulge neck bottle, handmade, dip mould, mouth blown, pontil base, blown bottle, liquor bottle, ale bottle -
 Flagstaff Hill Maritime Museum and Village
Container - Bottle, 1840s to 1878
This handmade black glass bottle was recovered between the late 1960s to early 1970s from the wreck of the sailing ship Loch Ard. The ship was wrecked in 1878 and its remains are located at Mutton Bird Island, near Port Campbell, Victoria and bottles of liquor were listed as part of the Loch Ard’s cargo. This bottle is now part of the John Chance collection. Black glass is one of the oldest bottle colours and dates back to the early 17th century. In the 1840s to late-1870s black glass bottles were mainly used for liquor and ale. All glass is made from silica, which is found in quartz sand. The naturally occurring sand has impurities, such as iron, that determine the colour of the glass. Residual iron leads to green or amber coloured glass, and carbon in the sand makes that glass appear as ‘black’. A strong light behind the glass will show its colour as dark green or dark amber. This handmade bottle appears to have been made in a dip mould, with the molten glass blown into a seamless shoulder-height mould to give the body a uniform symmetrical shape and size. After the body is blown, the glass blower continues blowing free-form (without the mould) to form the shoulder and neck, then the base is pushed up with a tool, and the finish for the mouth is added with his tools. The dip mould gives the body a slightly textured surface, with the free blown shoulders and neck being smoother and shinier. There is usually a line around the shoulder where the mould of the body meets the shoulder, and a lump or mark in the centre of the base, called a pontil mark, where the push-up tool was removed. The ship Loch Ard was built on the River Clyde in Scotland in 1873 for the prestigious Loch Line of colonial clipper ships, designed for the Australian run. It sailed from England on 1 March 1878 carrying 37 crew, 17 passengers and a diverse general cargo ranging from luxury items to bulk railway iron. On 1 June 1878, emerging from fog and hearing too late the sound of breakers against the tall limestone cliffs, the vessel struck the southern foot of Mutton Bird Island and sank in 23 metres of water. Of the fifty-four people on board only two survived, one young male crewman, Tom Pearce, and one young female passenger, Eva Carmichael. This bottle is historically significant as an example of liquor bottles imported into to Colonial Victoria in the mid-1800s to early-1900s. Its significance is increased by also being an artefact recovered by John Chance, a diver from the wreck of the Loch Ard and other wrecks in the late-1960s to early-1970s. Items that come from several wrecks along Victoria's coast have since been donated to the Flagstaff Hill Maritime Village’s museum collection by his family, illustrating this item’s level of historical value. The bottle is also significant for being part of Flagstaff Hill’s collection of artefacts from the Loch Ard, which is significant for being one of the largest collections of artefacts from this shipwreck in Victoria. The collection is significant for its association with the shipwreck, which is on the Victorian Heritage Register (VHR S417. The collection has additional significance because of the relationship between the objects, as together they have a high potential to interpret the story of the Loch Ard. The Loch Ard collection is archaeologically significant as the remains of a large international passenger and cargo ship. The Loch Ard collection is historically significant for representing aspects of Victoria’s shipping history and its potential to interpret sub-theme 1.5 of Victoria’s Framework of Historical Themes (living with natural processes). The shipwreck is one of the worst, and best known, shipwrecks in Victoria’s history.Bottle, black glass. Thick matt body, with slightly bumpy texture, areas with sheen, colour imperfections. Mouth is sealed, and has remnants of tape on outside. Tooled cork-top finish with ring below. Slightly bulged neck. Shoulder has some diagonal creases and a distinct line where shoulder meets body. Body tapers inwards to base. It has a bubble and diagonal crease lines. Base is uneven. Pushed up base has pontil mark. Handmade, dip mould. No inscriptions.flagstaff hill, warrnambool, flagstaff hill maritime museum, maritime museum, shipwreck coast, flagstaff hill maritime village, great ocean road, shipwreck artefact, loch ard, mutton bird island, eva carmichael, tom pearce, john chance, bottle, black glass, antique bottle, bulge neck bottle, handmade, dip mould, mouth blown, pontil base, blown bottle, liquor bottle, ale bottle -
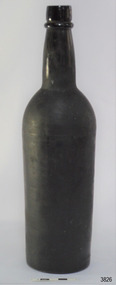 Flagstaff Hill Maritime Museum and Village
Container - Bottle, 1840s to 1878
This handmade black glass bottle was recovered between the late 1960s to early 1970s from the wreck of the sailing ship Loch Ard. The ship was wrecked in 1878 and its remains are located at Mutton Bird Island, near Port Campbell, Victoria and bottles of liquor were listed as part of the Loch Ard’s cargo. This bottle is now part of the John Chance collection. Black glass is one of the oldest bottle colours and dates back to the early 17th century. In the 1840s to late-1870s black glass bottles were mainly used for liquor and ale. All glass is made from silica, which is found in quartz sand. The naturally occurring sand has impurities, such as iron, that determine the colour of the glass. Residual iron leads to green or amber coloured glass, and carbon in the sand makes that glass appear as ‘black’. A strong light behind the glass will show its colour as dark green or dark amber. This handmade bottle appears to have been made in a dip mould, with the molten glass blown into a seamless shoulder-height mould to give the body a uniform symmetrical shape and size. After the body is blown, the glass blower continues blowing free-form (without the mould) to form the shoulder and neck, then the base is pushed up with a tool, and the finish for the mouth is added with his tools. The dip mould gives the body a slightly textured surface, with the free blown shoulders and neck being smoother and shinier. There is usually a line around the shoulder where the mould of the body meets the shoulder, and a lump or mark in the centre of the base, called a pontil mark, where the push-up tool was removed. The ship Loch Ard was built on the River Clyde in Scotland in 1873 for the prestigious Loch Line of colonial clipper ships, designed for the Australian run. It sailed from England on 1 March 1878 carrying 37 crew, 17 passengers and a diverse general cargo ranging from luxury items to bulk railway iron. On 1 June 1878, emerging from fog and hearing too late the sound of breakers against the tall limestone cliffs, the vessel struck the southern foot of Mutton Bird Island and sank in 23 metres of water. Of the fifty-four people on board only two survived, one young male crewman, Tom Pearce, and one young female passenger, Eva Carmichael. This bottle is historically significant as an example of liquor bottles imported into to Colonial Victoria in the mid-1800s to early-1900s. Its significance is increased by also being an artefact recovered by John Chance, a diver from the wreck of the Loch Ard and other wrecks in the late-1960s to early-1970s. Items that come from several wrecks along Victoria's coast have since been donated to the Flagstaff Hill Maritime Village’s museum collection by his family, illustrating this item’s level of historical value. The bottle is also significant for being part of Flagstaff Hill’s collection of artefacts from the Loch Ard, which is significant for being one of the largest collections of artefacts from this shipwreck in Victoria. The collection is significant for its association with the shipwreck, which is on the Victorian Heritage Register (VHR S417. The collection has additional significance because of the relationship between the objects, as together they have a high potential to interpret the story of the Loch Ard. The Loch Ard collection is archaeologically significant as the remains of a large international passenger and cargo ship. The Loch Ard collection is historically significant for representing aspects of Victoria’s shipping history and its potential to interpret sub-theme 1.5 of Victoria’s Framework of Historical Themes (living with natural processes). The shipwreck is one of the worst, and best known, shipwrecks in Victoria’s history.Bottle, black glass. Thick matt body, with slightly bumpy texture, areas with sheen, colour imperfections, bubble in glass. Bottle has foul smelling contents inside. Mouth has hard capped cork seal with black, hard rubber capped stopper. Side of mouth has ship or mark. Tooled cork-top finish with ring below, slightly bulged neck. Shoulder has some diagonal creases and a line where shoulder meets body. Body tapers inwards to base. Heel varies in width. Base is uneven. Pushed up base has pontil mark. Handmade, dip mould. No inscriptions.flagstaff hill, warrnambool, flagstaff hill maritime museum, maritime museum, shipwreck coast, flagstaff hill maritime village, great ocean road, shipwreck artefact, loch ard, mutton bird island, eva carmichael, tom pearce, john chance, bottle, black glass, antique bottle, bulge neck bottle, handmade, dip mould, mouth blown, pontil base, blown bottle, liquor bottle, ale bottle -
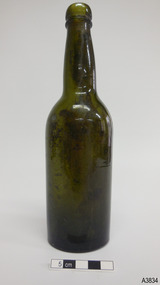 Flagstaff Hill Maritime Museum and Village
Container - Bottle, 1840s to 1870s
This small green bottle has been handmade by a glassblower and is the typical shape of a carbonated soda or mineral water bottle. It was made from 1840s-1870s. The bottle was found in the coastal waters of Victoria about 100 years from when it was made. It is part of the John Chance Collection. Glassblowers made bottles like this one by blowing air through a long pipe and into molten glass at the end of it. The shape of the glass would be blown out to fit into the shape of the cylindrical dip mould. Once it set, the glass was removed from the mould and the glassblower would continue using the pipe to create the neck and another ponty tool to push up and form the base. The bottle would be cracked off the end of the glassblower’s pipe and a blob of molten glass would be wrapped around the top of the neck and shaped to finish the lip of the bottle. The seal was usually a cork, held in place with a ball-wire fitting attached between the upper and lower parts of the neck finish. This style of handmade bottles usually had thick glass so that it could be heat-sterilised, then re-filled. The bottles would often have horizontal bubbles in the applied finish, caused by twisting the glass, and vertical bubbles and diagonal lines in the body from it being blown, and a pontil mark in the base where the ponty tool had been attached. Although the bottle is not linked to a particular shipwreck, it is recognised as being historically significant as an example of bottles imported for use in Colonial Victoria in the mid-to-late 1800s. The bottle is also significant as it was recovered by John Chance, a diver in Victoria’s coastal waters in the late 1960s to early 1970s. Items that come from several wrecks have since been donated to the Flagstaff Hill Maritime Village’s museum collection by his family, illustrating this item’s level of historical value. Bottle; green glass, soda or mineral water style, handmade. Double ring collar blob finish on neck; upper is wide and rounded, lower is a thin ring. Diagonal lines in glass on neck, low shoulder mould seam, rippled texture around body. Push-up base with pontil mark, rectangular impression in heel. Uneven base. Sediment on inside surfaces.flagstaff hill, warrnambool, flagstaff hill maritime museum, maritime museum, shipwreck coast, flagstaff hill maritime village, great ocean road, shipwreck artefact, john chance, glass bottle, antique bottle, handmade, dip mould, mouth blown, pontil mark, 19th century bottle, collectable, soda bottle, mineral water bottle, green glass, blob finish, push-up base -
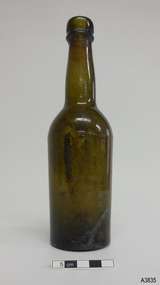 Flagstaff Hill Maritime Museum and Village
Container - Bottle, 1840s to 1870s
This small green bottle has been handmade by a glassblower and is the typical shape of a carbonated soda or mineral water bottle. It was made from 1840s-1870s. The bottle was found in the coastal waters of Victoria about 100 years from when it was made. It is part of the John Chance Collection. Glassblowers made bottles like this one by blowing air through a long pipe and into molten glass at the end of it. The shape of the glass would be blown out to fit into the shape of the cylindrical dip mould. Once it set, the glass was removed from the mould and the glassblower would continue using the pipe to create the neck and another ponty tool to push up and form the base. The bottle would be cracked off the end of the glassblower’s pipe and a blob of molten glass would be wrapped around the top of the neck and shaped to finish the lip of the bottle. The seal was usually a cork, held in place with a ball-wire fitting attached between the upper and lower parts of the neck finish. This style of handmade bottles usually had thick glass so that it could be heat-sterilised, then re-filled. The bottles would often have horizontal bubbles in the applied finish, caused by twisting the glass, and vertical bubbles and diagonal lines in the body from it being blown, and a pontil mark in the base where the ponty tool had been attached. Although the bottle is not linked to a particular shipwreck, it is recognised as being historically significant as an example of bottles imported for use in Colonial Victoria in the mid-to-late 1800s. The bottle is also significant as it was recovered by John Chance, a diver in Victoria’s coastal waters in the late 1960s to early 1970s. Items that come from several wrecks have since been donated to the Flagstaff Hill Maritime Village’s museum collection by his family, illustrating this item’s level of historical value. Bottle; green glass, soda or mineral water style, handmade. Applied finish, blob double ring collar; upper is wide and rounded, lower is a narrow ring. Diagonal lines in glass on neck and shoulder. Low shoulder mould seam. Body is matt and tapers inward towards base. Shoulder and neck are shiny. Push-up base with pontil mark. Uneven base. Bubble on top of lip. Sediment on inside surfaces. White rubbing line and scratches on outside. flagstaff hill, warrnambool, flagstaff hill maritime museum, maritime museum, shipwreck coast, flagstaff hill maritime village, great ocean road, shipwreck artefact, john chance, glass bottle, antique bottle, handmade, dip mould, mouth blown, pontil mark, 19th century bottle, collectable, soda bottle, mineral water bottle, green glass, blob finish, push-up base -
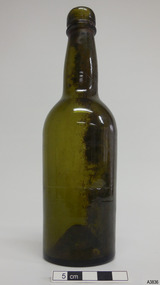 Flagstaff Hill Maritime Museum and Village
Container - Bottle, 1840s to 1870s
This small green bottle has been handmade by a glassblower and is the typical shape of a carbonated soda or mineral water bottle. It was made from 1840s-1870s. The bottle was found in the coastal waters of Victoria about 100 years from when it was made. It is part of the John Chance Collection. Glassblowers made bottles like this one by blowing air through a long pipe and into molten glass at the end of it. The shape of the glass would be blown out to fit into the shape of the cylindrical dip mould. Once it set, the glass was removed from the mould and the glassblower would continue using the pipe to create the neck and another ponty tool to push up and form the base. The bottle would be cracked off the end of the glassblower’s pipe and a blob of molten glass would be wrapped around the top of the neck and shaped to finish the lip of the bottle. The seal was usually a cork, held in place with a ball-wire fitting attached between the upper and lower parts of the neck finish. This style of handmade bottles usually had thick glass so that it could be heat-sterilised, then re-filled. The bottles would often have horizontal bubbles in the applied finish, caused by twisting the glass, and vertical bubbles and diagonal lines in the body from it being blown, and a pontil mark in the base where the ponty tool had been attached. Although the bottle is not linked to a particular shipwreck, it is recognised as being historically significant as an example of bottles imported for use in Colonial Victoria in the mid-to-late 1800s. The bottle is also significant as it was recovered by John Chance, a diver in Victoria’s coastal waters in the late 1960s to early 1970s. Items that come from several wrecks have since been donated to the Flagstaff Hill Maritime Village’s museum collection by his family, illustrating this item’s level of historical value. Bottle; green glass, soda or mineral water style, handmade. Applied finish, blob double ring collar; upper is wide and rounded, lower is a narrow ring. Diagonal lines in glass on neck and shoulder. Low shoulder mould seam. Body is matt with ripples in glass, tapers inward towards base. Shoulder and neck are shiny. Push-up base with pontil mark, visible through glass. Marks on heel. Uneven base. Bubble on side and top of lip. Sediment on inside surfaces. Two score lines, one half way down body, one near base. flagstaff hill, warrnambool, flagstaff hill maritime museum, maritime museum, shipwreck coast, flagstaff hill maritime village, great ocean road, shipwreck artefact, john chance, glass bottle, antique bottle, handmade, dip mould, mouth blown, pontil mark, 19th century bottle, collectable, soda bottle, mineral water bottle, green glass, blob finish, push-up base -
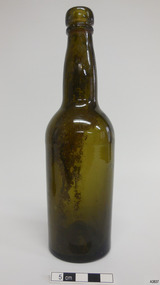 Flagstaff Hill Maritime Museum and Village
Container - Bottle, 1840s to 1870s
This small green bottle has been handmade by a glassblower and is the typical shape of a carbonated soda or mineral water bottle. It was made from 1840s-1870s. The bottle was found in the coastal waters of Victoria about 100 years from when it was made. It is part of the John Chance Collection. Glassblowers made bottles like this one by blowing air through a long pipe and into molten glass at the end of it. The shape of the glass would be blown out to fit into the shape of the cylindrical dip mould. Once it set, the glass was removed from the mould and the glassblower would continue using the pipe to create the neck and another ponty tool to push up and form the base. The bottle would be cracked off the end of the glassblower’s pipe and a blob of molten glass would be wrapped around the top of the neck and shaped to finish the lip of the bottle. The seal was usually a cork, held in place with a ball-wire fitting attached between the upper and lower parts of the neck finish. This style of handmade bottles usually had thick glass so that it could be heat-sterilised, then re-filled. The bottles would often have horizontal bubbles in the applied finish, caused by twisting the glass, and vertical bubbles and diagonal lines in the body from it being blown, and a pontil mark in the base where the ponty tool had been attached. Although the bottle is not linked to a particular shipwreck, it is recognised as being historically significant as an example of bottles imported for use in Colonial Victoria in the mid-to-late 1800s. The bottle is also significant as it was recovered by John Chance, a diver in Victoria’s coastal waters in the late 1960s to early 1970s. Items that come from several wrecks have since been donated to the Flagstaff Hill Maritime Village’s museum collection by his family, illustrating this item’s level of historical value. Bottle; green glass, soda or mineral water style, handmade. Rough applied finish, blob double ring collar; upper is wide and rounded, lower is a narrow ring. Diagonal lines in glass on neck. Low shoulder mould seam. Body is matt, tapers inward towards base. Shoulder and neck are shiny. Push-up base with pontil mark, visible through glass. Marks on heel, glass thickness varies. Uneven base. Bubble in glass. Sediment on inside surfaces. flagstaff hill, warrnambool, flagstaff hill maritime museum, maritime museum, shipwreck coast, flagstaff hill maritime village, great ocean road, shipwreck artefact, john chance, glass bottle, antique bottle, handmade, dip mould, mouth blown, pontil mark, 19th century bottle, collectable, soda bottle, mineral water bottle, green glass, blob finish, push-up base -
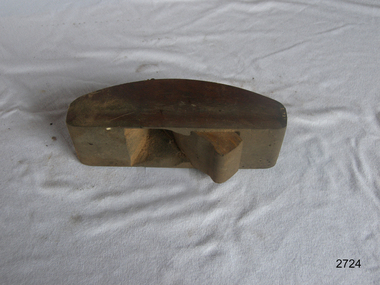 Flagstaff Hill Maritime Museum and Village
Tool - Circle/Convex Faced Plane, Prior to 1950
Before setting the barrel head, the cooper smooths the inside surface of some barrels with a stoup, compass or circle plane and an inside shave (or in shave plane). A stoup or compass plane has a convex sole in both directions to work within the doubly curved staves of a barrel. The cooper smooths the outside of the barrel with a downright, another large-handled shave, and a similar scraping tool to finish off called a buzz. The final step is to fit the head and drive on wooden or steel hoops. Making the barrel has taken a number of planes similar but different from those of other trades, each perfectly adapted to a cooper’s work shaping curved surfaces. And if he has done his work well, the barrel will hold the exact amount of liquid and not leak.A tool unique to the cooper used to smooth out the inside of a barrel that has been in use since the making of wooden barrels and buckets for hundreds of years without much change to the design or how the tool is used.Compass or Circle face PlaneNonewarrnambool, shipwrecked-coast, flagstaff-hill, flagstaff-hill-maritime-museum, shipwreck-coast, flagstaff-hill-maritime-village, coopers tools, joiners plane, coopers plane, woodworking tools, circle plane, convex plane, carpenters wood planes -
 Flagstaff Hill Maritime Museum and Village
Container - Bottle, 1870s-1910s
This clear, green tinged, Half Whirley (or Whirly) salad oil bottle has been handmade by a glassblower from 1870s-1910s. A bottle with such elaborate decoration would have been sought after as there was no need to decant the sauce into another jug or bottle to make it acceptable for table service. It is possible that this bottle was recovered from the Loch Ard, wrecked in 1878. A diver found the bottle on a shipwreck in the coastal waters of Victoria about 100 years from when it was made. The diver who found this bottle has recovered objects from several different shipwrecks between the late 1950s and early 1970s. A sizeable proportion of those objects was from the wreck of the famous clipper ship Loch Ard. This salad oil bottle may very well have been amongst that ship’s cargo. It is part of the John Chance Collection. A paper titled ‘Glass Bottles from the Loch Ard Shipwreck (1878): A Preliminary Study’ by Iain Stuart, (published in Australian Historical Archaeology, 9, 1991) included a study of twelve salad oil bottles from the wreck of the Loch Ard. The bottles were of this same Half Whirley design (half meaning that it was Whirley on the upper half but not on the lower half of the body), as well as the same colour and size. A diagram of one of these twelve bottles matches the bottle in our collection. The paper mentions that eleven of the twelve bottles have a number on their base, just as this one has. It is estimated that foreign and salad oil bottles totalled four percent of all of the bottles carried as cargo on the ship. The Half Whirley bottle has side seams from below the lip to the base, indicating that the bottle was made in a two-piece mould that included the heel, body, shoulder and neck. The fancy ‘whirly’ twist pattern and panelled sides would have been cut into the mould’s inner surface. The uneven thickness of the ridge around the base comes from adding a separately moulded and embossed base after the bottle was removed from the mould. The applied finish (mouth and lip) was also added to the bottle. The elongated bubbles in the glass are evidence of the glass being mouth blown into the mould, thus forming the shape and pattern from the inside shape of the mould. The bottle probably had a glass stopper with a round top and wedge-shaped shank with a ground surface, allowing the bottle to be re-sealed. The ring between upper and lower lip allows the closure to be sealed and anchored. The embossed numbers are either “133” or “833” and may represent a particular bottle pattern, manufacturer or filler. Although the bottle is not currently linked to a particular shipwreck, it is recognised as being historically significant as an example of bottles imported for use in Colonial Victoria in the mid-to-late 19th century. This whirley salad oil bottle is matches the whirley salad oil bottles recovered from the Loch Ard in the 1990s, adding depth of interpretation to the array of salvaged Loch Ard artefacts in Flagstaff Hill’s collection. The salad oil bottle is an example of the type of food condiment containers that were used in Victoria’s early days. The bottle is also significant as it was recovered by John Chance, a diver in Victoria’s coastal waters in the late 1960s to early 1970s. Items that come from several wrecks, including the Loch Ard, have since been donated to the Flagstaff Hill Maritime Village’s museum collection by his family, illustrating this item’s level of historical value. Bottle; glass Half Whirley salad oil bottle, green-tinged, with some opalescence. Handmade, elaborately decorated bottle with round neck and base, and five-sided body. Applied double lip; straight upper, flared lower. The lower neck and shoulder have twisted spiral whirley patterns in the glass. The body tapers slightly inwards towards the base. It has five plain panels, one wider than the others. Side seams run from below the lip to the heel. The heel of the bottle is uneven in width, height and density where it joins the body of the bottle. The base is not level. Embossed characters on base. Glass has elongated bubbles towards the base and orange-brown sediment inside, on one side. Embossed "133" or “833” (the first character may be an “8”) flagstaff hill, warrnambool, flagstaff hill maritime museum, maritime museum, shipwreck coast, flagstaff hill maritime village, great ocean road, shipwreck artefact, john chance, glass bottle, antique bottle, handmade, mouth blown, blown bottle, 19th century bottle, collectable, bottle, green glass, tinged green, two piece mould, food bottle, oil bottle, salad oil bottle, whirley, whirly, half whirley, condiment bottle -
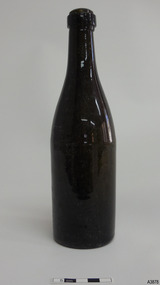 Flagstaff Hill Maritime Museum and Village
Container - Bottle, circa 1870-1910
This brown glass bottle has been handmade from about the 1870s-1910s. The bottle, possibly used to store ale or soda or mineral water, was found in the coastal waters of Victoria. It is part of the John Chance Collection. Glassblowers made bottles like this one by blowing air through a long pipe into the molten glass blob at the end of the pipe. The glass was blown out to fit into the shape of the cylindrical dip mould. Once it hardened, the glass was removed from the mould and the glassblower would continue using the pipe to create the neck while carefully using a tool to hold the base. A 'ponty' (pontil) tool would been used to complete the shape, pushing up the base. A tool would have been used to cut off the bottle from the blowpipe and apply and form the ring band on the neck. Bottles like this would usually be sealed with a cork, which may have been held in place with wax or wire and tape. Although this bottle is not linked to a particular shipwreck, it is recognised as a historically significant example of handmade, late 19th to early 20th century beverage bottles imported for use in Colonial Victoria. The bottle is also significant for its association with John Chance, a diver in Victoria’s coastal waters in the late 1960s to early 1970s. Items that come from several shipwrecks have since been donated to the Flagstaff Hill Maritime Village’s museum collection by his family, illustrating this item’s level of historical value.Bottle, brown glass, tall and slim, cork-top style. Tooled finish on mouth with applied ring, shoulder seam, body tapers inwards towards base. Concave base has pontil mark. Sediment inside bottle. Glass has shiny surface and diagonal rings from shoulder to mouth, then is less shiny and has an slightly undulating surface from shoulder to base. The surface is markedly raised where base and shoulder meet. Glass has many scratches.flagstaff hill, warrnambool, flagstaff hill maritime museum, maritime museum, shipwreck coast, flagstaff hill maritime village, great ocean road, shipwreck artefact, john chance, glass bottle, antique bottle, handmade, mouth blown, blown bottle, collectable, bottle, dip mould, soda bottle, brown glass, ale bottle, beverage bottle -
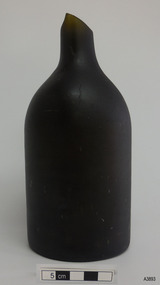 Flagstaff Hill Maritime Museum and Village
Container - Bottle, 1840s-1870s
This broken, handmade black glass bottle was made around the mid 1800s. The bottle was found in the coastal waters of Victoria about 100 years from when it was made. It is now part of the John Chance collection. Black glass is one of the oldest bottle colours and dates back to the early 17th century. In the 1840s to late-1870s black glass bottles were mainly used for liquor and ale. All glass is made from silica, which is found in quartz sand. The naturally occurring sand has impurities, such as iron, that determine the colour of the glass. Residual iron leads to green or amber coloured glass, and carbon in the sand makes that glass appear as ‘black’. A strong light behind the glass will show its colour as dark green or dark amber. This handmade bottle appears to be made in a dip mould, with the molten glass blown into a seamless shoulder-height mould to give the body a uniform symmetrical shape and size. After the body was blown, the glass blower continued blowing free-form (without the mould) to form the shoulder and neck, then the base was pushed up with a pontil tool, and the finish for the mouth was added. The dip mould gives the body a slightly textured surface, with the free blown shoulders and neck usually looking smoother and shinier. A horizontal line can often be seen around the shoulder where the mould of the body meets the free-blown shoulder. A lump or mark in the centre of the base, called a 'ponty' mark (named after the pontil tool), is also common on this type of bottle. Although the bottle is not linked to a particular shipwreck, it is recognised as being historically significant as an example of bottles imported for use in Colonial Victoria in the mid-to-late 1800s. (Similar bottles were recovered from the 'Loch Ard' shipwreck, lost in 1898.) The bottle is also significant as it was recovered by John Chance, a diver in Victoria’s coastal waters in the late 1960s to early 1970s. Items that come from several wrecks have since been donated to the Flagstaff Hill Maritime Village’s museum collection by his family, illustrating this item’s level of historical value. Bottle, thick black glass (dark olive) with matt surface. Mouth has been broken off, leaving sharp edges. Short neck, wide shoulders, body tapers slightly inwards towards base. Wide uneven heel and deep concave base with a fold line in glass. No visible seams.flagstaff hill, warrnambool, flagstaff hill maritime museum, maritime museum, shipwreck coast, flagstaff hill maritime village, great ocean road, shipwreck artefact, john chance, bottle, black glass, antique bottle, handmade, mouth blown, blown bottle, liquor bottle, ale bottle, 19th century bottle -
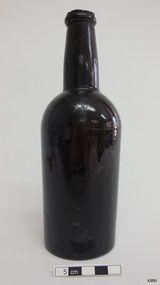 Flagstaff Hill Maritime Museum and Village
Container - Bottle, c. 1840s - 1870s
This broken black glass bottle has been handmade from about the 1840s to 1870s. The bottle, possibly used to store ale or soda or mineral water, was found in the coastal waters of Victoria. It is part of the John Chance Collection. Black glass is one of the oldest bottle colours and dates back to the early 17th century. In the 1840s to late 1870s black glass bottles were mainly used for liquor and ale. All glass is made from silica, which is found in quartz sand. The naturally occurring sand has impurities, such as iron, that determine the colour of the glass. Residual iron leads to green or amber coloured glass, and carbon in the sand makes that glass appear as ‘black’. A strong light behind the glass will show its colour as dark green or dark amber. This handmade bottle appears to have been made in a three piece dip mould with a cylindrical base and two removable neck pieces. The molten glass was blown into the mould to give the body a uniform symmetrical shape and size. After the bottle was blown, the glassblower removed it from the mould then the base was pushed up with a pontil tool that gave it the concave shape. The finish for the mouth was added by hand or with another tool to form the ring collar. The mould gives the body a slightly textured surface. There is usually a line around the shoulder and on the sides of the neck where the mould meet, and a lump or mark in the centre of the base, called a pontil mark, where the push-up tool was removed. Although this bottle is not linked to a particular shipwreck, it is recognised as a historically significant example of handmade, 1840s to 1870s beverage bottles imported for use in Colonial Victoria. The bottle is also significant for its association with John Chance, a diver in Victoria’s coastal waters in the late 1960s to early 1970s. Items that come from several shipwrecks have since been donated to the Flagstaff Hill Maritime Village’s museum collection by his family, illustrating this item’s level of historical value.Bottle, black glass. Mouth is broken off. Roughly applied ring collar. Bottle has shoulder seam and two neck seams. Heel is uneven, base is concave with tool mark. Glass has crease lines, a drip and imperfections. flagstaff hill, warrnambool, flagstaff hill maritime museum, maritime museum, shipwreck coast, flagstaff hill maritime village, great ocean road, shipwreck artefact, john chance, glass bottle, antique bottle, handmade, mouth blown, blown bottle, collectable, bottle, dip mould, soda bottle, ale bottle, beverage bottle, black bottle, three pece mould -
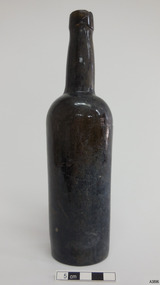 Flagstaff Hill Maritime Museum and Village
Container - Bottle, c. 1840s - 1870s
This broken black glass bottle has been handmade from about the 1840s to 1870s. The bottle, possibly used to store ale or soda or mineral water, was found in the coastal waters of Victoria. It is part of the John Chance Collection. Black glass is one of the oldest bottle colours and dates back to the early 17th century. In the 1840s to late 1870s black glass bottles were mainly used for liquor and ale. All glass is made from silica, which is found in quartz sand. The naturally occurring sand has impurities, such as iron, that determine the colour of the glass. Residual iron leads to green or amber coloured glass, and carbon in the sand makes that glass appear as ‘black’. A strong light behind the glass will show its colour as dark green or dark amber. This handmade bottle appears to have been made in a three piece dip mould with a cylindrical base and two removable neck pieces. The molten glass was blown into the mould to give the body a uniform symmetrical shape and size. After the bottle was blown, the glassblower removed it from the mould then the base was pushed up with a pontil tool that gave it the concave shape. The finish for the mouth was added by hand or with another tool to form the ring collar. The mould gives the body a slightly textured surface. There is usually a line around the shoulder and on the sides of the neck where the mould meet, and a lump or mark in the centre of the base, called a pontil mark, where the push-up tool was removed. Although this bottle is not linked to a particular shipwreck, it is recognised as a historically significant example of handmade, 1840s to 1870s beverage bottles imported for use in Colonial Victoria. The bottle is also significant for its association with John Chance, a diver in Victoria’s coastal waters in the late 1960s to early 1970s. Items that come from several shipwrecks have since been donated to the Flagstaff Hill Maritime Village’s museum collection by his family, illustrating this item’s level of historical value.Bottle, black glass, 'gallon' style. Applied broken lip, wide collar. Shoulder seam, two side seams, body tapers inwards towards base. Concave base. Glass has bumps, creases and imperfections.flagstaff hill, warrnambool, flagstaff hill maritime museum, maritime museum, shipwreck coast, flagstaff hill maritime village, great ocean road, shipwreck artefact, john chance, glass bottle, antique bottle, handmade, mouth blown, blown bottle, collectable, bottle, dip mould, soda bottle, ale bottle, beverage bottle, black bottle, three pece mould -
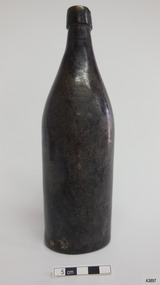 Flagstaff Hill Maritime Museum and Village
Container - Bottle, c. 1840s - 1870s
This broken black glass bottle has been handmade from about the 1840s to 1870s. The bottle, possibly used to store ale or soda or mineral water, was found in the coastal waters of Victoria. It is part of the John Chance Collection. Black glass is one of the oldest bottle colours and dates back to the early 17th century. In the 1840s to late 1870s black glass bottles were mainly used for liquor and ale. All glass is made from silica, which is found in quartz sand. The naturally occurring sand has impurities, such as iron, that determine the colour of the glass. Residual iron leads to green or amber coloured glass, and carbon in the sand makes that glass appear as ‘black’. A strong light behind the glass will show its colour as dark green or dark amber. This handmade bottle appears to have been made in a cylindrical dip mould. The molten glass was blown into the mould to give the body a uniform symmetrical shape and size. After the body was blown, the glassblower removed it from the mould and formed the shoulder and neck by free-blowing the glass. The base was pushed up with a pontil tool that gave it the concave shape. The finish for the mouth was added by hand to form the collar. The mould gives the body a slightly textured surface. There is usually a line around the shoulder where the mould meet the base, and a lump or mark in the centre of the base, called a pontil mark, where the push-up tool was removed. Although this bottle is not linked to a particular shipwreck, it is recognised as a historically significant example of handmade, 1840s to 1870s beverage bottles imported for use in Colonial Victoria. The bottle is also significant for its association with John Chance, a diver in Victoria’s coastal waters in the late 1960s to early 1970s. Items that come from several shipwrecks have since been donated to the Flagstaff Hill Maritime Village’s museum collection by his family, illustrating this item’s level of historical value.Bottle, black glass, 'gallon' style. Applied lip, straight collar with circular lines from being hand moulded. Shoulder seam, body tapers inwards towards base. Heel has varied width, shallow base has small pontil mark. Mouth is chipped. Glass is discoloured and has uneven surface and encrustations. flagstaff hill, warrnambool, flagstaff hill maritime museum, maritime museum, shipwreck coast, flagstaff hill maritime village, great ocean road, shipwreck artefact, john chance, glass bottle, antique bottle, handmade, mouth blown, blown bottle, collectable, bottle, dip mould, soda bottle, ale bottle, beverage bottle, black glass -
 Australian Gliding Museum
Machine - Glider – Sailplane, 2015
The Salamandra is a Polish glider designed by Waclaw Czerwinski at the Military Glider Workshops in Krakow in 1936. This glider, designated “W.W.S.1”, was produced in substantial numbers prior to the second world war and used in Poland and some other eastern European countries for training pilots. Only one example survived the war, hidden away in the village of Goleszow in Silesia. In addition, no technical drawings could be found, so when the glider was discovered, the Gliding Institute being keen to re-establish gliding in Poland, used the glider to draw up new plans for construction. Five were built for the Institute in 1947 before production was resumed of the “Salamandra 48” at the SZD Jezow Workshops. Improvement were made by adding airbrakes and structural changes for the “Salamandra 49” and a windscreen and larger tailplane were changes adopted for the “Salamandra 53”. An export version designated “53A” was sold to and built under licence in China. Production of the Salamandra ceased in the early 1960s. Total production may have been in excess of 500. The glider was well regarded as a light weight trainer capable of soaring performance. The Museum’s replica was built by Ray Ash and may be may be classified as a “Salamandra 53”. However, he has added something of his own to the design by replacing the cable runs in the wings with control rods. The glider is substantially complete. The wings and tail / rudder surfaces have been covered with poly-fibre fabric. The fuselage woodwork is sealed with varnish. In addition to the finishing work (including painting) and rigging of the main components, the linkages for Ray’s control rod modification may need further engineering to make them operational. The Ray Ash Salamandra is the first of the type to appear in Australia. The Salamandra did not play any role in the development of gliding in Australia in the early years. However, it is an important exhibit in that it shows in tangible form a nacelle fuselage training glider in configuration and construction detail. As such it revisits the pioneering era of the 1930s and 1940s in Australia when wood, wire and fabric were the rule and the nacelle primary glider was generally the first step up for pilots who had mastered the basics in an open primary.Nacelled solo training glider of traditional wood and fabric construction. Construction incomplete.Noneaustralian gliding, sailplane, glider, salamandra, czerwinshi, poland, ash -
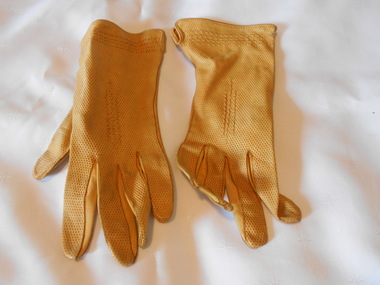 Bendigo Historical Society Inc.
Clothing - MAGGIE BARBER COLLECTION: HONEY COLOURED LEATHER WRIST LENGTH GLOVES, 1920-30's
Clothing. Made from soft lambskin, the leather appears to be finely punched all over, giving the appearance of tiny pin holes over the outer surface, but not showing through to the inside. Finely bound at the top edge, and around a 3 cm long round split at the outer wrist. The inside of the leather has a brushed finish-soft and warm. Three rows of stitching on the back of the hand, and around the wrist give a decorative effect.Inside left glove 'LAMBSKINS. Made in Italy. Inside right glove 7.costume accessories, female, honey coloured leather gloves -
 Moorabbin Air Museum
Document (item) - CAC Collection - Military Handbook - Protective Finishes For Metal And Wood Surfaces
Department Of Defence USA MIL-HDBK-132A -
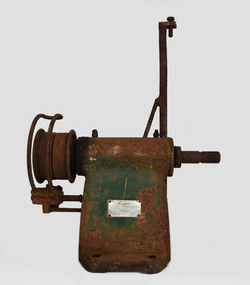 National Wool Museum
Tool - Grinder, 1960-69
Cooper S.E. Ball Bearing Grinder made and guaranteed by Sunbeam Corporation Limited. Grinders like this example have been made the same since the early 1900s, with this grinder thought to have been produced in the 1960s. It is belt driven, with the other end of the belt being attached to an engine; the same engine that would have powered the overhead shearing equipment in shearing sheds. It was common for shearing teams to bring their own equipment, especially pre-1960 as most shearing sheds were not connected to power, and shearers preferred to work with their own equipment. The engines that powered the shears and grinder were typically fuelled with kerosene or petrol. The large circular disks are attached to the bolt that protrudes from the grinder and fastened tightly with a nut. An example of seeing a similar grinder in action can be found on the following link - https://www.youtube.com/watch?v=O7eimI_Gm9o. Inventor Frederick Wolseley made the world's first commercially successful power-shearing system in Australia in 1888. US company Cooper, which had been founded in 1843 as a maker of sheep dip, began selling Wolseley equipment in the USA in 1895. The Chicago Flexible Shaft Company successfully entered the power-shearing market a few years later and entered a joint venture with Cooper. It set up a branch in Sydney and sold shearing sets, and engines to power them, into the Australian market. In 1921 the US parent company, realising it needed to make products whose sales were not as seasonal as those of shearing equipment, made its first household appliances and branded them Sunbeam. In 1933, changes in exchange rates and taxes led the company to manufacture engines and shearing equipment in Australia via subsidiary Cooper Engineering, which changed its name to Sunbeam in 1946. Although most Australians know of this company as a major manufacturer of household appliances, its rural division flourished and retained the Sunbeam name for shearing equipment even after it was taken over by New Zealand company Tru-Test in 2001. The grinder is formed from a central arch shaped block of green painted metal. Much of this paint has been lost to age, leaving the grinder in a ‘farm used’ condition with much surface oxidation present. On the front of the arch is a specification plate, reading “Cooper S.E. ball bearing grinder. Made and guaranteed by Sunbeam”. At the foot of the arch, three bolt holes are found for securing the grinder to the base of a solid wooden surface. Two of the bolt holes are found on the front of the grinder, with another found on the rear. From the central arch, a bolt protrudes to the right of the grinder. This large bolt is for securing a grinding plate to the grinder. Above the central arch is a pendulum which holds the comb / cutter that is being sharpened. From the pendulum, a large arm extends down (not pictured) to meet and strike the plate spinning at a rapid speed. On the left-hand side of the central arch of the grinder, a wheel is found which a belt is attached to for power. This belt is then attached to a separate engine, spinning the wheel and hence powering the grinder. The wheel is partially covered with a section of protective bent tube, designed to provide protection from the rapidly spinning wheel. Below this wheel is the belt shifter. It is designed to move the protective bent tube from one side of the grinder to the other, to accommodate the grinder in the setup of different shearing sheds. The two separate grinding plates are identical. They have a slight slope for sharpening the comb and cutters in the correct method, with a slight bias towards the base, or “tooth”, of the equipment. The disks have a large central bolt for attaching to the grinder. They have tags on the horizontal axis of the grinding plates, for securing the plates in transportation, and to help with initial alignment when setting up the grinder. The reverse of these grinding plates has the same green painted metal finish found on the grinder. This paint is also in a ‘farm used’ condition, with surface oxidation present. The grinder would be provided from the factory with a comb holder, shifter for securing the grinding plates, emery cloth and emery glue. The emery cloth is what does the actual grinding and is applied to the grinding disks, replacing once well worn. These items can be seen in the final images in the multimedia section, showcasing advertising for this grinder. Plate. Inscribed. “Cooper / S.E. BALL BEARING GRINDER / MADE AND GUARANTEED BY / Sunbeam / CORPORATION LIMITED / SYDNEY MELBOURNE / ADELAIDE BRISBANE ”sheep shearing, shearing equipment, sunbeam, grinder -
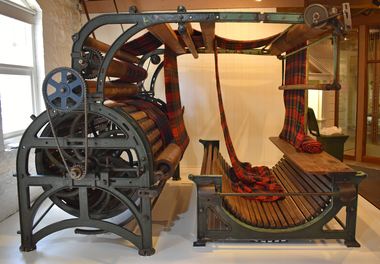 National Wool Museum
Machine - Teasel Gig, c1890
When the fabric is removed from the loom it is often stiff, rough and uneven. There are a number of finishing processes, both mechanical and chemical that give wool fabrics their special look and feel. The fabric is often scoured again to remove oils and dirt picked up during manufacture. It is then pressed. For a soft and fluffy surface, the fabric is brushed. For a smooth surface, it is shorn. For centuries, machines similar to this teasle gig were used to finish fabrics. It uses the prickly flower head off the teasle plant (Dispsacus Fullonum) to do the delicate work to raise the surface, or nap, the woollen cloth. At least 1,500 teasle heads are needed for one gig. The teasel is a thistle like plant whose dried heads are used on the teasel gig. They are fixed to frames around the drum, or gig. The gig turns in the opposite direction to the flow of the cloth until the nap is raised. Also spelled as Teazel Gig.Large metal machine with wooden rollers and teasel covered drum.textile finishing, raising, raising machinery, teasel gig, fabric, wool processing, plants, thistle, drum