Showing 290 items
matching sydney tram museum
-
 Ballarat Tramway Museum
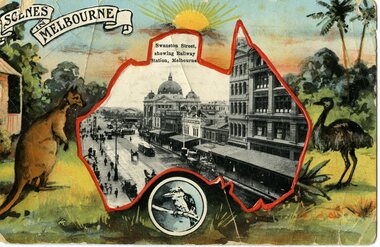
Postcard, Swanston St Melbourne, showing Flinders St station, 1913
Yields information about Swanston St Melbourne and demonstrates German printed colour photo postcards.Black and white view of Swanston St Melbourne, showing Flinders St station, with cable trams, located within a map of main land Australia, with a colour printed background containing a kangaroo, emu and kookaburra. Title "Scenes in Melbourne". On rear of card "Printed in Saxony" Has been sent by a person on the RMS Medina, from Sydney, 29/10/1913 to Miss M Fenton at the "All Nations Hotel", Port Melbourne. Has an Australian 1d one penny stamp.Written on reartrams, tramways, postcards, melbourne, swanston st -
 Ballarat Tramway Museum
Literary work - Manuscript, Alan Bradley, "Santa Trams in Ballarat", Dec. 2008
Yields information about the decorated trams in Ballarat in the last few years of the system, Myers Santa trams etc.A4 manuscript, titled "Santa Trams in Ballarat" written by Alan Bradley Dec 2008 for Dec. 2008 issue of Fares Please! Provides information about the Myers Christmas trams, the tramcars and Bridge St traders in 1968. Was related to colour photos received from Sydney of two of the trams. trams, tramways, christmas trams, myers, bridge st traders, santa tram -
 Ballarat Tramway Museum
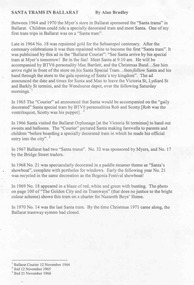
Book, Sydney Tramway Museum, "the North Sydney Cable Tramway 1886 - 1900", May. 1986
Yields information about the North Sydney Cable tramway that operated from 1886 to 1900.Twelve page booklet, yellow paper covers, centre stapled, folded A4 sheets to give an A5 book, white inside pages, titled "the North Sydney Cable Tramway 1886 - 1900". Gives a short history of the cable tramway that operated from Milsons Point ferry terminus until replaced by electric tramcars, photographs, map, and a short note on preserved cable trams. Does not note the re-use of some of the trailers for construction of the Ballarat electric cars in 1905. Published by the Sydney Tramway Museum, 5/1986. On the top right hand corner of the front cover is a yellow prince label - $0.5 and on top right hand corner of page 3, a printed label "Graeme S. Breydon" and his address at the time.trams, tramways, cable trams, sydney, north sydney, milsons point -
 Ballarat Tramway Museum
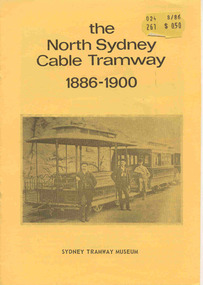
Magazine - Illustration/s, Colin Jones, "Tramway Heydays", 1979?
Pages 32 to 40 of an article titled "Tramway Heydays" with illustrations from a magazine titled "This Australia", late 1970's. Article authored by Colin Jones has photographs of Brisbane Horse trams, Sydney steam trams, Adelaide horse trams, Melbourne cable cars, Geelong soon after opening featuring an overhead truck, Brisbane electric trams, Adelaide and Sydney electric trams. On the last page is a series of small photographs of Ballarat, Bendigo, Brisbane, Adelaide and Melbourne including Z class trams. Article notes the Burwood extension in Melbourne of 1978. Four sheets stapled in the top left hand corner.trams, tramways, australian trams, melbourne, brisbane, sydney, adelaide, geelong -
 Ballarat Tramway Museum
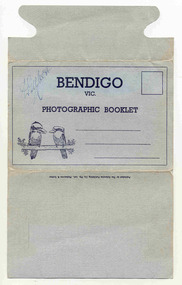
Postcard - Folder set, Valentine & Sons Publishing Co, "Bendigo Photographic Booklet", 1940's
Set of 9 black and white views of Bendigo printed on a folded strip, glued within a light grey colour light weight cardboard folder, titled "Bendigo Photographic Booklet". Booklet printed with an address area with title and kookaburras. Produced by The Valentine Publishing Co. Pty Ltd Melbourne & Sydney The rear has a slit on the rear cover that allowed the folder to be secured. Pictures are: 1. Mitchell St 2. The Lookout Tower 3. Conservatory Gardens 4. Shamrock Hotel 5. The Lake, Upper Reserve 6. The Pall Mall 7. Civic Buildings 8. Soldiers Memorial Hall and Post Office 9. Alexandria Fountain, Bendigo with a single trucker, M class type tram, prior to alterations, but in SEC colour scheme of the mid 1930's Made during 1940, with photographs of the 1930's as well given motor cars in the photo. Has "D. Gilbert" in ink on cover.trams, tramways, bendigo, pall mall, charing cross, mitchell st -
 Ballarat Tramway Museum
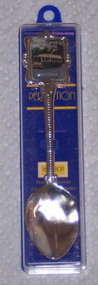
Souvenir - Teaspoon, Perfection Plate, BTPS Teaspoon - tram 33, late 1980's
Souvenir Teaspoon featuring Ballarat tram No. 33 in a Square inset at the top of the tea spoon, contained within a plastic case. The teaspoon made by Perfection Plate, of the Galaxy style or type. The case has dark blue plastic base, with clear top, with a paper insert, with word "Perfection" and other details, including the name of the manufacturer "Hansen & Berry Ltd" with Auckland and Sydney photo numbers. On the rear of the case is the wording "Perfection". The teaspoon is silver plated, with the tram in a picture 18mm square. The teaspoon is marked "Galaxy" on the rear. Tea spoon is 112mm long x 25mm wide. Case is 125mm high, 32mm wide, by 16mm deep. Made late 1980's?. See Reg Item 3555 for another example of this teaspoon.trams, tramways, teaspoons, sales items, btps -
 Ballarat Tramway Museum
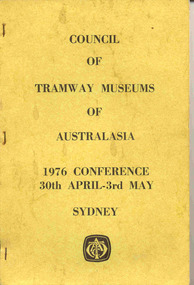
Book, South Pacific Electric Railway, "Council of Tramway Museums of Australasia 1976 Conference 30 April - 3rd May Sydney 1976", 1976
Book, 88 pages A4 size with yellow card covers, stapled on left hand edge, with 3 staples. Details the Proceedings of the 2nd Conference of the Australasian Tramway Museums (COTMA), Sydney, April 30 - May 3, 1976. Produced by the South Pacific Electric Railway, edited by David Rawlings. Includes a list of contents - page 2 and list of delegates - page 4, and the programme on pages 5 and 6. 2nd conferencetrams, tramways, cotma, conferences, sper -
 Ballarat Tramway Museum
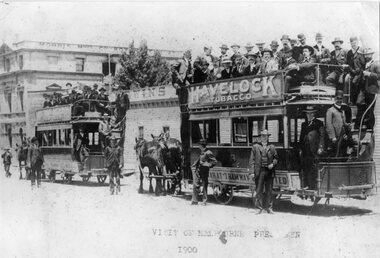
Photograph - Black & White Photograph/s - set of 2, 1900
Yields information about the nature of a visit to Ballarat by Melbourne pressmen and the buildings in the background at the time. Also shows the dress of the visitors at the time. Various sources - ex photo held by the Ballarat Historical Society. Also shows the condition of the trams at the time.Black and white print of a photograph of two crowded horse trams in Lydiard St North. Ballarat, titled "Visit of Melbourne Pressmen 1900". Has Morris Manufacturing Company building in the background. Both horse trams, No.9 nearest to camera, have "Havelock" Tobacco roof advertisements. Behind the trams is Irwin's Provincial Hotel, when it was a timber structure. Print made from a copy negative held in the Ballarat Historical Society collection???? 2nd copy added 8/11/2005 from BTM collection of photos in mess room. 2785.1 - as above, but photographed from an album - shows the full length of horse tram No. 9 and has number TR4 in bottom right hand corner. 2785.2 - as above but cropped on sides - cropped out rear of horse tram 9. 2785.1 & .2 added 12/7/2009, ex William F Scott. See Email from Max Harris 12/8/042785.1 - top on rear in ink - "Ballarat Visit of Press men , 1900 Sydney Harvey photo". 2785.2 - in ink on rear "18a)", "Visit from Melbourne Press 1900, opposite Ballarat Railway Station". In bottom right hand corner "Sydney Harvey" and "William F Scott" address label.tramways, trams, horse trams, melbourne pressmen, ballarat, tram 9 -
 Ballarat Tramway Museum
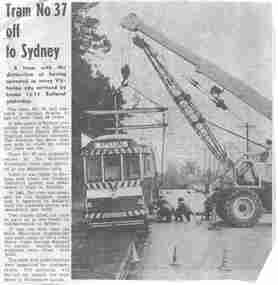
Newspaper, The Courier Ballarat, "Tram No 37 off to Sydney", Sep. 1971
... the despatch of a bogie tram to the Sydney Tramway Museum, being loaded ...Yields information about the despatch of a bogie tram to the Sydney Tramway Museum, being loaded in Wendouree Parade, outside the depot, using two cranes and the road being closed.Newspaper Clipping from the Courier, 28 September 1971, titled "Tram No 37 off to Sydney". Features a photo of Bogie tram No. 37 being lifted by two cranes in Wendouree Parade outside the tram depot. Notes that the tram is being taken to Sydney, for the "South Pacific Electric Traction Association Museum". Gives a history of its operation in four cities. Noted that this was the first time the SEC had used cranes rather than by using jacks. See Reg Item 3777 for a print of the Courier photograph. No date on item - item dated from Excel file referred to Reg Item 3777. sper, closure, disposal, sydney -
 Ballarat Tramway Museum
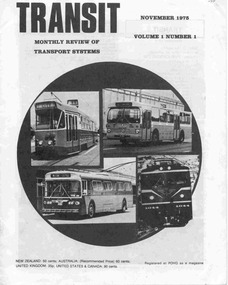
Magazine, Transit Publications Ltd and Auckland NZ, "Transit", Nov. 1975
Twenty Four page printed magazine, saddle stapled, printed on off-white paper, titled "Transit", Vol. 1 No. 1, November 1975 and subtitled 'Monthly Review of Transport Systems'. Articles feature; The Auckland Bus-rail shemozzle, Sydney Rail Progress (Eastern Suburbs line), Transit in Toronto, The new Generation of Melbourne Tramcars (Z class cars), Auckland Trolley buses (Is There a Future?), Transit topics and news, Troubled Time for Interurbans, and Transit Museums news and The New Order for Melbourne. News items note the subsidising of tram replacement buses in Ballarat and Bendigo by the SEC and that it was apparently illegal in the view of the Solicitor General (page 19) and BTPS news on operations in Wendouree Parade. Published by Transit Publications in Auckland New Zealand. Not known whether was further issues of this magazine.trams, tramways, melbourne, mmtb, ballarat, bendigo, sec, buses, sydney, toronto, museums, auckland -
 Ballarat Tramway Museum
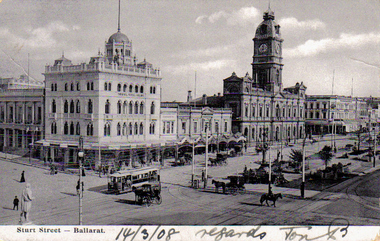
Photograph - Digital image, WTP, Sturt and Lydiard St from a postcard, c1907
Taken from the Post office building looking towards the National Mutual Life building, and the Town Hall. Has numerous horse-drawn vehicles in the image along with an ESCo tram. Received from David Critchley of Sydney Tramway Museum in an email dated 6/5/2010. See the folder for a print of the email and a copy of the image. Notes that it is from a WTP Postcard, hand-dated 14/3/1908 along the bottom edge. See the Email dated 15/3/2010 regarding the use of this image. See 8988 for the postcard.Yields information about the corner of Sturt and Lydiard St in 1907c, from a digital image copy of a post card.Digital image of the corner of Sturt and Lydiard St from a postcard, 1908. trams, tramways, sturt st, lydiard st, esco -
 Ballarat Tramway Museum
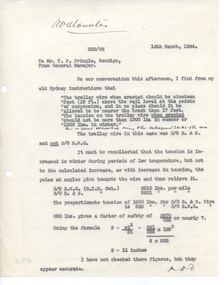
Document - Letter/s, 14/03/1934 12:00:00 AM
Yields information about the setting the tension in the overhead in Sydney and the author's calculations for it.Carbon copy of memo dated 14/3/1934 to Mr. Pringle, Bendigo, regarding tension in overhead and the various calculations referring to the author's Sydney instructions. Author unknown, has initials RDD/WM on the top of the letterhead.trams, tramways, overhead, trolley wire -
 Ballarat Tramway Museum
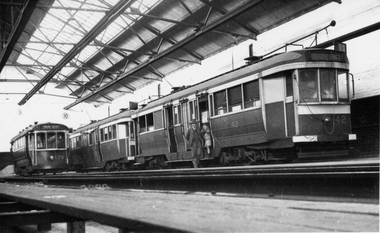
Album - Photo Album, Wal Jack, NSWT Steam Trams, 1950's
Some 143 black and white photographs of steam trams in Sydney, Newcastle, Broken Hill and Maitland. Also has some photos of Toronto, Burrinjuck, Bryon Bay, and Kurri Kurri For details of each photograph and layouts see file - WJ Sydney steam trams listing - btm5004.pdfHas a strong association with Wal Jack and his collecting of tramway history/developments until 1964.Light brown folder with a red binding strip brown coloured heavy paper inside covers holding some 25 brown colour sheets of light card on which photos have been mounted using photo corners of various types, captions in white ink. trams, tramways, steam trams, sydney, newcastle, maitland, tramcars, wal jack, broken hill -
 Ballarat Tramway Museum
Album - Photo Album, Wal Jack, Parramatta Steam Trams NSW, 1940s
Some 68 black and white photographs of the Parramatta Steam Trams NSW, operated by the Sydney Ferries Limited. The line closed in 1943. Almost all of the photographs have been obtained from his correspondents. For details of each photograph and layouts see - WJ Parramatta Listing.pdfHas a strong association with Wal Jack and his collecting of tramway history / developments until 1964.Marbled brown folder with a brown binding strip, marbled brown coloured heavy paper inside covers holding some 18 dark grey coloured sheets of light card on which photos have been mounted using photo corners of various types, captions in white ink. trams, tramways, steam trams, sydney, parramatta, tramcars, wal jack, sydney ferries ltd -
 Ballarat Tramway Museum
Album - Photo Album, Wal Jack, 1950's
These notes are based on a report prepared for the Board re the donation of materials collected by Wal Jack and donated to the BTM in 2011. The following notes are general across the collection unless written for a specific Ballarat item. Has proven association with Wal Jack and tramway developments within Australasia until 1964 and given their extent particular significance. Features Sydney TramsDark brown binder cloth covered folder, 3 brass screw binders brown paper inside covers holding some 50 manila cover foolscap size sheets of card on which photos have been mounted using photo corners so various types, captions in black ink. Folder supplied Norman Bros Melbourne. Has photos of various locations and lines within Sydney including some works trams. trams, tramways, sydney, tramcars, wal jack -
 Ballarat Tramway Museum
Ephemera - Envelope/s, NSW Tramway Historical Assn, "Last Trammail Cover", 10/2/1961
"Last Mail carried by tram in NSW Special Commemorative Trip Operated by the NSW Tramway Historical Assn. during last week of Trams in NSW 19 February 1961". Also has a hand stamp in purple ink "Last tram mail City Railway La Perouse Maroubra Beach Randwick 19 February 1961" The stamp is a 1/- stamp featuring a Melbourne street scene for the 1956 Olympics. Addressed to "Wally Jack 31 York St., Ballarat East Victoria". The post office cancellation stamp "Last Tram Mail Sydney NSW Aust 19FE61"Yields information about the type of materials that a local Ballarat tramway enthusiast collected and reflects the closure of the Sydney tram system in 1961. Envelope - preprinted in dark green and red ink - titled "Last Day Cover" - with a colour stamp in top left hand corner. On rear is another small hand stamp about details of the last tram mail and in the bottom right hand corner the number "1422".trams, tramways, sydney, last tram, post office, postage stamps -
 Ballarat Tramway Museum
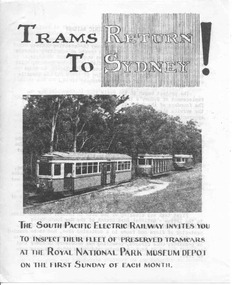
Pamphlet, South Pacific Electric Railway, "Trams Return to Sydney", 1961
Folded foolscap sheet, printed, titled "Trams Return to Sydney", with a photo of three trams on the Royal Park line at Loftus, c1961, prior to actual operation of the trams. Provides notes on the site, SPER, progress and plans. On rear has a plan of the area relative to Sutherland station.trams, tramways, sper, sydney trams -
 Ballarat Tramway Museum
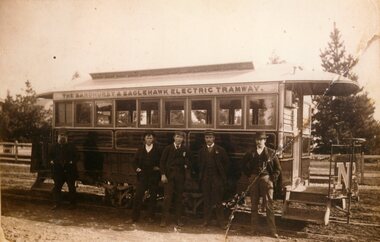
Photograph - Black & White Photograph/s - set of 4, 1890
Demonstrates part of the evolution of Ballarat's trams when they were drawn from cable trailers of North Sydney for use as the central section of ESCo's Ballarat trams.4373 - Black and White sepia coloured reproduction (copy by scanning and reprinting) of a image of "The Sandhurst & Eaglehawk Electric Tramway" battery tram, with five men (two in uniform) standing alongside. Cans see the letters "No." Note the unpaved streets. Company operated the battery tram during 1890. 4373.1 - Black and white print - copied by Harris House of Photography - 3 prints and 1 negative - N526 - with tear in image removed. 4373.2 - Negative only - N524 - no people but with one of the battery doors only - negative only - see image. Envelope and other paperwork with the 4373.1 and 4373.2 - with the worksheet file. 3 - Black and White copy print contained within the Wal Jack Bendigo and Geelong Album, see Reg Item 5003 for more details. Added 1/7/2013 .0 In pencil "Basil W Miller Collection" .3 - "PWD" in bottom right hand corner in ink.trams, tramways, bendigo, battery trams, eaglehawk -
 Ballarat Tramway Museum
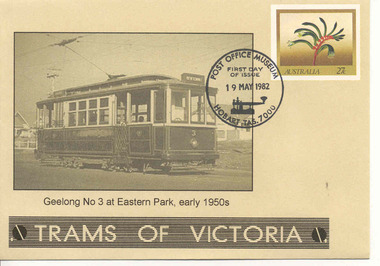
Ephemera - Envelope/s, Australia Post, "Trams of Victoria", 1/07/2009 12:00:00 AM
Demonstrates Australia Post use of an image on a pre-stamped envelope, first day of issue and a printed stamp.Printed pre-stamp envelope titled "Trams of Victoria" on light brown paper, featuring Geelong No. 3, at Eastern Park, early 1950's. Has as printed 27c Australia stamp on the envelope. Has been post cancelled by the Hobart Post Office Museum 19/5/1982 - First day of issue. On the rear, gives details of the stamp - Mangles' Kangaroo Paw. Designer - Paul Jones, Sydney, pre-stamped envelope No. 051. Purchased from eBay C.Siviero, 19/6/2009 for $6.21 including postage. eBay sheet filed with worksheet.trams, tramways, envelopes, geelong, stamps, australia post -
 Ballarat Tramway Museum
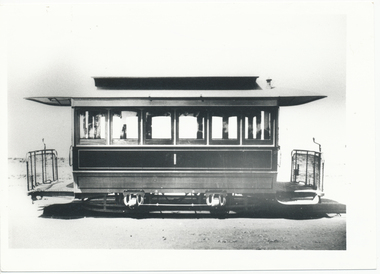
Photograph - Black & White Photograph/s, 1890's
Demonstrates the nature of working of the horse trams in Ballarat when at times three horses were required to take trams from Grenville St to Lydiard St. Yields information about the dress of Gentlemen at the time and the buildings behind the tramcar..Black and White photograph of North Sydney cable tram trailer, No. 1, side on view. From the CB Thomas Collection and published in Sydney tram books. Hi Res of image added 15/7/2014. On rear in ink, cropping marks in the top edge. Along the bottom edge "Trailers of this type were converted to electric cars for the Electric Supply Co. of Victoria tramways in Ballarat. The trailers were from the North Sydney cable try of the early 1890's" and "Nth Sydney cable trailer No. 1, Late CB Thomas collection". "KM2" and a blue sticker with "9" written on it.trams, tramways, cable trams, sydney, esco, tram 1 -
 Ballarat Tramway Museum
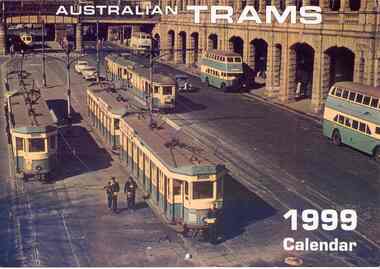
Document - Calendar, Topmill Pty Ltd, "Australian Trams - 1999 Calendar", 1998
... and Sydney Tramway Museum. "Australian Trams - 1999 Calendar ...Yields information about tramway operations post WW2 throughout Australia tramway cities.Wall Calendar - heavy card covers, 12 gloss art pages inside, titled "Australian Trams - 1999 Calendar" containing cull colour photographs of Sydney, Brisbane, Adelaide, Perth, Bendigo, Ballarat, Hobart, Melbourne, and a list of Australian and New Zealand tramway museums. Ballarat featured in June, 33 in the depot yard during a hail storm - 20/8/1971 - photographer not given. Has a punched hole along the top edge to enable wall use. Provides dates for holidays, school holidays and Pension payment days and phases of the moon. Produced by Topmill Pty Ltd and distributed by Gordon & Gotch Pty Ltd. Photos by Hugh Ballment, Dale Budd, Robert Merchant, Arthur Perry and Sydney Tramway Museum.tramways, trams, ballarat, bendigo, melbourne, adelaide, hobart, brisbane, sydney -
 Ballarat Tramway Museum
document - Typed Notes, "New South Wales Government Tramways (Page 16) - North Sydney System" - Wal Jack Collection, 1950's
Typed notes on foolscap paper, carbon copy titled "New South Wales Government Tramways (Page 16) - North Sydney System", one page only. Describes the North Sydney cable trams, cars, early electrification extensions to Spit Junction and replacement by electric trams and the reuse of the tramcars in King St. Sydney. Source unknown. Contained originally within Reg Item 5623 at the front of this note book. For items see btm5623 loose items list.pdf.tramways, cable trams, sydney -
 Ballarat Tramway Museum
Magazine, Australian Electric Traction Association (AETA), "The Trolley Wire", Vol 1, No. 3, "The Trolley Wire", Vol 1, No. 4, "The Trolley Wire", Vol 1, No. 7, "The Trolley Wire", Vol 1, No. 8, "The Trolley Wire", Vol 1, No. 10, 1952
5685.1 - Spirit duplicated magazine, 4 quarto pages, single sided - " The Trolley Wire", Vol 1, No. 3, April 1952, stapled down along the left hand side. Has items on Sydney trams, a Map of Ballarat tramways (See image i2), Newcastle News, and a discussion of the influx of transport experts into Sydney from England. 5685.2 - Spirit duplicated magazine, 7 quarto pages, single sided - " The Trolley Wire", Vol 1, No. 4, May 1952, stapled down along the left hand side. Has notes on use of tramway power for pumping stations, map of Bendigo (see image i4), news from Brisbane, Sydney news, association news, tramcar painting letters, Newcastle Destination roll 5685.3 - Spirit duplicated magazine, 7 quarto pages, single sided - " The Trolley Wire", Vol 1, No. 7, August 1952, stapled down along the left hand side. Has notes on Brisbane, Association news, map of the La Perouse - Botany - Mascot district, Ryde Cemetery, Sydney R 1890 runaway, North Sydney destination roll (1910) 5685.4 - Spirit duplicated magazine, 8 quarto pages, single sided - " The Trolley Wire", Vol 1, No. 8, September 1952, stapled down along the left hand side. Has notes on Association news, (left hand side very faded), map of the Enfield's lines, Brisbane Trolley Bus system 1952, Sydney news, and Eastern Suburbs roll. 5285.5 - Spirit duplicated magazine, 9 quarto pages, single sided - " The Trolley Wire", Vol 1, No. 10, November 1952, stapled down along the left hand side. Has notes on Brisbane, Wylde St trolley bus route in Sydney, Sydney news, association notes, Proposed lines in Sydney - Haberfield to Dobroyd, use of triple trams in Sydney, Broken Hill destination roll, Fort Macquarie depot track drawing and Newcastle news. See Reg Item 5685 for other Vol 1 issues and Reg Item 5686 for Vol. 2 issues.Vol 1, No. 4 has pencil inscription of "H. H. Matthews" in top right hand corner.trams, tramways, tramway news, history, sydney, newcastle, broken hill, brisbane, ballarat, bendigo, map -
 Ballarat Tramway Museum
Magazine, Australian Electric Traction Association (AETA), "The Trolley Wire", Vol 2, No. 4, "The Trolley Wire", Vol 2, No. 5, "The Trolley Wire", Vol 2, No. 6, "The Trolley Wire", Vol 2, No. 7, "The Trolley Wire", Vol 2, No. 8, "The Trolley Wire", Vol 2, No. 9, 1953
5686.1 - Spirit duplicated magazine, 8 quarto pages, single sided - " The Trolley Wire", Vol 2, No. 4, April 1953, stapled down along the left hand side. Has items on proposed tramway to Rockdale, map of the VR tramway to Brighton Beach, tramways and ferry connecting services in Sydney, Eastern Suburbs tramways, Sydney news, tram destination roll for Ashfield (1910), list of destination boards on Sydney steam trams. 5686.2 - Spirit duplicated magazine, 7 quarto pages, single sided - " The Trolley Wire", Vol 2, No. 5, May 1953, stapled down along the left hand side. Has notes on Tempe to Rockdale (map), tramways and ferry connecting services in Sydney, Rushcutters Bay depot track layout, opening dates of Sydney tramway extensions, Sydney news, association news and signs used on Sydney trams. 5686.3 - Spirit duplicated magazine, 7 quarto pages, single sided - " The Trolley Wire", Vol 2, No. 6, June 1953, stapled down along the left hand side. Has an editorial on Sydney transport, tramways and ferry connecting services in Sydney, Sydney news, introduction of electric trams into Sydney, Light St depot, Brisbane track layout, Sydney news, association news. 5686.4 - Spirit duplicated magazine, 9 quarto pages, single sided - " The Trolley Wire", Vol 1, No. 7, July 1953, stapled down along the left hand side. Has notes on replacement with buses on the Ryde line, tramways and ferry connecting services in Sydney, Sydney news, Honeysuckle Depot 1887, Iron Cove or Drummoyne Bridge, Sydney news, Association and Museum news. 5286.5 - Spirit duplicated magazine, 6 quarto pages, single sided - " The Trolley Wire", Vol 2, No. 8, August 1953, stapled down along the left hand side. Has notes on the commencement of electric trams in Sydney, Iron Cove or Drummoyne Bridge, Association and Museum news, map of Sydney electric lines in 1899 and opening dates of Sydney tramway extensions. 5286.6 - Spirit duplicated magazine, 6 quarto pages, single sided - " The Trolley Wire", Vol 2, No. 9, September 1953, stapled down along the left hand side. Has notes on an electric train tour, tramways and ferry connecting services in Sydney, Sydney news, Iron Cove or Drummoyne Bridge, Association news and Newcastle news. See Reg Item 5685 for other Vol 1 issues and Reg Item 105 for Vol 1, No. 6 and Vol. 3 No. 5All copies have pencil or typed inscription of "H. H. Matthews "along top edge.trams, tramways, tramway news, history, sydney, newcastle, map -
 Ballarat Tramway Museum
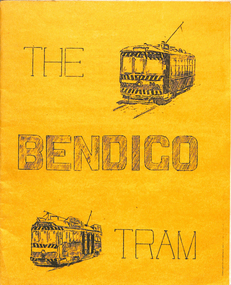
Book, Written by A. Weston and typed by Geoff Clark, "The Bendigo Tram", 1971
Produced by the North Sydney Boys High School Railway club, prior to the closure of the Bendigo system - little else written and published at the time about the history and details of the system. A very good booklet for the time - produced entirely by the wax cut stencil process. Has a strong association with the people who prepared the document. Lower significance as not directly associated with Ballarat.Twenty page booklet on the history, operation and tramcars of Bendigo, produced by the Nth Sydney Boys High School Railway Club in September 1971. Printed on a wax cut stencil process, with green covers, drawings, maps, track layout, fleet list, gives tentative closure dates, route descriptions, sketches, stapled on edge. Title "The Bendigo Tram". Inside front cover notes written by A. Weston and typed by Geoff Clark. See Reg item 302 for the Ballarat version.trams, tramways, bendigo -
 Ballarat Tramway Museum
Photograph - Digital image, c1945
Yields information about a Ballarat bogie tram prior to its sale to the SEC Ballarat and its appearance at the time.Digital image of MMTB No. 42 stored at Coburg Depot with route number boxes, prior to sale to the SEC, became Ballarat 39. See photo Reg item 5327. Note the white bumper strips. Behind the tram is an ex Hawthorn bogie tram and T class 179. Photo provided by Mal Rowe 29/1/2016 by e-mail - who thought it came from the collection of the Sydney Tramway Museum. trams, tramways, coburg, sale of trams, stored trams -
 Ballarat Tramway Museum
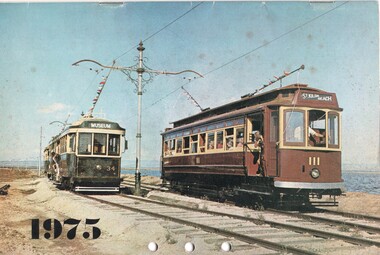
Document - Calendar, Sydney Tramway Museum, 1974
Calendar 1975 - 28 pages - black and white photos except for the front cover. Produced by the Sydney Tramway Museum. Features photographs of various Australasian Tramway Systems: Ballarat 34 and Adelaide 111 at the St Kilda Tramway Museum Dunedin 61 Ballarat 37 at the City terminus Bulimba Power Station electric locomotive Newcastle 383 Darling St Balmain Perth Trolley Bus 21 Perth 55 Melbourne Tait train Launceston 26 Sydney Suburban train Adelaide 365 Brisbane 293 VR 28 Geelong 14 - at Eastern Park Sydney tramway museum tramways, trams, ballarat, adelaide, newcastle, sydney, dunedin tramways, brisbane, perth, trolley buses, melbourne, launceston, victorian railways, geelong, tram 14, tram 37, tram 34 -
 Ballarat Tramway Museum
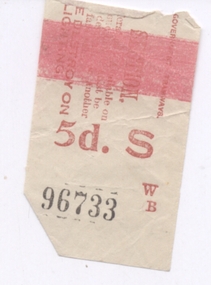
Ephemera - Ticket, NSWGR, Sydney tram ticket - 5d, - Wal Jack Collection, 1930-1940's
Sydney tram ticket - 5d, printed pink / red ink on white paper with number "96733" in black. Contained within Reg Item 5485 - Service Exercise Book, black covers, with label, red binding titled "No. 2 - Ballarat Tramways & S.E.C. Systems". Item was located inside folio 15 of this book - see list. trams, tramways, sydney -
 Ballarat Tramway Museum
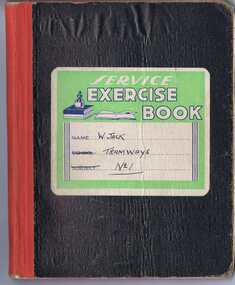
Document - Exercise Book, Wal Jack, "W. Jack Tramways No. 1", 1950s
Contains notes on the following tram systems. Brisbane - includes notes on photographs Rockhampton steam Sydney Tram Depots NSW Tramways tramcars - notes on each class and work vehicles Birmingham including two cuttings about the closure of Birmingham dated 31-3-1939 London Passenger Transport Board - one page Bristol - closure and damage. Sheffield History of the Tramcar Victorian Railways - St Kilda Brighton Electric Street Railway Sandringham to Black Rock MMTB Cable trams and opening dates Opening dates for the tramway routes in Melbourne to 1921 News Paper cuttings on Doncaster Newspaper cutting - cable trams "Cable Trams.....clang into history" by Hugh Murphy History and Development to 1943 - Brisbane Trams by G. R. Steel (half page only) Perth Tramways Adelaide Municipal Tramways Trust notes South Africa Trams Wellington Corporation Tramways (NZ) Tramways in Soviet Russia World's Largest Tram Systems - July 1938Demonstrates the work of Wal Jack in recording tramway information.Service Exercise Book, black covers, with label, red binding titled "W. Jack Tramways No. 1" lined pages, four sections each of 10 sheets, (80 pages), stitched bound. trams, tramways, tramways, sydney, brisbane, vr, melbourne, cable trams -
 Ballarat Tramway Museum
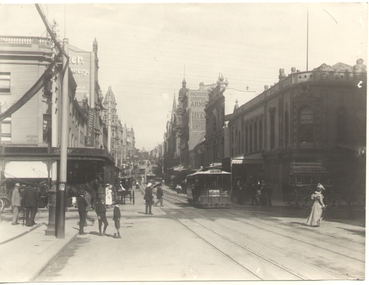
Photograph - Black & White Photograph/s, 1897
Yields information and demonstrates information about the use of Ballarat No. 29 as a service tram in 1943. This tram was seldom used in traffic, very few photographs exist of it.Black and white photograph of King St Sydney with cable trams, at the intersection of King and George St, looking east. Has a cable set (dummy No. 13) with destination of King St. Has Packers Liverpool Arms, Royal Exchange Hotel and other shops in the background and many well dressed people.Typed on rear "New South Wales Government Cable Tramways" "King and George Streets in 1897 showing Cable Dummy No. 13 and trailer." "594.AA."trams, tramways, sydney, cable trams