Showing 109 items
matching tram 53
-
 Ballarat Tramway Museum
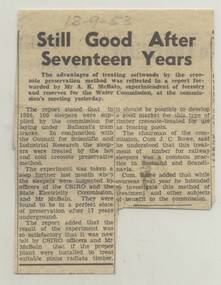
Newspaper, The Courier Ballarat, "Still good after Seventeen Years", 18/09/1953 12:00:00 AM
Yields information about a provision of treated wooden pine sleepers to tramways in Ballarat.Newspaper clipping from The Courier, Ballarat, dated 18-9-53 regarding treated softwood sleepers, 100 installed in 1936 from Ballarat Water Commission, creosote treatment CSIRO. Titled "Still good after Seventeen Years" Record updated and images added 20/8/2013.Pencil date of "18-9-53"trams, tramways, sleepers, tram track, trackwork -
 Ballarat Tramway Museum
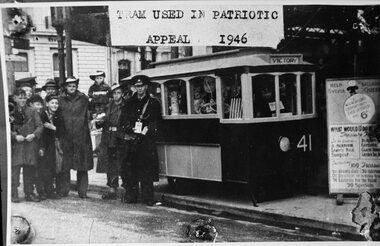
Photograph - Black & White Photograph/s, c1944
Yields information the model tram used during the second world war and some of the people involved in fund raising in BallaratReproduction of c1944 photograph of Ballarat's Most Popular Conductress Competition to raise funds for the Red Cross Prisoner of War fund. Photo features a model tram, No. 41, known as the Treasure Tram with a group of boys and men group at the rear of the tram. Boys are dressed in army or sailors uniforms. Men dressed in army uniform and one SEC conductor with conductors bag around shoulder. From original of another reproduction believed to be held by the Ballarat Historical Society. Incorrectly labelled as being taken during 1946. See other reference for details of the Treasure Tram. Conductor believed to be Robert Morrison. Identified by Doreen Brown, 307 Simpson St. Buniyong as her father - 53 412 125, during the exhibition. Laminated with 4 Velcro dots on rear. 5/2/1997 - additional print 10" x 8" stored with item. 26/7/2007 - additional print "10" x 8" stored with item - ex Alan Bradley photographs 5/2007. Copy negative scanned and image changed to a higher resolution 5-5-2020. See Alan Bradly, History of Ballarat Tramways.trams, tramways, ballarat trams, secv, world war ii, staff, fund raising , tram treasure tram, tram 41 -
 Ballarat Tramway Museum
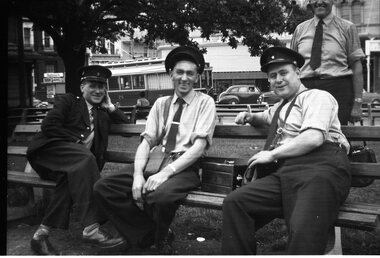
Photograph - Black and White photograph - laminated, Travis Jeffrey, 1959
Photograph of a group of Ballarat Crew or trammies photographed while waiting for their next trams by Travis Jeffery at the City terminus. Has tram No. 25 in the background. Note the padlock tin between the two Connies.Photograph of four Ballarat trammies, crews, on a seat on the north side of Sturt St waiting to go for next trip. From left to right, Norman Lorensini, Ray Curnow, Maurice Shillington, and Ted Edmonds. Has cash tin on seat. In background is tram 25, Commonwealth bank, (old) and the Newsagent kiosk. Taken during 1959. Additional prints made by John Phillips April 1999. 1x 203H x 254W to Marlene Lorensini 4 Duke St. Ballarat, home 53 317 592 for Norms 80th Birthday. Also 1 x 203H x 254W and 89H x 140 Prints for archives. Negative from Travis Jeffrey donated to Museum at same time. 406 large print - 02-02-04 - small print - 1999 - 01-01-57 large print - 01-01-71 - added 20-07-2006 - 278H x 355W Image revised 9/5/2020 from the negative of the photo held.trams, tramways, ballarat, crews, personnel, 25, tram 25 -
 Ballarat Tramway Museum
Slide - 35mm slide/s, Keith Kings, 3/11/1953 12:00:00 AM
Geelong No. 37 at Corner of Ryrie and Moorabool Streets 3/11/1953, showing 'East' on destination. Tram not well exposed. Stopped by a centre of the road pole marked as a tram stop, with 'Safety Zone' sign in foreground. Outside Mayfair School of Dancing building. Photo by Keith Kings.In Blue ink 'Geelong was closed early 1956' in top left hand corner. In base 'Geelong No. 37, on 'EAST' Cr Ryrie &b Moorabool Sts City, 3/11/53, Maximum traction 1/50 f11' Stamped on top edge, 'K.S.Kings No. K(a)(7)'tramways, trams, geelong, ryrie st, maximum traction, tram 37 -
 Ballarat Tramway Museum
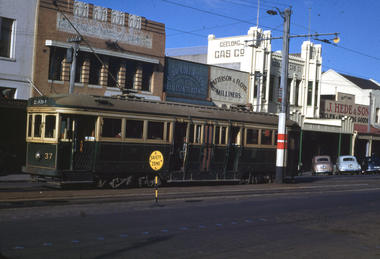
Photograph - No 37 in the parking loop at Sturt St, Wal Jack, 14/02/1953
Photograph of No 37 in the parking loop or City Loop in Sturt St, 14-2-1953. Wal Jack Photo. In the background is the Camp Hotel, with the name Alan Hood under the hotel name. See image i2 for rear of photograph. See image i3 for hi res scan of print. See image i4 for hi res scan of negativeYields information about the appearance of No. 37 in 1953 and the Sturt St south end buildings.Black and white photograph from the Wal Jack Ballarat Album.On rear of photograph in ink "SEC, Ballarat (1st) No. 37 ex No. 22 bogie ex MMTB 117 Sturt St loop 14-2-53" and in top right hand corner, Wal Jack stamp with "T153" written in.trams, tramways, bogie trams, sturt st, tram 37, city loop -
 Ballarat Tramway Museum
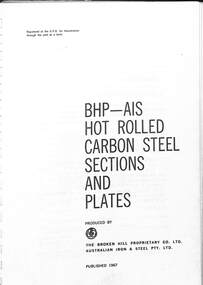
Book, Broken Hill Pty Co Ltd (BHP), "BHP - Hot rolled carbon steel sections and plates", 1967
Published by BHP 1967 gives the dimensions and properties of rails, steel sections and plates produced by Australian Iron and Steel and Broken Hill Pty Ltd. Was supplied free by BHP to students. Rail sections listed: 387 pound/yard crane rail 175 lb crane rail 146 lb crane rail 107 lb - 53 kg/m with fishplate and sleeper plates details 102 lb or 51 kg grooved tram rail 94 lb or 47 kg - fishplates and sleeper plates 91 lb or 45 kg NZR standard rail 82 lb or 41 kg - fishplates and sleeper plates 75 lb or 37 kg - fishplates and sleeper plates 63 lb or 30 kg - fishplates 45 lb or 22 kg - fishplates 30 lb or 15kg - fishplates 20 lb or 10kg - fishplates Yields information about rails and associated items produced by BHP AIS in 1967 along with other steel sections and plates.Book - 132 pages, white comb bound + blue plastic covers.railways, tramways, rails, bhp, fishplates, sleeper plates -
 Ballarat Tramway Museum
Album - Postcards & Photographs - Vic Solomons and others - Australian Tramways, Vic Solomons, 2023
Contains 184 images of postcards and photographs collected primarily by Vic Solomons of Sydney, with others from the collection of Wal Jack and Warren Doubleday. Covers almost all of Australia's tramway systems. 1 Post Card Hay St Perth Looking East No 3 Unknown Perth 2 Post Card Cars 30 & 90 both on Route 19 pass in Barrack St looking South Perth WA 1935.02.18 Perth 3 Post Card Hay St Looking East Perth WA Unknown Perth 4 Post Card William St Perth WA Unknown Perth 5 Post Card Perth from Shaftsbury Hotel Unknown Perth 6 Post Card Hay St Perth WA Looking East Unknown Perth 7 Post Card Barrack St Perth Unknown Perth 8 Post Card Murray Views No 3 High St Showing Town Hall Fremantle WA Unknown Fremantle 9 Post Card High St Fremantle WA Unknown Fremantle 10 Post Card View of Bolder City Golden Mile in the Background (Section No 1) 1908.08.20 Kalgoolie 11 Post Card Hannan St Kalgoolie 1900.08.19 Kalgoolie 12 Post Card Hannan St Kalgoolie WA (No 2) Unknown Kalgoolie 13 Post Card Intersection Hannan & Maritana Sts Kalgoolie WA Unknown Kalgoolie 14 Post Card Hannan St Kalgoolie Unknown Kalgoolie 15 Post Card Lane Street Bolder City Unknown Kalgoolie 16 Post Card Hobart Double Deck Tram Unknown Hobart 17 Post Card Macquarie St Hobart Unknown Hobart 18 Photo Liverpool Street Hobart Unknown Hobart 19 Photo Hobart 21 Unknown Hobart 20 Photo Hobart 14 in Elizabeth St Hobart Unknown Hobart 21 Post Card Macquarie St Hobart Unknown Hobart 22 Post Card Macquarie St Hobart Tas Unknown Hobart 23 Photo Double Decker Tram 3 at G.P.O. Hobart Tas No 31 Unknown Hobart 24 Post Card Double Decker Tram 19 Hobart Tas A B Series No 24 Unknown Hobart 25 Photo Hobart Municipal Tramways Tas No 95 Unknown Hobart 26 Post Card Elizabeth St Hobart Unknown Hobart 27 Post Card Elizabeth St Hobart Unknown Hobart 28 Post Card Elizabeth St Hobart Unknown Hobart 29 Post Card Elizabeth St Hobart Tas Unknown Hobart 30 Post Card HMT 21 with crew at Beach Road Terminus Unknown Hobart 31 Post Card HMT 9 & another with crew at Beach Road Terminus. Front cover photo of Destination GPO 1921.01.00 Hobart 32 Post Card Cascade Road and Mount Wellington Hobart Unknown Hobart 33 Post Card Elizabeth St Hobart Unknown Hobart 34 Post Card Elizabeth St Hobart Unknown Hobart 35 Post Card Elizabeth St Hobart 1915.04.07 Hobart 36 Post Card Macquarie St Hobart Tas Unknown Hobart 37 Post Card Macquarie St showing Post Office Hobart 1908.03.12 Hobart 38 Post Card Hobart Municipal Tramways 21 Unknown Hobart 39 Post Card Elizabeth St Hobart Tas Unknown Hobart 40 Post Card Liverpool Street Hobart Unknown Hobart 41 Post Card Electric Tram Launceston Tas 446 W J Little Photo 1919.02.08 Launbceston 42 Post Card Launceston Tram no 3 1911.08.30 Launbceston 43 Post Card Launceston Tram no 3 passes tram No 1 Unknown Launbceston 44 Post Card Tram 6 at Trevallyn a popular suburb Launceston Tasmania Unknown Launbceston 45 Post Card Tram 7 at Trevallyn Road Terminus Launceston Tasmania Unknown Launbceston 46 Post Card Tram 4 in Brisbane St Launceston Unknown Launbceston 47 Post Card Tram 9 in Brisbane St Launceston Tasmania Unknown Launbceston 48 Post Card Camerom Street Launceston Tasmania Unknown Launbceston 49 Post Card Murray Views No 15 Jetty Road Glenelg Terminus 1962-02-08 Adelaide 50 Post Card Bay Tram at Jetty Road Terminus Glenelg SA Unknown Adelaide 51 Post Card Tram 3 in King William Street Adelaide S Aust Unknown Adelaide 52 Post Card Valentine Series No 3065 The Old Horse Tram Victor Harbour Unknown Victor Harbour 53 Post Card Bourke Street Melbourne with Cable Car Looking East 1904.04.25 Melbourne 54 Post Card Opening of New Electric Tramway Elsternwick 1913-11-13 Melbourne 55 Post Card Cable trams in Clarendon St Sth Melb Unknown Melbourne 56 Post Card Pall Mall from Charing Cross Bendigo Unknown Bendigo 57 Post Card Tram 4 & 7 pass at The Fountain and Mitchell Street Bendigo Vic Rose Series P 3198 Unknown Bendigo 58 Post Card M&MTB 133 at Charing Cross bound for Eaglehawk Bendigo Vic Murray Views No 45 Unknown Bendigo 59 Post Card Pall Mall Bendigo Vic Unknown Bendigo 60 Post Card Charing Cross & Mitchell St Bendigo Trams passing 1919.00.00 Bendigo 61 Post Card Pall Mall Looking East Unknown Bendigo 62 Post Card Electric Trams and City Hotel Bendigo Vic Unknown Bendigo 63 Post Card Moorabool Street Geelong V 23 Unknown Geelong 64 Post Card Murray Views No 3 Moorabool Street Geelong Vic Unknown Geelong 65 Post Card The Rose Series P 2487 Ryrie Street Geelong Vic Unknown Geelong 66 Post Card Southern Cross Series 2696 Ryrie Stret Geelong Vic Unknown Geelong 67 Post Card The Rose Series P 1490 Ryrie Street Geelong Vic 1920-03-04 Geelong 68 Post Card Valentine Series No 1568 Lower Sturt Street Ballarat Unknown Ballarat 69 Post Card Rose Series P 1710 Sturt Street Ballarat Victoria Unknown Ballarat 70 Post Card Sturt Street Ballarat Victoria Unknown Ballarat 71 Post Card Horse Tram In Sturt Street Ballarat 1905.11.10 Ballarat 72 Post Card Sturt Street Ballarat Looking North-West Unknown Ballarat 73 Post Card Shoppes Square Sturt Street Ballarat Looking North Unknown Ballarat 74 Post Card Junction Sturt and Lydiard Streets Ballarat 1909-09-01 Ballarat 75 Post Card The Electric Supply Co Souvenir Tram Ticket No 3085of the opening of Electric System August 18 1905 1905.08.18 Ballarat 76 Post Card Sturt Street Ballarat Victoria 1907.11.25 Ballarat 77 Post Card Off to the Gardens Electric Tram Ballarat Unknown Ballarat 78 Post Card Sturt Street Ballarat 1907.04.16 Ballarat 79 Post Card Sturt Street Ballarat Looking East Electric tram with Double Deck Trailer 1911.04.17 Ballarat 80 Post Card Sturt Street Ballarat Looking East Unknown Ballarat 81 Post Card Sturt Street Ballarat Looking West 1911.03.01 Ballarat 82 Post Card Town Hall and Sturt Street Ballarat Unknown Ballarat 83 Post Card Lydiard Street Ballarat 1906.11.23 Ballarat 84 Post Card Looking North along Adelaide Street from George Street Brisbane Sidues Series No 764 Unknown Brisbane 85 Post Card Looking South along Queen Street from the Creek Street Intersection Brisbane Qld Sirues Series No 1379 Unknown Brisbane 86 Post Card George Street from near Supreme Court Brisbane Unknown Brisbane 87 Post Card Queen and Eagle Streets Brisbane 1907.07.04 Brisbane 88 Post Card Queen Street showing His Majesty’s Theatre Brisbane Unknown Brisbane 89 Post Card Queen Street Treasury Building 1908.01.20 Brisbane 90 Post Card G P O and Queen Street Brisbane Unknown Brisbane 91 Post Card Queen Street Brisbane Looking from Wharf Street Unknown Brisbane 92 Post Card Customs House Brisbane 1905.02.16 Brisbane 93 Post Card Queen St Brisbane 1905.09.16 Brisbane 94 Post Card Queen St Brisbane 1907.11.19 Brisbane 95 Post Card Treasury Buildings Brisbane Unknown Brisbane 96 Post Card Queen and Eagle Streets Brisbane Unknown Brisbane 97 Post Card The Valley Corner Brisbane Unknown Brisbane 98 Post Card Brisbane Queen Street opposite General Post Office Unknown Brisbane 99 Post Card North Quay and Milton Beach Brisbane Q Unknown Brisbane 100 Post Card Victoria Bridge Brisbane South Side 1907.08.14 Brisbane 101 Post Card Victoria Bridge Brisbane Unknown Brisbane 102 Post Card Breakfast Creek Bridge Brisbane Q Unknown Brisbane 103 Post Card Melbourne Street Station South Brisbane Queensland Unknown Brisbane 104 Post Card General Post Office Queen Street Brisbane 1955.09.23 Brisbane 105 Post Card Customs House Brisbane 1904.11.04 Brisbane 106 Post Card Queen St Brisbane 1919.11.00 Brisbane 107 Post Card Queen St Brisbane Sidues Series No 627 Unknown Brisbane 108 Post Card Creek Street Brisbane Queensland Unknown Brisbane 109 Post Card Customs House and Garden Reach Brisbane Queensland 1910.00.08 Brisbane 110 Post Card Queen and Creek Streets Brisbane 1909.06.07 Brisbane 111 Post Card Queensland National Bank andd Queen Street Brisbane Queensland Unknown Brisbane 112 Post Card Queen Street and Treasury Buildings Brisbane 0000.09.07 Brisbane 113 Post Card Queen Street showing “Courier” Buildings Brisbane Unknown Brisbane 114 Post Card Intersection George & Roma Streets Brisbane Q 1916.05.11 Brisbane 115 Post Card Adelaide Street Brisbane Q Unknown Brisbane 116 Post Card G P O Queen Street Brisbane Q Unknown Brisbane 117 Post Card Treasury Building Brisbane 1906.03-20 Brisbane 118 Post Card Queen and Eagle Streets Brisbane 1907.02.01 Brisbane 119 Post Card Queen St Brisbane Unknown Brisbane 120 Post Card Queen St Brisbane Q Unknown Brisbane 121 Post Card Victoria Bridge Brisbane 1906.07.30 Brisbane 122 Post Card An Unusual View showing Head of Queen Street Victoria Bridge & South SideSuburbs Brisbane Q Unknown Brisbane 123 Post Card Petries Bight Brisbane Q Unknown Brisbane 124 Post Card South End Victoria Bridge Brisbane Q Unknown Brisbane 125 Post Card Customs House Brisbane Unknown Brisbane 126 Post Card Photo of toastrack car circa 1910 Unknown Brisbane 127 Post Card Treasury Buildings Brisbane Unknown Brisbane 128 Post Card East Street Rockhampton with Steam Tram & trailer Unknown Rockhampton 129 Post Card Post Office Rockhampton with steam tram Unknown Rockhampton 130 Post Card East Street Rockhampton with Steam Trams Rose Series P 7154 Unknown Rockhampton 131 Post Card William Street Rockhampton Rose Series P 7156 Unknown Rockhampton 132 Post Card Central East Street Rockhampton Q with Steam Trams Unknown Rockhampton 133 Photo Sturt St Ballarat Unknown Ballarat 134 Photo Bridge Street Ballarat Unknown Ballarat 135 Post Card George St Sydney Unknown Sydney 136 Post Card Elizabeth St Sydney Unknown Sydney 137 Post Card Railway Square Unknown Sydney 138 Post Card Sydney Harbor Bridge - pending receipt 139 Post Card Kings Cross - Mowbray Series with description on rear from C Roy G Field Unknown Sydney 140 Post Card Kings Cross - Mowbray Series with description on rear from C Roy G Field Unknown Sydney 141 Post Card Central Railway Station Sydney - Rose Series P6033 1954-01-26 Sydney 142 Post card William Street Darlinghurst looking towards City - Rose Series P6602 unknown Sydney 143 Post Card Circular Quay Sydney - Rose Series P6680 Unknown Sydney 144 Post Card View at Manly NSW - Rose Series B1003 Unknown Sydney 145 Post Card Hunter St Newcastle NSW - Rose Series P7843 Unknown Newcastle 146 Post Card Bank Corner Newcastle NSW - Mowbray Series No. 155 Unknown Newcastle 147 Post Card Hunter St Newcastle NSW Unknown Newcastle 148 Post Card Criterion Hotel Hunter St Newcastle NSW Unknown Newcastle 149 Photo Horse tram at Newtown Station 1894 to 1898 - PTC photo c1894 Newtown 150 Photo Steam tram motor No 3 at Railway Square 1879 1879 Sydney 151 Photo Railway steam tram c1900 with a horse drawn double deck bus c1900 Sydney 152 Photo Steam motor 5A and doubled deck bus Unknown Sydney 153 Photo Steam motor 53A with detail notes on rear 1922 Sydney 154 Photo Cable tram set at Milsons Point ferry terminal c1900 Sydney 155 Photo Early Sydney electric car - Ocean St - Rose Bay Unknown Sydney 156 Photo George St looking souoth c1905 c1905 Sydney 157 Photo Tram 165 at Circular Quay Unknown Sydney 158 Photo Tramcar ferry or transporter at The Spit Unknown Sydney 159 Photo tram 882 George St at Marti Place, 1937 1937 Sydney 160 Photo Tram 826 Railway Sq area Unknown Sydney 161 Photo Railway Sq in background, Broadway with double decker bus and toastrack car late 1930s Sydney 162 Photo Coupled St Pitt St? - photo Ben Parle Feb. 1950 Sydney 163 Photo Electric tram No. 2 - North Sydney with side trolley pole running Unknown Sydney 164 Photo George St - Horden's Corner Unknown Sydney 165 Photo George St at Martin Place c1920 Sydney 166 Photo Castlereagh St Sydney c1928 c1928 Sydney 167 Photo Railway Sqare c1920 c1920 Sydney 168 Photo Darling St Countereweight Unknown Sydney 169 Photo Trolley bus depot Unknown Sydney 170 Photo Trolley bus No. 14 Unknown Sydney 171 Photo Newcastle Railway Station with steam tram - Wharf Road?? Unknown Newcastle 172 Photo High St West Maitland - steam tram Unknown Maitland 173 Photo High St West Maitland - steam tram Unknown Maitland 174 Post Card Argent St near tram terminal Broken Hill NSW c1900 Broken Hill 175 postcard Argent St looking south Broken Hill - with Ken Magor's notes on rear Unknown Broken Hill 176 Photo Toronto - steam tram 61A Unknown Toronto 177 Photo 124A trial run 1911? Sutherland - Cronulla line 1911 Sutherland 178 Photo 103A at a tram stop Unknown Sydney 179 Photo Cable tram set at Crows Nest terminus grip car 12, trailer 22 Unknown Sydney 180 Photo Cable tram Queens Square Sydney 1903 Sydney 181 Photo cars 2078 and 2077 Chatswood late 1950s Sydney 182 Photo car 1877 Balmain area late 1950s Sydney 183 Photo Trolley bus - Rockdale destination Late 1950s Sydney 184 Photo Broken Hill steam tram - motor 18A North Tram Unknown Broken Hill 185 Photo Millars Point Sydney NSW - ferry/tram interchange, unknown Sydney All items imaged including the rear or back where there was writing of information. All files stored on the Museum's Photo Collections directory. Demonstrates through the medium of many images, Australian tramway systems and Ballarat's place in them.Album - heavy card covers, plastic lined with postcard or 6x4 photo sleeves.australia, tramways, postcards, photographs, steam trams, horse trams, cable trams, trolley buses -
 Melbourne Tram Museum
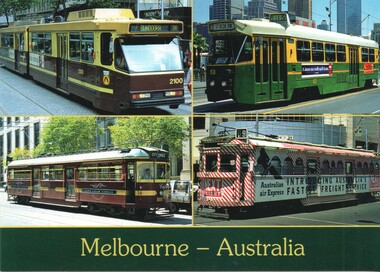
Postcard - Four panel Melbourne tram photographs, Bartel Collectors World, 1993
Postcard featuring four Melbourne tramcars - B2 2100 (Bundoora route 86), Z1 53 (St Kilda Junction, route 15), SW6 888 (City Circle), and SW6 965 advertising Australian Express 1993Yields information about four different types of Melbourne trams around 1993.Postcard colour - four panel Melbourne tram photographs - Barteltrams, tramways, tramcar restaurant, luna park, w7 class tram, sw6 class tram, b class tram, c1 class tram, advertising trams -
 Melbourne Tram Museum
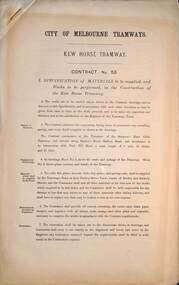
Document - Specification, Melbourne Tramways Trust (MTT), Kew Horse Tramway - Contract No. 53, 1887
Provides a detailed specification of materials to be supplied and the works to be performed for the construction of the Kew Horse Tramway between Victoria Bridge and the Kew Cemetery. Has a schedule of rates. Details materials to be supplied by the contractor. Note it is headed "City of Melbourne Tramways". The Kew Horse Tramway was opened 28-12-1887. It was built by the Melbourne Tramways Trust and operated by the cable tram operator, Melbourne Tramway and Omnibus Co. Yields information about the construction of the Kew horse tram line.Printed 5 page foolscap document stapled with a cut diagonal piece in the top left hand corner titled - Kew Horse Tramway - Contract No. 53.mtt, melbourne tramways trust, horse trams, kew horse tram, victoria bridge -
 Melbourne Tram Museum
Album - Charles Craig - part 1 of 2, 1950s to 1970s
Photo - see pdf file for further information. Number Brief Description CC1 S178 at Elsternwick level crossing track works CC2 Building East Preston Depot 1955 CC3 Camberwell depot – post WW2 – lots of trams and a black cat CC4 W2 584 and SW6 958 northbound – Chapel St and Brighton Road CC5 W2 357 – southbound, Chapel St Brighton Road CC6 Pascoe Vale Road, Raceday working – note the signal CC7 The Preston Workshops - The Argus, post WW2, 223, 647 et al CC8 923 or is it 922 being built at Preston – The Argus photo - CC8A 832 being positioned onto trucks at Preston after an overhaul – Argus Photo – see also CC306 CC9 Footscray depot` CC10 W5 797 in St Kilda Road during track works – 1950s CC11 W2 457 at Kew Post Office CC12 Wellington Parade – W2 432, 492 and 337 – special event CC13 Swan St line up of trams – football? Or other special event – Sinclair’s bus on the right side. CC14 W2 630 being washed at a depot – The Argus photo CC15 Royal Park line at Flemington Road – W2 355 and W5 786 CC16 Nicholson St track construction from a tram cab CC17 T181 on tour at Gordon St CC18 T181 on Maribyrnong Bridge CC19 Ditto at River St just off bridge CC20 As for CC18 CC21 At Raleigh Rd CC22 T181 at Footscray depot CC23 Track construction, Nicholson, just north of Gertrude CC24 Commissioning overhead Bourke St tram 988 CC25 Queens Parade – 997 and 994 CC26 Swapping trolley wheel to skid – commissioning CC27 Track construction in Gertrude St CC28 985 in Queens Parade running special CC29 997 in Queens Parade CC30 1033 at North Fitzroy – AETA Special CC31 Bourke St at Elizabeth St – has passengers on board CC32 W6 985, 996 Queens Parade, Mk 3 bus 333 CC33 As above CC34 Showing construction at Nicholson & Gertrude – Bourke St CC35 W2 223 on Burnley temporary bridge – VR track expansion CC36 W5 823 – ditto CC37 Tram on old bridge prior to removal CC38 W2 433 on temporary bridge with new bridge beams and old track CC39 Looking down showing temporary single track – Swan St CC40 Tait train passing under tram bridge CC41 SW6 on single line – off loading CC42 W2 547 at City Road Junction CC43 City Road Jtn – 1969 – 596 and 771 CC44 City Road Jtn – 1969 – 596 and 771 (same as CC45 438 in Flinders St CC46 355 somewhere CC47 552 somewhere CC47A 364 at Preston Workshops? CC48 W2 334 on Traverser – Preston Workshops CC49 Wellington pade – large line up of trams, c1950 925, and 611 CC50 W2 493 Franklin st – advertising for Savings Certificates CC51 Possibly 551 with advertising for fund raising for Blind institute CC52 249 at Hawthorn – Riversdale Junction – with a Tally Ho and Village Fair Aux. board CC53 MMTB Postcard of 511 CC54 Wattle Park terminus with Single line warning sign CC55 Wattle Park Duplication CC56 36 at Domain Junction – 833 CC57 36 at Domain Junction CC58 36 at Domain Junction with 810 and 833 CC59 36 in Swanston by Flinders St Station CC60 36 in Spencer St at A’Beckett CC61 36 crossing Collins St CC62 36 crossing Collins St CC63 36 northbound in St Kilda Road with Shrine in background CC64 36 northbound in Swanston St at Flinders St CC65 Postcard – Ballarat 36 in Domain Road CC66 Postcard - Stampshow – Hawthorn Horse tram CC67 Postcard - Stampshow – Peace cable tram CC68 Postcard - 1041 and cable car set 1 at Preston CC69 Postcard - Colins & Elizabeth – greetings from old Melbourne CC70 Postcard - Cable car set at Preston CC71 Postcard - Twentyman’s cable cars CC72 Postcard - Nu-color-vue – horse tram 256 CC73 Cable car set – Market & Flinders CC74 Cable trams at Twentymans’ in their shed CC75 Cable tram track at Bourke & Spencer prior to removal CC76 Cable tram bogie at Preston Workshops – used as a dolly CC77 Cable trams at Twentymans’ CC78 Postcard - Valentines – Bourke looking west from Swanston CC79 Postcard - Rose 3938 – Bourke at Swanston – the Leviathan building CC80 Postcard - Valentines – Elizabeth St looking south from Collins – No. 19 CC81 Postcard - Rose P4765 – Bourke St Melbourne CC82 Postcard - Rose 4090 – cable tram passing Parliament house CC83 Postcard - Valentines – GPO Elizabeth St CC84 Interior of cable trailer with clothing on a set CC85 Elizabeth St looking north CC86 Cigarette card - Collins St No. 41- WD HO Wills CC87 Postcard - Rialto building with cable set CC88 Postcard - Valentines - Swanston at Flinders looking north CC89 CC90 Q 150 Hanna St – dated on rear CC91 176 turning – photo ex Alan Jungworth CC92 161 on Princes Bridge – minimum fare 4d sign and Inspector CC93 459 at Point Ormond CC94 158 at Gordon St – side on view CC95 X 217 in Swanston St CC96 X 217 in Swanston St with an East Brighton destination CC97 T177 CC98 T177 Peel St – no destination roll – being transferred? CC99 X1 462 in Glenhuntly Road to Point Ormond CC100 X1 462 in Glenhuntly Road to Elsternwick Rly Station CC101 X1 462 in Glenhuntly Road to Point Ormond CC102 Q 150 Hanna St CC103 190 at Camberwell Depot CC104 T182 at Footscray CC105 X1 466 and W2 at Footscray CC106 190 at Camberwell Depot CC107 X1 467 Barkly St Footscray CC108 X2 679 turning into William St from La Trobe St CC109 X2 677 Glenhuntly Road with Point Ormond Destination CC110 Postcard T180 CC111 Postcard format – X1 467 on a truck – see also CC178 CC112 Postcard format – X1 467 at Wantirna South CC113 Q200 and SW6 896 at Thornbury – has labels on rear CC114 T177, Ballarat Road – has labels on rear CC115 T178 at Point Ormond CC116 Postcard X1 465 and 466 CC117 Postcard – X2 676 CC118 Postcard – TMSV X2 217 CC119 810 on temporary bridging – 24-12-67 CC120 W2 575 – Queens Parade junction in, still temporary bridging, substation under construction CC121 Forming Queens Parade Junction base slab CC122 W2 596 prior to tramway works – all tracks still in position CC123 It’s a mass of reinforcing – bridging being formed CC124 Looking north with substation being built CC125 Looking east with some rather tight curves, Wellington St still in use CC126 SW6 958 ex Wellington St with all tracks and signal box and buildings. CC127 Victoria Pde at Gisborne looking east – at least 4 cars CC128 SW6 893? With dash canopy lights and SW6 862 and a man with a newspaper CC129 SW6 894 on the S curves, with tram in Wellington St CC130 Similar photo CC131 W2 564 turning into Wellington St – the concrete tracks are not that old CC132 W2 552 running out of Wellington St CC133 W5 732 from Fitzroy St into St Kilda Road with next iteration in position – very wonky CC134 W5 764 turning into Fitzroy St CC135 SW6 947 turning from Wellington St CC136 W2 586 running out of High St CC137 W2 500 turning into Wellington St CC138 W2 543 in Wellington St inbound CC139 L103 with St Kilda Junction destination, and a tower truck on right CC140 Workmen – new track in Queensway in use CC141 Ditto CC142 L103 in Queensway, and another car in bound CC143 Looking east along Wellington St which has been taken out of use. Also a MMTB Roller CC144 W5 824 and a W2 and all types of wobbly temporary track CC145 W2 354 to High St CC146 Sw6 947 on the S bends CC147 W2 500 looking north – tram on the S bends CC148 SW6 896 leaving the S bend CC149 W2 357 and a MMTB City bus with trees/gardens on the side CC150 W5 817 Elliot Ave – see also CC302 CC151 W2 552 – note the large trolley bridge CC152 W2 550 at depot or workshops CC153 1B truck CC154 SW2 432 CC155 W2 155 at Glenhuntly CC156 SW6 937 on AETA tour? CC157 X2 677 on Footscray service – Ballarat Rd? CC158 W2 641 – High St Kew? CC159 SW6 847 – Power St Hawthorn CC160 Simpson St – big line up CC161 W2 546 truck No. 1? CC162 W2s at Glenhuntly depot CC163 No. 15 truck under 899 CC164 206 and other junk at Preston Workshops CC165 W in Swanston St Melbourne – Rose series card CC166 Y1 613 Batman Ave?? or William St at Collins CC167 Tram plans CC168 X 217 Swanston St – see also 95 and 96 CC169 217 in Swanston St – same as 95 CC169A 192 in St Kilda Road at Princes bridge CC170 192 in St Kilda Road at Princes bridge CC171 Bendigo 3 arriving Malvern depot – being unloaded CC172 Ditto CC173 T180 at a depot CC174 X1 463 wheel set CC175 C30 – dog car side view – close up CC176 C30 dog car CC177 206 and 30 at Preston Workshops CC178 X1 467 on a truck – see CC111 also CC179 42 CC180 42 at a depot, no destination box CC181 W2 556 1A type truck CC182 Flinders St Station – Rose Series CC183 W7 1035 Spring – Nicholson St CC184 W7 1022 MMTB Post Card CC185 Adelaide 178 – has on rear – R. Lilburn 4/82 CC186 Adelaide 175 – has on rear – R. Lilburn 4/82 CC187 Y1 610 on AETA tour CC188 Y1 610 on AETA tour with large group – Point Ormond CC189 AETA display – has GH55-32 in pencil on rear CC190 AETA display – has GH55-29 in pencil on rear CC191 Y1 610 on AETA tour with large group – Point Ormond CC192 VR 53 at Footscray CC193 VR cars 40 and 34 at Elwood wash dock CC194 W7 1024 as the 1970 Christmas tram CC195 Geelong – loading a set of 22E trucks CC196 Geelong 10 and 23 running an AETA special CC197 Geelong – AETA special CC198 Geelong 7 at Junction CC199 Geelong 10, in the city CC200 Geelong 33 with Belmont destination CC201 Geelong 15 Eastern Park destination 29-3-1948 CC202 Geelong 23 at Railway Station – 29-3-1948 CC203 Geelong 23 at Railway Station – 29-3-1948 CC204 Geelong – loading a bogie tram CC205 Geelong – loading a bogie tram CC206 Geelong 40 – loaded on truck CC207 Geelong 40 – on jacks CC208 Geelong 40 on jacks – 19 behind CC209 Geelong 38 with two workers on either side CC210 – 214 Australian Historic Tramways stamp folder and set CC215 Bendigo 17 at depot – has dup JBS on rear CC216 Bendigo 20, 29 bogie and straight sill car at Charing Cross CC217 Bendigo one man bogie Pall Mall CC218 Bendigo – Bogie 23, other cars and welding truck at depot CC219 Bendigo 7 with Quarry Hill destination CC220 Bendigo 21 with Lake Weerona destination CC221 ESCo 18 Ballarat CC222 Ballarat bogie 22 on AETA special CC223 Ditto CC224 Ballarat 34 at Stones Corner – R Lilburn CC225 Ballarat 15 in Bridge St – R Lilburn CC226 Ballarat 40 at Gardens – R Lilburn CC227 Ballarat 37 running out of depot – R Lilburn CC228 Postcard – Valentines – Sturt St with loaded horse tram trailer CC229 AETA Geelong tram tour ticket – 29-3-1948 CC230 Postcard – Geelong – Valentine 2114 – T&G building CC231 Postcard – PMTT ! – High St Malvern CC232 Postcard – Empire – Glenferrie Road, Malvern at Wattletree Rd CC233 Postcard Y469, MMTB CC234 Postcard Z2 Spring St CC235 Postcard – Z1 MMTB CC236 Postcard – Stamp Show W1 431 CC237 Postcard – Stamp show B2005 CC238 Postcard – Stamp show W6 982 CC239 Postcard – Valentines 1264 – Johnstone Park with tram in distance CC240 Postcard – Rose 10711 – Swanston and Lonsdale – Hospital and W232 CC241 Postcard – Rose 4827 – Fitzroy St St Kilda W2 362 and 548 CC242 Postcard – Valentines – 939 – St Kilda War Memorial, W and a R? CC243 Postcard – Valentines – 572 – St Kilda War Memorial, W 413 and 140? CC244 Postcard – Valentines – 938 – Uper and Lower Esplanade – L 104 CC245 Postcard – St Kilda Rd at Princes Bridge Y1 and W CC246 Postcard – Biscay BG82 – W5 814 - CC247 Postcard – Biscay 796112 – Bourke St looking west CC248 Postcard – Biscay 796109 – Bourke St looking east CC249 Postcard – Biscay 2AUS58 – Z5 Bourke St CC250 Postcard – Biscay BG 249 – Swanston St CC251 Postcard – National View – St Kilda Rd – shrine and Prince Henrys W2 405 CC252 Postcard – Nu color vue – 11 ML 156 – St Kilda Rd CC253 Postcard – Nu color vue – 11 ML 153 – Swanston St CC254 Postcard – Nu Color vue – Collins St 442 CC255 Postcard – Pitt card – Adelaide – H 364 at Victoria St CC256 Postcard – SPER L/P 154 CC257 Postcard – BTMS – 550 CC258 Postcard – SPER – Brisbane 295 CC259 Adelaide 131 at Burnside – has R Lilburn on card, c1911 CC260 Adelaide 194 CC261 Adelaide 235, with two crew, The News photo CC262 Rockhampton, outside post office – has source of photo details CC263 Sydney – 2086 and 2062 arriving Circular Quay CC264 Sydney – P class – Pitt St? CC265 Sydney – 1610 at Circular Quay CC266 Brisbane 99 and 468 CC267 Sydney with bridge behind CC268 Steam tram Paramatta Park – 103 CC269 Sydney – Museum Station =- Elizabeth St CC270 Sydney – weed burner 137S at a loop Demonstrates the work of Charles Craig in photography and collection of prints.Assembled album in a black presentation folder of 270 photographs from the Charles Craig Collection - 86 sleeves - part 1 of 2. All photographs have been scanned and placed on the Museum's G drive. A list of all photographs with details where possible has been compiled. Victorian Provincial, Launceston, Hobart and Sydney tram photos have been transferred to other Museums, image files retained.melbourne, tramways, tramcars, trams, charles craig, st kilda junction, trackworks -
 Melbourne Tram Museum
Album - Geoff Grant Photos, Geoff Grant, mid 1950s
Photo - see pdf file for further information. Number Brief Description GAG1 51 Sandringham GAG2 50 Sandringham GAG3 50 side Sandringham GAG4 Depot Sandringham_ GAG5 426 Camberwell Depot GAG6 822 St Kilda Rd GAG7 496 St Kilda Rd GAG8 347 Caulfield GAG9 440 Princes Bridge GAG10 190 Camberwell GAG11 190 Camberwell GAG12 Ys Camberwell GAG13 Interior Camberwell Depot GAG14 921 Camberwell GAG15 613 Camberwell Depot GAG16 613 front Camberwell Depot GAG17 887 Bourke St opening_ GAG18 888 Victoria St North Richmond GAG19 888 Victoria Pde GAG20 888 887 Malvern Depot GAG21 888 887 Malvern Depot GAG22 888 Victoria Pde GAG23 1033 North Fitzroy Depot GAG24 957 1033 Bourke St GAG25 1033 Nicholson St East Brunswick GAG26 1001 East Preston Depot GAG27 980 East Preston Depot GAG28 980 Dandenong Rd GAG29 Tower wagons Bourke St at Swanston St GAG30 Tower wagons Nicholson St GAG31 988 tower wagons Nicholson St GAG32 988 tower wagons Bourke St at Russell St GAG33 Albion Tower wagon Clifton Hill GAG34 988 tower wagon Bourke St at Russell St GAG35 988 East Preston Depot GAG36 Cleaner 7 Bourke St GAG37 988 turning from Nicholson St into Victoria Pde GAG38 991 Bourke St GAG39 View down Bourke St from 988 GAG40 988 Nicholson St GAG41 988 Smith St GAG42 988 High St GAG43 988 testing overhead Bourke St GAG44 1003 Nicholson St into Gertrude St GAG45 988 Clifton Hill GAG46 988 Nicholson St GAG47 988 1003 Nicholson St GAG48 988 Bourke St looking west from Elizabeth St GAG49 988 Bourke St looking east from Swanston St GAG50 988 1003 and tower wagons Nicholson St GAG51 988 Clifton Hill GAG52 988 East Preston Depot GAG53 190 Etched saloon door window Yields infomation about VR Tramways, Bourke Street trams and AETA tours. Geoff Grant was a Herald Sun photographer.Assembled album in a black presentation folder of 53 photographs from the Geoff Grant Collection - 27 sleeves All photographs have been scanned and placed on the Museum's G drive. A list of all photographs with details where possible has been compiled. tramways, trams, sandingham, camberwell depot, bourke st, new tramways, tower wagons, tours, victoria parade, east preston, aeta tours -
 Melbourne Tram Museum
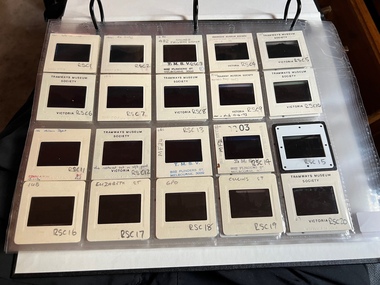
Album - Ron Scholten Slide Collection, Ron Scholten
Photo - see pdf file for further information. Number Brief Description RSC1 PCC 1041 at the gates of Preston Workshops on a test run without it’s trolley retriever RSC2 PCC 1041 in Glenhuntly Road on Route 67 en route to Carnegie crossing the Railway Gates at Glenhuntly Station RSC3 W2 482 stored at Malvern Depot with Olympic Park on the Destination RSC4 Cable Car Set 64 in Swanston St outside Princess Bridge Station in Bound with open top Double Deck Bus, Trak Motors ? Departing from Flinders St Station RSC5 W3 669 in St George Rd at Sumner St en route to Preston Workshops for scrapping RSC6 Cable Car in Lygon St en route to Carlton RSC7 PCC 1041 turning from St Georges Rd into Miller St to enter Preston Workshops RSC8 Flinders St Station with cable cars RSC9 PCC 1041 in strife on it’s maiden day in service. Trams on route 88 delayed in Queens Parade Clifton Hill RSC10 Flinders St at William St with Cable Cars RSC11 L 104 on the fan of the new shed at Malvern Depot on a TMSV tour RSC12 Cable Set 1 after it’s restoration at Preston Workshops on the fan near the front gate RSC13 X1 466 at a suburban terminus of the Footscray System RSC14 X2 680 at Point Ormond Terminus RSC15 An ex Launceston Tram at the outside terminus of the Penny Royal Complex Tramway in Launceston RSC16 Q 148 at Preston Workshops awaiting disposal RSC17 Elizabeth St with Cable Cars RSC18 Elizabeth and Bourke St corner outside the GPO with cable cars RSC19 Collins St with Cable Cars RSC20 A photo taken from the observation deck of the ICI building showing a view of Parliament house with a w class tram in Nicholson St RSC21 Auburn Horse car with a posed photo of all the tramwaymen employed RSC22 Cheltenham Double Deck Horsecar with a full load of passengers RSC23 City of Northcote cable trailer 3 at a terminus RSC24 City of Northcote Cable cars passing in High St Northcote RSC25 St Kilda Rd at Princes Bridge with Cable Cars RSC26 Flinders St with Cable Cars RSC27 Cable Cars RSC28 Bourke St looking towards Elizabeth St from Queen St RSC29 Cable cars in Bourke St at Elizabeth St looking East RSC30 Cable cars in Elizabeth St at the terminus at Flinders St RSC31 Cable cars in Bourke St at Swanston St looking west RSC32 Cable cars in Swanston St at Flinders St looking North RSC33 Cable cars in Collins St near Russell St RSC34 Cable cars in Elizabeth St at Bourke St RSC35 Cable cars in Collins St at Elizabeth St RSC36 Cable Cars in Swanston St at Flinders St RSC37 Cable cars in Collins St RSC38 Cable Cars RSC39 Cable cars in St Kilda Rd near Princes Bridge RSC40 Cable cars in Collins St East of Swanston St RSC41 Cable cars in Spring St outside Parliament house RSC42 K 92 in M&MTB Chocolate and cream livery but with a P&MTT Destination box on Route 14 RSC43 Thornbury depot viewed from Miller St and St Georges rd. Two W2 class cars are laying over between the peaks RSC44 Z3 201 in Met Livery passes D1 3510 in new M Tram livery. A Staff member in uniform stands in the doorway. Dandenong Rd RSC45 D1 3530 advertising Heinekin Super Golf on Route 55 in Royal Park RSC46 D1 3504 in M Tram livery on the reserved track in Matthews Ave near Essendon Airport showing Route 81 Travancore . I suspect it is a private enthusiasts charter due to the Malvern W class run number in the rear windscreen RSC47 D1 3504 on Route 64 in Dandenong Rd in M Tram Livery RSC48 D1 3504 in M Tram Livery at Airport West Terminus RSC49 D1 3504 in M Tram Livery in Union Rd outside the Showgrounds RSC50 D1 3504 at West Maribyrnong Terminus in M Tram Livery RSC51 D1 3503 in M Tram Livery in Malvern Depot RSC52 SW6 960 and VR 53 in Harbour Esplanade for the NMEL&T Co Centenary RSC53 Hawthorn Tramways Trust 32 in Harbour Esplanade for the NMEL&T Co Centenary RSC54 VR 53 & B 2042 in Harbour Esplanade for the NMEL&T Co Centenary RSC55 VR 53 & C 3016 in Harbour Esplanade for the NMEL&T Co Centenary RSC56 NMEL&T Co 13 usually V214 in Harbour Esplanade for the NMEL&T Co Centenary RSC57 NMEL&T Co 13 usually V214 at Preston Workshops for the NMEL&T Co Centenary RSC58 Hawthorn Tramways Trust Lettering on HTT 32 in Harbour Esplanade for the NMEL&T Co Centenary RSC59 Hawthorn Tramways Trust 32 in Harbour Esplanade for the NMEL&T Co Centenary RSC60 Hawthorn Tramways Trust 32in Harbour Esplanade for the NMEL&T Co Centenary RSC61 Hawthorn Tramways Trust 32 in Harbour Esplanade for the NMEL&T Co Centenary RSC62 NMEL&T Co 13 usually V214 at Preston Workshops for the NMEL&T Co Centenary RSC63 W2 516 and another on route 59 wait to shunt at Essendon Airdrome Terminus as W2 571 on route 49 departs. This was the last day of operation. RSC64 Australia’s First Electric Tram at Box Hill with Tramwaymen including H J Hilton who is in the centre RSC65 W2 484 en route to St Kilda Junction and another wait for passengers after a race meeting at Caulfield Racecourse RSC66 X1 463 on the Footscray system en route to Russell St RSC67 Geelong 35 on Chilwell Route, Formerly HTT 13, M&MTB 119, then Bendigo 1 and Ballarat 37 RSC68 P&MTT 4 on Opening Day of the system in Glenferrie Rd RSC69 Bendigo 6 in McCrae St near the Depot end route to North Bendigo RSC70 P&MTT 4 in Glenferrie on opening day of the System RSC71 Scrubber 3 stripped and awaiting scrapping at Preston Workshops RSC72 Scrubber 4 at South Melbourne Depot RSC73 Q 191 & 139 at Preston Workshops awaiting scrapping RSC74 Rail Grinder 3 at Preston Workshops as purchased from Sydney RSC75 Y 469 waits to shunt at Wattle Park Terminus as Y1 613 departs on driver training duties RSC76 VR 53 on the outside roads at Essendon Depot RSC77 W5 796 with three doors and square windows running out of Brunswick Depot in Cameron St, with a supplementary destination board showing “City via Swanston St” RSC78 W2 258 on the wheel grinder road at Brunswick depot RSC79 X2 676 on a TMSV tour, W5 817 & 836 & VR 53 on the open roads at Essendon Depot RSC80 PCC 1041 on test, passes W71035 in High St Preston RSC81 D1 class production number 7 as delivered on test in Matthews Ave RSC82 W2 383 on route 5 turning from the reserved track in Dandenong Rd into St Kilda Rd at St Kilda Junction RSC83 Z3 204 as advertising tram for Vodaphone Grand Prix running into Malvern Depot new shed RSC84 Z1 4 on test in St Georges Rd RSC85 PCC 1041 on Route 96 in Burke St near Exhibition St RSC86 Z1 3 without numbers on test turning from Miller St in St Georges Rd RSC87 Track components stored in Coldblo Rd at Malvern Depot with Z class cars adjacent RSC88 D1 3501 in M Tram Livery on Route 55 in Peel St at Franklin St RSC89 C 3001 in Yarra Trams Livery Porto 018 & D13502 in M Tram Livery on Display in Harbourside Esplanade RSC90 D1 class tram production number 7, in as delivered condition on test in Matthews Ave RSC91 D1 3503 inside Malvern Depot RSC92 SW6 955 and W6 974 in St Kilda at City Rd at Dusk RSC93 Freight Car 19 at Preston Workshops in green Livery RSC94 Rail Grinder 3 in green Livery at South Melb Per Way Yard RSC95 A SW6 class car on route 50 shunting at Elizabeth St Terminus at night, taken from Flinders St Station RSC96 W2 588 & 435 in St Kilda Rd at Batman Ave RSC97 Y1 613 in service at Wattle Park Terminus RSC98 W2 588 in Wellington Parade en-route to the City with a Grand Final Load of passengers followed closely by 384 RSC99 W2 558 on a MCG Footy Special entering the Simpson St sidings RSC100 W3 657 & an L Class in the new shed at Malvern Depot RSC101 Y1 613 in St Kilda Rd on an enthusiasts tour in St Kilda Rd south of St Kilda jun RSC102 Y1 613 on an enthusiasts tour in Clarendon St with the two extra tracks on the Viaduct under construction RSC103 W6 976 on the fan of the new shed at Malvern Depot RSC104 W7 1024 as an advertising car for Bank of NSW at the route 1 terminus at South Melb Beach RSC105 PCC 980 on route 96 in Nicholson St near North Fitzroy Depot RSC106 SW6 890 with dash canopy lighting in Market St on the opening day of William St Services RSC107 W2 444 with big numbers heads a line of footy specials in Simpson St Sidings RSC108 Cable Cars in Elizabeth St RSC109 NMEL&T co 2 with a trailer outside the power station in Mount Alexander Rd RSC110 Alf Twentyman’s cable car set in his Northcote backyard RSC111 Cable Cars in Queens Parade Clifton Hill RSC112 Cable cars in Collins St outside the Townhall RSC113 PCC 1041 at Carnegie terminus RSC114 Cable cars in Elizabeth St RSC115 Cable cars in Collins St near Swanston St RSC116 HTT 19 turns from Riversdale Rd into Camberwell Rd at Camberwell Junction RSC117 W1 419 official builders photo of first car of the class RSC118 Cable car with a full load of passengers RSC119 W1 422 illuminated for the visit of T.R.H. The Duke and Duchess of York RSC120 PCC 1041 in strife on it’s maiden day in service. Trams on route 88 delayed in Queens Parade Clifton Hill RSC121 Bendigo birney in Finn St near North Bendigo terminus RSC122 SW6 in St Kilda Rd at Domain Rd at night RSC123 All 3 of Alf Twentyman’s cable cars in his Northcote backyard RSC124 Cable trailer 256 being unloaded into the shed at Bylands RSC125 Cable grip car 1 being removed from the Melbourne Museum RSC126 Alf Twentyman's cable cars in his Northcote Backyard RSC127 Alf Twentyman's cable cars in his Northcote Backyard RSC128 Alf Twentyman's cable cars in his Northcote Backyard RSC129 Alf Twentyman's cable cars in his Northcote Backyard RSC130 W class car in Swanston St at Collins St RSC131 Y1 469, L & W3 on the run out of Glenhuntly Depot on a tour RSC132 W7 1024 as an advertising tram for Bank of NSW at Clifton Hill RSC133 W2 496 on a footy special in Simpson St Sidings RSC134 W2 as originally converted to a test car at Preston Workshops RSC135 W3 667 in Brunswick Depot with Ellen Butland at the controls RSC136 W3 669 on it’s final run at Victoria Prd & Brunswick St RSC137 W2 571 in Wellington Prd at Clarendon St with a Footy Final load of Passengers RSC138 Y1 613 shunts at Spencer St Terminus as X217 waits on Australia Day Pageant RSC139 PCC 1041 on Rt 96 in Burke St outside the Southern Cross Hotel RSC140 890 with accident damage on the outside roads at Preston Workshops c1978 RSC141 535 on Rt 4 at the old St Kilda Jun c1967 RSC142 1041 on Rt 88 turns from Bourke St into Spring St 1973 RSC143 102 on a tour at Albert Park Beach Terminus Feb 1972 RSC144 833, 835 & 834 in the shed at Malvern Depot c1976 RSC145 281 in Wellington Parade on a football very crowded special c1974 RSC146 464 Ballarat Rd 1960 RSC147 181 Explosives Fty - at Footscray Station - July 1960 RSC148 181 Williamstown Road 1960 RSC149 Cable car set at Alf Twentyman’s c1970 RSC150 X 217 at Malvern Depot c1970 RSC151 X1 465 and T181 Footscray Football ground in Barkly St. c1960 RSC152 Scrubber 5 at South Melbourne depot c1960 RSC153 X1 465 Footscray to Russell St, c1960 RSC154 X1 467 Leeds St Footscray 1960 RSC155 PMTT 4 Glenferrie Road, 1910 RSC156 S 164 at Malvern Depot c1970 RSC157 T178 Footscray c1960 RSC158 Cleaner No. 7 at South Melbourne depot c1960 RSC159 Two Y classes at Princes Bridge / Batman Ave mid 1950s RSC160 Swanston St – Nu color vue slide – M142 Demonstrates the work of Ron Scholten in photography, collection and/or production of duplicate slidesAssembled album in a black presentation folder of 160 colour slides, 8 slide sleeves, collected or produced by Ron Scholten. Many are TMSV or Windsor Publications slides. All photographs have been scanned and placed on the Museum's G drive. A list of all photographs with details has been compiled. melbourne, tramways, trams, cable trams -
 Melbourne Tram Museum
Album - David Frost Slide Collection, David Frost
Photo - see pdf file for further information. Number Brief Description date DFC1 A general view from the former railway platform at Port Melb Station looking towards Station Pier on opening day 20-12-1987 DFC2 A2 285 in the Tramway Platform at Port Melbourne Station on opening Day 20-12-1987 DFC3 A2 285 in the Tramway Platform at Port Melbourne Station on opening Day 20-12-1987 DFC4 A2 285 in the Tramway Platform at Port Melbourne Station on opening Day 20-12-1987 DFC5 A2 273 at St Kilda Tramway Station on opening day 22-11-1987 DFC6 A2 273 turning from Fitzroy St into St Kilda Tramway Station on opening day 22-11-1987 DFC7 B1 2001 at St Kilda Tramway Station turning into Fitzroy St on opening day 22-11-1987 DFC8 B1 2002 enters St Kilda Tramway Station on opening day 22-11-1987 DFC9 An A2 approaches St Kilda Tramway Station on opening day 22-11-1987 DFC10 Concreting the connecting curve from Fitroy St into St Kilda Station c July 1987 DFC11 An MTA AEC MKVI bus in Grey St St Kilda at Dalgety St with Tramway works in the background c July 1987 DFC12 Grey St St Kilda at Dalgety St with Tramway works in the background in Fitzroy St c July 1987 DFC13 Concreting the connecting curve from Fitroy St into St Kilda Station c July 1987 DFC14 Restaurant Tram 442 in Fitzroy St at Grey St Passing MTA bus 59 outside St Kilda Station c1986 DFC15 Former VR tram stop sign painted on a pole at Glenhuntly Rd & Broadway DFC16 Former VR Elwood Tram Depot under demolition 1996 DFC17 Former VR Elwood Tram Depot under demolition 1996 DFC18 Former VR Elwood Tram Depot under demolition 1996 DFC19 Former VR Elwood Tram Depot under demolition 1996 DFC20 Former VR Elwood Tram Depot under demolition 1996 DFC21 Former VR Elwood Tram Depot under demolition 1996 DFC22 Former VR Elwood Tram Depot under demolition 1996 DFC23 Former VR Elwood Tram Depot under demolition 1996 DFC24 MTS Tower waggon in use at the former VR Elwood Tram Depot under demolition 1996 DFC25 A Sign advertising the sale of the Former VR Elwood Tram Depot – 10/8/1996 1996 DFC26 Former VR Elwood Tram Depot under demolition 1996 DFC27 Interior of a shed at the former VR Elwood Tram Depot under demolition 1996 DFC28 Former VR Elwood Tram Depot under demolition 1996 DFC29 Former VR Elwood Tram Depot under demolition 1996 DFC30 Former VR Elwood Tram Depot under demolition 1996 DFC31 VR 20, former breakdown car in Bob Prentice’s Back Yard Jan 1974 DFC32 VR 20 on a low loader en route to Bob Prentice’s for preservation 1959 DFC33 VR 20 as the breakdown car on the St Kilda Electric Street Railway c1955 DFC34 VR 39 waits in St Kilda St as breakdown car 20 enters Elwood Depot c1955 DFC35 VR 54 and 50 in the rear yard of Elwood Depot c1958 DFC36 VR 50 in the rear yard of Elwood Depot c1958 DFC37 VR 50 in the rear yard of Elwood Depot c1958 DFC38 VR 28 in St Kilda St outside Elwood depot after the line had been cut back to this point c1958 DFC39 VR 29 in St Kilda St outside Elwood depot after the line had been cut back to this point c1958 DFC40 VR 35 passes 28 on the St Kilda Electric Street Railway c1955 DFC41 VR 39 on the St Kilda Electric Street Railway c1955 DFC42 Y1 613 on a tour c1970 DFC43 VR 54 in St Kilda St outside Elwood Depot c1955 DFC44 VR 28 at Brighton Beach Terminus c1955 DFC45 VR 33 being washed in the wash bay at the rear of Elwood Depot c1955 DFC46 VR 20 breakdown car running into Elwood Depot c1955 DFC47 VR 3 in the rear yard at Elwood Depot c1955 DFC48 VR 51 on an AETA Tour running out of Elwood Depot c1958 DFC49 VR 28 on the St Kilda Electric Street Railway c1955 DFC50 VR 28 with crew in St Kilda St outside Elwood depot after the line had been cut back to this point 1959 DFC51 VR 52 in Grey St near Fitzroy St c1958 DFC52 VR 51 on a AETA Tour passes 33 in Grey St near Fitzroy St c1958 DFC53 VR 29 in Grey St near Fitzroy St c1958 DFC54 VR51 on an AETA Tour shunts as 52 waits on the St Kilda Electric Street Railway c1958 DFC55 VR 51 on the Black Rock Electric Street Railway c1955 DFC56 VR 28 in St Kilda St outside Elwood depot after the line had been cut back to this point c1958 DFC57 Combined Rail-Tram Tickets of the Black Rock Electric Street Railway Feb 1975 DFC58 Combined Rail-Tram Tickets of the St Kilda Electric Street Railway Feb 1975 DFC59 Electric Street Railway & Motor Coach Paper Tear off Tickets Feb 1975 DFC60 VR 52 & 53 on Rt 82 pass in Cordite Ave near Wests Rd Sept 1975 DFC61 Z 68 & 52 in East Preston Depot in M&MTB Livery c1977 DFC62 Copy photo of VR 18 in Elwood Depot c1910 DFC63 VR 51 as a one man car at Black Rock Terminus c1955 DFC64 VR 53 on Rt 82 in Droop St Footscray Jan 1974 DFC65 B2 2027 on Rt 96 in South Melb Station c1988 DFC66 VR 20 as preserved in Bob Prentice’s backyard High St Prahran Jan 1974 DFC67 VR 700 on Rt 82 in Droop St Footsray c1978 DFC68 VR 28 as the last car from ST Kilda Station 28-2-1959 DFC69 VR 700 at the Rt 82 Moonee Ponds Terminus c1978 DFC70 VR 52 waiting time at the Rt 82 Footscray Terminus, the driver intently stares at the bundy clock as the Braid and the Connie gossip Jul 1972 DFC71 VR 54 shunting outside Elwood Depot to return to St Kilda Station 1959 DFC72 SW6 969 in MTA Livery blocking the entrance to South Melb Depot presumably during the scratch ticket dispute Jan 1990 DFC73 VR 52 & 53 on Rt 82 pass in Droop St Footscray Sept 1975 DFC74 VR 700 after withdrawl in the Newport Railway museum in the process of a repaint c1985 DFC75 VR 700 after withdrawl in the Newport Railway museum in the process of a repaint c1985 DFC76 VR 700 on Rt 82 in Droop St Footsray at The Cresent c1978 DFC77 VR 700 on Rt 82 in Droop St Footsray c1978 DFC78 Former VR tram depot in use as an MTA Bus depot c1990 DFC79 VR 52 waiting time at the Rt 82 Footscray Terminus Jul 1972 DFC80 VR 52 waiting time at the Rt 82 Footscray Terminus with Connie changing the pole Jul 1972 DFC81 VR 52 at the Rt 82 Moonee Ponds Terminus with the crew chatting 7-12-1974 DFC82 VR 52 on Rt 82 on the reserved track in Raleigh Rd Ascot Vale Jan 1974 DFC83 VR 53 on Rt 82 in Leeds St Footscray about to turn into Hopkins St April 1976 DFC84 VR 53 on Rt 82 in Droop St Footsray Jan 1974 DFC85 VR 700 on Rt 82 in Droop St Footsray at Hopkins St c1978 DFC86 Z 52 in MTA livery on Rt 19 in Elizabeth St near Bourke St c1985 DFC87 VR 52 at the Rt 82 Moonee Ponds Terminus Jul 1972 DFC88 VR 53 at the Rt 82 Footscray Terminus Jan 1974 DFC89 VR 52 freshly outshopped from the workshops and W7 1011 at the Bourke St Terminus with 52 on display for the 1968 railway exhibition 1968 DFC90 Painting of W class 369 in Chocolate & Cream c1930 DFC91 Charing Cross, Bendigo at night c1965 DFC92 Ballarat ? c1965 DFC93 Bendigo 18 on an AETA tour in McCrae St near Tramway Ave c1965 DFC94 View from the roof of a tram in the body shop at Preston Workshops 1977 DFC95 View from the roof of a tram in the body shop at Preston Workshops 1977 DFC96 View from the roof of a tram in the body shop at Preston Workshops showing the panto on 546 1977 DFC97 Interior view of Carlton Control Centre showing desk and wall panel c1968 DFC98 W2 493 on Rt 55 in Kingsway outside South Melb Depot Aug 1973 DFC99 W2 496 in Sturt St at Kingsway on Rt 1 Jul 1973 DFC100 Z class truck c1975 DFC101 Z3 116 in Bourke St at King St as new c1979 DFC102 Bob Prentice on tour c1968 DFC103 SW6 900 as an advertising tram for Newsday at night 1969 DFC104 597 Jul 1973 DFC105 W2 480 on Rt 3 passing under the railway bridge at Caulfield Oct 1972 DFC106 Interior view of Carlton Control Centre showing desk c1968 DFC107 SW6 856 on Rt 77 at night Jul 1973 DFC108 W2 496 in Sturt St at Kingsway on Rt 1 Jul 1973 DFC109 PCC 980 on a tour at South Melb Depot c1968 DFC110 SW6 856 on Rt 77 at night Jul 1973 DFC111 View from the roof of a tram in the body shop at Preston Workshops showing the panto on 546 1977 DFC112 Dandenong Rd from Chapel St Nov 1968 DFC113 A Z class car turns from Gertrude into Nicholson St c1990 DFC114 SW6 900 as an advertising tram for Newsday at night 1969 DFC115 Port Melbourne Station showing Centennial bridge and station building prior to closure. 10-1987 DFC116 Port Melbourne station with train prior to closure, looking south 10-1987 Demonstrates the work of David Frost in photography and or collecting slides.Assembled album in a black presentation folder of 116 colour slides, 6 slide sleeves, collected or photographed by David Frost. Many are TMSV or Windsor Publications slides. All photographs have been scanned and placed on the Museum's G drive. A list of all photographs with details has been compiled. melbourne, tramways, trams, vr trams, elwood, st kilda light rail, port melbourne, opening, elwood depot, buses -
 Melbourne Tram Museum
Album - Compiled by David Frost - VR trams etc, David Frost, 2005
Page 1 - postcards and notes on the Alf Twentyman's preserved cars. 2 - VR tram 41 at Bendigo 2001 and two VR tram tickets 3 - VR 41 at Sandringham station - night photo 4 & 5 - VR 41 at Bendigo 6 & 7 - VR 41 at Bendigo 8 & 9 - photo copies of VR railway - tram tickets 10 - 11 - photo copies of VR railway - tram tickets and photo of VR 41 at North Bendigo. 12 - Photo of David Frost selling a ticket to David Vendy, Mayor of Ballarat at the time - July 2002 13 & 14 Two Melbourne tram postcards and tram tickets 15 - 18 - Four Peter Gerasimon greeting cards featuring Melbourne trams, 19 - Ballarat tramway postcard and cable saloon trailer 171 being loaded for Portland - July 2002. 20 - three photos of David Frost at Bylands rear cover - photos of VR 41 and VR 53 at Bendigo.Illustrates the work of David Frost and his interest in VR trams.Photo Album - 10 heavy card sheets with plastic sheets over each, white plastic ring bound, covered with a large photograph of Alf Twentyman's cable cars at Northcote. See 3086 for an unused version.cable cars, vr trams, alf twentyman, david frost, vr 41, bendigo, tickets, postcards, peter gerasimon, trams, tramways -
 Ballarat Tramway Museum
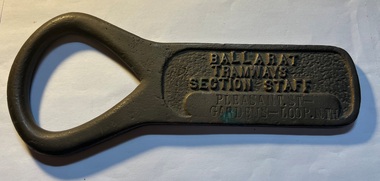
Functional object - Section Staff, Electric Supply Co. of Vic (ESCo), "Pleasant St Gardens - Loop Nth"
Used as a means of authorising a tramcar to have sole use of the track between the named points to avoid head-on collisions. Safeworking object - known as a section staff. Not known when made, but in use, until the introduction of the electric signalling in the mid 1930's by the SEC. See also Reg Items 934 and 988 for details of use and other examples are at 1851, 52 and 53, 2473 and 4444 to 4448 , 4996 and 4497 and Reg item 934 and 988 for articles on the safeworking systems.Demonstrates aspects of Safeworking on the Ballarat Tramway system used to c1936 when replaced by electric signals. Yields Information about the operation of Ballarat's trams and safeworking procedures.Cast brass item with a flat part recessed section with the words "BALLARAT TRAMWAYS SECTION STAFF" cast into the surface and a flat section underneath, flush with the outside edges in which the words "PLEASANT ST - GARDENS LOOP NTH. " stamped in. Has an open rounded end which forms a handle or a point where it could be hung on a peg.tramcars, tramways, staff, safeworking, tramway staffs, sec, esco -
 Melbourne Tram Museum
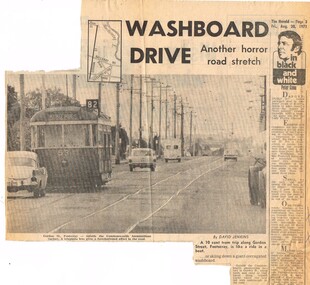
Newspaper, The Herald, "Washboard Drive - Another horror road stretch", 20/08/1971 12:00:00 AM
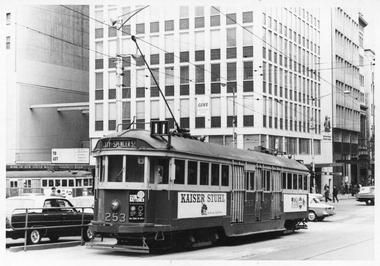
Newspaper clipping The Herald, 20/8/1971 titled "Washboard Drive - Another horror road stretch", about the condition of the pavement surface in Gordon St Footscray - like travelling on a corrugated washboard. Has a photo of No. 53, with the destination of Moonee Ponds - taken with a telephoto lens.trams, tramways, gordon st, trackwork, footscray -
 Melbourne Tram Museum
Ephemera - Ticket/s, The Met, Block of The Met, Check tickets, Zone 1, 1995
Block of The Met, Check tickets, Zone 1, issued in conjunction with the use of a prepaid short trip ticket. Green printing on white paper with the numbers 1 to 30 along the sides. Has the 2nd generation The Met logo. Ticket numbers H130507 to 130550. Block stapled with two staples to a sheet of cardboard and paper retaining strip along the top edge. See Reg items 53, 975 and 1041 for associated information and their use.trams, tramways, check ticket, short trip tickets, the met, tickets -
 Melbourne Tram Museum
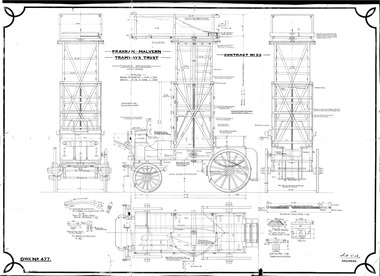
Drawing, Prahran & Malvern Tramway Trust (PMTT), "Prahran and Malvern Tramways Trust Tower Wagon Horse Drawn - Drawing No. 477 - Contract No.53", 1916
Blueprint of drawing No. 477 - "Prahran and Malvern Tramways Trust Tower Wagon Horse Drawn - Drawing No. 477 - Contract No.53", showing the detail construction of the tower truck, both wooden and metal parts for the PMTT. Drawn by CC 19.6.14 and signed of A. S. Dix. Scanned in a high res tif file March 2016.In blue pencil on rear "Tower Wagon" and in bottom right corner "P&MTT Horse Drawn Tower Wagon Drg 477 19/06/1914. Found by John Prideaux, in MMTB / MTA Dumpmaster bin - former MTO building Bourke St City c1991".trams, tramways, tower wagon, pmtt, tower truck, horse drawn vehicle -
 Melbourne Tram Museum
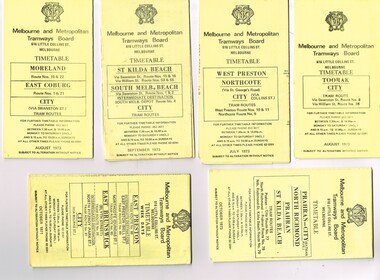
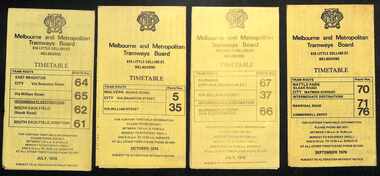
Ephemera - Timetable/s, Melbourne & Metropolitan Tramways Board (MMTB), "MMTB Tram Timetables", 1971 and 1973
Set of 20 MMTB Tram timetables, folded sheets, generally 10 sections, providing timetables for specific routes, day of week giving information on tram times at specific time points, route map, sections and fares and organisation address - 616 Little Collins St. Melbourne. All printed on yellow paper unless noted otherwise. .1 - Route 8 and 38, Toorak - City - August 1973 .2 - Route 9, 10 and 11, West Preston, Northcote - City - July 1973 .3 - Route - 1, 2, 4, 15, 16, 53, 55 - St Kilda Beach, south Melbourne Beach - City - September 1973 .4 - Route 1, 21, 15, 22 - Moreland, East Coburg - City - August 1973 .5 - Route 77, 78, 79 - Prahran - City, North Richmond, St Kilda Beach - October 1973 .6 - Route 88, 89, 90, 97 - East Preston, East Brunswick - City - October 1971 .7 - ditto - printed on green paper for Saturdays and Sundays. .8 - Route 59 - Essendon - City - June 1961 .9 - Route 8 - Toorak - City - Oct 1961, printed on yellow paper .10 - Routes 48, 40, 41, 37 and 74, 75, 76, 28 - North Balwyn or Burwood to City - March 1972 lists all the short routes by name and printed on yellow paper. .11 - Route 55, 56 and 68 - West Coburg - City or Domain Road - March 1972 - printed on yellow paper. .12 - Routes 48, 24, 40, 41, 29, 74, 75, 76 and 28 - North Balwyn or Burwood to City - March 1976 - printed on yellow paper. .13 - as for .12, Saturdays and Sundays - printed on green paper, ,14. - Route 19, 20 and 18 - Coburg - March 1972 - includes connecting bus to Upfield ,15 - Routes 1, 21, 15 and 22 - Moreland and East Coburg - March 1972 .16 - Routes 64, 65, 62 and 61 - East Brighton - June 1973 .17 - Route 3 - East Malvern - June 1973 ,18 - Route 5, 35 - June 1973 .19 - Route 82 - Footscray - Moonee Ponds - Oct. 1974 - bus Saturday afternoons and Sundays .20 - Route 67, 37 and 66 - Carnegie - June 1973trams, tramways, mmtb, timetables, melbourne, upfield, fares, route 1, route 2, route 3, route 4, route 5, route 8, route 9, route 10, route 11, route 15, route 16, route 18, route 19, route 20, route 21, route 22, route 38, route 35, route 37, route 53, route 55, route 66, route 67, route 77, route 78, route 79, route 88, route 89, route 90, route 96, route 97, route 59, route 48, route 40, route 41, route 37, route 74, route 75, route 76, route 82, route 28, route 55, route 56, route 68, route 29, route 24 -
 Melbourne Tram Museum
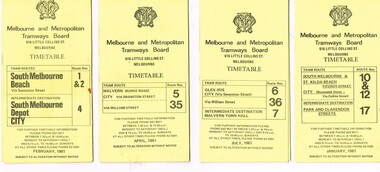
Ephemera - Timetable/s, Melbourne & Metropolitan Tramways Board (MMTB), "MMTB Tram Timetables", 1981
Timetables for specific routes, day of week giving information on tram times at specific time points, route map, sections and fares and organisation address - 616 Little Collins St. Melbourne. All printed on yellow paper unless noted otherwise. .1 - Route 10, 12, 17 - South Melbourne - St Kilda Beach - city - Jan. 1981 .2 - Route 5, 35 - Malvern - City .3 - Route 6, 7, 36 - Glen Iris - City - July 1981 .4 - Route 1, 2, 4 - South Melb. Beach - City - Feb. 1981 .5 - Route 70, 71, 76 - Wattle Park - City - April 1981 .6 - Route 72, 32, 73 - Camberwell - city - April 1981 .7 - Route 77, 78, 79 - Prahran - city, North Richmond - St Kilda Beach - April 1981 .8 - Route 82, Footscray - Highpoint West - Moonee Ponds - Bus route 223, Saturday afternoons and Sundays - Jan. 1981 9 - Route 15 & 16, 53 & 55 - St Kilda Beach - Via Swanston St or William St - Feb. 1981 10 - Routes 6, 36 and 7 - Glen Iris, July 1981Yields information about MMTB Tram timetables 1981Set of 10 MMTB Tram timetables, folded sheets, generally 10 sections, trams, tramways, mmtb, timetables, melbourne, fares, bus replacement, route 1, route 2, route 3, route 4, route 5, route 6, route 7, route 10, route 12, route 17, route 32, route 35, route 36, route 70, route 71, route 72, route 73, route 76, route 77, route 78, route 79, route 82, route 223, route 15, route 16, route 53, route 55 -
 Melbourne Tram Museum
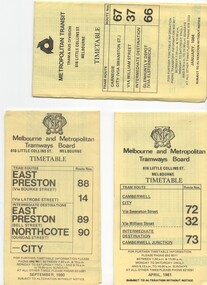
Document - Timetable/s, Melbourne & Metropolitan Tramways Board (MMTB), "MMTB Tram Timetables", 1980 - 1984
Set of 13 MMTB Tram timetables, folded sheets, 10 sections, providing timetables for specific routes, day of week giving information on tram times at specific time points, route map, sections and fares and organisation address - 616 Little Collins St. Melbourne. .1 - Route 72, 32 and 73 - Camberwell City via Swanston St (72), via William St (32) and Camberwell Junction (73) printed on yellow paper, dated April 1981 .2 - Route 88, 14, 89 and 90 - East Preston via Bourke St (88), via Latrobe St (14), East Preston Bell St (89) and Northcote Dundas St (90) to the city, printed on yellow paper, dated September 1980. .3 - Route 67, 37 and 66 - Carnegie - City via Swanston St (67), via William St (37) and Glenhuntly Depot (66) - printed on yellow paper, dated Jan. 1984 -has the Metropolitan Transit Logo. .4 - Route 70, 71 and 76 - Wattle Park - Nov 1979 .5 - Route 77, 78 and 79 - Prahran - City, Prahran - North Richmond - Nov 1979 .6 - Route 82 and 223 - Footscray - Moonee Ponds - tram and bus - Jan 1981 .7 - Route 1, 2, 4 - South Melbourne Beach - Feb 1981 .8 - Route 5 and 35 - Malvern - April 1981 .9 - route 70, 71, 76 - Wattle Park - April 1981 .10 - Route 15, 16, 53 and 55 - St Kilda Beach - Feb 1981 .11 - Route 6, 36. 7 - Glen Iris - July 1981 .12 - Route 59, 49, 51, 52, 82 - Essendon Airport March 1982 .13 - Route 48, 24, 40, 41, 29 North Balwyn - March 1982trams, tramways, mmtb, timetables, melbourne, fares, route 1, route 2, route 4, route 5, route 6, route 7, route 14, route 15, route 16, route 24, route 29, route 32, route 35, route 36, route 37, route 40, route 41, route 48, route 49, route 51, route 52, route 53, route 55, route 59, route 66, route 67, route 70, route 71, route 72, route 73, route 76, route 77, route 78, route 79, route 81, route 82, route 88, route 89, route 90, route 223 -
 Melbourne Tram Museum
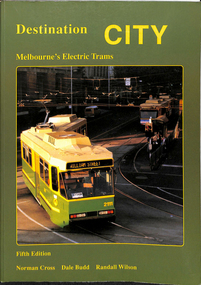
Book, Norm Cross, Dale Budd, Randall Wilson, Ian Hammond, "Destination City", "Destination City - 1993 - Victorian Railways Trams", 1993
1986.1 - Book - "Destination City" with subtitle "Melbourne's Electric Trams" - 128 A4 pages + card , printed on gloss paper - 7 sections, perfect bound, describes Melbourne's tram car fleet. Includes brief description of each type, photographs and a summary history, including the Victorian Railway's trams. Has many photographs of the various tramcars associated with relevant text. On front cover is a photo of Z3 at the Burwood terminus. Written by Norm Cross, Dale Budd and Randall Wilson as editors, published by Transit Australia Publishing. Has two maps, north and south of Melbourne, printed on the inside card covers. Pages 92, 93, 96, 98 - 103 have been annotated by Lloyd Rogers - see htd1986i1.pdf - red and blue ink. - giving corrections and notes. 1986.2 - 8 pages of typed and handwritten notes - photocopied with "Comments by Lloyd Rogers Jan. 1 1994" on bottom of each sheet - giving page by page notes - see htd1986i2.pdf for a scan of these notes. Includes notes on the paint scheme for VR. 53 and a copy of a memo from the Rolling Stock Engineers Office, dated 22/6/1942 titled "Construction 3 - 45 feet tram cars" giving instructions re the paint colour schemes.trams, tramways, melbourne, tramcars, mmtb, vr trams -
 Melbourne Tram Museum
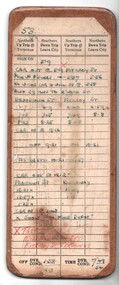
Administrative Record - Table Cards, Melbourne & Metropolitan Tramways Board (MMTB), Table card for Run 53 from South Melbourne depot, c1970
Table card for Run 53 from South Melbourne depot, c1970. Sheet of paper hand written, preprinted as for item 2206 glued to a sheet of Masonite, then varnished. Written in blue and red ink. Gives sign on time, times at the from the various terminus. Highlights the need to test phones at Millswyn and ? streets and the Fitzroy St terminus. Timetables runs between Brunswick St and Fitzroy St and between Franklin St and South Melbourne Depot, Kingsway. Gives hours for the crews.trams, tramways, forms, drivers, table cards, conductors -
 Melbourne Tram Museum
Ephemera - Timetables - MMTB trams - set of 8, Melbourne & Metropolitan Tramways Board (MMTB), 1976
Timetables - provide information on ticketing, fares, and timing points, with a description of the route and a map. Not all services had been allocated a route number at the time. 1 - East Brighton - City and via William St - routes 64, 65, 62 and 61 - July 1976 2 - Malvern (Burke Rd) to City and via Wiliam St - routes 5 and 35 - Oct. 1976 3 - Carnegie - City and via William St - routes 67, 37, and 66 - July 1976 4 - Wattle Parke - City and Camberwell depot - routes 70, 71 and 76 - Sept. 1976 5 - Kew - Cotham Road to St Kilda Beach - route 69 - August 1976 6 - East Preston - via Bourke or La Trobe, and East Brunswick - routes 88, 14, 89. 90, 96, 95, and 97 - Feb. 1976 7 - Toorak - City and via William St - routes 8 and 38 - August 1976 8 - St Kilda Beach and South Melbourne Beach and via William St - routes 15, 16, 53, 55, 1, 2 and 4 - Sept. 1976 Yields information about MMTB tram services during the 1970s. Set of 8 MMTB tram timetables - multifolded printed on yellow paper.timetable, mmtb, wattle park, east brighton, malvern, carnegie, kew, east brunswick, toorak, st kilda beach, south melbourne beach, route 64, route 65, route 62, route 61, roure 5, route 35, route 67, route 37, route 66, route 70, route 71, route 76, route 69, route 88, route 96, route 8, route 38, route 15, route 1, route 2, route 55, route 53 -
 Melbourne Tram Museum
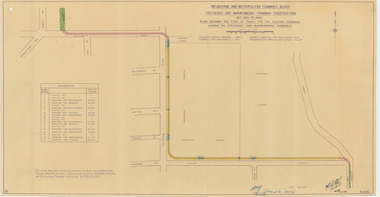
Drawing, Melbourne & Metropolitan Tramways Board (MMTB), "Footscray and Maribyrnong Tramway Construction - Act 1953 - Showing the type of track for the electric tramway jointing the Footscray and Maribyrnong Tramways", Nov. 1953
Drawing - hand coloured titled "Footscray and Maribyrnong Tramway Construction - Act 1953 - Showing the type of track for the electric tramway jointing the Footscray and Maribyrnong Tramways", dated 13/11/53. Details the streets, land types, road crossings, track types and has a reference to the Order in Council for the tramway construction.Has a ink note along the bottom edge "13/11/53 Sample copy"trams, tramways, footscray, maribyrnong, new tramway, order in council, acts of parliament -
 Melbourne Tram Museum
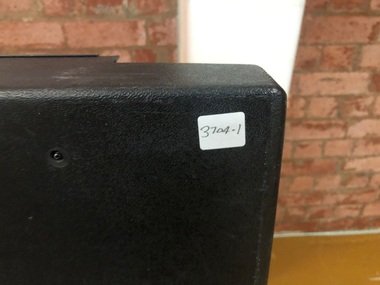
Functional object - Tramcar component, Boselli Italy, Luminator Texas, Set of six destination indicator equipment that was fitted to Z, Z3 and B class trams, c1975 - 1990's?
... "ex 53" (Z class tram), made in Italy by Boselli has yellow... "ex 53" (Z class tram), made in Italy by Boselli has yellow ...Set of six destination indicator equipment that was fitted to Z, Z3 and B class trams. .1 - dot matrix type destination sign fitted to the side of a B class tram - set at Preston Depot - serial number 232636 - Luminator type, back cover loose, 180H x 1300W x 100D. See images 3704i1a to e. .2 - dot matrix type route number fitted to the front of a tram, type fitted to B2 class tram, set at 86D, serial number 273644 - Luminator type, marked "163 No", 240H x 350W x 135D. See images 3704i2a to d. .3 - flipper type, side destination type, marked "ex 53" (Z class tram), made in Italy by Boselli has yellow label 37/702S, serial number 40A1603, set to St Kilda Beach and stamped 136 on one flange. 120H x 330W x 165D. See images 3704i3a to c .4 - flipper type, destination box, with markings "B'Wick Flaps", with labels "New" "Universal A flaps" made in Italy by Boselli, serial number 40A6623, set to St Kilda Junc". 210H x 1000W x 1900. See images 3704i4a to d. .5 - flap from an above type box, half of "Richmond" and "South Melb Depot", 970W x 80H. See images 3704i5a to b .6 - controller box, marked "No. 105" on rear, serial number 202311 Luminator, numeric pad, illuminated display and five control buttons made by gulton Luminator division fitted to a B2 tram. See images 3704i6a to b .7 - dot matrix destination sign fitted to the front of a B2 class tram, set to "Not in Service", Serial number 502626 Luminator, 220H x 1300W x 165D, See images 3704i7a to e. Source of items 3 and 4 name based on drawings held by the Museum for the destination signs fitted to Z class trams. Refer to drawing R11-982 as an example. Luminator made by Luminator Technology Group Texas - see https://www.ltgglobal.com/ access 12/7/2019. Imagetrams, tramways, destination indicators, z3 class, transport equipment, z class, b class -
 Melbourne Tram Museum
Photograph - Set of 4 Black & White Photograph/s, Keith Kings, 16/02/1957 12:00:00 AM
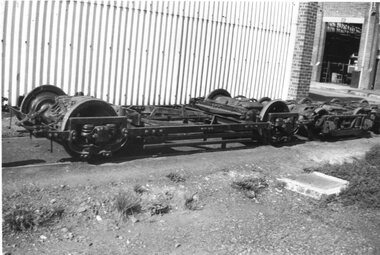
Set of four Black and White Photographs of "Radiax" truck MMTB and SEC Geelong. .1 - "Radiax" Truck ex T-179, Preston Workshops, 23/10/53 .2 - Geelong - "Radiax" Truck from No. 20, which is on pillar jacks on right. 21/8/1955 .3 - Photo of part of the truck, under T179, 20/8/1953 .4 - as for .3On rear in ink .1 - "M&MTB - "Radiax" Truck ex T-179, Preston Workshops, 23/10/53 and KSK number "H(q)(7)". .2 - "Geelong - "Radiax" Truck from No. 20, which is on pillar jacks on right. Note: Transom at bottom right hand corner 21/8/55" and KSK number "P(e)(8)" .3 - "M&MTB T-179, Detail of Truck arrangement. 20///8/53" and KSK number "H(i)(8)" .4 - "M&MTB T-179, Detail of Truck arrangement. 20///8/53" and KSK number "H(i)(7)"trams, tramways, trucks, bogies, radiax truck, mmtb, geelong, preston workshops, tram 179, tram 20 -
 Melbourne Tram Museum
Ephemera - Exercise Book, Keith Stodden, "Tickets 3", 1980's to 1987
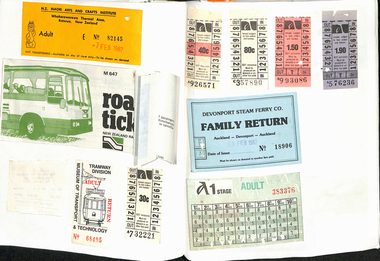
Exercise or Mapping book - Australian Mapping book, yellow cover with mathematical tables on the rear, plain paper, 64 pages holding tickets collected by Keith Stodden. Titled "Tickets 3". Tickets have been positioned using stamp hinges. Pages 1 - 10 - Misc., tickets, airlines, buses, tours and entry - NZ and Australia 11 - Painted tram and Neighbourhood 12 - 17 - ditto, travel cards, theatre and MTA single journey 18 - 21 - Misc. tickets, Canada, 22 - 24 - VLine, NSW, 25 - 34 - Theatre, Transporting Art, VLine Parcels, MMTB and Vic passes, Bendigo, St Kilda Line rail, airlines 35 - 36 - Misc. including Pennyroyal, Tasmania. 37 - Airline, ETRB, Skybus 38 - Theatre 39 - 42 - Airline, Whyalla, Theatre, Travelcard 43 - 44 - Theatre, bus, rail and Sydney 45 - 46 - Neighbourhood, coaches, MTA Travelcard, theatre 47 - 51 - TMSV, theatre, rail Neighbourhood 52 - Ansett, Skybus 53 - 57 - scratch tickets, 58 - 59 - theatre 60 - 61 - Sydney, CityRail, 62 - 64 - Neighbourhood, The Met, short trip and Transporting Arttrams, tramways, tickets, the met, mmtb, adelaide, sec, tmsv, sydney, buses -
 Melbourne Tram Museum
Pamphlet, Yarra Trams, "Your new accessible tram stops", Apr. 2007
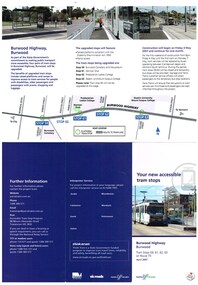
Set of five Pamphlets - DL - 3 fold, full gloss paper titled "Your new accessible tram stops" about the introduction in April 2007 of upgrades stops in Burwood Highway - stops 59, 61, 62, and 63 to Superstops. Has VicRoads logos as well as Vic Government and Yarra Trams. Two copies held. 1 -2 fold DL - for stops 124A on routes 96, 109, and 112 - on the Specert St Bridge over the Yarra River - has map. 2 - 3 fold DL for stops 38, 42, 48 and 52 Dandenong Road - Nov. 2007 3 - 3 fold DL for stops 22, 23, 24 and 26 Queens Parade Fitzroy North, Nov. 2008 4 - 3 fold DL for stops 53 to 59 - Matthews Ave Airport West April 2008trams, tramways, yarra trams, burwood, vermont south, superstops, route 75, spencer st, route 96, route 109, route 112 -
 Melbourne Tram Museum
Photograph - Black and White photograph, Ellen Butland, Set of 53 photos, 1974 and 1998
Set of 53 black and white photographs collected or taken by Ellen Butland - 1964 to 1975 For a listing of the prints see htd5720list.pdf. Word file and scanning by Gary Davey 5/2021 EB1 253 in Collins St, circa 1970 Ellen Butland.jpg EB2 349 on a tour in Dandenong Rd, circa 1975 Ellen Butland.jpg EB3 249 in William St, Center poles, demolition Menzies Hotel, c1970 Ellen Butland.jpg EB4 399 in Elizabeth St, TAA building in Franklin St. c1970 Ellen Butland.jpg EB5 410, 811, 397, 273, 526 Camberwell Depot, c1970 Ellen Butland.jpg EB6 388 & 852 in Riversdale Rd, c1967 Ellen Butland.jpg EB7 410 in Flinders St, c1970 Ellen Butland.jpg EB8 349 in Royal Park, c1973 Ellen Butland.jpg EB9 385 and AEC MK.VI bus in South Melbourne Depot, c1974 Ellen Butland.jpg EB10 606 in St Kilda Rd, c1973 Ellen Butland.jpg EB11 434 on a tour at South Melbourne Depot, c1974 Ellen Butand.jpg EB12 433 in Riversdale Rd, c1969 Ellen Butand.jpg EB13 418 in St Kida Rd, c1974 Ellen Butland.jpg EB14 432 & 273 in Camberwell Depot, c1968 Ellen Butland.jpg EB15 410, Cotham Rd Kew? c1968 Ellen Butland.jpg EB16 415 in Riversdale Rd, c1969 Ellen Butland.jpg EB17 418 in St Kilda Rd, c1968 Ellen Butand.jpg EB18 992 in Camberwell Depot, c1975 Ellen Butand.jpg EB19 983 in Bourke St, late 1968 Ellen Butland.jpg EB20 968 in Bourke St, late 1968 Ellen Butand.jpg EB21 9A Truck, c1969 Ellen Butland.jpg EB22 611at Batman Ave, c1964 Ellen Butland.jpg EB23 588 at South Melbourne Siding, c1968 Ellen Butland.jpg EB24 578 in Riversdale Rd, c1968 Ellen Butand.jpg EB25 507 at Camberwell Terminus, c1967 Ellen Butland.jpg EB26 674 in Swanston St, c1964 Ellen Butland.jpg EB27 681 on Route 56 in William St, c1969 Ellen Butland.jpg EB28 682 in Williamson Rd, c1971 Ellen Buckland.jpg EB29 772 in Elizabeth St, c1968 Ellen Butland.jpg EB30 776 on Route 69 Glenferrie Road at Henrietta St, c1968 Ellen Buckland.jpg EB31 786 at Footscray Terminus, c1972 Ellen Butland.jpg EB32 667 in Swanston St, c1958 Ellen Butland.jpg EB33 267 in St Kilda Rd, c1935 Ellen Butland.jpg EB34 900 and a L class at South Melbourne Depot, Jan 1975 Ellen Butland.jpg EB35 1003 in Spring St, c1965 Ellen Butland.jpg EB36 958 on Route 4, c1953 Ellen Butland.jpg EB37 1 and 7 in Victoria Parade, 1975 Ellen Butland.jpg EB38 3, 2 & 5 at Preston Workshops, 30-4-1975 Ellen Butland.jpg EB39 3 in Nicholson St, 30-4-1975 Ellen Butland.jpg EB40 3 in Queens Parade, 30-4-1975 Ellen Butland.jpg EB41 217 at Malvern Depot, 13-1-1974 Ellen Butland.jpg EB42 220 in Collins St, c1970 Ellen Butland.jpg EB43 225 in Swanston St, c1967 Ellen Butland.jpg EB44 233 in South Melbourne Per way yard, c1976 Ellen Butland.jpg EB45 242 in Brunswick Depot, c1968 Ellen Butland.jpg EB46 1007 in Bourke St, c1970 Ellen Butland.jpg EB47 1013 in Bourke St ,c1970 Ellen Butland.jpg EB48 1020 in LaTrobe St, c1969 Ellen Butland.jpg EB49 1025 in Collins St, c1969 Ellen Butland.jpg EB50 1037 in Collins St, c1970 Ellen Butland.jpg EB51 838 in South Melbourne Depot, c1975 Ellen Butland.jpg EB52 W2's and R10 recovery vehicle in Glenhuntly Depot, c1975 Ellen Butland.jpg EB53 1001 in Bourke St, c1970 Ellen Butland.jpgtrams, tramways, glenferrie road, collins st, dandenong rd, elizabeth st, st kilda rd, riversdale rd, batman ave, nicholson st, victoria parade, preston workshops, malvern depot, glenhuntly depot, camberwell depot, riversdale road, flinders st, tram 253, tram 606, tram 434, tram 433, tram 418, tram 432, tram 273, tram 410, tram 415, tram 418, tram 992, tram 983, tram 349, tram 968, tram 611, tram 588, tram 578, tram 507, tram 674, tram 681, tram 682, tram 772, tram 249, tram 776, tram 786, tram 667, tram 267, tram 900, tram 1003, tram 958, tram 1, tram 7, tram 3, tram 2, tram 5, tram 399, tram 217, tram 220, tram 225, tram 233, tram 242, tram 1007, tram 1013, tram 1020, tram 1025, tram 1037, tram 838, tram 1001, w2 class, w3 class, w4 class, w5 class, sw6 class, w6 class, w7 class, y1 class, x class, z1 class, tram 811, tram 397, tram 526, tram 385, tram 653, r10 vehicle, 9a truck, route 11, route 56, route 59, route 48, route 74, route 7, route 4, route 9a, route 9e, route 97