Showing 2198 items
matching tram routes
-
 Ballarat Tramway Museum
Slide - 35mm slide/s, Noel Simons, 21/11/1962 12:00:00 AM
... taken looking in along the route. Tram has destination of North... taken looking in along the route. Tram has destination of North ...Set of 6 transparencies taken on 21/11/1962 on Kodak mounts. 1189.1 - Bendigo No.11 at Quarry Hill terminus. Photo taken looking in along the route. Tram has destination of North Bendigo. 1189.2 - No. 21 in Pall Mall bound for North Bendigo. Tram has roof ads for Mamouney's furniture and SEC. In the background are the National Bank building, Dad and Dave's Cafe and the Beehive Buildings and the London Pharmacy. 1189.3 - No. 2 in Mitchell St, just after crossing over railway bridge. Photo taken after tram has passed photographer. Has what appears to be an SEC road works crew in the background. Has destination of Quarry Hill. 1189.4 - No. 17 climbing Mitchell St. on the start of the single track section, just before crossing the railway bridge. Has destination of Quarry Hill and the large Maples building sign in the background. 1189.5 - as for 1189.4 but after tram has passed photographer. Has an Ilford film roof ad and an SEC roof ad. Railway bridge in the background. 1189.6 - No. 21 at Charing Cross with passengers boarding. Tram has destination of North Bendigo and roof ads for SEC 'Electric Cooking' and Sandhurst Milk. In background are the buildings on the south side of High St. Also has a SEC worker in white overalls sweeping the track.Information written on in black ink and date stamped on purple ink. 1189.1 - "Birney car No. 11 in High St. Bendigo at Golden Square terminus" 1189.2 - "No. 21 in Pall Mall Bendigo near Charing Cross" 1189.3 - "No. 2 in Mitchell St. Bendigo, just after crossing bridge over railway line (Quarry Hill route)" 1189.4 - "No. 17 in Mitchell St. Bendigo, climbing the hill the bridge over the railway line. (Quarry Hill route)" 1189.5 - "No. 17 in Mitchell St., Bendigo approaching bridge over Railway line (Quarry Hill route)" 1189.6 - "No. 21 at Charing Cross, Bendigo"tramways, trams, bendigo, golden square, pall mall, mitchell st., quarry hill, tram 2, tram 11, tram 17, tram 21 -
 Ballarat Tramway Museum
Slide - 35mm slide/s - set of 32, Noel Simons, 25/02/1971 12:00:00 AM
... in High St. with Cathedral in background. Tram en route to North... shopping centre. Numerous cars and pedestrians. Tram en route ...Set of 31 transparencies taken on 25/2/1972 on Kodak mounts. 1201.1 - Bendigo No. 26 in Bond St. just after leaving Long Gully en route for Quarry Hill. Has Norris Supermarket in background. Has two SEC roof ads. 1201.2 - No. 26 climbing View St. from Charing Cross en route to Eaglehawk. Has ANZ bank and AMOCO service station in background. 1201.3 - as for 1201.3, but after tram has passed photographer. Has buildings west of Mackenzie St. in photograph. 1201.4 - Tram stop and centre of the road pole with two "CARS STOP BY REQUEST" signs mounted on pole at the corner of Mackenzie St. 1201.5 - same position as for 1201.3, but with No. 5 descending the street. 1201.6 - same position as for 1201.2, but with No. 5 descending the street. Photo taken after tram has passed photographer. 1201.7 - No. 7 in Nolan St. from across the park at Lake Weeroona. 1201.8 - No. 7 entering McCrae St from Nolan St. - distant view. Note "TRAM "sign on left hand side under tree and overhead in McCrae St. from former track that once was in this street. 1201.9 - No. 7 in High St. with Cathedral in background. Tram en route to North Bendigo. Note scaffolding around Cathedral main spire area. 1201.10 - No. 7 crossing Bendigo Creek bridge in High St. near Golden Square. Has a Caltex Service station in the background. 1201.11 - No. 7 at Golden Square terminus with Sunburst Fruit Juices and a Peters Ice cream delivery vans alongside. 1201.12 - as for 1201.11 but photo taken from behind tram, with the end of the rails in the photograph. 1201.13 - No. 7 and 21 in Pall Mall at Charing Cross with No. 5 in the background. Taken some distance away from the location. 1201.14 - No. 7 at Golden Square terminus, taken a short distance from the tram terminus. Shows Milk Bar on right hand side and the hotel on the left hand side. Taken from the south side of the roadway. 1201.15 - as from 1201.14 but taken from the north side of the roadway. 1201.16 - No 5 waiting at California Gully loop. Distant photo showing surrounds 1201.17 - No. 5 en route for Quarry Hill crossing No. 26 at California Gully. 1201.18 - No. 26 at Eaglehawk terminus with Eaglehawk Town Hall and Post Office in background. 1201.19 - No. 21 arriving at Charing Cross en route to North Bendigo. Has Alexandra Fountain in the background, ANZ bank RACV building, and other buildings on the north side of Pall Mall or Nolan St. 1201.20 - No. 26 en route for Quarry Hill at Charing Cross, with crew standing by front door. Has Colonial Mutual life building, Armstrong Tyre Service (Firestone) and a sign for Cohns Drinks in the background. 1201.21 - as for 1201.20 but with No. 5 en route to Eaglehawk now in photograph. 1201.22 - No. 26 at Quarry Hill terminus. 1201.23 - No. 26 at Quarry Hill terminus, view of front portion of tram only from a gate at the Bendigo cemetery. 1201.24 - Track at the end of the Quarry Hill line showing the point blades of the former "Y" terminus and the overhead for this. 1201.25 - No. 2 at the Quarry Hill terminus, looking along the former Trackwork. 1201.26 - as for 1201.25 1201.27 - number not used. 1201.28 - Golden Square terminus from some distance from the actual terminus, showing the Warning sign "TRAM" for motorists from the south. No. 7 at the terminus. 1201.29 - No. 7 passing through the Golden Square shopping centre. Numerous cars and pedestrians. Tram en route for North Bendigo. 1201.30 - No. 7 in High St. Golden Square, en route for North Bendigo. Photo taken after tram has passed photographer. 1201.31 - No. 7 in High St. just past Wattle St. with the Cathedral in the background. Tram has two SEC roof ads good side on photo, 'Everything's fine in my all electric kitchen' and 'Electrical cooking - clean, quick, economical'. 1201.32 - No. 7 in High St. nearing Wattle St. Has Cathedral in the background. Photo taken after tram has passed photographer.Information written on in black ink and date stamped on purple ink. 1201.1 - "No. 26 in Bond St just after leaving Long Gully" 1201.2 - "No. 26 climbing View St. from Charing Cross" 1201.3 - "No. 26 ascending View St. from Charing Cross (At Mackenzie St.)" 1201.4 - "View St. & Mackenzie St." 1201.5 - "No. 5 in View St. near Mackenzie St." 1201.6 - "No. 5 in View St. nearing Charing Cross." 1201.7 - "No. 7 in Nolan St. seen from Lake Weeroona Park." 1201.8 - "No. 7 entering McRae St. from Nolan St. Note "TRAM" warning sign on left. 1201.9 - "No. 7 in High St. passing Short St." 1201.10 - "No. 7 crossing Bendigo Creek bridge in High St. near Golden Square." 1201.11 - "No. 7 at Golden Square terminus" 1201.12 - "No. 7 at Golden Square terminus" 1201.13 - "No 7, 21 and 5 at Charing Cross" 1201.14 - "No. 7 at Golden Square terminus" 1201.15 - "No. 7 at Golden Square terminus" 1201.16 - "No 5 waiting at California Gully loop." 1201.17 - "Nos. 5 and 26 crossing at California Gully loop" 1201.18 - "No. 26 at Eaglehawk terminus" 1201.19 - "No. 21 arriving at Charing Cross from Golden Square" 1201.20 - "No. 26 at Charing Cross" 1201.21 - "Nos. 5 and 26 at Charing Cross." 1201.22 - "No. 26 at Quarry Hill terminus" 1201.23 - "No. 26 at Quarry Hill terminus seen through the gates of the Bendigo Cemetery." 1201.24 - "Quarry Hill terminus showing remains for former double track layout abandoned before 1964." 1201.25 - "No. 2 at Quarry Hill terminus" 1201.26 - "No. 2 at Quarry Hill terminus" 1201.28 - "The Southern approach to Golden Square with No. 7 standing at the terminus, "TRAM" warning sign on the left. 1201.29 - "No. 7 passing through Golden Square Shopping Centre" 1201.30 - "No. 7 in High St. Golden Square" 1201.31 - "No. 7 in High St. passing Wattle St." 1201.32 - "No. 7 in High St. nearing Wattle St."tramways, trams, bendigo, bond st., view st., nolan st., high st., eaglehawk, california gully, charing cross, quarry hill, trackwork, tram 2, tram 5, tram 7, tram 21, tram 26 -
 Melbourne Tram Museum
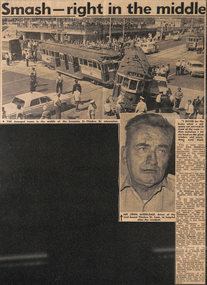
Newspaper, The Sun, The Herald, The Age, “Smash – right in the middle”, “Trams Hit; 25 People Hurt” "Crowd causes chaos", “Driver out before crash”, 21/03/1968 12:00:00 AM
... committee Tram W2 304 (City Route 6) was crossing Flinders Street... by tram W2 559 (Spencer St route 28) which failed to stop ...Newspaper clipping titled: “Smash – right in the middle” The Sun, Thursday, March 21, 1968 The Herald, The Age Photos and text Flinders and Swanston Streets 25 people taken to hospital, St Vincent's, Royal Melbourne, Prince Henry's Accident happened about 12:30 pm when west-bound Flinders St tram crashed into north-bound city tram in Swanston St “Driver out before crash” The Age, Thursday, March 21, 1968 Photos and text Flinders and Swanston Sts Driver, Mr John Middlemo, was knocked semi-conscious two blocks before the collision. He struck his head when a car pulled out in front of him at Exhibition Street. Risson said it was worst accident he had seen in 40 years. Appoints 5 man inquiry committee Tram W2 304 (City Route 6) was crossing Flinders Street when it was hit by tram W2 559 (Spencer St route 28) which failed to stop at the red light. Tram 304 was subsequently scrapped.trams, tramways, collision, accidents, flinders st, swanston st, tram 304, w2 class, tram 559, mmtb -
 Melbourne Tram Museum
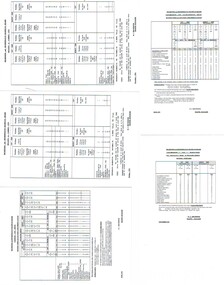
Ephemera - Timetable, Melbourne & Metropolitan Tramways Board (MMTB), "Running Timetable and Locations of Recording Clocks", Jun. 1973
... Timetable and Locations of Recording Clocks" for various tram... and Locations of Recording Clocks" for various tram and bus routes ...Set of photocopies of timetable information titled "Running Timetable and Locations of Recording Clocks" for various tram and bus routes - dated June 1973, signed R. C. Drummond Traffic Manager. Gives running times for sections during various parts of the day, early am, am peak, mid period, pm peak, weekdays, Saturdays and Sundays, and evening and the location of Bundy Clocks. Photocopied or retyped by donor 2016. 1442.1 - two sheets copied onto A4 paper and scanned to a pdf file. East Brighton - City via Swanston Carnegie - City East Malvern - City East Brighton - City - Dudley St Glen Iris -City Malvern Burke Road - City Camberwell - City via William St Camberwell - City via Swanston St Burwood - Spencer St Toorak - City Weekdays North Balwyn - City Wattle Park - Princes Bridge East Preston - City West Preston - St Kilda Beach Essendon Aerodrome - City West Maribyrnong Moreland - St Kilda Beach West Coburg - Domain Road North Coburg - City East Coburg - South Melbourne Beach. On A5 sheets - one large scan Carnegie - City - June 1973 Bulleen to Garden City - 18 June 1972 Bulleen to Garden City - Nov. 1963 East Brighton - City - Dudley St - Nov. 1968 East Brighton - City - via Swanston St - June 1973.trams, tramways, timetables, schedules, bundy clock, mmtb -
 Melbourne Tram Museum
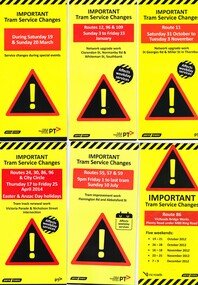
Pamphlet, Yarra Trams, "Important Tram Service Changes", 2012 to 2016
... West, route 59 - September 2014 .23 - Tram stop works... West, route 59 - September 2014 .23 - Tram stop works ...Set of 24 pamphlets, DL size when folded, Full colour, titled "Important Tram Service Changes", giving details of interruptions to the tram system due to Roadworks or events. Have been number .1 to .3 and .5 to .26. Have the logos of Yarra Trams, VicRoads, PTV, .1 - Grand Prix 2016 .2 - Roadworks - Clarendon St, Normandy Road and Whiteman St Southbank, track reconstruction of Southbank or Port junction accessible tram stops, 3/1/16 to 15/1/16 - put in siding for the Restaurant Tram .3 - Route 11 - reconstruction of junction into Preston Workshops - Oct. 2015 .5 - Victoria Parade and Nicholson St intersection reconstruction - April 2014 .6 - Reconstruction of junction - Abbotsford St and Flemington Road - July 2016 .7 - Route 86, VicRoads bridge works - Plenty Road - Oct. to Dec. 2012 .8 - Route 70, Swan St, Burnley track renewal - June 2012 .9 - as for .7 .10 - Route 70, Riversdale Road, Camberwell track renewal, Nov. 2012 .11 - Chapel and Carlisle Sts, Trackwork - June 2013 .12 - ditto .13 - Route 86 - Gertrude and Smith Streets Collingwood .14 - Route 78 and 79 - track renewal Chapel St Sept. 2013 .15 - Elizabeth St track reconstruction and accessible tram stops - Oct. 2013 - see also Reg Item 859. .16 - Tram track renewal, Mt Alexander Road - Ormond Road and Kent St - Routes 55 and 59 - Feb. 2014 .17 - St Kilda Road, between Southbank Blvd and Park St - Feb. 2014 .18 - Overhead Renewal Camberwell depot - March 2014 .19 - Gilbert Road and Miller St - track and overhead renewal - July 2014 .20 - Tram stop works - Melbourne and Olympic Park - August 2014 .21 - Tram stop works - Melbourne Town Hall - Collins St - August 2014 .22 - Matthews Ave, Airport West, route 59 - September 2014 .23 - Tram stop works, Flinders St - Sept. 2014 .24 - Tram stop works - Bourke and Swanston St - Oct. 2014 .25 - Tram stop works - Flinders Jan. 2015 .26 - Elizabeth St works - May and July 2013trams, tramways, grand prix, trackwork, overhead, southbank, tram stops, route 11, victoria parade, nicholson st, preston workshops, abbotsford st, flemington rd, route 86, chapel st, carlisle st, gertrude st, smith st, riversdale rd, swan st, route 70, route 55, route 59, mount alexander rd, st kilda rd, camberwell depot, gilbert rd, miller st, collins st, route 59, matthews ave, flinders st, port junction -
 Melbourne Tram Museum
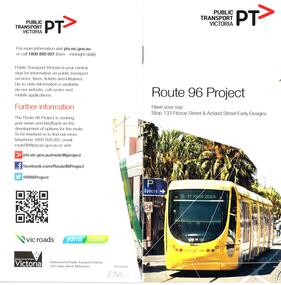
Pamphlet, Public Transport Victoria (PTV), "Route 96 Project", "Route 96 is being upgraded so everyone can catch the tram", 2013 and 2019
... floor tram stop platforms along route 96, East Brunswick to St... Trams tramways Route 96 Tram Stops Fitzroy St Acland St Platform ...Set of 6 documents associated with the provision of low floor tram stop platforms along route 96, East Brunswick to St Kilda. .1 - Pamphlet - 20 pages centre stapled, titled "Route 96 Project - Have your say: Stop 133 Fitzroy St and Acland Street Early designs" Includes a feedback form. Dated 2013. .2 - Drop in DL card - for general update on Nicholson St between Kay Street and Fitzroy North and Brunswick Road. March 2019 .3 - 6 fold A3 to DL - "Route 96 is being upgraded so everyone can catch the tram" - shows the program and map for the provision of 9 stops and timeline. The later was not achieved. 2 copies held. .4 - 6 fold to DL, special size sheet - for the redevelopment of stop 125 Port Junction - shows the siding for the Tramcar Restaurant, and stop 124 at the world trade centre. Dated 2013 .5 - 8 fold to DL - special size paper (has been torn into two), for the Acland St options, and Fitzroy St at the junction with the Light Rail line. Again not all work undertaken. Dated 2013. Have logos of PTV, Yarra Trams and Department of Transport.trams, tramways, route 96, tram stops, fitzroy st, acland st, platform stops, nicholson st, brunswick rd, port junction, clarendon st, whiteman st -
 Melbourne Tram Museum
Letter, Keith Kings, "Yarra Rewards Club Member", "Yarra Trams Update", "Yarra Connections", 2001 to 2004
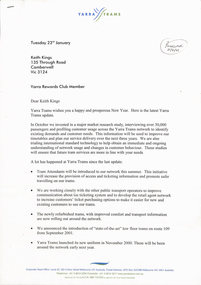
... 10 - Feedback from Keith about route 70 trams, dated 10/5/03... 10 - Feedback from Keith about route 70 trams, dated 10/5/03 ...Set of 13 letters, from or to Yarra Trams during 2001 and 2002 to Keith Kings re various maters, sending the latest issue of "Yarra Trams Update" or "Yarra Connections" 1 - 23/1/2001 - latest news and the proposed launch of "Yarra Rewards Club Member" 2 - 25/5/2001 3 - 13/8/2001 - now known as "Yarra Connections" 4 - letter to Paul Matthews, Marketing Manager, dated 14/10/2001 re various matters, including road markings, timetables at tram stops and the newsletters. 5 - 11/12/2001- Superstops 6 - 2/1/2002 7 - 1/5/2002 8 - 21/11/2002 - Yarra Connections No. 9, notes possible take over of M>Tram 9 - 23/4/2003 10 - Feedback from Keith about route 70 trams, dated 10/5/03 11 - 4/5/2003 - map attached to above about service improvements in the CBD. 12 - 5/8/2003 - Opening to Box Hill and Met Link. 13 - 2004 - not dated, first issue of Yarra Connections for 2004 - merger with M>Tram and a copy of Reg Item 5033. All signed by Paul Matthews as Marketing Manager.trams, tramways, yarra trams, passengers, m>tram, box hill, letters, metlink -
 Melbourne Tram Museum
Slide - Set of 9, Keith Caldwell, 17/03/1966 12:00:00 AM
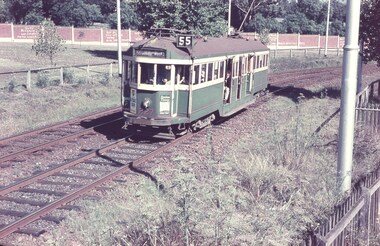
... and Kleenex tissues. .2 - W2 521, route 55, passing a tram stop... Trams tramways Royal Park Route 55 West Coburg W2 class Domain ...Set of 8 Agfa colour blue white plastic mount slides, photo by Keith Caldwell of trams on the Royal Park line in the vicinity of the Royal Park railway line. .1 - W2 328 (West Coburg Bell St route 55) passing under the railway bridge, with another W2 (362 or 382?) behind. Tram 328 has adverts for Remy Martin and Kleenex tissues. .2 - W2 521, route 55, passing a tram stop. Note the overhead light. .3 -W2 456, route 55 West Coburg via William St, passing under the railway bridge. .4 - not used, .5 - W2 355 with railway bridge in background, Domain Road, Route 56. .6 - W2 506 climbing the hill, Domain Road, route 55. Tram has adverts for White Crow tomato sauce. .7 - W5 812, arriving at stop (Section sign), to Carnegie, route 4. The tram stop has the fares to the city (15d and 7d). In the background is a Perway box. .8 - W2 227 (Domain Road route 56) with the railway station and two other trams in the background. .9 - SW6 (Route 55) outbound with the zoo walls in the background. Tram has advert for Coffey Ford. 17/3/1966In ink "17 iii 66"trams, tramways, royal park, route 55, west coburg, w2 class, domain rd, route 56, w5 class, sw6 class, tram 328, tram 521, tram 456, tram 355, tram 506, tram 812, tram 227, tram 913 -
 Melbourne Tram Museum
Pamphlet, Public Transport Victoria (PTV), Yarra trams for tramways works during 2017 and early 2019, 2017 to 2018
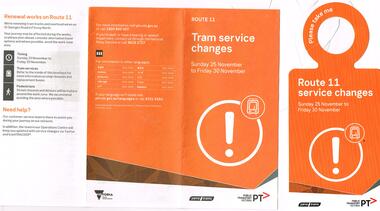
... Set of six pamphlets issued by Yarra trams for tramways... Trams tramways Yarra Trams PTV Tramway Per Way Trackwork Route ...Set of six pamphlets issued by Yarra trams for tramways works during 2017 and early 2019 .1 - six fold DL - route 11 tram service changes for work in St Georges Road and over the Merri Creek bridge 25/11/2018 to 30/11/2018. Route 11 - 2 copies held .2 - hanging strip type notice for the above work - cut to fit around a strap hanger bar for the St Georges Rd work - 2 copies held. .3 - as for .1 - work in Toorak Road, Camberwell, 3/1/19 to 12/1/19 - route 75. .4 - hanging strip type notice for the above work - cut to fit around a strap hanger bar. for the Toorak Rd. work. .5 - hanging strip type notice for the above work - cut to fit around a strap hanger bar - routes 96 and 109 for Claredon St junction work 9/8/2017 to 14/8/2017. .6 - ditto for routes 11, 12, 48, 109 - Queens Birthday weekend 10/6/17 to 12/6/17. .7 - ditto for routes 86 and 96 - 31/8/2018 to 16/9/2018 for work in Nicholson St Fitzroy. Have Yarra Trams PTV and Vic Govt. logos along with printing dates.trams, tramways, yarra trams, ptv, tramway per way, trackwork, route 11, route 12, route 48, route 75, route 96, route 109 -
 Melbourne Tram Museum
Slide - Set of 7, Keith Caldwell, 12/03/1960 12:00:00 AM
... with the Zoo walls in the background. Destination West Coburg, Route... Trams tramways Royal Park West Coburg Route 55 Graffiti Domain ...Set of 7 Agfa Colour slide, cardboard mount, by Keith Caldwell of 7 or 12 March 1960 - .1 - W2 227 outbound in Royal Park with the Zoo walls in the background. Destination West Coburg, Route 55. Tram has two adverts which are hard to read. .2 - W2 470 inbound, Domain Road, Route 56 with the Upfield (Fawkner) railway line in the background. Tram has a Remy Martin Brandy advert. .3 - W5 786, as for .2, with an Exide battery advert. .4 - W2 456 as for .2, with an Coca Cola Advert .5 - SW6 965 in bound, showing St Kilda, route 55 with the railway line in the background. Tram has adverts for Band-Aids, Porsche motor cars in Richmond and Singletons? .6 - L 106 - in bound, showing destination of Carnegie, route 4. This would most likely be a Glen Huntly depot doing a late afternoon trip via William St. Has the zoo wall in the background. .7 - W3 655 in bound, showing destination of Carnegie, route 4. This would most likely be a Glen Huntly depot doing a late afternoon trip via William St. Tram has a Remy Martin Brandy advert. Tram running down to the Flemington Road intersection. .1 and .7 have political graffiti or slogans painted onto the zoo walls. examples are" Vote Bryant Out, ?? and the Labor Party? Welfare not warfare out Menzies and Drop Bob today Vote ? Out".1 to .4 - hand stamped "12 Mar '60" .5 to .7 - ditto "& Mar '60" .2 - "W2 Royal Park" .5 - "SW Car Royal Park" .6 - "L Royal Park" .7 - "W3 Royal Park"trams, tramways, royal park, west coburg, route 55, graffiti, domain rd, railways, route 56, w2 class, w5 class, w3 class, l class, st kilda beach, tram 470, tram 227, tram 456, tram 965, tram 655, tram 106, sw6 class, tram 786 -
 Ballarat Tramway Museum
Photograph - Black & White Photograph/s set of 19, Mar. 1972
... - tram 7 en route to North Bendigo at the site of the Bridge St... - tram 7 en route to North Bendigo at the site of the Bridge St ...Set of 19 black and white prints, all 89mm square of Bendigo trams, date machine printed on print is "Mar 1972". 981.1 - Tram 21 at North Bendigo terminus, with level crossing in background. Has destination "Golden Square" and two SEC roof ads. 981.2 - tram 2? at Eaglehawk, with destination "Depot", two SEC roof ads and "Leo A. Hughes Photographer" on side of building in background. 981.3 - tram 2? at Eaglehawk, side on view. 981.4 - tram 26 at Quarry Hill terminus looking back into city. 981.5 - tram 7 en route to North Bendigo at the site of the Bridge St. loop. Has a Peters Ice Cream truck and Sandhurst Fruit Juices truck on right side of photograph. 981.6 - tram 2 at Quarry Hill terminus. 981.7 - tram 2? at one of the loops on the Eaglehawk line, inbound? 981.8 - bogie tram at Charing Cross with fountain in background. Side on view looking south. 981.9 -trams 7 and 21 on Golden Square/North Bendigo line with bogie tram in background, at Charing Cross. Same as item 972. 981.10 - bogie tram at Charing Cross - has buildings in south west corner in background, including Colonial Mutual Life and an advertisement for the Herald newspaper. 981.11 - trams 25, 7 and two other trams at Charing Cross. 981.12 - trams 2 and 26 and three others at Charing Cross. 981.13 - tram 25 at Golden Square terminus, with Rodda's Golden Square Hotel in the background. Tram showing destination of "Nth Bendigo" 981.14 - tram 24, showing "Special" on depot access track. Has two Johnnie Walker roof ads on side. 981.15 - as above, but tram on bridge outside depot. 981.16 - trams 25 and 28 at depot 981.17 - tram 24 showing "Special" on depot access track with a single truck car in background. 981.18 - trams 2 and 26 at Charing Cross. Has advertisements for "Armstrong Tyre Service" and "Cohn's drinks" on buildings in background. 981.19 - Bendigo 2 at location?, about to enter a loop or double track section. Has hotel in background. On rear of each photo in the top left hand corner is a print number 1 to 19 in ink and location notes, generally "Bendigo"trams, tramways, charing cross, bendigo, golden square, quarry hill, tram 2, tram 21, tram 7, tram 24, tram 26 -
 Melbourne Tram Museum
Album - Ron Scholten Slide Collection, Ron Scholten
... Golf on Route 55 in Royal Park RSC46 D1 3504 in M Tram livery... Golf on Route 55 in Royal Park RSC46 D1 3504 in M Tram livery ...Photo - see pdf file for further information. Number Brief Description RSC1 PCC 1041 at the gates of Preston Workshops on a test run without it’s trolley retriever RSC2 PCC 1041 in Glenhuntly Road on Route 67 en route to Carnegie crossing the Railway Gates at Glenhuntly Station RSC3 W2 482 stored at Malvern Depot with Olympic Park on the Destination RSC4 Cable Car Set 64 in Swanston St outside Princess Bridge Station in Bound with open top Double Deck Bus, Trak Motors ? Departing from Flinders St Station RSC5 W3 669 in St George Rd at Sumner St en route to Preston Workshops for scrapping RSC6 Cable Car in Lygon St en route to Carlton RSC7 PCC 1041 turning from St Georges Rd into Miller St to enter Preston Workshops RSC8 Flinders St Station with cable cars RSC9 PCC 1041 in strife on it’s maiden day in service. Trams on route 88 delayed in Queens Parade Clifton Hill RSC10 Flinders St at William St with Cable Cars RSC11 L 104 on the fan of the new shed at Malvern Depot on a TMSV tour RSC12 Cable Set 1 after it’s restoration at Preston Workshops on the fan near the front gate RSC13 X1 466 at a suburban terminus of the Footscray System RSC14 X2 680 at Point Ormond Terminus RSC15 An ex Launceston Tram at the outside terminus of the Penny Royal Complex Tramway in Launceston RSC16 Q 148 at Preston Workshops awaiting disposal RSC17 Elizabeth St with Cable Cars RSC18 Elizabeth and Bourke St corner outside the GPO with cable cars RSC19 Collins St with Cable Cars RSC20 A photo taken from the observation deck of the ICI building showing a view of Parliament house with a w class tram in Nicholson St RSC21 Auburn Horse car with a posed photo of all the tramwaymen employed RSC22 Cheltenham Double Deck Horsecar with a full load of passengers RSC23 City of Northcote cable trailer 3 at a terminus RSC24 City of Northcote Cable cars passing in High St Northcote RSC25 St Kilda Rd at Princes Bridge with Cable Cars RSC26 Flinders St with Cable Cars RSC27 Cable Cars RSC28 Bourke St looking towards Elizabeth St from Queen St RSC29 Cable cars in Bourke St at Elizabeth St looking East RSC30 Cable cars in Elizabeth St at the terminus at Flinders St RSC31 Cable cars in Bourke St at Swanston St looking west RSC32 Cable cars in Swanston St at Flinders St looking North RSC33 Cable cars in Collins St near Russell St RSC34 Cable cars in Elizabeth St at Bourke St RSC35 Cable cars in Collins St at Elizabeth St RSC36 Cable Cars in Swanston St at Flinders St RSC37 Cable cars in Collins St RSC38 Cable Cars RSC39 Cable cars in St Kilda Rd near Princes Bridge RSC40 Cable cars in Collins St East of Swanston St RSC41 Cable cars in Spring St outside Parliament house RSC42 K 92 in M&MTB Chocolate and cream livery but with a P&MTT Destination box on Route 14 RSC43 Thornbury depot viewed from Miller St and St Georges rd. Two W2 class cars are laying over between the peaks RSC44 Z3 201 in Met Livery passes D1 3510 in new M Tram livery. A Staff member in uniform stands in the doorway. Dandenong Rd RSC45 D1 3530 advertising Heinekin Super Golf on Route 55 in Royal Park RSC46 D1 3504 in M Tram livery on the reserved track in Matthews Ave near Essendon Airport showing Route 81 Travancore . I suspect it is a private enthusiasts charter due to the Malvern W class run number in the rear windscreen RSC47 D1 3504 on Route 64 in Dandenong Rd in M Tram Livery RSC48 D1 3504 in M Tram Livery at Airport West Terminus RSC49 D1 3504 in M Tram Livery in Union Rd outside the Showgrounds RSC50 D1 3504 at West Maribyrnong Terminus in M Tram Livery RSC51 D1 3503 in M Tram Livery in Malvern Depot RSC52 SW6 960 and VR 53 in Harbour Esplanade for the NMEL&T Co Centenary RSC53 Hawthorn Tramways Trust 32 in Harbour Esplanade for the NMEL&T Co Centenary RSC54 VR 53 & B 2042 in Harbour Esplanade for the NMEL&T Co Centenary RSC55 VR 53 & C 3016 in Harbour Esplanade for the NMEL&T Co Centenary RSC56 NMEL&T Co 13 usually V214 in Harbour Esplanade for the NMEL&T Co Centenary RSC57 NMEL&T Co 13 usually V214 at Preston Workshops for the NMEL&T Co Centenary RSC58 Hawthorn Tramways Trust Lettering on HTT 32 in Harbour Esplanade for the NMEL&T Co Centenary RSC59 Hawthorn Tramways Trust 32 in Harbour Esplanade for the NMEL&T Co Centenary RSC60 Hawthorn Tramways Trust 32in Harbour Esplanade for the NMEL&T Co Centenary RSC61 Hawthorn Tramways Trust 32 in Harbour Esplanade for the NMEL&T Co Centenary RSC62 NMEL&T Co 13 usually V214 at Preston Workshops for the NMEL&T Co Centenary RSC63 W2 516 and another on route 59 wait to shunt at Essendon Airdrome Terminus as W2 571 on route 49 departs. This was the last day of operation. RSC64 Australia’s First Electric Tram at Box Hill with Tramwaymen including H J Hilton who is in the centre RSC65 W2 484 en route to St Kilda Junction and another wait for passengers after a race meeting at Caulfield Racecourse RSC66 X1 463 on the Footscray system en route to Russell St RSC67 Geelong 35 on Chilwell Route, Formerly HTT 13, M&MTB 119, then Bendigo 1 and Ballarat 37 RSC68 P&MTT 4 on Opening Day of the system in Glenferrie Rd RSC69 Bendigo 6 in McCrae St near the Depot end route to North Bendigo RSC70 P&MTT 4 in Glenferrie on opening day of the System RSC71 Scrubber 3 stripped and awaiting scrapping at Preston Workshops RSC72 Scrubber 4 at South Melbourne Depot RSC73 Q 191 & 139 at Preston Workshops awaiting scrapping RSC74 Rail Grinder 3 at Preston Workshops as purchased from Sydney RSC75 Y 469 waits to shunt at Wattle Park Terminus as Y1 613 departs on driver training duties RSC76 VR 53 on the outside roads at Essendon Depot RSC77 W5 796 with three doors and square windows running out of Brunswick Depot in Cameron St, with a supplementary destination board showing “City via Swanston St” RSC78 W2 258 on the wheel grinder road at Brunswick depot RSC79 X2 676 on a TMSV tour, W5 817 & 836 & VR 53 on the open roads at Essendon Depot RSC80 PCC 1041 on test, passes W71035 in High St Preston RSC81 D1 class production number 7 as delivered on test in Matthews Ave RSC82 W2 383 on route 5 turning from the reserved track in Dandenong Rd into St Kilda Rd at St Kilda Junction RSC83 Z3 204 as advertising tram for Vodaphone Grand Prix running into Malvern Depot new shed RSC84 Z1 4 on test in St Georges Rd RSC85 PCC 1041 on Route 96 in Burke St near Exhibition St RSC86 Z1 3 without numbers on test turning from Miller St in St Georges Rd RSC87 Track components stored in Coldblo Rd at Malvern Depot with Z class cars adjacent RSC88 D1 3501 in M Tram Livery on Route 55 in Peel St at Franklin St RSC89 C 3001 in Yarra Trams Livery Porto 018 & D13502 in M Tram Livery on Display in Harbourside Esplanade RSC90 D1 class tram production number 7, in as delivered condition on test in Matthews Ave RSC91 D1 3503 inside Malvern Depot RSC92 SW6 955 and W6 974 in St Kilda at City Rd at Dusk RSC93 Freight Car 19 at Preston Workshops in green Livery RSC94 Rail Grinder 3 in green Livery at South Melb Per Way Yard RSC95 A SW6 class car on route 50 shunting at Elizabeth St Terminus at night, taken from Flinders St Station RSC96 W2 588 & 435 in St Kilda Rd at Batman Ave RSC97 Y1 613 in service at Wattle Park Terminus RSC98 W2 588 in Wellington Parade en-route to the City with a Grand Final Load of passengers followed closely by 384 RSC99 W2 558 on a MCG Footy Special entering the Simpson St sidings RSC100 W3 657 & an L Class in the new shed at Malvern Depot RSC101 Y1 613 in St Kilda Rd on an enthusiasts tour in St Kilda Rd south of St Kilda jun RSC102 Y1 613 on an enthusiasts tour in Clarendon St with the two extra tracks on the Viaduct under construction RSC103 W6 976 on the fan of the new shed at Malvern Depot RSC104 W7 1024 as an advertising car for Bank of NSW at the route 1 terminus at South Melb Beach RSC105 PCC 980 on route 96 in Nicholson St near North Fitzroy Depot RSC106 SW6 890 with dash canopy lighting in Market St on the opening day of William St Services RSC107 W2 444 with big numbers heads a line of footy specials in Simpson St Sidings RSC108 Cable Cars in Elizabeth St RSC109 NMEL&T co 2 with a trailer outside the power station in Mount Alexander Rd RSC110 Alf Twentyman’s cable car set in his Northcote backyard RSC111 Cable Cars in Queens Parade Clifton Hill RSC112 Cable cars in Collins St outside the Townhall RSC113 PCC 1041 at Carnegie terminus RSC114 Cable cars in Elizabeth St RSC115 Cable cars in Collins St near Swanston St RSC116 HTT 19 turns from Riversdale Rd into Camberwell Rd at Camberwell Junction RSC117 W1 419 official builders photo of first car of the class RSC118 Cable car with a full load of passengers RSC119 W1 422 illuminated for the visit of T.R.H. The Duke and Duchess of York RSC120 PCC 1041 in strife on it’s maiden day in service. Trams on route 88 delayed in Queens Parade Clifton Hill RSC121 Bendigo birney in Finn St near North Bendigo terminus RSC122 SW6 in St Kilda Rd at Domain Rd at night RSC123 All 3 of Alf Twentyman’s cable cars in his Northcote backyard RSC124 Cable trailer 256 being unloaded into the shed at Bylands RSC125 Cable grip car 1 being removed from the Melbourne Museum RSC126 Alf Twentyman's cable cars in his Northcote Backyard RSC127 Alf Twentyman's cable cars in his Northcote Backyard RSC128 Alf Twentyman's cable cars in his Northcote Backyard RSC129 Alf Twentyman's cable cars in his Northcote Backyard RSC130 W class car in Swanston St at Collins St RSC131 Y1 469, L & W3 on the run out of Glenhuntly Depot on a tour RSC132 W7 1024 as an advertising tram for Bank of NSW at Clifton Hill RSC133 W2 496 on a footy special in Simpson St Sidings RSC134 W2 as originally converted to a test car at Preston Workshops RSC135 W3 667 in Brunswick Depot with Ellen Butland at the controls RSC136 W3 669 on it’s final run at Victoria Prd & Brunswick St RSC137 W2 571 in Wellington Prd at Clarendon St with a Footy Final load of Passengers RSC138 Y1 613 shunts at Spencer St Terminus as X217 waits on Australia Day Pageant RSC139 PCC 1041 on Rt 96 in Burke St outside the Southern Cross Hotel RSC140 890 with accident damage on the outside roads at Preston Workshops c1978 RSC141 535 on Rt 4 at the old St Kilda Jun c1967 RSC142 1041 on Rt 88 turns from Bourke St into Spring St 1973 RSC143 102 on a tour at Albert Park Beach Terminus Feb 1972 RSC144 833, 835 & 834 in the shed at Malvern Depot c1976 RSC145 281 in Wellington Parade on a football very crowded special c1974 RSC146 464 Ballarat Rd 1960 RSC147 181 Explosives Fty - at Footscray Station - July 1960 RSC148 181 Williamstown Road 1960 RSC149 Cable car set at Alf Twentyman’s c1970 RSC150 X 217 at Malvern Depot c1970 RSC151 X1 465 and T181 Footscray Football ground in Barkly St. c1960 RSC152 Scrubber 5 at South Melbourne depot c1960 RSC153 X1 465 Footscray to Russell St, c1960 RSC154 X1 467 Leeds St Footscray 1960 RSC155 PMTT 4 Glenferrie Road, 1910 RSC156 S 164 at Malvern Depot c1970 RSC157 T178 Footscray c1960 RSC158 Cleaner No. 7 at South Melbourne depot c1960 RSC159 Two Y classes at Princes Bridge / Batman Ave mid 1950s RSC160 Swanston St – Nu color vue slide – M142 Demonstrates the work of Ron Scholten in photography, collection and/or production of duplicate slidesAssembled album in a black presentation folder of 160 colour slides, 8 slide sleeves, collected or produced by Ron Scholten. Many are TMSV or Windsor Publications slides. All photographs have been scanned and placed on the Museum's G drive. A list of all photographs with details has been compiled. melbourne, tramways, trams, cable trams -
 Melbourne Tram Museum
Photograph - set of 9 Black & White Photograph/s, Melbourne & Metropolitan Tramways Board (MMTB), 1966
... Princes Bridge with a route 6 tram and Princes Bridge Station... Trams tramways Traffic Control Congestion Spencer St Route 27 ...Series of 9 black and white photographs of the traffic congestion in the CBD during 1951. .1 - view looking south along Spencer St from Collins St showing the VR Head office, and the railway viaduct with a Berger Paint advertisement, Has one wide body tram with dash canopy lighting and three W2's. Also one small bus. Has "G3" in pencil on rear. .2 - similar view but with a different vehicle mix - W2 317 (Richmond Route 28), an SW6 route 27 and another W2 (route 41). Includes one large truck carrying Land Rover boxes. Typed on rear "Enlargement of No. 72 - Sheet No. 26 (Report P25/1/8) and in ink initials and "For Testing Engs 1/11/51". .3 - View looking north along Swanston St Princes Bridge with a route 6 tram and Princes Bridge Station and St Pauls Cathedral. On rear in pencil "11/2" .4 - Spencer St - trams crossing Spencer St bridge - W5 781 (Route 10) and a W2 649, route 9, South Melbourne Beach. .5 - Queensbridge under bridge - showing many cars jammed and the railway viaduct. .6 - ?? - Collins St - National Mutual and Shaw Savill Line offices - has a Safety Zone stand. .7 - Collins St looking east from Market St - with many trams in the view and many cars. .8 - Collins at Market St with a SW6 with dash canopy lighting - route 45, followed by a route 9A .9 - same location - total chaos. See also Reg 4520 for another 7 photos of the same series.trams, tramways, traffic control, congestion, spencer st, route 27, route 28, route 41, route 6, princes bridge, swanston st, w2 class, sw6 class, route 10, route 9, spencer st bridge, market st, collins st, route 45, route 9a, tram 317, tram 781, tram 649 -
 Melbourne Tram Museum
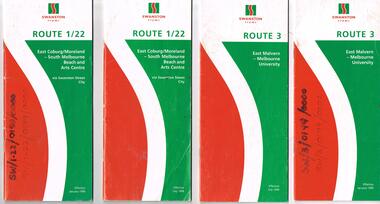
Ephemera - Timetable, Swanston Trams, Set of Swanston Trams timetables, 1999
... , frequency, a Welcome to Swanston Trams, description of route..., frequency, a Welcome to Swanston Trams, description of route ...Set of Swanston Trams timetables, red white green cover with route number on cover, giving details of popular destination, check points, use of Metcards and contact details, tram hire, frequency, a Welcome to Swanston Trams, description of route and route map. Has a fold out with a feed back form. .1 - Route 1/22 - East Coburg / Moreland - South Melbourne Beach and Arts Centre - January 1999 - 40 pages. .2 - ditto - July 1999. .3 - Route 3 - East Malvern - University - July 1999 - 28 pages .4 - ditto - January 1999 .5 - Route 5 - Malvern (Burke Rd) - University - July 1999 - 24 pages .6 - Route 6 - Glen Iris - City - January 1999 - 28 pages .7 - ditto - July 1999. .8 - Route 8 - Toorak - January 1999 - 32 pages .9 - ditto July 1999 .10 - Route 16 - St Kilda Beach - University - January 1999 - 28 pages .11 - ditto July 1999 .12 - Route 19 - North Coburg - City - January 1999 - 48 pages .13 - ditto July 1999 .14 - Route 55 - West Coburg - Domain Interchanges via William St - January 1999 - 32 pages .15 - ditto July 1999 .16 - Route 57 - West Maribyrnong - City - January 1999 .17 - ditto July 1999 .18 - Route 59 - Airport West - City - June 1999 .19 - Route 64 - East Brighton - University - January 1999 - 28 pages .20 - ditto July 1999 .21 - Route 67 - Carnegie - City - January 1999 - 28 pages .22 - ditto July 1999 .23 - Route 69 - Kew Cotham Rd - St Kilda Beach - January 1999 - 28 pages .24 - ditto July 1999 .25 - Route 72 - Camberwell - University - January 1999 - 28 pages .26 - ditto July 1999 .27 - Route 78/79 - North Richmond - Prahran or St Kilda Beach - January 1999 - 28 pages .28 - ditto July 1999 .29 - Route 82 - Moonee Ponds - Footscray - January 1999 - 20 pages .30 - ditto July 1999Some have number notes and notes written inside about changes or errors in ink. See History.trams, tramways, swanston trams, tram services, timetables, route 1, route 22, route 3, route 5, route 6, route 8, route 16, route 19, route 55, route 57, route 59, route 64, route 67, route 69, route 72, route 78, route 79, route 82 -
 Melbourne Tram Museum
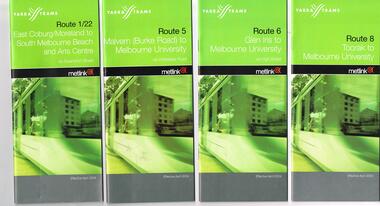
Ephemera - Timetable, Yarra Trams, Set of 22 Yarra Trams timetables, 2003 and 2004
... , frequency, a Welcome to Swanston Trams, description of route... Trams tramways Yarra Trams Tram Services Timetables Route 1 ...Set of 22 Yarra Trams timetables, green grey cover with route number on cover, giving details of popular destination, check points, use of Metcards and contact details, tram hire, frequency, a Welcome to Swanston Trams, description of route and route map. .1 - Route 1/22 - East Coburg / Moreland - South Melbourne Beach and Arts Centre - April 2004 - 36 pages. .2 - Route 5 - Malvern (Burke Rd) - University - April 2004 - 32 pages. .3 - Route 6 - Glen Iris - City - April 2004 - 20 pages. .4 - Route 8 - Toorak - April 2004 - 20 pages. .5 - Route 16 - St Kilda Beach - University - April 2004 - 24 pages. .6 - Route 48 - North Balwyn to Docklands - May 2003 - 28 pages .7 - Route 57 - West Maribyrnong - City - April 2004 - 28 pages. .8 - Route 59 - Airport West - City - April 2004 - 32 pages. .9 - Route 64 - East Brighton - University - April 2004 - 28 pages. .10 - Route 67 - Carnegie - City - April 2004 - 20 pages. .11 - Route 70 - Wattle Park - City - May 2003 - 24 pages .12 - Route 72 - Camberwell - University - April 2004 - 28 pages. .13 - Route 78/79 - North Richmond - Prahran or St Kilda Beach - April 2004 - 20 pages .14 - Route 82 - Moonee Pond - Footscray - April 2004 - 20 pages. .15 - Route 109 - Port Melbourne to Box Hill - May 2003 - 28 pages. .16 - Route 112 - Sth Melbourne/St Kilda Beach to West Preston - May 2003 - 44 pages. .17 - Route 3 - East Malvern to Melbourne University - April 2004 - 20 pages .18 - Route 16 - Melbourne University to Kew - Oct. 2004 - 40 pages with fold out map .19 - Route 24 - North Balwyn to LaTrobe St and Route 30 - St Vincent's Plaza to Flinders St via Docklands - 8 pages. .20 - Route 69 - Kew (Cotham Road) to St Kilda Beach - April 2004 .21 - Route 86 - Bundoora to Central Pier - May 2003 .22 - Route 96 - St Kilda Beach to East Brunswick - Sept 2002Some have number notes and notes written inside about changes or errors in ink. See History.trams, tramways, yarra trams, tram services, timetables, route 1, route 3, route 22, route 5, route 6, route 8, route 16, route 24, route 30, route 48, route 57, route 59, route 64, route 67, route 69, route 70, route 72, route 78, route 79, route 86, route 96, route 109, route 112 -
 Glen Eira Historical Society
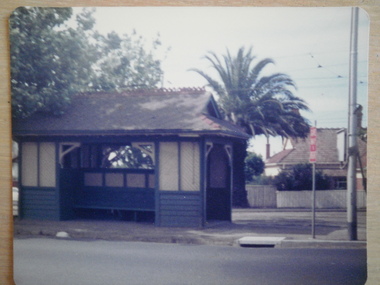
Article - Tram Shelter, Balaclava Road
Caulfield Conservation study by Andrew Ward dated October 1994 on Tram Shelter, corner of Balaclava Road and Orrong Road with a brief history and a statement of significance from the National Trust of Australia. Four black and white photos of Balaclava Road tram shelter. National Trust classification report giving detail of shelter and others on the tramway routes of Melbourne. Includes history of cable car system and reasons for tramways amalgamations. It includes architectural features. Article from the Trust News, June 2000 on history of Melbourne Tram shelters, various architectural design and features and where they were built and who designed thembalaclava road, orrong road, tram shelters, street furniture, cast iron work, verandahs, edwardian style, the prahran and malvern tramways trust, ward andrew, historic buildings, dandenong road, caulfield north, glenhuntly road, green robert -
 Glen Eira Historical Society
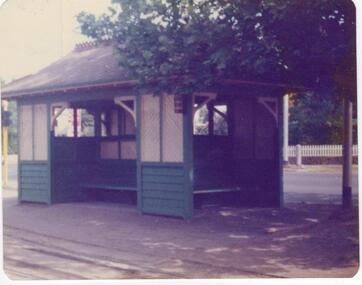
Article - Tram Shelter, Dandenong Road
National Trust of Australia, Victoria, report giving details of tram shelters on the tramways routes of Melbourne; history of cable car system and reasons for tramways amalgamations, includes architectural plan, map and photocopies of two photographs before restoration 1994. Includes bibliography. Two coloured photographs of tram shelter Dandenong Road opposite Hawthorn Road taken in 1978. Detailed history from the Trust News 2000 on history of Melbourne Tram Shelters, various architectural design features, where erected and who design by.dandenong road, hawthorn road, north caulfield, glen eira, flannagan l.s., prahran and malvern tramways trust, street furniture, tram shelters, edwardian style, architectural features, glenhuntly road, caulfield, orrong road, balaclava road, watson stephen, storey rohan, ward andrew -
 Eltham District Historical Society Inc
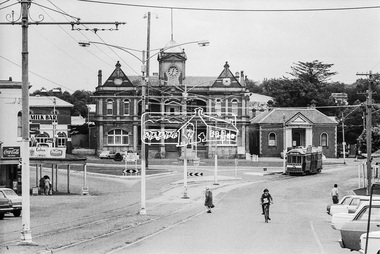
Photograph, Bendigo Tramways No. 2 en route to Quarry Hill outside Eaglehawk Town Hall, January 1972, Jan 1972
Viewed from High Street (Loddon Valley Highway) looking northwest from near Napier StreetDigital TIFF file Scan of 35mm Ilford FP3 black and white negative transparencybendigo, bendigo tramways no. 2, eaglehawk, eaglehawk mechanics institute, eaglehawk town hall, george coop collection, high street, loddon valley highway, milk bar, quarry hill, sailors gully road, tram -
 Eltham District Historical Society Inc
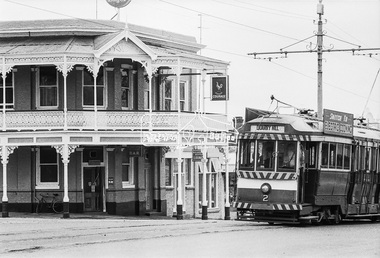
Photograph, Bendigo Tramways No. 2 en route from Quarry Hill outside the Victoria Hotel near the intersection of High Street at Victoria Street, Eaglehawk, January 1972, Jan 1972
Looking northwest across High Street, Eaglehawk at the intersection with Victoria Street. The Victoria Hotel is the present day New Victoria HotelDigital TIFF file Scan of 35mm Ilford FP3 black and white negative transparencybendigo, bendigo tramways no. 2, eaglehawk, eaglehawk mechanics institute, eaglehawk town hall, george coop collection, high street, loddon valley highway, milk bar, street new victoria hotel, pub, quarry hill, sailors gully road, tram, victoria hotel -
 Eltham District Historical Society Inc
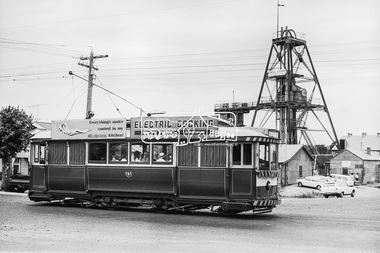
Photograph, Bendigo Tramways No. 7 en route to Golden Square passes the Central Deborah Gold Mining Co, High Street (Midland Highway) and Violet Street, Bendigo, January 1972, Jan 1972
Looking east from Midland Highway at intersection of Violet StreetDigital TIFF file Scan of 35mm Ilford FP3 black and white negative transparencybendigo, bendigo tramways no. 7, central deborah gold mining co. n.l., eaglehawk, george coop collection, golden square, high street, midland highway, tram, violet street -
 Eltham District Historical Society Inc
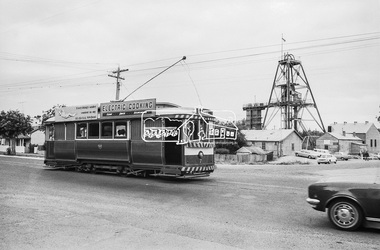
Photograph, Bendigo Tramways No. 7 en route to Golden Square passes the Central Deborah Gold Mining Co, High Street (Midland Highway) and Violet Street, Bendigo, January 1972, Jan 1972
Looking east from Midland Highway at intersection of Violet StreetDigital TIFF file Scan of 35mm Ilford FP3 black and white negative transparencybendigo, bendigo tramways no. 7, central deborah gold mining co. n.l., eaglehawk, george coop collection, golden square, high street, midland highway, tram, violet street -
 Eltham District Historical Society Inc
Photograph, Bendigo Tramways No. 7 en route to Golden Square, January 1972, Jan 1972
Most likely High Street, Golden SquareDigital TIFF file Scan of 35mm Ilford FP3 black and white negative transparencybendigo, bendigo tramways no. 7, eaglehawk, george coop collection, golden square, high street, tram -
 Eltham District Historical Society Inc
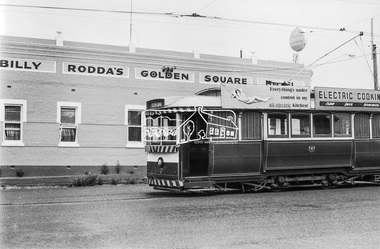
Photograph, Bendigo Tramways No. 7 en route to Golden Square on High Street near the intersection of Maple Street, Golden Square, January 1972, Jan 1972
Billy Rodda's Golden Square Hotel now known as the Golden Square HotelDigital TIFF file Scan of 35mm Ilford FP3 black and white negative transparencybendigo, bendigo tramways no. 7, billy rodda's golden square hotel, eaglehawk, george coop collection, golden square, high street, maple street, tram -
 Eltham District Historical Society Inc
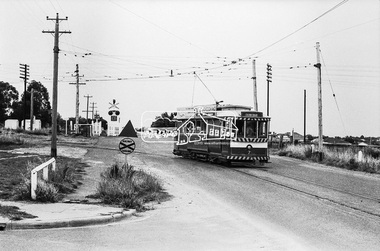
Photograph, Bendigo Tramways No. 7 departs from Thunder Street in North Bendigo en route to Golden Square, Bendigo, January 1972, Jan 1972
The tram line proceeds up to the left just pass Moray Crescent where it terminated alongside the railway line in North Bendigo in 1972Digital TIFF file Scan of 35mm Ilford FP3 black and white negative transparencybendigo, bendigo tramways no. 7, george coop collection, moray crescent, north bendigo, railway crossing, railway line, thunder street, tram -
 Eltham District Historical Society Inc
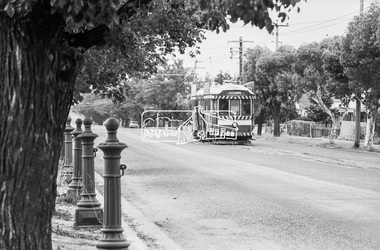
Photograph, Bendigo Tramways No. 26 en route to Eaglehawk outside Bendigo Cemetery, Carpenter street, Quarry Hill, January 1972, Jan 1972
Looking south along Carpenter StreetDigital TIFF file Scan of 35mm Ilford FP3 black and white negative transparencybendigo, bendigo cemetery, bendigo tramways no. 26, carpenter street. quarry hill, eaglehawk, george coop collection, tram -
 Eltham District Historical Society Inc
Photograph, Bendigo Tramways No. 26 en route to Eaglehawk outside the entrance to Bendigo Cemetery, Carpenter street, Quarry Hill, January 1972, Jan 1972
Looking south along Carpenter StreetDigital TIFF file Scan of 35mm Ilford FP3 black and white negative transparencybendigo, bendigo cemetery, bendigo tramways no. 26, carpenter street. quarry hill, eaglehawk, george coop collection, tram -
 Eltham District Historical Society Inc
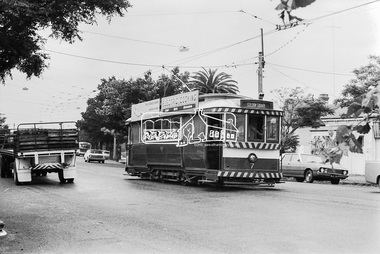
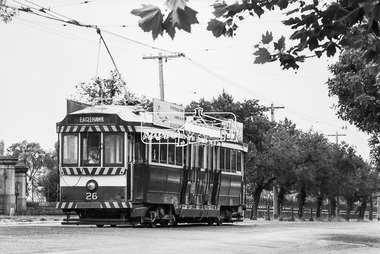
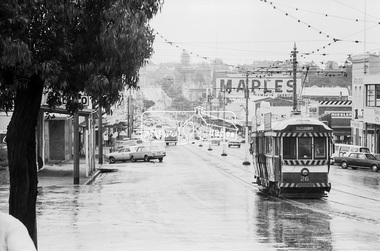
Photograph, Bendigo Tramways No. 26 descending Mitchell Street en route to Eaglehawk, January 1972, Jan 1972
Possibly Pall Mall, Bendigo, Mitchell StreetDigital TIFF file Scan of 35mm Ilford FP3 black and white negative transparencybendigo, bendigo tramways no. 26, eaglehawk, george coop collection, maples, pall mall, tram -
 Eltham District Historical Society Inc
Photograph, Bendigo Tramways No. 2 en route to Quarry Hill passes over the Mitchell Street Railway Bridge, Bendigo, January 1972, Jan 1972
Digital TIFF file Scan of 35mm Ilford FP3 black and white negative transparencybendigo, bendigo railway station, bendigo tramways no. 2, eaglehawk, george coop collection, mitchell street, railway line, tram -
 Eltham District Historical Society Inc
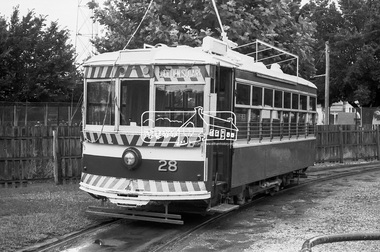
Photograph, Golden Square route Bendigo Tramways No. 28 parked, possibly near the Arnold Street Tram Depot, Bendigo, January 1972, Jan 1972
Birney (USA manufacture) tram carDigital TIFF file Scan of 35mm Ilford FP3 black and white negative transparencyarnold street depot, bendigo, bendigo tramways no. 28, eaglehawk, george coop collection, golden square, tram, birney (usa) tram car