Showing 730 items matching "ballarat railway stations"
-
 Ballarat Tramway Museum
Slide - 35mm slide/s - set of 7, Eldon Hogan, Aug. 1964
Set of seven Kodak cardboard mounted slides - featuring photos taken during a visit to Bendigo by Eldon Hogan. Slides have slide number (26 to 32) and date "Aug 64" stamped onto them. Possibly a Xavier College Cadets tour - Eldon was involved with them at the time, given slide No. 27. Scanned on the Canon scanner at the depot 15/12/1971 at the time of the installation of the scanner. .1 - No 11 and a bogie car at the Railway Station .2 - ditto - note uniformed person boarding (Xavier College Cadet?) .3 - No. 11 at Charing Cross, showing "special" .4 - No. 11 bound for Eaglehawk at a Crossing loop .5 - No. 20 in bound for Quarry Hill - at the above crossing loop? .6 - No. 11 crossing the Eaglehawk / Swan Hill railway line at the overbridge. .7 - No. 11, High St Eaglehawk.tramways, trams, bendigo, railway station, eaglehawk, charing cross, birney, tram 11, tram 20 -
 Ballarat Tramway Museum
Album - Photo Album, c1970
Set of 16 photos of Ballarat tram system taken 1970c on a tour by an unknown Qld based person.Photo album containing 16 colour prints. Photo album has heavy card covers, covered in black textured plastic containing 12 clear plastic photo sleeves held with a white comb binder. Photos of Ballarat prior to closure, c1970. Photographer unknown. Donated by Peter Hyde of Brisbane Tramway Museum to BTM 3/2/2010, from a deceased estate. Photos apparently taken on a tram tour. .1 - No. 42 and a single trucker inbound in Sturt St. .2 - taken from tram ascending Bakery St hill in Victoria St. .3 - End of No. 42, with the destination "Haddon St via Drummond Nth" .4 - No. 11 and 42 in Lydiard St Nth, near the railway station. No. 11 showing special. .5 - photo of three people on the tour. .6 - Trams reversing at the Victoria St terminus .7 - ditto .8 - 11, 42 and 12? in Lydiard St North by railway station. .9 - Three trams at Sebastopol terminus. .10 - View in Albert St Sebastopol looking north along the track on the side of the road. .11 - View of the tram crossing in Albert St. .12 - 27 and 42 crossing Albert St Sebastopol. .13 - View of Albert St from the tram, north of the crossing looking at the reserved track 14. - Lydiard St North looking south .15 - 42 at the railway level crossing. .16 - View south of the railway level crossing, three trams, with passengers alighting.trams, tramways, ballarat, albert st, sebastopol, victoria st, sturt st, lydiard st nth, railway crossing -
 Ballarat Tramway Museum
Photograph - Digital image, 1970s
Yields information about the railway level crossing.Digital image, black and white, of No. 41 north bound in Lydiard St North, crossing the railway lines with Victoria House in the background, at the level crossing. A wet day. Photo taken by Peter Bruce 1970's and 1971, prior to the closure of the Ballarat tramway system. Peter's Title of image: "No. 41 at the Railway"trams, tramways, level crossings, railway station, lydiard st nth, tram 41 -
 Ballarat Tramway Museum
Photograph - Black & White Photograph/s, John Alfred, 1960
Yields information about the appearance of BTM tram No. 661 in 1960, W2 349 and how the Carnegie line section of single track was worked.Black and white photograph of trams W3 661 (Route 4 Carnegie) and X2 675 (Point Ormond), Glenhuntly Road, Elsternwick Station, during the lowering of the railway line, 1960. Photo by John Alfred. Two copies held. See also Reg Item 5163 for an Ian Brady photograph prior to the work commencing.trams, tramways, mmtb, elsternwick, point ormond, w class trams, level crossings, tram 661, tram 675 -
 Ballarat Tramway Museum
Photograph - Black & White Photograph/s, Wal Jack, 7/03/1954 12:00:00 AM
Black and White print contained within the Wal Jack Bendigo and Geelong Album, see Reg Item 5003 for more details. Photo of No. 21 in Mitchell St, near the Railway Station, 7-3-1954. Photo by Wal Jack. Printed on Ilford paper. See image i2 for rear of photograph. See image i3 for hi res scan of negative On the rear in blue ink "SEC Bendigo No 21 in Mitchell St near Rly Stn Sunday morning 7-3-54" with Wal Jack copyright stamp in the top right hand corner and the number "T67PC" written in.trams, tramways, bendigo, mitchell st, tram 21 -
 Ballarat Tramway Museum
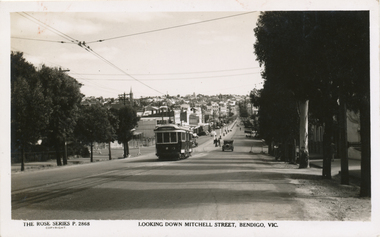
Postcard, Rose Stereograph Co, "Looking down Mitchel St Bendigo Vic"
Postcard contained within the Wal Jack Bendigo and Geelong Album, see Reg Item 5003 for more details. Rose Series Postcard No. 2868, titled "Looking down Mitchel St Bendigo Vic", from the railway overbridge. Has bogie tram No. 23 descending the hill, with the destination of Eaglehawk. Would appear the railway station entrance has been barriered off. Published by the Rose Stereograph Co. Armadale Vic, has the rose logo on the rear and a statement "A real photograph produced in Australia". No space for the stamp or address line. On rear in ink "Bogie 23" and in pencil "WJ"trams, tramways, bendigo, rose postcards, mitchell st, tram 28 -
 Ballarat Tramway Museum
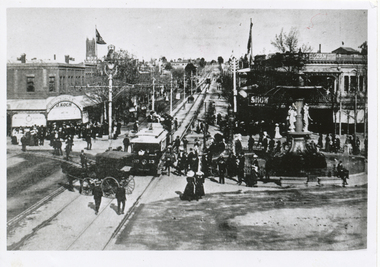
Photograph - Black & White Photograph/s, The Bendigonian, Sep. 2005
Black and White copy print contained within the Wal Jack Bendigo and Geelong Album, see Reg Item 5003 for more details. Photo of looking east along Mitchell St towards the Railway Station with tram No. 13 and a double deck trailer - has the centre poles along Mitchell St. in the photograph. In the background is a J. Koch and the Bendigo Supply Stores. Has fountain in photograph. Copied by Keith Kings from The Bendigonian 19/9/1905. On rear in ink " SA782, Bendigo, No. 13 - 3 window saloon Charing Cross. Note:- Crossover in Mitchell St.". Copied ex "The Bendigonian 19/9/1905."trams, tramways, bendigo, charing cross, horse trams, mitchell st -
 Ballarat Tramway Museum
Photograph - Black & White Photograph/s, Wal Jack, 27/06/1955 12:00:00 AM
Black and White print contained within the Wal Jack Bendigo and Geelong Album, see Reg Item 5003 for more details. Photo of Geelong No. 8 at the Railway Station with the Gordon Institute buildings in the background. The tram has the destination of Chilwell. Photo by Wal Jack 27/6/1955. Printed on Ilford paper. i1 - scan of print in the album i2 - rear of image i3 - scan of negative at 3200dpi added 27/6/2020. On rear in ink "SEC Geelong No. 8 to Chilwell at Geelong Station". Has the Wal Jack copyright stamp in the top right hand corner with the number "T331" written in and the date "27 Jun 1955" stamped with a purple ink hand date stamp.trams, tramways, geelong, railway station, tram 8 -
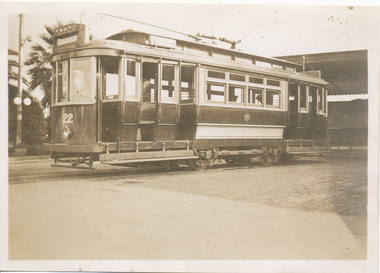
 Ballarat Tramway Museum
Photograph - Black & White Photograph/s, Wal Jack, Jun. 1939
Black and White print contained within the Wal Jack Bendigo and Geelong Album, see Reg Item 5003 for more details. Photo of No. 22 at the Geelong Railway Station. Photographer unknown - possibly Wal Jack - see date on Reg Item 5861. Wal's album notes dates the photo as June 1939. Printed on Kodak Velox paper. The tram has two trolley poles, the destination of Newtown. A conductor is standing in one of the doorways. i1 - scan of print in the album i2 - rear of image i3 - scan of negative at 3200dpi added 6/6/2020. trams, tramways, geelong, railway station, tram 22 -
 Ballarat Tramway Museum
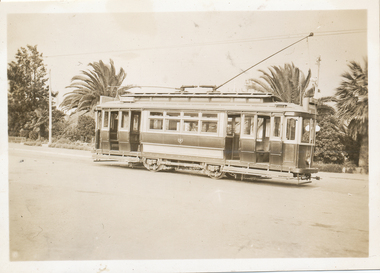
Photograph - Black & White Photograph/s, Wal Jack, Jun. 1939
Black and White print contained within the Wal Jack Bendigo and Geelong Album, see Reg Item 5003 for more details. Photo of No. 22 at the Geelong Railway Station. Photographer unknown same as 5859 - possibly Wal Jack - see date on Reg Item 5861. Wal's album notes dates the photo as June 1939. Printed on Kodak Velox paper. The tram has two trolley poles. i1 - scan of print in the album i2 - rear of image i3 - scan of negative at 3200dpi added 6/6/2020. trams, tramways, geelong, railway station, tram 22 -
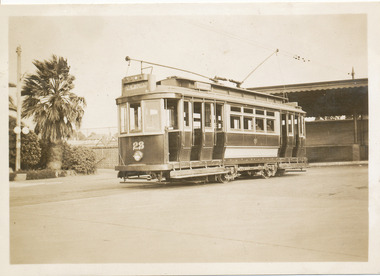
 Ballarat Tramway Museum
Photograph - Black & White Photograph/s - Geelong 23 at Railway Station, Wal Jack, Jun. 1939
Black and white photo from the Wal Jack album (item 5003) of Geelong tram 23 leaving the railway station with Johnstone park in the background. i1 - scan of print in the album i2 - rear of image i3 - scan of negative at 3200dpi - not exactly the same location given the position of the trees behind. i4 - scan of a print from the Ken Magor collection i5 - scan of rear of print with date 21-6-1939 and Ken Magor number 1805. Yields information about Geelong tram 23Photo of No. 23 at the Geelong Railway Station. Has the Wal Jack copyright stamp on the back.trams, tramways, geelong, railway station, tram 23 -
 Ballarat Tramway Museum
Photograph - Black & White Photograph/s, Wal Jack, Jun. 1939
Black and White print contained within the Wal Jack Bendigo and Geelong Album, see Reg Item 5003 for more details. Photo of No. 23 at the Geelong Railway Station with the station buildings in the background. Photographer unknown - handwriting is the same as other photos such as Reg item 5850.. Wal's album notes dates the photo as June 1939. Printed on Kodak Velox paper. The tram has two trolley poles and the destination of Newtown. i1 - scan of print in the album i2 - rear of image i3 - scan of negative at 3200dpi added 6/6/2020. Has the rear in ink "Geelong Tramways, No. 23 "Two man trams", built by A. Pengelley South Australia"trams, tramways, geelong, railway station, tram 23 -
 Ballarat Tramway Museum
Photograph - Black & White Photograph/s, Wal Jack, 3/01/1945 12:00:00 AM
Black and White print contained within the Wal Jack Bendigo and Geelong Album, see Reg Item 5003 for more details. Photo of No. 17 from the Railway Station turning out of Railway Terrace into Mercer St. 3-1-1945. Printed on Ilford Paper. Tram has the destination of West. i1 - scan of print in the album i2 - rear of image i3 - scan of negative at 3200dpi added 30/6/2020.Has the rear in ink "SEC Geelong No. 17 from the Railway Station turning out of Railway Terrace into Mercer St. 3rd January 1945". Has the Wal Jack copyright stamp on the rear with the number T319 written in.trams, tramways, geelong, mercer st, railway station, tram 17 -
 Ballarat Tramway Museum
Photograph - Black & White Photograph/s, 8/01/1956 12:00:00 AM
Black and White print contained within the Wal Jack Bendigo and Geelong Album, see Reg Item 5003 for more details. Photo of Geelong No 31 bound for North Geelong at Railway station junction, Malop and Mercer Streets 8/1/1956. General view of junction in the area with a Olympic tyre / service station No details on photographer. On rear in ink "No.31 bound for North Geelong at Railway Stn Junc Malop and Mercer Streets 8/1/56"trams, tramways, geelong, north, railway station, malop st, mercer st, tram 31 -
 Ballarat Tramway Museum
Photograph - Black & White Photograph/s, 11/07/1950 12:00:00 AM
Black and White print contained within the Wal Jack Bendigo and Geelong Album, see Reg Item 5003 for more details. Photo of an illuminated street sign, lamp, near Geelong Railway Station, at Mercer St corner, 11-7-1950. Photographer not known. Photo is glued into album. Sign has the words "Geelong Electric Tramways / Board tram at Curve" with a hand and finger pointing the direction to walk in.trams, tramways, geelong, signs, railway station -
 Ballarat Tramway Museum
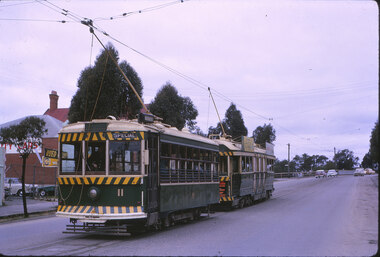
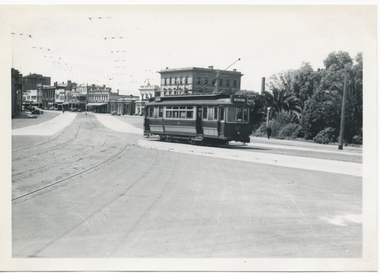
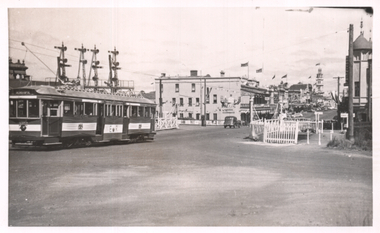
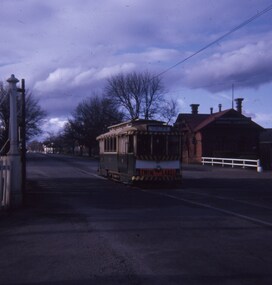
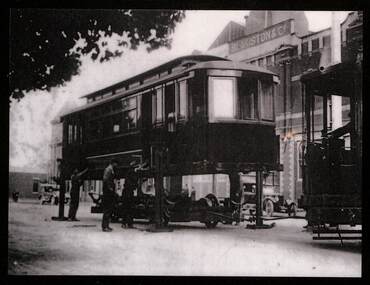
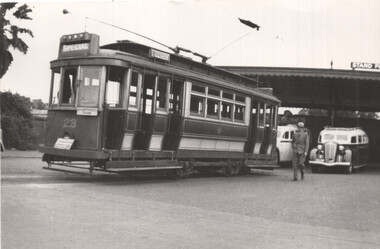
Photograph - Tram 38 decorated for Royal Visit, Ken Magor, 1954
... , crossing the railway tracks at Ballarat Station in Lydiard St North... at Ballarat Station in Lydiard St North. The tram has the destination ...The photo, shows tram 38 decorated for the 1954 Royal Visit, crossing the railway tracks at Ballarat Station in Lydiard St North. The tram has the destination of Sebastopol. In the background is the railway signal gantry, Reids Coffee Palace and the Post Office. Many of the buildings are flying flags.Yields information about the 1954 Royal Tram.Photograph, black and white - plain black with Ken Magor stamp and negative number written on the rear.Ken Magor Negative Number - "3427" tramways, trams, royal visit, decorated trams, tram 38, lydiard st nth, level crossings -
 Ballarat Tramway Museum
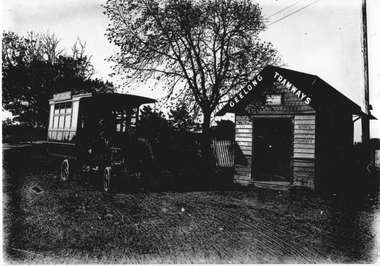
Photograph - Geelong MESCo Bus East Geelong, c1920
The photo shows the Melbourne Electric Supply Co. (MESCo), bus at the East Geelong terminus. MESCo operated the Geelong tram system from 1912 and opened the tram line to this location "East Geelong" in 1923. The terminus was at the Geelong Cemetery, with a wooden waiting room shelter with signage about the building being used for passengers only and prohibiting the posting of bills. The buses ran from the railway station and Moorabool St wharf from 1912 until they were replaced by trams in 1923. The bus is also seen in item 4315. Yields information about the operation of a bus by MESCo in Geelong.Black and white photograph - plain back.geelong, tramways, mesco, buses, east geelong, shelters -
 Ballarat Tramway Museum
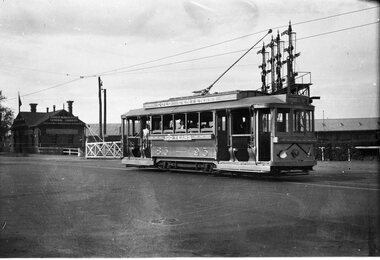
Negative, Wal Jack, 1951
... Ballarat Railway Station... Ballarat Railway Station Gold Tram tram 23 Negative and Digital ...Yields information about the Gold tram of 1951 and of the railway level crossing in Lydiard St North.Negative and Digital image of the Wal Jack Ballarat Negative file of No. 23 as the gold tram crossing the level crossing in Lydiard St North, during 1951 on its way to Lydiard St North. In the background is the signal gantry and the Kennedy Murray Pty Ltd General Carriers. trams, tramways, lydiard st nth, level crossings, ballarat railway station, gold tram, tram 23 -
 Ballarat Tramway Museum
Slide - 27 mm sq slide/s - set of 3, Andrew Howlett, Lydiard St North level crossing, March 1969?
Yields information about the Lydiard St Nth line, the level crossing and the terminus.Set of three Colour slides, Kodak white cardboard mount, developed Mar 1969 of No. 37 .1 - while running a special crossing at the Lydiard St North level crossing at the Railway Station. Has the Reid's Coffee Palace and Railway Station in the background. .2 - No. 37 and a single trucker carrying a "Trotting at Bray Raceway" auxiliary board, at the Lydiard St North terminus. Has the shelter on the right-hand side. .3 - No. 37 waiting at the terminus. See Reg Items 7675, 7678, 7681, 7684, 7686, 7705 and 7713.ballarat, tramways, trams, lydiard st nth, railway station, shelters, level crossings, tram 37 -
 Ballarat Tramway Museum
Slide - 27 mm sq slide/s, Andrew Howlett, Tram No. 27, southbound crossing the Lydiard St level crossing, Sep. 1968
Yields information about the Lydiard St Nth Level crossing.Colour slide, Kodak white cardboard mount, developed September 1968 of No. 27, southbound crossing the Lydiard St level crossing with a destination of Sebastopol. The tram has a Twin Lakes sign. the Kennedy Murrays General Carrier building in the background."Railway Xing Lydiard St Nth" in red ink.ballarat, tramways, trams, lydiard st nth, level crossings, railway station, tram 27 -
 Ballarat Tramway Museum
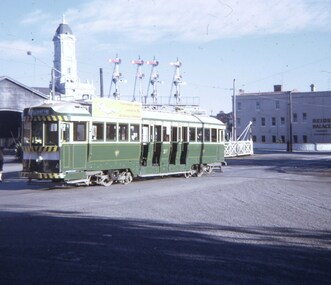
Negative, Wal Jack, early 1960's
Yields information about Ballarat tram No. 30 about to cross the level crossing in Lydiard St North at the railway station.Negative and Digital images of the Wal Jack Ballarat Negative file of No 30 to Sebastopol about to cross the Lydiard St North Level crossing at the railway station. Tram has a White Horse Whiskey Advert. trams, tramways, lydiard st north, railway station, level crossings, tram 30 -
 Ballarat Tramway Museum
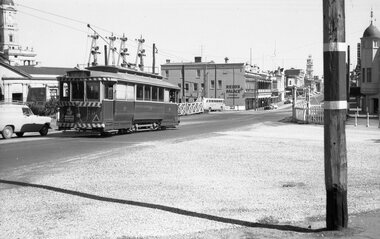
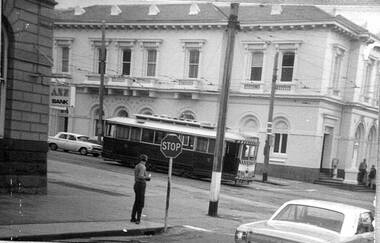
Photograph - Black & White - Tram 20 at Railway level crossing, Keith Kings, 22/1/1955
Shows trams at the Lydiard St level crossing gates and the signal gantry.Yields information about Ballarat tram No. 20 and the locationBlack and White photograph of SEC Ballarat tram No. 20 crossing the railway level crossing in Lydiard St North. Has the signal gantry in the background. Photo by Keith Kings 22/1/1955.On rear has the photographers file number (M)(d)(3)ballarat, lydiard st north, level crossing, railway station, tram 20 -
 Ballarat Tramway Museum
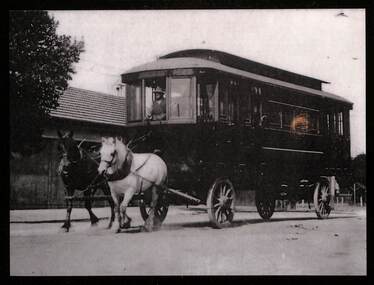
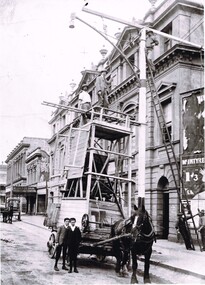
Photograph - Geelong tram body being delivered from the Railway Station c1924
Demonstrates the method of delivery of a tramcar body for Geelong from the railway station using a horse drawn jinker with the horse driver standing in the same location as a tram driver would have. Tramcar built by Pengelley of Adelaide. The tramcar bodies were delivered during 1924 and 1925.Yields information about the Pengelly built tramcars for Geelong c1924 and how tramcar bodies could be transported using a horse drawn jinker. At the time, the Geelong tram system operated by the Melbourne Electric Supply Co.Copy photograph on black plastic type backing with black edges of a Pengelley Adelaide built tramcar body for the Geelong tramway system being delivered 1924, from the Geelong Railway station.geelong, tramways, pengelley, tram bodies, horse drawn jinker -
 Ballarat Tramway Museum
Photograph - Geelong tram body being fitted with a truck or wheelset
Provides information on how a tramcar body was fitted with a wheelset or truck (Brill Radiax EB1 type). Lifted on the jacks after delivery by a horse drawn jinker from the Railway Station (See Reg Item 8321) The wheel set is being pushed under the tramcar by another tramcar. Once fitted the tramcar would have been towed back into the depot and the motors etc connected. Has the Blakiston & Co. building in the background. Yields information about how tramcar bodies were lifted outside the Geelong tram depot in Brougham St in order to be made operational. Copy photograph on black plastic type backing with black edges of a Pengelley Adelaide built tramcar body on jacks being fitted with a truck or wheel set.geelong, tramways, pengelley, tram bodies, brill radiax truck, brougham st, trams -
 Ballarat Tramway Museum
Photograph - Series of 9 black and white photographs of Ballarat trams, Ellen Butland, 1971
.1 - No. 27 in Lydiard St North at Sturt St. .2 - Scene at Railway station in Lydiard St North following arrival of the ARHS tour train. .3 - Nos. 27, 42, 11 at Sebastopol terminus. .4 - No. 42 in Sturt St .5 - Nos. 27, 42, 11 at Sebastopol terminus. .6 - No. 11 in Sturt St .7 - No. 27 crossing Albert St Sebastopol. .8 - No. 42 in Lydiard St North at Sturt St. .9 - Nos. 27, 42, 11 at Lydiard St. North terminus. Note: - some of the captions under the photos have the wrong locations.Has a strong association with a Melbourne tram driver who assembled the scrap book and series of photos of Ballarat trams at the time of closure. Yields information about the tram operations.Set of nine black and white photographs contained with Reg item 5988, a Stamford Kiwi School Scrap Book - prepared by Ellen Butland of Auckland following the closure of the SEC Ballarat Tramway system."Ballarat, Australia 21-9-71" in ink along the top edge of the sheet.trams, tramways, ballarat, sturt st, sebastopol, tram 27, railway station, tram 42, tram 11 -
 Ballarat Tramway Museum
Photograph - Positioning street lights - Lydiard St North, Ballarat late 1890s
Photo of the installation of an electric arc type street lamp in Lydiard St North, near the Provincial Hotel Ballarat. The tower wagon is drawn by a single horse. Two boys standing alongside while two men are on the top of the wagon, a man on the top of the ladder is positioning a lifting beam while two men on the ground hold the rope for this beam. On the side of the wagon is possibly an extension that could be lifted onto the top of the tower itself to give a greater working height. The buildings between Mair St and the railway station on the west side of Lydiard St North remain in position. Yields information about the methodology of the late 1890's to install street lighting in BallaratDigital print of a Positioning street lights Lydiard St North Ballarat late 1890sarc lamps, ballarat, lydiard st north, electric lighting, tower wagons, horses, workmen, street lights -
 Ballarat Tramway Museum
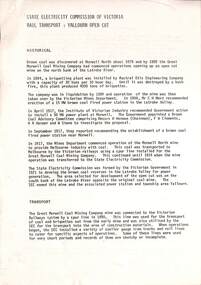
Document, 'State Electricty Commission of Victoria Rail Transport: Yallourn Open Cut"
Provides details of the history of SECV rail operations in the Yallourn and other power station open cuts and the transport of coal and the locomotives used in the Latrobe Valley operations of the SEC. Possibly prepared in the early 1980s. Rail operations on the interconnecting railway ceased in 2000. Shows outline diagrams of the steam, electric and diesel locomotives and the coal wagons.Provides information about the SEC Coal railways and their rolling stock used for power generation in Victoria.Report or document - 16 A4 pages titled Report - 'State Electricty Commission of Victoria Rail Transport: Yallourn Open Cut"sec tramways, power supply, secv, open cut mining, locomotives, interconnecting railway -
 Ballarat Tramway Museum
Slide - R711 Ballarat Station - COTMA Conference 2000, David Verrier, 17-11-2000
... Photo shows West Coast Railway locomotive R711 at Ballarat... Railway locomotive R711 at Ballarat Station after hauling ...Photo shows West Coast Railway locomotive R711 at Ballarat Station after hauling the special train for passengers for the 2000 COTMA Conference in Ballarat. The locomotive was provided by West Coast Railway who was running the Warnambool service at the time and was a suprise to the conference attendees.Demonstrates the use of a steam locomotive to transport passengers for a COTMA Conference in 2000.Kodak colour slide - plastic mount"Fri 17/11/00 R711 Ballarat"cotma, btm, r 711, steam locomotives, ballarat, west coast railway -
 Ballarat Tramway Museum
Slide - Set of 7 - Lydiard Street level crossing and tram terminus, David Verrier, 21-11-2000
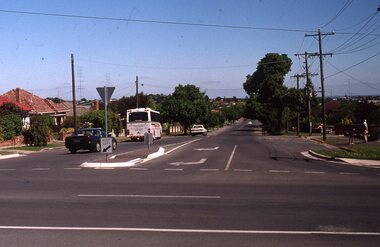
Set of seven slides taken during the 2000 COTMA Conference visit to the Ballarat Tramway Museum depot on 21-11-2022 1 - Former Lydiard St North terminus looking south 2 - Ballarat Station with the temporarily closed Lydiard St level crossing. 3 - Ballarat Station with the temporarily closed Lydiard St level crossing. 4 - Ballarat Station good shed looking east 5 - Lydiard St level crossing with G521 on freight leaving 6 - Lydiard St level crossing with G521 on freight leaving 7 - Train on level crossingYields information about the Lydiard St Nth terminus in 2000 and the level crossing.Set of seven Kodak colour slides - white plastic mountEach slide has details written on it.ballarat, specials, cotma, lydiard st north, level crossing, g 521, railways -
 Ballarat Tramway Museum
Photograph - Geelong Tram tour AETA, Charles Craig, 29-3-1948
Photos show the first AETA Provincial tram tour of 29-3-1948. The tour used Geelong tram 23. See also items 7234 to 7238 for other photos.Yields information about the AETA's first Geelong tour in 1948.Set of four Black and white photographs of the AETA tour to Geelong.Items 1 and 2 have the date on the rear in ink.tramways, trams, sec tramways, tram 23, geelong, geelong railway station