Showing 6516 items
matching tramways -- hawthorn
-
 Melbourne Tram Museum
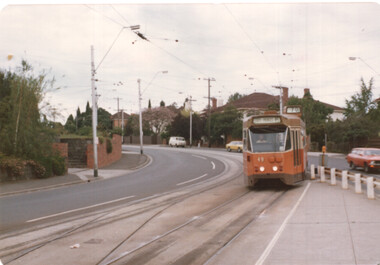
Photograph - Z1 49 Riversdale Rd Hawthorn, George Bishop, 1-1-1979
Photograph shows Z1 No. 49 (City Princes Bridge, route 70) at the corner of Riversdale Road, Wallen Road and Power Street. Shows the crossover that was subsequently relocated to Wallen Road. Photo George Bishop, 1-1-1979Yields information about the operation of Z1 class trams on route 70.Colour photograph - Z1 49 Riversdale Rd HawthornDetails of the photograph and photographer on the rear in ink.trams, tramways, z1 class, tram 49, riversdale road, wallen road, power street, route 70 -
 Melbourne Tram Museum
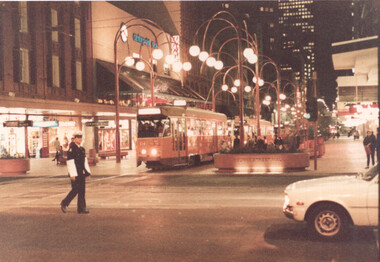
Photograph - Z2 114 Bourke St Mall at Swanston Street, George Bishop, August 1983
Photograph shows - Z2 114 Bourke St Mall at Swanston Street with a traffic policeman and the decorative lights in the Mall. Photo by George Bishop, August 1983.Yields information about the operation of Z2 class trams in Bourke Street.Colour print - Z2 114 Bourke St Mall at Swanston StreetDetails of the photograph and photographer on the rear in ink.trams, tramways, z2 class, tram 114, swanston st, bourke st mall, police -
 Melbourne Tram Museum
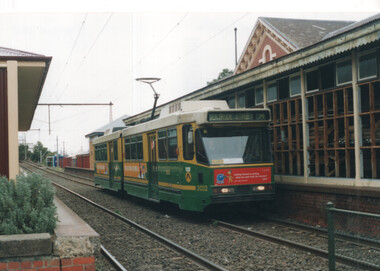
Photograph - Set of 3 colour prints - St Kilda light rail, George Bishop, April 1999
Set of three photographs taken by George Bishop on April 1999 - All route 96 - East Brunswick to St Kilda Beach 1 - B2 2032 at the former Albert Park Railway Station 2 - B1 2001 at Albert Park 3 - B2 2057 Albert ParkYields information about the operation of Melbourne trams during early 1995.Set of three colour prints printed on Kodak paperDetails of the photograph and photographer on the rear in ink.trams, tramways, st kilda, b2 class, b1 class, tram 2032, tram 2001, tram 2057, albert park, st kilda light rail, light rail -
 Melbourne Tram Museum
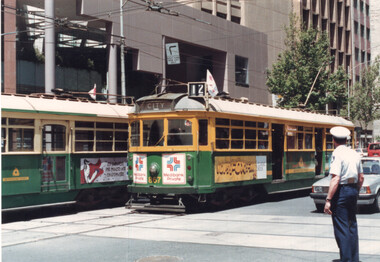
Photograph - Set of 2 colour prints - Elizabeth and Collins Streets, George Bishop, c1990
Set of two photographs taken by George Bishop c1990 at the corner of Elizabeth and Collins Streets, Melbourne. Both photos show police on point duty controlling the intersection. 1 - SW6 867 (Route 12) in Collins St. 2 - Z3 158 (North Coburg) and another ZYields information about the operation of Melbourne trams during early 1990s.Set of two colour prints printed on Fujichrome paperDetails of the photograph and photographer on the rear in ink.trams, tramways, police, collins street, z3 class, sw6 class, tram 158, tram 867, elizabeth sreet -
 Melbourne Tram Museum
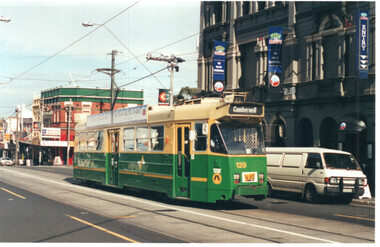
Photograph - Colour Print Z3 129 Burke Road Camberwell, George Bishop, c1999
Colour print of photograph taken by George Bishop c1999, of Z3 129 (Camberwell, Route 72) Burke Road Camberwell near Burwood Ave. Has the Palace Hotel in the background.Yields information about the operation of Melbourne trams during the late 1990s.Colour prints printed on Kodak paperDetails of the photograph and photographer on the rear in ink.trams, tramways, z3 class, tram 129, burke road, camberwell, palace hotel, route 72 -
 Melbourne Tram Museum
Album - David Frost Slide Collection, David Frost
Photo - see pdf file for further information. Number Brief Description date DFC1 A general view from the former railway platform at Port Melb Station looking towards Station Pier on opening day 20-12-1987 DFC2 A2 285 in the Tramway Platform at Port Melbourne Station on opening Day 20-12-1987 DFC3 A2 285 in the Tramway Platform at Port Melbourne Station on opening Day 20-12-1987 DFC4 A2 285 in the Tramway Platform at Port Melbourne Station on opening Day 20-12-1987 DFC5 A2 273 at St Kilda Tramway Station on opening day 22-11-1987 DFC6 A2 273 turning from Fitzroy St into St Kilda Tramway Station on opening day 22-11-1987 DFC7 B1 2001 at St Kilda Tramway Station turning into Fitzroy St on opening day 22-11-1987 DFC8 B1 2002 enters St Kilda Tramway Station on opening day 22-11-1987 DFC9 An A2 approaches St Kilda Tramway Station on opening day 22-11-1987 DFC10 Concreting the connecting curve from Fitroy St into St Kilda Station c July 1987 DFC11 An MTA AEC MKVI bus in Grey St St Kilda at Dalgety St with Tramway works in the background c July 1987 DFC12 Grey St St Kilda at Dalgety St with Tramway works in the background in Fitzroy St c July 1987 DFC13 Concreting the connecting curve from Fitroy St into St Kilda Station c July 1987 DFC14 Restaurant Tram 442 in Fitzroy St at Grey St Passing MTA bus 59 outside St Kilda Station c1986 DFC15 Former VR tram stop sign painted on a pole at Glenhuntly Rd & Broadway DFC16 Former VR Elwood Tram Depot under demolition 1996 DFC17 Former VR Elwood Tram Depot under demolition 1996 DFC18 Former VR Elwood Tram Depot under demolition 1996 DFC19 Former VR Elwood Tram Depot under demolition 1996 DFC20 Former VR Elwood Tram Depot under demolition 1996 DFC21 Former VR Elwood Tram Depot under demolition 1996 DFC22 Former VR Elwood Tram Depot under demolition 1996 DFC23 Former VR Elwood Tram Depot under demolition 1996 DFC24 MTS Tower waggon in use at the former VR Elwood Tram Depot under demolition 1996 DFC25 A Sign advertising the sale of the Former VR Elwood Tram Depot – 10/8/1996 1996 DFC26 Former VR Elwood Tram Depot under demolition 1996 DFC27 Interior of a shed at the former VR Elwood Tram Depot under demolition 1996 DFC28 Former VR Elwood Tram Depot under demolition 1996 DFC29 Former VR Elwood Tram Depot under demolition 1996 DFC30 Former VR Elwood Tram Depot under demolition 1996 DFC31 VR 20, former breakdown car in Bob Prentice’s Back Yard Jan 1974 DFC32 VR 20 on a low loader en route to Bob Prentice’s for preservation 1959 DFC33 VR 20 as the breakdown car on the St Kilda Electric Street Railway c1955 DFC34 VR 39 waits in St Kilda St as breakdown car 20 enters Elwood Depot c1955 DFC35 VR 54 and 50 in the rear yard of Elwood Depot c1958 DFC36 VR 50 in the rear yard of Elwood Depot c1958 DFC37 VR 50 in the rear yard of Elwood Depot c1958 DFC38 VR 28 in St Kilda St outside Elwood depot after the line had been cut back to this point c1958 DFC39 VR 29 in St Kilda St outside Elwood depot after the line had been cut back to this point c1958 DFC40 VR 35 passes 28 on the St Kilda Electric Street Railway c1955 DFC41 VR 39 on the St Kilda Electric Street Railway c1955 DFC42 Y1 613 on a tour c1970 DFC43 VR 54 in St Kilda St outside Elwood Depot c1955 DFC44 VR 28 at Brighton Beach Terminus c1955 DFC45 VR 33 being washed in the wash bay at the rear of Elwood Depot c1955 DFC46 VR 20 breakdown car running into Elwood Depot c1955 DFC47 VR 3 in the rear yard at Elwood Depot c1955 DFC48 VR 51 on an AETA Tour running out of Elwood Depot c1958 DFC49 VR 28 on the St Kilda Electric Street Railway c1955 DFC50 VR 28 with crew in St Kilda St outside Elwood depot after the line had been cut back to this point 1959 DFC51 VR 52 in Grey St near Fitzroy St c1958 DFC52 VR 51 on a AETA Tour passes 33 in Grey St near Fitzroy St c1958 DFC53 VR 29 in Grey St near Fitzroy St c1958 DFC54 VR51 on an AETA Tour shunts as 52 waits on the St Kilda Electric Street Railway c1958 DFC55 VR 51 on the Black Rock Electric Street Railway c1955 DFC56 VR 28 in St Kilda St outside Elwood depot after the line had been cut back to this point c1958 DFC57 Combined Rail-Tram Tickets of the Black Rock Electric Street Railway Feb 1975 DFC58 Combined Rail-Tram Tickets of the St Kilda Electric Street Railway Feb 1975 DFC59 Electric Street Railway & Motor Coach Paper Tear off Tickets Feb 1975 DFC60 VR 52 & 53 on Rt 82 pass in Cordite Ave near Wests Rd Sept 1975 DFC61 Z 68 & 52 in East Preston Depot in M&MTB Livery c1977 DFC62 Copy photo of VR 18 in Elwood Depot c1910 DFC63 VR 51 as a one man car at Black Rock Terminus c1955 DFC64 VR 53 on Rt 82 in Droop St Footscray Jan 1974 DFC65 B2 2027 on Rt 96 in South Melb Station c1988 DFC66 VR 20 as preserved in Bob Prentice’s backyard High St Prahran Jan 1974 DFC67 VR 700 on Rt 82 in Droop St Footsray c1978 DFC68 VR 28 as the last car from ST Kilda Station 28-2-1959 DFC69 VR 700 at the Rt 82 Moonee Ponds Terminus c1978 DFC70 VR 52 waiting time at the Rt 82 Footscray Terminus, the driver intently stares at the bundy clock as the Braid and the Connie gossip Jul 1972 DFC71 VR 54 shunting outside Elwood Depot to return to St Kilda Station 1959 DFC72 SW6 969 in MTA Livery blocking the entrance to South Melb Depot presumably during the scratch ticket dispute Jan 1990 DFC73 VR 52 & 53 on Rt 82 pass in Droop St Footscray Sept 1975 DFC74 VR 700 after withdrawl in the Newport Railway museum in the process of a repaint c1985 DFC75 VR 700 after withdrawl in the Newport Railway museum in the process of a repaint c1985 DFC76 VR 700 on Rt 82 in Droop St Footsray at The Cresent c1978 DFC77 VR 700 on Rt 82 in Droop St Footsray c1978 DFC78 Former VR tram depot in use as an MTA Bus depot c1990 DFC79 VR 52 waiting time at the Rt 82 Footscray Terminus Jul 1972 DFC80 VR 52 waiting time at the Rt 82 Footscray Terminus with Connie changing the pole Jul 1972 DFC81 VR 52 at the Rt 82 Moonee Ponds Terminus with the crew chatting 7-12-1974 DFC82 VR 52 on Rt 82 on the reserved track in Raleigh Rd Ascot Vale Jan 1974 DFC83 VR 53 on Rt 82 in Leeds St Footscray about to turn into Hopkins St April 1976 DFC84 VR 53 on Rt 82 in Droop St Footsray Jan 1974 DFC85 VR 700 on Rt 82 in Droop St Footsray at Hopkins St c1978 DFC86 Z 52 in MTA livery on Rt 19 in Elizabeth St near Bourke St c1985 DFC87 VR 52 at the Rt 82 Moonee Ponds Terminus Jul 1972 DFC88 VR 53 at the Rt 82 Footscray Terminus Jan 1974 DFC89 VR 52 freshly outshopped from the workshops and W7 1011 at the Bourke St Terminus with 52 on display for the 1968 railway exhibition 1968 DFC90 Painting of W class 369 in Chocolate & Cream c1930 DFC91 Charing Cross, Bendigo at night c1965 DFC92 Ballarat ? c1965 DFC93 Bendigo 18 on an AETA tour in McCrae St near Tramway Ave c1965 DFC94 View from the roof of a tram in the body shop at Preston Workshops 1977 DFC95 View from the roof of a tram in the body shop at Preston Workshops 1977 DFC96 View from the roof of a tram in the body shop at Preston Workshops showing the panto on 546 1977 DFC97 Interior view of Carlton Control Centre showing desk and wall panel c1968 DFC98 W2 493 on Rt 55 in Kingsway outside South Melb Depot Aug 1973 DFC99 W2 496 in Sturt St at Kingsway on Rt 1 Jul 1973 DFC100 Z class truck c1975 DFC101 Z3 116 in Bourke St at King St as new c1979 DFC102 Bob Prentice on tour c1968 DFC103 SW6 900 as an advertising tram for Newsday at night 1969 DFC104 597 Jul 1973 DFC105 W2 480 on Rt 3 passing under the railway bridge at Caulfield Oct 1972 DFC106 Interior view of Carlton Control Centre showing desk c1968 DFC107 SW6 856 on Rt 77 at night Jul 1973 DFC108 W2 496 in Sturt St at Kingsway on Rt 1 Jul 1973 DFC109 PCC 980 on a tour at South Melb Depot c1968 DFC110 SW6 856 on Rt 77 at night Jul 1973 DFC111 View from the roof of a tram in the body shop at Preston Workshops showing the panto on 546 1977 DFC112 Dandenong Rd from Chapel St Nov 1968 DFC113 A Z class car turns from Gertrude into Nicholson St c1990 DFC114 SW6 900 as an advertising tram for Newsday at night 1969 DFC115 Port Melbourne Station showing Centennial bridge and station building prior to closure. 10-1987 DFC116 Port Melbourne station with train prior to closure, looking south 10-1987 Demonstrates the work of David Frost in photography and or collecting slides.Assembled album in a black presentation folder of 116 colour slides, 6 slide sleeves, collected or photographed by David Frost. Many are TMSV or Windsor Publications slides. All photographs have been scanned and placed on the Museum's G drive. A list of all photographs with details has been compiled. melbourne, tramways, trams, vr trams, elwood, st kilda light rail, port melbourne, opening, elwood depot, buses -
 Melbourne Tram Museum
Sign - "Do not lean against door", Melbourne & Metropolitan Tramways Board (MMTB), 1940s?
Was located at the top of the driver's exit door in W class tramcars. If a person was leaning against door, made it very difficult for the driver to exit quickly from their cabin.Demonstrates MMTB signage in tramcars.Sign - engraved brass sheet, with black lettering and lining on the outside and screw holes in each corner and top and bottom edges in the centre with the words: "Do not lean against door" in capitals. trams, tramcars, drivers, emergencies, w class trams, signs -
 Melbourne Tram Museum
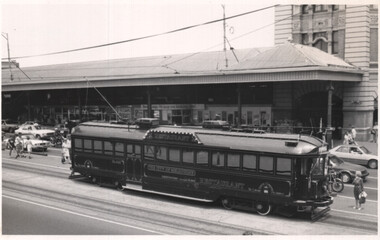
Photograph - Restaurant Tram W2 442 on test, Keith Kings, 14/12/1982
Image by Keith Kings shows the first Restaurant tram (W2 442) on trials at the corner of Flinders and Swanston St. Melbourne 14/12/1982. Notes that it has been rebuilt by Preston Workshops for The Colonial Tramcar Restaurant Co. Has Flinders Street station in the background.Yields information about the first restaurant tram built for Melbourne.Black and white photograph of Restaurant Tram W2 442 on test, photo number 195-21Has details and date written on the rear.colonial tramcar restaurant, restaurant tram, flinders street, swanston street, tramways, tramcars, trams, preston workshops, w2 class, tram 442 -
 Melbourne Tram Museum
Photograph - Black and White - MMTB Uniform - 1920's
Copy photograph by Keith Kings of an old photo showing a MMTB Driver or Conductor in an early to mid 1920s uniform. Cap has the MMTB logo badge but no employee number. Five button tunic with four pockets with a vest and pocket watch chain, possibly with a Union badge attached to it. At the time Union badges were permitted to be attached to a watch chain.Yields information about early MMTB Uniforms.Black and White Photograph - MMTB Uniform - 1920's photo number 213-18Has details and date written on the rear.tramways, uniforms., tram crews, conductors, tram drivers, mmtb -
 Melbourne Tram Museum
Photograph - W5 754 at Beaconsfield Parade terminus, Keith Kings, 3/4/1953
Photograph shows W5 754 (East Coburg Route 1) at the former Beaconsfield Parade terminus at the intersection with Fitzroy St Kilda. The photographer notes the square windscreen windows on the tram.Yields information about tram 754 in 1953 in Beaconsfield Parade.Black and white photograph - W5 754 at Beaconsfield Parade terminus photo number G(y)(7)Has details and date written on the rear.tramways, beaconsfield parade, st kilda, fitzroy st, w5 class, tram 754, route 1 -
 Melbourne Tram Museum
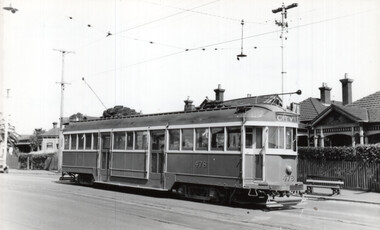
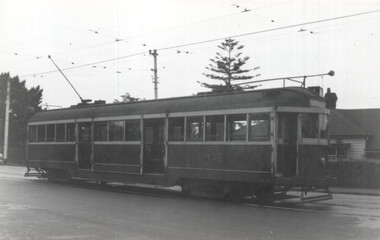
Photograph - Black and White SW2 478 Riversdale Road Hawthorn, Keith Kings, 3/11/1956
Photograph shows SW2 478 (City Route 70) in Riversdale Road at Tooronga Rd Hawthorn. The photographer notes the metal fascias on the tram. Note the lenses fitted to one side of the street lights to indicate a tram stop to the tram drivers.Yields information about tram 478 in 1956.Black and White SW2 478 Riversdale Road Hawthorn photo number N(m)(i)Has details and date written on the rear.tramways, trams, sw2 class, tram 478, riversdale road, route 70 -
 Melbourne Tram Museum
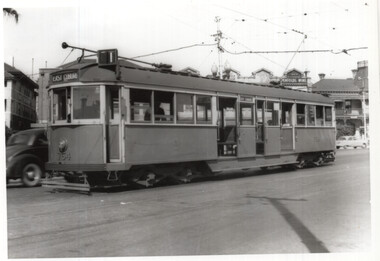
Photograph - Black and White SW2 436, Wallen Road, Keith Kings, 1/1/1955
Photograph shows SW2 436 in Wallen Road Hawthorn, opposite the Hawthorn Tram Depot. Photographer notes the metal fascias on the tram.Yields information about tram 436 in 1955Black and White SW2 436, Wallen Road, photo number L(i)(4)Has details and date written on the rear.tramways, trams, sw2 class, tram 478, wallen road -
 Melbourne Tram Museum
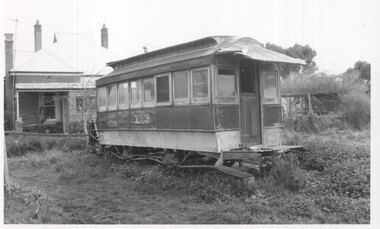
Photograph - Black and White set of 6 - cable trailer 153 near St Arnaud
Photographs show former Melbourne cable tram trailer 153 on a farm near St Arnaud in a deteriorating condition. The wheel set remains with the tram body. Photos not dated, possibly 1970s.Yields information about the condition of the cable tram trailers out in the open, many years after their sale.Set of 6 black and white photos of former cable tram trailer No. 153 near St Arnaud tramways, trams, cable trams, trailers, sale of trams, tram 153 -
 Melbourne Tram Museum
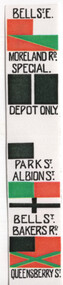
Memorabilia - Replica destination roll MBCTT, Dean Filgate
Item shows the probable original destination roll based on contract data for the Melbourne Brunswick Coburg Tramways Trust - MBCTT. Prepared by Dean Filgate.Yields information about the destination roll used by the MBCTT.Paper sheet, colour photocopy of the MBCTT Destination roll replica or facsimile and an envelope with a note about the item written by Keith Kings.Has details and date written on the rear.tramways, trams, destination rolls, mbctt -
 Melbourne Tram Museum
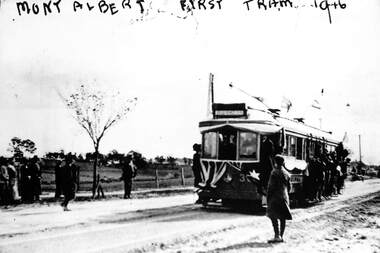
Photograph - First tram to Mont Albert, A Bailey, 1916
Photograph shows a maximum traction tram at the new Mont Albert tram terminus, 30-9-1916 by the Prahran and Malvern Tramways Trust (PMTT). Photo by A Bailey.Yields information about the opening of the tram line to Mont Albert in 1916Black and White photograph of the first tram to Mont Albert printed on Kodak paper.tramways, trams, new tramways, mont albert, pmtt, opening -
 Melbourne Tram Museum
Newspaper, The Argus, "Railway to Edenhope, Demand for Redgum, use for Road Blocking", 20-1-1927
Provides information on the cost of wood blocking tram tracks in Melbourne with wood blocks - Red gum and Jarrah - part of a Parliamentary enquiry into the construction of a railway to Edenhope. The line was authorised but not built.Yields information about the cost of wood blocks for use in tram tracks.Extract via Trove - 3A4 sheets when printed - Railway to Edenhope, Demand for Redgum, use for Road Blocking" - The Argus 20-1-1927tramways, tram tracks, wood blocks, parliament, edenhope, new railways -
 Melbourne Tram Museum
Photograph - VR Sandringham tram in Bay Road, late 1940s, late 1940s
Photo shows either VR tram 48 or 49 (two man car) in Bay St Sandringham, just prior to turn into the tram depot. In the background is the Roxy Theatre and the spire of the All Souls Anglican Church. (The church spire has since been rebuilt). The VR Sandringham to Black Rock tramway closed on 5-11-1956. The print is a copy print of an original photograph.Shows a VR tram in Bay Road Sandringham.Black and white copy print on Kodak paper of a VR Sandringham tram in Bay Road. trams, tramways, vr trams, bay road, sandringam -
 Melbourne Tram Museum
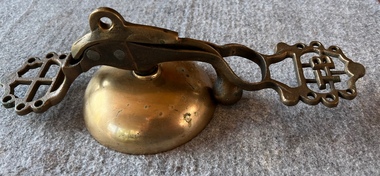
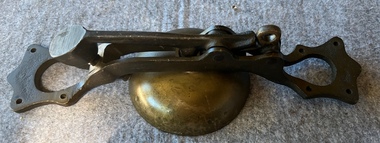
Functional object - Conductor's (Signal) Bell - MMTB Pattern, Melbourne & Metropolitan Tramways Board (MMTB)
Bell used by the conductor or passengers to signal to the driver - stop, proceed or an emergency stop. MMTB Drawing R1241 Details of Signal Bell refers.Demonstrates a conductors communication or signal bell made for use on tramcars. Brass Conductor Communication Bell, or signal bell, consisting of cast frame, bell, striker, bell pull part, three nuts to secure the bell to the frame and two rivets securing for the bell pull part. Has at both ends, four screw holes that were used to secure the bell to the roof. Has at either end, some letters cast into the section that was used to secure the bell into position. Unable to be deciphered.trams, tramways, conductors, bells, mmtb -
 Melbourne Tram Museum
Functional object - Conductor's (Signal) Bell -TB Pattern, Tramway Board
Bell used by the conductor or passengers to signal to the driver - stop, proceed or an emergency stop. Demonstrates a conductors communication or signal bell made for use on tramcars. Brass Conductor Communication Bell, or signal bell, consisting of cast frame, bell, striker, bell pull part, one nut and washer to secure the bell to the frame and two rivets securing for the bell pull part. Has at both ends, six screw holes that were used to secure the bell to the roof and at one end the initials "TB" cast in - "Tramway Board".trams, tramways, conductors, bells, tramway board -
 Melbourne Tram Museum
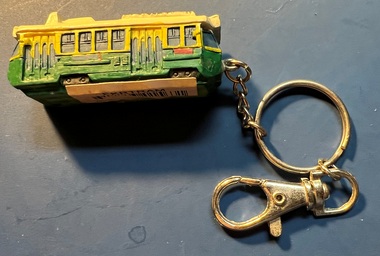
Souvenir - Z class tram - Key Ring, 1980s
Item demonstrates the wide variety of Melbourne tram souvenirs, this one featuring a Z class tram rather than the W class tram. In the MTA 1980s colour scheme.Demonstrates a souvenir of a Melbourne tram.Heavy plastic model of a Melbourne Z class tram fitted with a multi part key ring and clip. Tram painted in the the MTA livery. Has the words "Melbourne Australia" on top.trams, tramways, souvenirs, z class tram, mta -
 Melbourne Tram Museum
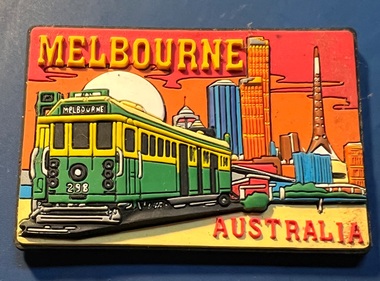
Souvenir - Fridge Magnet - rubber - W2 298, 1980s
Item demonstrates the wide variety of Melbourne tram souvenirs, this one featuring a Melbourne W2 class tram and Melbourne landmarks.Demonstrates a souvenir of a Melbourne tram.Rubber based fridge magnet of a relief view of tram W2 298 and Melbourne buildingstrams, tramways, souvenirs, w2 class, tram 298 -
 Melbourne Tram Museum
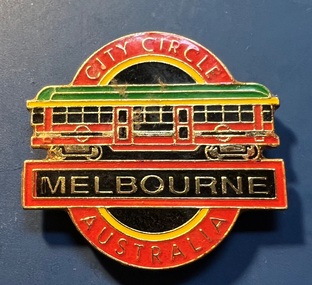
Souvenir - Fridge Magnet - City Circle, 1980s
Item demonstrates the wide variety of Melbourne tram souvenirs, this one featuring a burgundy City Circle tram with location details.Demonstrates a souvenir of a Melbourne tram.Metal enamel painted fridge magnet of a Melbourne City Circle tram.trams, tramways, souvenirs, city circle -
 Melbourne Tram Museum
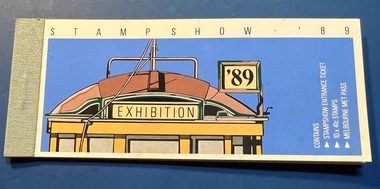
Souvenir - Ticket , infomation and stamps, Australia Post, Stampshow '89, 1989
Item demonstrates some of the souvenirs and stamps issued for the 1989 Stamp show including a Melbourne Met Pass ticket valid for use on a specific day. See Reg Item 6027 for other paperwork.Part of the extensive paperwork issued for the 1989 stamp show which featured historic tramcars.Souvenir booklet comprising entrance ticket, information sheets, 10x 41c cable tram stamps and a Melbourne Met Pass for the 1989 Stamp show - six card sheets + stamps - stapled. Has been punched for 22 October. Second copy added 14/3/2024 - in unused condition.trams, tramways, souvenirs, stamp show, australia post, the met, tickets, stamps, cable trams -
 Melbourne Tram Museum
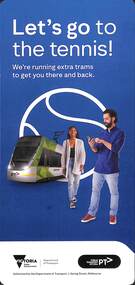
Pamphlet - Hanging strip type notice, Public Transport Victoria (PTV), Let's go to the tennis!, January 2023
Provides tram information for Australian Open 2023Provides tram and timetable information for catching trams to the Australian Open. Contains a QR code for further information,hanging strip type notice australian open, trams, special event services, route 70, route 70a, tramways -
 Melbourne Tram Museum
Book, Melbourne & Metropolitan Tramways Board (MMTB), "Instructions to Drivers in Electric Tram Operation", 1966
Provides in a Q & A format, instructions to drivers in electric car operation, photos of various types of controllers, an A.B.C. for tramways drivers - "always" points to remember and has a reference index. Issued to F Reale-Key who worked for the Civil Engineering at South Melbourne Depot. Section of the MMTB or The Met and was authorised to drive trams. Demonstrates instructions issued to drivers and to those authorised to drive trams.Forty-Eight page, side staple book within blue Rexine covers and covered with plastic. Titled "Melbourne and Metropolitan Tramways /Electric System /Instructions to Drivers in Electric Car Operation" Dated 1966. Printed by Regent Press Pty Ltd, 457 Plenty Road, Preston. On the inside rear cover has an electric tram driver's certificate issued to F Reale-Key. On the inside front and rear cover has a card trimmed for "The Metropolitan Transit Authority of Victoria". For a photo of Frank standing in front of tram 8, see "MetLines - Vol 1, No. 9 December 1985". See image i2 for details.tramways, trams, mmtb, the met, drivers, training, south melbourne depot, civil engineering department, instructions -
 Melbourne Tram Museum
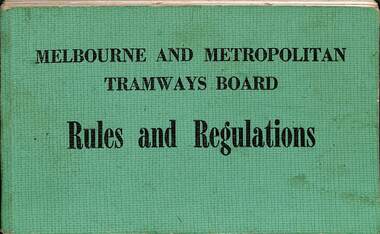
Book, Melbourne & Metropolitan Tramways Board (MMTB), "Rules and Regulations", 1974
Provides rules for both tramway and motor bus operations, has index pages 3 to 28, rules for both systems and specific type of vehicle, ticket machines and ticket issuing. At rear is MMTB By-Law 11 and By-Law, the latter dated 1956. Issued to F Reale-Key who worked for the Civil Engineering at South Melbourne Depot. Section of the MMTB or The Met and was authorised to drive trams. Dated Nov. 1974. For a photo of Frank standing in front of tram 8, see "MetLines - Vol 1, No. 9 December 1985". See Item 82 for a full scan of the document.Demonstrates the Rules and Regulations issued to drivers and to those authorised to drive trams or buses.Book - green Rexine covers, 106 pages with title - "Melbourne and Metropolitan Tramways Board - Rules and Regulations". Six sections, sewn into covers, dated Nov. 1974. See image i2 for details.tramways, trams, mmtb, the met, drivers, training, south melbourne depot, civil engineering department, instructions, rules, regulations -
 Melbourne Tram Museum
Functional object - Conductor's (Signal) Bell - MMTB Pattern, Melbourne & Metropolitan Tramways Board (MMTB)
Bell used by the conductor or passengers to signal to the driver - stop, proceed or an emergency stop. MMTB Drawing R1241 Details of Signal Bell refers. Tram 579 entered service 9/1929.Demonstrates a conductors communication or signal bell made for use on tramcars. Brass Conductor Communication Bell, or signal bell, consisting of cast frame, bell, striker, bell pull part, three nuts to secure the bell to the frame and two rivets securing for the bell pull part. Has at both ends, four screw holes that were used to secure the bell to the roof. Has been stamped at one end on the underside "579 2", indicating it was made or used on W2 579, No. 2 end.trams, tramways, conductors, bells, mmtb, w2 class, tram 579 -
 Melbourne Tram Museum
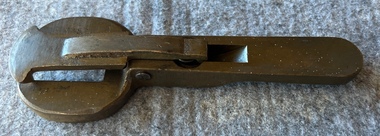
Functional object - Controller Key, Melbourne & Metropolitan Tramways Board (MMTB)
Device used by drivers to unlock the tram controller and move the tram forward or in reverse. Does not appear to be have been used extensively, little wear marks. Would have been made at Preston Workshops.Demonstrates part of the equipment a driver would have used.Brass Controller key - four parts - cast handle, cast securing clip, spring and steel rivet. trams, tramways, drivers, preston workshops, controllers, controller key -
 Melbourne Tram Museum
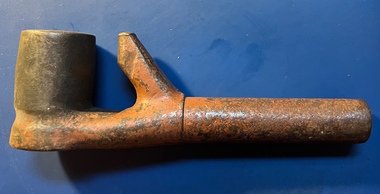
Functional object - brake handle, Melbourne & Metropolitan Tramways Board (MMTB)
Used by drivers to control the brakes on an air-braked tram. Designed to fit a Westinghouse self lapping W type brake valve.An essential part for the control of an air-braked tramcar.Brake handle or key consisting of cast steel handle and a welded section that fits into the brake valve. The angled section allows the handle to be removed when the brake is fully applied.tramcars, trams, brakes, westinghouse, drivers -
 Melbourne Tram Museum
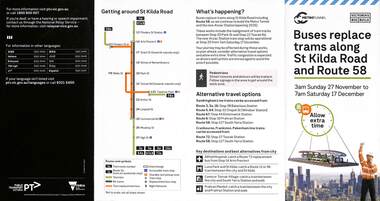
Pamphlet, Public Transport Victoria (PTV), Buses replace trams along St Kilda Road and Route 58, Oct. 2022
Pamphlet - Buses replace trams along St Kilda Road and Route 58 - issued for the track relocation at Domain Junction / Anzac station during the period 27-11-2022 to 17-12-2022. Actual work took a day longer due to weather. Similar pamphlets would have been issued for other routes that used St Kilda Road. Includes maps, alternative routes. Issued by Public Transport Victoria. Part of the Metro tunnel works.Yields information about the reconstruction of Domain Junction for the future Anzac station.Pamphlet - four fold DL - full colour on semi gloss paper. Two copies held.tramways, route 58, anzac station, domain interchange, track work, bus replacement