Showing 692 items
matching tramway crossings
-
 Melbourne Tram Museum
Slide, David Verrier, 22/04/1977 12:00:00 AM
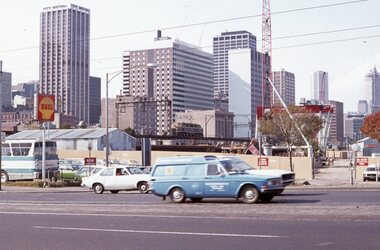
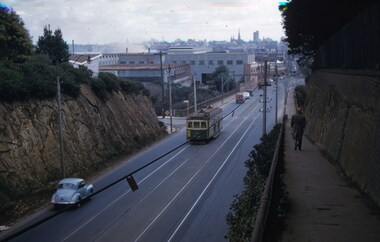
Agfa colour slide, white blue plastic mount. Photograph by David Verrier. View from Spencer St south just before bridge looking back to the city skyline and the Flinders St railway viaduct. An L class is crossing the viaduct. Photo has the City Mutual and SEC Buildings along with some construction work for the new railway viaduct underway. A Shell service station sign is visible. Photos taken 22/4/1977In ink: "Fri 22/4/77 Flinders St Viaduct"trams, tramways, railways, flinders st, melbourne -
 Melbourne Tram Museum
Slide, David Verrier, 24/08/1974 12:00:00 AM
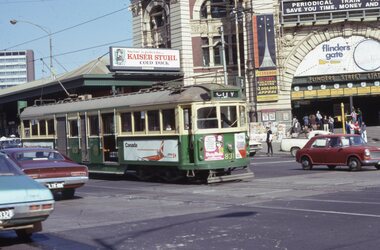
Kodak Kodachrome colour slide, white cardboard mount. Photograph by David Verrier. W5 831 crossing Flinders St in Swanston St. Tram has route number 3. In the background is the Flinders St station with advertising for Kaiser Stuhl Cold Duck, Arts Centre appeal, Flinders Gate redevelopment. Behind the traffic policeman on the corner is a large display of newspapers and magazines for sale. the tram has adverts for CP Air, Robo car wash and Dirty Dicks. Photos taken 24/8/1974.In ink: , "Sat 24/8/74 831 Cnr Swanston & Flinders St"trams, tramways, flinders st, swanston st, w5 class, route 3, tram 831 -
 Melbourne Tram Museum
Negative, Ellis Collection, c1956
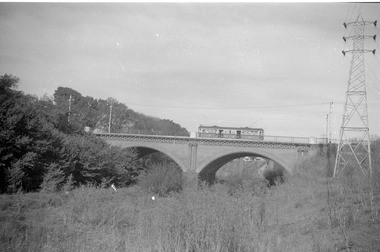
Negative (120) of a view of a W7? crossing the Merri Creek Bridge in Queens Parade Clifton Hill - notes provide date of 1956. A low resolution A4 laminated was received with the negatives. Hi Res image filed in the dbtext/hawthtramcoll/Large Images/htd3588large.jpgtrams, tramways, queens parade, clifton hill, merri creek, bridges -
 Melbourne Tram Museum
Negative - Set of 2, Ellis Collection, c1940?
Set of two Negatives (120) of a wide body car crossing the Wallen St Road Bridge Hawthorn possibly after the construction of The Boulevard. Taken from either side of the river. Hi Res image filed in the dbtext/hawthtramcoll/Large Images/htd3595aLarge.jpg and htd3595bLarge A low resolution A4 laminated was received with the negatives. Image i2 - taken from Glan Avon Rd in Hawthorn of Wallen Rd bridge – the tram is one of three SW2 class trams (not the first one due to the door sizes, but one of 426, 432 or 478, most probably 478 as that was a Camberwell car)trams, tramways, wallen rd, bridges, sw2 class -
 Melbourne Tram Museum
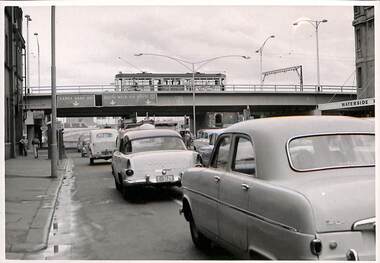
Photograph - Set of 6 Black & White Photograph/s, 1959 to 1960
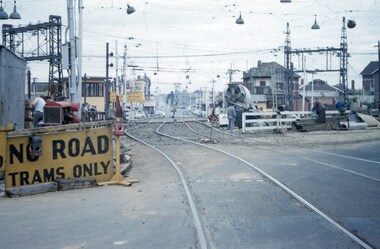
Set of 6 photographs of the Flinders St flyover over Kings St, soon after opening with tramcars and motor vehicles on the streets and bridge. Has the Waterside Hotel on the right side of the photographs. Has the pedestrian crossing traffic lights in the views. Don Storey's tramway history notes - http://www.classicaustraliantv.com/Gunzel.htm accessed 23/6/2019 notes that for 1959 - Temporary track on a new flyover in Flinders Street at King Street was brought into use; the permanent track was completed on June 26, 1960.Photos were contained within an envelope marked "Secretary Head Office MMTB (616 Lt Collins St) and "Please do not fold.trams, tramways, king st, flinders st, bridges, traffic lights -
 Melbourne Tram Museum
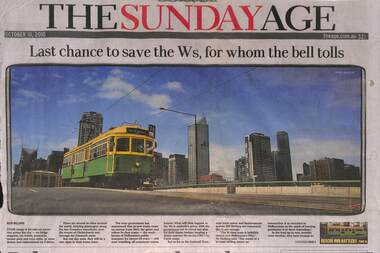
Newspaper, The Age, "Last chance to save the Ws, for whom the bell tolls", "Joy ride bid to save the W's for whom the bell tolls", "Something in sway means a ride back in time", "For the love of Melbourne's W class tram", 10/10/2010 12:00:00 AM
Newspaper clipping - set of three different pages - from the Sunday Age 10/10/2010, titled "Last chance to save the Ws, for whom the bell tolls". Article looks at the future of the W class trams, a possible tourist route, union and crew viewpoints, Page 1 has a photo of SW6 884, crossing the Latrobe St bridge, written by Ruth Williams. Page 4 - "Joy ride bid to save the W's for whom the bell tolls" and "Something in sway means a ride back in time". Article written by John Elder and Craig Sillitoe. Page 16 - Editorial "For the love of Melbourne's W class tram" - promoting the retention of the trams, use for tourist services and upgrading them for use.trams, tramways, w class, sw6 class, save the w's, tram 884 -
 Melbourne Tram Museum
Photograph - Illustration/s, Jul. 1967
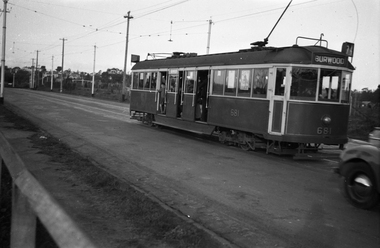
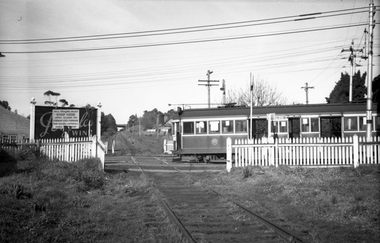
Illustration from a printed publication glue to a sheet of paper. Photo graph of W2 220 on Moreland Rd stub terminus, near Brunswick depot. Dated 7/1967 Tram has the destination of South Melbourne, route 15. On the right is Rocky's Milk bar advertising Pepsi Cola and Gilmore's Milk. In the foreground are the railway gates and the level crossing.in ink on rear ""W2 220 (7/67) Old Moreland Rd stub Melbourne (Far Right "Rocky's Milk bar Col's 1st milk share!!)"trams, tramways, w2 class, moreland rd, route 15, tram 220 -
 Melbourne Tram Museum
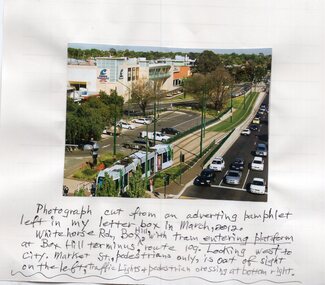
Photograph - Illustration, Keith Kings, Mar. 2012
Illustration of the Box Hill tram terminus from a real estate magazine March 2012 - showing a C class tram arriving at the terminus with many motor vehicles alongside and glued to a sheet of paper. Route 109In ink below "Photograph cut from an advertising pamphlet left in my letter box in March 2012. Whitehorse Rd Box Hill with tram entering platform at Box Hill terminus, route 109. Looking west to city. Market St, pedestrians only is out of sight on the left. Traffic lights and pedestrian crossing at bottom right."trams, tramways, box hill, route 109, c class -
 Melbourne Tram Museum
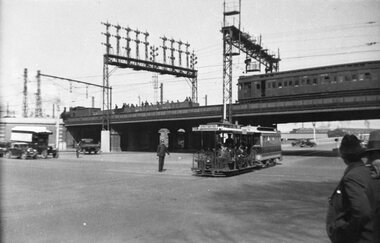
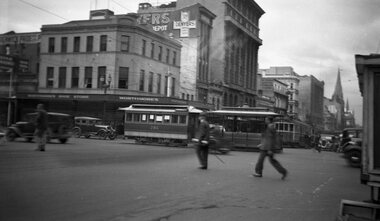
Negative, 1936
Negative of cable tram crossing from Queensbridge Road into Market St after passing under the railway underpass, along Flinders St. In the background is a the bridge with a Tait train crossing, a work or ballast train on the bridge and the signal gantry. There is a policeman on point duty. The cable tram has the destination of Collins St.trams, tramways, cable trams, flinders st, market st, collins st, railways -
 Melbourne Tram Museum
Negative, Wal Larsen, possibly 14/4/1939
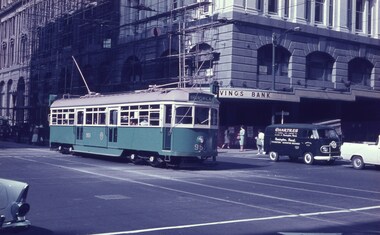
Negative of a cable set in Lonsdale St crossing Swanston St, possibly on the last day of operation 14/4/1939. Trailer 286. Has in the background Worthmore's Shoe Store and Denyers depot or store. In Swanston St is a W2. Photographer could be Wal Larsen based on negative size - see Reg Item 5064.Written on rear of album print - "Cable and electric trams at corner of Lonsdale and Swanston Sts."trams, tramways, cable trams, lonsdale st, swanston st, tram 286 -
 Melbourne Tram Museum
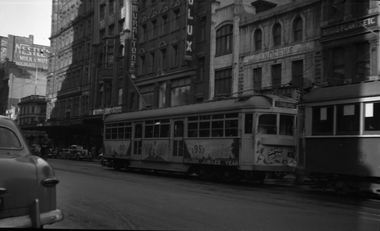
Negative, Wal Jack, 21/07/1951 12:00:00 AM
Black and white negative, by Wal Jack, of SW6 915 decorated for the Golden Jubilee of Australia, on a route 20, Coburg service in Elizabeth St, just before crossing Collins St. Has in the background Muraltune and Andrews stores and adverts for Nestle's and Dulux. Mal Rowe advised 23/8/2020 by e-mail: From the draft text of "The W book": "The first SW6 tram to be decorated was No. 915, which was painted and fitted with panels and aprons promoting fifty years of the Federation of Australia, 1901 to 1951. No. 915 ran on all lines from November, 1950 until May, 1951. In November 1951 No. 915 was fitted with roof illuminations for a six week Christmas promotion. "trams, tramways, decorated trams, elizabeth st, sw6 class, route 20, tram 915 -
 Melbourne Tram Museum
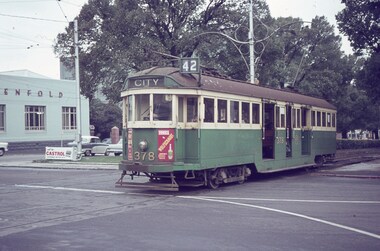
Slide, Keith Caldwell, 30/04/1964 12:00:00 AM
Agfa colour slide, blue / white plastic mount, photo by Keith Caldwell of W2 378 crossing Brunswick St in Victoria Parade, Fitzroy. Tram running a route 42 to the city. In the background is the former cable tram winding house - Penfold wines. Tram has an advert for Wolfschmidt Vodka. A seat has a Castrol Advert. 30/4/1964In ink "W2 PM 30-4-64"trams, tramways, route 11, w2 class, victoria parade, brunswick st, tram 378 -
 Melbourne Tram Museum
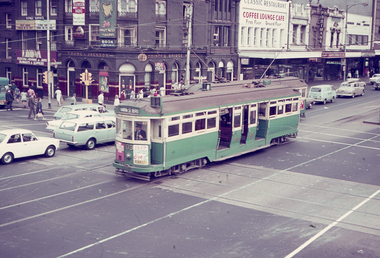
Slide, Keith Caldwell, Mar. 1968
Agfa colour slide, blue / white plastic mount, photo by Keith Caldwell of L103 south bound in Swanston St crossing Flinders St, showing Hanna St Depot. Tram has an advert for Renault cars. In the background is the Young and Jackson's Hotel, the Classic Restaurant coffee lounge and cafe, Portmans, a sign for Visit Tasmania and HMV radios. 3/1968In ink "L 3/68"trams, tramways, l class, hanna st, hanna st depot, flinders st, swanston st, tram 103 -
 Melbourne Tram Museum
Slide - Set of 2, John Webster, 14/06/1960 12:00:00 AM
Set of two Colour slides Kodak, white cardboard of trams: .1 - an SW6 (route 42) car descending the Barkers Road hill through the cutting towards Victoria Bridge over the Yarra river, Has the Vickers Ruwolt factor in the background and the city skyline. .2 - SW6 893 (City Route 42), crossing the Victoria Bridge after leaving the Barkers Road cutting. Shows the overhead support structure on the bridge. Slide datedHand writing on rear in ink "14-6-60 - Retrieving a trolley pole Church St Hawthorn."trams, tramways, route 42, barkers road, sw6 class, bridges, victoria bridge, tram 893 -
 Melbourne Tram Museum
Slide - Set of 5, John Webster, 17/10/1959 12:00:00 AM
... Trams tramways Elsternwick Level Crossings Railway squares W2 ...Set of five Colour slides, Kodak, brown cardboard of the removal of the Elsternwick Level crossing on 17-10-1959 .1 - looking east along Glenhuntly Road, showing the level crossing, concrete truck and road protection signs and the temporary track. .2 - W2 287 traversing the temporary track over the level crossing. Tram has the destination of route 4B, Sth Caulfield via Glenhuntly Road. Also has adverts for APEX and Fitwear socks. .3 - ditto on the crossing. .4 - ditto past the crossing. .5 - W2 551 (Carnegie Route 4) and L 103 (City route 4B) on the level crossing. 551 has adverts for Castle Vintage Sherry and Apex. 103 has adverts for Remy Martin Brandy, Alongside is a Victorian Railways sign advertising trains to the city.Hand writing on rear in ink; .1 - 17-10-59 - KFH1 .2 - KFH 1a .3 - KFH 1b .4 - KFH 1c .5 - KFH 1etrams, tramways, elsternwick, level crossings, railway squares, w2 class, l class, carnegie, south caulfield, glenhuntly rd, tram 287, tram 551, tram 103 -
 Melbourne Tram Museum
Slide - Set of 7, John Webster, 17/10/1959 12:00:00 AM
... Trams tramways Elsternwick Level Crossings Railway squares W2 ...Set of seven Colour slides, Kodak, brown cardboard of the removal of the Elsternwick Level crossing on 28-5-1960 .1 - looking down into he cutting through the old goods yard - has the platform being installed. .2 - X2 675 crossing the new bridge with the level crossing in the background. .3 - L103, to the city, route 4, with the conductor watching the trolley pole. Has an advert for white horse whiskey. .4 - W2 269, route 4 to Carnegie, on the level crossing. Has a building in the background, advertising Esquire car sales. .5 - A Tait train on the crossing no gates in operation. .6 - ditto, to Sandringham .7 - W6 965, route 4 to the City on the crossing. Has two railway hoardings in the background advertising BP Benzol petrol and Saunders Pure Malt extract and part of a sign for Penfolds. The tram has an advert for Porsche cars. Note the tram stop sign on the small post alongside the tram.Hand writing on rear in ink; .1 - 28-5-60 - Railway cutting for underpass at Elsternwick Vic. .2 - ditto, tram 675 on temporary tracks in Glenhuntly Road, Elsternwick Vic. .3 - tram 103 on temporary tracks in Glenhuntly Road, Elsternwick Vic. .4 - tram 269 on temporary tracks in Glenhuntly Road, Elsternwick Vic. .5 - Elsternwick station new crossing .6 - Temporary track Elsternwick Vic .7 - Tram 965 at temporary stop at Elsternwick Vic.trams, tramways, elsternwick, level crossings, railway squares, w2 class, l class, carnegie, south caulfield, glenhuntly rd, w6 class, vr -
 Melbourne Tram Museum
Slide - Set of 2, Keith Caldwell, 1/11/1978 12:00:00 AM
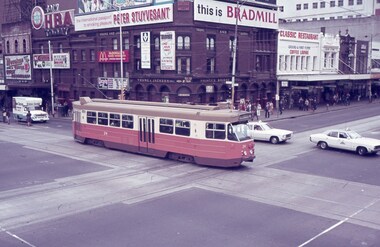
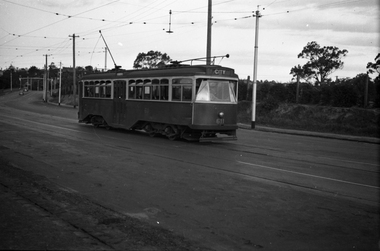
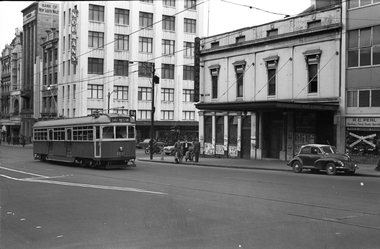
Set of 2 Agfa colour slide, blue and white plastic mount, photo by Keith Caldwell 1/11/1978 of : .1 - Z24 in Flinders St, crossing Swanston St. The tram is bound for Burwood Middleborough Road, route 75. Note the two taxis doing hook turns. .2 - Z65, Route 74, Burwood and W2 629? route 48, North Balwyn. In the background is the Young and Jacksons Princes Bridge Hotel, Portmans, Classic Restaurant Coffee Lounge, and many advertisements including HBA, Peter Stuyvesant, McDonalds, Bradmill, Tattslotto, and Mocopan Coffee. Also in the photo is a policeman on point duty, cars doing a hook turn and a large paper / magazine stand on the wall of Young and Jacksons..1 - has "1-11-78" written in red ink.trams, tramways, flinders st, swanston st, z class, route 48, route 74, burwood, tram 24, tram 65, tram 629? -
 Melbourne Tram Museum
Slide, Keith Caldwell, Mar. 1963
Agfa Colour slide, cardboard mount, by Keith Caldwell dated 16 March 1962 of W6 951 in Elizabeth St crossing Bourke St, showing Brunswick route 18. Has the State Savings Bank of Victoria building in the background. IN the side is a VW Kombi lettered Chartres doing a hook turn.In ink:"Bourke - Eliz Mar 62"trams, tramways, elizabeth st, bourke st, brunswick, route 18, tram 951 -
 Melbourne Tram Museum
Slide, Keith Caldwell, 12/03/1960 12:00:00 AM
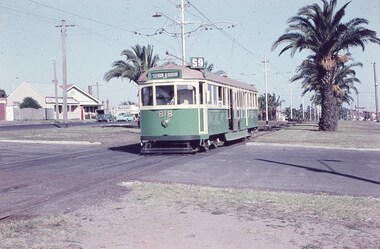
Agfa Colour slide, cardboard mount, by Keith Caldwell dated 12 March 1960, of W5 818 running in Mount Alexander Road, North Essendon, crossing the street access for Marco Polo Street. The tram showing route 59, Essendon Aerodrome, has trolley wheels and has a second person in the cab, possibly a trainer. Unusually the tram number is placed above the headlight, In the background are the palm trees in the centre median plantation. The house with the red guttering is one that dates back to the gold mining era. See http://www.esshissoc.org.au/1070%20Mount%20Alexander%20Road.pdf It was relocated to Woodland Park during 2017? Note the Centre poles, overhead construction and street light. Also in the background is a Mobil Service station that later became a garden centre. Now a block of apartments.hand stamped "12 Mar '60"trams, tramways, mount alexander rd, north essendon, essendon airport, essendon aerodrome, route 59, w5 class, tram 818 -
 Melbourne Tram Museum
Slide - Set of 2, Keith Caldwell, 10/03/1960 12:00:00 AM
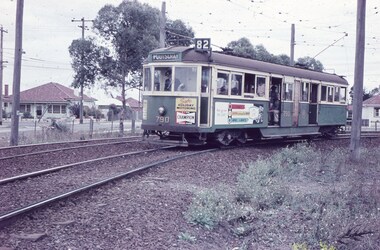
Set of 2 Agfa Colour slide, cardboard mount, by Keith Caldwell of 10 March 1960 - .1 - W5 790, turning on Rosamond Road Maribyrnong into River St, destination of Footscray, Route 82. Tram has the adverts for Champion spark plugs and a recruiting advert for MMTB Conductors. .2 - W5 790 returning, photographed in Rosamond Road, destination Moonee Ponds, Route 82. Has an adverts for Knight? and Tulip? Note the cattle guard on the level crossing and the "Trams No Road Only" and "No Road" signs.All hand stamped "10 Mar '60". .1 - marked "Footscray Connection"trams, tramways, maribyrnong, footscray, rosamond rd, river st, level crossings, w5 class, route 82, moonee ponds, tram 790 -
 Melbourne Tram Museum
Photograph - Set of 4 Colour Print/s, Keith Stodden, c2010
Set of four colour prints of Melbourne trams operating in Bendigo for the Bendigo Trust, c2010. Photos not dated and assumed taken by Keith Stodden. .1 - SW5 808 at Charing Cross in a light blue livery carrying a Hume and Iser Timber and Hardware adverts. VicSig has a photo of the tram in 2007. .2 - W6, 976 as Cafe tram 976 crossing Charing Cross .3 - SW5 808 at Central Deborah mine terminus. .4 - SW6 880 at the depot.Has a $15 price label on rear.trams, tramways, sw5 class, bendigo, charing cross, tram 808, tram 976, tram 880 -
 Melbourne Tram Museum
Negative, Wal Jack, c1941
Black and white negative, by Wal Jack, of W2 392 (from information in the Wal Jack Album) crossing the Swan St or Wallen St bridge over the Yarra River. Photo not dated, in the Wal Jack album.trams, tramways, swan st, wallen road, bridges, w2 class, yarra river, tram 392 -
 Melbourne Tram Museum
Negative, Wal Jack, 10/02/1941 12:00:00 AM
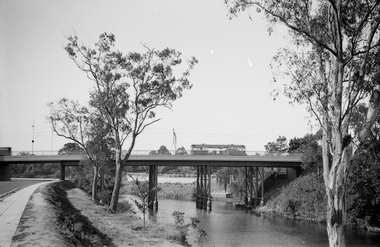
Black and white negative, by Wal Jack, of No.Y1 611 inbound in Swan St Richmond or Burnley after crossing the Yarra River bridge. Photo dated 10-2-1941 in the Wal Jack album along with details of the location.trams, tramways, swan st, y1 class, burnley, tram 611 -
 Melbourne Tram Museum
Negative, Wal Jack, 1/09/1941 12:00:00 AM
Black and white negative, by Wal Jack, of CW5 681, (Burwood, Route 74) in Swan St Burnley, prior to crossing the Yarra River. Photo dated 1-9-1941 in the Wal Jack album along with details of the location.trams, tramways, burnley, cw5 class, swan st, route 74, tram 681 -
 Melbourne Tram Museum
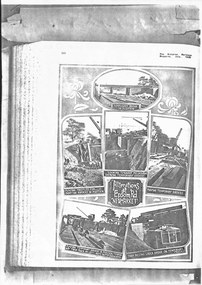
Magazine, Victorian Railways, "Alterations at Epsom Road Newmarket", Jun. 1930
Photocopy of pages 361 and 365 Victorian Railways Magazine, July 1925 and page 485 of September 1925 about the construction of the rail over road/tram bridge in Epsom Road, Newmarket to replace the level crossing. Titled: "Alterations at Epsom Road Newmarket" and "Lifting 28-ton Girders an all-night job!" Gives details and photographs of the work and how financed. Sheets have been stapled together.trams, tramways, victorian railways, epsom road, level crossings, newmarket -
 Melbourne Tram Museum
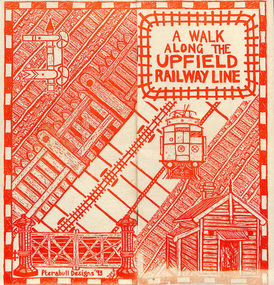
Pamphlet, Brunswick Community History Group, "A walk along the Upfield railway line", 1993
Pamphlet or small booklet, 12 pages on recycled paper, centre stapled titled "A walk along the Upfield railway line", outlining the history of the line, dates, hand operated gates, Royal Park to Brunswick, cable trams and the Sarah sands, sketches, The Jewell, map, Brunswick Station, grain stores, substation, Brunswick tram depot, sidings and railway signals. Published by the Brunswick Community History Group in 1993In ink page 3 "KS 8-7-94"trams, tramways, upfield, brunswick, railways, level crossings -
 Melbourne Tram Museum
Negative, Wal Jack, 24/07/1944 12:00:00 AM
Black and white negative, by Wal Jack, of W2 365 in Whitehorse Road, crossing the outer circle railway. The tram has the destination of Balwyn. Note the sign on the level crossing requiring all trains to stop before proceeding. In the background is a Penfolds Wine billboard. Photo dated 24-7-1944 in the Wal Jack album along with details of the location and the tramcar.trams, tramways, balwyn, whitehorse road, level crossings, outer circle railway, w2 class, tram 365 -
 Melbourne Tram Museum
Negative, Wal Jack, 24/07/1944 12:00:00 AM
Black and white negative, by Wal Jack, of W2 638 (Route 42) in Whitehorse Road crossing Burke Road, Camberwell, with SW6 883 (City Route 7) at the terminus. Note the curves in front of the tram which allowed for cars to turn from Whitehorse Road Westbound into Burke Road. Note the conductor standing in the doorway. Photo dated 24-7-1944 in the Wal Jack album along with details of the location and the tramcar.trams, tramways, balwyn, whitehorse road, burke road, w2 class, sw6 class, tram 638, tram 883 -
 Melbourne Tram Museum
Negative, Wal Jack, 1943-44
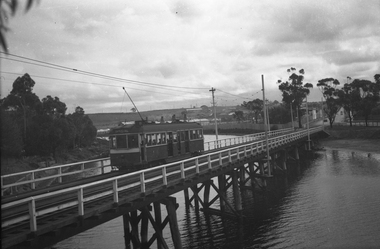
Black and white negative, by Wal Jack, of W5 832, showing Special B, crossing the Maribyrnong River Bridge westbound with a number of passengers. The tram only bridge has been duplicated during September 1943. Photo not dated in the Wal Jack album, c1943 - 44trams, tramways, w5 class, special b, maribyrnong river bridge, maribyrnong rd, world war 2, tram 832 -
 Melbourne Tram Museum
Negative, Wal Jack, 25/06/1955 12:00:00 AM
Black and white negative, by Wal Jack, of W7 1011 (East Preston, route 88) in Bourke St crossing Russell St, 25-6-1955 In the background is A C Pearl Handbag and Travel goods specialist, Richardson Wine and Spirit store which appears to be closed, Normans, E Watkins? and Bank of NSW. Note the soft top Morris and the men on the street corner squatting.trams, tramways, bourke st, route 88, russell st, w7 class, east preston, tram 1011