Showing 710 items
matching ballarat railway station
-
 Ballarat Tramway Museum
Photograph - Black & White Photograph/s, Wal Jack, Jun. 1939
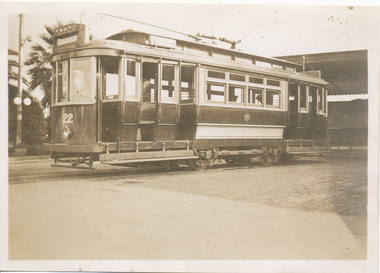
Black and White print contained within the Wal Jack Bendigo and Geelong Album, see Reg Item 5003 for more details. Photo of No. 22 at the Geelong Railway Station. Photographer unknown same as 5859 - possibly Wal Jack - see date on Reg Item 5861. Wal's album notes dates the photo as June 1939. Printed on Kodak Velox paper. The tram has two trolley poles. i1 - scan of print in the album i2 - rear of image i3 - scan of negative at 3200dpi added 6/6/2020. trams, tramways, geelong, railway station, tram 22 -
 Ballarat Tramway Museum
Photograph - Black & White Photograph/s - Geelong 23 at Railway Station, Wal Jack, Jun. 1939
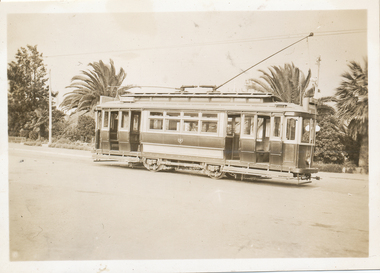
Black and white photo from the Wal Jack album (item 5003) of Geelong tram 23 leaving the railway station with Johnstone park in the background. i1 - scan of print in the album i2 - rear of image i3 - scan of negative at 3200dpi - not exactly the same location given the position of the trees behind. i4 - scan of a print from the Ken Magor collection i5 - scan of rear of print with date 21-6-1939 and Ken Magor number 1805. Yields information about Geelong tram 23Photo of No. 23 at the Geelong Railway Station. Has the Wal Jack copyright stamp on the back.trams, tramways, geelong, railway station, tram 23 -
 Ballarat Tramway Museum
Photograph - Black & White Photograph/s, Wal Jack, Jun. 1939
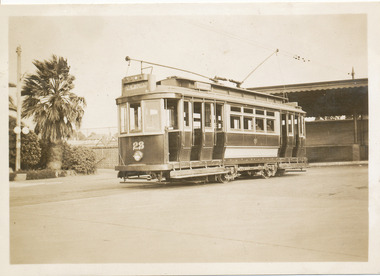
Black and White print contained within the Wal Jack Bendigo and Geelong Album, see Reg Item 5003 for more details. Photo of No. 23 at the Geelong Railway Station with the station buildings in the background. Photographer unknown - handwriting is the same as other photos such as Reg item 5850.. Wal's album notes dates the photo as June 1939. Printed on Kodak Velox paper. The tram has two trolley poles and the destination of Newtown. i1 - scan of print in the album i2 - rear of image i3 - scan of negative at 3200dpi added 6/6/2020. Has the rear in ink "Geelong Tramways, No. 23 "Two man trams", built by A. Pengelley South Australia"trams, tramways, geelong, railway station, tram 23 -
 Ballarat Tramway Museum
Photograph - Black & White Photograph/s, Wal Jack, 3/01/1945 12:00:00 AM
Black and White print contained within the Wal Jack Bendigo and Geelong Album, see Reg Item 5003 for more details. Photo of No. 17 from the Railway Station turning out of Railway Terrace into Mercer St. 3-1-1945. Printed on Ilford Paper. Tram has the destination of West. i1 - scan of print in the album i2 - rear of image i3 - scan of negative at 3200dpi added 30/6/2020.Has the rear in ink "SEC Geelong No. 17 from the Railway Station turning out of Railway Terrace into Mercer St. 3rd January 1945". Has the Wal Jack copyright stamp on the rear with the number T319 written in.trams, tramways, geelong, mercer st, railway station, tram 17 -
 Ballarat Tramway Museum
Photograph - Black & White Photograph/s, 8/01/1956 12:00:00 AM
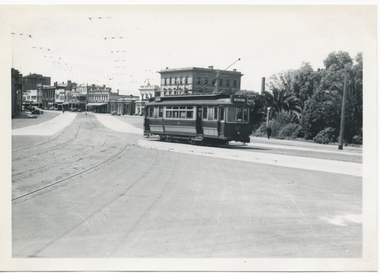
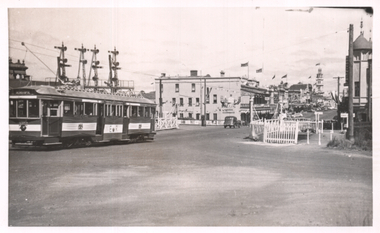
Black and White print contained within the Wal Jack Bendigo and Geelong Album, see Reg Item 5003 for more details. Photo of Geelong No 31 bound for North Geelong at Railway station junction, Malop and Mercer Streets 8/1/1956. General view of junction in the area with a Olympic tyre / service station No details on photographer. On rear in ink "No.31 bound for North Geelong at Railway Stn Junc Malop and Mercer Streets 8/1/56"trams, tramways, geelong, north, railway station, malop st, mercer st, tram 31 -
 Ballarat Tramway Museum
Photograph - Black & White Photograph/s, 11/07/1950 12:00:00 AM
Black and White print contained within the Wal Jack Bendigo and Geelong Album, see Reg Item 5003 for more details. Photo of an illuminated street sign, lamp, near Geelong Railway Station, at Mercer St corner, 11-7-1950. Photographer not known. Photo is glued into album. Sign has the words "Geelong Electric Tramways / Board tram at Curve" with a hand and finger pointing the direction to walk in.trams, tramways, geelong, signs, railway station -
 Ballarat Tramway Museum
Photograph - Tram 38 decorated for Royal Visit, Ken Magor, 1954
... , crossing the railway tracks at Ballarat Station in Lydiard St North... at Ballarat Station in Lydiard St North. The tram has the destination ...The photo, shows tram 38 decorated for the 1954 Royal Visit, crossing the railway tracks at Ballarat Station in Lydiard St North. The tram has the destination of Sebastopol. In the background is the railway signal gantry, Reids Coffee Palace and the Post Office. Many of the buildings are flying flags.Yields information about the 1954 Royal Tram.Photograph, black and white - plain black with Ken Magor stamp and negative number written on the rear.Ken Magor Negative Number - "3427" tramways, trams, royal visit, decorated trams, tram 38, lydiard st nth, level crossings -
 Ballarat Tramway Museum
Photograph - Geelong MESCo Bus East Geelong, c1920
The photo shows the Melbourne Electric Supply Co. (MESCo), bus at the East Geelong terminus. MESCo operated the Geelong tram system from 1912 and opened the tram line to this location "East Geelong" in 1923. The terminus was at the Geelong Cemetery, with a wooden waiting room shelter with signage about the building being used for passengers only and prohibiting the posting of bills. The buses ran from the railway station and Moorabool St wharf from 1912 until they were replaced by trams in 1923. The bus is also seen in item 4315. Yields information about the operation of a bus by MESCo in Geelong.Black and white photograph - plain back.geelong, tramways, mesco, buses, east geelong, shelters -
 Ballarat Tramway Museum
Slide - 27 mm sq slide/s - set of 3, Andrew Howlett, Lydiard St North level crossing, March 1969?
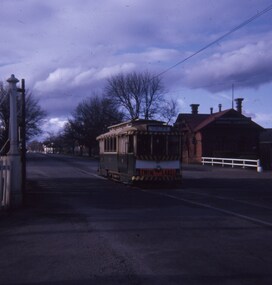
Yields information about the Lydiard St Nth line, the level crossing and the terminus.Set of three Colour slides, Kodak white cardboard mount, developed Mar 1969 of No. 37 .1 - while running a special crossing at the Lydiard St North level crossing at the Railway Station. Has the Reid's Coffee Palace and Railway Station in the background. .2 - No. 37 and a single trucker carrying a "Trotting at Bray Raceway" auxiliary board, at the Lydiard St North terminus. Has the shelter on the right-hand side. .3 - No. 37 waiting at the terminus. See Reg Items 7675, 7678, 7681, 7684, 7686, 7705 and 7713.ballarat, tramways, trams, lydiard st nth, railway station, shelters, level crossings, tram 37 -
 Ballarat Tramway Museum
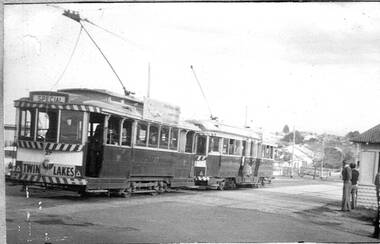
Slide - 27 mm sq slide/s, Andrew Howlett, Tram No. 27, southbound crossing the Lydiard St level crossing, Sep. 1968
Yields information about the Lydiard St Nth Level crossing.Colour slide, Kodak white cardboard mount, developed September 1968 of No. 27, southbound crossing the Lydiard St level crossing with a destination of Sebastopol. The tram has a Twin Lakes sign. the Kennedy Murrays General Carrier building in the background."Railway Xing Lydiard St Nth" in red ink.ballarat, tramways, trams, lydiard st nth, level crossings, railway station, tram 27 -
 Ballarat Tramway Museum
Negative, Wal Jack, early 1960's
Yields information about Ballarat tram No. 30 about to cross the level crossing in Lydiard St North at the railway station.Negative and Digital images of the Wal Jack Ballarat Negative file of No 30 to Sebastopol about to cross the Lydiard St North Level crossing at the railway station. Tram has a White Horse Whiskey Advert. trams, tramways, lydiard st north, railway station, level crossings, tram 30 -
 Ballarat Tramway Museum
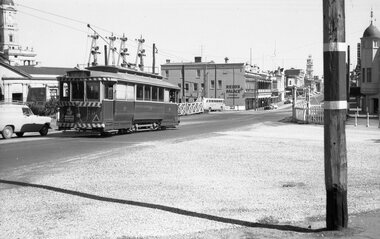
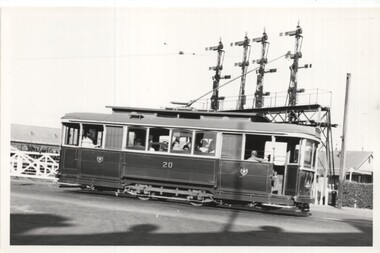
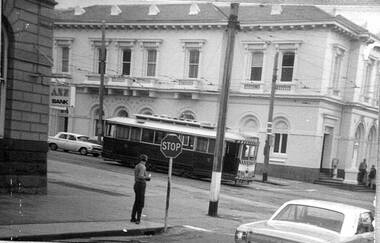
Photograph - Black & White - Tram 20 at Railway level crossing, Keith Kings, 22/1/1955
Shows trams at the Lydiard St level crossing gates and the signal gantry.Yields information about Ballarat tram No. 20 and the locationBlack and White photograph of SEC Ballarat tram No. 20 crossing the railway level crossing in Lydiard St North. Has the signal gantry in the background. Photo by Keith Kings 22/1/1955.On rear has the photographers file number (M)(d)(3)ballarat, lydiard st north, level crossing, railway station, tram 20 -
 Ballarat Tramway Museum
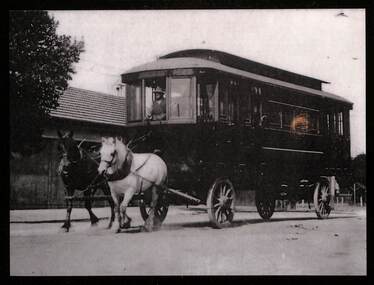
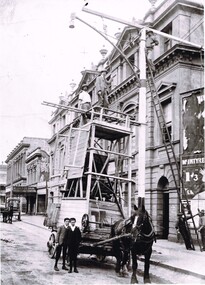
Photograph - Geelong tram body being delivered from the Railway Station c1924
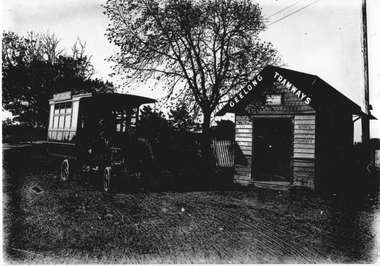
Demonstrates the method of delivery of a tramcar body for Geelong from the railway station using a horse drawn jinker with the horse driver standing in the same location as a tram driver would have. Tramcar built by Pengelley of Adelaide. The tramcar bodies were delivered during 1924 and 1925.Yields information about the Pengelly built tramcars for Geelong c1924 and how tramcar bodies could be transported using a horse drawn jinker. At the time, the Geelong tram system operated by the Melbourne Electric Supply Co.Copy photograph on black plastic type backing with black edges of a Pengelley Adelaide built tramcar body for the Geelong tramway system being delivered 1924, from the Geelong Railway station.geelong, tramways, pengelley, tram bodies, horse drawn jinker -
 Ballarat Tramway Museum
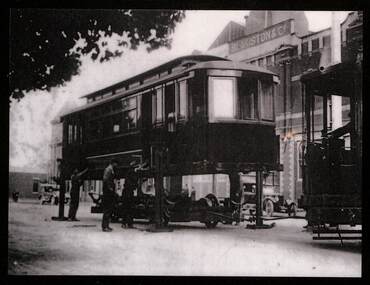
Photograph - Geelong tram body being fitted with a truck or wheelset
Provides information on how a tramcar body was fitted with a wheelset or truck (Brill Radiax EB1 type). Lifted on the jacks after delivery by a horse drawn jinker from the Railway Station (See Reg Item 8321) The wheel set is being pushed under the tramcar by another tramcar. Once fitted the tramcar would have been towed back into the depot and the motors etc connected. Has the Blakiston & Co. building in the background. Yields information about how tramcar bodies were lifted outside the Geelong tram depot in Brougham St in order to be made operational. Copy photograph on black plastic type backing with black edges of a Pengelley Adelaide built tramcar body on jacks being fitted with a truck or wheel set.geelong, tramways, pengelley, tram bodies, brill radiax truck, brougham st, trams -
 Ballarat Tramway Museum
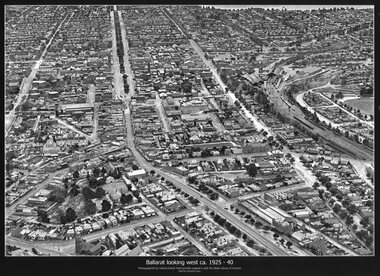
Photograph - Black & White copy, Charles Pratt, "Ballarat looking west ca 1925-40"
Original photograph by Charles Daniel Pratt, with the original image held by the State Library of Victoria. Edited by Richard Conn. Purchased by the Museum.Provides information about the appearance of Ballarat East and views across over the Railway Station to Lake Wendouree and along along Sturt St. Shows the nature of the Bridge St shopping centre and other places.Black & White copy photograph aerial view A4 size, titled "Ballarat looking west ca 1925-40" - looking along Sturt St with the Railway yards, Bridge St and Victoria St in the view. Some trams can be seen at Grenville St.ballarat, aerial photo, sturt st, victoria st -
 Ballarat Tramway Museum
Photograph - Series of 9 black and white photographs of Ballarat trams, Ellen Butland, 1971
.1 - No. 27 in Lydiard St North at Sturt St. .2 - Scene at Railway station in Lydiard St North following arrival of the ARHS tour train. .3 - Nos. 27, 42, 11 at Sebastopol terminus. .4 - No. 42 in Sturt St .5 - Nos. 27, 42, 11 at Sebastopol terminus. .6 - No. 11 in Sturt St .7 - No. 27 crossing Albert St Sebastopol. .8 - No. 42 in Lydiard St North at Sturt St. .9 - Nos. 27, 42, 11 at Lydiard St. North terminus. Note: - some of the captions under the photos have the wrong locations.Has a strong association with a Melbourne tram driver who assembled the scrap book and series of photos of Ballarat trams at the time of closure. Yields information about the tram operations.Set of nine black and white photographs contained with Reg item 5988, a Stamford Kiwi School Scrap Book - prepared by Ellen Butland of Auckland following the closure of the SEC Ballarat Tramway system."Ballarat, Australia 21-9-71" in ink along the top edge of the sheet.trams, tramways, ballarat, sturt st, sebastopol, tram 27, railway station, tram 42, tram 11 -
 Ballarat Tramway Museum
Photograph - Series of 7 black and white photographs of Ballarat trams, Ellen Butland, 1971
.1 - Nos. 27, 42, at Lydiard St. North terminus. .2 - No. 11 at Lydiard St North terminus .3 - Nos. 27, 42, 11 at Lydiard St. North terminus. .4 - Controls of No. 11 with keys in position .5 - Scene at Railway Station after touring the system .6 - Interior photo of No. 11 .7 - Second convoy at Railway Station unloading - includes No. 39 Note: - some of the captions under the photos have the wrong locations.Has a strong association with a Melbourne tram driver who assembled the scrap book and series of photos of Ballarat trams at the time of closure. Yields information about the tram operations.TRAMSet of seven black and white photographs contained with Reg item 5988, a Stamford Kiwi School Scrap Book - prepared by Ellen Butland of Auckland following the closure of the SEC Ballarat Tramway system.closure, arhs, tours, trams, tramways, ballarat, sturt st, lydiard st nth, sebastopol, tram 27, tram 42, tram 11, tram 39, interiors -
 Ballarat Tramway Museum
Photograph - Positioning street lights - Lydiard St North, Ballarat late 1890s
Photo of the installation of an electric arc type street lamp in Lydiard St North, near the Provincial Hotel Ballarat. The tower wagon is drawn by a single horse. Two boys standing alongside while two men are on the top of the wagon, a man on the top of the ladder is positioning a lifting beam while two men on the ground hold the rope for this beam. On the side of the wagon is possibly an extension that could be lifted onto the top of the tower itself to give a greater working height. The buildings between Mair St and the railway station on the west side of Lydiard St North remain in position. Yields information about the methodology of the late 1890's to install street lighting in BallaratDigital print of a Positioning street lights Lydiard St North Ballarat late 1890sarc lamps, ballarat, lydiard st north, electric lighting, tower wagons, horses, workmen, street lights -
 Ballarat Tramway Museum
Document, 'State Electricty Commission of Victoria Rail Transport: Yallourn Open Cut"
Provides details of the history of SECV rail operations in the Yallourn and other power station open cuts and the transport of coal and the locomotives used in the Latrobe Valley operations of the SEC. Possibly prepared in the early 1980s. Rail operations on the interconnecting railway ceased in 2000. Shows outline diagrams of the steam, electric and diesel locomotives and the coal wagons.Provides information about the SEC Coal railways and their rolling stock used for power generation in Victoria.Report or document - 16 A4 pages titled Report - 'State Electricty Commission of Victoria Rail Transport: Yallourn Open Cut"sec tramways, power supply, secv, open cut mining, locomotives, interconnecting railway -
 Ballarat Tramway Museum
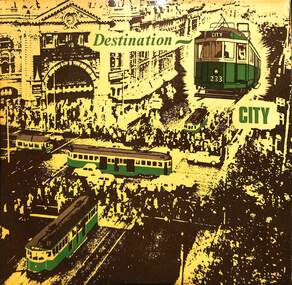
Audio - Vinyl Recording, Ormond Slater & Ewen Cameron, Destination City, 1969
The jacket has a stylised view of the intersection of Flinders and Swanston Streets and Flinders St railway station with W2 233 in the top right-hand corner. On the rear are extensive details of each of the 11 recording tracks featuring various trams around Melbourne. The vinyl disk itself has a blue label with the title, speed and side number. Includes recordings of trams 676, 933, 980, 233, and 662. Produced and recorded by Ormond Slater and Ewen Cameron in 1969 with the assistance of the Australasian Post and the TMSV.Demonstrates sound records and production of Vinyl records.Record - vinyl based with paper card jacket and plastic record cover - 33 1/3 rpm microgroove vinyl record, or "LP", titled "Destination City".tramways, tramcars, melbourne, sound recordings, vinyl records, w3 class, w2 class, tram 233, tram 662, tram 980, tram 933, tram 676, tmsv -
 Ballarat Tramway Museum
Slide - R711 Ballarat Station - COTMA Conference 2000, David Verrier, 17-11-2000
... Photo shows West Coast Railway locomotive R711 at Ballarat... Railway locomotive R711 at Ballarat Station after hauling ...Photo shows West Coast Railway locomotive R711 at Ballarat Station after hauling the special train for passengers for the 2000 COTMA Conference in Ballarat. The locomotive was provided by West Coast Railway who was running the Warnambool service at the time and was a suprise to the conference attendees.Demonstrates the use of a steam locomotive to transport passengers for a COTMA Conference in 2000.Kodak colour slide - plastic mount"Fri 17/11/00 R711 Ballarat"cotma, btm, r 711, steam locomotives, ballarat, west coast railway -
 Ballarat Tramway Museum
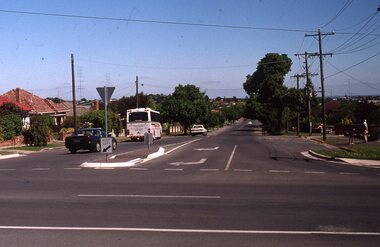
Slide - Set of 7 - Lydiard Street level crossing and tram terminus, David Verrier, 21-11-2000
Set of seven slides taken during the 2000 COTMA Conference visit to the Ballarat Tramway Museum depot on 21-11-2022 1 - Former Lydiard St North terminus looking south 2 - Ballarat Station with the temporarily closed Lydiard St level crossing. 3 - Ballarat Station with the temporarily closed Lydiard St level crossing. 4 - Ballarat Station good shed looking east 5 - Lydiard St level crossing with G521 on freight leaving 6 - Lydiard St level crossing with G521 on freight leaving 7 - Train on level crossingYields information about the Lydiard St Nth terminus in 2000 and the level crossing.Set of seven Kodak colour slides - white plastic mountEach slide has details written on it.ballarat, specials, cotma, lydiard st north, level crossing, g 521, railways -
 Ballarat Tramway Museum
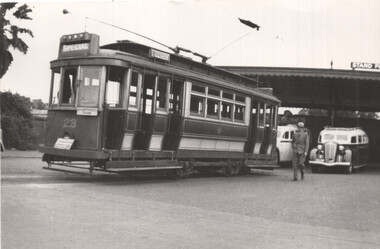
Photograph - Geelong Tram tour AETA, Charles Craig, 29-3-1948
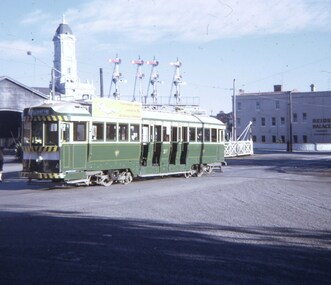
Photos show the first AETA Provincial tram tour of 29-3-1948. The tour used Geelong tram 23. See also items 7234 to 7238 for other photos.Yields information about the AETA's first Geelong tour in 1948.Set of four Black and white photographs of the AETA tour to Geelong.Items 1 and 2 have the date on the rear in ink.tramways, trams, sec tramways, tram 23, geelong, geelong railway station -
 Ballarat Tramway Museum
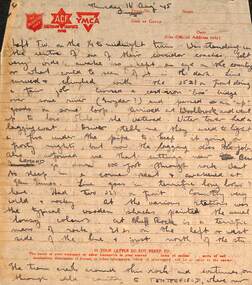
Letter - from Wal Larsen to Wal Jack re the Tenterfield railway, Wal Larsen, Aug 1945
Wal Jack had an extensive range of correspondents throughout Australia and the world who often prepared extensive notes and records for him. This letter from Wal Larsen of Bright, dated 16 Aug 1945 describes a trip to Tenterfield, notes on crews, their hats, station layouts and detailed map. With the letter is a plan of the station layouts of the West Tamworth to Barraba line dated 6-10-45. Demonstrates some of the correspondence that Wal Jack received from around the world and that of Wal Larsen.Letter - handwritten with ink on a set of four ruled Salvation Army - Australian Comfort Fund and YMCA printed sheets and a drawing on a foolscap sheet on the rear of Australian Military Forces for - "Return on Members of the Permanent forces entitled to Medical Attendance"letters, wal jack, railways, nsw, wal larsen, tenterfield, barraba, west tamworth, nswgr -
 Ballarat Tramway Museum
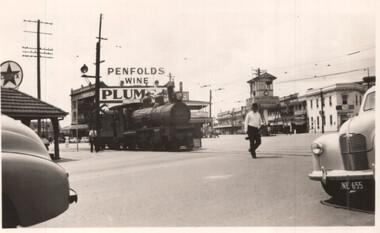
Photograph - QGR locomotive at Woolloongabba Brisbane, Keith Kings, 10/1/1951
Wal Jack swapped photographs with his correspondents. This photo by Keith Kings, a railway photograph of QGR locomotive 748 crossing the complex arrangements of tracks at Woolloongabba - three tram tracks, one trolley bus route. The photographer noted that trains could block all tram lines at times. Trains were always proceeded by a man carrying a red flag and ringing a bell. Has the tramway signal box in the background and a large Penfolds Wines advert on a building, a Caltex service station and an advert for Plume petrol.Demonstrates a photograph that would have been sent to Wal Jack by Keith Kings.Black and white photograph of QGR locomotive 748Has extensive details of the photograph on the rear. Keith Kings photo number E(k)(vii)letter, wal jack, keith kings, qgr, railways, woolloongabba -
 Ballarat Tramway Museum
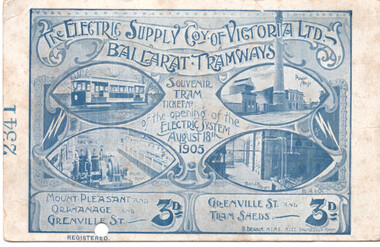
Postcard - Souvenir ESCo opening Ticket, Electric Supply Co. of Vic (ESCo), August 1905
Used as a souvenir ticket and postcard on the opening day of the Electric Supply Co. of Victoria (ESCo), Ballarat tramways on 18 August 1905, Has been punched for the Mount Pleasant and Orphanage - Grenville St section. Collected by David Budge - 1879 - 1974, son of William and Mary Budge of Trevor St Ballarat, who worked for the Victorian Railways as a blacksmith residing in Walnut St Carnegie. Demonstrates a souvenir item for the opening of the electric tramways in Ballarat in the form of a postcard, which could be sent to others as a souvenir of the new tram system in Ballarat. Has a strong association with the collector.Postcard - size Souvenir Tram ticket, printed using blue ink on one side with fare, photos of power station, engine room, boiler room and a tram & No.2341 stamped on edge. On reverse side is space for stamp, address etc., - with line & "postcard' etc., printed in red ink. See item 608 for other examples.esco, opening, tramways, ballarat, tickets, postcards, david budge -
 Ballarat Tramway Museum
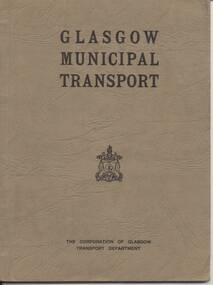
Book, Corporation of Glasgow Transport Department, "Glasgow Municipal Tramway", c1933
Book - 48 pages + 2 fold out maps + cover, card cover, bound, giving details of history of Glasgow tramways, power stations, substations, workshops, bus stations, training and underground railway. Commences at p41 - 92, could have been part of a larger document. Record reviewed and scanned images of cover added 5/9/13. trams, tramways, glasgow, uk, tramway, bus, underground -
 Ballarat Tramway Museum
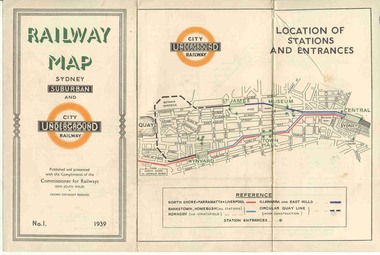
Map, NSWGR, "Railway Map of Sydney Suburban and Underground" - 1939, 1939
Light card or Heavy paper. Colour map showing location of Sydney stations and entrances and where the trains ran. Issued as No.1. Title "Railway Map of Sydney Suburban and Underground" - 1939. Handle with care - both copies.trams, tramways, sydney, railway map, suburban and underground, trams -
 Ballarat Tramway Museum
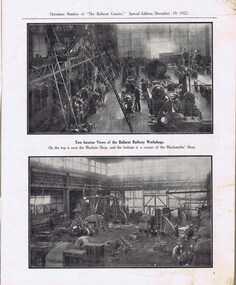
Newspaper, The Courier Ballarat, The Courier, Christmas Number, 1922, Special Issue, Dec. 1922
Yields information about Ballarat, it businesses, identifies and its locations or environs through photos and advertisements and articles.The body of the "Christmas Number of the Ballarat Courier, Special Edition - December 1922" = coves missing. See attached listing with worksheet for summary of contents. Contains many advertisement for local business houses, photos and fiction and articles , pages 3 - 94 still existing, stapled. Notes on contents of Christmas Number of The Ballarat Courier Special edition, December 19, 1922. Photos Ballarat Association Cricket Team, winners Country championship - 1922 and photo of dinner at Sth Melb. Town Hall by VCA. - p83 Ballarat Golf club, Arch of Victoria and Club House - p63, 65 Ballarat Imperial Football club - league premier- 1922 - p19 Ballarat Miners Turf Club - showing stands and office bearers - p43 Ballarat North Golf Club - p67 Ballarat Town hall - p87 Ballarat Turf Club Office bearers and race finish - p45 Ballarat Yacht club - opening day and yacht race - p89 Black Hill Progress Association, - members and scenes - p33 Eureka Monument - p79 Finish of a race at Miners RC - p45 Head of the Lake and St. Patrick's the winning crew - p47 1.ake Wendouree - boating on (Gardens side - p] 1 Lake Wendouree, rowing and club houses - p28 Lal Lal waterfalls - p61 Lydiard St. View - Railway Station, Cemetery gates, Mining Exchange, Post Office and Banks - p71 National Federation Conference - 1922 - p39 South city Football club, Ballarat Assoc. Premiers 1922 - p25 Sturt and Lydiard St - top photo Town Hall and T&G building, with ESCo tram (pencil note "Tram No- 3 - Peckham Truck" written in - p75. Bottom photo, looking south from Town Hall. The Western Oval during a football match - p23 Victorian Farmers Union Conference, Ballarat 1922 - p37 Victorian Railway photos of various scenes around Victoria: Pages 3, 5, 7, 55, 59 Views of Victoria Park - p91 VR Ballarat Railway Workshops - p9 Advertisements on even numbered pages, featuring in particular: Ballarat Motor Garage - with photos - p88 C.A.V. Willard - storage battery service Stn - p76 with photo. CA Mitaxa - Builder - includes photos of new homes - p38 Coles & Pullham - stock sales - with photos - p86 ESCo - p70 Geo E. Dibble, machinery merchant - includes photos - p26 Geo. Waller - asphalt and carrier - photos of work and buildings Hanrahan's of Ballarat - Garage and stables - p30 J.L.Ridings - dentists, - photos of surgery p14 Longhurst's Bakeries - Mair and Yuille St. Includes Photos. - P84 Preston Motors, Melbourne - The Maxwell Sep Morse - Motor and Carriage builders - photo - p78 St. Patrick's College - photos of students and buildings - p46 State Savings Bank of Vic. - p20 T-J. Brown house remover and general carrier, photo of traction engines - p90 T.J.Haymes - Wallpaper etc. - p33 The Ballarat Co-Op Distribution Society - includes photos - p44 The Hupmobile - McLean Richards Motors - p22 Wallace Butter Factor - p82 Articles Black Hill Progress Association - p35 Damaged pages - cut outs clippings etc. Page 17/18 - top half bottom 1/3 of page 21/22 Pages: 9, 70, 71, 75, 87 and 90 imaged. Record reviewed and images of some of the pages added 10-9-2013p74. Note re tram 33.trams, tramways, ballarat, commerce, ballarat business, sports, science, esco -
 Ballarat Tramway Museum
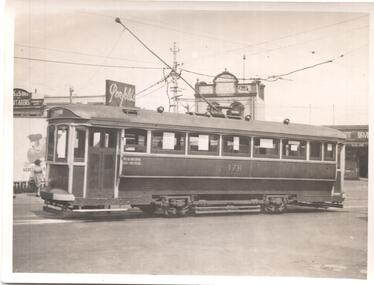
Photograph - Black & White Photograph/s, Wal Jack, 23/02/1942 12:00:00 AM
Black & white photograph of M&MTB T class 178 in Glenhuntly Road Elsternwick Railway station, 23-2-1942. Tram modified as a 1 man tram. Has shops in background. Tram possibly fitted with war time blackout mask. See Inscriptions for further details. Reimaged 17/7/2017 both front and back.On rear in ink, 'T308, M&MTB 'T' class No. 178 rebuilt as one man car. Glenhuntly Road Elsternwick (near Rly stn.) 23-2-42. Ex Melb. Brunswick & Coburg Tramways' car. W.Jack Photo.'trams, tramways, mmtb, t class, mbctt, elsternwick , tram 178