Showing 9918 items
matching south st
-
 Ballarat Tramway Museum
Slide - 35mm slide/s - set of 6, Noel Simons, 28 Feb. 1972
Set of 6 transparencies taken on 28/2/1972 on Kodak mounts. 1206.1 - Bendigo No. 5 at Hayes St. Loop, en route for Quarry Hill. 1206.2 - No. 5 at Garden Gully Loop, Mt. Korong road, Ironbark. en route to Quarry Hill. Note the water column in the background. 1206.3 - No. 5 in View St. Bendigo, with the Commodore Motel in the background. 1206.4 - No. 6 en route for Golden Square in Fire Station loop, with the fire station building in the background. Photo taken after tram has passed photographer. 1206.5 - No. 6 in High St., running through Golden Square Shopping Centre, en route for Golden Square. Photo taken after tram has passed photographer. 1206.6 - No. 6 arriving at Charing Cross, bound for North Bendigo, with the City Family Hotel, ANZ bank and the Cenotaph (war memorial) in the background.Information written on in blue ink and date stamped on purple ink. 1206.1 - "No. 5 at Hayes Loop, Ironbark." 1206.2 - "No. 5 at Garden Gully Loop, Mt. Korong road, Ironbark." 1206.3 - "No. 5 in View St. just after start of double track near Barnard St." 1206.4 - "No. 6 in High St. at Fire Station loop." 1206.5 - "No. 6 in High St. running through Golden Square shopping centre." 1206.6 - "No. 6 arriving at Charing Cross from Golden Square."tramways, trams, bendigo, hayes st. loop, garden gully loop, view st., golden square, charing cross, tram 5, tram 6 -
 Ballarat Tramway Museum
Slide - 35mm slide/s - set of 12, Noel Simons, 28 Feb. 1972
Set of 12 transparencies taken on 28/2/1972 on Kodak mounts. 1207.1 - Bendigo 26 and 2 at Charing Cross. 26 en route for Eaglehawk, 2 for Quarry Hill. Has the Colonial Mutual Life, Armstrong Tyre Service, and Australian Mutual Provident Society buildings and a Cohns Drinks ad. in the background. 1207.2 - as for 1207.1 but with Alexandra fountain in the foreground. 1207.3 - No. 2 in Mitchell St. heading for Quarry Hill. Photo taken after tram has passed photographer. Has buildings on either side of Mitchell St. in the background, including the Plaza Theatre. 1207.4 - No. 6 en route for Golden Square departing Charing Cross. Has the RACV and ANZ bank in the background. 1207.5 - No. 2 crossing Pall Mall to enter Charing Cross ex Quarry Hill, with the Fountain Plaza in the background. 1207.6 - No. 6 arriving Charing Cross ex Golden Square with No. 21 alongside. No. 21 has the SEC ad. 'Everything's fine in my all electric kitchen.' Has the City Family Hotel and the Fountain Plaza shopping centre in the background. 1207.7 - No. 5 at Charing Cross en route for Quarry Hill with No. 2 behind. No. 2 has two SEC roof ads, 'Everything s fine in my all electric kitchen' and 'Electricity best for cooking'. RACV building in the background. Tram crews are discussing the day in the front of the tram. 1207. 8 - No. 21 in High St. Bendigo with the Cathedral in the background. No. 21 has two SEC roof ads, 'Everything's fine in my all electric kitchen' and 'Electricity best for cooking'. 1207.9 - No. 6 in High St. Bendigo with the Cathedral in the background. 1207.10 - No. 6 in High St. Bendigo, just past Wattle St. Photo taken after the tram has passed the photographer from within the Highway Car Sales yard. 1207.11 - No. 26 bound for Eaglehawk at the end of the double track in View St., note signal contactors, tram stop and section signs mounted on pole. 1207.12 - No. 26 turning from View St. into Barnard St.Information written on in blue ink and date stamped on purple ink. 1207. 1- "Nos. 26 and 2 at Charing Cross." 1207.2 - "Nos. 26 and 2 at Charing Cross." 1207.3 - "No. 2 in Mitchell St. just after leaving Charing Cross." 1207.4 - "No.6 leaving Charing Cross for Golden Square." 1207.5 - "No. 2 arriving at Charing Cross from Quarry Hill." 1207.6 - "No. 21 waits at Charing Cross as No. 6 arrives from Golden Square." 1207.7 - "No 5 at Charing Cross with No. 2 lurking behind." 1207.8 - "No. 21 in High St. at cnr of Wattle St." 1207.9 - "No. 6 in High St. at cnr of Wattle St." 1207.10 - "No. 6 in High St. between Wattle and Vine Sts." 1207.11 - "No. 26 at end of double track in View St. near Barnard. St. 1207.12 - "No. 26 seen at dusk turning from View St. into Barnard St."tramways, trams, bendigo, charing cross, high st, view st., tram 2, tram 5, tram 6, tram 21, tram 26 -
 Ballarat Tramway Museum
Slide - 35mm slide/s set of 7, Noel Simons, 29 Feb. 1972
Set of 7 transparencies taken on 29/2/1972 on Kodak mounts. 1208.1 - Bendigo 18 (en route to Quarry Hill) and 2 (Eaglehawk) in the early morning at Charing cross with the Alexandra fountain and the Fountain Plaza building in the background. 1208.2 - No. 2 descending View St. Photo taken after tram has passed the photographer. 1208.3 - as for 1208.2 at Mackenzie St. intersection 1208.4 - No. 26 ascending View St. with the ANZ bank, T& G in the background. 1208.5 - as for 1208.4, but at Mackenzie St. intersection. Photo taken after tram has passed the photographer. 1208.6 - No. 18 in View St. seen from the lookout tower in Rosalind Park. 1208.7 - No. 7 en route to North Bendigo in Nolan St. Photographed across the Centenary Oval.Information written on in blue ink and date stamped on purple ink. 1208.1 - "Nos. 18 and 2 in the early morning sun at Charing Cross." 1208.2 - "No. 2 descending View St. towards Charing Cross." 1208.3 - "No. 2 in View St. passing Mackenzie St." 1208.4 - "No. 26 in View St. just after leaving Charing Cross." 1208.5 - "No. 26 climbing View St. past Mackenzie St." 1208.6 - "No. 18 climbing View St. seen from lookout tower in Rosalind Park." 1208.7 - "No. 7 in Nolan St. heading towards North Bendigo. / Last picture of a Bendigo tram."tramways, trams, bendigo, charing cross, view st., nolan st., tram 2, tram 7, tram 18, tram 26 -
 Ballarat Tramway Museum
Slide - 35mm slide/s - set of 4, Noel Simons, Apr. 1972
Set of 4 transparencies - copy slides - possibly ARE film strip dated March 1972. 1209.2 and 1209.4 on Kodak Readymount mounts. 1209.1 - Bendigo 5, 6 and 28 on a special tram service in bound to the City on a tour in Caledonia St. about to enter Lucan St, or White Hills Road or Weeroona Ave. (mis match in names in various maps). Gas works in the background. No. 5 has a white disk on the rear of the tram. 1209.2 - Nos 2 and 26 at Charing Cross with the Fountain Plaza in the background. Both trams have the destination of Quarry Hill, though 26 is on the Eaglehawk bound track. 1209.3 - No. 19 at the Golden Square terminus, with the conductor or driver swinging the pole and Billy Rodda's Golden Square hotel in the background. 1209.4 - No. 7 at Fire Station loop, en route to North Bendigo, picking up a passenger with a pram. Part of a set of 20 slides made by the Association of Railway Enthusiast Provincial Tramways film strip. Reference Item 2560 details the ARE Film Strip and provide references to other slides.Information written on in blue ink and date stamped on purple ink. 1209.1 - "Nos 5, 6 and 28 in Caledonia St. about to enter Weeroona Ave." 1209.2 - "Nos 2 and 26 at Charing Cross." 1209.3 - "Swinging the pole on No. 19 at Golden Square Terminus." 1209.4 - "No. 7 inward bound from Golden Square stops at Fire Station Loop."tramways, trams, bendigo, charing cross, golden square, gas works, special trams, tram 2, tram 5, tram 6, tram 7, tram 19, tram 28 -
 Ballarat Tramway Museum
Slide - 35mm slide/s - set of 4, Noel Simons, Apr. 1972
Set of 4 transparencies - copy slides - possibly ARE film strip dated April 1972. 1210.3 on Kodak Readymount mount. 1210.1 - No. 3 arriving at Quarry Hill terminus. 1210.2 - Bogie car at Long Gully Loop, in the far distance, with a Hotel and the ESSO service station in between. Has Fosters Lager and Carlton signs on hotel. Note sign on the closet pole - "No standing between Notices" 1210.3 - Nos. 26 (Quarry Hill) and 25 (Eaglehawk) at Jobs Gully Loop. 1201.4 - No. 5 showing Charing Cross in bound for Charing Cross and No. 3 en route for Eaglehawk in View St. near the end of the double track. Appears to be SEC employee at the rear of No. 3. Part of a set of 20 slides made by the Association of Railway Enthusiast Provincial Tramways film strip. Reference Item 2560 details the ARE Film Strip and provide references to other slides.Information written on in blue ink and date stamped on purple ink. 1210.1 - "No. 3 arriving at Quarry Hill terminus." 1210.2 - "Bogie car at Long Gully Loop." 1210.3 - "Nos. 26 and 25 at Jobs Gully Loop." 1210.4 - "Nos 5 and 3 in View St. near the end of the double track."tramways, trams, bendigo, long gully, quarry hill, view st., tram 3, tram 5, tram 25, tram 26 -
 Ballarat Tramway Museum
Slide - 35mm slide/s set of 7, Noel Simons, 1972
Set of 7 transparencies undated on PAKON mounts - appear to be early 1970's. 1212.1 - No. 18 about to enter the Long Gully loop with ESSO service station on the right hand side. 1212.2 - No. 6 in Mitchell Street bound for Charing Cross. Tram has destination of "Rly Station". Has buildings on the east side of Mitchell St. in the background. 1212.3 - No. 7 (North Bendigo) and 29 (Golden Square) crossing. Actual location? 1212.4 - "No 6 showing 'SPECIAL' at Eaglehawk terminus. Has the Foodland store and Fruit shop in the background. 1212.5 - No. 19 at Eaglehawk terminus, on the extension to the normal Eaglehawk terminus. Tram has showing 'Eaglehawk'. Tram has two SEC roof ads. 1212.6 - No. 25 and another Bogie car at Quarry Hill terminus on last day. 1212.7 - No. 18 and 29 at Quarry Hill terminus. No.. 18 showing 'Quarry Hill' - has two SEC roof ads 'Electric Cooking - Matchless' and 'Everything's fine in my all electric kitchen' and No. 29 has a briquettes roof ad.Information typed onto a white label stuck on the slide. 1212.1 - "No. 18 at Long Gully" 1212.2 - "No. 6 in Mitchell Street." 1212.3 - "7 and 29 Lake View Hotel" 1212.4 - "No. 6 at Eaglehawk" 1212.5 - "No. 19 at Eaglehawk Term." 1212.6 - "Last cars Quarry Hill." 1212.7 - "18 & 29 Quarry Hill"tramways, trams, bendigo, long gully, mitchell st., eaglehawk, quarry hill, last tram, tram 6, tram 7, tram 18, tram 19, tram 25, tram 29 -
 Ballarat Tramway Museum
Document - Photocopies, Photocopies of layout plans of South Melbourne tram depot
... Ballarat Tramway Museum South Gardens Reserve Wendouree ...Five A3 photocopies of drawings of the South Melbourne tram depot and per way yard. Drawings dated 8/1938. Depot also known as Hanna St. Depot. Sheet A - drawing of per way yard section , drawing P8349. Sheet B - drawing of whole depot and tracks in Hanna St. - drawing P8345. - date 12/8/1938. Sheet C - drawing of entry area and detail plans of administrative blocks - drawing P8346. Sheet D - drawing of south end of yard at corner of Hanna and Bank Streets - overhead and building section - drawing P 8348. Sheet E - drawing of tramcar depot portion of the site, with rolling stock offices and building to the south side of the car shed - drawing P8347, dated 12/8/1938.trams, tramways, south melbourne depot, hanna st. depot, mmtb, depot -
 Ballarat Tramway Museum
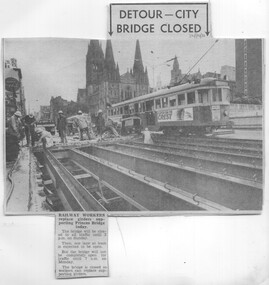
Newspaper, Herald & Weekly Times Ltd, "Detour - City Bridge Closed", 24/10/1970 12:00:00 AM
Newspaper Clipping from The Sun newspaper 24/10/1970 about the replacement of bridge girders in Swanston St. over the Railway lines with W2 381 in the background. Gives details of road closure. Good photo of the type of structure."24/10/70" in blue ink in top left hand corner.trams, tramways, swanston st., mmtb, bridges -
 Ballarat Tramway Museum
Newsletter, Ballarat Tramway Preservation Society (BTPS), Notice to BTPS members about a Social Meeting t, Jan. 1972
1239.1 - Notice to BTPS members about a Social Meeting to be held at St. Cuthbert's Church Hall, Sturt St. West on 27 Jan. 1972. Notes an inspection of the proposed track to Wendouree Parade and work commenced on the depot foundations. Signed by Hal Cain, President. Printed on pink paper using Stencil process. 1239.2 - Appeal form or notice to members, seeking funds to cover the cost of acquisition of tram No. 33, ($750) and transport ($450) from Hamilton. Gives notes on history of 33 in Hamilton. Donations to be sent to the Treasurer, Mrs. Dean in Box Hill. Gives date of return of tram 33 to Ballarat as 28 April 1977. Printed on yellow paper with duplicator process.1239.2 has "Nancy's" in top right hand corner in blue ink.museums btps, appeals, hamilton, social meetings -
 Ballarat Tramway Museum
Photograph - Black & White Photograph/s, David Endacott, 14/08/1971 12:00:00 AM
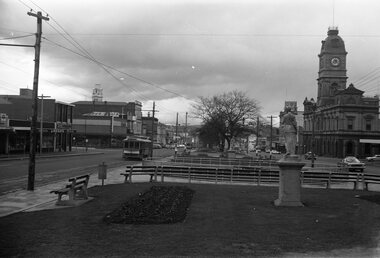
Black and white photograph and negative of Ballarat No. 26 eastbound in Sturt St., Saturday 14 August 1971 at the corner of Doveton St. Has the George V statute adjacent. Tram has destination of Lydiard St. North. Has Walter Connell Chemist on left hand side of photo, with a BP display thermometer showing temperature - about 12 degrees and a finger board for the Mid City Motel on chemist building. Original print by David Endacott, duplicate print (1261A) by John Phillips 12/99. Second copy added 5/2001. Original neg scanned at hi res and updated 11/5/2020.On original print "Last week of full tram service before phasing out / from Cnr of Sturt and Doveton Sts. / Sat 14 August 1971" in pencil.trams, tramways, ballarat, sturt st., doveton st., tram 26 -
 Ballarat Tramway Museum
Photograph - Black & White Photograph/s, David Endacott, 14/08/1971 12:00:00 AM
Black and white photograph and negative of Sturt St, north side, looking to the east of Armstrong Street, Saturday 14 August 1971 at the corner of Armstrong St. Has two single truck trams at the intersection with Lydiard St. North and a few parked cars. Original print by David Endacott, duplicate print (1262A) by John Phillips 12/99. Second copy added 5/2001. Original neg scanned at hi res and updated 11/5/2020.On original print "From Cnr Sturt & Armstrong Sts / Sat 14 Aug 1971" in pencil.trams, tramways, ballarat, sturt st., armstrong st. -
 Ballarat Tramway Museum
Photograph - Black & White Photograph/s, David Endacott, 14/08/1971 12:00:00 AM
Black and white photograph and negative of tram 33 outbound to Gardens via Sturt St. West, in Sturt St. west, with long brick fence in the background. Photo taken Saturday, August 14, 1971. Original print by David Endacott, duplicate print (1263A) by John Phillips 12/1999 - three copies held 5/2001. Original neg scanned at hi res and updated 11/5/2020. On original print "Sturt St. West / Sat 14 Aug 1971" in pencil.trams, tramways, ballarat, sturt st. west, tram 33 -
 Ballarat Tramway Museum
Photograph - Black & White Photograph/s, David Endacott, 14/08/1971 12:00:00 AM
Black and white photograph and negative of tram 33 outbound to Gardens via Sturt St. West, in Wendouree Parade, near Carlton St., with Lake Wendouree in the background. Tram has destination of "Gardens via Sturt St. West". Photo taken after the tram has passed the photographer. Original print by David Endacott, duplicate print (1265A) by John Phillips 12/1999 - two copies held 1/2000. Original neg scanned at hi res and updated 11/5/2020.On original print "Ballaarat Gardens / Sat 14 Aug 1971" in pencil.trams, tramways, ballarat, wendouree parade, lake wendouree, tram 33 -
 Ballarat Tramway Museum
Photograph - Black & White Photograph/s, David Endacott, 14/08/1971 12:00:00 AM
Black and white photograph and negative of tram 27 in Sturt St at the corner of Armstrong St. with the Ballarat Town Hall in the background. Photo taken from the central median strip with a number of seats in the foreground and flowers growing in the planter beds. Original print has water mark damage on the lower portion of the photograph. Taken 14 August 1971 Original print by David Endacott, duplicate print (1266A) by John Phillips 12/1999. Second copy added 5/2001. Original neg scanned at hi res and updated 11/5/2020.On original print "Cnr Sturt & Armstrong Sts / Sat 14 Aug 1971" in pencil.trams, tramways, ballarat, ballarat town hall, sturt st, armstrong st, tram 27 -
 Ballarat Tramway Museum
Photograph - Black & White Photograph/s, David Endacott, 14/08/1971 12:00:00 AM
Black and white photograph and negative of two bogie trams crossing at the Grey St. Loop, Albert St. Sebastopol. Photo has an Ampol Service station on the right hand side of the photograph. Photo taken some distance away from the trams. Photo probably taken on 14/8/1971. Duplicate print (1267) by John Phillips 12/1999. Large copy print added 5/2001. Original neg scanned at hi res and updated 11/5/2020.trams, tramways, albert st., sebastopol, grey st loop -
 Ballarat Tramway Museum
Photograph - Black & White Photograph/s, David Endacott, 14/08/1971 12:00:00 AM
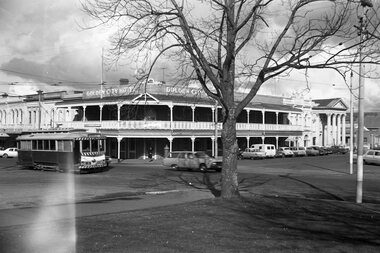
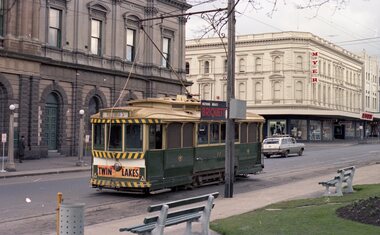
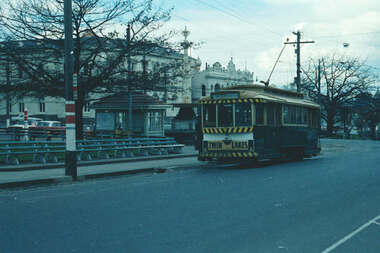
Black and white photograph and negative of tram 33 outbound to the Gardens, passing the Golden City Hotel at the corner of Sturt and Dawson Sts. Tram has a Twin Lakes Ad on the front dash panel. Taken from the central median strip, August 1971. Original print by David Endacott, duplicate print (1268A) by John Phillips 12/1999. Second copy added 5/2001. Original neg scanned at hi res and updated 11/5/2020.On original print "Last week before phasing / out of trams / from Cnr Sturt & Dawson Sts. / Aug 1971" in pencil.trams, tramways, ballarat, sturt st., dawson st, golden city hotel, tram 33 -
 Ballarat Tramway Museum
Photograph - Black & White Photograph/s, David Endacott, 14/08/1971 12:00:00 AM
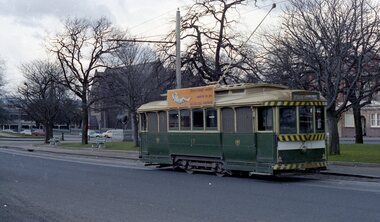
Black and white photograph and negative of an inbound single truck tram in Sturt St. just to the west of Dawson St. Photo taken from the central median strip, has the shops on the north side of Sturt St. in the photograph - such as Gear Chemist. Photo taken 14 August 1971. The Alexandra Bandstand in the foreground. Original print by David Endacott, duplicate print (1270A) by John Phillips 12/1999. Large copy print added 5/2001. Original neg scanned at hi res and updated 11/5/2020. Original neg scanned at hi res and updated 11/5/2020.On original print "Last week of full tram service before phasing out / from Cnr Sturt & Dawson Sts. / Aug 1971" in pencil.trams, tramways, ballarat, sturt st, dawson st., alexandra bandstand -
 Ballarat Tramway Museum
Photograph - Black & White Photograph/s, David Endacott, 14/08/1971 12:00:00 AM
Black and white photograph and negative of an inbound single truck tram in Sturt St. just to the east of Doveton St, with another single truck tram at Lydiard St. and buildings either side of Sturt St. Photo taken from the central median strip, has the Town Hall on the right hand side. Photo taken 14 August 1971. Original print by David Endacott, duplicate print (1271A) by John Phillips 12/1999. Large copy print added 5/2001. Original neg scanned at hi res and updated 11/5/2020.On original print "From Cnr Sturt & Doveton Sts. Sat 14 Aug 1971" in pencil.trams, tramways, ballarat, sturt st, doveton st. -
 Ballarat Tramway Museum
Photograph - Colour Photograph/s set of 2, David Endacott, 19/09/1971 12:00:00 AM
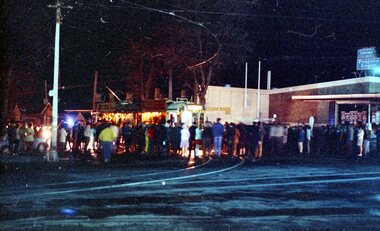
Two colour prints (Copies 1 and 2) of the scene at the Hospital Corner, Drummond St. Sth and Sturt St. after the running of the last tram from Sebastopol prior to running into the depot on 19 Sept. 1971. Shows one bogie tram No. 40 (from the advertising boards) with many people at the corner, a few cars and a police car leading the tram through the people standing around. Has the liquor store on the south west corner of the intersection in the background. Tram is heavily loaded with passengers. Copy 1 on Fujicolour Crystal Archive Paper is the better exposed and larger print and has been used in the scanned image.. Copy 2 another print off the same negative but with a smaller photograph area. Original film image scanned at 3200dpi 12/5/2020 and record revised. Image i2 - shows the crowd before the tram departed with a police escort. Image i3 - shows the scene as the tram departed with a police escort.On copy 2 - "The Last Tram at Drummond and Sturt Sts." in black ink.sebastopol, last tram, closure, hospital corner, tram 40 -
 Ballarat Tramway Museum
Photograph - Colour Photograph/s, David Endacott, 19/09/1971 12:00:00 AM
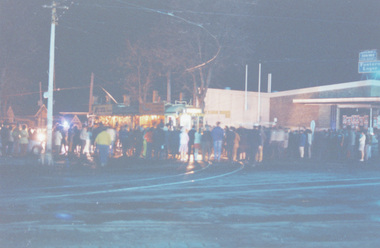
Two colour prints (Copies 1 and 2) of the scene at the Hospital Corner, Drummond St. Sth and Sturt St. after the running of the last tram from Sebastopol prior to running into the depot on 19 Sept. 1971. Shows one bogie tram No. 40 (from the advertising boards) with many people at the corner. Possibly taken after the police car has moved on, prior to the tram leaving for the depot after a few minutes. Has the liquor store on the south west corner of the intersection in the background. Tram is heavily loaded with passengers. Copy 1on Fujicolour Crystal Archive Paper is the better exposed and larger print and has been used in the scanned image.. Copy 2 another print off the same negative but with a smaller photograph area. Original film image scanned at 3200dpi 12/5/2020.On copy 2 - "Last tram to run in Ballaarat at Cnr Drummond & Sturt Sts on way to depot." in black ink.sebastopol, last tram, closure, hospital corner, tram 40 -
 Ballarat Tramway Museum
Photograph - Colour Photograph/s, David Endacott, 1971
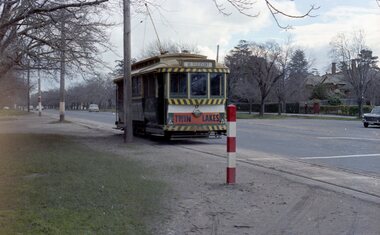
Colour print of Ballarat No. 17 in-bound to the City in Sturt St. West, about to pass a school crossing. Tram has destination of Mt Pleasant and a Twin Lakes sign on the front canopy. Shows the Sturt St. West layout, with houses in the background. Taken in 1971, possibly August 1971 as trees have lost their leaves. On Kodak paper. Original film image scanned at 3200dpi 12/5/2020.On rear in blue ink "Sturt St. West" and in top left hand corner "1971".sturt st. west, mt pleasant, tram 17 -
 Ballarat Tramway Museum
Photograph - Colour Photograph/s, David Endacott, 1971
Colour print of Ballarat No. 11 outside the Ballarat Town Hall during Winter 1971. Tram showing destination of "Victoria St." in the rear destination box. Has an SEC Briquettes roof advertisement and Twin Lakes dash advertisement. Photo taken from behind the tram. Also Myer building in the background. On Kodak paper. Original film image scanned at 3200dpi 12/5/2020.On rear in blue ink "Sturt St." and in top left hand corner "1971". A previous note has been partially rubbed out.ballarat, town hall, myer, victoria st, tram 11 -
 Ballarat Tramway Museum
Photograph - Colour Photograph/s, David Endacott, 1971
Colour print of Ballarat No. 17 in bound to the City in Sturt St. just to the west of Lyons St during Winter 1971. Tram has rear destination of "Gardens via Drummond Nth" and an SEC Roof ad "Everything's fine in my all electric kitchen". St Patricks Church in the background. On Kodak paper. Original film image scanned at 3200dpi 12/5/2020.On rear in blue ink "Sturt St." and in top left hand corner "1971".ballarat, sturt st., st patricks, tram 17 -
 Ballarat Tramway Museum
Photograph - Colour Photograph/s, David Endacott, 1971
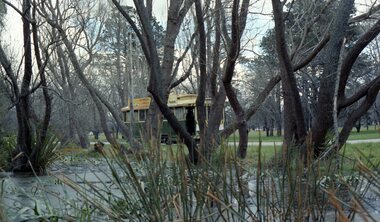
Colour print of a Ballarat single trucker en route for the Gardens, just past St Aidans Drive during Winter 1971. Photo taken from partly within Lake Wendouree, looking at the tramcar through the trees, which has passed the photographer. See also Reg Nos. 1279 and 1280 for related images. On Kodak paper. Not the same tram as on 1279 or 1280 as it has a SEC and Eureka Tiles roof ad. Original film image scanned at 3200dpi 12/5/2020.On rear in blue ink "Lake Wendouree" and in top left hand corner "1971".ballarat, lake wendouree, st aidans drive -
 Ballarat Tramway Museum
Photograph - Colour Photograph/s, David Endacott, 1971
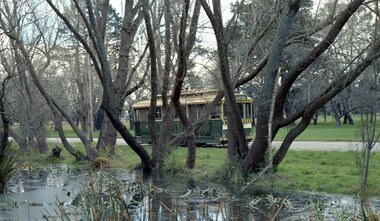
Colour print of a Ballarat No. 13 en route for the Gardens, just past St Aidans Drive during Winter 1971. Photo taken from partly within Lake Wendouree, looking at the tramcar through the trees, which has passed the photographer. See also Reg Nos. 1278 and 1280 for related images. On Kodak paper. Would appear to be the same trams as in 1280 as it does not have a roof advertisement. Original film image scanned at 3200dpi 12/5/2020.On rear in blue ink "Lake Wendouree" and in top left hand corner "1971".ballarat, lake wendouree, st aidans drive, tram 13 -
 Ballarat Tramway Museum
Photograph - Colour Photograph/s, David Endacott, 1971
Colour print of a Ballarat No. 13 en route for the Gardens, just past St Aidans Drive during the winter of 1971. Photo taken from partly within Lake Wendouree, looking at the tramcar through the trees, before it has passed the photographer. See also Reg Nos. 1278 and 1279 for related images. On Kodak paper. Tram has a Twin Lakes advertisement on the front dash panel. Homes along St. Aidans drive can be seen in the background. Original film image scanned at 3200dpi 12/5/2020.On rear in blue ink "Lake Wendouree" and in top left hand corner "1971".ballarat, lake wendouree, st aidans drive, tram 13 -
 Ballarat Tramway Museum
Photograph - Colour Photograph/s, David Endacott, 1971
Colour print of a Ballarat No. 30 in Lydiard St. North opposite the concrete retaining wall on the east side of Lydiard St. North, just before Macarthur St, the cutting was between Clarendon St and Macarthur St. Tram has destination of Lydiard St. Nth. Has homes and the city of Ballarat in the background. Original film image scanned at 3200dpi 12/5/2020.On rear in blue ink "Lydiard St. Nth" and in the top left hand corner "1971".ballarat, lydiard st. nth, retaining wall, tram 30 -
 Ballarat Tramway Museum
Photograph - Colour Negative, Colour Print, David Endacott, 1971
Colour positive (negative) of SEC tram No. 11 at the City terminus. Tram has destination of "Gardens via Sturt St. West" and a Twin Lakes advertising board on the front dash panel. Has fountain and tramway waiting shed in the background as well as the Ballarat Post Office. Tram stop pole and attached signs in front of the tramcar. A colour laser image of this negative made on 10/1/2000 using a Canon Laser printer has been placed on file at 01-01-57. Original film image scanned at 3200dpi 12/5/2020.ballarat, lydiard st. nth, city terminus, sturt st., tram 11 -
 Ballarat Tramway Museum
Photograph - Colour Photograph/s, Earl Ewers, 1994
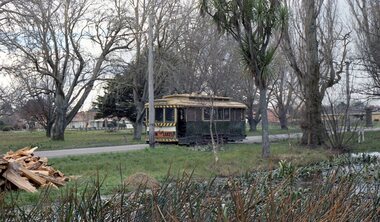
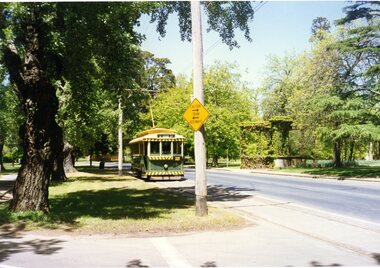
Colour photograph of BTM No. 18 north bound in Wendouree Parade, about to cross Windmill Drive North. Tram showing destination of "St. Aidans Drive". The "Caution Tram Bothways" sign on the pole adjacent to Windmill Drive had recently been positioned, following donation of the signs from St. Georges Road by the City of Northcote. Taken c1994 Has the MacDonald Gates in the view."E E" on back.windmill drive, wendouree parade, road signs, tram 18 -
 Ballarat Tramway Museum
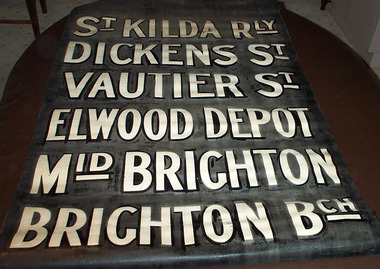
Functional object - Destination Roll, Victorian Railways, "St Kilda - Brighton", 1950?
Destination roll - white lettering on black background for the St Kilda - Brighton tramway, operated by the Victorian Railways until November 1956. Letters are 125 high, with painted black linen (glossy black), leaving the letters white, but with edge to give a shadow effect - see images. Roll quite stiff when rolled out. Roll 790 wide, with a top section (no destinations) 225 long, the destination roll section, 995 long and a bottom 240 long. Destinations in order are: ST KILDA RLY; DICKENS ST; VAUTIER ST; ELWOOD DEPOT; MID BRIGHTON; BRIGHTON BCH. Rolled in direction with destinations on the outside of the roll. Image information: btm1745i1 - photo of roll showing front of destinations btm 1745i2 - close up of part of St Kilda, when held up to light - no flash btm 1745i3 - close up of part of St. Kilda from rear or primary painted side btm 1745i4 - close up of part of St. Kilda from front showing painting method. See Destination City - 5th edition Not to be used in a tramcar destination box - original to be kept in archives.tram, trams, vr trams, destination roll, st kilda - brighton