Showing 2441 items
matching goldfields north
-
 Ballarat Diocesan Historical Commission
Flag, House Flag McAuley College Dooboobetic
McAuley College was established at Dooboobetic in 1977 as a Catholic consolidated secondary college bringing together secondary catholic students from Donald, St Arnaud and Charlton in Victoria's Wimmera. A new school was built on a 23-acre site at Dooboobetic constructed from mostly portable classrooms among wheat fields, five minutes from the Gooroc church. The college served the north-west from Wycheproof to Wedderburn. The concept proved unsustainable and the Dooboobetic campus was closed in 2003 marking the end of a century of Catholic secondary education in the district. -
 Victorian Harness Racing Heritage Collection at Lord's Raceway Bendigo
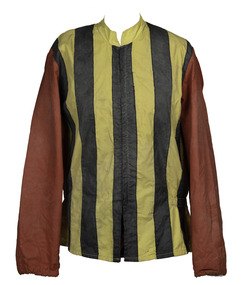
Clothing - Race colours, Alice Laidlaw
Alice Laidlaw Victorian Harness Racing Hall of Fame 2019 Alice McCulloch was born in 1894 at Deniliquin, NSW, and grew up on a huge 56,000 acre property at Navarre, “North Woodlands”, where she learnt to ride at a young age. She soon learnt to jump and would jump the farm fences and only went through gates if she was shifting stock. In 1915 Alice travelled to Egypt as a Red Cross volunteer to nurse soldiers injured in the Gallipoli campaign. The young Alice met and married Adam Alexander (Sandy) Laidlaw of Hamilton and lived at “The Hill: in Ararat. Their son Colin, a successful Ararat trainer /driver, was born on 31st March 1923. One of Australia’s most respected and accomplished female riders, Alice excelled at educating, training, riding, driving, hunting and jumping. Alice rode in the Melbourne, Sydney, Brisbane, Adelaide and Tasmania Royal Shows as well as almost every country show in between. She would win the Champion Hack with a horse and then turn around and win the High Jump with the very same horse. Her horse Look Out held the Australian record for a high jump of 7 ft 10 ¼ in at Tenterfield, NSW. She also rode in England. Alice also trained and rode/drove trotters, ridden or in a sulky. She competed and won against the men. In 1929 she won several races with Bazil Bells at country tracks, but authorities refused to grant women licences to drive at the metropolitan track at Richmond so she had to engage men drivers. She won rces against the men at Stawell and Ballarat tracks. Among harness horses that she owned, trained and rode or drove were Mountain Derby, Dane Grey, Wonga Grattan, Plain Grattan, Miss Keewong, and Wong Derby the dam of the Ararat and Mildura Cup winner and later sire, Efficiency. She also trained gallopers, and rode them in races against the men, with a lot of success. Her father owned the 1917 Caulfield Cup winner Lieutenant Bill. Alice Laidlaw died of a heart attack in Ararat in 1947 several weeks after an accident with one of her horses at the Korumburra Show. Her 54 horses were then sold. After she died, the Alice Laidlaw Memorial Trophy for lady riders over 18 at the Royal Melbourne Show was commenced in her honour. This continues.Black and yellow vertical stripes, red sleeves -
 Linton and District Historical Society Inc
Photograph, Electro Hydraulic Dredge, Snake Valley, 1909
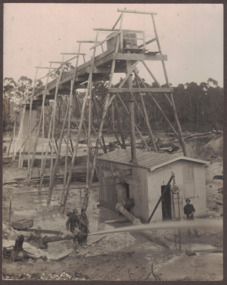
Electro hydraulic dredge Snake Valley 1909. J Mc Bennett, was an engineer back at the main base, at Dawson's dam on the Carngham Road, Between Linton and Snake Valley. These dredges were used for getting gold. The streams of water under high pressure just washed the hills and ground away. This dredge closed down early 1910. 200 H.P. motors were used and 10 in. pumps.Black and white image of three workmen, one beside mining building the other two at dredge pump outlet. Image mounted on dark brown card. Between 1904 and 1911 the Electro Hydraulic Company sought to extract gold in an area north of Linton known as the Hard Hills. By blasting water from high-pressure hoses into the hillsides, soil containing gold was washed out for sluicing. Two gravel pumps in Dawson's Dam pumped the wash through the sluices. Despite considerable investment in expensive equipment, the Company did not have a great deal of success, and the mining operation ceased in 1911.mining, gold, mining equipment, electro hydraulic dredge, dredging, sluicing, dawson's dam, snake valley, miners -
 Linton and District Historical Society Inc
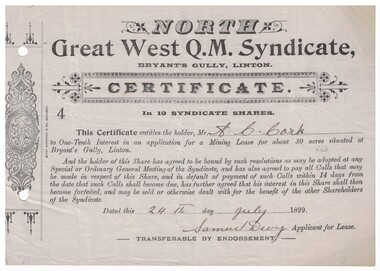
Certificate - Mining Lease, North Great West Q.M. Syndicate, Bryant's Gully, Linton, 1899
... Linton 3360 goldfields Mining Lease Certificate North Great West ...Grey paper, black printing, headed North Great West Q.M. Syndicate, dated 24th July 1899, signed Samuel Devy. Decorative design printed in left hand margin. Number "4" on certificate. Serrated left edge of certificate suggests it was detached from a booklet or form. The certificate was issued to A. C. Cork and entitled him to a one-tenth interest in an application for a mining lease at Bryant's Gully, Linton.mining, leases, north great west q.m. syndicate, bryant's gully, linton, a.c. cork -
 Thompson's Foundry Band Inc. (Castlemaine)
Sheet Music, Champions of the North
-
 Hymettus Cottage & Garden
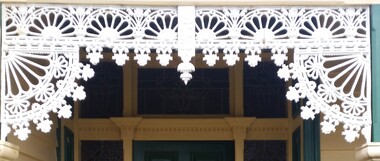
Iron Lace Frieze
This Daisy Pattern iron lace frieze was registered by the Cochrane foundry North Melbourne and exhibited at the Great Exhibition Melbourne in 1880. One of the most popular patterns used in Eastern Australia the actual foundry where this was cast is unknown but this example adorns the return verandah of Hymettus cottage in Ballarat. -
 Hymettus Cottage & Garden
Photograph, North Lodge Ballarat Botanical Gardens, 2020
... goldfields Photograph Photograph North Lodge Ballarat Botanical ... -
 Charlton RSL Sub Branch
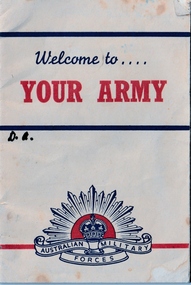
Booklet - Small army booklet, Welcome to your Army Booklet
Small booklet31.5.52 Raymond Keith Watkins. 81 Canterbury St, St Arnaud, Victoria. D.R. Watkins 105 Alma Rd, North Caulfield, Melbourne -
 Wooragee Landcare Group
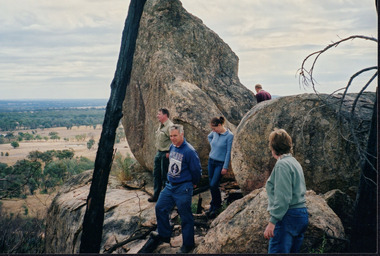
Photograph, circa April 2003
This photograph was taken in the Mount Pilot Chiltern National Park. It was taken during a search for the tiger quoll conducted by a team of volunteers from the Wooragee Landcare Group. The tiger quoll is also known as the spotted-tail quoll and is found in the national park. The 2003 bushfires caused worry for the safety of the tiger quoll, hence the need for a search for it. Mount Pilot Chiltern National Park is located near Chiltern in Victoria. It's most notable landmarks include Mt Pilot and Woolshed Falls. It also has many mines from the Gold Rush in the late 1800s. It is home to much flora and fauna, including the tiger quoll. The park is also home to the box-ironbark forest that once was present in most of north-eastern Victoria. The park is a large tourist destination as in there are many bushwalks and other attractions for visitors. In 2003, bushfires raged through Mount Pilot National Park and destroyed much of the environment. Some of this damage can be seen in the burnt trees in the picture. This photograph represents the work that goes into protecting a important species like the tiger quoll and there has been much work done to preserve it. This photograph was taken when the Wooragee Landcare group went to ensure the survival of this species, highlighting how the tiger quoll is being protected. This photograph also demonstrates the significance of Mount Pilot Chiltern National Park. The park has many special flora and fauna that can only be found in this area. For example, the box-ironbark forest and the tiger quoll. The forest used to stretch over much of north-eastern Victoria and is therefore reminiscent of what that area of Victoria was once like. This park is historical for this reason but it is also historical through it being once goldfields from the Gold Rush in the 1800s.Landscape coloured photograph printed on gloss paperReverse: WAN NA 0ANA2N0 NNN- 1 1636 / [PRINTED] (No.8) / 922mount pilot, mount pilot chiltern national park, chiltern, victoria, landmark, woolshed falls, gold rush, tiger quoll, flora, fauna, spotted tail quoll, marsupial, andy murray, andy murray quolls, carnivorous marsupial, forests, rainforests, coastal heathlands, woodlands, photograph, species, wooragee, wooragee landcare group, wooragee landcare, bushfires, identification, search, dna, droppings, box ironbark forest, ironbark, box iron bark -
 Ballarat Tramway Museum
Photograph - Colour Photograph/s set of 5, Carolyn Dean, 4/03/1997 12:00:00 AM
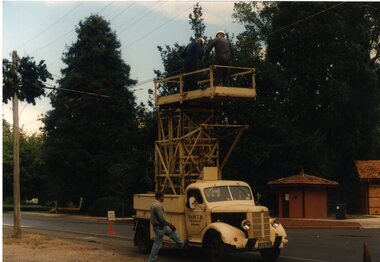
Set of five colour photographs of Trolley Wire replacement in Wendouree Parade sent to the Editor of Trolley Wire - 2 used in the May 1997 issue of Trolley Wire. All photos by Carolyn Dean. All photos taken on 4-3-1997. All photos on AGFA paper. 1139.1 - Working on the trolley wire just to the north of Gardens Loop 1139.2 - Alan Snowball's Ute and trailer with wire reel, North Gardens area. 1139.3 - Replacing wire -group photo around behind truck - used on page 38 of Trolley Wire. 1139.4 - General photo of work with Ute and trailer in foreground and tower truck in background. Wire run out for a number of pole lengths - used on page 38 of Trolley Wire. 1139.5 - Photo of work on trolley wire replacement with tower truck. All have in black ink "4.3.97" and "Photo by / Carolyn Dean". 1139.3 has "Gardens Loop" in blue ink on top edge, and white sticker with "Photo 56 / 14.4 x 9.5cm" written on in black ink. 1139.4 - has white sticker with "Photo 57 / 14.5 and 7cm" written on in black ink.trolley wire, btm, wendouree parade, overhead -
 Ballarat Tramway Museum
Slide - 35mm slide/s - set of 7, Noel Simons, 22/11/1962 12:00:00 AM
Set of 7 Kodachrome transparencies taken on 22/11/1962. 1161.1 - trams 38 and 20 in Sturt St. West at the Russell St. loop. No. 20 has possibly terminated and is showing "CITY" while 38 is showing "Mt Pleasant" Both trams fitted with dash canopy lighting, but no large white stripe. 20 has a Twin Lakes sign. 1161.2 - tram 33 just before Gardens Loop in Wendouree Parade, with destination of "Victoria St." Has a Twin Lakes sign. 1161.3 - tram 39 at corner of Lydiard St. North and Sturt St. with Post Office in background. 1161.4 - tram 40 turning from Sturt St into Lydiard St. North with Post Office in background and showing destination of Lydiard St. North. A blue Holden with red stripes for the Radio Cabs co. is in the foreground, along with pedestrians. 1161.5 - tram 41 in Sturt St. at the City terminus, showing destination of Mt Pleasant with Post Office and ANZ Bank buildings in background. Numerous people waiting on the seats at the tram stop. 1161.6 - tram 13 in Sturt St. near Doveton St. showing destination of Bell St. Many cars and pedestrians on the south side of Sturt St. Note the Austin motor car by the tram showing a stop signal. Tram 13 has a Twin Lakes sign. 1161.7 - trams 13, 26, and 39 in the City Loop near Bridge St. Has Morseheads and Grenville St. tram shelter in the background.1161.1 - "38 and 20 crossing in Sturt St. Ballarat near Russell Street" - in blue and black ink. The "Russell St" is a later addition, over white out. 1161.2 - "33 near Botanic Gardens terminus, Wendouree Parade, Ballarat" 1161.3 - "No. 39 in Lydiard St. Ballarat at Cnr. of Sturt St." 1161.4 - "No. 40 entering Lydiard St. from Sturt St. Ballarat" 1161.5 - "No. 41 in Sturt St. Ballarat at cnr of Lydiard St." 1161.6 - "No. 13 in Sturt St. Ballarat, at Cnr. of Doveton St." 1161.7 - "Nos. 13, 26, and 39 in Sturt St. Ballarat near Bridge St." All have date stamp of "22 Nov. 1962" in purple ink. All black ink unless otherwise noted.tramways, trams, ballarat, sturt st. west, wendouree parade, lydiard st., city loop, taxis, radio cabs, tram 13, tram 20, tram 26, tram 33, tram 38, tram 39, tram 40, tram 41 -
 Ballarat Tramway Museum
Slide - 35mm slide/s - set of 14, Noel Simons, 23/11/1962 12:00:00 AM
Set of 14 Kodachrome transparencies taken on 23/11/1962. 1162.1 - tram 38 turning into Lydiard St. North from Sturt St. with tram 20 in background. Many motor vehicles in photo. 1162.2 - as above, but a minute of so later. Has Mutual Life building in background as well as Town Hall. 1162.3 - No. 40 entering Albert St. from Skipton St. outbound to Sebastopol. 1162.4 - No. 40 near start of side of the road running in Albert St. heading to Sebastopol. 1162.5 - No. 40 at the City terminus, on the South side of Sturt St. Has Town Hall and other buildings along the south side of Sturt St. in the background. 1162.6 - No. 40 at Sebastopol terminus - shows arrangement of the signs at the terminus. 1162.7 - No. 40 and No. 38 crossing at loop between Sayle and Grey St. No. 40 inbound. 1162.8 - No. 40 turning from Drummond St. South to Sturt St. at Hospital Corner with Southern Cross Hotel in background. 1162.9 - No. 18 in Wendouree Parade near Forest St. heading east with destination of "Victoria St." 1162.10 - Nos 41 and 39 at Depot Junction. Both trams have SEC ads. 1162.11 - No. 39 turning into the depot from Wendouree Parade - showing destination of "Gardens via Drummond Nth" 1162.12- No. 17 at Lydiard St. North terminus, showing destination of "Grey St. Sebas". Has a Twin Lakes sign 1162.13 - ditto, but with trolley pole turned around. Has SEC Briquettes roof ad and Whitehorse whiskey ad on rear dash panel. 1162.14 - No. 40 outbound to Sebastopol crossing Albert St. 1162.1 -"Nos. 38 and 20 in Sturt St. Ballarat at corner of Lydiard St." 1162.2 - "No. 38 turns into Lydiard St. as No. 20 waits at stop in Sturt St. Ballarat" 1162.3 - "No. 40 entering Albert St. from Skipton St. Redan on Sebastopol route." 1162.4 - "No 40 at beginning of reserved track on Sebastopol route, Albert St. Redan." 1162.5 - "No. 40 in Sturt St. Ballarat near cnr. of Armstrong St." 1162.6 - "No. 40 at Sebastopol terminus" 1162.7 - "No. 38 and 40 crossing at Sayle St. Loop on Albert St. reserved track, Sebastopol route" 1162.8 - "No. 40 turning into Sturt St. from Drummond St." 1162.9 - "No. 18 in Wendouree Pde. Ballarat near tramway depot" 1162.10 - "No. 41 and 39 outside Ballarat tramway depot, Lake Wendouree in background" 1162.11 - "No. 39 entering tramway depot from Wendouree Parade, Ballarat" 1162.12 - "No 17 at Lydiard St. North terminus, Ballarat North" 1162.13 - "No 17 at Lydiard St. North terminus, Ballarat North" 1162.14 - "No. 40 crossing Albert St. Sebastopol as reserved track switches from left to right of road" All have date stamp of "23 Nov. 1962" in purple ink. All black ink unless otherwise noted.tramways, trams, ballarat, albert st., sturt st., sebastopol, grey st., hospital corner, wendouree parade, depot junction, lydiard st. north, tram 17, tram 18, tram 20, tram 38, tram 39, tram 40, tram 41 -
 Ballarat Tramway Museum
Slide - 35mm slide/s - set of 2, Noel Simons, 23/12/1967 12:00:00 AM
Set of two Kodak Ready-mount with slides made from the Association of Railway Enthusiast Provincial Tramways film strip. Both taken by D. Macartney, 23/12/1967. See Reg Item 2560 for details of the slide strip and reference to the other slides within the strip. 1164.1 - No. 18 north bound in Drummond St. North, at Victoria Ave. - side on photo - slide has a red coloured background. 1164.2 - No. 32 decorated for Myer's Christmas tram at Macarthur St. with destination of "Victoria St." See Reg Item 4184 for a black and white photograph.1164.1 - "No. 18 heads up Drummond St. North, bound for "Gardens"" 1164.2 - "No. 32 with Christmas decoration alongside Lake Wendouree" All have date stamp of "Dec 1967" in blue ink. Writing in blue ink.tramways, trams, myer, christmas trams, drummond st. nth, wendouree parade, tram 18, tram 32 -
 Ballarat Tramway Museum
Slide - 35mm slide/s, Noel Simons, 28/04/1971 12:00:00 AM
Transparency slide of Ballarat No. 37 at the Lydiard St. North terminus, taken from the north side of Norman St. looking back over the city. Tram has destination of "Sebastopol". Alongside the tram is the tram terminus shelter building. Slide dated 28 April 1971. The slide does not have a manufacturer's name.In blue ink at the top of the slide "No. 37 at Lydiard St. North terminus" and on base "28 April 1971"tramways, trams, lydiard st. north, norman st., tram 37 -
 Ballarat Tramway Museum
Slide - 35mm slide/s - set of 14, Noel Simons, 22/05/1971 12:00:00 AM
Set of 14 transparencies taken on 22/5/1971. 1170.1 - No. 31 outbound in Sturt St. West near Murray St. - has "To read pack Tilt Train" roof advert. 1170.2 - No. 31 ditto, near Russel St. loop. 1170.3 - No. 14 in Wendouree Parade at what is now BTM Depot Junction, near Toilet block. 1170.4 - No. 31 in Wendouree Parade at the North Gardens, approaching St. Aidans Drive 1170.5 - Scrubber car on "O " road with tennis court alongside. 1170.6 - Scrubber, 43 and 3 8 on 0 road at depot. 1170.7 - 3 8 and 43 on 0 road at depot 1170.8 - 38 on 0 road at depot, showing sharpness of 0 road curves. 1170.9 - 39 and 40 inside depot. 40 has "To read pack, tilt tram" roof advertisement. 1170. 10 - Tram 27 passes the depot gates, east bound with Lake Wendouree in the background. 1170.11 - SEC Depot, from Wendouree Parade, with No. 38 on "O" road. 1170.12 - trams 14 and 30 at depot loop, Wendouree Parade 1170.13 - ditto 1170.14 - "Cars take following line" sign on tram stop pole at Wendouree Parade Loop. All have date stamp of "28 Apr 1971" in purple ink on base. All blue ink unless otherwise noted. 1170.1 - "No. 31 in Sturt St. West between Murray and Wonliss Sts." 1170.2 - "No. 31 approaching Russell St. Loop in Sturt St. West Ballarat" 1170.3 - "No. 14 Gardens" 1170.4 - "No. 3 1 North Gardens 1170.5 - "Track cleaner car (formerly No. 23) at Wendouree Depot" 1170.6 - "Track cleaner, No. 43 and No. 38 at Wendouree Depot" 1170.7 - "No. 43 and No. 38 at Wendouree Depot" 1170.8 - "No. 38 gazes across Lake Wendouree from depot" 1170.9 - "Nos 3 9 and 40 in Wendouree Depot" 1170.10 - "No. 27 passing Wendouree Depot" 1170.11 - "Wendouree Depot with No. 38 on road No. "O" on left. 1170.12 - "Depot Loop" 1170.13 - "Depot Loop" 1170.14 - "Depot" tramways, trams, sturt st. west, wendouree parade, o road, depot, depot loop, signs, bliss bombs, tram 14, tram 27, tram 30, tram 31, tram 38, tram 39, tram 40, tram 43, tram scrubber -
 Ballarat Tramway Museum
Slide - 35mm slide/s - set of 9, Noel Simons, Sept. 1971
Set of 9 Kodak Ready-mount with slides made from the Association of Railway Enthusiast Provincial Tramways film strip. Reference Item 2560 details the ARE Film Strip, and provide references to other slides. See also Reg. item 1164. 1174.9 on plain white mount. 1174.1 - Tram 40 North bound for Lydiard St. North at the Railway Gates, with the gates closed. Tram carrying a heavy load of passengers. Railway station building and car park in background. Taken from the signal box. 1174.2 - Tram 12 bound for Gardens, photographed across the median strip plantation near Dawson St. Image i2a - adjusted 9/2021 to remove colour cast. 1174.3 - Tram 43 in bound along Wendouree Parade near Barrett Ave, passing a former tram stop and with "Warning Oncoming Trams" sign mounted on an adjacent pole. See also Reg. item 1172.1 for a photo taken in May 1971. This photo taken after the closure of the Victoria St. line, as the tram stop has been painted out. 1174.4 - Looking along the track to Sebastopol terminus on the west side of Albert St. - telephoto shot showing bogie tram in the far distance. Shows the nature of the track, poles, tram stop frequency and in the fare distance the terminus. Also show the trees that used to be along this section of the track. 1174.5 - No. 42 showing "Special" in Macarthur St. approaching Drummond St. north. Photo taken from under the verandah of a shop on the south side of the street that were many years later to become the Tramcar Restaurant. Note metal fence to cemetery. 1174.6 - Nos. 21 (Sebastopol) crossing 14 (Lydiard St. Nth) at the loop between Sayle and Grey St. Photo taken looking south. 1174.7 - No. 12 bound for Mt Pleasant, in Bridge St. about to stop at the junction for the two routes. Telephoto photo looking west along Bridge St. with many cars in the photo. Very few people on the street itself. 1174.8 - No. 30 and 17 at the City Terminus, on the north side of Sturt St. Taken from the Post Office corner with the Town Hall in the background. 1174.9 - No. 39 inbound along Sturt St. West. with many cars on the road. Bus stop on a pole on the other side of the road.1174.1 - "No. 40 on Lydiard St. North service waits at the level crossing at Ballarat Railway Station." 1174.2 - "No. 12 bound for 'Gardens' seen across the centre plantation in Sturt St." 1174.3 - "Barrett Ave." 1174.4 - "The Sebastopol route near the terminus" 1174.6 - "Nos. 21 and 14 crossing at Sayle St. Loop on Sebastopol route" 1174.7 - "No. 12 at Eastern end of Bridge St." 1174.8 - "Nos. 30 and 17 in Sturt St. at Cnr of Lydiard St." 1174.9 - "No. 39 City bound from 'Gardens" in Sturt St. West" All have date stamp of "Sep 1971" in black ink. Writing in blue ink.tramways, trams, lydiard st. nth, railway crossing, sturt st, wendouree parade, sebastopol, macarthur st., bridge st., sturt st. west, tram 12, tram 14, tram 17, tram 21, tram 30, tram 39, tram 40, tram 42, tram 43 -
 Ballarat Tramway Museum
Slide - 35mm slide/s - set of 7, Noel Simons, 1970's
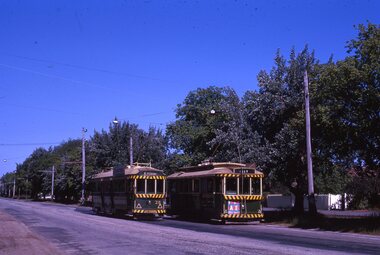
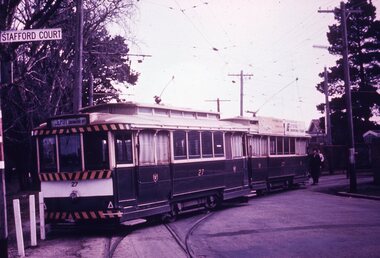
Set of 7 transparencies taken undated (appear to be 1970 or 71) on PAKON mounts. Also possibly copy slides as quality is poorish. 1175.1 - No. 27 has derailed at Depot, across Wendouree Parade, and No. 33 appears to be about to try and tow it back on. Wendouree Parade totally blocked. Adjacent pole has tram stop sign and has "Stafford Court" street sign mounted on it. 1175.2 - No. 43 at corner of Drummond St. South and Dana Street, with destination Lydiard St. North. 1175.3 - No. 42 (Mt Pleasant) and 21 (Gardens via Sturt St. West) crossing at Gardens Loop. 1175.4 - No. 42 bound for Lydiard St. Nth at intersection with Macarthur St. Shows the retaining wall for the cutting on the east side of Lydiard St. Nth. 1175.5 - No. 43 at corner of Lydiard St and Sturt St., at city terminus showing "Special" and tram 35 adjacent to Post Office in Lydiard St. Nth. Photo shows the small tram stop pole at this location and Post Office building. 1175.6 - No. 39 and 26 and 27 at the Mt Pleasant terminus. Near closure as a bus stop sign has been positioned on the west side of the road. No. 39 showing destination of "Gardens via Sturt St. West" 1175.7 - Nos 21 and 34 crossing at the Grant St. loop in Barkly St. 21 has destination of Mt Pleasant, while 34, - Gardens via Sturt St. West"All information on typed small white labels, on the top of the slides using black ink. 1175.1 - "27 derailed and 33 at depot" 1175.2 - "43 at cnr Drummond & Dana Sts" 1175.3 - "21 and 42 Gardens Terminus" 1175.4 - "42 at cnr Macarthur & Lydiard" 1175.5 - "43 & 35 at Post Office" 1175.6 - "39, 26 and 27 at Mt Pleasant" 1175.7 - "21 & 34 at Grant St"tramways, trams, wendouree parade, depot, accidents, derailments, drummond st. sth, gardens loop, post office, mt pleasant, grant st., tram 21, tram 26, tram 27, tram 33, tram 35, tram 42, tram 43 -
 Ballarat Tramway Museum
Slide - 35mm slide/s - set of 11, Noel Simons, 23/10/1965 12:00:00 AM
Set of 11 Kodachrome transparencies taken on 23/10/1965 in Melbourne. 1178.1 - W7 1020 (on route 9A, Northcote via St Georges Road) with a W2 536 (Deepdene) behind at the corner of Victoria Parade and Brunswick St. East Melbourne or Fitzroy. Has Eastern Hill fire station and ICI building in background. 1020 has front dash panel ads for Queens Bridge Motors and Bridgestone tyres. 1178.2 - W5 759 (route 19, North Coburg) and W5 807 in Elizabeth St. Melbourne at the intersection of Bourke St. with the State Savings Bank building in the background. 759 has side ads, one of which is for CASTROL. 1178.3 -SW6 903 crossing Brunswick St. in Victoria Parade, Fitzroy bound for Deepdene, route 45. Photo taken after tram has passed photographer. 1178.4 - W7 1019 (route 96, East Brunswick Blyth St.) and W7 1010 (route 88 East Preston) in Nicholson St at intersection with Victoria Parade. A Herald newspaper truck is alongside 1019. 1178.5 - W7 1040 (route 96, East Brunswick Blyth St.) in Nicholson St at intersection with Albert St. Has Princess Theatre in the background. (High res scan added 26/10/2008 - copy to FOHTD) .1178.6 - W6 974 (route 89 East Preston Bell St.) in Bourke St. about to turn into Spring St. Has buildings on the south side of Bourke St in background, including Southern Cross Hotel. Note trees in tubs and red phone box by Windsor Hotel. 1178.7 - as for same location as 1178.6 - SW6 967 (route 96) and W6 971 (inbound - route 90 - City Spencer St.) 967 has Lucas ad on front dash. 1178.8 - W7 1013 (route 88 East Preston) photographed from W6 991 in Bourke St at corner of Russell St. Has Normans corner store, Treadways and Foys in background. 1178.9 - W2 553 (route 1 East Coburg) at the corner of Elizabeth St and Bourke St. Has the Leviathan, Roger David and Ezywalkin shops in the background. 1178.10 - W6 991 (route 88) and W7 (route 96) in Bourke St. at corner with Elizabeth St. Photo taken from the GPO steps. 991 has ads for BIC pens and CASTROL. In background are the State Savings Bank, Halls Books and McEwans shops. 1178.11 - Line up of north bound trams (3 +) lead by W2 449and southbound in Elizabeth St at corner of Collins St. Has Flinders St. station building in the background. Hi -res image of .10 added 22-12-2018All have date stamp of "23 Oct 1965" in purple ink. All black ink unless otherwise noted. 1178.1 - "W7 1020 turning into Brunswick St. from Victoria parade, East Melbourne (followed by W2 536) 1178.2 - "W5 799 and 807 in Elizabeth St. Melbourne at cnr. of Bourke St." 1178.3 - "SW6 903 entering reserved track in Victoria Parade, East Melbourne" 1178.4 - "W7 1019 and 1010 in Nicholson St. East Melbourne at Victoria Pde intersection" 1178.5 - "W7 1040 Melbourne's last tram (to date) in Nicholson St. at Albert St. intersection." 1178.6 - "W6 974 in Bourke St. Melbourne, about to turn into Spring St." 1178.7 - "W6 971 entering Bourke St. from Spring St. Melbourne, passes SW6 967 outward bound for East Brunswick" 1178.8 - "W7 1013 (seen from W6 991) in Bourke St. Melbourne crossing Russell St." 1178. 9 -"W2 553 in Elizabeth St. Melbourne at cnr of Bourke St." 1178.10 - "W6 991 and W7 1005 in Bourke St. Melbourne at cnr of Elizabeth St." 1178.11 - "W2 449 leads a line of Peak hour cars along Elizabeth St. Melbourne (at Collins St. corner)"tramways, trams, melbourne, victoria parade, nicholson st., brunswick st., bourke st, elizabeth st, tram 1020, tram 536, tram 799, tram 807, tram 903, tram 1019, tram 1010, tram 1040, tram 974, tram 967, tram 971, tram 1013, tram 553, tram 991, tram 1005, tram 449 -
 Ballarat Tramway Museum
Slide - 35mm slide/s - set of 17, Noel Simons, 20/11/1962 12:00:00 AM
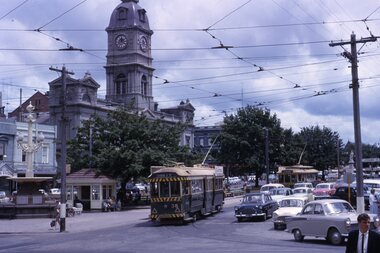
Set of 17 transparencies taken on 20/11/1962 on Kodak mounts. 1187.1 - Bendigo No. 2 at the Quarry Hill terminus, showing destination of Quarry Hill. Has Cohns Drinks and Streets Ice Cream ads on dash panel, a SEC 'electric cooking' roof ad and another roof ad. Shows the Y terminus at this location, but tram standing just before it. Overhead in position. 1187.2 - as above, but closer up. 1187.3 - as above, but from the north side, showing cemetery in the background. 1187.4 - Bendigo No.3 at Eaglehawk terminus. Tram showing destination of Quarry Hill. Has the various buildings at Eaglehawk in the background including the Foodland store. Has Streets Ice cream and White Horse Whiskey ads on the dash panel. 1187.5 - Bendigo No. 18 at Garden Gully crossing loop, in bound, with destination of Eaglehawk. Passengers waiting for an Eaglehawk tram at the stop. Has a white horse whiskey ad on dash panel and SEC roof ads. Conductor standing in doorway looking out. 1187.6 - Bendigo No. 7 inbound in Nolan St. at cnr of McCrae St. showing destination of Golden Square. Has Streets Ice cream ad on dash panel and a Castrol Roof ad. 1187.7 - Bendigo No. 19 at the North Bendigo terminus with railway level crossing in background. Tram has a Cohns Drinks ad and an SEC 'Electric Cooking' roof ad. 1187.8 - Bendigo No. 2 at the Quarry Hill terminus, looking back into Bendigo, showing destination of Eaglehawk. 1187.9 - Bendigo No. 21 in McCrae St, near Nolan St outbound for North Bendigo. Photo taken after tram has passed photographer. 1187.10 - Bendigo Nos. 4 and 26 at Charing Cross in View St. with fountain alongside and the Beehive, Ezywalkin Buildings in the background. No. 26 has a Sandhurst Milk and SEC 'Electric Cooking' roof ad. 1187.11 - close up of 22E maximum traction truck and folded footstep. 1187.12 - Bendigo No. 19 at Charing Cross terminus, after tram has passed photographer, showing destination of North Bendigo, with the Beehive building in the background and passengers boarding tram. 1187.13 - Bendigo No. 11, turning from View St. into Pall Mall, showing Special with the conductor holding point bar. Has the Beehive and Ezywalkin Buildings in the background. 1187.14 - No. 7 at Charing Cross terminus, in Pall Mall, bound for Golden Square. Has the Beehive and Ezywalkin buildings in the background and passengers waiting at the tram stop. 1187.15 - No. 18 at the Charing Cross terminus, bound for Eaglehawk. Has the Beehive and Ezywalkin buildings in the background and passengers waiting at the tram stop. Also has the 'Safety Zone' sign in the photograph. 1187.16 - No. 2 at Quarry Hill terminus, night or dusk photo. Tram showing destination of Depot. 1187.17 - No. 26 at Charing Cross, night photo. Tram has destination of Quarry Hill, but is on the line for Eaglehawk. Photo looks along Mitchell St. Also shows Safety Zone sign. Information written on in black ink and date stamped on purple ink. 1187.1 - "No. 2 at Quarry Hill terminus Bendigo" 1187.2 - "No. 2 at Quarry Hill terminus Bendigo" 1187.3 - "No. 2 at Quarry Hill terminus Bendigo" 1187.4 - "No. 3 at Eaglehawk terminus" 1187.5 - "No. 18 in Mt Korong Road, Long Gully at cnr of Havilah Road (Eaglehawk Route)" 1187.6 - "No. 7 in Nolan St. Bendigo, at Cnr of McCrae St., near lake Weeroona, (North Bendigo Route)' 1187.7 - "No. 19 at North Bendigo terminus" 1187.8 - "No. 2 at Quarry Hill terminus" 1187.9 - "No. 21 in McCrae St. Bendigo, near Nolan St. (North Bendigo Route) 1187.10 - "4 and 26 at Alexandra Fountain, Charing Cross Bendigo" 1187.11 - "Truck of Bogie Car, Bendigo Tramways" 1187.12 - "No. 19 in Pall Mall at Charing Cross, Bendigo" 1187.13 - "Birney car No. 11 entering Pall Mall from View St. at Charing Cross Bendigo" 1187.14 - "No. 7 in Pall Mall at Charing Cross, Bendigo" 1187.15 - "No. 18 at Alexandra Fountain, Charing Cross, Bendigo" 1187.16 - "No. 2 at Quarry Hill terminus, Bendigo" 1187.17 - "No. 26 at Alexandra Fountain, Charing Cross, Bendigo" tramways, trams, bendigo, quarry hill, eaglehawk, north bendigo, maximum traction, night photo, tram 2, tram 3, tram 4, tram 7, tram 11, tram 18, tram 19, tram 21, tram 26 -
 Ballarat Tramway Museum
Slide - 35mm slide/s, Noel Simons, 21/11/1962 12:00:00 AM
Set of 6 transparencies taken on 21/11/1962 on Kodak mounts. 1189.1 - Bendigo No.11 at Quarry Hill terminus. Photo taken looking in along the route. Tram has destination of North Bendigo. 1189.2 - No. 21 in Pall Mall bound for North Bendigo. Tram has roof ads for Mamouney's furniture and SEC. In the background are the National Bank building, Dad and Dave's Cafe and the Beehive Buildings and the London Pharmacy. 1189.3 - No. 2 in Mitchell St, just after crossing over railway bridge. Photo taken after tram has passed photographer. Has what appears to be an SEC road works crew in the background. Has destination of Quarry Hill. 1189.4 - No. 17 climbing Mitchell St. on the start of the single track section, just before crossing the railway bridge. Has destination of Quarry Hill and the large Maples building sign in the background. 1189.5 - as for 1189.4 but after tram has passed photographer. Has an Ilford film roof ad and an SEC roof ad. Railway bridge in the background. 1189.6 - No. 21 at Charing Cross with passengers boarding. Tram has destination of North Bendigo and roof ads for SEC 'Electric Cooking' and Sandhurst Milk. In background are the buildings on the south side of High St. Also has a SEC worker in white overalls sweeping the track.Information written on in black ink and date stamped on purple ink. 1189.1 - "Birney car No. 11 in High St. Bendigo at Golden Square terminus" 1189.2 - "No. 21 in Pall Mall Bendigo near Charing Cross" 1189.3 - "No. 2 in Mitchell St. Bendigo, just after crossing bridge over railway line (Quarry Hill route)" 1189.4 - "No. 17 in Mitchell St. Bendigo, climbing the hill the bridge over the railway line. (Quarry Hill route)" 1189.5 - "No. 17 in Mitchell St., Bendigo approaching bridge over Railway line (Quarry Hill route)" 1189.6 - "No. 21 at Charing Cross, Bendigo"tramways, trams, bendigo, golden square, pall mall, mitchell st., quarry hill, tram 2, tram 11, tram 17, tram 21 -
 Ballarat Tramway Museum
Slide - 35mm slide/s - set of 3, Noel Simons, 22/11/1962 12:00:00 AM
Set of 3 transparencies taken on 22/11/1962 on Kodak mounts. 1190.1 - No. 7 (bound for North Bendigo) at the Charing Cross stop with No. 19 just left for Quarry Hill. Has the buildings on the south side of High St. in the background, including RACV building. No. 7 has front dash panel ad for Streets ice cream, and roof ads for Ilford Film and an SEC "Cook with Electricity". Passengers are boarding the tram. 1190.2 - Bendigo No. 2 at Charing Cross with fountain in the background and other buildings on the south side of High St. Tram has two SEC roof ads - good side on view - "Electric Cooking - Matchless" and "Switch to Electric Cooking". 1190.3 - Nos. 19, 2 and 7 at Charing cross with a Austin ? motor car. Has buildings on the south side of High St. in the background, along with SEC and Ilford film roof ads.Information written on in black ink and date stamped on purple ink. 1190.1 - "Nos. 19 and 7 at Alexandra Fountain, Charing Cross, Bendigo" 1190.2 - "No. 2 at Alexandra Fountain, Charing Cross, Bendigo" 1190.3 - "Nos. 19, 2 and 7 at Alexandra Fountain, Charing Cross, Bendigo" tramways, trams, bendigo, charing cross, alexandra fountain, tram 2, tram 7, tram 19 -
 Ballarat Tramway Museum
Slide - 35mm slide/s - set of 2, Noel Simons, Apr. 1967
Set of 2 slides made from the Association of Railway Enthusiast Provincial Tramways film strip, possibly during April 1967. 1191.1 - No. 6 heading for North Bendigo in Bridge St., just past the disused Bridge St. Loop. 1191.2 - Bendigo 16 and 17 in the depot. Photo taken inside the building. No. 16 showing Thorpe St., 17 - Depot.1191.1 - "No. 6 passes the disused Bridge St. loop on its path to North Bendigo" - dated with a hand stamp in purple ink "Apr 1967". 1191.2 - "No. 16 and 17 at rear of Bendigo Depot". - slide not dated - late 60's or early 70's. Details are in blue ink written onto slide mount.tramways, trams, north bendigo, bendigo, bridge st loop, depot, tram 6, tram 16, tram 17 -
 Ballarat Tramway Museum
Slide - 35mm slide/s, Noel Simons, Sep. 1971
One slide on a Kodak Ready Mount made from the Association of Railway Enthusiast Provincial Tramways film strip, during September 1971 with a group of three trams at Charing Cross at dusk. Taken from an elevated position (the tower in the City Family Hotel) over looking the Alexandra fountain and looking towards the North on a wet evening. Two single truckers (1 possibly No. 6) and one bogie car waiting to proceed."Rainy evening at Charing Cross" in blue ink and "Sept 1971" in purple ink using a hand stamp.tramways, trams, charing cross, bendigo, tram 6 -
 Ballarat Tramway Museum
Slide - 35mm slide/s - set of 24, Noel Simons, 20/05/1971 12:00:00 AM
Set of 24 transparencies taken on 20/5/1971 on Kodak mounts. 1195.1 - Bendigo 19 arriving at Charing Cross en route to North Bendigo with Fountain Plaza and the City Family Hotel in the background. No. 19 has two roof ads for the SEC. -'Electricity better for cooking' and 'Everything's under control in my all electric kitchen' 1195.2 - as above, but standing at the Charing cross stop, with the Beehive Stores and other buildings along the east side of Pall Mall in the background. 1195.3 - No 21 ex Golden Square crossing View St. trackwork in front of No. 25 waiting to depart for Quarry Hill. No.21 has two roof ads (as for No.19 in 1195.1) and No.25 has one SEC roof ad and another. Ezywalkin sign in the background, and Fountain Plaza. 1195.4 - as for 1195.3, but after 21 has arrived and 25 left for Quarry Hill. Has Ezywalkin store and the Beehive store in the background. 1195.5 - No. 5 at the Eaglehawk terminus. Photo taken with a cannon in foreground looking along High St. Eaglehawk. Has shops on the west side of High St. in the background. 1195.6 - No. 5 at the Eaglehawk terminus, close up of the rear of the tram - note tow bar arrangement. Has destination of Quarry Hill. 1195.7-Nos.25 and 5 crossing at the Thorpe St. Loop, California Gully. No. 25 bound for Eaglehawk (has SEC Briquette and electric cooking roof ads) and 5 en route for Quarry Hill with a SEC and Cinzano roof ad. 1195.8 - as for 1195.7, but after trams have passed each other. Has Borough Auto Service building in the background. 1195.9 - No. 5 in Mt Korong Road, towards Bamard Street, photo taken after tram has passed photographer. 1195.10 - No. 30 at the Golden Square terminus with the Milk Bar on the right hand side of the photograph. 1195.11 - No. 30 inbound at Fire Station Loop, High St. Golden Square. Has old fire station in the background. Passengers are boarding the tramcar. 1195.12 - No. 30 in High St, bound for North Bendigo between Vine and Wattle Streets. 1195.13 - No. 5 bound for Eaglehawk waits at Iron Bark Gully Loop, at Hayes St. 1195.14 - No. 5 and No. 2 crossing at Iron Bark Gully Loop. 1195.15 - No. 5 bound for Eaglehawk leaving the Manchester Loop, Long gully. 1195.16 - No. 5 passing William Street, Long Gully en route to Eaglehawk. 1195.17 - No. 5 just before the California Gully Crossing Loop. 1195.18 - Nos. 5 and 26 crossing at California Gully crossing Loop. No. 5 heading to Eaglehawk, 26, Quarry Hill. 1195.19 - No. 5 in High St. Eaglehawk with Bob Moyle's Victoria Hotel and the TAB in the background. 1195.20 - No. 5 in High St. Eaglehawk approaching the terminus. Photo taken after the tram has passed the photographer. Has Foodland store and J. Best Fruit supply in the background, along with Eaglehawk Town Hall. 1195.21 - No. 5 at the Eaglehawk terminus, photo taken along seldom used track along High St. 1195.22 - as for 1195.22 - but at the very end of the track. 1195.23 - No. 5 en route for Quarry Hill climbs High St. Eaglehawk with the Victoria Hotel and Eaglehawk Town Hall in the background. 1195.24 - No. 5 and 25 crossing at Jobs Gully Loop. Note 25 has a black on white destination roll, while No. 5 has a white on black destination roll. Information written on in black ink and date stamped on purple ink. 1195.1 - "No. 19 arrives at Charing Cross Bendigo from Golden Square" 1195.2 - "No. 19 about to leave Charing Cross for North Bendigo" 1195.3 - "No. 25 awaiting departure for Quarry Hill, watches No. 21 arrive at Charring Cross from Golden Square" 1195.4 - "No. 21 on North Bendigo service and No. 25 on Quarry Hill run await departure at Charing Cross" 1195.5 - "No. 5 at Eaglehawk terminus" 1195.6 - "No. 5 at Eaglehawk terminus" 1195.7 - "Nos. 5 and 25 crossing at Thorpe St. Loop, California". 1195.8 - "Nos. 25 and 5 crossing Thorpe St. Loop, California Gully". 1195.9 - "No. 5 descending Mt Korong Rd. towards Bamard St." 1195.10 - "Birney car No. 30 at Golden Square terminus" 1195.11 - "Birney car No. 30 in High Street near Thistle Street (Fire Station Loop)" 1195.12 - "No. 30 in High St. between vine and Wattle Streets" 1195.13 - "No. 25 at Hayes Street Loop Iron Bark". 1195.14 - "Nos. 2 and 5 crossing at Hayes Street Loop Iron Bark" 1195.15 - "No. 5 at Manchester Loop opposite Havilah Road, Long Gully" 1195.16 - "No. 5 passing William Street, Long Gully". 1195.17 - "No. 5 at California Gully" 1195,18 - "Nos. 26 and 5 at Thorpe St. Loop, California Gully". 1195.19 - "No. 5 in High St. Eaglehawk". 1195.20 - "No. 5 approaching Eaglehawk terminus" 1195.21 - "No. 5 at Eaglehawk terminus" 1195.22 - "No. 5 at Eaglehawk terminus" 1195.23 - "No. 5 in High St. Eaglehawk" tramways, trams, bendigo, charing cross, eaglehawk, california gully, golden square, iron bark gully, jobs gully, tram 2, tram 5, tram 19, tram 21, tram 25, tram 26, tram 30 -
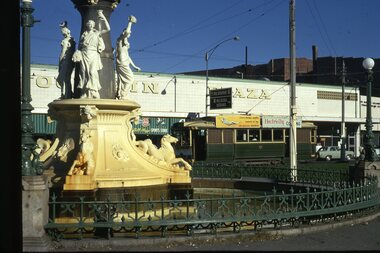 Ballarat Tramway Museum
Slide - 35mm slide/s - set of 2, Noel Simons, 20/05/1971 12:00:00 AM
Set of 2 slides mounted in Kodak Ready Mounts. Slides dated 20 May 1971. 1196.1 - Bendigo No. 21 arriving at Charing Cross from Golden Square with the Alexandria Fountain in the foreground. In the background is the Fountain Plaza building. Tram has 2 SEC roof ads. 1196.2 - No. 30 at Charing Cross from North Bendigo. On a pole in front of the tram are two signs "All cars stop here" in white printing on a red background and "Cars Stop by Request" in white lettering on a black background.1196.1 - "No. 21 passing Alexandra Fountain on arrival at Charing Cross from Golden Square" 1196.2 - "No. 30 at Charing Cross"tramways, trams, charing cross, bendigo, alexandra fountain, tram stops, tram 21, tram 30 -
 Ballarat Tramway Museum
Slide - 35mm slide/s - set of 23, Noel Simons, 26/02/1972 12:00:00 AM
Set of 23 transparencies taken on 26/2/1972 on Kodak mounts. 1205.1 - Bendigo No. 25 on a special tour at Fire Station Loop, en route to Golden Square. 1205.2 - No. 21 and 25 crossing at Fire Station Loop, note photographers on the ground. No. 21 bound for North Bendigo. 1205.3 - as for 1205.3, but with trams departing loop and fire station in the background. 1205.4 - No. 25 at Golden Square Hotel with 'Rodda's Golden Square Hotel' in the background. Tram on a special tour, but showing destination of North Bendigo. 1205.5 - as for 1205.4 - but showing special. Has the end of the track in the photograph. 1205.6 - Nos. 7 and 25 (on a special tour) crossing at Myrtle St. Loop. 1205.7 - No. 7 leaving Myrtle St. loop with the mine poppet head in the background. Photo taken after tram has passed photographer. (Print made of this slide 10/2001 for use in the Gold Gold Gold exhibition of 10/2001 - See Reg. item 1979. 1205.8 - No. 25 entering depot. Tram showing 'special'. Tennis court on right has players. Photo taken after tram has passed photographer. 1205.9 - No. 24 (showing 'special') and No. 20 (showing 'Long Gully') at Bendigo Depot. 1205.10 - No. 24 on a special charter, leaving Bendigo depot. Tram has two 'Johnnie Walker' roof ads. 1205.11 - Bendigo depot with 29, 25 and a bogie car inside the depot doors. 1205.12 - As for 1205.11, but with 28 and 29. 1205.13 - No. 24 standing at front entrance of Bendigo depot with No. 20 in the background. 1205.14 - No. 24 running out into McCrae St showing special, with conductor on front step. 1205.15 - No. 24 in Caledonia St. at corner of Thunder St with the Gasworks in the background. 1205.16 - No. 5 en route for Quarry Hill at Charing cross with No. 26 (en route for Eaglehawk) about to arrive. Has former crossover at this location in the foreground. Has the Ezywalkin building in the background. 1205.17 - No. 5 and 26 at Charing Cross, with the Alexandra Fountain in the foreground and the Beehive and Ezywalkin buildings in the background. No.26 has two SEC roof ads. 1205.18 - Charing Cross looking along Pall Mall with trams 7 and 21 and 26 in the picture. 1205.19 - Charing Cross, with 21 departing for Golden Square and No. 5 heading for Quarry Hill. Has the Ezywalkin and the Beehive buildings in the background. 1205.20 - as for 1205.19, but a few moments later. Adjacent pole has a "NO ROAD" letter in reflectors vertically. 1205.21 - Charing Cross with Nos. 25, 21, 26 and 7, looking south from Pall Mall end. 1205.22 - No. 24 crossing Mitchell St. en route for Golden Square, showing 'special' with the Beehive and Ezywalkin buildings in the background. 1205.23 - Charing Cross with Nos. 24, 21 and 7 in the photo and Fountain Plaza in the background. Print of 1205.7 - stored in box D1.Information written on in blue ink and date stamped on purple ink. 1205.1 - "No. 25 at Fire Station Loop High Street, Golden Square." 1205.2 - "Nos. 25 and 21 crossing at Fire Station Loop, near Golden Square." 1205.3 - "Nos. 25 and 21 crossing at Fire Station Loop, near Golden Square." 1205.4 - "No. 25 at Golden Square terminus." 1205.5 - "No. 25 at Golden Square terminus." 1205.6 - "Nos. 7 and 25 crossing at Myrtle St. Loop." 1205.7 - "No. 7 leaving Myrtle St. Loop." 1205.8 - "No 25, entering Bendigo Depot." 1205.9 - "Nos. 20 and 24 at Bendigo Depot." 1205.10 - "No. 24 at Bendigo Depot." 1205.11 - "Nos. 25 and 29 at Bendigo Depot." 1205.12 - "Birney cars 29 and 28 at Bendigo Depot." 1205.13 - "No. 24 (with 20 beyond) at Bendigo Depot." 1205.14 - "No. 24 entering McCrae St. from Arnold St." 1204.15 - "No. 24 in Caledonia St. at cnr of Thunder St." 1204.16 - "No. 5 waits at Charing Cross as No. 26 arrives from Quarry Hill. Note remains of crossover abandoned on relocation in 1965." 1204.17 - "Nos. 5 and 26 at Charing Cross." 1204.18 - "Nos. 26, 7 and 21 at Charing Cross (No. 5 just visible behind No. 26)." 1204.19 - "No. 21 leaves Charing Cross for Golden Square as No. 5 starts off for Quarry Hill." 1204.20 - "No. 21 swings onto the single track Golden Square line as No. 5 heads into Mitchell St. towards Quarry Hill." 1204.21 - "Nos. 25, 21 and 26 watch No. 7 arrive at Charing Cross from Golden Square." 1204.22 - "No. 24 at Charing Cross crossing Mitchell St." 1204.23 - "Nos. 24, 21 and 7 at Charing Cross."tramways, trams, bendigo, golden square, myrtle st., fire station, depot, charing cross, tram 5, tram 7, tram 20, tram 21, tram 24, tram 25, tram 28, tram 29 -
 Ballarat Tramway Museum
Slide - 35mm slide/s set of 7, Noel Simons, 1972
Set of 7 transparencies undated on PAKON mounts - appear to be early 1970's. 1212.1 - No. 18 about to enter the Long Gully loop with ESSO service station on the right hand side. 1212.2 - No. 6 in Mitchell Street bound for Charing Cross. Tram has destination of "Rly Station". Has buildings on the east side of Mitchell St. in the background. 1212.3 - No. 7 (North Bendigo) and 29 (Golden Square) crossing. Actual location? 1212.4 - "No 6 showing 'SPECIAL' at Eaglehawk terminus. Has the Foodland store and Fruit shop in the background. 1212.5 - No. 19 at Eaglehawk terminus, on the extension to the normal Eaglehawk terminus. Tram has showing 'Eaglehawk'. Tram has two SEC roof ads. 1212.6 - No. 25 and another Bogie car at Quarry Hill terminus on last day. 1212.7 - No. 18 and 29 at Quarry Hill terminus. No.. 18 showing 'Quarry Hill' - has two SEC roof ads 'Electric Cooking - Matchless' and 'Everything's fine in my all electric kitchen' and No. 29 has a briquettes roof ad.Information typed onto a white label stuck on the slide. 1212.1 - "No. 18 at Long Gully" 1212.2 - "No. 6 in Mitchell Street." 1212.3 - "7 and 29 Lake View Hotel" 1212.4 - "No. 6 at Eaglehawk" 1212.5 - "No. 19 at Eaglehawk Term." 1212.6 - "Last cars Quarry Hill." 1212.7 - "18 & 29 Quarry Hill"tramways, trams, bendigo, long gully, mitchell st., eaglehawk, quarry hill, last tram, tram 6, tram 7, tram 18, tram 19, tram 25, tram 29 -
 Ballarat Tramway Museum
Newspaper, The Courier Ballarat, "Tourist Trams for Bendigo", 24/10/1972 12:00:00 AM
Newspaper Clipping possibly from The Courier, Ballarat, 24/10/1972 about questions to be asked in the Legislative Assembly today by Mr. Floyd (Labour Williamstown) about the running of the trams in Bendigo for tourists and running of trams in Ballarat. Item notes that approved the service between the North Deborah mine and the Chinese Joss House. Item possibly from the Courier as it has Ballarat people funeral notices on the rear."24/10/72" in top right hand corner in black ink.trams, tramways, bendigo, parliamentary questions, mr. floyd, mr. v. wilcox -
 Ballarat Tramway Museum
Photograph - Colour Photograph/s, David Endacott, 1971
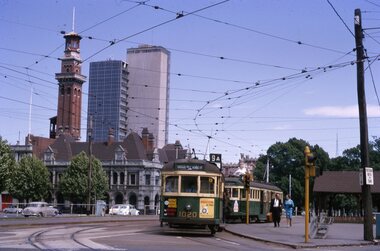
Colour print of a Ballarat No. 30 in Lydiard St. North opposite the concrete retaining wall on the east side of Lydiard St. North, just before Macarthur St, the cutting was between Clarendon St and Macarthur St. Tram has destination of Lydiard St. Nth. Has homes and the city of Ballarat in the background. Original film image scanned at 3200dpi 12/5/2020.On rear in blue ink "Lydiard St. Nth" and in the top left hand corner "1971".ballarat, lydiard st. nth, retaining wall, tram 30 -
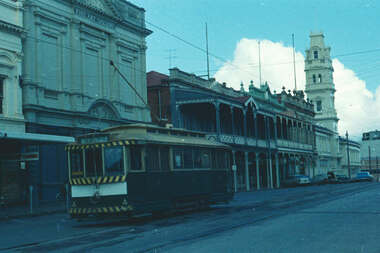 Ballarat Tramway Museum
Photograph - Colour Negative, Colour Print, David Endacott, 1971
Colour positive (negative) of SEC tram No. 30 south bound in Lydiard St. North, with the destination of Sebastopol between Mair St and Sturt St. Has the Fine Art Gallery buildings, Post Office and Mining Exchange building in the background of the photograph. Photo taken after the tram has passed the photographer. A colour laser image of this negative made on 10/1/2000 using a Canon Laser printer has been placed on file at 01-01-57. Original film image scanned at 3200dpi 12/5/2020.ballarat, lydiard st. nth, fine art gallery, tram 30