Showing 773 items
matching looped the loop.
-
 Ballarat Tramway Museum
Slide - 35mm slide/s, 1968
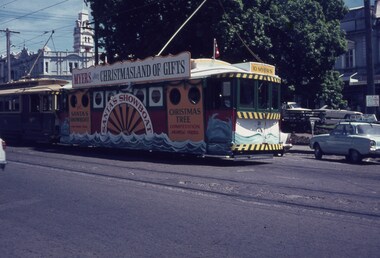
... City Loop... 12 and 21 as Myers Christmas tram in City Loop. See 382... Christmas Trams Decorated Trams City Loop tram 12 tram 21 Nil ...As for 382, but photographed at a shorter distance. Trams 12 and 21 as Myers Christmas tram in City Loop. See 382 for further details. Photo taken during the 1968 Christmas season. See Date advised by Alan Bradley, 15/3/03Niltramways, trams, myers, christmas trams, decorated trams, city loop, tram 12, tram 21 -
 Ballarat Tramway Museum
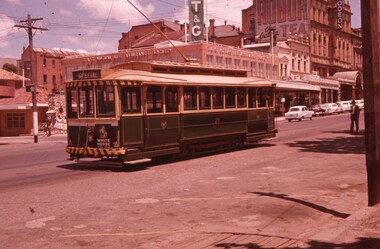
Photograph - Black and White photograph - laminated, John Phillips, 1968
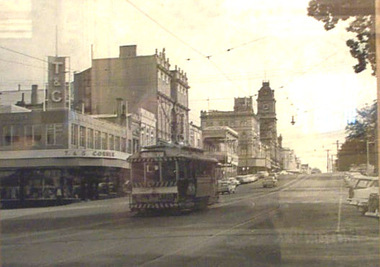
... City Loop... up Sturt St. hill, passing City loop. Tram fitted with large... St. City Loop tram 12 Photograph taken after tram has passed ...Photograph taken after tram has passed, of No. 12 heading up Sturt St. hill, passing City loop. Tram fitted with large white stripe, Twin Lakes sign under headlight. Destination showing Victoria St. Many Holdens in photograph and some Ford motor cars. Good photo of buildings on south side of Sturt St. at the time, T&G corner building in photo. Image on data base file, made from digital photo of photo 22/6/02.trams, tramways, ballarat, sturt st., city loop, tram 12 -
 Ballarat Tramway Museum
Slide - 35mm slide/s, Wal Jack, 28/03/1959 12:00:00 AM
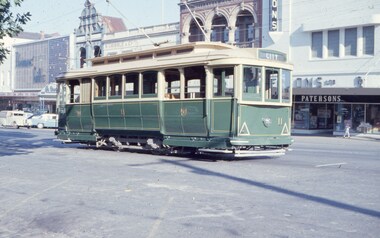
... City Loop...Ballarat Tram No. 11, parked in City Loop, with 'City...SEC Ballarat, No. 11, Sturt St. Loop, 28-3-59, W.Jack Photo... Loop tram 11 SEC Ballarat, No. 11, Sturt St. Loop, 28-3-59 ...Ballarat Tram No. 11, parked in City Loop, with 'City' destination, 28.3.1959. Tram has large triangles on front, looks recently painted, no ads. In background is the buildings of the south side of Sturt St. by loop, Patersons, Ballarat Gas Co.SEC Ballarat, No. 11, Sturt St. Loop, 28-3-59, W.Jack Photo' in blue inktramways, trams, ballarat, city loop, tram 11 -
 Ballarat Tramway Museum
Slide - 35mm slide/s, Wal Jack, 5/01/1962 12:00:00 AM
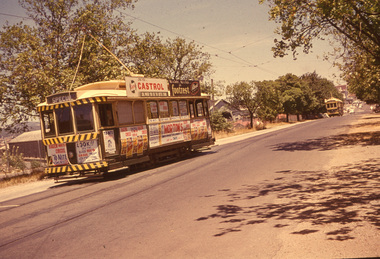
... Seymour St. loop..., just left Seymour St. loop, following another bogie car. Both... Morton's Circus Lydiard St. Seymour St. loop tram 31 SEC Ballarat ...Ballarat No. 31 covered on below windows with posters for Morton's Circus, ads for 'To-Nite'. Has Castrol and footrest shoes? roof ads. Tram travelling down Lydiard St, towards station, just left Seymour St. loop, following another bogie car. Both trams have dash canopy lights with small white strip. No. 31 showing 'SPECIAL' on destination.SEC Ballarat No. 31 with Morton's Circus Posters, Lydiard St. North, 5/1/62' in blue inktramways, trams, ballarat, morton's circus, lydiard st., seymour st. loop, tram 31 -
 Ballarat Tramway Museum
Slide - 35mm slide/s, Wal Jack, 30/03/1959 12:00:00 AM
... City Loop...Ballarat tram No. 11 in City Loop, 30-3-1959. Tram fitted... Loop tram 11 'Ballarat No. 19, Sturt St. 30-3-59' Ballarat tram ...Ballarat tram No. 11 in City Loop, 30-3-1959. Tram fitted with large triangles on front dash, showing 'City' destination. Exposed for shadow on tram. Taken in same location as slide No.411. In background is the buildings of the south side of Sturt St. by loop, Patersons, Ballarat Gas Co.'Ballarat No. 19, Sturt St. 30-3-59'tramways, trams, ballarat, city loop, tram 11 -
 Ballarat Tramway Museum
Slide - 35mm slide/s, Wal Jack, 2/01/1961 12:00:00 AM
... City Loop...Ballarat No. 21 in City Loop, 2-1-61. Tram has been.... loop, 2-1-61' in blue ink, and 'W.Jack' stamped on.... Loop tram 21 'SEC Ballarat Tramways, No. 21, ex Adelaide A10 ...Ballarat No. 21 in City Loop, 2-1-61. Tram has been painted with small white strip under headlights, pending dash canopy lights. Slide dark, sun directly overhead. Has T&G buildings, Odeon Theatre in background along with some cars.'SEC Ballarat Tramways, No. 21, ex Adelaide A10, Sturt St. loop, 2-1-61' in blue ink, and 'W.Jack' stamped on.tramways, trams, ballarat, city loop, tram 21 -
 Ballarat Tramway Museum
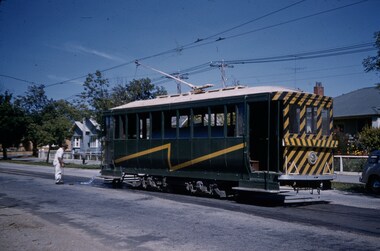
Slide - 35mm slide/s, Keith Kings, 28/02/1962 12:00:00 AM
... , flushing track drains at Duncan St. loop. Workman in white..., 28/2/62, Ballarat, Scrubber flushing track drains at loop..., Scrubber flushing track drains at loop on Drummond St. Nth ...Ballarat Scrubber car, in Drummond St. North, 28.2.1962, flushing track drains at Duncan St. loop. Workman in white at rear of tram, parked at entry to loop. Photo by Keith Kings.'K.S.Kings No.' stamped onto slide' 'H(w)(369), 1/250, f11, 28/2/62, Ballarat, Scrubber flushing track drains at loop on Drummond St. Nth.' in blue ink.tramways, trams, ballarat, drummond st. nth, scrubber tram, maintenance, scrubber -
 Ballarat Tramway Museum
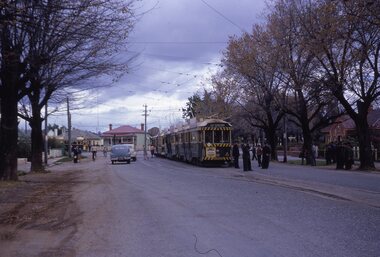
Slide - 35mm slide/s, Keith Kings, 20/10/1962 12:00:00 AM
... Bridge St Loop...Bendigo trams, 18, 26, 29, 11 in Bridge St. Loop, with 5..... Loop, Bendigo'... Bendigo Bridge St Loop ARHS tram 18 tram 26 tram 29 tram 11 tram 5 ...Bendigo trams, 18, 26, 29, 11 in Bridge St. Loop, with 5 in Nolan St waiting for a Bendigo tram? on 20-10-1962 as part of an ARHS tour to Bendigo. Note white convoy marker on front tram, Tram 18 showing 'RLY Station' destination. Tram 18 has 'Kohn Drinks' ad on front panel. Photo by Keith Kings.Stamped 'K.S.KIngs etc', and in blue ink 'K(k)(384), 1/250, f5.6, 20/10/62, ARHS, Convoy 'A' 5,11,29,26,18 on Bridge St.. Loop, Bendigo'tramways, trams, bendigo, north bendigo, bridge st loop, arhs, tram 18, tram 26, tram 29, tram 11, tram 5 -
 Kew Historical Society Inc
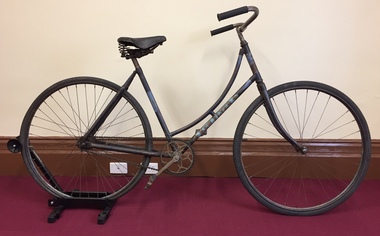
Vehicle, Kew Flyer, Women's Roadster, c.1920
... work and logo on the loop frame in navy blue, blue and gold... and logo on the loop frame in navy blue, blue and gold, featuring ...In 1903, an article in the Box Hill 'Reporter' noted that the Kew Flyer Cycle business had been started in 1893 by Harry F. Cooper, and that he was "the oldest cycle maker in the district". By 1903, the Kew Flyer business was located at 8 (later 14) Cotham Road where it was to remain an institution until its closure. In 1910, W.D. Vaughan, in his 'Jubilee History of Kew, Victoria' wrote that: "Several cycling clubs have been born and died, suffering chiefly from the migration of the leading spirits in the organisations, but since 1900 the ‘Kew Flyer’ road race, instituted by Mr. H. F. Cooper, has been the cycling event of the year among local riders. It is run on the White Horse Road at Blackburn." Early newspaper reports recorded the distance of the race as initially 10 miles but by 1906, the event extended to 15 miles, starting from the Travellers' Rest Hotel in Blackburn. Cooper's Kew Flyer business in Cotham Road introduced new technologies and models throughout its 56-years of operation. By 1908, it was claimed that the shop had been enlarged with new "workshops and [the] latest lathes and cycle building tools. [it] Is now one of the most up-to-date Cycle Works in Victoria". By the First World War, Cooper had expanded his business to include motorbikes with "Precision Engines". The Kew Flyer business and the annual road races continued through the War, even though a number of its staff left for the front. One of these was [Pte] Robert Charles Field Richardson, who joined the 6th Battalion, fought and was wounded at Gallipoli, and died of wounds in Alexandria, Egypt in 1915. In 1917, the death of Private H.S. Herbert was announced. He had been the winner of the Kew Flyer Cycle Road Race in 1913. He died in action in France, having fought at Gallipoli and at the Battle of Pozieres. The majority of bicycles advertised by Cooper were designed for men, although bikes for women and 'juveniles' were advertised as early as 1918, so they were probably manufactured throughout the period. Harry Cooper was to sell his Kew Flyer business in 1936, after 39 years of trading. The business he began continued until 1949.This is an historically significant and rare 1920s Kew Flyer Cycle in intact condition, with most of the original paintwork preserved on the frame. Harry F Cooper, who was the manufacturer of the cycle had a retail business and a factory in Kew. He promoted the Kew Flyer Road Race which was the most important trader-run cycle event in Victoria from 1900 to his retirement in 1936.An unrestored Kew Flyer Women's Roadster ca 1920, donated to the Kew Historical Society by John Wyatt in 2017. Original paint work and logo on the loop frame in navy blue, blue and gold, featuring Egyptian influences in the painted design . The rubber sprung saddle was made by Dunlop and has a serial number on a plate at the rear. The loop frame is original. Most of the cycle, on an initial evaluation following the donation were judged to be original, but with the addition of a later mudguard, reflector and chain guard. These have now been removed.Kew Flyerwomen's roadster, kew flyer, harry f cooper, businesses - kew, cycling -
 Glen Eira City Council History and Heritage Collection
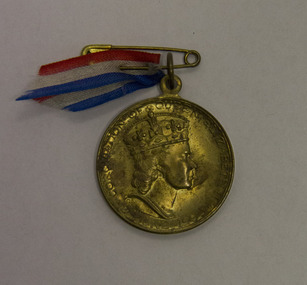
Medal, commemorative, "City of Caulfield, Coronation of H. M. Queen Elizabeth II, 2nd June, 1953", c. 1953
... Small round gilt bronze commemorative medal with loop. Red... bronze commemorative medal with loop. Red, white and blue striped ...Small round gilt bronze commemorative medal with loop. Red, white and blue striped ribbon attached to the loop with a small gold coloured safety pin. Profile of HM Queen Elizabeth II on obverse surrounded by the inscription "CORONATION OF QUEEN ELIZABETH II JUNE 2ND 1953" and "AMOR" near the left shoulder. The City of Caulfield Coat of Arms (unofficial version) is depicted in the centre surrounded by the inscription "CITY OF CAULFIELD VICTORIA" around central coat of arms. Some abrasion and rust evident on both sides.Obverse - "CORONATION OF QUEEN ELIZABETH II 2ND JUNE 1953" around Head of Elizabeth II and "AMOR" near Queen's shoulder- Reverse - "CITY OF CAULFIELD VICTORIA" around central coat of arms. -
 Clunes Museum
Tool - PULLEY
... round outside to form a metal lined loop to attach to hook above... loop to attach to hook above and one lead reinforced loop ...This wooden pulley was used in mineshafts. The pulley is a wheel with a grooved rim inside a wooden frame for carrying a rope, turning in the frame and serving to change the direction of, or transmit power, as in pulling at one end of the line to raise a weight or object at the other end.USED IN UNDERGROWN MINING ON THE GOLD FIELDSWooden Pulley with ropes attached. Pulley has rope bound round outside to form a metal lined loop to attach to hook above and one lead reinforced loop to attach load to be lowered. The grooved wheel in centre of pulley houses the rope or to attach the load for transport.underground mining, mining tool, wooden pulley -
 Brighton Historical Society
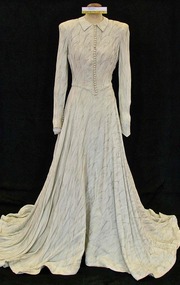
Dress, Wedding dress, 1948
... . Fastens down front with small self-covered buttons and loops. Long... front with small self-covered buttons and loops. Long fitted ...Louris Holly Larsen-Disney married Percy James White at Melbourne Grammar Chapel on 17 June 1948. In later years the dress was given to an opportunity shop and purchased by Mrs Landells of the Brighton Historical Society. Louris subsequently visited the Society and recognised her dress, and was able to provide BHS with information on it. Also in the Society's collection is a 1950s pink strapless silk chiffon dress worn by Louris, and a wedding photo of Louris taken at her mother and stepfather's home at 53 South Road, Brighton. The couple moved into a house just a few doors down, at 49 South Road.Wedding dress made from silver metallic thread crepe. Fastens down front with small self-covered buttons and loops. Long fitted sleeves fastened with 10 covered buttons and loops. Full bias cut skirt with train.wedding dress, 1940s fashion, louris holly white, percy james white, brighton -
 Vision Australia
Functional object - Object, Roytal Sheltered Workshop, White cane
... handle loops around the wrist, when unfolded and in use. When... loops around the wrist, when unfolded and in use. When folded ...This white cane was included in the 1991 time capsule. It is a Royal brand cane and folds up into 4 sections. An elasticised handle loops around the wrist, when unfolded and in use. When folded, the handle loops around the 4 parts, keeping them folded.4 metal/plastic pieces joined together with an elasticized cordorientation and mobility, assistive devices -
 Vision Australia
Functional object - Object, Royal National Institute for the Blind, Collapsible white cane
... with an elastic cord for carrying purposes'. An elasticized handle loops... for carrying purposes'. An elasticized handle loops around the wrist ...This collapsible cane is in four sections joined to each other by braided rubber tubing. Original paper wrapping has instructions on the outside including: 'The top section can easily be identified as it is the thickest of the four and is threaded with an elastic cord for carrying purposes'. An elasticized handle loops around the wrist, when unfolded and in use. When collapsed , the handle loops around the four parts, keeping them folded.4 metal/plastic pieces joined together with an elasticized cordassistive devices, royal national institute for the blind -
 Beechworth RSL Sub-Branch
Dress,Women’s,indoor uniform, 1962
... ,with a neck button loop(2cm). Two epaulettes 5cmm x 11 cm(long... loop(2cm). Two epaulettes 5cmm x 11 cm(long). The pockets have ...The garment was a sealed sample 26 feb 1962. It is unknown when the dress was replaced. It is a representative example of this type of uniform in the period.The dress is in excellent condition.Light green,short sleeves.410mm shoulder to shoulder.1018mm top of collar to bottom of dress.320 mm wide waist.25mm sleeve from shoulder top to sleeve end. Sleeve cuff 4 cm wide.Two pockets on front, each set 12 cmm below waist and 9 mm from edge of centre opening.bottom of pocket is 10 cm from edge of centre opening.The dress opens at front with 8 button holes (24mm) openings,with a neck button loop(2cm). Two epaulettes 5cmm x 11 cm(long). The pockets have a sewn flap 2cm long from pocket top and 5 cm (at apex) from top of pocket.Two loops (5cm high) at each side of dress.A loop for hanging dress is inside collar at rear.Three press studs at front to fasten dress.Attached certificate in plastic seal. “Department of Army - inspection service/ SFC 8.3.13. (June 1958). Sealed sample/ sealed pattern no class 8415 article/CLO 1489 DRESS WOMEN’S indoor uniform,short/sleeves.RAANC,S55./ the supply is not to differ from this sale sample except in such/ respects as may shown on back thereof./Approved 26.2.1962/ for Director of inspection” On reverse of sealed tag is: “ measurements shall be as specified.Buttons/RAANC Line 30 (fronts) . Buttons RAANC LINE 26/(SHOULDER STRAPS).”dress, women’s, raanc, short sleeve, uniform -
 Beechworth RSL Sub-Branch
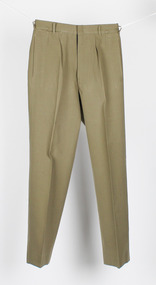
Trousers
... . Trousers have seven loops for a belt and smaller loops for metal.... Trousers have seven loops for a belt and smaller loops for metal ...Khaki coloured dress trousers with pressed seam running vertically down front and back of each leg. Two hip pockets, one on each side, with rear pocket on right side fastened by plastic button; additional pocket sits in waistline on right side. Trousers have seven loops for a belt and smaller loops for metal inserts which support a Sam Brown belt. Trousers fastened by a zipper in front and flap which secures with a plastic button on the interior. Spare button is sewn into the interior waistband. Leg hem is reinforced at front and back with strip of synthetic binding, presumably to aid against wear from rubbing on boots. Interior label on left back of waistband reads "DRY CLEAN/REPRESS ON ORIGINAL CREASES/USE DAMP CLOTH OR MEDIUM TO/HOT STEAM IRON/MENDING PATCH ATTACHED" Interior label on right back of waistband reads "ARMY NO/NAME" dress uniform, pants, australian defence force -
 Beechworth RSL Sub-Branch
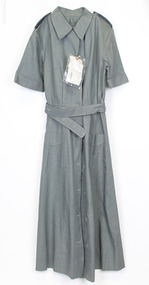
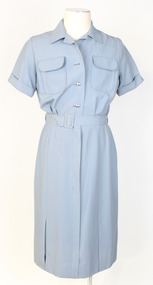
Dress
... two loops on the back, through which a fabric belt (0030.2... two loops on the back, through which a fabric belt (0030.2 ...Mid-length shift dress in light grey-blue. Dress consists of two breast pockets, each with rounded flap closure held in place by two press studs. Dress is fastened down centre with three silver buttons held in place with a metal ring (only two buttons remain). From waist line down, dress is fastened by a hidden zipper and hook and eye. Waist line is pleated and carries two loops on the back, through which a fabric belt (0030.2) is threaded. Two fabric loops on each shoulder may have been used to hold epaulettes or similar. Dress sleeves are rolled up by 40 mm. Collar is notched. Interior label on left side at waist height reads "IYD CLO CO/VIC./8410-66-000-000/SIZE 18/ARMY NO........../NAME............" -
 Beechworth RSL Sub-Branch
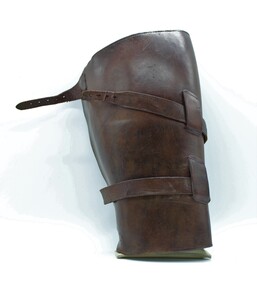
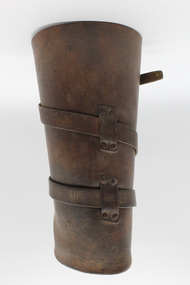
Legging, c. 1913
... a leather loop at the front. The strap then wraps around the gaiter.... This crosses over the lower exterior and passes through a leather loop ...According to the UK National Archives, the firm F. C. Chamberlain & Co. was founded by Frederick Chamberlain, who made boot uppers at West Street, Wellingborough, in 1891. In 1903, he had moved to Mill Road, and by 1903, was established in Palk Road, producing boot uppers, leggings and gaiters by 1919. These gaiters are therefore presumed to be an early example of products produced by the company.Brown leather cylindrical shaped gaiter with two leather straps for fastening. One strap is attached to the lower edge of the interior. This crosses over the lower exterior and passes through a leather loop at the front. The strap then wraps around the gaiter and passes through a second leather loop at the front. This strap, along with a shorter strap that is sewn into the top of the gaiter, passes through a buckle (now missing) and is tucked under two final leather loops. Interior length of gaiter is stamped with manufacturer's name. Top of gaiter also carries a small metal hook, presumably to hold layers together firmly.Embossed manufacturer's name, "F.C. CHAMBERLAIN & CO/1913"legging, gaiter, f c chamberlain & co, first world war -
 Beechworth RSL Sub-Branch
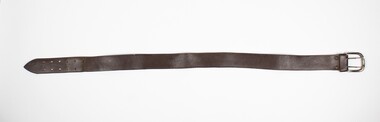
Belt
... hold the leather in a loop of the other end... brass studs which hold the leather in a loop of the other end ...This belt was manufactured for military service. It is presumably a World War Two era article of Army uniform.This Army belt was presumably made and used during the World War Two era and therefore has historic value. Brown leather belt with a brass buckle. The belt has twelve holes in two rows at one end for fastening into the buckle. The very tip narrows to a point. There is light brown stitching along the edges of the belt. There are two brass studs which hold the leather in a loop of the other end. There is an additional piece of leather fixed to this looped edge for holding the other end in place. The buckle is made of a silver coloured brass and has two rods which pass through two of the twelve holes for fastening. The buckle also exhibits blue/green copper corrosion in several areas. belt, war, uniform, army, royal australian army, world war two, ww2, wwii, second world war -
 Beechworth RSL Sub-Branch
Legging, c. 1913
... a leather loop at the front. The strap then wraps around the gaiter.... This crosses over the lower exterior and passes through a leather loop ...According to the UK National Archives, the firm F. C. Chamberlain & Co. was founded by Frederick Chamberlain, who made boot uppers at West Street, Wellingborough, in 1891. In 1903, he had moved to Mill Road, and by 1903, was established in Palk Road, producing boot uppers, leggings and gaiters by 1919. These gaiters are therefore presumed to be an early example of products produced by the company.Brown leather cylindrical shaped gaiter with two leather straps for fastening. One strap is attached to the lower edge of the interior. This crosses over the lower exterior and passes through a leather loop at the front. The strap then wraps around the gaiter and passes through a second leather loop at the front. This strap, along with a shorter strap that is sewn into the top of the gaiter, passes through a buckle (now missing) and is tucked under two final leather loops. Interior length of gaiter is stamped with manufacturer's name. Top of gaiter also carries a small metal hook, presumably to hold layers together firmly.Embossed manufacturer's name, "F.C. CHAMBERLAIN & CO/1913"legging, gaiter, f c chamberlain & co, first world war -
 Beechworth RSL Sub-Branch
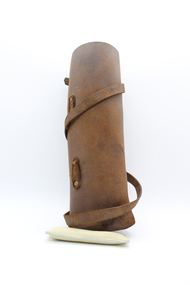
Legging
... and passes through a leather loop at the front. The strap then wraps... through a leather loop at the front. The strap then wraps around ...Brown leather cylindrical shaped gaiter with one leather strap for fastening. One strap is attached to the lower edge of the interior with a metal pin. This crosses over the lower exterior and passes through a leather loop at the front. The strap then wraps around the gaiter and passes through a second leather loop at the front. This strap appears to pass through two rectangular cut out holes. The edges of the gaiter are unfinished and all elements are affixed through metal pins rather than stitching.Stamped in black ink on interior is the word "WONDER" alongside other illegible markings.legging, gaiter, first world war -
 Beechworth RSL Sub-Branch
Legging
... and passes through a leather loop at the front. The strap then wraps... through a leather loop at the front. The strap then wraps around ...Brown leather cylindrical shaped gaiter with two leather straps for fastening. One strap is attached to the lower edge of the interior with a metal pin. This crosses over the lower exterior and passes through a leather loop at the front. The strap then wraps around the gaiter and passes through a second leather loop at the front. This strap appears to pass through a buckle at the top of the gaiter. Another strap is passed through multiple rectangular cut out holes and secures to a second buckle.The edges of the gaiter are unfinished and all elements are affixed through metal pins rather than stitching.Stamped in black ink on interior is the word "WONDER" alongside other illegible markings.legging, gaiter, first world war -
 Beechworth RSL Sub-Branch
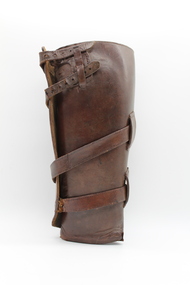
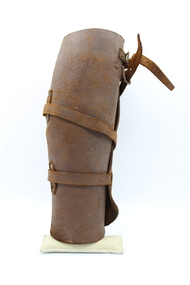
Legging
... a leather loop at the front, which is attached by four metallic.... This crosses over the lower exterior and passes through a leather loop ...This legging is part of a pair of leggings which presumably would have been worn by a cavalry soldier in the Royal Australian Army to protect the lower legs when riding in armed conflict. This item most likely dates to the World War One era.As an article of WWI protective clothing for use in armed conflict by a cavalry soldier, this item is of historic value. Brown leather cylindrical shaped legging with two leather straps for fastening. One strap is attached to the lower edge of the interior. This crosses over the lower exterior and passes through a leather loop at the front, which is attached by four metallic nails. The strap then wraps around the gaiter and passes through a second leather loop at the front, which is also attached by four corroded metallic nails. This strap (along with a shorter strap that is sewn and nailed into the top of the legging) pass through two buckles. The upper buckle is made of brass and the lower is made of steel. The straps then tuck under three final leather loops, two of which are bolted to the legging with three corroded nails. There should be a third loop here that is missing. Top corner of legging also carries a small corroded metal hook, presumably to hold layers together firmly.legging, gaiter, first world war, world war one, world war 1, wwi, ww1, war, army, uniform, royal australian army, the great war -
 Beechworth RSL Sub-Branch
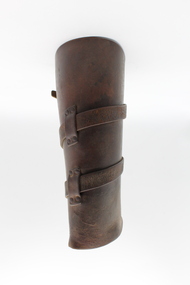
Legging
... a leather loop at the front, which is attached by four metallic.... This crosses over the lower exterior and passes through a leather loop ...This legging is part of a pair of leggings which presumably would have been worn by a cavalry soldier in the Royal Australian Army to protect the lower legs when riding in armed conflict. This item most likely dates to the World War One era.As an article of WWI protective clothing for use in armed conflict by a cavalry soldier, this item is of historic value. Brown leather cylindrical shaped legging with two leather straps for fastening. One strap is attached to the lower edge of the interior. This crosses over the lower exterior and passes through a leather loop at the front, which is attached by four metallic nails. The strap then wraps around the gaiter and passes through a second leather loop at the front, which is also attached by four corroded metallic nails. This strap (along with a shorter strap that is sewn and nailed into the top of the legging) pass through two buckles at the top. Both buckles are made of brass. The straps then tuck under four final leather loops, two of which are bolted to the legging with three corroded nails. Top of legging also carries a small brass hook.legging, gaiter, first world war, world war one, world war 1, wwi, ww1, war, army, uniform, royal australian army, the great war -
 Parks Victoria - Wilsons Promontory Lightstation
Sheave Block/Pulley
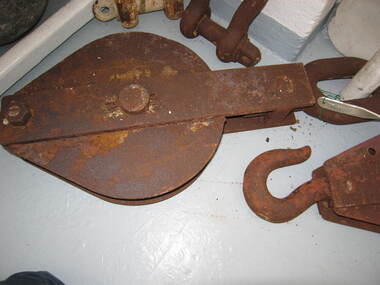
... Large rusted iron pulley, large loop at one end and smaller... loop at one end and smaller loop at the other. No hook.(Sheave ...Pulleys were used to lift goods to and from boats and at other sites at the lightstation where hauling was undertaken. Historical images and text panels in the Wilsons Promontory Museum attest to the detailed logistics that needed to be exercised in lifting and transporting goods once they had arrived by boat at the Eastern Landing. Cranes and a flying fox were employed in the nineteenth century and updated versions of this equipment served well into the twentieth century. The first cranes to be employed at the site were built just after December 1857, when tenders were called to construct two cranes prior to the commencement of building the lightstation.The first boat landing at the promontory was built on the west side of the lighthouse, which the architect, Charles Maplestone sketched in June 1859, the same month that he announced the completion of the lighthouse. His drawing shows one of the cranes as a large structure built for heavy duty lifting. Soon the east landing became the preferred place for delivering stores, but as late as 1993 a crane, timber structures and disused heavy iron machinery remained at the old site.Large rusted iron pulley, large loop at one end and smaller loop at the other. No hook.(Sheave Block) -
 Trafalgar Holden Museum
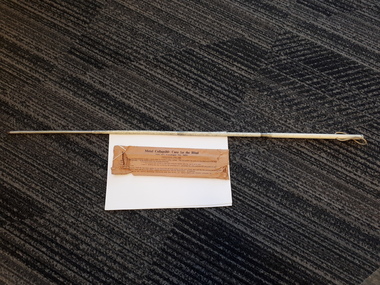
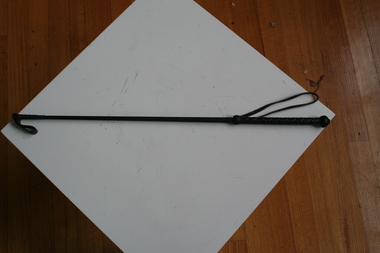
Functional object - Jockey's crop, Ca 1900
... leather loop 50mm long the other end a plaited leather hand grip... in plaited cotton mesh cover, one end leather loop 50mm long ...As used by equestrians whilst riding to help control their mount whilst riding. Ca 1900.As manufactured and sold by Holden and Frost Ca 1900Tapered shaft covered in plaited cotton mesh cover, one end leather loop 50mm long the other end a plaited leather hand grip and leather wrist loop.equestrian crop, leather -
 Trafalgar Holden Museum
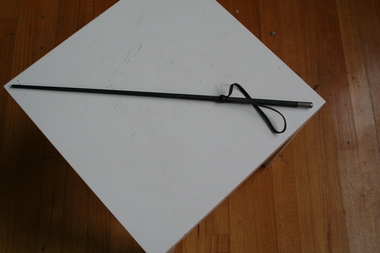
Functional object - Equine accessory, Ca 1900
... a 50mm leather loop the other end a steel cap 180mm from leather... leather loop the other end a steel cap 180mm from leather loop ...Used by horse rider to control their horse to urge them to go faster. Used by racing jockeys and competitive riders. Ca1900As manufactured and sold by Holden and Frost Ca 1900Tapered shaft covered in a cotton meshed cover. At one end a 50mm leather loop the other end a steel cap 180mm from leather loopequine, crop -
 Trafalgar Holden Museum
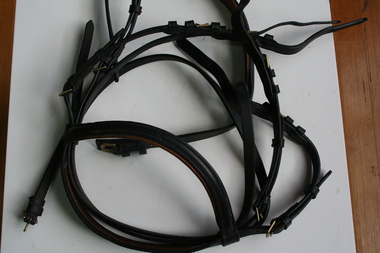
Accessory - Surcingle Set
... leather lined looped straps one with buckle the other with loop... leather lined looped straps one with buckle the other with loop ...Used in agriculture for directing a working horseReplica of surcingles made by Holden and FrostBlack and brown leather straps with brass buckles. Two leather lined looped straps one with buckle the other with loop going over another strapsurcingles, agricultural, military, leather -
 Woodend RSL
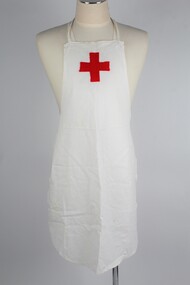
Uniform - Apron
... of bib is attached to a white fabric neck loop near bib corners... to a white fabric neck loop near bib corners by machine sewn white ...Apron manufactured for military purposes. This item has significance as an example of uniform likely worn ny nurses and/or other medical staff, associated with Australian military campaigns. White fabric apron. One piece comprised of fabric square, white cotton bib, convex shaped side flaps, and square shaped lower apron with rounded corners. Fabric edges are folded over and hemmed with white thread in straight stitch, 5mm distance from edge of apron. Underside is overlocked with white thread. Top of bib is attached to a white fabric neck loop near bib corners by machine sewn white thread, with a criss-cross shape enclosed in a square; stitching is visible on front of apron. Apron has a white fabric tie on each side, attached in similar fashion to neck loop. Bib features red fabric red cross, stitched onto bib using zig zag stitch in red thread, edges of cross are raw fabric. Both ties and neck loop are hemmed with straight stitch and overlocked in white thread. military, war, apron, uniform, medical, hospital, women, female, outfit, nurse, fashion, textiles -
 Woodend RSL
Knife sheath
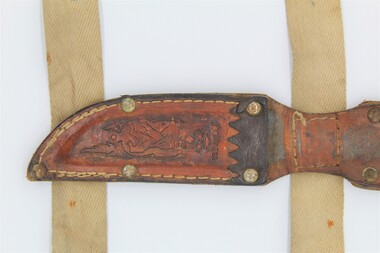
... is located just below the belt loop. Both straps are fixed in place...On back of belt loop flap, there is an embossd manufactuing... vietnam lindsay fankhouser raaf On back of belt loop flap ...This knife and scabbard belongs to Lindsay Fankhouser, who wore it on his ankle when he served as an engineer/ crewman in the RAAF (Iroquois and Hercules) during the Vietnam war. He used this knife many times a day while he was serving. It is a brown leather knife sheath, with a decorative front and two canvas straps attached at the back. The shorter strap is located at the bottom of the sheath and the longer strap is located just below the belt loop. Both straps are fixed in place with stitching. The top strap has a square of stitching, while the bottom strap has two lines of stitching that follows the stitching of the sheath. The belt loop is at the top of sheath and is a fixed flap of leather that is folded across the top and also holds the handle of the knife in place using a circular hole that fits around the butt of the knife. The bottom canvas strap has three adjustable brass male press studs on the left side as well as the fixed female one on the right. The top canvas strap has four adjustable brass male press studs on the right side as well as as the fixed female one on the right. The sheath is held together by stitching and five iron rivets. There is one on the point of the sheath, two on either side of the top, and two more 51mm below the top two. 46mm above the sheath, there are another two iron rivets on either side. Above that on the holding flap, there are two iron rivets just above the circular hole on either side. On the flap, around the hole there are three brass flat-headed split pins, one on either side and one on the front. At the top of the sheath, above the decorative embossing, there is a dark brown jagged cut strip of fixed leather. All the leather on the object is a reddish-brown, while the canvas and stitching is light beige. The end stitching on the canvas straps is dark grey. The front of the sheath is polished leather, while the back is rough.On back of belt loop flap, there is an embossd manufactuing patent number; PATENT Nr152.463 On face of the sheaf there embossed decoration. It depicts a lion with stylised decorative foliage and above the lion there is a fleur de lise. Above that it reads Soallingen Norge.norway, norge, soallingen, knife, small knife, hunting, scabbard, sheath, vietnam, lindsay fankhouser, raaf