Showing 1279 items
matching hawthorn railway
-
 Melbourne Tram Museum
Photograph - Preston Workshops Tour yard storage of trams, Warren Doubleday, 30/7/1969
Photos show some of the stored or parked trams at the Preston Workshops yard during a Monash Railway club tour on 30/7/1969. 1 -Tram 15 - sleeper transport car with flat car trailer 20 alongside. 2 - Sleeper transport car 485 with ballast wagon 24 and trailer 20 behind. 3 - trams 485 and 15 stored in the Preston workshops yard. 4 - T 182 on transport bogies or workshop dollies - prior to disposal. 5 - SW6 883, W2 and former T 182 stored at Preston Workshops.Yields information about Preston Workshops and trams stored or being repaired.Set of five Black and white photographs of the storage yard of Preston Workshops during a tour.Has details on rear in red ink and pencil.tramways, trams, preston workshops, tram 15, works cars, tram 182, tram 883, sw6 class, t class, w2 class, tram 20, tram 24, mmtb -
 Melbourne Tram Museum
Photograph - Black and White - Swan Street track lowering, John Alfred, 1957
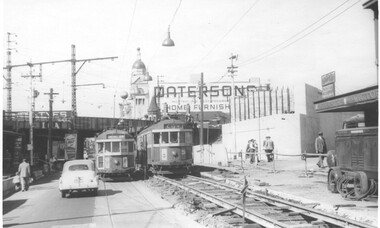
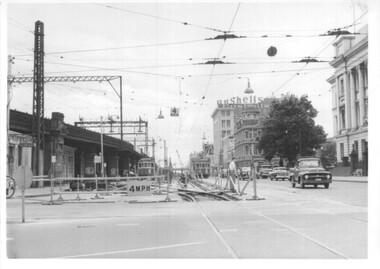
Photo shows - works in Swan Street Richmond to lower the tram tracks under the Railway bridge which were later replaced by an open web girder truss bridge. The track on the left has been completed while on the right, the original road surface can be seen as well as the temporary track. Shows the abutment for a new railway bridge on the right, for the six tracks to South Yarra. Tram W2 330 (left, Camberwell Depot, route 76) and 339 (City, route 77) are passing each other. In the background is a large advertisement for Pattersons home furnishings. Photo dated 1957.Yields information about alterations to tram services during road reconstruction project.Photograph - Black and White - Swan Street track lowering Has details handwritten on rear, date stamp and John Alfred Stamp. tramways, tramcars, swan street, richmond, route 77, railways, bridges, tram 330, tram 339 -
 Melbourne Tram Museum
Photograph - Black and White - trams 661 and 675 Elsternwick, John Alfred, 1960
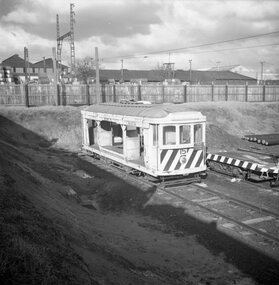
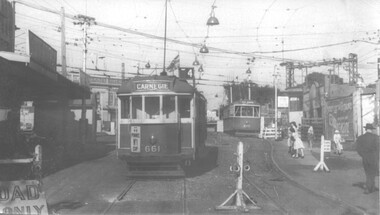
Black and white photograph of trams W3 661 (Route 4 Carnegie) and X2 675 (Point Ormond) , Glenhuntly Road, Elsternwick Station, during the lowering of the railway line, 1960. Photo by John Alfred. Yields information about alterations to tram services during a level crossing removal project.Photograph - Black and White - trams 661 and 675 ElsternwickHas details handwritten on rear, and John Alfred Stamp. tramways, tramcars, glenhuntly rd, level crossing, elsternwick, tram 661, tram 675, w3 class, x2 class, point ormond -
 Melbourne Tram Museum
Photograph - Set of 6 colour prints - Melbourne Seaside trams, George Bishop, 24-2-1995
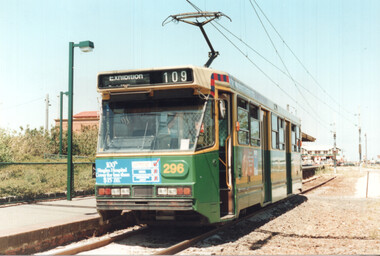
Set of six photographs taken by George Bishop on 24-2-1995 1 - A 296 (Route 109) at Port Melbourne terminus 2 - Z3 197 at South Melbourne Beach, advertising MBF (Medical Benefits Fund) on an East Coburg service - note the "temporary" sign in front of the tram giving the destination. 3 - Z2 2119 (Route 96) at the former St Kilda Railway Station 4 - Z2 2028 (Route 96) St Kilda beach, The Esplanade 5 - Z2 2058 (Route 96) St Kilda beach, The Esplanade 6 - W7 1021 (Route 15) St Kildas beach, The EsplanadeYields information about the operation of Melbourne trams during early 1995.Set of six colour prints printed on Kodak paperDetails of the photograph and photographer on the rear in ink.trams, tramways, st kilda, south melbourne, port melbourne, a class, b2 class, z3 class, w7 class, tram 296, tram 197, tram 2119, tram 2028, tram 2058, tram 1021 -
 Melbourne Tram Museum
Photograph - Set of 3 colour prints - St Kilda light rail, George Bishop, April 1999
Set of three photographs taken by George Bishop on April 1999 - All route 96 - East Brunswick to St Kilda Beach 1 - B2 2032 at the former Albert Park Railway Station 2 - B1 2001 at Albert Park 3 - B2 2057 Albert ParkYields information about the operation of Melbourne trams during early 1995.Set of three colour prints printed on Kodak paperDetails of the photograph and photographer on the rear in ink.trams, tramways, st kilda, b2 class, b1 class, tram 2032, tram 2001, tram 2057, albert park, st kilda light rail, light rail -
 Melbourne Tram Museum
Album - Ron Scholten Slide Collection, Ron Scholten
Photo - see pdf file for further information. Number Brief Description RSC1 PCC 1041 at the gates of Preston Workshops on a test run without it’s trolley retriever RSC2 PCC 1041 in Glenhuntly Road on Route 67 en route to Carnegie crossing the Railway Gates at Glenhuntly Station RSC3 W2 482 stored at Malvern Depot with Olympic Park on the Destination RSC4 Cable Car Set 64 in Swanston St outside Princess Bridge Station in Bound with open top Double Deck Bus, Trak Motors ? Departing from Flinders St Station RSC5 W3 669 in St George Rd at Sumner St en route to Preston Workshops for scrapping RSC6 Cable Car in Lygon St en route to Carlton RSC7 PCC 1041 turning from St Georges Rd into Miller St to enter Preston Workshops RSC8 Flinders St Station with cable cars RSC9 PCC 1041 in strife on it’s maiden day in service. Trams on route 88 delayed in Queens Parade Clifton Hill RSC10 Flinders St at William St with Cable Cars RSC11 L 104 on the fan of the new shed at Malvern Depot on a TMSV tour RSC12 Cable Set 1 after it’s restoration at Preston Workshops on the fan near the front gate RSC13 X1 466 at a suburban terminus of the Footscray System RSC14 X2 680 at Point Ormond Terminus RSC15 An ex Launceston Tram at the outside terminus of the Penny Royal Complex Tramway in Launceston RSC16 Q 148 at Preston Workshops awaiting disposal RSC17 Elizabeth St with Cable Cars RSC18 Elizabeth and Bourke St corner outside the GPO with cable cars RSC19 Collins St with Cable Cars RSC20 A photo taken from the observation deck of the ICI building showing a view of Parliament house with a w class tram in Nicholson St RSC21 Auburn Horse car with a posed photo of all the tramwaymen employed RSC22 Cheltenham Double Deck Horsecar with a full load of passengers RSC23 City of Northcote cable trailer 3 at a terminus RSC24 City of Northcote Cable cars passing in High St Northcote RSC25 St Kilda Rd at Princes Bridge with Cable Cars RSC26 Flinders St with Cable Cars RSC27 Cable Cars RSC28 Bourke St looking towards Elizabeth St from Queen St RSC29 Cable cars in Bourke St at Elizabeth St looking East RSC30 Cable cars in Elizabeth St at the terminus at Flinders St RSC31 Cable cars in Bourke St at Swanston St looking west RSC32 Cable cars in Swanston St at Flinders St looking North RSC33 Cable cars in Collins St near Russell St RSC34 Cable cars in Elizabeth St at Bourke St RSC35 Cable cars in Collins St at Elizabeth St RSC36 Cable Cars in Swanston St at Flinders St RSC37 Cable cars in Collins St RSC38 Cable Cars RSC39 Cable cars in St Kilda Rd near Princes Bridge RSC40 Cable cars in Collins St East of Swanston St RSC41 Cable cars in Spring St outside Parliament house RSC42 K 92 in M&MTB Chocolate and cream livery but with a P&MTT Destination box on Route 14 RSC43 Thornbury depot viewed from Miller St and St Georges rd. Two W2 class cars are laying over between the peaks RSC44 Z3 201 in Met Livery passes D1 3510 in new M Tram livery. A Staff member in uniform stands in the doorway. Dandenong Rd RSC45 D1 3530 advertising Heinekin Super Golf on Route 55 in Royal Park RSC46 D1 3504 in M Tram livery on the reserved track in Matthews Ave near Essendon Airport showing Route 81 Travancore . I suspect it is a private enthusiasts charter due to the Malvern W class run number in the rear windscreen RSC47 D1 3504 on Route 64 in Dandenong Rd in M Tram Livery RSC48 D1 3504 in M Tram Livery at Airport West Terminus RSC49 D1 3504 in M Tram Livery in Union Rd outside the Showgrounds RSC50 D1 3504 at West Maribyrnong Terminus in M Tram Livery RSC51 D1 3503 in M Tram Livery in Malvern Depot RSC52 SW6 960 and VR 53 in Harbour Esplanade for the NMEL&T Co Centenary RSC53 Hawthorn Tramways Trust 32 in Harbour Esplanade for the NMEL&T Co Centenary RSC54 VR 53 & B 2042 in Harbour Esplanade for the NMEL&T Co Centenary RSC55 VR 53 & C 3016 in Harbour Esplanade for the NMEL&T Co Centenary RSC56 NMEL&T Co 13 usually V214 in Harbour Esplanade for the NMEL&T Co Centenary RSC57 NMEL&T Co 13 usually V214 at Preston Workshops for the NMEL&T Co Centenary RSC58 Hawthorn Tramways Trust Lettering on HTT 32 in Harbour Esplanade for the NMEL&T Co Centenary RSC59 Hawthorn Tramways Trust 32 in Harbour Esplanade for the NMEL&T Co Centenary RSC60 Hawthorn Tramways Trust 32in Harbour Esplanade for the NMEL&T Co Centenary RSC61 Hawthorn Tramways Trust 32 in Harbour Esplanade for the NMEL&T Co Centenary RSC62 NMEL&T Co 13 usually V214 at Preston Workshops for the NMEL&T Co Centenary RSC63 W2 516 and another on route 59 wait to shunt at Essendon Airdrome Terminus as W2 571 on route 49 departs. This was the last day of operation. RSC64 Australia’s First Electric Tram at Box Hill with Tramwaymen including H J Hilton who is in the centre RSC65 W2 484 en route to St Kilda Junction and another wait for passengers after a race meeting at Caulfield Racecourse RSC66 X1 463 on the Footscray system en route to Russell St RSC67 Geelong 35 on Chilwell Route, Formerly HTT 13, M&MTB 119, then Bendigo 1 and Ballarat 37 RSC68 P&MTT 4 on Opening Day of the system in Glenferrie Rd RSC69 Bendigo 6 in McCrae St near the Depot end route to North Bendigo RSC70 P&MTT 4 in Glenferrie on opening day of the System RSC71 Scrubber 3 stripped and awaiting scrapping at Preston Workshops RSC72 Scrubber 4 at South Melbourne Depot RSC73 Q 191 & 139 at Preston Workshops awaiting scrapping RSC74 Rail Grinder 3 at Preston Workshops as purchased from Sydney RSC75 Y 469 waits to shunt at Wattle Park Terminus as Y1 613 departs on driver training duties RSC76 VR 53 on the outside roads at Essendon Depot RSC77 W5 796 with three doors and square windows running out of Brunswick Depot in Cameron St, with a supplementary destination board showing “City via Swanston St” RSC78 W2 258 on the wheel grinder road at Brunswick depot RSC79 X2 676 on a TMSV tour, W5 817 & 836 & VR 53 on the open roads at Essendon Depot RSC80 PCC 1041 on test, passes W71035 in High St Preston RSC81 D1 class production number 7 as delivered on test in Matthews Ave RSC82 W2 383 on route 5 turning from the reserved track in Dandenong Rd into St Kilda Rd at St Kilda Junction RSC83 Z3 204 as advertising tram for Vodaphone Grand Prix running into Malvern Depot new shed RSC84 Z1 4 on test in St Georges Rd RSC85 PCC 1041 on Route 96 in Burke St near Exhibition St RSC86 Z1 3 without numbers on test turning from Miller St in St Georges Rd RSC87 Track components stored in Coldblo Rd at Malvern Depot with Z class cars adjacent RSC88 D1 3501 in M Tram Livery on Route 55 in Peel St at Franklin St RSC89 C 3001 in Yarra Trams Livery Porto 018 & D13502 in M Tram Livery on Display in Harbourside Esplanade RSC90 D1 class tram production number 7, in as delivered condition on test in Matthews Ave RSC91 D1 3503 inside Malvern Depot RSC92 SW6 955 and W6 974 in St Kilda at City Rd at Dusk RSC93 Freight Car 19 at Preston Workshops in green Livery RSC94 Rail Grinder 3 in green Livery at South Melb Per Way Yard RSC95 A SW6 class car on route 50 shunting at Elizabeth St Terminus at night, taken from Flinders St Station RSC96 W2 588 & 435 in St Kilda Rd at Batman Ave RSC97 Y1 613 in service at Wattle Park Terminus RSC98 W2 588 in Wellington Parade en-route to the City with a Grand Final Load of passengers followed closely by 384 RSC99 W2 558 on a MCG Footy Special entering the Simpson St sidings RSC100 W3 657 & an L Class in the new shed at Malvern Depot RSC101 Y1 613 in St Kilda Rd on an enthusiasts tour in St Kilda Rd south of St Kilda jun RSC102 Y1 613 on an enthusiasts tour in Clarendon St with the two extra tracks on the Viaduct under construction RSC103 W6 976 on the fan of the new shed at Malvern Depot RSC104 W7 1024 as an advertising car for Bank of NSW at the route 1 terminus at South Melb Beach RSC105 PCC 980 on route 96 in Nicholson St near North Fitzroy Depot RSC106 SW6 890 with dash canopy lighting in Market St on the opening day of William St Services RSC107 W2 444 with big numbers heads a line of footy specials in Simpson St Sidings RSC108 Cable Cars in Elizabeth St RSC109 NMEL&T co 2 with a trailer outside the power station in Mount Alexander Rd RSC110 Alf Twentyman’s cable car set in his Northcote backyard RSC111 Cable Cars in Queens Parade Clifton Hill RSC112 Cable cars in Collins St outside the Townhall RSC113 PCC 1041 at Carnegie terminus RSC114 Cable cars in Elizabeth St RSC115 Cable cars in Collins St near Swanston St RSC116 HTT 19 turns from Riversdale Rd into Camberwell Rd at Camberwell Junction RSC117 W1 419 official builders photo of first car of the class RSC118 Cable car with a full load of passengers RSC119 W1 422 illuminated for the visit of T.R.H. The Duke and Duchess of York RSC120 PCC 1041 in strife on it’s maiden day in service. Trams on route 88 delayed in Queens Parade Clifton Hill RSC121 Bendigo birney in Finn St near North Bendigo terminus RSC122 SW6 in St Kilda Rd at Domain Rd at night RSC123 All 3 of Alf Twentyman’s cable cars in his Northcote backyard RSC124 Cable trailer 256 being unloaded into the shed at Bylands RSC125 Cable grip car 1 being removed from the Melbourne Museum RSC126 Alf Twentyman's cable cars in his Northcote Backyard RSC127 Alf Twentyman's cable cars in his Northcote Backyard RSC128 Alf Twentyman's cable cars in his Northcote Backyard RSC129 Alf Twentyman's cable cars in his Northcote Backyard RSC130 W class car in Swanston St at Collins St RSC131 Y1 469, L & W3 on the run out of Glenhuntly Depot on a tour RSC132 W7 1024 as an advertising tram for Bank of NSW at Clifton Hill RSC133 W2 496 on a footy special in Simpson St Sidings RSC134 W2 as originally converted to a test car at Preston Workshops RSC135 W3 667 in Brunswick Depot with Ellen Butland at the controls RSC136 W3 669 on it’s final run at Victoria Prd & Brunswick St RSC137 W2 571 in Wellington Prd at Clarendon St with a Footy Final load of Passengers RSC138 Y1 613 shunts at Spencer St Terminus as X217 waits on Australia Day Pageant RSC139 PCC 1041 on Rt 96 in Burke St outside the Southern Cross Hotel RSC140 890 with accident damage on the outside roads at Preston Workshops c1978 RSC141 535 on Rt 4 at the old St Kilda Jun c1967 RSC142 1041 on Rt 88 turns from Bourke St into Spring St 1973 RSC143 102 on a tour at Albert Park Beach Terminus Feb 1972 RSC144 833, 835 & 834 in the shed at Malvern Depot c1976 RSC145 281 in Wellington Parade on a football very crowded special c1974 RSC146 464 Ballarat Rd 1960 RSC147 181 Explosives Fty - at Footscray Station - July 1960 RSC148 181 Williamstown Road 1960 RSC149 Cable car set at Alf Twentyman’s c1970 RSC150 X 217 at Malvern Depot c1970 RSC151 X1 465 and T181 Footscray Football ground in Barkly St. c1960 RSC152 Scrubber 5 at South Melbourne depot c1960 RSC153 X1 465 Footscray to Russell St, c1960 RSC154 X1 467 Leeds St Footscray 1960 RSC155 PMTT 4 Glenferrie Road, 1910 RSC156 S 164 at Malvern Depot c1970 RSC157 T178 Footscray c1960 RSC158 Cleaner No. 7 at South Melbourne depot c1960 RSC159 Two Y classes at Princes Bridge / Batman Ave mid 1950s RSC160 Swanston St – Nu color vue slide – M142 Demonstrates the work of Ron Scholten in photography, collection and/or production of duplicate slidesAssembled album in a black presentation folder of 160 colour slides, 8 slide sleeves, collected or produced by Ron Scholten. Many are TMSV or Windsor Publications slides. All photographs have been scanned and placed on the Museum's G drive. A list of all photographs with details has been compiled. melbourne, tramways, trams, cable trams -
 Melbourne Tram Museum
Album - David Frost Slide Collection, David Frost
Photo - see pdf file for further information. Number Brief Description date DFC1 A general view from the former railway platform at Port Melb Station looking towards Station Pier on opening day 20-12-1987 DFC2 A2 285 in the Tramway Platform at Port Melbourne Station on opening Day 20-12-1987 DFC3 A2 285 in the Tramway Platform at Port Melbourne Station on opening Day 20-12-1987 DFC4 A2 285 in the Tramway Platform at Port Melbourne Station on opening Day 20-12-1987 DFC5 A2 273 at St Kilda Tramway Station on opening day 22-11-1987 DFC6 A2 273 turning from Fitzroy St into St Kilda Tramway Station on opening day 22-11-1987 DFC7 B1 2001 at St Kilda Tramway Station turning into Fitzroy St on opening day 22-11-1987 DFC8 B1 2002 enters St Kilda Tramway Station on opening day 22-11-1987 DFC9 An A2 approaches St Kilda Tramway Station on opening day 22-11-1987 DFC10 Concreting the connecting curve from Fitroy St into St Kilda Station c July 1987 DFC11 An MTA AEC MKVI bus in Grey St St Kilda at Dalgety St with Tramway works in the background c July 1987 DFC12 Grey St St Kilda at Dalgety St with Tramway works in the background in Fitzroy St c July 1987 DFC13 Concreting the connecting curve from Fitroy St into St Kilda Station c July 1987 DFC14 Restaurant Tram 442 in Fitzroy St at Grey St Passing MTA bus 59 outside St Kilda Station c1986 DFC15 Former VR tram stop sign painted on a pole at Glenhuntly Rd & Broadway DFC16 Former VR Elwood Tram Depot under demolition 1996 DFC17 Former VR Elwood Tram Depot under demolition 1996 DFC18 Former VR Elwood Tram Depot under demolition 1996 DFC19 Former VR Elwood Tram Depot under demolition 1996 DFC20 Former VR Elwood Tram Depot under demolition 1996 DFC21 Former VR Elwood Tram Depot under demolition 1996 DFC22 Former VR Elwood Tram Depot under demolition 1996 DFC23 Former VR Elwood Tram Depot under demolition 1996 DFC24 MTS Tower waggon in use at the former VR Elwood Tram Depot under demolition 1996 DFC25 A Sign advertising the sale of the Former VR Elwood Tram Depot – 10/8/1996 1996 DFC26 Former VR Elwood Tram Depot under demolition 1996 DFC27 Interior of a shed at the former VR Elwood Tram Depot under demolition 1996 DFC28 Former VR Elwood Tram Depot under demolition 1996 DFC29 Former VR Elwood Tram Depot under demolition 1996 DFC30 Former VR Elwood Tram Depot under demolition 1996 DFC31 VR 20, former breakdown car in Bob Prentice’s Back Yard Jan 1974 DFC32 VR 20 on a low loader en route to Bob Prentice’s for preservation 1959 DFC33 VR 20 as the breakdown car on the St Kilda Electric Street Railway c1955 DFC34 VR 39 waits in St Kilda St as breakdown car 20 enters Elwood Depot c1955 DFC35 VR 54 and 50 in the rear yard of Elwood Depot c1958 DFC36 VR 50 in the rear yard of Elwood Depot c1958 DFC37 VR 50 in the rear yard of Elwood Depot c1958 DFC38 VR 28 in St Kilda St outside Elwood depot after the line had been cut back to this point c1958 DFC39 VR 29 in St Kilda St outside Elwood depot after the line had been cut back to this point c1958 DFC40 VR 35 passes 28 on the St Kilda Electric Street Railway c1955 DFC41 VR 39 on the St Kilda Electric Street Railway c1955 DFC42 Y1 613 on a tour c1970 DFC43 VR 54 in St Kilda St outside Elwood Depot c1955 DFC44 VR 28 at Brighton Beach Terminus c1955 DFC45 VR 33 being washed in the wash bay at the rear of Elwood Depot c1955 DFC46 VR 20 breakdown car running into Elwood Depot c1955 DFC47 VR 3 in the rear yard at Elwood Depot c1955 DFC48 VR 51 on an AETA Tour running out of Elwood Depot c1958 DFC49 VR 28 on the St Kilda Electric Street Railway c1955 DFC50 VR 28 with crew in St Kilda St outside Elwood depot after the line had been cut back to this point 1959 DFC51 VR 52 in Grey St near Fitzroy St c1958 DFC52 VR 51 on a AETA Tour passes 33 in Grey St near Fitzroy St c1958 DFC53 VR 29 in Grey St near Fitzroy St c1958 DFC54 VR51 on an AETA Tour shunts as 52 waits on the St Kilda Electric Street Railway c1958 DFC55 VR 51 on the Black Rock Electric Street Railway c1955 DFC56 VR 28 in St Kilda St outside Elwood depot after the line had been cut back to this point c1958 DFC57 Combined Rail-Tram Tickets of the Black Rock Electric Street Railway Feb 1975 DFC58 Combined Rail-Tram Tickets of the St Kilda Electric Street Railway Feb 1975 DFC59 Electric Street Railway & Motor Coach Paper Tear off Tickets Feb 1975 DFC60 VR 52 & 53 on Rt 82 pass in Cordite Ave near Wests Rd Sept 1975 DFC61 Z 68 & 52 in East Preston Depot in M&MTB Livery c1977 DFC62 Copy photo of VR 18 in Elwood Depot c1910 DFC63 VR 51 as a one man car at Black Rock Terminus c1955 DFC64 VR 53 on Rt 82 in Droop St Footscray Jan 1974 DFC65 B2 2027 on Rt 96 in South Melb Station c1988 DFC66 VR 20 as preserved in Bob Prentice’s backyard High St Prahran Jan 1974 DFC67 VR 700 on Rt 82 in Droop St Footsray c1978 DFC68 VR 28 as the last car from ST Kilda Station 28-2-1959 DFC69 VR 700 at the Rt 82 Moonee Ponds Terminus c1978 DFC70 VR 52 waiting time at the Rt 82 Footscray Terminus, the driver intently stares at the bundy clock as the Braid and the Connie gossip Jul 1972 DFC71 VR 54 shunting outside Elwood Depot to return to St Kilda Station 1959 DFC72 SW6 969 in MTA Livery blocking the entrance to South Melb Depot presumably during the scratch ticket dispute Jan 1990 DFC73 VR 52 & 53 on Rt 82 pass in Droop St Footscray Sept 1975 DFC74 VR 700 after withdrawl in the Newport Railway museum in the process of a repaint c1985 DFC75 VR 700 after withdrawl in the Newport Railway museum in the process of a repaint c1985 DFC76 VR 700 on Rt 82 in Droop St Footsray at The Cresent c1978 DFC77 VR 700 on Rt 82 in Droop St Footsray c1978 DFC78 Former VR tram depot in use as an MTA Bus depot c1990 DFC79 VR 52 waiting time at the Rt 82 Footscray Terminus Jul 1972 DFC80 VR 52 waiting time at the Rt 82 Footscray Terminus with Connie changing the pole Jul 1972 DFC81 VR 52 at the Rt 82 Moonee Ponds Terminus with the crew chatting 7-12-1974 DFC82 VR 52 on Rt 82 on the reserved track in Raleigh Rd Ascot Vale Jan 1974 DFC83 VR 53 on Rt 82 in Leeds St Footscray about to turn into Hopkins St April 1976 DFC84 VR 53 on Rt 82 in Droop St Footsray Jan 1974 DFC85 VR 700 on Rt 82 in Droop St Footsray at Hopkins St c1978 DFC86 Z 52 in MTA livery on Rt 19 in Elizabeth St near Bourke St c1985 DFC87 VR 52 at the Rt 82 Moonee Ponds Terminus Jul 1972 DFC88 VR 53 at the Rt 82 Footscray Terminus Jan 1974 DFC89 VR 52 freshly outshopped from the workshops and W7 1011 at the Bourke St Terminus with 52 on display for the 1968 railway exhibition 1968 DFC90 Painting of W class 369 in Chocolate & Cream c1930 DFC91 Charing Cross, Bendigo at night c1965 DFC92 Ballarat ? c1965 DFC93 Bendigo 18 on an AETA tour in McCrae St near Tramway Ave c1965 DFC94 View from the roof of a tram in the body shop at Preston Workshops 1977 DFC95 View from the roof of a tram in the body shop at Preston Workshops 1977 DFC96 View from the roof of a tram in the body shop at Preston Workshops showing the panto on 546 1977 DFC97 Interior view of Carlton Control Centre showing desk and wall panel c1968 DFC98 W2 493 on Rt 55 in Kingsway outside South Melb Depot Aug 1973 DFC99 W2 496 in Sturt St at Kingsway on Rt 1 Jul 1973 DFC100 Z class truck c1975 DFC101 Z3 116 in Bourke St at King St as new c1979 DFC102 Bob Prentice on tour c1968 DFC103 SW6 900 as an advertising tram for Newsday at night 1969 DFC104 597 Jul 1973 DFC105 W2 480 on Rt 3 passing under the railway bridge at Caulfield Oct 1972 DFC106 Interior view of Carlton Control Centre showing desk c1968 DFC107 SW6 856 on Rt 77 at night Jul 1973 DFC108 W2 496 in Sturt St at Kingsway on Rt 1 Jul 1973 DFC109 PCC 980 on a tour at South Melb Depot c1968 DFC110 SW6 856 on Rt 77 at night Jul 1973 DFC111 View from the roof of a tram in the body shop at Preston Workshops showing the panto on 546 1977 DFC112 Dandenong Rd from Chapel St Nov 1968 DFC113 A Z class car turns from Gertrude into Nicholson St c1990 DFC114 SW6 900 as an advertising tram for Newsday at night 1969 DFC115 Port Melbourne Station showing Centennial bridge and station building prior to closure. 10-1987 DFC116 Port Melbourne station with train prior to closure, looking south 10-1987 Demonstrates the work of David Frost in photography and or collecting slides.Assembled album in a black presentation folder of 116 colour slides, 6 slide sleeves, collected or photographed by David Frost. Many are TMSV or Windsor Publications slides. All photographs have been scanned and placed on the Museum's G drive. A list of all photographs with details has been compiled. melbourne, tramways, trams, vr trams, elwood, st kilda light rail, port melbourne, opening, elwood depot, buses -
 Melbourne Tram Museum
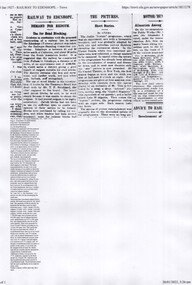
Newspaper, The Argus, "Railway to Edenhope, Demand for Redgum, use for Road Blocking", 20-1-1927
Provides information on the cost of wood blocking tram tracks in Melbourne with wood blocks - Red gum and Jarrah - part of a Parliamentary enquiry into the construction of a railway to Edenhope. The line was authorised but not built.Yields information about the cost of wood blocks for use in tram tracks.Extract via Trove - 3A4 sheets when printed - Railway to Edenhope, Demand for Redgum, use for Road Blocking" - The Argus 20-1-1927tramways, tram tracks, wood blocks, parliament, edenhope, new railways -
 Melbourne Tram Museum
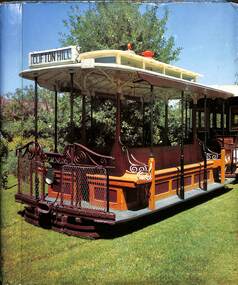
Album - Compiled by David Frost - VR trams etc, David Frost, 2005
Page 1 - postcards and notes on the Alf Twentyman's preserved cars. 2 - VR tram 41 at Bendigo 2001 and two VR tram tickets 3 - VR 41 at Sandringham station - night photo 4 & 5 - VR 41 at Bendigo 6 & 7 - VR 41 at Bendigo 8 & 9 - photo copies of VR railway - tram tickets 10 - 11 - photo copies of VR railway - tram tickets and photo of VR 41 at North Bendigo. 12 - Photo of David Frost selling a ticket to David Vendy, Mayor of Ballarat at the time - July 2002 13 & 14 Two Melbourne tram postcards and tram tickets 15 - 18 - Four Peter Gerasimon greeting cards featuring Melbourne trams, 19 - Ballarat tramway postcard and cable saloon trailer 171 being loaded for Portland - July 2002. 20 - three photos of David Frost at Bylands rear cover - photos of VR 41 and VR 53 at Bendigo.Illustrates the work of David Frost and his interest in VR trams.Photo Album - 10 heavy card sheets with plastic sheets over each, white plastic ring bound, covered with a large photograph of Alf Twentyman's cable cars at Northcote. See 3086 for an unused version.cable cars, vr trams, alf twentyman, david frost, vr 41, bendigo, tickets, postcards, peter gerasimon, trams, tramways -
 Melbourne Tram Museum
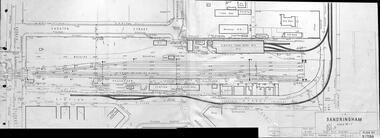
Drawing, "Possible railway extensions from Sandringham"
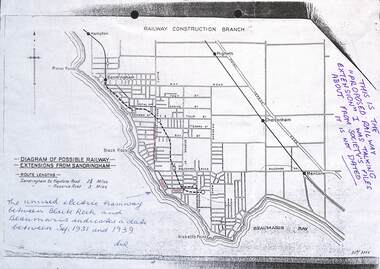
Drawing, photocopied from the Sandringham and District Historical Society's files showing possible route and station locations of an extension from the Sandringham station. Prepared by the Railway Construction Branch of the Victorian Railways. Shows the tram lines. Possibly late 1930s.Yields information about a possible extension of the Sandringham railway line to Beaumaris.Drawing - photocopied with hand written notes - A4 sheetExtensive notes in ink.trams, railways, sandringham, beaumaris, new railways, railway construction branch -
 Melbourne Tram Museum
Magazine - Colour photocopy, Geoffrey Skelsey, "The MMTB's 'VR' trams", June 2009
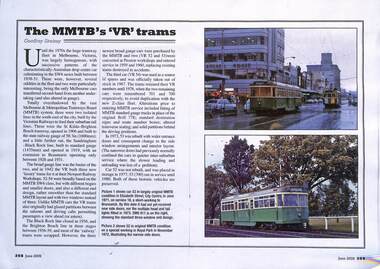
Colour photocopy of an article by Geoffrey Skelsey providing a short history of the two VR tram lines, and the construction of the luxury trams, Nos. 52 to 54. Covers the use of the first two on the MMTB system and their operational history.Provides details of VR luxury trams in a UK based magazine,Photocopy of an article from the June 2009 issue of Tramway Review - two A4 sheets.trams, railways, vr trams, tram 52, tram 53, tram 54, mmtb, tramways, lrta -
 Melbourne Tram Museum
Document - Report and Drawing, Victorian Railways (VR), "Electric Street car tyres", 1-10-1948
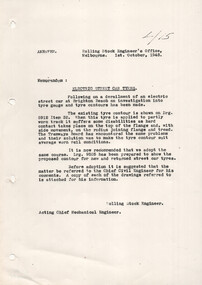
Report photocopied from VR Engineering files titled "Electric Street car tyres" detailing issues with worn track and tram tyres resulting in derailments. Notes after discussions with the MMTB, changed the profile to suit average worn rail conditions. The attached drawing does not seem to relate to the report as different drawing numbers given. For Melbourne tyres - see drawings R6320 and R12-279.Yields information about issues with tramcar wheels.Report - photocopied - two A4 sheets of paper.trams, railways, vr trams, wheels, wheel profiles, tyres, derailments -
 Melbourne Tram Museum
Document - Report, Victorian Railways (VR), "Operating and Maintenance costs - St Kilda Brighton and Sandringham - Black Rock", 1939
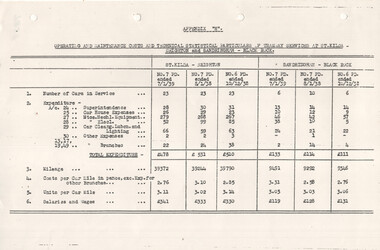
Single sheet copied from a larger report - Appendix H title "Operating and Maintenance costs - St Kilda Brighton and Sandringham - Black Rock" giving details of the number of cars in service, expenditure maintenance, mileage, costs, salaries and wages for 1938/1939 for three reporting periods.Yields information about VR tramway operating costs 1939Report - photocopied - single A4 sheettrams, railways, vr trams, costs, maintenance, sandingham, black rock tramway, st kilda brighton electric tramway -
 Melbourne Tram Museum
Drawing, Victorian Railways (VR), "Sandringham" - Plan No. R17384, July 1940
... Melbourne Tram Museum 8 Wallen Road Hawthorn melbourne ...Drawing - Victorian Railways R17384 showing Sandringham Railway station yard, facilities, tram depot, tram tracks, railway tracks, buildings, drains, poles, adjacent streets and buildings. Dated July 1940. The tram tracks have been inked in on the print.Yields information about issues Sandringham depot and its tram tracks.Drawing - photocopy of original- two parts joined in the centre by adhesive tape.trams, railways, vr trams, sandringham, tram tracks, depot, sandringham depot -
 Melbourne Tram Museum
Document - Report, "Power supply for Victorian Railways Electric Street Railways"
Report details the history of the power supply for the Victorian Railways, electric street railways or tramways. Looks at the costs, equipment purchased, operation, and construction. Compiled from original VR documents, with photos. Includes the Elwood depot fire of 1907, Covers the provision of power for Sandringham tramway. Has drawings of the main switchboard layouts, the crossing of the St Kilda - Brighton tramway by the MMTB tramways. Author unknown.Yields information about the provision of the power supply for VR Trams.Report 50 x A4 pages - photocopied from an original document. trams, railways, vr trams, sandringham, st kilda brighton electric tramway, power supply, elwood depot, elwood substation, substations -
 Melbourne Tram Museum
Document - Report, David Frost, Sale of 33 Fifth St Black Rock - tram shed
Documents related to the sale of 33 Fifth Street Black Rock, including two colour photocopies with the external and internal views of a shed said to be a former tram shed associated with the Sandringham to Black Rock horse tram line. Includes the City of Bayside heritage report and Hocking Stuart sales sheets for an auction on Saturday 4 August 2007. It would appear from Google Earth that all buildings were demolished.Yields information about the sale of a property said to be associated with the Black Rock tramway.Four A4 sheets - two colour and one colour sheet providing auction details.trams, railways, vr trams, sandringham, black rock tramway, sale of land, 33 fifth st black rock -
 Melbourne Tram Museum
Album - Public Transport Tickets, David Frost
Tickets collected by the donor contains: Sheet 1 - Victorian Railways combined rail / tram St Kilda Brighton line 2 - ditto - most used with part tickets 3 - mainly rail and bus 4 - rail and bus 5 - ditto with some rail only 6 - ditto - with tickets torn in half 7 - rail and bus weekly 8 - Single and return tickets for Sandringham to Black Rock 9 - ditto with tickets torn to cancel them 10 - various rail tickets - mixed including some country and weekly tickets 11 - combined train and bus tickets post 1956 12 - Mixed railway tickets - including first and second class suburban 13 - General railway tickets 14 - Rail tickets just prior to Neighbourhood tickets. 15 - ditto with some NSW tickets 16 - MMTB Section tickets and others systems. 17 - Miscellaneous tickets 18 - Miscellaneous tourist operator tickets 19 - ditto 20 - Train world examples 21 - Metcards 22 - Metcards 23 - Metcards - printed for events etc. 24 - Metcards 25 - Frankston line Connex timetable, V/Line ticket folder and Ganga phone card. Yields information about the Victorian Railways rail and tram ticketing systems.Album - red plastic cover two ring spring binder, with gold block "Swap Card Album" - with a $14.50 price label in the top right hand corner. Contains 25 used or partly used card plastic sleeves and four unused sleves. tickets, st kilda brighton electric tramway, victorian railways, metcard, sandringham to black rock, buses, vr, railways, tramways, mmtb, train world -
 Melbourne Tram Museum
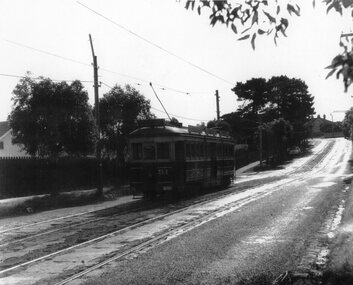
Photograph - VR tram 51 Fernhill Road Sandringham, 13-5-1956
Photo shows 51 in Fernhill Road on the Sandringham to Black Rock tramway that was operated by the Victorian Railways . The tram line closed on 5-11-1956Yields information the Sandringham to Black Rock tramway.Photograph - Black and White, printed on an A4 sheet.At one end of the print " #219 7540 No. 51 grinds up Fernhill Road 13-5-1956"trams, tramways, bay road, sandringham, black rock, vr trams, fernhill road, tram 51 -
 Melbourne Tram Museum
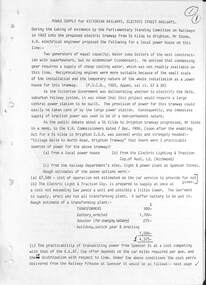
Document, Bruce McLaren, "ARE Day Tour - St Kilda to Brighton Beach", June 2006
Tour notes compiled for "ARE Day Tour - St Kilda to Brighton Beach" - 3-6-2006 by Bruce McLaren. Compiled from various sources such as Destination City 5th edition, VR annual reports, VR to 62, Memories of the Railway Trams by Jim Seletto, Tram Tracks - AETA, the Brighton Electric Line by L Marshall-Wood, Bradshaws Guide and Yarra trams 2006 pamphlets.Yields information about the St Kilda Brighton Electric tramway for a tour.Tour notes - approx 60 A4 sheets double side within an Esselte green binder. Has a railfan shop $17.95 price label on the top right hand corner.vr trams, are, tour notes, bruce mclaren, st kilda brighton electric tramway -
 Melbourne Tram Museum
Book, Victorian and Melbourne Centenary Celebrations Council, "The Official Centenary Guide and Souvenir", 1934
Produced by the Victorian and Melbourne Centenary Celebrations 1934-1935. An extensive four month event was planned. Includes a short section of the history of Victoria and Melbourne, Education, Religious Activities, Public Utilities, Primary production, places of interest, Instructions, Pleasure Resorts and Sporting. The Utilities included the Victorian Railways, MMTB, Police, Melbourne Harbour Trust and the SEC. Includes many advertisements for car dealers, manufacturers, insurance and hotels.Yields information about the Melbourne Centenary Celebrations in 1934.Book - 222 pages - 7 sections, glued cover with many black and white photos and advertisements.Has pencil marks on the front and inside front cover and in marks on the outside rear cover.victoria, centenary celebrations, melbourne, mmtb, vr, secv, harbour trust -
 Melbourne Tram Museum
Photograph - Scrubber 11 W on Bundoora line, Ray Marsh, 29-9-1998
Colour print of Scrubber tram 11W in Plenty Road Bundoora after passing under the Western Ring Road overpass. Tram is a former Sydney scrubber tram and is now located at the Sydney Tramway Museum.Yields information about scrubber tram 11WColour print on Kodak Royal paper, with price lable and details hand written on rear along with the stamp of "Railway Tramway Photography"."11 W Bundoora 29-8-1998" and source stamp on rear.tramways, trams, scrubber 11w, tram 11w, plenty road, bundoora -
 Melbourne Tram Museum
Photograph - VR 53 being transported to Bendigo, Rodney Hudson, Feb. 2006
Colour photo of Victorian Railways No. 53, later MMTB 53 and renumbered to VR 700 during 1975/76 on a L. Arthur semitrailer being transported to Bendigo for refurbishment. The tram was donated to the ARHS Museum in Newport in September 1980. The L. Arthur building is in the background. Yields information the history of VR 53.Full colour photo with Rodney Hudson and image number printed on the rear by the photo printer. Printed on Fuji papertramways, trams, vr class, vr trams, tram 53, l. arthur, transporting trams -
 Melbourne Tram Museum
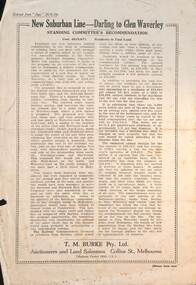
Pamphlet - Real estate sale, T M Burke, "New Suburban line - Darling to Glen Waverley", July 1926
Pamphlet advising potential land purchasers of the recommendation to extend the railway line from Darling to Glen Waverley, extracted from The Age 26/6/1926. Advises that the land and losses would be paid for by the residents through their rates. Gives costs of the proposed new line. Has a plan showing the estates for sale along the line, the Ashburton line (later extended to Alamein) and Burwood Road. Published by T M Burke Pty Ltd. Demonstrates the style of land sale pamphlet including the proposed availability of train services to prospective purchasers.Pamphlet - single quarto sheet with map on rear - printed.sale of land, real estate, railways, glen waverley, suburban railways -
 Melbourne Tram Museum
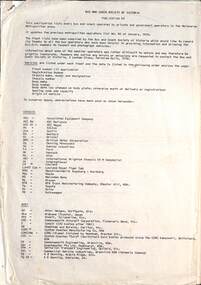
Document - List of Melbourne Buses, Bus and Coach Society of Victoria (BCSV), "Publication M3", August 1982
Provides a detailed list of buses operated in Melbourne by both the MMTB and the Victorian railways and the many private operators at the time. Details the chassis, body builders, operator, depot, fleet number, registration, body date, seating code, seating capacity and bus ownership history. Provides a publication date of of August 1982 on page 3. Yields extensive information about Melbourne's suburban bus fleet in 1982 with details of the Government and Privately owned fleet.Duplicated document - originally a 55 page A4 document - missing page 54 and covers. Page 55 loose. mmtb, buses, melbourne, route numbers, lists, fleet list, victorian railways, vr buses, bcsv -
 Melbourne Tram Museum
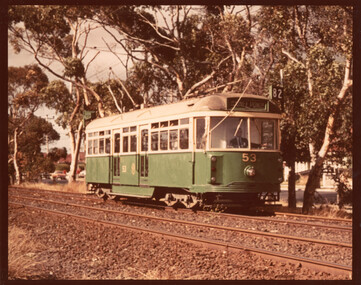
Photograph - VR class tram 53 River St Maribyrnong, c1975
Photograph of Victorian Railways built tram No. 53 which was sold to the MMTB following closure of the St Kilda - Brighton Beach line in 1959. Modified by the MMTB, as VR class tram No. 53 and generally used on the Moonee Ponds to Footscray route 82. This photo shows the tram in River St after being fitted with tail lights in Feb. 1973 and before being renumbered to tram 700 in Oct. 1976Yields information about VR class tram 53Colour print on Kodak paper with black borders. trams, tramways, river st, route 82, vr class, tram 53 -
 Melbourne Tram Museum
Photograph - Set of 12 - construction of King St overpass in Flinders St, 1959
Photos show the construction of King St overpass in Flinders St which was part of the project to construct a bridge over the Yarra River and provide a new southern outlet road between the city and eventually St Kilda Junction. The overpass construction was commenced in 1959 with tramway works first commencing. It was demolished in 2005. 1 - looking west at Market St. 2 - looking east from Spencer and Flinders St with the railway viaduct behind. 3 - Tram lines diverted onto the new overpass. Note the hand-powered overhead tower on the left behind the compressor. 4 - Tracks partially diverted. 5 - Looking east at Spencer and Flinders St with a Dunlop tyre truck in the view. 6 - prior to the diversion onto the new bridge. 7 - Looking east near William St. with W2 451 (Route 48, North Balwyn) in the view. 8 - Bridge works near King St. Original tracks still in use. 9 - Looking east prior to the introduction of the temporary tracks on the south side of the new overpass. 10 - SW6 852 and a W2 on new overpass trackwork - old trackwork being demolished. 11 - Cross over at Spencer St in Flinders St, prior to change over. 12 - Looking west at Flinders and Spencer St with SW6 853 turning into Spencer St.Yields information about the construction of the King St overpass in Flinders St during 1959.Set of 12 black and white prints of the construction of the King St overpass in Flinders St.trams, tramways, flinders st, king st overpass, construction, bridges, w2 class, sw6 class, tram 451, tram 853, tram 852 -
 Kew Historical Society Inc
Article, The New Electric Tramway, Malvern to Kew
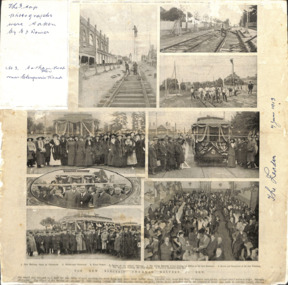
One of a group of photographs, including three within a published photo collage , taken by Edgar James Dower in the second decade of the twentieth century. Born and raised in Olinda, Dower later moved to Surrey Hills. He worked as an adult as a clerk in the city office of the Metropolitan Gas Company, and in his role as a 'collector', he was able to photograph scenes including the construction of tramlines, railways and associated buildings in Kew, Hawthorn, Camberwell and Surrey Hills. Later he established a real estate agency with his brother - the E.J. Dower Real Estate Agency, Mount Dandenong Office.The photo collage is an historically significant record of the development of transport infrastructure which was used to connect Victorians in the first two decades of the twentieth century. This development resulted from increases in population and the consequent extension of Melbourne's suburbs. The photographs, both individually and collectively, richly detail the labour of workers and the tools and machinery used to create and extend Melbourne's public transport network in the years preceding and during World War 1.Photo collage, published in The Leader newspaper in 1913, to commemorate the opening of the Malvern to Kew Tramway. The numbered photos are: 1. Kew Railway Gates at Glenferrie. 2. Burke Road Terminus. 3. Final Stages. 4. Ladies at the Official Opening. 5. The Acting Mayoress of Kew Cutting the Ribbon at the Kew Boundary. 6. Mayor and Councillors at the Kew Terminus. 7. The Cutting the First Ribbon. 8. Guests at the Hawthorn Town Hall.Inscribed in ink by Edgar J Dower top left: "The 3 top photographs were taken by E J Dower. No.3 Cotham Road Kew near Glenferrie Road"theme -- connecting victorians by transport and communications, theme -- travelling by tram -
 Flagstaff Hill Maritime Museum and Village
Horse Brass
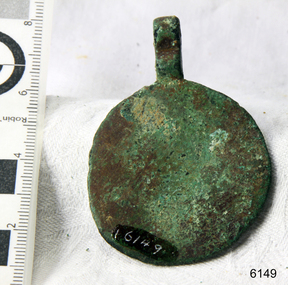
When the ship Schomberg was launched in 1855, she was considered the most perfect clipper ship ever to be built. James Blaine’s Black Ball Line had commissioned her to be built for their fleet of passenger liners. At a cost of £43,103, the Aberdeen builders designed her to sail faster than the quick clippers designed by North American Donald McKay. She was a three masted wooden clipper ship, built with diagonal planking of British oat with layers of Scottish larch. This luxury vessel was designed to transport emigrants to Melbourne in superior comfort. She had ventilation ducts to provide air to the lower decks and a dining saloon, smoking room, library and bathrooms for the first class passengers. At the launch of Schomberg’s maiden voyage, her master Captain ‘Bully’ Forbes, drunkenly predicted that he would make the journey between Liverpool and Melbourne in 60 days. Schomberg departed Liverpool on 6 October 1855 with 430 passengers and 3000 tons cargo including iron rails and equipment intended the build the Geelong Railway and a bridge over the Yarra from Melbourne to Hawthorn. The winds were poor as Schomberg sailed across the equator, slowing her journey considerably. She was 78 days out of Liverpool when she ran aground on a sand-spit near Peterborough, Victoria, on 27 December; the sand spit and the currents were not marked on Forbes’s map. Overnight, the crew launched a lifeboat to find a safe place to land the ship’s passengers. The scouting party returned to Schomberg and advised Forbes that it was best to wait until morning because the rough seas could easily overturn the small lifeboats. The ship’s Chief Officer spotted SS Queen at dawn and signalled the steamer. The master of the SS Queen approached the stranded vessel and all of Schomberg’s passengers were able to disembark safely. The Black Ball Line’s Melbourne agent sent a steamer to retrieve the passengers’ baggage from the Schomberg. Other steamers helped unload her cargo until the weather changed and prevented the salvage teams from accessing the ship. Local merchants Manifold & Bostock bought the wreck and cargo, but did not attempt to salvage the cargo still on board the ship. They eventually sold it on to a Melbourne businessman and two seafarers. After two of the men drowned when they tried to reach Schomberg, salvage efforts were abandoned.32 In 1975, divers from Flagstaff Hill, including Peter Ronald, found an ornate communion set at the wreck. The set comprised a jug, two chalices, a plate and a lid. The lid did not fit any of the other objects and in 1978 a piece of the lid broke off, revealing a glint of gold. As museum staff carefully examined the lid and removed marine growth, they found a diamond ring, which is currently on display in the Great Circle Gallery.33 Flagstaff Hill also holds ship fittings and equipment, personal effects, a lithograph, tickets and photograph from the Schomberg. Most of the artefacts were salvaged from the wreck by Peter Ronald, former director of Flagstaff Hill. The Schomberg, which is on the Victorian Heritage Register (VHR S612), has great historical significance as a rare example of a large, fast clipper ship on the England to Australia run, carrying emigrants at the time of the Victorian gold rush. She represents the technical advances made to break sailing records between Europe and Australia. Flagstaff Hill’s collection of artefacts from the Schomberg is significant for its association with the shipwreck. The collection is primarily significant because of the relationship between the objects, as together they have a high potential to interpret the story of the Schomberg. It is archaeologically significant as the remains of an international passenger Ship. It is historically significant for representing aspects of Victoria’s shipping history and for its association with the shipwreck and the ship, which was designed to be fastest and most luxurious of its day Small brass horse harness disc 1½" in diameter. Slight verdigris and encrustation. Recovered from the wreck of the Schombergwarrnambool, shipwrecked-coast, flagstaff-hill, flagstaff-hill-maritime-museum, maritime-museum, shipwreck-coast, flagstaff-hill-maritime-village, schomberg, shipwrecked-artefact, clipper ship, black ball line, 1855 shipwreck, aberdeen clipper ship, captain forbes, peterborough shipwreck, ss queen, horse harness, horse brass -
 Melbourne Tram Museum
Photograph - Colour Photograph/s, c1980's
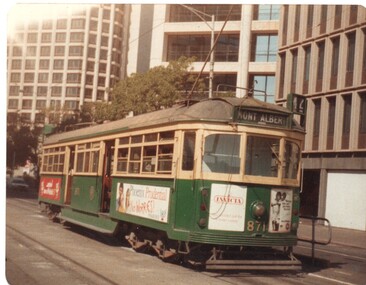
Colour photograph print with rounded corners of SW6 class tram No. 871 at the Collins Street terminus, early 1980's. Tram has the destination of Mont Albert, route 42. Advertisements for Invicta, Prudential Insurance and others. In the background is Transport House, the railway head office at the time. Photographer unknown. Printed on Kodak Paper.trams, tramways, collins st, tram 871, sw6 class, route 42 -
 Melbourne Tram Museum
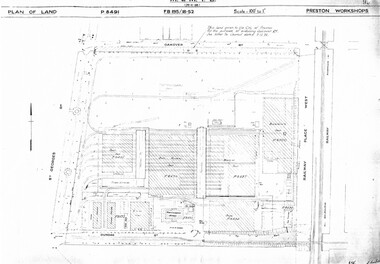
Drawing, Melbourne & Metropolitan Tramways Board (MMTB), "Preston Workshops", c1938
Set of nine photocopied plans or drawings on A3 sheets of the "Preston Workshops" - c1939 .1 - P8491 - Plan of land showing layout and associated drawings including Reservoir railway line - 19-4-1939. .2 - P8492 - Plan of Timber stacks and Hall - 3-2-1939 .3 - P8493 - Plan of Offices and location of sub-station - 13-12-1938 .4 - P8494 - Plan of Store including Oil store - c1939. .5 - P8495 - Plan of Paint Shop and relationship to timber stack - 1-3-1939 .6 - P8496 - Plan of Car building and Repairs shop - 6-12-1938 .7 - P8497 - Plan of machine shop - 10-12-1938 .8 - P8500 - Plan of Blacksmiths shop - 1-12-1938 .9 - P8590 - Plan of Substation - 1-12-1938trams, tramways, drawings, depots, property, preston workshops, workshops, substation