Showing 2884 items
matching ww1 and ww2
-
 City of Moorabbin Historical Society (Operating the Box Cottage Museum)
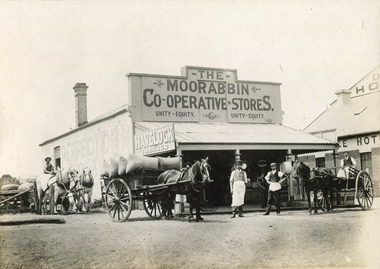
Photograph - Photograph, 1906 The Moorabbin Co-Operative Stores, 1906
1906: The Moorabbin Co-Operative Stores. Located on the Nepean Road, Cheltenham, (before 1st WW). . There are four men outside the Store and a 3 horse carriage. Two of the men are sitting on their carriages, one to the left and the other on the right of the photograph. The third horse and carriage is right beside the left of the store, carrying eight large sacks. Towards the side of the Moorabbin Stores there is a building located to right which is called The Exchange Hotel.1906: The Moorabbin Co-Operative Stores. Located on the Nepean Road, Cheltenham, (before 1st WW). The Leader Newspaper office occupied the site. The Exchange Hotel is to the right.Photograph is black and white. 1906: The Moorabbin Co-Operative Stores. Located on the Nepean Road, Cheltenham, (before 1st WW). The Leader Newspaper office occupied the site. The Exchange Hotel is to the right.Stamped on back :City of Moorabbin Historical Society Written on Front of mount : 1906moorabbin, stores, horses, men, ww1, world war 1, tobacco, nepean road, co-operative, cheltenham -
 Casterton RSL Sub Branch
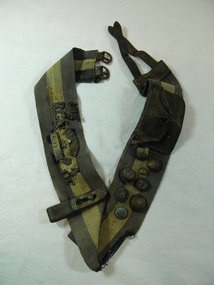
Belt, 1914 - 1918
The inclusion of 2 Turkish buttons and the possibility of the belt itself being Turkish seems to indicate that the belt was obtained at Gallipoli. As some of the other badges and buttons are not of Australian origin, the indication is that they were traded during the owner's service.This item is significant in that it has original badges and buttons from uniforms of WWI. The person to whom this belt belonged obviously served at Gallipoli and returned from active service. brass button bearing the insignia of artillery, 2 brass buttons bearing a crescent and star, 1 bearing the outline of Australia with a crown above, 1 plain copper button and 1 brass button bearing the picture of a hand grenade.Belt: Webbing, 2 metal buckles with 2 leather ends and tongues and a leather pocket stitched 7.5 cm from the tongue end. 29 cm from the buckle end there is what is possibly a leather canteen hook, 2 cm wide, 17 cm long, with a copper escutcheon which hooks over a brass knob . Three stripes, top and bottom stripes blue, middle stripe khaki. Pinned to the buckle end of the belt are 5 copper badges: INF / RGA / / 4 / LH and a small crown and 3 brass badges TYNESIDE / 4 / SCOTTISH. On the tongue end are 2 brass buttons embossed with crowns, 1 world war one, anzac, ww1, gallipoli, badges, buttons, uniform belt, turkish uniform, turkish, british badges, tyneside scottish -
 The Beechworth Burke Museum
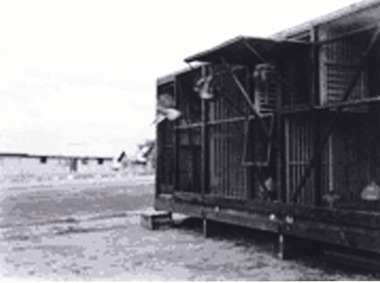
Photograph, 03/05/1944
Taken in 1944 in Bonegilla, Victoria by Captain E.C. Johnston, this photograph depicts soldiers of the 1st Australian Corps Signals training battalion releasing carrier pigeons from a portable loft for their daily exercise.The 1st Australian Corps Signals was a branch of the Australian Imperial Airforce that was active during World War Two. One of the tasked carried out by 1st Australian Corps Signals was to send messages through the use of carrier pigeons. Carrier pigeons were most commonly used by the Allied Forces to send messages from the front line trenches or advancing units. Edgar Charles Johnston (1896-1988) was an aviator and public servant. In WW1 he served with the Australian Imperial Force, and later joined the Royal Flying Corps. For his service in the Royal Flying Corps he was awarded the Distinguished Flying Cross, which assisted him in becoming the assistant director-general in 1939 of the Commonwealth Department of Aviation. During World War II he was heavily engaged in the department’s activities in support of the war effort.Black and white square reproduced photograph on rectangular archival paperObverse: Bonegilla Victoria 1944-05-03/ Carrier Pigeons being released for their daily exercise/ from a portable loft of the 1st Signals training Battalion/ Photograph made 3 May 1944, by E.C. Johnston/ copied from CD Image supplied from/ Australian War Memorial collection/ Copyright/ Use of this image for the/ Robert O'Hara Burke Memorial Museum, Beechworth/ enhanced to remove moir effect/ Reverse: 7993.2/military album, beechworth, burke museum, military, world war 2, ww2, australian army, bonegilla, pigeons, edgar charles johnston -
 The Beechworth Burke Museum
Photograph
Taken during World War I from the forecastle of a navy ship, the photograph depicts an eruption of water and smoke as a result of an underwater submarine being bombed from above.The naval war of World War I was a conflict unlike any previous one with the exception of the brief Russo-Japanese War (1904-1905), with naval warfare in World War I being mainly between the German forces and the Great Britain forces. The naval war of World War I proved largely a disappointment to officials on both sides as it did not produce the decisive fleet actions envisioned in the pre-war years. Nevertheless, the war at sea was a crucial part of World War I overall. The German use of the submarine against commerce not only threatened the Allied war effort, but also drew the United States into the conflict. In addition, the British economic blockade of Germany afforded by the Royal Navy’s command of the sea inflicted great damage on the war effort of Germany. Finally, the naval war held great ramifications for the future since many practices employed in the First World War were those pursued in the Second World War.Black and white rectangular reproduced photograph on matte photographic paperReverse: 6527/ (Crown copyright notice from the Imperial War Museum)/ Naval 23/ 23/ A99/ burke museum, world war 1, world war i, ww1, wwi, submarine, submarine warfare, navy, naval vessels -
 The Beechworth Burke Museum
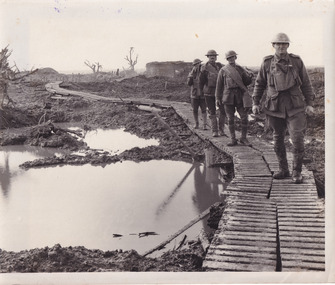
Photograph
Taken during World War I on the Western Front, this photograph depicts four soldiers dressed in full uniform and kit walking through muddy trenches on wooden duckboards.On the Western Front, the war was fought by soldiers in trenches. Trenches were long, narrow ditches dug into the ground where soldiers lived. They were very muddy, uncomfortable and the toilets overflowed. These conditions caused some soldiers to develop medical problems such as trench foot. There were many lines of German trenches on one side and many lines of Allied trenches on the other. In the middle was no man's land, which soldiers crossed to attack the other side. 'Duckboards' (or 'trench gratings') were first used at Ploegsteert Wood, Ypres in December 1914. They were used throughout the First World War being usually placed at the bottom of the trenches to cover the sump-pits, the drainage holes which were made at intervals along one side of the trench. This made it easier to pump out the pits when necessary. The raised edges of the boards in theory helped protect men's feet from accumulated water; walking along them (especially at night and in the wet) was something of an art as it was easy to lose one's footing and slip or trip on the fequently misaligned sections.Sepia rectangular reproduced photograph on matte photographic paperReverse: 6528/ (A copyright and reproduction notice from the Australian War Museum, printed in blue ink)/burke museum, military album, trench warfare, duckboards, soldiers, ww1, wwi, world war 1, world war i, western front -
 The Beechworth Burke Museum
Photograph, c. 1918
Taken in c. 1918, this photograph depicts the ruins of the French village Villers-Bretonneux. In the foreground of the image are rows of shell damaged houses and buildings. In the background of the image stands a tower of the ruined church.On 24 April, Villers-Bretonneux was captured by the Germans as they advanced towards the regional city of Amiens. If they achieved their goal and drove onto the French coast, splitting the British and French armies, the Allied cause might have been lost. The fate of Amiens hung in the balance as two Australian brigades were given the task of retaking Villers-Bretonneux through a swift night-time counter attack. One brigade would assault from the south, while another would attack from the north. The assault began at 10pm on 24 April. The 13th Brigade in the south were held up by German machine guns, before the Australians linked up east of the village. After dawn on 25 April Australian and British troops were involved in fierce fighting to clear the Germans from the village. Some Germans escaped Villers-Bretonneux through nearby woods. Later on the morning of 25 April, three years to the day after the Anzacs landings at Gallipoli, French and Australian flags were raised over Villers-Bretonneux.Black and white rectangular reproduced photograph printed on matte photographic paperReverse: (A copyright and reproduction notice from the Australian War Museum, printed upside-down in blue ink) Church x Ruins/ Villers Bretonneux/ (in pencil) burke museum, world war 1, ww1, wwi, france, australia, villers-bretonneux, ruins, military album -
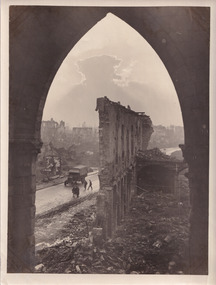 The Beechworth Burke Museum
Photograph, 5 November 1917
Taken on the 5 November 1917 by James Francis Hurley, this photograph depicts the a war damaged Ypres. The shell damaged wall of the Cloth Hall is featured in the centre of the photograph, with an army vehicle and personal are located on the street beneath the ruined wall.First Battle of Ypres, (October 19–November 22, 1914), first of three costly World War I battles centred on the city of Ypres (now Ieper) in western Flanders. Attempted flank attacks by both the Allies and the Germans failed to achieve significant breakthroughs, and both sides settled into the trench warfare that would characterize the remainder of the war on the Western Front.Black and white rectangular reproduced photograph printed on mate photographic paperReverse: 6525/ (A copyright and reproduction notice from the Australian War Museum, printed upside-down in blue ink)military album, burke museum, world war one, world war 1, ww1, ypres, belguim, ruins, first battle of ypres, james francis hurley -
 Montmorency/Eltham RSL Sub Branch
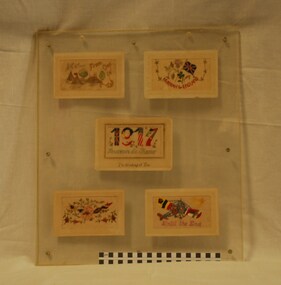
Postcard - Hand Embroidered Postcards, WW1 Hand Embroidered Postcards, 1917
A display of five hand embroidered World War One postcards mounted on a board and protected by glass. Multi-coloured lettering on a white background. From One in Camp, Harrah for England, 1917 Souvenir de France - I'm Thinking of You Until the End.embroidery, 1917, postcards, souvenirs, first world war -
 Montmorency/Eltham RSL Sub Branch
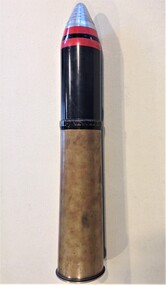
British 18 Pounder WW1 Artillery Round, 1916
The Ordnance QF 18-pounder was the standard British field gun of the First World War and was used by both British and Commonwealth Forces. It was horse drawn until the army replaced horses with motor vehicles in the 1930s. The gun was still in use with the Australian Army in the early days of WW2 until replaced by more modern 25 pounder gun/howitzers. Rimmed brass shell with iron and steel projectile.18 PR II M.A.C. 255 F BA 19816 1916artillery -
 Montmorency/Eltham RSL Sub Branch
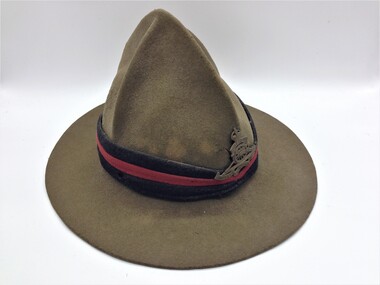
Hat, Fur Felt, New Zealand, 1916-1918
This head-wear was Introduced by Lieutenant colonel William Malone whilst in command of a New Zealand Territorial unit (Taranaki Rifles) just prior to World War 1. The hat's crown was said to mirror the outline of Mount Taranaki. The hat was formerly adopted by the New Zealand army in France in early 1916 and is commonly referred to as the 'Lemon Squeezer'. It is still in use for ceremonial purposes. Note: Lieutenant colonel Malone was killed in action on Gallipoli in 1915 during the battle of Chunuk Bair. Fur felt hat, khaki, similar in appearance to a Scout's hat but with a higher crown and longer 'bashes'. Blue/red/blue cloth Puggaree with brass WW1 NZ Artillery badge. Often referred to as a New Zealand "Lemon squeezer" of WW1.hat, headgear -
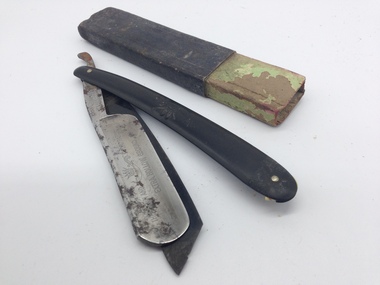 Montmorency/Eltham RSL Sub Branch
Cut-Throat Razor and Case, WW1 era
WW1 era shaving cut-throat razorWW1 eraFolding cut-throat steel razor and cardboard protective case (case missing the top section). The blade folds into a dark brown coloured two sided bakelite plastic handle, riveted at each end. The cardboard case is dark coloured, with a light green coloured insert. The steel blade has a curved section at one end, and the shaving blade at the other.THE CROWN AND (crown and sword picture trademark) SWORD RAZOR EXTRA HOLLOW GROUND CROWN (crown and sword picture trademark) & SWORD TRADE-MARK MADE IN GERMANY ERN 1166 The Crown and Sword picture trademark is embossed on one side of the Bakelite holder.razor, cut-throat, steel, germany, crown and sword, bakelite, shaving -
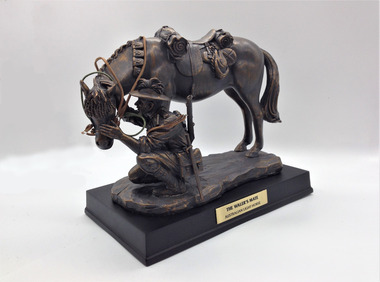 Montmorency/Eltham RSL Sub Branch
Australian Light Horse Figurine 'The Waler's Mate', 2019
Although the 'Waler' was specifically bred for the Australian bush it proved a tough, reliable mount in the desert battles in the Middle East during WW1. Over 130,000 were sent overseas and of these 15,000 served with the Light Horse. None would return to Australia.Cold cast bronze figurine of an Australian Light horseman kneeling beside his "Waler" horse. Mounted on a wooden base with an engraved brass nameplate.THE WALER'S MATE AUSTRALIAN LIGHT HORSE -
 Montmorency/Eltham RSL Sub Branch
Knife, Clasp, with Marlin Spike and Tin Opener, WW1 era to late 1930s
Knife, Clasp, with Marline Spike and Tin Opener, manufactured in England to the Standard Pattern 6353/1905, as modified in 1913 with specific dimensions to the tin opener. This pattern was used by British forces, and was one of the patterns issued to members of the Australian Infantry Force during WW1. This pattern was used up until the late 1930s, where it was superseded by other patterns.Knife, Clasp, with Marlin Spike and Tin Opener, manufactured to the standard British pattern 6353/1905, as modified in 1913 with changed dimensions for the tin opener. The hilt of the knife has two chequered pattern sides secured by five metal rivets. The underside of the hilt has two recesses to allow storage of the blade and the tin opener. A tapered steel Marline spike is mounted on the other side of the hilt, pivoting at the opposite end to the blade and tin opener. A copper wire shackle is also secured at this end of the hilt that was used to attach the knife to a lanyard or belt clip. A fingernail indentation is located near the top of one side of the blade. The tin opener has bevelled edges tapered to a point on one side, with a steel post mounted in the middle of the other side.J. CLARKE & SON SHEFFIELDknife, clasp, ww1, steel, marline spike, australian infantry force, milirary -
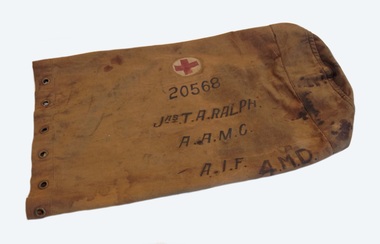 Montmorency/Eltham RSL Sub Branch
Kit Bag, WW1, World War one era
The kit bag was used by James Thomas Alfred Ralph, who was born in South Australia on 25 September 1897. He enlisted for service in the First World War on 17 May 1918 in Adelaide with the Australian Medical Corps General Reinforcements. He was allocated the service number 20568 and embarked from Adelaide on the HMT Gaika on 6 August 1918. He arrived in London, England on the 13 October 1918 and allocated to the Australian Army Medical Corps Training Depot. He transferred as a medical officer to the 1st Australian Hospital (Hayfield?) on 2 December 1918, and was attached to the 1st Australian Army Hospital (Sutton Vale?) in January 1919. He returned to Australia in Febuary 1920 on the Cape Verde as nursing staff. He was discharged from service in Adelaide on 17th March 1920.Tan coloured canvas kit bag used by a member of the Australian Army Medical Corps during World War 1. The tubular kit bag has 12 brass eyelets placed around its opening, and is reinforced with a second layer of canvas at its base. The kit bag has a side stitched seam, stiching around the base and top opening. A circular lightweight tan canvas flap is stitched to the top opening at the side seam.On the side if the kit bag is a red cross on a white background, surrounded by a circular yellow line. It also has the numbers 20568, with the words JAS.T. A. RALPH, A.A.M.C, A.I.F., AND 4.M.D. The base of the kit bag has a map of Australia in black ink, with 4.M.D printed in black ink above the map. "Sth. Aus." and numbers "20568" are printed in black ink over the map of Australia. The marking 'broad arrow' is printed in black ink on the inside of the top opening.world war one, kit bag -
 Montmorency/Eltham RSL Sub Branch
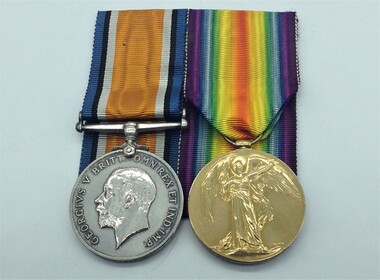
Medal Group, WW1, 2166 Lieutenant Reginald Frank Barratt
Information from "The AIF Project" Lieutenant Reginald Frank Barratt was born in 1879 in Withington, Manchester, Lancashire, England. Regimental number 2166. 3rd Field Artillery Brigade, Military District 3 and Military District 6. Arrived in Australia in 1903 aged 24. Address was Mount Street, Heidelberg, Victoria. Occupation - Farmer. Enlistment date was 17th August 1914. Served with the 68 Battery Royal Field Artillery during the South African War. Rank on enlistment was Sergeant. Embarkation details - Unit embarked from Melbourne, Victoria on board Transport A2 Geelong on 19th September 1914. Rank Lieutenant - Unit 1st Divisional Ammunition Column. Information from the Roll of Honour - Awarded Royal Human Society Medal for saving three lives from drowning in Orange River during South African War. Wounded at Zillebeke, near Ypres, Belgium. Died of wounds 22nd August 1917 at the age of 38. Buried at Bedford House Cemetery, Enclosure No 2, (Plot 1, R0w F, Grave 23), Zillebeke, Belgium. Panel number , Roll of Honour Australian War Memorial British War Medal - The medal was struck by the Royal Mint, is a silver disc 36mm in diameter with a straight clasp suspended without swivel. The obverse shows Sir Bertram Mackennal's bare headed effigy of King George V facing left with the legend 'GEORGIVS V BRITT:OMN:REX ET IND:IMD - "George V, King of all the British Isles & Emperor of India". The reverse, designed by William McMillan, shows St George, naked on horseback and armed with a short sword, an allegory of the physical & mental strength which achieved victory of Prussianism. The horse tramples on the Prussian eagle shield and the emblems of death, a skull and cross bones. In the background are ocean waves and just off centre near the right upper time is the risen sun of victory. The years 1914-1918 appear on the perimeter in the left and right fields respectively. The watered silk ribbon is 32mm wide with 3mm wide royal blue band, 2mm wide black band, 3mm wide white band repeated in reverse order and separated by 16mm wide orange band. Victory Medal - The medal is bronze disc 36mm in diameter with a winged figure of Victory on the obverse. The reverse has the words 'THE GREAT WAR FOR CIVILIZATION 1914-1918', all surrounded by a laurel leaf. The watered silk ribbon is 32mm wided has two rainbow design with the violet from each rainbow on the outside edges, moving through to a central red stripe where both rainbows meet.The recipients name, rank and unit are impressed on the bottom edge of the medals - Lieut F Barratt AIF -
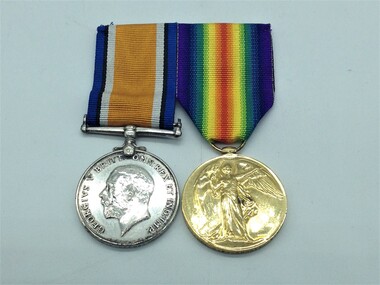
 Montmorency/Eltham RSL Sub Branch
Medal - Medal Group, WW1, 82069 Pte. A. Warner
British War Medal - The medal was struck by the Royal Mint, is a silver disc 36mm in diameter with a straight clasp suspended without swivel. The obverse shows Sir Bertram Mackennal's bare headed effigy of King George V facing left with the legend 'GEORGIVS V BRITT:OMN:REX ET IND:IMD - "George V, King of all the British Isles & Emperor of India". The reverse, designed by William McMillan, shows St George, naked on horseback and armed with a short sword, an allegory of the physical & mental strength which achieved victory of Prussianism. The horse tramples on the Prussian eagle shield and the emblems of death, a skull and cross bones. In the background are ocean waves and just off centre near the right upper time is the risen sun of victory. The years 1914-1918 appear on the perimeter in the left and right fields respectively. The watered silk ribbon is 32mm wide with 3mm wide royal blue band, 2mm wide black band, 3mm wide white band repeated in reverse order and separated by 16mm wide orange band. Victory Medal - The medal is bronze disc 36mm in diameter with a winged figure of Victory on the obverse. The reverse has the words 'THE GREAT WAR FOR CIVILIZATION 1914-1918', all surrounded by a laurel leaf. The watered silk ribbon is 32mm wided has two rainbow design with the violet from each rainbow on the outside edges, moving through to a central red stripe where both rainbows meet.The recipients name, rank, service number and unit are impressed on the bottom edge of the medal - 82069, PTE WARNER R.A.M.C -
 Montmorency/Eltham RSL Sub Branch
Medal - Medal Group, British War & Victory
Ancestor of Sub Branch memberPte. Dempster was an ancestor of a Montmorency/Eltham sub-branch member.British War Medal Silver disc with a straight clasp suspender without a swivel Ribbon (in clasp) - wide central watered stripe of orange, flanked by two narrow white stripes, which are in turn flanked by two black pin-stripes, further flanked by two outer stripes of blue Obverse ... bare headed effigy of King George V (by Sir Bertram Mackennal) facing left with the legend around circumference Reverse ... St. George on horseback trampling shield of eagle (symbol of "Central Powers"); above is rising sun of victory. Victory Medal Bronze disc with circular loop which is threaded with ribbon Ribbon - a ‘two rainbow’ design, with the violet from each rainbow on the outside edges moving through to a central red stripe where both rainbows meet Obverse ... image of "winged Victory" Reverse ... inscription surrounded by laurel reathBritish War Medal Obverse ... GEORGIVS V BRITT OMN : REX ET IND. IMP. (George V, King of all the British Isles and Emperor of India) Reverse ... 1914 1918 Rim ... Pte J. H. Dempster, 24 BN AIF Victory Medal Obverse ... no inscription Reverse ... THE GREAT WAR FOR CIVILIZATION 1914 - 1919 Rim ... Pte J. H. Dempster, 24 BN AIFwar service medals, ww1 -
 Geelong RSL Sub Branch
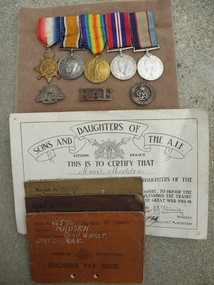
Medals & Documents, Early 20th Century
Medals and Documents relating to Cecil Walker Madden - Served 1st AIF and 2nd AIF member of Department of Defence who served during WW1 and WW25 x Defence Medals Full Size, 5 x Defence Medals Miniatures, various medallions, 3 x Australian Military Forces Soldier's Pay Book's, 1 x Sons and Daughters of the AIF Certificate, The Australian Flag, a black and white photograph of Dvr C.W. Madden.Medals & Pay Books 1st AIF 5112 Dvr C W Madden Medals & Pay Books 2nd AIF V4574 C W Madden Sons & Daughters Certificate Mavis Maddenww2, medals and documents -
 Geelong RSL Sub Branch
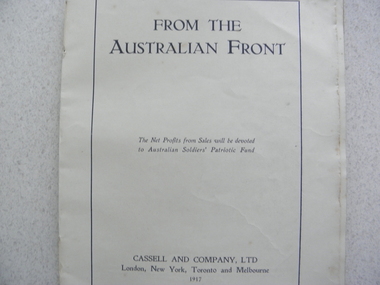
Book, From the Australian Front, 1917
From the Australian Front is a pictorial history of Australians at war in FranceThis book depicts Australians at War in France during 1917An oblong book, buffy coloured pages, no outer covers.Printed by Cassell and Company, Ltd London, New York, Toronto and Melbourne 1917australia, france ww1 -
 Geelong RSL Sub Branch
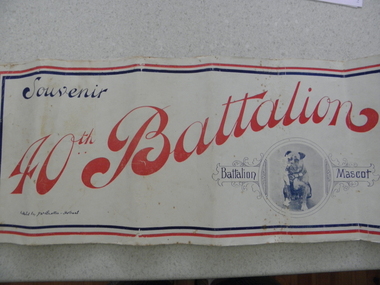
Book - 40th Battalion, A souvenir of the 40th Battalion, Mid 20th Century
The 40th Battalion was an Infantry Battalion of the Australian Army raised in 1916. The battalion was recruited completely from Tasmanis as part of the 10th Brigade, 3rd Division.The Batalion served during WW1 - along the Western Front, 1919 to 1921 was a CMF unit. During WW2 the Battalion remained in Australia and was amalgamated with 12th Battalion. The Battalion was merged into 12th/40th Battalion Royal Tasmania Regiment in 1987.An oblong book, buff colour, paper pages, blue and red edging.On the front page Souvenir 40th Battalion, the Battalion Mascot, Published by J W Beatie - Hobart, back page wholly Engraved and Printed by 'The Examiner' and 'Weekly Courier' Offices, 73-75 Patterson Street, Launceston, Tasmania.ww1 ww2 40th battalion tasmania -
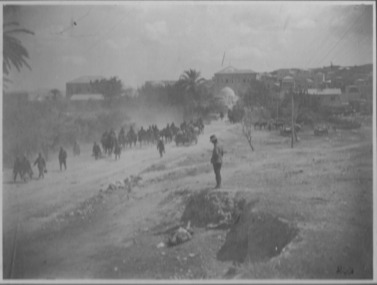 Geelong RSL Sub Branch
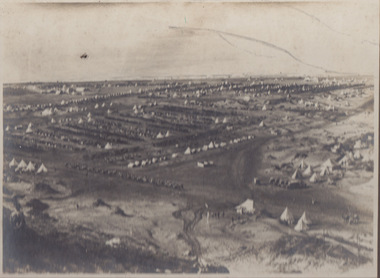
Photograph - Jenin Palestine 21 September 18, Early 20th Century
The Capture of Jenin occurred on 20 September 1918 during the last months of the Sinai and Palestine Campaign of the First World War. This photograph portrays a scene the day after the Battle 21 September 1918. Australian Commanders and Units were involved.This is a photograph of the Jenin area the day after the Capture, 21 September 1918. Australian Commanders and Units were involved in the Capture of Jenin.A black and white photograph on a cardboard backing.On the front of the backing - Jenin, Palestine. 21.9.18. On the bottom right corner of the photograph the figures 259. On the back of the backing - B259 Australian War Musuem, Wool Exchange, King Street, Melbourne. Copyright. Prosecution will follow Infringement.ww1, capture of jenin. september 1918. palestine. -
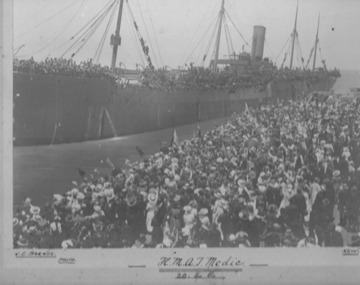 Geelong RSL Sub Branch
Photograph - HMAT Medic, Early 20th Century
A fleet of Transport Ships was leased by the Commonwealth Government for the specific purpose of transporting various AIF formations to the respective overseas destinations. When not committed to military transport the ships were employed on other duties. The fleet was made up of British Ships and captured German Ships. The HMAT Medic weighed 12,032 tons and was owned by the Oceanic SN Co Ltd Liverpool, she was leased by the Commonwealth Government until 26 October 1917.This photograph is of HMAT Medic leaving Australian Shores 20-05-16. The Medic was also used as a troopship for Australia during the Boer War.Photograph of the ship on a cardboard backing.HMAT Medic 20-5-16. J E Barnes Photo. Kew.hmat medic troopship, .commonwealth government, ww1, boer war -
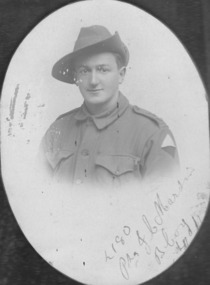 Geelong RSL Sub Branch
Medals - 2180 J C Martin MM, Early 20th Century
2180 Pte J C Martin MM was a member of the AIF and served during WW1 with 8 BN.These are the original Medals of 2180 Pte J C Martin MM who served with the AIF during WW1. On a wooden board is a black and white (oval shape) photograph of 2180 Pte J C Martin MM, 1914/15 Star, British War Medal and Victory Medal. Pte J C Martin MM was awarded a Military Medal for Bravery in the Field on 12 July 1918. Unfortunately the Military Medal is not with this collection.On the photograph written - 2180 Pte J C Martin, B Coy. On each medal - 2180 Pte J C Martin. 8/BN AIF. ww1 8 bn aif, 2180 pte j c martin mm -
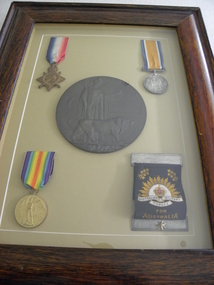 Geelong RSL Sub Branch
Medals - Norman H V Powell, 20th Century
The Medals, Plaque and Scroll are the original items presented to 2952 N H V Powell's Family. 2952 N H V Powell enlisted in the AMF on 12 October 1915 and was Killed in Action on 25 July 1916 in FranceThe items are the originals of 2952 N H V Powell as presented to his family.A collection of Medals and Memorial Plaque and cloth scroll in a wooden frame. Medals are - 1914-1915 Star, British War Medal, Victory Medal, Plaque, cloth scroll.The Medals are behind glass, inscriptions cannot be confirmed. Plaque is inscribed - He Died for Freedom and Honour - Norman Henry Victor Powell Cloth Scroll - Australian Military Forces - For Australiaww1, france, killed in action, 2952 n h v powell -
 Geelong RSL Sub Branch
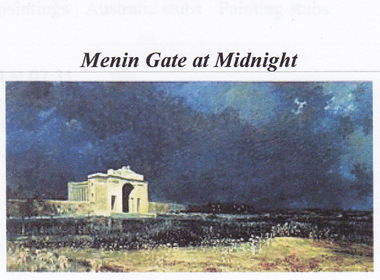
Print, Menin Gate at Midnight, 20th Century
Minin Gate at Midnight is a painting by Australian artist Will Longstaff. Longstaff completed the painting in 1927 and the original is now located at the Australian War Memorial. The painting depicts ghostly soldiers marching across a field in front of the Menin Gate War Memorial.Longstaff painted the work after attending the unveiling of the Menin Gate Memorial, at Ypres, on 24 July 1927. The memorial commemorates the men of the British Empire, including Australia, who died during the 1st World War around the town of Ypres. A print of the Menin Gate at Midnight, oblong in shape, framed in a timber frame, a cardboard matte surrounds the print.Careys Picture Framing Gallery, Professional Framing, Shop 13 Packington Arcade, 129 Packington Street, Geelong West. A brass plaque is also attached to the Print.menin gate, longstaff, ww1, australian war memorial -
 Geelong RSL Sub Branch
Photograph - 3rd Light Horse Brigade, Brigade Camp Tripoli, Early 20th Century
The 3rd Light Horse Brigade was a mounted infantry brigade of the 1st AIF and served in the Middle East during WW1.This photograph is of the the 3rd Light Horse Brigade camp at Tripoli, Syria circa December 1918.Sepia coloured photograph on a charcoal coloured matt backing.On the front - 3rd L H Brg Camp Tripoli On the back - B813 Australian Official Photo No, purchased from Australian War Museum Wool Exchange , King Street, Melbourne. Copyright ww1, 3rd light horse brigade, 3rd light horse brigadetripoli, syria, december 1918 -
 Geelong RSL Sub Branch
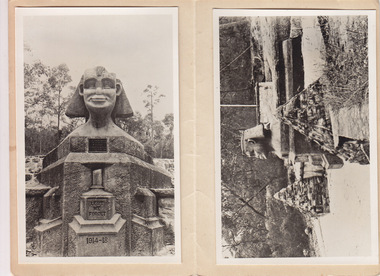
Photographs, The Sphinx War Memorial, Ku-Ring-Gai Chase, NSW, 1925-1926
Pte W Shirley served with 13 Battalion during WW1. Whilst an inpatient at Lady Davidson Home ex Pte Shirley commuted to Ku-Ring-Gai Chase to cut the Sphinx out of rock as a Memorial to his comrades. The time taken for the project was approximately 1 year 6 months.This is a project of 5756 Pte W Shirley 13 Battalion AIF. The Memorial is dedicated 'To my Glorious Comrades of the AIF'2 x black and white photographs of the Sphinx War Memorial, Ku-Ring-Gai Chase, NSW. A buff coloured cover for the photographs with a detailed description of the Memorial and who was responsible for the erection and placement of the memorial.On the front of the 'Sphinx' 1st plaque - To my Glorious Comrades of the AIF, by the Late W. Shirley, no 5756, 13th Battalion. Died 27 August, 1929. 2nd plaque 'Lest We Forget'. 3rd plaque - 1914-1918.w shirley, aif, 13 battalion, sphinx memorial, ku-ring-gai chase, nsw -
 Geelong RSL Sub Branch
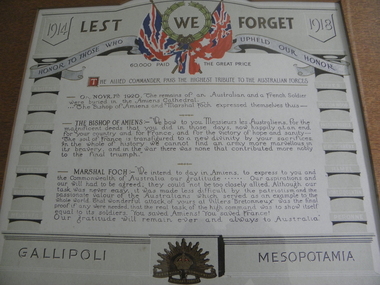
Dedication, There is no makers mark, Mid 20th Century
On 07 November 1920 a plaque to commemorate Australians who defended Amiens between March and August 1918 was fixed to a pillar in the Amiens Cathedral. The Bishop of Armiens and Marshal Foch spoke at the unveiling of the plaque.This a copy of the speeches of the Bishop and Marshal Foch and is a dedication to the men of the AIF who fought on the Somme between March and August 1918.A framed poster dedication of a plaque that is in the Amiens Cathedral commemorating the Australians who defended Amiens between March and August 1918. The poster is framed in a wooden frame.The dedications on the poster are by the Bishop of Amiens and Marshal Foch that were made on 07 November 1920 part of the speeches of these two men are printed on the poster.ww1, somme, bishop of amiens, marshal foch -
 Geelong RSL Sub Branch
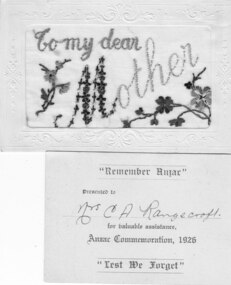
Greeting Cards from 1289 Sgt H C Rangecroft to his Mother Mrs C A Rangecroft, Early 20th Century
1289 Sgt Horace Rangecroft was serving overseas during WW1 with 38th Battalion, these cards were sent by him to his Mother.These are the original cards that were sent by 1289 Sgt Rangecroft to his Mother Mrs C A Rangecroft.One x embroidered greeting card, one post card, two by oblong cards - one Christmas 1917, onr New Year 1918. Cards are made from paper and cardboard and embroidery materials.Silk Card - to my dear Mother, Post Card dated 22 October 1918, cheerio for a pleasant Xmas, small card One King, One Flag, One Empire New Year 1918, small card Christmas 1917.greeting cards, ww1, sgt rangecroft, 38 battalion, 1289 h rangecroft, ww1, 38th battalion, greeting cards, -
 Geelong RSL Sub Branch
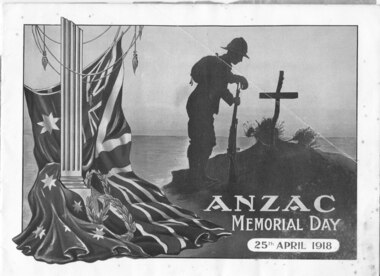
Magazine - ANZAC Memorial Day, D W Paterson Co Pty Ltd, ANZAC Memorial Day, 1918
The magazine has been produced for ANZAC Memorial Day 25 April 1918, the pages are full of photographs of Australain Troops preparing for departure overseas and preparing for their service overseas. There are two pages 'Heroes of the Southern Cross' authored by A M David, Secretary Victorian Branch, RSL.This magazine is an original of those printed for ANZAC Memorial Day 25 April 1918. The magazine contains photographs of the period 1914-1918 and a dedication authored by the then Secretary of the RSL Victorian Branch, A M David.An oblong magazine, colour photograph on the front page with a soldier at a grave site and the Australian Flag on the left side, 6 paper pages the cover of the magazine has a grease proof paper cover.The magazine has been printed by D W Paterson Co Pty Ltd for the Victorian Branch of the RSL, J W Mc Kenzie, President, A M David Secretary.anzac memorial day, 1918, magazine, ww1, photographs