Showing 2198 items
matching tram routes
-
 Ballarat Tramway Museum
Photograph - Black & White Photograph/s - set of 5, Charles Craig, 1971
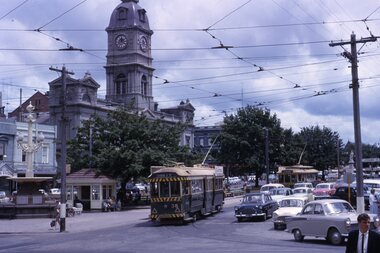
Yields information about the intersection of Sturt St and Drummond St and its use by trams in the period before the closure of the SEC system. Shows the Southern Cross Hotel.Set of five Black and White photographs of trams near the intersection of Sturt St and Drummond St South, Hospital Corner. All have the Southern Cross Hotel in the background .1 - No. 31 crosses Drummond St, Gardens via Sturt St West, with two Johnnie Walker Roof adverts. .2 - No. 40 turns from Drummond St South en route to Lydiard St North, while another bogie car waits. Both trams have an electric cooking roof advert. .3 - No. 17 crosses Sturt St with two bogie trams in the view - appears to have been taken before .2. Note the passengers getting off the tram on the south side. .4 - No. 21 turning into Drummond St south, with destination of Sebastopol. Tram has an electric cooking roof advert. .5 - No. 33 crosses Sturt St from Sebastopol while another tram waits at the Sturt St stop. Photo by Charles Craig - during 1971. trams, tramways, sturt st, hospital corner, drummond st sth, tram 31, tram 40, tram 17, tram 21, tram 33 -
 Ballarat Tramway Museum
Photograph - Black & White Photograph/s, Charles Craig, 1971
Yields information about the appearance of Albert St where the tram crossed at Ophir St, Sebastopol. Black and White photograph of a single trucker tram, with a Twin Lakes sign crossing Albert St, near Ophir St en route to Sebastopol. Shows the street scene at the time. Photo by Charles Craig - during 1971. trams, tramways, albert st, sebastopol, ophir st -
 Ballarat Tramway Museum
Poster, Transport Regulation Board, Ballarat Bus Services", Aug. 1971
Yields information about the closure of the Ballarat Tramway system and the bus replacements made by the Transport Regulation Board, can be compared to that for Bendigo and Geelong.Poster, titled "Ballarat Bus Services" printed on off white gloss paper. Produced shortly before the closure of the State Electricity Commission of Victoria operated Ballarat Tramway system. Gives details of the replacement bus services as well as the existing bus services and other changes planned. Provides notes on the operator, timetables, fares, route numbers and dates when the services would be changed. Map shows the bus routes, route numbers, section points and City stands and stops. Authorised by the Secretary of the Transport Regulation Board B. P. Kay. pdf file has to be opened outside dbTextWorks.trams, tramways, ballarat, map, closure, buses -
 Ballarat Tramway Museum
Poster, Transport Regulation Board, Bendigo Bus Services", Feb. 1972
Yields information about the closure of the Bendigo Tramway system and the bus replacements made by the Transport Regulation Board, can be compared to that for BallaratDigital print of a scanned Poster, titled "Bendigo Bus Services" printed on white paper. Produced shortly before the closure of the State Electricity Commission of Victoria operated Bendigo Tramway system. Gives details of the replacement bus services as well as the existing bus services and other changes planned. Provides notes on the operator, timetables, fares, route numbers and dates when the services would be changed. Map shows the bus routes, route numbers, section points and City stands and stops. Authorised by the Transport Regulation Board. trams, tramways, bendigo, map, closure, buses -
 Ballarat Tramway Museum
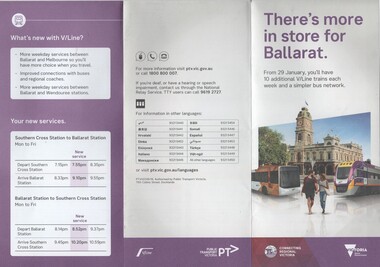
Pamphlet, Public Transport Corporation (PTC), "There's more in store for Ballarat", Jan. 2017
Set of two pamphlets distributed at the time of the introduction of revised routing of Ballarat bus services and the introduction of further trains on the Ballarat line - and the opening of Caroline Springs Station on 29.1.2017. .1 - 6 fold to DL size from an A3 sheets - titled "There's more in store for Ballarat", colour on white paper showing the new Ballarat bus network map, discontinued routes, additional train services and a summary of changes. .2 - a grab rail pamphlet listing the new bus routes for use on the buses - piece of heavy card with a round top and a slit to enable it to be placed on a grab rail within the bus itself. Two copies of each held.trams, tramways, ballarat public transport, buses, ptv, public transport victoria, timetables -
 Ballarat Tramway Museum
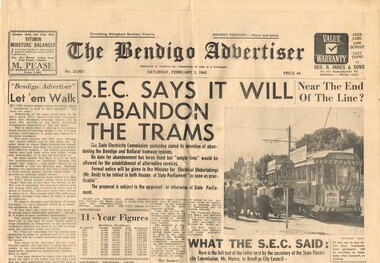
Newspaper, Bendigo Advertiser, "SEC Says it will abandon the trams" "Near the end of the Line?" "Let 'em Walk", "What the SEC Said", "Lost City Without Trams", 3/02/1962 12:00:00 AM
Yields information about the 1962 proposal of the SEC to closure the Bendigo tramway system and notes the impact on the city, with references to Ballarat and Geelong.Newspaper - The Bendigo Advertiser, Saturday 3/2/1962, 14 broad sheet pages, with the main headline ""SEC Says it will abandon the trams" about the notice given in Parliament the previous day by the Minister for Electrical Undertakings Mr. Reid following notice by the SEC. Includes the text of a letter to the City of Bendigo, by the Secretary of the SEC, Mr. D. H. Munro. Has an editorial titled "Let 'em Walk", a photo of the No. 2 en route to Eaglehawk at Charing Cross and further article reporting on comments from four civic leaders "Lost City Without Trams". Quotes two local MLA's - L. W. Galvin, C.P. Stoneham, Cr. W. Mathrick of Eaglehawk and the K.H. Gordon,Chamber of Commerce. Notes impact on the city, Ballarat and Geelong bus system. See Reg Item 6950 for the Ballarat The Courier Report. Full copy of the newspaper collected for style and adverts - has a Briquette advert on page 14.sec, closure, bendigo, parliament, eaglehawk, geelong, ballarat -
 Ballarat Tramway Museum
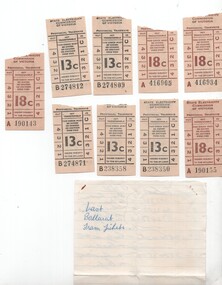
Ephemera - Ticket/s, State Electricity Commission of Victoria (SECV), Set of 8 tickets - closure of Mt Pleasant, 1971
Provides information about the last tickets issued on the Mt Pleasant route at the time of closure and sample tickets.Set of 8 tickets and handwritten notes regarding the last tickets issued on 5/9/1971 when the Mt Pleasant - Gardens via Sturt St west route closed. .1 - hand written noted on a ruled sheet of paper from a note book - listing the last tickets for 4c, 5, 7c and 13c on the route for both the last tram to and from the city. .2 - Set of 4 No. 18c - brown print on off white paper, ticket nos. A190143, 190155, 416905 and 416934 - not listed on the above sheet. .3 - set 5 No. 13c - black print on off-white paper, ticket nos. B274809, 812, 871 and B238350 and 358. Collected and noted by Keith Kings at the time.trams, tramways, secv, closure, tickets, last tram, mt pleasant, gardens -
 Ballarat Tramway Museum
Photograph - Black & White Photograph/s, Geoff Grant, 8/01/1956 12:00:00 AM
... -West routes. Trams tramways Geelong Depot MESC tram 4 On Rear ...Yields information about Geelong trams at the time of the closure of the Chilwell and East-West routes.Black and White photograph of Geelong No. 4 leaving the depot with the depot building in the background. You can see another tram in the background through the building This is a large format print of Reg Item 476.3, photograph by Geoff Grant.On Rear ink "Geelong Tram Depot 8th Jan. 1956"trams, tramways, geelong, depot, mesc, tram 4 -
 Ballarat Tramway Museum
Photograph - Black & White Photograph/s, Geoff Grant, 8/01/1956 12:00:00 AM
... -West routes. Trams tramways Geelong Chilwell Closure tram 18 ...Yields information about Geelong trams at the time of the closure of the Chilwell and East-West routes.Black and White photograph of Geelong No. 18 at the Chilwell terminus on the last day of operation of this route. This is a large format print of Reg Item 476.5, photograph by Geoff Grant.On Rear ink "Last day of operation Chilwell & East - West Line 8th Jan. 1956"trams, tramways, geelong, chilwell, closure, tram 18 -
 Ballarat Tramway Museum
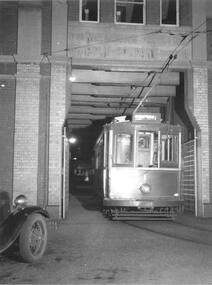
Photograph - Black & White Photograph/s, Geoff Grant, 8/01/1956 12:00:00 AM
... -West routes. Trams tramways Geelong Chilwell Closure Depot tram ...Yields information about Geelong trams at the time of the closure of the Chilwell and East-West routes.Black and White photograph of Geelong No. 1 entering the depot portal on the closure of the Chilwell and East - West routes on 8/1/1956 This is a large format print of Reg Item 476.8, photograph by Geoff Grant.On Rear ink "Last day of operation Chilwell & East - West Line 8th Jan. 1956"trams, tramways, geelong, chilwell, closure, depot, tram 1 -
 Ballarat Tramway Museum
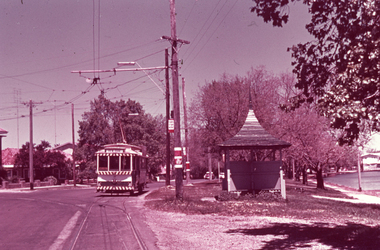
Slide - 35mm slide/s, Keith Caldwell, 8/03/1960 12:00:00 AM
Yields information about Hospital corner and tram 40.Agfa colour slide, white cardboard mount, photo by Keith Caldwell on 8/3/1960 of: Tram 40 turning at Hospital corner from Drummed St South into Sturt St, en-route to Lydiard St North. The ?bert Wine and Spirits shop and Oasis Cake and Kitchen shop in the background.Stamped on bottom of slide "8 Mar 60".tramways, trams, sturt st, drummond st, hospital corner, tram 40 -
 Ballarat Tramway Museum
Slide - 35mm slide/s - set of 2, Keith Caldwell, 16/03/1963 12:00:00 AM
... and the Barkly St Mt Pleasant route. Tramways trams Mt Pleasant Barkly St ...Yields information about 12 and the Barkly St Mt Pleasant route.Set of two Agfa colour slides, white cardboard mount, photo by Keith Caldwell on 16/3/1963 of: .1 - Tram 12 in Barkly St, with destination of Mt Pleasant. Tram has adverts for Dancing at Civic Hall and Whitehorse Whiskey on the front dash panel. .2 - on the return trip - has the same adverts. In ink "16.3.63"tramways, trams, mt pleasant, barkly st, tram 12 -
 Ballarat Tramway Museum
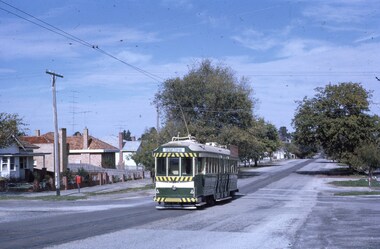
Slide - 35mm slide/s, Keith Caldwell, c1963
... and the Victoria St route. Tramways trams Victoria St tram 21 Agfa colour ...Yields information about 21 and the Victoria St route.Agfa colour slide, white cardboard mount, photo by Keith Caldwell undated, c1963. Tram 21 in bound in Victoria St showing the card beds on either side of there road. Tram has the destination of Gardens via Sturt St West and a Whitehorse Whiskey advert on the front panel. tramways, trams, victoria st, tram 21 -
 Ballarat Tramway Museum
Newspaper, The Courier Ballarat, "Two new W class trams will make their home at the Ballarat Tram Museum", 16/08/2019 12:00:00 AM
Newspaper clippings from The Courier, Ballarat, 16/8/2019 titled "Two new W class trams will make their home at the Ballarat Tram Museum" about the delivery of two trams (836 and 1029) from Newport to Bungaree. Press conference held at the Ballarat depot featuring Paul Mong, Michaela Settle (Buninyong State MP) and Juliana Addison (Wendouree State MP) and Chris Phillips. Article by Greg Gliddon, photo Lachlan Bence. Items includes photographs of the trams being loaded at Newport the previous day and a photo of W6 965 en route to the Docks on its way to Denmark. See Reg Item 7396 for two video files ex VicTrackw class trams, grants, btm, donations, victorian government, tram acquisition -
 Ballarat Tramway Museum
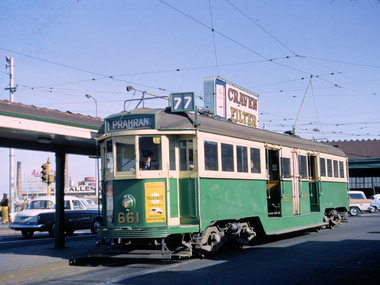
Photograph - Digital image, Dick Jones, Jul. 1965
... class Shelters Prahran Route 77 tram 661 Digital Image of MMTB ...Digital Image of MMTB tram W3 661 at the Batman Ave terminus, July 1965. Tram has the destination of Prahran, Route 77, advertisement for Proofkote (rain wear protection?) In the background is a large sign for Craven Filter and a sign for Allen's Sweets. Photo reference from Dick Jones - 661_BatmanAve_DickJones_6507M.34.07trams, tramways, batman ave, w3 class, shelters, prahran, route 77, tram 661 -
 Ballarat Tramway Museum
Photograph - Digital image, Dick Jones, W3 661 outbound in St Kilda Road, Dec. 1964
Demonstrates one of the Museum's trams in service in Melbourne.Digital Image of MMTB tram W3 661 outbound in St Kilda Road, approaching Doman Junction. Tram has destination of East Brighton, Route 64 and an advertisement for Proofkote (rain wear protection?) BP House in the background. Photo December 1964. Photo reference from Dick Jones - 661_StKildaRd_DickJones_6412MIns.23.04trams, tramways, w3 class, st kilda road, east brighton, tram 661 -
 Ballarat Tramway Museum
Photograph - Digital image, Dave Macartney, c1969
Digital Image of MMTB tram W5 836 inbound in Mt Alexander road, just before the crossing of Moonee Ponds Creek. Tram is freshly painted, showing City Route 59. In the background is a Holden car dealer, the railway bridge over Flemington Road. Photo by Dave Macartney 1969?trams, tramways, w5 class, mt alexander road, tram 836 -
 Ballarat Tramway Museum
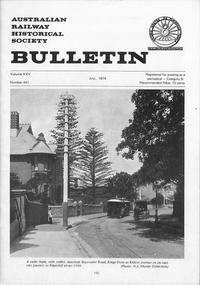
Magazine, Australian Railway Historical Society (ARHS), "ARHS Bulletin No. 441, July 1974", "The Cable Trams of Sydney and the Experiments leading to final electrification of the tramways", 1974
Magazine - 24 pages, printed on off white paper, centre stapled titled "ARHS Bulletin No. 441, July 1974", containing an article "The Cable Trams of Sydney and the Experiments leading to final electrification of the tramways" by R. F. Wylie. Looks at the both the North Sydney and Kings St cable lines, from which the body of ESCo tram operated on, the winding houses, route maps, depots. trams, tramways, arhs, sydney, cable trams, north sydney, king st -
 Ballarat Tramway Museum
Slide - 35mm slide/s, Robert Thomson, May. 1968
Yields information about Ballarat's trams in Lydiard St North.Kodak Kodachrome cardboard mount, colour slide of tram 37 south bound in Lydiard St North, soon after leaving the terminus, en route to Sebastopol."5/68" in ink.tramways, trams, lydiard st north, tram 37 -
 Ballarat Tramway Museum
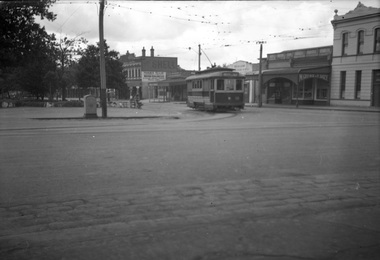
Negative, Wal Jack, late 1930's
Yields information about Ballarat 's tram operations and Hospital Corner.Negative and Digital image of the Wal Jack Ballarat Negative file of No. 19 turning from Sturt St into Drummond St North end route to Gardens. In the background are the premises of Shell Petrol, Morris Ellis Motor Engineers, a hair dresser, a bakery, M. George and E Daly and the Great Southern Hotel. Also in the view is the ESCo street electrical pillar. trams, tramways, hospital corner, sturt st, drummond st, tram 19 -
 Ballarat Tramway Museum
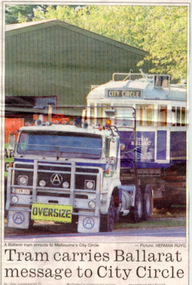
Newspaper, The Courier Ballarat, "Tram carries Ballarat message to City Circle", 24/02/1996 12:00:00 AM
Newspaper cutting from The Courier, Ballarat, Saturday 24/2/1996 of City of Ballarat Tram W4 671 leaving the depot on a low loader bound for Melbourne. Has front page colour photo of truck and tram at the rear of the depot in Gilles St. Tram has destination of 'City Circle'. Photo by Herman Ruyg. Accompanying item written by Ian Haberfield quoting Peter Hiscock about the tram and the running on the City Circle route in Melbourne. Also mentions Alan Brown, Public Transport Minister.trams, tramways, 671, btm, city of ballarat, city circle, melbourne -
 Ballarat Tramway Museum
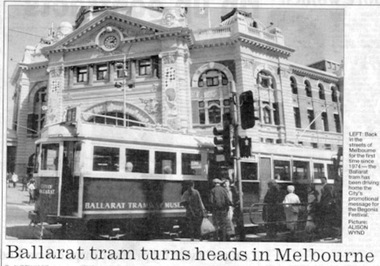
Newspaper, The Courier Ballarat, "Ballarat tram turns heads in Melbourne", 8/03/1996 12:00:00 AM
Newspaper cutting from The Courier, Ballarat, Friday 8/3/1996 of tram W4 671 running on the City Circle route with a black and white photo with Flinders St. station in the background. Picture and story by Alison Wynd. Quotes Warren Doubleday about the running of the tram in Melbourne, its promotional use and other details.trams, tramways, 671, btm, city of ballarat, city circle, melbourne -
 Ballarat Tramway Museum
Photograph - Black & White Photograph/s, c1956
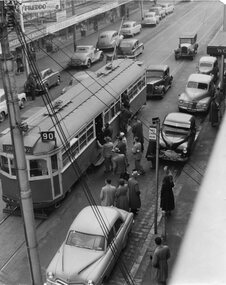
Black and white photograph of W6 994 in Smith St. Collingwood/Fitzroy, in bound on route 90 to City - Spencer St., picking up passengers at a tram stop. Pole obscuring front of tram. Tram has destination "City Spencer St" and run number "P44" Tram appears to be fairly crowded already. Photo taken c1956 with a number of motor cars in the street including some Holdens. In the background are a number of shop fronts, with signs for "Singer Sewing Machines", "Freddo frogs", "Peters Ice Cream", Davies Hardware, John Cornish. On the side of the photograph is the first part of a Woolworths store front. The address of the John Cornish, Mercer, was 205 Smith St. Fitzroy and Woolworths were at 182 -184 Smith St. Collingwood. See 1968 Sands and McDougal Director of Victoria for Smith St. details.trams, tramways, mmtb, smith st., w6 class, bourke st., tram w6 994 -
 Ballarat Tramway Museum
Ephemera - Timetable/s, Melbourne and Metropolitan Tramways Board (MMTB), Set of 24 MMTB Melbourne tram timetables, 1969
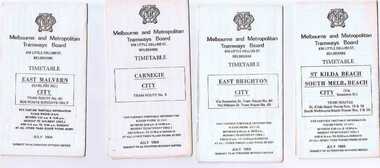
Set of 24 MMTB timetables for various routes, dated July 1969. Generally includes Sat and Suns, Good Friday and Christmas day as well as weekdays, unless noted otherwise. Also includes a map of the route, detailed time points, sections, connecting services, fares, and organisation address - 616 Little Collins St. Melbourne. Have been folded into ten portions. All on white paper unless noted otherwise. Items shown with an # - have a sticker modifying timetable information details on the front page. 1154.1 - Route 4 - Carnegie - City .2 - Route 4D - East Malvern (Darling Road) - City # .3 - Route 5 - Malvern Burk Road, - City # .4 - Route 6 - Glen Iris - City # .5 - Route 7 - Camberwell - City # .6 - Route 8 - Toorak - City # .7 - Routes 9, 10 and 12 - South Melbourne and St Kilda Beach - City (Brunswick St.) - via Collins St. .8 - Routes 10, 11 - West Preston and routes 9 & 9A Northcote .9 - Routes 15 & 22 - Moreland and 1 & 21 - East Coburg .10 - Route - 15 & 16 - St Kilda Beach and 1 & 2A - South Melbourne Beach - via Swanston St. .11 - Route 19 - North Coburg - City # .12 - Route 42 - Mont Albert - City # .13 - Routes 48 - North Balwyn and Burwood - City .14 - as above, but for Saturdays and Sundays on pink paper .15 - Routes 55 & 56, West Coburg - City - (William St.) - Domain Road. .16 - Route 57 - West Maribyrnong - City .17 - Route 59 - Essendon (Aerodrome) - City .18 - Route 64 & 65 - East Brighton - City .19 - Route 69 - Kew Cotham Road - St. Kilda Beach # .20 - Route 70 - Wattle Park - City # .21 - Routes 77 - Prahran - City, 78 - North Richmond - Prahran, 79 - North Richmond - St Kilda Beach .22 - Route 82 - Footscray to Moonee Ponds .23 - Route 88 - East Preston - City and Route 96, East Brunswick - City .24 - as above but for Saturdays and Sundays on pink paper. Images of a sample of documents added 16-11-2013.mmtb, timetables, melbourne -
 Ballarat Tramway Museum
Slide - 35mm slide/s - set of 14, Noel Simons, 23/11/1962 12:00:00 AM
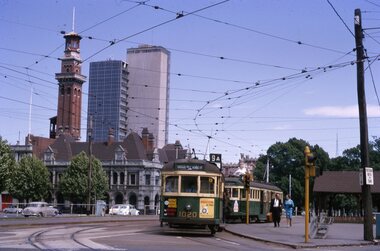
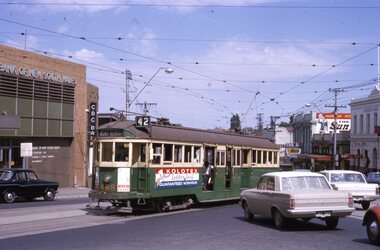
Set of 14 Kodachrome transparencies taken on 23/11/1962. 1162.1 - tram 38 turning into Lydiard St. North from Sturt St. with tram 20 in background. Many motor vehicles in photo. 1162.2 - as above, but a minute of so later. Has Mutual Life building in background as well as Town Hall. 1162.3 - No. 40 entering Albert St. from Skipton St. outbound to Sebastopol. 1162.4 - No. 40 near start of side of the road running in Albert St. heading to Sebastopol. 1162.5 - No. 40 at the City terminus, on the South side of Sturt St. Has Town Hall and other buildings along the south side of Sturt St. in the background. 1162.6 - No. 40 at Sebastopol terminus - shows arrangement of the signs at the terminus. 1162.7 - No. 40 and No. 38 crossing at loop between Sayle and Grey St. No. 40 inbound. 1162.8 - No. 40 turning from Drummond St. South to Sturt St. at Hospital Corner with Southern Cross Hotel in background. 1162.9 - No. 18 in Wendouree Parade near Forest St. heading east with destination of "Victoria St." 1162.10 - Nos 41 and 39 at Depot Junction. Both trams have SEC ads. 1162.11 - No. 39 turning into the depot from Wendouree Parade - showing destination of "Gardens via Drummond Nth" 1162.12- No. 17 at Lydiard St. North terminus, showing destination of "Grey St. Sebas". Has a Twin Lakes sign 1162.13 - ditto, but with trolley pole turned around. Has SEC Briquettes roof ad and Whitehorse whiskey ad on rear dash panel. 1162.14 - No. 40 outbound to Sebastopol crossing Albert St. 1162.1 -"Nos. 38 and 20 in Sturt St. Ballarat at corner of Lydiard St." 1162.2 - "No. 38 turns into Lydiard St. as No. 20 waits at stop in Sturt St. Ballarat" 1162.3 - "No. 40 entering Albert St. from Skipton St. Redan on Sebastopol route." 1162.4 - "No 40 at beginning of reserved track on Sebastopol route, Albert St. Redan." 1162.5 - "No. 40 in Sturt St. Ballarat near cnr. of Armstrong St." 1162.6 - "No. 40 at Sebastopol terminus" 1162.7 - "No. 38 and 40 crossing at Sayle St. Loop on Albert St. reserved track, Sebastopol route" 1162.8 - "No. 40 turning into Sturt St. from Drummond St." 1162.9 - "No. 18 in Wendouree Pde. Ballarat near tramway depot" 1162.10 - "No. 41 and 39 outside Ballarat tramway depot, Lake Wendouree in background" 1162.11 - "No. 39 entering tramway depot from Wendouree Parade, Ballarat" 1162.12 - "No 17 at Lydiard St. North terminus, Ballarat North" 1162.13 - "No 17 at Lydiard St. North terminus, Ballarat North" 1162.14 - "No. 40 crossing Albert St. Sebastopol as reserved track switches from left to right of road" All have date stamp of "23 Nov. 1962" in purple ink. All black ink unless otherwise noted.tramways, trams, ballarat, albert st., sturt st., sebastopol, grey st., hospital corner, wendouree parade, depot junction, lydiard st. north, tram 17, tram 18, tram 20, tram 38, tram 39, tram 40, tram 41 -
 Ballarat Tramway Museum
Slide - 35mm slide/s - set of 2, Noel Simons, Nov. 1970
Set of 2 Kodak Ready-mount with slides made from the Association of Railway Enthusiast Provincial Tramways film strip. 1166.1 - No. 31 at the View Point terminus, corner of Wendouree Parade and Macarthur St., shows tram and section arrangements on poles. Also has SEC tramway shelter alongside stop. Tram has destination of "View Point" 1166.2 - No. 38 crossing Albert St. en route to Sebastopol.1166.1 - "No. 21 at View Point terminus. Line of left is that for cars on "Gardens via Drummond St. Nth" route." 1166.2 - "No. 38 crossing Albert St. near Sebastopol terminus" All have date stamp of "Nov. 1970" in blue ink. Writing in blue ink.tramways, trams, view point, wendouree parade, albert st, sebastopol, tram 21, tram 38 -
 Ballarat Tramway Museum
Slide - 35mm slide/s - set of 9, Noel Simons, Sept. 1971
Set of 9 Kodak Ready-mount with slides made from the Association of Railway Enthusiast Provincial Tramways film strip. Reference Item 2560 details the ARE Film Strip, and provide references to other slides. See also Reg. item 1164. 1174.9 on plain white mount. 1174.1 - Tram 40 North bound for Lydiard St. North at the Railway Gates, with the gates closed. Tram carrying a heavy load of passengers. Railway station building and car park in background. Taken from the signal box. 1174.2 - Tram 12 bound for Gardens, photographed across the median strip plantation near Dawson St. Image i2a - adjusted 9/2021 to remove colour cast. 1174.3 - Tram 43 in bound along Wendouree Parade near Barrett Ave, passing a former tram stop and with "Warning Oncoming Trams" sign mounted on an adjacent pole. See also Reg. item 1172.1 for a photo taken in May 1971. This photo taken after the closure of the Victoria St. line, as the tram stop has been painted out. 1174.4 - Looking along the track to Sebastopol terminus on the west side of Albert St. - telephoto shot showing bogie tram in the far distance. Shows the nature of the track, poles, tram stop frequency and in the fare distance the terminus. Also show the trees that used to be along this section of the track. 1174.5 - No. 42 showing "Special" in Macarthur St. approaching Drummond St. north. Photo taken from under the verandah of a shop on the south side of the street that were many years later to become the Tramcar Restaurant. Note metal fence to cemetery. 1174.6 - Nos. 21 (Sebastopol) crossing 14 (Lydiard St. Nth) at the loop between Sayle and Grey St. Photo taken looking south. 1174.7 - No. 12 bound for Mt Pleasant, in Bridge St. about to stop at the junction for the two routes. Telephoto photo looking west along Bridge St. with many cars in the photo. Very few people on the street itself. 1174.8 - No. 30 and 17 at the City Terminus, on the north side of Sturt St. Taken from the Post Office corner with the Town Hall in the background. 1174.9 - No. 39 inbound along Sturt St. West. with many cars on the road. Bus stop on a pole on the other side of the road.1174.1 - "No. 40 on Lydiard St. North service waits at the level crossing at Ballarat Railway Station." 1174.2 - "No. 12 bound for 'Gardens' seen across the centre plantation in Sturt St." 1174.3 - "Barrett Ave." 1174.4 - "The Sebastopol route near the terminus" 1174.6 - "Nos. 21 and 14 crossing at Sayle St. Loop on Sebastopol route" 1174.7 - "No. 12 at Eastern end of Bridge St." 1174.8 - "Nos. 30 and 17 in Sturt St. at Cnr of Lydiard St." 1174.9 - "No. 39 City bound from 'Gardens" in Sturt St. West" All have date stamp of "Sep 1971" in black ink. Writing in blue ink.tramways, trams, lydiard st. nth, railway crossing, sturt st, wendouree parade, sebastopol, macarthur st., bridge st., sturt st. west, tram 12, tram 14, tram 17, tram 21, tram 30, tram 39, tram 40, tram 42, tram 43 -
 Ballarat Tramway Museum
Slide - 35mm slide/s - set of 11, Noel Simons, 23/10/1965 12:00:00 AM
Set of 11 Kodachrome transparencies taken on 23/10/1965 in Melbourne. 1178.1 - W7 1020 (on route 9A, Northcote via St Georges Road) with a W2 536 (Deepdene) behind at the corner of Victoria Parade and Brunswick St. East Melbourne or Fitzroy. Has Eastern Hill fire station and ICI building in background. 1020 has front dash panel ads for Queens Bridge Motors and Bridgestone tyres. 1178.2 - W5 759 (route 19, North Coburg) and W5 807 in Elizabeth St. Melbourne at the intersection of Bourke St. with the State Savings Bank building in the background. 759 has side ads, one of which is for CASTROL. 1178.3 -SW6 903 crossing Brunswick St. in Victoria Parade, Fitzroy bound for Deepdene, route 45. Photo taken after tram has passed photographer. 1178.4 - W7 1019 (route 96, East Brunswick Blyth St.) and W7 1010 (route 88 East Preston) in Nicholson St at intersection with Victoria Parade. A Herald newspaper truck is alongside 1019. 1178.5 - W7 1040 (route 96, East Brunswick Blyth St.) in Nicholson St at intersection with Albert St. Has Princess Theatre in the background. (High res scan added 26/10/2008 - copy to FOHTD) .1178.6 - W6 974 (route 89 East Preston Bell St.) in Bourke St. about to turn into Spring St. Has buildings on the south side of Bourke St in background, including Southern Cross Hotel. Note trees in tubs and red phone box by Windsor Hotel. 1178.7 - as for same location as 1178.6 - SW6 967 (route 96) and W6 971 (inbound - route 90 - City Spencer St.) 967 has Lucas ad on front dash. 1178.8 - W7 1013 (route 88 East Preston) photographed from W6 991 in Bourke St at corner of Russell St. Has Normans corner store, Treadways and Foys in background. 1178.9 - W2 553 (route 1 East Coburg) at the corner of Elizabeth St and Bourke St. Has the Leviathan, Roger David and Ezywalkin shops in the background. 1178.10 - W6 991 (route 88) and W7 (route 96) in Bourke St. at corner with Elizabeth St. Photo taken from the GPO steps. 991 has ads for BIC pens and CASTROL. In background are the State Savings Bank, Halls Books and McEwans shops. 1178.11 - Line up of north bound trams (3 +) lead by W2 449and southbound in Elizabeth St at corner of Collins St. Has Flinders St. station building in the background. Hi -res image of .10 added 22-12-2018All have date stamp of "23 Oct 1965" in purple ink. All black ink unless otherwise noted. 1178.1 - "W7 1020 turning into Brunswick St. from Victoria parade, East Melbourne (followed by W2 536) 1178.2 - "W5 799 and 807 in Elizabeth St. Melbourne at cnr. of Bourke St." 1178.3 - "SW6 903 entering reserved track in Victoria Parade, East Melbourne" 1178.4 - "W7 1019 and 1010 in Nicholson St. East Melbourne at Victoria Pde intersection" 1178.5 - "W7 1040 Melbourne's last tram (to date) in Nicholson St. at Albert St. intersection." 1178.6 - "W6 974 in Bourke St. Melbourne, about to turn into Spring St." 1178.7 - "W6 971 entering Bourke St. from Spring St. Melbourne, passes SW6 967 outward bound for East Brunswick" 1178.8 - "W7 1013 (seen from W6 991) in Bourke St. Melbourne crossing Russell St." 1178. 9 -"W2 553 in Elizabeth St. Melbourne at cnr of Bourke St." 1178.10 - "W6 991 and W7 1005 in Bourke St. Melbourne at cnr of Elizabeth St." 1178.11 - "W2 449 leads a line of Peak hour cars along Elizabeth St. Melbourne (at Collins St. corner)"tramways, trams, melbourne, victoria parade, nicholson st., brunswick st., bourke st, elizabeth st, tram 1020, tram 536, tram 799, tram 807, tram 903, tram 1019, tram 1010, tram 1040, tram 974, tram 967, tram 971, tram 1013, tram 553, tram 991, tram 1005, tram 449 -
 Ballarat Tramway Museum
Slide - 35mm slide/s - set of 7, Noel Simons, 23/10/1965 12:00:00 AM
Set of 7 Kodachrome transparencies taken on 23/10/1965 in Melbourne. 1179.1 - W2 488 (route 42, Mont Albert) at the corner of High St. and Cotham Road Kew. Taken from Kew Post Office, has Bank of New South Wales in the background, CBC bank and the Greyhound Hotel. Tram has ads for Kolotex stockings and Ryco oil filters. 1179.2 - SW2 436, in bound (route 45, City) leaving Cotham Road, about to join High St, Kew. Buildings on the south side of Cotham Road in photo. Tram has an ad along with others for Vincent's powders. 1179.3 - W2 545 (route 48, North Balwyn) in High St. Kew. Has Commercial bank in background along with other shops. 1179.4 - W2 648 (route 42, Mont Albert) turning from High St. South into High St at Kew Junction, with Clifton Hotel in background. Tram has an ad for Kenric clothes. Note an MFBB street fire alarm by the tram stop. 1179.5 - W2 566 (inbound route 42, City) at same location as 1179.5. Tram has a Jex and a Remy Martin Brandy ads. on front dash panel. 1179.6 - W2 572 entering Victoria Parade from Brunswick St. Fitzroy. Tram has a Jex and a Remy Martin Brandy ads. on front dash panel. Eastern Hill Fire Station and ICI building in background. 1179.7 - W2 378 (inbound, route 45, City) and W2 572, inbound, in Victoria Parade between Brunswick St and Gismo St. East Melbourne. Otherwise as for 1179.6.All have date stamp of "23 Oct 1965" in purple ink. All black ink unless otherwise noted. 1179.1 - "W2 488 Entering Cotham Rd. from High St. Kew" 1179.2 - "SW2 436 in Cotham Rd., Kew, about to enter High St." 1179.3 - "W2 545 in High Street Kew, nearly opposite Cotham Road" 1179.4 - "W2 648 entering High Street from High Street South, Kew". 1179.5 - "W2 566 entering High St. South from High St. Kew" 1179.6 - "W2 572 entering Victoria Pde from Brunswick St. East Melbourne" 1179.7 - "W2 378 and 572 in Victoria Pde between Brunswick and Gisborne Sts. East Melbourne."tramways, trams, kew, high st kew, cotham road, victoria parade, melbourne, tram 545, tram 488, tram 436, tram 648, tram 566, tram 572, tram 378 -
 Ballarat Tramway Museum
Slide - 35mm slide/s - set of 17, Noel Simons, 20/11/1962 12:00:00 AM
Set of 17 transparencies taken on 20/11/1962 on Kodak mounts. 1187.1 - Bendigo No. 2 at the Quarry Hill terminus, showing destination of Quarry Hill. Has Cohns Drinks and Streets Ice Cream ads on dash panel, a SEC 'electric cooking' roof ad and another roof ad. Shows the Y terminus at this location, but tram standing just before it. Overhead in position. 1187.2 - as above, but closer up. 1187.3 - as above, but from the north side, showing cemetery in the background. 1187.4 - Bendigo No.3 at Eaglehawk terminus. Tram showing destination of Quarry Hill. Has the various buildings at Eaglehawk in the background including the Foodland store. Has Streets Ice cream and White Horse Whiskey ads on the dash panel. 1187.5 - Bendigo No. 18 at Garden Gully crossing loop, in bound, with destination of Eaglehawk. Passengers waiting for an Eaglehawk tram at the stop. Has a white horse whiskey ad on dash panel and SEC roof ads. Conductor standing in doorway looking out. 1187.6 - Bendigo No. 7 inbound in Nolan St. at cnr of McCrae St. showing destination of Golden Square. Has Streets Ice cream ad on dash panel and a Castrol Roof ad. 1187.7 - Bendigo No. 19 at the North Bendigo terminus with railway level crossing in background. Tram has a Cohns Drinks ad and an SEC 'Electric Cooking' roof ad. 1187.8 - Bendigo No. 2 at the Quarry Hill terminus, looking back into Bendigo, showing destination of Eaglehawk. 1187.9 - Bendigo No. 21 in McCrae St, near Nolan St outbound for North Bendigo. Photo taken after tram has passed photographer. 1187.10 - Bendigo Nos. 4 and 26 at Charing Cross in View St. with fountain alongside and the Beehive, Ezywalkin Buildings in the background. No. 26 has a Sandhurst Milk and SEC 'Electric Cooking' roof ad. 1187.11 - close up of 22E maximum traction truck and folded footstep. 1187.12 - Bendigo No. 19 at Charing Cross terminus, after tram has passed photographer, showing destination of North Bendigo, with the Beehive building in the background and passengers boarding tram. 1187.13 - Bendigo No. 11, turning from View St. into Pall Mall, showing Special with the conductor holding point bar. Has the Beehive and Ezywalkin Buildings in the background. 1187.14 - No. 7 at Charing Cross terminus, in Pall Mall, bound for Golden Square. Has the Beehive and Ezywalkin buildings in the background and passengers waiting at the tram stop. 1187.15 - No. 18 at the Charing Cross terminus, bound for Eaglehawk. Has the Beehive and Ezywalkin buildings in the background and passengers waiting at the tram stop. Also has the 'Safety Zone' sign in the photograph. 1187.16 - No. 2 at Quarry Hill terminus, night or dusk photo. Tram showing destination of Depot. 1187.17 - No. 26 at Charing Cross, night photo. Tram has destination of Quarry Hill, but is on the line for Eaglehawk. Photo looks along Mitchell St. Also shows Safety Zone sign. Information written on in black ink and date stamped on purple ink. 1187.1 - "No. 2 at Quarry Hill terminus Bendigo" 1187.2 - "No. 2 at Quarry Hill terminus Bendigo" 1187.3 - "No. 2 at Quarry Hill terminus Bendigo" 1187.4 - "No. 3 at Eaglehawk terminus" 1187.5 - "No. 18 in Mt Korong Road, Long Gully at cnr of Havilah Road (Eaglehawk Route)" 1187.6 - "No. 7 in Nolan St. Bendigo, at Cnr of McCrae St., near lake Weeroona, (North Bendigo Route)' 1187.7 - "No. 19 at North Bendigo terminus" 1187.8 - "No. 2 at Quarry Hill terminus" 1187.9 - "No. 21 in McCrae St. Bendigo, near Nolan St. (North Bendigo Route) 1187.10 - "4 and 26 at Alexandra Fountain, Charing Cross Bendigo" 1187.11 - "Truck of Bogie Car, Bendigo Tramways" 1187.12 - "No. 19 in Pall Mall at Charing Cross, Bendigo" 1187.13 - "Birney car No. 11 entering Pall Mall from View St. at Charing Cross Bendigo" 1187.14 - "No. 7 in Pall Mall at Charing Cross, Bendigo" 1187.15 - "No. 18 at Alexandra Fountain, Charing Cross, Bendigo" 1187.16 - "No. 2 at Quarry Hill terminus, Bendigo" 1187.17 - "No. 26 at Alexandra Fountain, Charing Cross, Bendigo" tramways, trams, bendigo, quarry hill, eaglehawk, north bendigo, maximum traction, night photo, tram 2, tram 3, tram 4, tram 7, tram 11, tram 18, tram 19, tram 21, tram 26