Showing 9882 items
matching tram museum
-
 Ballarat Tramway Museum
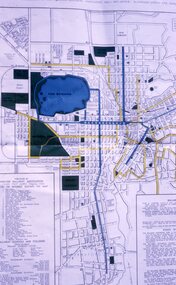
Slide - 35mm slide/s - set of 2, Peter Moses, Aug. 1971
Set of two photographs of a map of Ballarat showing the tramway routes that have been published by the Greater Ballarat Association. .1 - close up view of the map, focusing on the tram routes. .2 - the whole map. Kodak cardboard mount slide, taken by Peter Moses, August 1971. See Reg Item 5613 for an actual copy of this map, though in poor condition. Also Reg Item 2776 for another version.On the rear of the slides in red ink. .1 - "Ballarat / Tram routes" .2 - Ballarat / Tram routes" and words "very good".tramways, trams, ballarat, map, greater ballarat association -
 Ballarat Tramway Museum
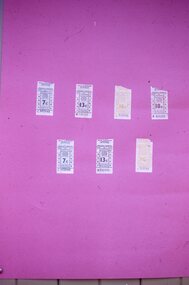
Slide - 35mm slide/s, Peter Moses, Sep. 1971
Photograph of SEC Ballarat tickets, on a light purple background - 7c, 13c, 16c and 18c. Assumed tickets collected by Peter Moses. Kodak cardboard mount slide, taken by Peter Moses, probably between August and Oct. 1971, slide dated "Oct 71".On the rear of the slide in pencil "Ballarat Tickets"tramways, trams, tickets -
 Ballarat Tramway Museum
Slide - 35mm slide/s, Peter Moses, 1977
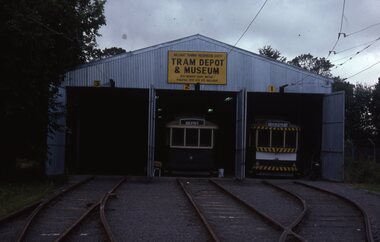
Photo of the depot fan and the front of the Ballarat Tramway Preservation Society depot, Jan. 1977. Has trams 28 (on No. 2 road) and 27 (on No. 1 road). Shows track arrangements at the time. Kodak cardboard mount slide, taken by Peter Moses Jan. 1977On the rear of the slides in black ink "1977 Ballarat Society Depot" and "P. Moses" in the bottom left hand corner in black ink on the other side of the slide.tramways, trams, btps, depot, tram 28, tram 27 -
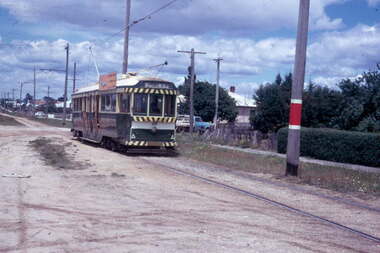
 Ballarat Tramway Museum
Slide - 35mm slide/s, Peter Moses, 1/1969?
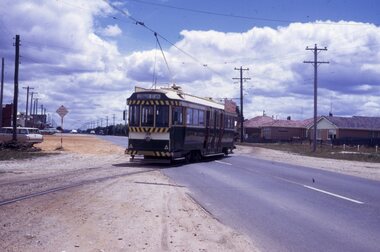
Photo of SEC Ballarat No. 39 northbound, Albert St. Sebastopol, crossing the highway to the east side of the road. Tram has destination of "Lydiard St. Nth" and has a SEC "Everything's under control in my all-electric kitchen" roof advertisement. See also Reg. Item 2098, the previous slide. Kodak cardboard mount slide, taken by Peter Moses assumed Jan. 1969.On the rear of the slide "Sebastopol Tram" in black ink "P. Moses" along bottom left hand corner in black ink on the other side of slide.tramways, trams, albert st, sebastopol, tram 39 -
 Ballarat Tramway Museum
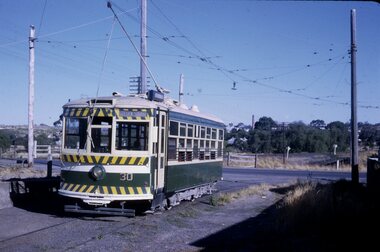
Slide - 35mm slide/s, Peter Moses, Jan. 1969
Photo of SEC Ballarat No. 30 west bound in Sturt St. crossing Drummond St., with the Southern Cross Hotel in the background and a bogie car northbound in Drummond St. South. Probably No. 39 as next photo in sequence - See Reg. item 2079. Location known as Hospital Corner. Kodak cardboard mount slide, taken by Peter Moses assumed Jan. 1969.On the rear of the slide "P. Moses" along bottom left hand corner in black ink.tramways, trams, hospital corner, sturt st, drummond st, tram 30 -
 Ballarat Tramway Museum
Slide - 35mm slide/s, Peter Moses, Jan. 1969
Photo of SEC Ballarat No. 39 turning from Drummond St. South into Sturt St., with the Southern Cross Hotel in the background. Location known as Hospital Corner. Note the two tone FC Holden. Also has Rimmington Bros Butchers and J. A. Malpass shops in the photograph. Kodak cardboard mount slide, taken by Peter Moses assumed Jan. 1969.On the rear of the slide "P. Moses" along bottom right hand corner in black ink.tramways, trams, hospital corner, sturt st, drummond st, tram 39 -
 Ballarat Tramway Museum
Slide - 35mm slide/s, Peter Moses, Jan. 1969
Photo of SEC Ballarat No. 41 turning from Sturt St into Drummond St. South., with the Southern Cross Hotel in the background. Location known as Hospital Corner. Note the SEC/ ESCo electrical section isolator box in the median strip by the pole. Tram has a SEC roof advertisement "Everything's under control in my all-electric kitchen." Kodak cardboard mount slide, taken by Peter Moses assumed Jan. 1969.On the rear of the slide "P. Moses" along bottom right hand corner in black ink.tramways, trams, hospital corner, sturt st, drummond st, tram 41 -
 Ballarat Tramway Museum
Slide - 35mm slide/s, Peter Moses, Jan. 1969
Photo of SEC Ballarat No. 31 east bound in Sturt St. with a destination of Mt. Pleasant, taken from the east of Drummond St. North. Tram about to pick up a passenger at the tram stop. Tram has two Johnnie Walker Whiskey roof advertisements. Kodak cardboard mount slide, taken by Peter Moses assumed Jan. 1969.On the rear of the slide "P. Moses" along bottom right hand corner in black ink.tramways, trams, sturt st, drummond st, tram 31 -
 Ballarat Tramway Museum
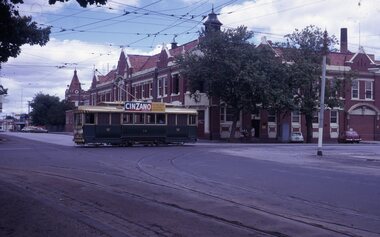
Slide - 35mm slide/s, Peter Moses, Jan. 1969
Photo of SEC Ballarat No. 14 crossing Sturt St, entering Drummond St. North with the Ballarat Base Hospital building in the background. Tram has a Cinzano roof advertisement and a Twin Lakes sign on the back of the tram. Kodak cardboard mount slide, taken by Peter Moses assumed Jan. 1969.On the rear of the slide "P. Moses" along bottom right hand corner in black ink.tramways, trams, hospital corner, sturt st, drummond st, tram 14 -
 Ballarat Tramway Museum
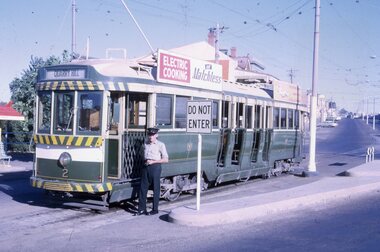
Slide - 35mm slide/s, Peter Moses, Jan. 1969
Photo of SEC Bendigo No. 2 at Eaglehawk terminus. Tram has a crew member (driver) standing by the rear door and has SEC roof advertisements "Electric Cooking is Matchless" and "Everything's under control in my all-electric kitchen". Kodak cardboard mount slide, taken by Peter Moses, Jan. 1969.On the rear of the slide "Jan 1969 Eaglehawk terminus", "P.Moses" and on the other side of the slide, in red ink “2”.tramways, trams, bendigo, eaglehawk, tram 2 -
 Ballarat Tramway Museum
Slide - 35mm slide/s - set of 2, Peter Moses, Jan. 1969
Set of two photos of SEC Bendigo No. 17 in Mitchell St. Bendigo. .1 - No. 17 using the crossover. Has destination of "Eaglehawk". In the background are the Plaza theatre, Maples store and Coles store. Advised that the Sunday run outs in the late morning, early afternoon used this crossover to form the first Eaglehawk tram service. .2 - No. 17, with destination of "Quarry Hill", near the Railway station. Has a Wilkinson Sword and SEC "Electric Cooking serves you best", roof advertisements. Kodak cardboard mount slide, taken by Peter Moses, Jan. 1969.On the rear of the slide: .1 - in red ink "Bendigo Mitchell St." , "6" and "P. Moses" in black ink. .2 - "3" in red ink and "P. Moses" in black ink.tramways, trams, bendigo, mitchell st, quarry hill, tram 17 -
 Ballarat Tramway Museum
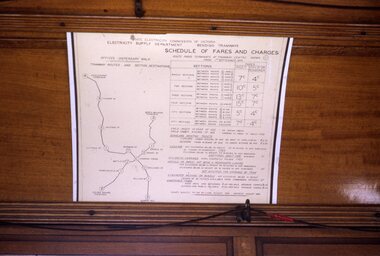
Slide - 35mm slide/s, Peter Moses, Jan. 1969
Photo of the SEC Bendigo "Schedule of Fares and Charges" inside a tram. The fare chart appears to have been mounted on a large sheet of white cardboard. Note the red tape joining the bell cord. Kodak cardboard mount slide, taken by Peter Moses, Jan. 1969.On the rear of the slide "Jan. 1969 Bendigo/ Map of Routes" in blue ink, "P. Moses" in black ink and other side of the slide in red ink “1”.tramways, trams, bendigo, schedule of fares, map, fares -
 Ballarat Tramway Museum
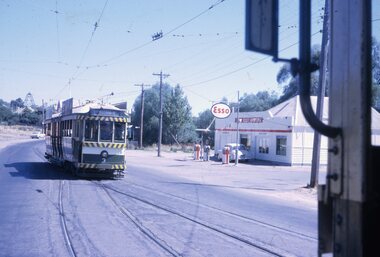
Slide - 35mm slide/s, Peter Moses, Jan. 1969
Photo of the SEC Bendigo No. 3 entering Long Gully Loop, bound for Eaglehawk, while another bogie tram waits in the loop. In the background is an Esso service station, known as Long Gully Motors, and a poppet head on a hillside in the background. Kodak cardboard mount slide, taken by Peter Moses, Jan. 1969.On the rear of the slide "P. Moses" in black ink and other side of the slide in red ink “4”.tramways, trams, bendigo, eaglehawk, long gully, esso, tram 3 -
 Ballarat Tramway Museum
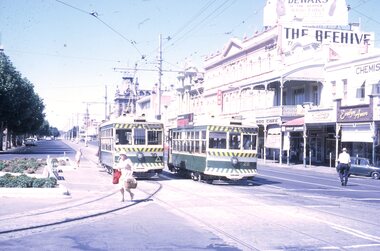
Slide - 35mm slide/s - set of 4, Peter Moses, Jan. 1969
Set of four colour slides taken at Charing Cross Bendigo, Jan. 1969. .1 - Trams 30 and 28 travelling to North Bendigo and Golden Square respectively. Has the Beehive building in the background, along with W.M.I. Jones Chemist, Evelyn Amor shop, Dewars Whiskey rooftop advertisement. 28 has a SEC Briquettes roof advertisement. .2 - As above but with the front or bogie tram in the photo. Also has A. G. Treloar Optician's shop. Kodak cardboard mount slide, taken by Peter Moses, Jan. 1969. .3 - Close up photo of Birney No. 30, with 28 in the background. .4 - No. 28 leaving for Golden Square with the Plaza building, the Cenotaph, and the City Family Hotel in the background. Kodak cardboard mount slide, taken by Peter Moses, Jan. 1969.On the rear of all the slides "P. Moses" in black ink .1 - "Bendigo Charing Cross" and in red ink "19" .2 - "Bendigo three trams / Charing Cross" and in red ink "21" .3 - "Bendigo" and in red ink "23" .4 - "Bendigo Charing Cross" and in red ink "14". tramways, trams, bendigo, tram 28, tram 30 -
 Ballarat Tramway Museum
Slide - 35mm slide/s - set of 5, Peter Moses, Jan. 1969
Set of five colour slides taken the SEC Bendigo depot, Jan. 1969. .1 - inside depot, show two bogies and one Birney on one road and the pit arrangements. .2 - ditto, slightly different exposure .3 - trams 21, 24 and 5 at the front of the depot .4 - Scrubber tram by the depot extension. .5 - Looking across the depot yard with the scrubber in the foreground and depot in the background. Kodak cardboard mount slide, taken by Peter Moses, Jan. 1969. On the rear of all the slides "P. Moses" in black ink .1 - "Jan 1969 Bendigo / Depot" in blue ink and on the opposite side of the slide in red ink “28” .2 - "Jan 1969 Bendigo / Depot" in blue ink and on the opposite side of the slide in red ink “27” .3 - "Jan 1969 Bendigo / Tram Depot" in blue ink and on the opposite side of the slide in red ink “29” .4 - In red ink "31" .5 - "Jan 1969 Bendigo / Depot" in blue ink and on the opposite side of the slide in red ink “30”. tramways, trams, bendigo, depot, scrubber tram, tram 21, tram 24, tram 5 -
 Ballarat Tramway Museum
Slide - 35mm slide/s - set of 3, Peter Moses, Jan. 1969
Set of two colour slides taken at the North Bendigo terminus and another in Pall Mall, Bendigo, Jan. 1969. .1 - No. 30 at North Bendigo terminus - has destination "Golden Square" .2 - Interior view of Birney tram with crew members numbers 22, 29 and three seated passengers. .3 - View of Pall Mall looking north from the tram stop - has the Shamrock Hotel in the distance and other buildings on the east side of the street, including a 3BO (Bendigo radio) sign. Kodak cardboard mount slide, taken by Peter Moses, Jan. 1969.On the rear of all the slides "P. Moses" in black ink .1 -"Bendigo / North Bendigo terminus" in blue ink, and in red ink “12” .2 - " Jan 1969 Bendigo / Inside Brill car" in blue ink .3 - "Bendigo Pall Mall" in black ink and in red ink “7”.tramways, trams, bendigo, north bendigo, birney, tram crews, pall mall, tram 30 -
 Ballarat Tramway Museum
Slide - 35mm slide/s - set of 13, Peter Moses, 1974
Set of 13 colour slides, 7 on Kodak cardboard mounts and 6 on Agfa colour plastic mounts. .1 - Bendigo Trust, Birney trams 28 and 30 at Central Deborah Mine terminus. No. 30 has a 3BO Roof advertisement. .2 - ditto .3 - ditto with the Central Deborah mine and buildings in the background. .4 - No. 30 inbound in High St. with Sacred Heart Cathedral in the background (spire under construction) .5 - Nos. 30 and 28 crossing at Charing Cross with the Fountain Plaza building and the fountain in the background. .6 - No. 28 north bound in Pall Mall, after leaving Charing Cross with the Shamrock Hotel in the background. .7 - Photo showing track and centre poles in View St. looking west - no overhead. Has AMOCO service station near McKenzie St. .8 - No. 28 taken from cab of No. 30, in McCrae St, at end of double track. .9 - No. 28 turning from McCrae St. into Nolan St. .10 - No. 28 in Nolan St. with Lake Weeroona rowing sheds in the background. .11 - No. 19 in now Tramway Ave (then Arnold St.) running into depot .12 - No. 19 outside Bendigo depot .13 - ditto Slides taken by Peter Moses, during the winter of 1974 (no leaves on the trees).On the rear of all the slides "P. Moses" in black ink. .1 - "1974 Bendigo Central Deborah Mine" in blue ink and in red ink “16”. .2 - "1974 Bendigo two Birney cars / Central Deborah Mine" in blue ink and in red ink “18”. .3 - "1974 Bendigo trams at Central Deborah Mine" in blue ink and in red ink “17”. .4 - "1974 Bendigo High St / tram near Sacred Hearth Cathedral" in blue ink and in red ink “15”. .5 - "1974 Bendigo two Birney cars / Charing Cross" in blue ink and in red ink “20”. .6 - "1974 Bendigo No. 28 Pall Mall" in blue ink and in red ink “8”. .7 - "1974 Bendigo / Old Tramline View St." in black ink and in red ink “5”. .8 - "1974 Bendigo, McRae St. (Pall Mall)" and in red ink "9". .9 - "1974 Bendigo, Lake Weeroona, / tram " and in red ink "10". .10 - "1974 Bendigo, Lake Weeroona" and in red ink “11”. .11 - "1974 Bendigo / Outside depot" and in red ink “24”. .12 - "1974 Bendigo / Outside depot" and in red ink “25”. .13 - "1974 Bendigo / Depot" and in red ink “26”.tramways, trams, bendigo, central deborah, bendigo trust, sacred hearth cathedral, north bendigo, depot, tram 19, tram 28, tram 30 -
 Ballarat Tramway Museum
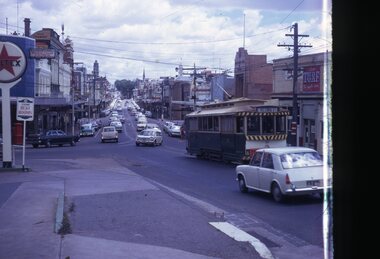
Slide - 35mm slide/s, Peter Moses, Jan. 1969
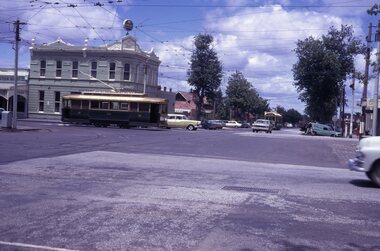
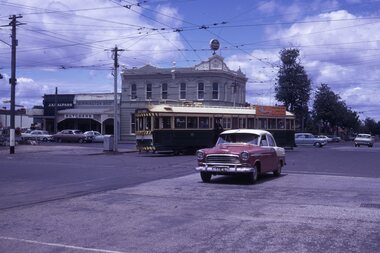
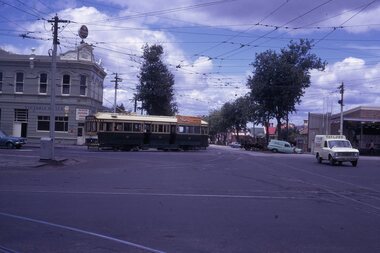
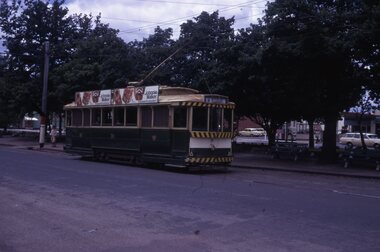
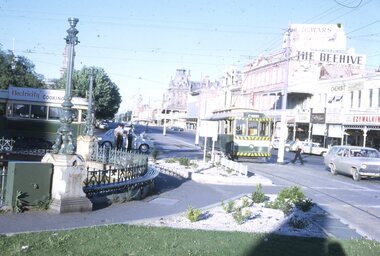
Photo of SEC Ballarat No. 40 west bound in Bridge St. Tram has two car numbers on the front, the destination roll with black background with white lettering. Later replaced with black letters on white background. Has Morseheads shop on the left hand side, Coles store and Christmas decorations in the street. The driver of the car in front of the tram is giving a hand signal - STOP! White cardboard mount slide, taken by Peter Moses assumed Jan. 1966.On the rear of the slides in black ink "Ballarat Tram, end of Main St." and "P. Moses" in the bottom left hand corner in black ink.tramways, trams, bridge st, morseheads, tram 40 -
 Ballarat Tramway Museum
Slide - 35mm slide/s, Peter Moses, Jan. 1969
Photo of SEC Ballarat No. 33 east bound at junction of Main St. and Victoria Streets, bound for Victoria St. Tram has destination of Victoria St., a Twin Lakes sign. Companies in image are Turf advertisement and Caltex. Photo taken looking along Bridge St. Slide has been at the start or the end of the roll, and has been hand mounted in a cardboard mount by the photographer. White cardboard mount slide, taken by Peter Moses assumed Jan. 1969.On the rear of the slides in black ink "Ballarat tram turn off to Victoria St." and "P. Moses" in the bottom left hand corner in black ink.tramways, trams, bridge st, main st, victoria st., tram 33 -
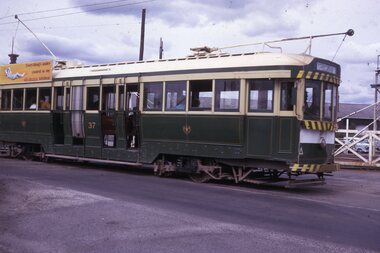 Ballarat Tramway Museum
Slide - 35mm slide/s, Peter Moses, Jan. 1969
Photo of SEC Ballarat No.37 passing through the railway gates at Ballarat Railway Station, Lydiard St. North, with the destination of "Sebastopol". Tram has a SEC "Everything's under control in my all-electric kitchen". Kodak cardboard mount slide, taken by Peter Moses assumed Jan. 1969, dated only "Jan", but date lines up with Bendigo slides and type of numbering. Could be 1970.On the rear of the slides in black ink "P. Moses" along bottom left hand corner in black ink.tramways, trams, railway crossing, lydiard st, tram 37 -
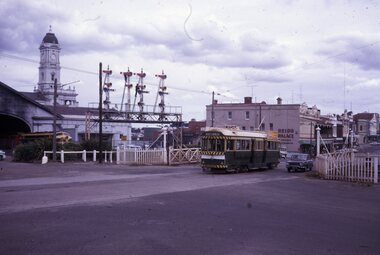 Ballarat Tramway Museum
Slide - 35mm slide/s, Peter Moses, Jan. 1969
Photo of SEC Ballarat No.41 passing through the railway gates at Ballarat Railway Station, Lydiard St. North, with the destination of "Lydiard St Nth". Tram has a SEC "Everything's under control in my all-electric kitchen". Reid's Coffee Palace is in the background. Photo shows the Ballarat Railway Station clock tower, part of the train shed and the signals on the station side of the gates. A "B" class locomotive on a passenger train is standing in platform 1 of the station. Kodak cardboard mount slide, taken by Peter Moses assumed Jan. 1969, dated only "Jan", but date lines up with Bendigo slides and type of numbering. Could be 1970.On the rear of the slides in black ink "P. Moses" along bottom left hand corner in black ink.tramways, trams, railway crossing, lydiard st, railway station, reid's coffee palace, tram 41 -
 Ballarat Tramway Museum
Slide - 35mm slide/s - set of 2, Peter Moses, Jan. 1969
2059.1 - Photo of SEC Ballarat No.41 passing through the railway gates at Ballarat Railway Station, Lydiard St. North, with the destination of "Sebastopol". Tram has a SEC "Everything's under control in my all electric kitchen". Reid's Coffee Palace is the background. Photo shows the Ballarat Railway station clock tower, part of the train shed and the signals on the station side of the gates and another bogie tram waiting at the end of the double track in Lydiard St. for No. 41 to pass. 2059.2 - ditto, but with the two trams passing each other. The Provincial Hotel is also in the photograph. Kodak cardboard mount slide, taken by Peter Moses assumed Jan. 1969, dated only "Jan", but date lines up with Bendigo slides and type of numbering. Could be 1970.On the rear of the slides in black ink "P. Moses" along bottom left hand corner in black ink.tramways, trams, railway crossing, lydiard st, railway station, reid's coffee palace, provincial hotel, tram 41 -
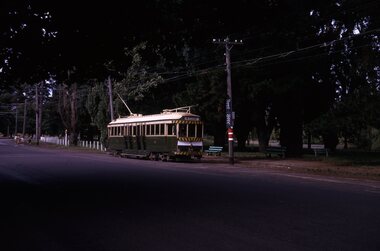 Ballarat Tramway Museum
Slide - 35mm slide/s - set of 2, Peter Moses, Jan. 1969
Set of two photos of SEC Ballarat No. 34 in Wendouree Parade at Gardens Loop. Tram has destination of "Mt Pleasant". .1 - No. 34 at the loop, waiting to depart. Note the signs on the poles and the seats at the stop. .2 - No. 34 has departed loop and running south along Wendouree Parade - note the many parked cars and trees in the street. Kodak cardboard mount slide, taken by Peter Moses assumed Jan. 1969, dated only "Jan", but date lines up with Bendigo slides and type of numbering. Could be 1970. See also Reg Item 3261 for photo used as Membership card for 2004 - 2005.On the rear of the slides in black ink "P. Moses" along bottom left or right hand corner in black ink.tramways, trams, wendouree parade, gardens loop, tram 34 -
 Ballarat Tramway Museum
Slide - 35mm slide/s, Peter Moses, 1/1969?
Photo of SEC Ballarat No. 39 northbound, Albert St. Sebastopol, prior to crossing the highway to the other side of the road. Tram has destination of "Lydiard St. Nth" and has a SEC "Everything's under control in my all-electric kitchen" roof advertisement. Slide dated 1970 on the back, but date lines up with Bendigo slides and type of numbering. Kodak cardboard mount slide, taken by Peter Moses assumed Jan. 1969.On the rear of the slide "Sebastopol Tram 1970" in black ink "P. Moses" along bottom left hand corner in black ink on the other side of slide.tramways, trams, albert st, sebastopol, tram 39 -
 Ballarat Tramway Museum
Slide - 35mm slide/s, Peter Moses, Jan. 1969
Photo of SEC Bendigo No. 6 crossing Mitchell St, north bound for North Bendigo, while a bogie tram waits to depart Charing Cross, east bound for Quarry Hill. Three SEC crew members standing by the front of the bogie tram and an inspector crossing the road near No. 6. Has part of the fountain in the view. Also in the photo are The Beehive building, and advertisement for Dewars whiskey and a shop front for "Ezywalkin" shoes. The bogie tram has a SEC roof advertisement "Electricity Best for cooking". Kodak cardboard mount slide, taken by Peter Moses, Jan. 1969.On the rear of the slide "Jan. 1969 Bendigo:" in blue ink, "P. Moses" in black ink and other side of the slide in red ink “22”.tramways, trams, bendigo, charing cross, tram 6 -
 Ballarat Tramway Museum
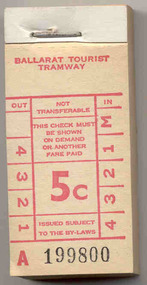
Ephemera - Ticket/s, Ballarat Tramway Museum (BTM), BTPS - 5c, Oct. 1975
Demonstrates the Museum's ticketing systems and ongoing production of tickets.Block of 200 tickets - red ink on off white paper, denomination 5c, lettered A 199800 to A 199999, headed Ballarat Tourist Tramway. The 200 tickets have been stapled onto a heavy cardboard back with a heavy metal staple. The tickets are in the style of the former State Electricity Commission of Victoria tramway tickets. Tickets in use as Museum entry tickets from mid 1972 at the depot, then as child single tickets in 1974 to 1975. See BTM Fare Chart. Also used as tickets for other purposes such as check tickets and 50c tickets over stamped, cash received checks as donations for many years. Printed 1971? See Fare structure of BTM/BTPStrams, tramways, btm, tickets -
 Ballarat Tramway Museum
Ephemera - Ticket/s, State Electricity Commission of Victoria (SECV), 4/- Scholar's Monthly Ticket, 1950's
Scarlet cloth lined paper ticket with white front, printed in black ink with fare value of 4/-. Blank or Unused Scholar's monthly ticket for use by under 15 years students, numbered A01831, 33 and 34. Has form number "TYE 2-13" in top left hand corner. Space for an expiry date to be stamped on the ticket and name, address and school of the student. Each ticket has been stamped "CANCELLED" in purple ink.trams, tramways, secv, ballarat, schools tickets -
 Ballarat Tramway Museum
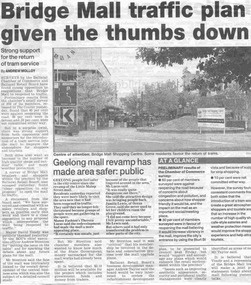
Newspaper, The Courier Ballarat, "Bridge Mall traffic plan given the thumbs down", 8/06/2002 12:00:00 AM
Newspaper cutting from the Courier 8/6/2002, titled "Bridge Mall traffic plan given the thumbs down" written by Andrew Molloy about the general opposition to opening Bridge St. Mall to traffic, but that there was strong support for the return of a tram service. Has a photo of the Mall taken from Grenville St. Article also has notes regarding the Geelong Mall.bridge st, mall, tram revival -
 Ballarat Tramway Museum
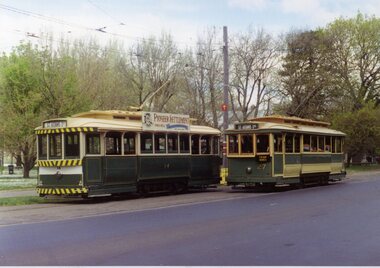
Photograph - Colour Photograph/s - set of 9, Carolyn Dean, 1/10/1995 12:00:00 AM
Yields information about the operation of the horse tram in Wendouree Parade and some of the people involved and the way it was operated and the repainting of tram 671.Set of eight colour photographs taken by Carolyn Dean on 1 October 1995 during operations of the Horse Tram No. 1 in Wendouree Parade and of tram No. 671 during repainting. Printed on Fujicolor paper. .1 - BTM trams 27 and 14 at Gardens Loop .2 - 14 in loop (with trolley pole facing for northbound running) and No. 1 passing. .3 - ditto .4 - ditto .5 - ditto .6 - view from the top deck, with the two horses in photo - taken south bound from St. Aidans Drive .7 - No. 671 being repainted, on depot fan - prior to lining and internal blue paint panels .8 - ditto with 14 in background. .9 - as for .2 See also Reg Item 4070.1 > 4070.5 for other photos of the same event. On rear of each photo in blue ink "1.10.95" and "C. Dean"horse trams, wendouree parade, gardens loop, 671, tram 14, tram 27, tram 1, tram 671 -
 Ballarat Tramway Museum
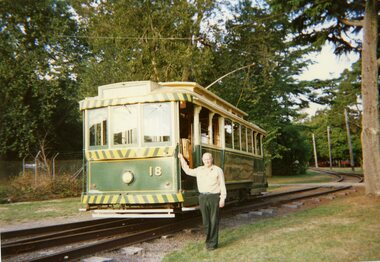
Photograph - Colour Photograph/s - set of 12, Jenny Puls, 13/03/1996 12:00:00 AM
Set of twelve colour photographs of the derailment of Tram No. 18 on the depot fan (2 and 3 road points) on 13 March 1996. Included within the cataloguing sheet are a copy of the report to the traffic manager and the envelope from Frank Puls. Photographs by Jenny Puls, on Kodak paper. The report is a photocopy of the original held by the Traffic Manager. .1 - Frank standing by No. 18 .2 - No. 1 end showing derailed wheel .3 - From the south side .4 - Close up photo showing marks on rail from the wheel. .5 - From the north side .6 - Dave Macartney locating jacks .7 - Looking west towards the depot .8 - From the northside during rerailing .9 - Alan Snowball holding towbar with 661 in the background .10 - 18 and 661 .11 - Being coupled to No. 38 .12 - Being towed back on with Alan Snowball observing. On rear of each photo in stamped in black ink "13 March 1996"accidents, btm, derailments, depot fan, tram 18, tram 661, tram 38