Showing 1015 items matching " cycling"
-
 Flagstaff Hill Maritime Museum and Village
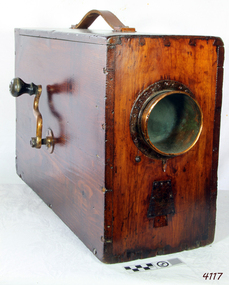
Instrument - Foghorn, Late 19th century
A foghorn is a device that uses sound to warn of navigational hazards like rocky coastlines, or boats of the presence of other vessels, in foggy conditions. The term is most often used with marine transport. When visual navigation aids such as lighthouses are obscured, foghorns provide an audible warning of rocky outcrops, shoals, headlands, or other dangers to shipping. An early form of fog signal was to use a bell, gong, explosive signal or firing a cannon to alert shipping. From the early 20th century an improved device called the diaphone was used in place of these other devices, The diaphone horn was based directly on the organ stop of the same name invented by Robert Hope-Jones, creator of the Wurlitzer organ. Hope-Jones' design was based on a piston that was closed only at its bottom end and had slots, perpendicular to its axis, cut through its sides, the slotted piston moved within a similarly slotted cylinder. Outside of the cylinder was a reservoir of high-pressure air. Initially, this air would be admitted behind the piston, pushing it forward. When the slots of the piston aligned with those of the cylinder, air passed into the piston, making a sound and pushing the piston back to its starting position, whence the cycle would be repeated. This method of producing a low audible sound was further developed as a fog signal by John Northey of Toronto and these diaphones were powered by compressed air produced by an electric motor or other mechanical means that admitted extremely powerful low-frequency notes. The example in the Flagstaff collection is an early cased and portable diaphone used on pleasure or sailing craft. By manually turning the crank handle air is produced and fed into valves that direct air across vibrating metal reeds to produce the required sound. in foggy weather, fog horns are used to pinpoint a vessels position and to indicate how the vessel is sailing in foggy conditions. One blast, when sailing on starboard tack and two blasts, when sailing on a port tack and three dots, when with wind is behind the vessel. Since the automation of lighthouses became common in the 1960s and 1970s, most older foghorn marine installations have been removed to avoid the need to run the complex machinery associated with them, and have been replaced with an electrically powered diaphragm or compressed air horns. The example in the collection is significant as it was used in the early 19th century for sailing vessels was important but these portable crank fog horns have also been superseded by modern electric varieties. Therefore the item has a historical connection with sailing and maritime pursuits from our past.English Rotary Norwegian Pattern nautical foghorn within a boxed pine varnished case with exposed corner dovetailing, original leather carrying strap, brass side crank, and original copper trumped horn. Card accessory with Directions for Use in both English and French.Noneflagstaff hill, warrnambool, shipwrecked coast, flagstaff hill maritime museum, maritime museum, shipwreck coast, flagstaff hill maritime village, great ocean road, foghorn, maritime technology, maritime communication, marine warning signal, portable foghorn, bellows foghorn, crank handle, robert hope-jones, john northey -
 Geelong Cycling Club
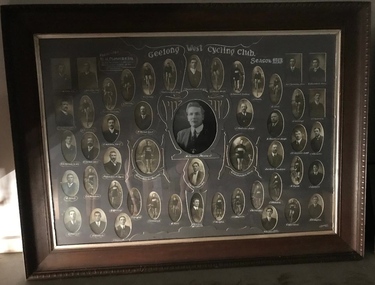
Honour Board, 1913
Decorative wooden frame surrounding black and white photographs behind photographic mounting card in grey. The inscriptions are hand painted in white with some highlights in gold and blue. “Geelong West Cycling Club/Season 1913/Presented to H.Flowers, Esq/by the members of the above club in appreciation of his valuable services as President/W.O’Shannessy, Com Hcapper/R.Thomson, Com/J.J.McCracken/L.Welsh/W.Fisher/T.A.Grundell, whipp/F.Annear, Treasurer and Hcapper/C.Smith,Whip/H.Preschud, Auditor/J.Smith/H.Foot/A.G.Thomson, Comm/W.Grundell, Com/T.W.Grundell/H.H. Potter/G.Hotchin, Jnr Sec & Capt/H.Flowers, President/J. Tournier, Judge/A. Bradshaw, Judge/G. Dorling/J.Thomson/H.H.Preschud, Ass.Sec’t/H. Fisher, Vice Pres/P.Grundell, Sen. TimeK/C.Bond, C Man & Aud/TJB Grundell, Vice Cp/E.G. Stott, Time Keeper/H. Toyne/J.C. Bennett, Judge/C. Simmons/A. Bond/E. Atkinson/E. Keating/ S. Knight/T. F. Preschud/A. Marr/T.R.Balfour/Track Steward/C. Hudgell/J. O’Loughlin/J.W.Grundell/C.Ovendon/H.Toyne/J. Jarrett/R. Preschud/H. Morrish/S.Balfour, Track Stew/V.Balfour, Track Steward/C.Williams/D.M.Hogan” geelong west cycling club; h.flowers; w.o’shannessy;r.thomson; j.j.mccracken; l.welsh; w.fisher; t.a.grundell; f.annear; c.smith; h.preschud; j.smith; h.foot; a.g.thomson; w.grundell; t.w.grundell; h.h. potter; g.hotchin; h.flowers; j. tournier,; a. bradshaw; g. dorling; j.thomson; h.h.preschud; h. fisher; p.grundell; c.bond; tjb grundell; e.g. stott; h. toyne; j.c. bennett; c. simmons; a. bond; e. atkinson; e. keating; s. knight; t. f. preschud; a. marr; t.r.balfour; c. hudgell; j. o’loughlin; j.w.grundell; c.ovendon; h.toyne; j. jarrett; r. preschud; h. morrish; s.balfour; v.balfour; c.williams; d.m.hogan; -
 Stawell Historical Society Inc
Realia - Calender, Brambuk Visitor Centre, A Year in Grampians - Gariwerd
Perpetual Calender. With eight proposed seasons according to Indigenous AustraliansOn a backgrous of Blurred of white and red Flowers "A Year in the Grampians Gariwerd". A Photo of the Grampians across farmland "This Calender combines Australian and European traditions" "Indigenous Australians observe changing weather and environmental patterns and resulting cycles of local seasons. On Each page of this calendar the large scene photos were taken in that month, over a period of twenty years. ( It must be remembered that flowers vary with the elevation, the soil, the aspect and the weather from year to year. You will not always find the same flowers in the same month as portrayed here.) In Europe, a calendar in the home is a long tradition: be it the familiar annual version or the Perpetual one to record important recurring dates such as family birthdays. It is our hope that however you choose to use our calendar, you will take peasure in the colour and beaty of the year in the Grampians Gariwerd." "All photographs by kees and Margo Sietsma. All Profits from the sale of this Calendar go to the Community Association of Halls Gap for the upkeep of our Botanical Gardens of Grampians flora. Dedicated to the memory of Kees Sietsma. with thanks to God, creator and Sustainer. -
 Ringwood and District Historical Society
Document - Folder, Landata Certificates - Part of Crown Portion Six, (Lots 1-4 and numbers 70-90) Maroondah Highway, Parish of Ringwood, Victoria
27 A4 pages of colour photocopied certificates with typewritten summaries, including Certificate of Title Vol 1156 Fol 231096, 8th March 1880. Certificate of Title Vol 1440 Fol 930, 14th March 1883. Certificate of Title Vol 8487 Fol 090, 28th January 1964. Certificate of Title Vol 9019 Fol 634, 5th December 1973. Certificate of Title Vol 3711 Fol 742129, William John Harnwell, 1st August 1913. Certificate ot Title Vol 6552 Fol 1310305, 5th June 1942. Certificate of Title Vol 5282 Fol 1056207, Arthur Clifton Beilby, 19th July 1927. Certificate of Title Vol 6573 Fol 1314497, Florence Beatrice McGoldrick, Lot 4 on Subdivision 14786, Whitehorse Road, Ringwood, 18th August 1942. Proprietors and transferees include: William Astley of Richmond, Compositor, Marianne Thomson of Jolimont, Spinster, Margaret McGillivray of Ringwood, Spinster, George Frederick Burgess Wilsmore of Ringwood, Railway Employee, Leslie Wilsmore, John Wilsmore, Lionel Wilsmore, 90 Whitehorse Road Ringwood, B.T. Building Aust P/L, Lot 1 of subidivision 35788, Whitehorse Road Ringwood, Maliblue P/L 33-35 Ruthven Way Ringwood East, Hesketh Motor Cycles P/L, 70 Maroondah Highway Ringwood, Arthur Clifton Beilby of Ringwood, Storekeeper, Florence Beatrice McGoldrick and Oscar Edward John McGoldrick of "Carrum", Whitehorse Road Ringwood, Elsie May McGoldrick, 82 Whitehorse Road Ringwood, Douglas Murray and Ronald Arthur Mason, H.W.P Tortice and D.M. Tortice, V.B. Rowe. -
 Bendigo Historical Society Inc.
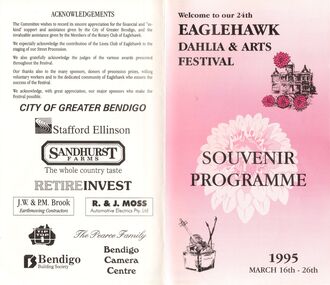
Document - DAHLIA & ARTS FESTIVAL, EAGLEHAWK, 16 March 1995
Dahlia & Arts Festival, Eaglehawk.16th - 26th March, 1995. Programme. Debutante Ball (1), 'The Festival' Exhibition at the Borough Galleries. Debutant Ball (2). Art Preview and Presentation of Awards. Craft Market. Displays of Cake Decorating. Sidewalk Busking Competition. Gala Fair. Eaglehawk Fire Brigade open day. Porcelain Art and Craft Show. Art Show. Display of Memorabilia-Cornish Assoc. Static Display-Irish Assoc. Children's Multi-Dimensional Art Exhibition. Children's Photographic Display. Flower Show. Photographic Print Competition. Eaglehawk Heritage Society-Display. Bridge to Park, foot race. Street Procession. O'Shea-Ryan Bendigo Irish Dancing School and O'Shea-Ryan Academy of Irish Dance - Melbourne Performance. 2nd Seasons Fashion Show. 13th Annual Dahlia & Arts Half Marathon. Ecumenical Church Service. Picnic Lunch. Free Concert-Guinness Show Band. Cycling Criterium. Mining Heritage Tour of Eaglehawk. Dahlia Diner. Variety Concert. ''High Jinx On The High Seas''. Childrens Fancy Dress Parade. Gala Charity Old Time Ball. Brass Instrument Solo/Party Competition. 'Gardening Through The Drought'-Guided Tour. California Hill Church Open Day Craft & Devonshire Teas. Traditional Cornish Concert. 'A Time to Remember'. Annual Croquet & Bowls Tournaments. Festival Guest of Honor Mr Wayne Gregson - Journalist. Editor - Bendigo Advertiser. Festival President, Mr Noel Thomas. Vice Presidents Alan Bull, Kevin Herdman. Executive Officer Jeanette Moss. Treasurer Lorna Thomas. Acknowledgements and sponsors on back page.event, entertainment, eaglehawk dahlia & arts festival, dahlia & arts festival, eaglehawk.16th - 26th march, 1995. programme. debutante ball (1), 'the festival' exhibition at the borough galleries. debutant ball (2). art preview presentation of awards. craft market. displays of cake decorating. sidewalk busking competition. gala fair. eaglehawk fire brigade open day. porcelain art and craft show. art show. display of memorabilia-cornish assoc. static display-irish assoc. children's multi-dimensional art exhibition. children's photographic display. flower show. photographic print competition. eaglehawk heritage society-display. bridge to park, foot race. street procession. o'shea-ryan bendigo irish dancing school and o'shea-ryan academy of irish dance - melbourne performance. 2nd seasons fashion show. 13th annual dahlia & arts half marathon. ecumenical church service. picnic lunch. free concert-guinness show band. cycling criterium. mining heritage tour of eaglehawk. dahlia diner. variety concert. ''high jinx on the high seas''. childrens fancy dress parade. gala charity old time ball. brass instrument solo/party competition. 'gardening through the drought'-guided tour. california hill church open day craft & devonshire teas. traditional cornish concert. 'a time to remember'. annual croquet & bowls tournaments. festival guest of honor mr wayne gregson - journalist. editor - bendigo advertiser. festival president, mr noel thomas. vice presidents alan bull, kevin herdman. executive officer jeanette moss. treasurer lorna thomas. acknowledgements and sponsors -
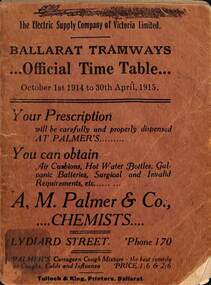 Ballarat Tramway Museum
Ephemera - Ballarat, Electric Supply Co. of Vic (ESCo), "Official Time table", 1914
Timetable published by the Electric Supply Co of Victoria (ESCo) for Ballarat Tramways - dated 1/10/1914 to 30/4/1915. Provides times for each route, ticket prices, school tickets, fare box routes, fares, transfer tickets, and route colours both for day and night. Also has notes to passengers and places of interest for each route. Has contact phone numbers for the Company. Manager Mr Pringle. See item 9131 for a 1915 Winter timetable. Has many adverts - from the front page: A M Palmer Chemist Hodgson - optical Snows - department store Summerscales - postcards W E Thomas - Dentist L Casper - optician E Jermyn - feed merchant Standsfield & Smith - Decorators Briant's Red shop tea rooms A E White - tailor Ellingsen & Co - furniture Southern Cross Hotel H P Stevens & Co - fur coats Frank Williams - painter and decorator Longhurst's bread factory G Buchanan - metal ceilings Robert Hutchinson - electrical engineer and contractor G Ludbrook - furnishing undertaker A Cant - plumber, gasfitter and ironmonger Huddart Parker and Howard Smith coal merchants Precision Big 4 - motor cycles and bicycles H W Channing - Tram drivers' training school T H Richards - butcher C Ellis - furniture exchange Levecke's motor garage Frank Penhalluriack - electrical work Nankervis - store Taffy King Fred A Reed - tobacconist F & J W Gower - builder E E Hobson - decorator Walter Cornell - liver pills Irvines - wines G Warner - Ironmonger J A Reynolds - Wall papers W J Robson - leadlights Porter's - boots and shoes Holman & Fiscalini - stables and motor garage Butler & Co - blinds Mrs Kerby - clothing reseller Rose Cosmetic - H Binzer & Co Mrs Busfield - laundry Mrs J H Dogson - registry office for servants B G Tucker's Water Cure Electric Supply Co Rowlands drinks On the bottom of most pages - Sidar products and on the top the Coliseum Picture Palace. Demonstrates and ESCo timetable and provides information about fare systems and local businesses.Time table - booklet - 40 pages + brown light card covers centre stapled with tabbed or cut pages.tramways, ballarat, timetables, esco, advertisements, fares, tickets, fare boxes -
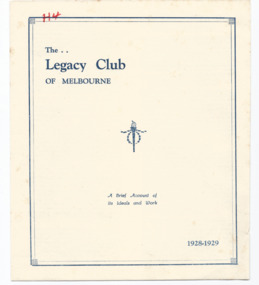 Melbourne Legacy
Pamphlet, The Legacy Club of Melbourne 1923-28 : A brief account of its ideals and works (H4), 1928
A brochure explaining 'A brief account of its ideals and work' in 1928. The notation H4 in red pen shows that it was part of the archive project that was trying to capture the history of Legacy. The brochure lays out the history of the young organisation, it has 146 members in 1927, and clubs had started in state capital and Geelong, Ballarat, and Bendigo. Members were all men who had served in the forces of the British Empire during the war. It shows the work of Legacy as : Junior Legacy Club - for sons (aged 9 to 21) of deceased soldiers. Members of the Legacy Club were in constant touch and acted as Big Brothers. Boys' Literary and Debating Branch - approximately 80 boys attended weekly meetings of a debating society at Anzac House. Boys' Physical Training Branch - for the boys physical welfare classes and conducted weekly by a permanent instructor (paid by Legacy). There were 161 boys attending. Also cricket, football, Lacrosse and swimming clubs, all supervised and coached. A holiday camp is held each Christmas at the seaside- 67 attended the previous year at Balnarring (led by Stan Savige). Girls' Physical Training Branch - started in 1927 and now over 120 girls were being instructed by Mrs AM Gilles (the wife of a Legatee). Lending Library of over 400 books. Vocational placements for junior legatees. Meetings were held in the Victoria Coffee Palace at 1pm on Tuesdays and included a half hour lecture. The policy and objectives were laid out including to preserve the memory of fallen comrades and to assist their dependents, particularly the children. Also to maintain a spirit of comradeship, and to safeguard the good standing and interests of ex-service men in the community and to assist the the to secure suitable employment. The brochure shows activities as: Employment Committee, Comradeship Committee, a pledge to assist the National War Memorial being established on the Domain site, and for the children the 'Deceased Soldiers' Children's Welfare Committee. A schedule of Boys' and Girls' Classes is included to show the options for the children. Also picnics, Christmas camp, cycle club, and rambles as arranged. There is help for vocational options for the children. See also 01480 for a copy from 1930.This is one of the first documents that promotes Legacy and summarises its objective and services. Brochure describing the ideal and activities of the Legacy Club in 1928.Handwritten H4 in red pen.legacy promotion, history, goals, objectives -
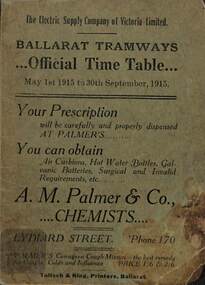 Ballarat Tramway Museum
Ephemera - Ballarat, Electric Supply Co. of Vic (ESCo), "Official Time table", 1915
Timetable published by the Electric Supply Co of Victoria (ESCo) for Ballarat Tramways - dated 1/5/1915 to 30/9/1915 - winter. Provides times for each route, ticket prices, school tickets, issue and use of tokens, fares, transfer tickets, and route colours both for day and night. Also has notes to passengers and places of interest for each route. Has contact phone numbers for the Company. Manager Mr Pringle. See item 9132 for a 1914 Summer timetable. Has many adverts - from the front page: A M Palmer Chemist Hodgson - optical Snows - department store ESCo - show room in Sturt St L Casper - optician E Jermyn - feed merchant Standsfield & Smith - Decorators Briant's Red shop tea rooms A E White - tailor Ellingsen & Co - furniture Southern Cross Hotel H P Stevens & Co - fur coats Frank Williams - painter and decorator Longhurst's bread factory G Buchanan - metal ceilings Robert Hutchinson - electrical engineer and contractor G Ludbrook - furnishing undertaker A Cant - plumber, gasfitter and ironmonger Huddart Parker and Howard Smith coal merchants Precision Big 4 - motor cycles and bicycles H W Channing - Tram drivers' training school T H Richards - butcher C Ellis - furniture exchange Levecke's motor garage Frank Penhalluriack - electrical work Nankervis - store Taffy King Fred A Reed - tobacconist F & J W Gower - builder E E Hobson - decorator Walter Cornell - liver pills Irvines - wines G Warner - Ironmonger J A Reynolds - Wall papers ESCo Electric lighting Holman & Fiscalini - stables and motor garage Butler & Co - blinds Mrs Kerby - clothing reseller Rose Cosmetic - H Binzer & Co Mrs Busfield - laundry Mrs J H Dogson - registry office for servants Summerscales - stationary and postcards W J Robson - glass Porter's Boots and Shoes B G Tucker's Water Cure Electric Supply Co Rowlands drinks On the bottom of most pages - Sidar products and on the top the Coliseum Picture Palace. Demonstrates and ESCo timetable and provides information about fare systems and local businesses.Time table - booklet - 40 pages + green light card covers centre stapled with tabbed or cut pages.tramways, ballarat, timetables, esco, advertisements, fares, tickets, tokens -
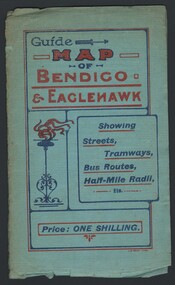 Bendigo Historical Society Inc.
Map - GUIDE MAP OF BENDIGO & EAGLEHAWK, Late 1920's
Map. Guide map of Bendigo & Eaglehawk. Folded map of Bendigo & Eaglehawk with blue outer cover booklet. Map is compiled by E E Parker, Eaglehawk. Map shows tramways, bus routes and cost one shilling. Map shows Agricultural Showgrounds located between Park Street, Water Street, Barnard Street and Bridge Lane. Also shows Acclimitization Reserve located behind the Botanical Gardens at White Hills. Shows the location of Sailors Gully, Peg-Leg Gully, Jobs Gully, California Gully, Long Gully, Ironbark Gully, Golden Gully, Poverty Gully, Sheepshead Gully, Charcoal Gully, Eaglehawk Creek, Bendigo Creek and Back Creek.Contains interesting facts about Bendigo:- Area - 7,900 acres, Population - 26,000, First Council elected - 1855, Proclaimed a City - 1871. Gold Rush broke out - 1851. For first 10 years gold yield averaged 8,600 ozs. Per week. Total gold yield to 1923 - 572 tons valued at 82,000,000 pounds. Deepest mines - Victoria Quartz 4,614 ft., New Chum Railway 4,318 ft., 13 mines over 3,000ft. deep, 53 mines over 2,000 ft. deep. Sewering of City commenced 1922. All principal buildings now sewered. Map printed by Arnall & Jackson, General Printers, Stationers & Engravers, 476 Collins Street. Outer map blue cover printed in red and blue ink by J B Young, Lithographer. Map displays advertisement for Bendigo Timber Co. Outer blue cover displays advertisement for Campbell Connelly & Co. Pty. Ltd, Ironmongers, Timware Manufacturers, Plumbers, Sewerage Contractors, High and Forest Sts, Bendigo 9outside back cover) and for Hartleys ( J L Shoosmith) Bendigo, displaying Indian Motor Cycles (inside back cover).map, bendigo, township, guide map of bendigo & eaglehawk -
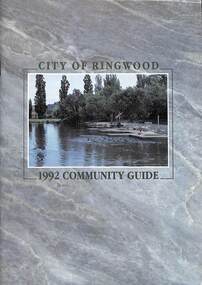 Ringwood and District Historical Society
Book, City of Ringwood, City of Ringwood 1992 Community Guide, 1992
Community information book issued by City of Ringwood for 1992 - covering the facilities and activities of the Ringwood Council and other local organisations and associations. Includes two Aquatic Centre entry vouchers valid until June 30th, 1992.CONTENTS: (page no.) 1991/92 COUNCIL REPRESENTATIVES 4 1992 CALENDAR 51 AQUATIC CENTRE 8 AQUATIC CENTRE VOUCHERS 49 CHIEF EXECUTIVE'S REPORT 6 CIVIC CENTRE TELEPHONE INDEX — DIRECT DIALLING 53 COMMUNITY DIRECTORY 35-47 COMMUNITY SERVICES 17-19 COUNCIL & COMMITTEE CYCLES 4 COUNCIL FINANCES & 1991/92 RATES 16 COUNCILLORS 3 FUNCTIONAL RESPONSIBILITIES 15 HISTORY OF RINGWOOD 5 HOUSING & RESIDENTIAL DEVELOPMENT 29-30 INFRASTRUCTURE 34 LOCAL, STATE & FEDERAL GOVERNMENT ELECTIONS 32 MANAGEMENT TEAM 14 MAYORAL MESSAGE – Cr. Max Williams 1 NEIGHBOURHOOD MAP 26-27 NOTES 52 PAPER & CARDBOARD COLLECTION SERVICE 22 PARKS & RESERVES — PUBLIC FACILITIES 31 PROTECTING OUR COMMUNITY 23-24 PROTECTING THE ENVIRONMENT 20-21 RINGWOOD FESTIVAL & HIGHLAND CARNIVAL 13 RINGWOOD GOLF COURSE 7 STRATEGIC BIKE PLAN 11 STREET INDEX A-L 25 STREET INDEX L-Z 28 THE LIBRARY 12 THE RINGWOOD CONVENTION & PERFORMING ARTS CENTRE 10 TRAFFIC MANAGEMENT 33 YOUR PERSONAL DIRECTORY 50 rinx -
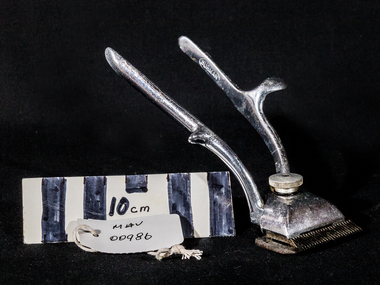 City of Moorabbin Historical Society (Operating the Box Cottage Museum)
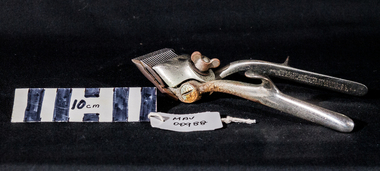
Barbers' Equipment, hair clippers 'BURMAN", c1950
Hair clippers are specialized implements used to cut human head hair. They work on the same principle as scissors, but are distinct from scissors and razors. :Hair clippers comprise a pair of sharpened comb-like blades in close contact one above the other which slide sideways relative to each other, a mechanism which may be manual or electrical to make the blades oscillate from side to side, and a handle. The clipper is moved so that hair is positioned between the teeth of the comb, and cut with a scissor action when one blade slides sideways relative to the other. Friction between the blades needs to be as low as possible, which is attained by choice of material and finish, and frequent lubrication. Hair clippers are operated by a pair of handles that are alternately squeezed together and released. Barbers used them to cut hair close and fast. The hair was picked up in locks and the head was rapidly depilated. Mid 20thC such haircuts became popular among boys, and young men in the military and in prisons. Burman & Sons Ltd, of Ryland Road, Birmingham, West Midlands, manufactured Burman-Douglas steering gear. Their recirculating worm and ball design of steering gear was fitted to pre-war vehicles such as the Ford Eight and the Ford Prefect, the Bedford CA, plus heavy trucks and off-road vehicles - both pre and post-war. In its day, Burman-Douglas steering-gear was regarded as.... a "quality" feature of a car chassis specification, but the worm and ball design was eventually surpassed by the cheaper rack and pinion design that dominates today. The company also manufactured motorcycle gearboxes, horse clippers and barbers’ clippers. 1871 Company founded. 1897 Private company. 1930s Gearbox for Ariel Square-four motorcycle. (Exhibit at Birmingham Thinktank museum) 1933 Burman and Sons Limited, manufacturers of horse and barbers' clippers, sheep shearers, motor cycle gear boxes and steering gears, Ryland road, Edgebaston 1953 S. F. Burman, M.B.E., Managing Director, Burman and Sons, Ltd 1955 Acquired by Vono Industrial Products. 1961 Manufacturers of motor and motorcycle accessories. 1,500 employees. 1968 Supplied rack and pinion steering units to Ford 1978 Adwest Group acquired Burman and Sons, the steering gear part of Duport. 1986 Major reduction in staffing at Burman due to fall in demand for its products and delivery problems. A set of hand held barbers’ hair clippers with an adjustable screw, from Burman and Sons Ltd of Birmingham, England. Chrome plated, in good condition, c1950. On left arm ; BURMAN On right arm ; MADE IN ENGLANDbarbers, hairdressing, hair clippers, grooming, horse clippers, cars, motor cycles, gear boxes, rack and pinion , worm and ball, steering gears, steel manufacture, birmingham england, burman and sons ltd, moorabbin, bentleigh, ormond, cheltenham, market gardeners, -
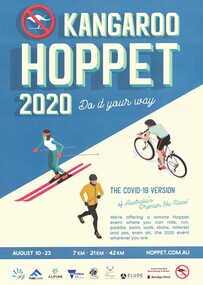 Falls Creek Historical Society
Poster - Kangaroo Hoppet 2020
The Kangaroo Hoppet is Australia’s premier long distance cross country ski race, and a member of the Worldloppet series of international cross country ski events. The first race at Falls Creek was held in 1979 under the name of “Australian Birkebeiner”. It was a 21km race with about 80 participants organised by the Birkebeiner Nordic Ski Club of Mount Beauty. The course started and finished at Falls Creek Alpine Resort and took participants out into the Bogong High Plains. After running the event for 10 years, it was decided they should become part of the Worldloppet series of marathon ski races. Representatives from the Birkebeiner Nordic Ski Club and the Australian Ski Federation attended the Worldloppet Annual Meeting in Finland in June 1990 to put the case for the acceptance of an Australian event into the Worldloppet series. Before being admitted, they had to demonstrate that the Birkebeiner Club could run a world class event, so three months later in August 1990 a 42km event named the Australian International Ski Marathon was held at Falls Creek together with a 21km Birkebeiner race and a 7km event called the Birkebeiner Lite. The event was approved by delegates from USA, Norway and Austria, in 1991 Australia became the 12th member of Worldloppet, with the condition that there had to be a name change. After some late night discussion allegedly involving red wine from North East Victoria the main event became the 42km Kangaroo Hoppet, with the minor events being the 21km Australian Birkebeiner, and 7km Joey Hoppet. In the winter of 1991, the first Kangaroo Hoppet was held. It was a great success and has been a regular fixture on the international ski calendar ever since. It features the main 42km event as well as a 21km event and a 7km event. The Hoppet brings the Australian snowfields to an international audience. Due to COVID-19 there was no normal Kangaroo Hoppet at Falls Creek in 2020 as the resort was closed down. Instead, the virtual Kangaroo Hoppet- “I did it my way” was held. The event was staged for two weeks between the 10th and 23rd August. Participants chose a distance of 7km, 21km, or 42km and could choose any human powered activity. Activities included running, walking, cycling, swimming, roller skiing, inline skating, paddling, canoeing, mountain biking, exercise machines, unicycles and a tricycle. The event attracted 1901 participants from 37 nations. This poster is significant because it documents an event which brings international attention to Falls Creek and the surrounding region.A poster featuring images of a skier, cyclist and runner on a blue and white background. Logos of AGL, Falls Creek, Alpine Shire Council, Victorian State Government, the Birkebeiner Nordic Ski Club, Rojo Outerwear, Elude Outerwear and Community Bank Mount Beauty & District are across the bottom of the poster. A kangaroo sign with crossed red circle feature at the top left and bottom right corners.KANGAROO HOPPET 2020 Do it your way Centre text: THE COVID-19 VERSION of Australia's Premier Ski Race. We're offering a remote Hoppet event where you can ride, run, paddle, swim, walk, skate, rollerski and yes, even ski, the 2020 event wherever you are. AUGUST 10 - 23 7 KM 21 KM 42 KM HOPPET.COM.AUkangaroo hoppet, worldloppet events, falls creek, mt. beauty -
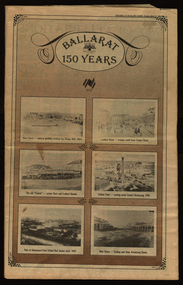 Federation University Historical Collection
Newspaper, Ballarat 150 Years: Supplement to the Ballarat Courier, 1988, 17/03/1988
A supplement to celebrate 150 since the establishment of the Port Phillip Colony (Victoria).40 page newspaper published to celebrate the Sesquicentenary of Ballarat. Articles include: 1838-the pastoral period begins; First White Settlers arrive (Anderson, Winter, Yuille, Kirkland, Learmonth); Learmonths - Pioneer Settlers; The Rush to Ballarat; Last of the Aborigines; Eureka Affair Gains New Importance; Mining-After the rush; SMB - First Technical School; Clubs Play their Part; Ballarat Yuilles had Wealthy Ancestors; Town, Country Share a Close Relationship; Many Sides to Metals Industry; True Victorian City; Five Severe Recessions; Financiers to the Fore; Ready for War; City Rich in Sport Facilities; Visitors to most exciting place; No Place for a Nervous Lady; Theatres Provide Welcome Diversion for Mines; Might Achievers Among famous Citizens; Life Seemed Different After the War; Ballarat School of Mines Eastern Station Hotel; Memorial (Her Majesty's) Last of Many Theatres; Art Gallery at its Best; Pilgrimage to Yuille Cairn at Sebastopol Images include: Jelbart tractor; Sunshine Harvester; Bailey's Mansion; Pennyweight Hotel; Bridge Mall; Blue Riband Mine, Black Hill, Burrumbeet Shooting party; A wendouree rowing club; Motor Cycle Racing; Women bowlers, Queen Elizabeth; Gong Gong Methodist Church; Arbour day at Waterloo Farm, Smythes Rd; Gold panners (1890s); Ballarat Cricket Team (1902); William Peart; D'Angri's store; Sturt St Advertisements include: Rehfisch and Co.; UFS Dispensaries; Deutscher Mower Sales and Service; Haymes Paint; Cincotta's; Abraham's Sportscene; McK's; McKay Macleod; St John of God Hospital; Benjamins Real Estate; Ballarat Water Board; Cornell's Pharmacy; Laminex Industries; Coltman Mitre 10; Lal Lal Iron Mine; Heinz Bros; Crockers; Frank ford travel; S.J. Weir; Ludbrook Plumbing Service; Mars; Robert Sim Building Supplies, Frank Day; Sectrol Systems; Thornton Richardsballarat, anniversary, sydney abraham, cincotta, eureka, ballarat school of mines, mining, ballarat club, lal lal iron mine, ballarat rangers, victorian rifles, 3rd battalion victorian rifles, ballarat militia, white flat, celia scott, adelphi theatre, victoria theatre, montezuma theatre, charlie napier, juliamatthews, royal theatre, dick richards, henry sutton, eleanor lucus, martin hosking, newington estate, saleyards, g. gay & co, ballarat books, old benev' alleviated distress on goldfields -
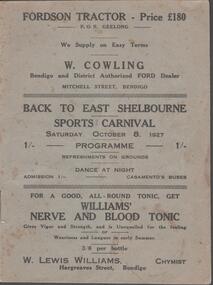 Bendigo Historical Society Inc.
Document - BACK TO EAST SHELBOURNE SPORTS CARNIVAL, 8 October, 1927
Back To East Shelbourne Sports Carnival, Saturday, October 8, 1927. Programme. Refreshments on grounds, dance at night. 1/- Casamento's Buses. Executive Committee: President; W Harris. Vice-President; M De Araugo. Messrs. E Wright, A D Holden, W Hamilton, J Bartels, J Hinck, and H Hinck. Hon. Sec.; H M Burke. Asst. Hon. Sec.; G H Marshall. Ladies; Mesdames J Bartels, H Burke, G H Marshall, E Pocock, R Vines, and E Wright. General Committee; In addition to the above, Messrs. E Pocock, J De Araugo, F J Roberts, and W Marshall, Mesdames W Harris, A Holden, J De Araugo, F J Roberts, and Miss Pocock. Officials Judges: Messrs. T D Cairns, J Craven, and Geo. Hogben. Handicappers: Mr P Davidson (Northern District Walker's Assn.) Starter: Mr W Harris, M De Araugo, J Hinck, H Hovenden, E Pocock, W Hamilton, F J Roberts, A D Holden. Timekeeper: Mr H Hinck. Patrons: Cr, J Bartels, Nuttall & Clarke, Mrs D Punton, R S V Cocking, J Murray, and A Wells. Next 8 pages contain information on the history of East Shelbourne beginning with; This district is situated about ten miles west of south-west of Bendigo on Back Creek or Spring Creek, which received its names from the early diggers of Bendigo who, through shortage of water, were compelled to puddle at Bullock Creek or further 'back,' hence Back Creek; and because of the number of springs it contained - Spring Creek. Among the first to settle, in 1860, were Messrs. John Jenkinson, J Kilgour, T Connelly, G Nichols, R Fox, (who married Mrs James Jenkinson), Kenny, J Roberts, J Genders, J Curry, G Nevinson, Bartram, J Geary, A Nicholl, H Spencer, W Saunders, Mrs Prichard, and J Stansfield. History of East Shelbourne continues . . . Events held were Boy's (State School) Bicycle Race, Stepping the Distance (Gents), Stepping the Distance (Ladies), Bowling at the Stump, Kicking Football Through Hoop, Sheaf Toss, Bucket Ball, Sheffield, Children's Relay Race, Men's Potato Race, Tilting Rings, on Bikes, Walking Contest 1 mile, Car Race through pegs, Slow Bicycle Race 50 yards, Handicap Bicycle Race 2 miles, Tilting Rings in Cars, High Jump, Ladies' and Gent's Cigarette Race, Weight Guessing. Prizes were awarded for first and second placing of these events.In 1923, a Sports Carnival was held in the precincts of what was then a water reserve, situated south of the State School. The area was reserved for watering purposes on 1st May, 1894; and on July 15th, 1912, a small portion was excised. By 1923 its usefulness for water storage had disappeared, and being ideal for recreation purposes, it was decided, at the final meeting of the above sorts carnival, to apply for the area appointed, Mr W Harris (chairman), Messrs. G H Marshall, J Roberts, D Gill, M Connolly, R Vines, E Pocock, and H M Burke (secretary). The matter terminated in a Land Board, presided over by Mr McPherson, being held in Bendigo. The application was granted, but was not gazetted, until Messrs. W Harris and F J Roberts, with Messrs. A E Cook, MLA and Hon. H Keck, MLC interviewed the Minister for Lands. Soon afterwards, at a public meeting, the following members were elected to constitute the first Board of management, Messrs. W Harris (chairman), G H Marshall, A D Holden, F J Roberts (tres.), M D'Araugo, E Wright, and H M Burke (sec.). Since then the arena has been cleared and levelled by residents, and labor and material to the value of 150 pounds have been put into the reserve. At least 2/3rds of the program contain ads from business in Bendigo. Fordson Tractor - W Cowling, W Lewis William's Chymist, Collier footwear, William Wallace Land and Clearing Sales, Bain & Daws Groceries, Farmers & Citizens Trustees Company Bendigo Limited, Northern Seed Supply Co., Marong Bakery, Bennetts' Arcade Store, Marong Hotel, Warren's Drapery & Clothing, Jas. Friswell Butcher, Webster's Wireless, Baker & Woods Tennis Supplies, Hartleys Wireless, Cycle Hartleys, Bendigo Book & Stationery Centre Frank J Every's, T R Jones Chemist, Wool Skins & Hides F Ferguson, Furniture Carpets Linoleums Morley Johnsons, Jewellery & Silverware Prescott & Dawe, Drapers Honan & O'Toole, Stilwell's of Bendigo, Gents' & Ladies' Tailoring Hatters & Mercers Messrs. Denton Bros., Groceries Ales Wines & Spirits W Jeffrey, Ashman's Tailors Hatters Mercers, Myer's, Farmers' Grocery D Whyte & Co., Drapers & Furniture Stores The Beehive, Butcher les. Friswell, Tobacconist & Hairdresser W J Lenten, Timber Merchants & Ironmongers Hume & Iser, Stock E M Vains & Co., Ladies' & Gents' Tailors Clifford & Fulton, Printers & Stationers Bolton Bros. Pty Ltd, Bendigo Leather Shop, Everything Musical Suttons, Andrew's Auction Rooms Butter Eggs Poultry etc, Meats A C Petherick's, Albert Bush's Produce Stores & Chaff Mills, T D Cairns & Co., Jeweller C J Kirby, Casamento's Garage & Ballarat Motor Bus Service, Webster Bros. Sporting House Cycle Builders Motor Cycle & Car Agents, British Motors Bendigo, Webb's Bacon Depot. 20 pages plus coverBoltons Print, Bendigoevent, social, east shelbourne sports carnival -
 City of Moorabbin Historical Society (Operating the Box Cottage Museum)
Equipment - Barbers’ Equipment, hair clippers steel 'Brown & Sharpe", c1940
1833 Brown & Sharpe was founded in Providence, Rhode Island by David Brown and his son Joseph R. Brown. David Brown retired in 1841 and Joseph Brown formed a partnership with Lucian Sharpe in 1853. During the 19th and 20th centuries, Brown & Sharpe was one of the best-known and most influential machine tool builders and was a leading manufacturer of instruments for machinists (such as micrometers and indicators ) and helped establish: The American wire gauge (AWG) standards for wire; The Brown & Sharpe taper in machine tool spindle tapers; and The Brown & Sharpe worm threadform for worm gears. .Like most machine tool builders, Brown & Sharpe rode a business cycle roller coaster during 1920- 40. After being kept very busy during World War I, builders suffered a slump in the post–World War I recession and depression of 1920–21. The Roaring Twenties brought renewed sales, but then the Great Depression slashed them. The armament-build-up period of 1936 to 1940 again renewed machine tool activity, and then the World War II materiel effort exploded demand, pushing it to record heights and employed 11,000 workers. Brown and Sharpe machine tools were a mainstay of American metal manufacturing until the late 20th Century and could be found in most machine shops and factories that worked with metal. Brown and Sharpe made callipers and micrometers that were essential to products built to fine tolerances. Shortly after World War II, Henry D. Sharpe, Jr. succeeded his father as president of Brown & Sharpe Manufacturing Company, at which point it evolved into a new and modern company built, or at least designed, to last. The firm stopped producing its old stalwarts: sewing machines, hair clippers, and certain categories of machine tools and employment dropped to 3,500 in 1976. Due to industrial disputes in the 1980’s B&S started focusing more on developing Coordinate-Measuring Machines. The company began to lose money as it shifted production away from machine tools and toward advanced metrology equipment, losing $14.6 million in 1990 and employed only 700. In 1994 Brown & Sharpe acquired DEA of Italy, an established manufacturer of CMMs. In 2001, substantially all of the assets of the Brown & Sharpe Manufacturing Company, including the intellectual property, designs, trademarks, facilities and inventory, were acquired by Hexagon AB, Switzerland, without the acquisition of the Brown & Sharpe Manufacturing Company itself. A set of manual barbers’ hair clippers with an adjustable wing screw, from Brown and Sharpe, Manufacturing Company Ltd., Providence, Rhode Island, USA. Chrome plated, in fair condition, c1940on Right handle; MADE BY BROWN & SHARPE MFG. CO. POV. R.I. / PAT'D IN GREAT BRITAIN, EN FRANCE, S.G.D.G. / U.S.A. PATENTS JULY 1-79, JUNE 3-84, AUG 23- 92 on top blade ; BRESSANT / TRADEMARK on base of lower blade ; No. 2* barbers, hairdressers, hair clippers, brown and sharpe manufacturing company, providence rhode island, hexagon ab, switzerland, great britain, france, ww1 1914-1918, ww11 1939-1945, great depression 1930, micrometers, tools, precision instruments, brown david, brown joseph r , sharpe lucian, sharpe henry d jnr, american wire gauge standard, sewing machines, metrological tools, worm gears, spindle tapers, screw machines, moorabbin, bentleigh, cheltenham, city of moorabbin industries, -
 Ballarat and District Irish Association
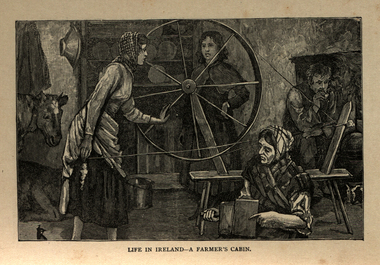
Image, Life in Ireland - A Farmer's Cabin, c1864
The tenant lived at the mercy of the resident landlord. Home was a one-roomed house, a chimney of wicker work plastered over with mud or just a hole in the roof. The walls might consist of mud too, or sods of grass. Any windows, were rarely glazed and would be open to the elements all year round. The Pig, if any, was kept in the house, the most valuable possession. Sold for cash at local market. The main items in the house were a potato pot and water bucket. As well as mother, father and children, there could well be grandparents all living in the same cramped conditions. The family would sleep on rushes or straw lain on the floor. Most tenants were tenants 'at will ', which meant they could be evicted at the 'will' of the landlord. Some had a lease for the life of the father and the eldest son, and this meant they were relatively safe from eviction as long as they could pay their rent. There was a tradition of passing on a portion of your land from father to each of the sons, who would build a small dwelling, and in turn pass a portion onto their own sons. This cycle of subdivision meant that many families were surviving on a tiny plot of land from which to derive a crop of potatoes for the year. Women worked hard in this environment, rearing children, cooking, cleaning, tending to any animals such a pigs or chicken and when needed, helping in the potato field. Life was dictated by the annual rent due to the landlord. Other typical expenses could be the Hearth Tax (actually charged by the number of fire places in a house) Turf, Hay (for any farm animals) and tithes. A tax known as the tithes were calculated at one tenth the value of everything saleable. Tithes were a bitter issue. They were for the support of the Church of Ireland, Protestant Bishops and Ministers, and a cess tax for the construction and maintenance of Protestant Church buildings. The problem being that the vast majority of those paying the Tax were Catholic and paying to support something that was contrary to their beliefs. Potatoes were the staple diet from September through to the end of Spring of the following year. But the summer months were months of hunger and hardship as they waited for the following harvest to come in Autumn. During these months people had to resort to eating anything they could find; turnips, cabbage, even wild grass, nettles, wild berries and dandelions. Those who lived close to the sea would collect seaweed and use it spread on their land as a form of manure. The dependency of so much of the population on the Potato as their sole source of food was to prove disastrous during the Famine years. [http://www.youririshroots.com/irishhistory/tenant.php, accessed 14 December 2013]A woman spins wools, while another cards fleece in preparation for spinning. I man smokes a pipe by an open fireplace, while a cow takes shelter in the cabin for warmth. ballarat irish, cabin, spinning, wool, cow -
 Melbourne Legacy
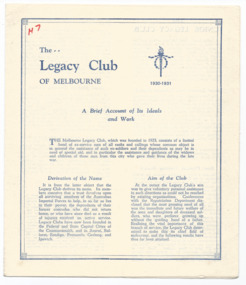
Pamphlet, The Legacy Club of Melbourne 1930-31 : A brief account of its ideals and works (H7), 1930
A brochure explaining 'A brief account of its ideals and work' in 1930. The notation H4 in red pen shows that it was part of the archive project that was trying to capture the history of Legacy. The brochure mentions clubs had started in the Federal and state capitals, and Geelong, Ararat, Ballarat, Fremantle, Ipswich and Bendigo. Members were all men who had served in the forces of the British Empire during the war. It shows the work of Legacy as : Junior Legacy Club - which had been running for 5 years, for sons (aged 9 to 21) of deceased soldiers. Members of the Legacy Club were in constant touch and acted as Big Brothers. Boys' Literary and Debating Branch - approximately 95 boys attended weekly meetings of a debating society at Anzac House. Boys' Physical Training Branch - for the boys physical welfare classes and conducted weekly by a permanent instructor (paid by Legacy). There were 270 boys attending. Also cricket, football, Lacrosse and swimming clubs, all supervised and coached. 'A permanent camp has been erected at Balnarring East, and this is occupied by the boys at the Christmas vacation under the control of Legatee Stan Savige, and the girls at Easter, with Mrs Gilles in charge. The value of these camps in enabling Junior Legatees to become better acquainted and in the development of character and the Legacy spirit cannot be overestimated'. Girls' Physical Training Branch - started in 1927 and now over 200 girls were being instructed by Mrs AM Gilles (the wife of a Legatee). Lending Library of over 600 books. Vocational placements for junior legatees. Meetings were held in the Victoria Palace Hotel, Little Collins St, on Tuesdays and included an informative lecture. The policy and objectives were laid out including to preserve the memory of fallen comrades and to assist their dependents, particularly the children. Also to maintain a spirit of comradeship, and to safeguard the good standing and interests of ex-servicemen in the community. The brochure shows activities as: Employment Committee, Comradeship Committee, a pledge to assist the National War Memorial being established on the Domain site, and for the children the 'Deceased Soldiers' Children's Welfare Committee. Also picnics, Christmas camp, cycle club, and rambles as arranged. There is help for vocational options for the children. It is mentioned during 1930 which consisted of 'a hospital ward, mess room seating 80, a kitchen and storeroom. Also tent frames and necessary offices are provided and the total value of the building and equipment owned by the Club is our £600.' See also 01478 for a copy from 1928.This is one of the first documents that promotes Legacy and summarises its objective and services. Brochure describing the ideal and activities of the Legacy Club in 1930.Handwritten H4 in red pen.legacy promotion, history, goals, objectives -
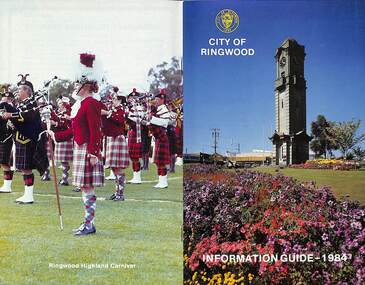 Ringwood and District Historical Society
Booklet, City of Ringwood Information Guide - 1984, 1984
Community information booklet issued by City of Ringwood for 1984 - covering the facilities and activities of the Ringwood Council and other local organisations and associations.CONTENTS: (page no.) Building - General Information 23 By-Laws/Traffic Regulations 22 Canterbury Road Railway Bridge Widening 34 Commissioners for Taking Declarations and Affidavits 24 Council Elections 11 Council Representatives 1983/1984 7 Council Structure. 10 Deferment of Rates 11 Emergency Telephone Numbers 59 Employment Initiatives Programme 32 European Wasps 26 Facilities for Disabled Persons 15 From the Chief Executive Officer 8 Garbage 20 Genera] Use Buildings 39 Historical Museum 29 Home Help Service 14 Immunisations - Health Care 12 Immunisation Programme - 1984 13 Justices of the Peace 23 Library Service for Senior Citizens 15 Maintenance of Facilities 34 Management Executive 9 Mayor’s Message – Cr. F.J. Corr 2 Meals on Wheels 14 Members of Parliament 25 Parking Signs and Street Names 35 Pedestrian Hazards 36 Pensioner Rate Assistance Scheme 12 Property Records 11 Rates 11 Re-Cycling of Waste 21 Ringwood Centre (Hostel) for the Frail Aged 17 Ringwood Cultural Centre 40 Ringwood Festival 28 Ringwood Golf Course. 36 Ringwood Highland Carnival 28 Ringwood Lake Reserve 29 Ringwood Library 17 Shopping Centre Studies 38 Staley Gardens 32 Standing Committees of Council 6 Swimming Centre 37 Welfare and Community Services 41 rinx -
 Ballarat Heritage Services
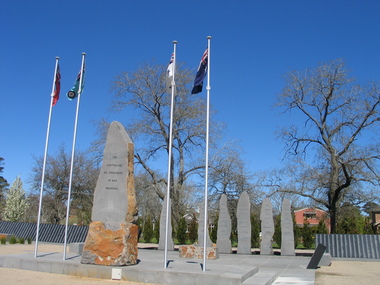
Photograph, L.J. Gervasoni, Australian Ex-Prisoner of War Memorial, Ballarat, 2014, 04/11/2014
The Trustees of the Australian Ex-Prisoners of War Memorial have defined a Prisoner of War to be a person who was captured by a common enemy and/or interned in a neutral or non-combatant country. To be defined an Australian Prisoner of War, the person needs to be either an Australian Born person serving in the Uniform of an Australian Service; or in the Uniform of a friendly country, or Born Elsewhere and serving in the Uniform of an Australian Service. A Prisoner is a person who has lost personal privileges, suffers deprivation of liberty or is unable to return home or dies in captivity.Colour photograph of a War Memorial designed by Peter Blizzard. The granite wall of the Australian Ex-Prisoners of War Memorial features a listing the names of Australian Prisoners and was opened on the 6th February 2004 by General Peter Cosgrove AM MC to recognise and remember over 36,000 Australians who became Prisoners of War during the Wars of the 20th Century. In 2008 the Memorial became the First Military Memorial of National Significance outside Canberra. The Memorial which was designed by Peter Blizzard OAM, symbolises that all Australian prisoners embarked on a journey to serve away from their homeland and acknowledges the hardship, deprivation, brutality, starvation and disease endured by Prisoners of War during their capture and the scars that many continued to endure upon their repatriation to Australia. Heritage Victoria describes the memorial in the following way" "A JOURNEY OF HONOUR, REMEMBRANCE AND HEALING - The Australian Ex-Prisoners of War Memorial is a dramatic and highly symbolic tribute to the sacrifice made by more than 35,000 young Australian service men and women in four theatres of war. At the heart of the monument is a stark, 130 metre long, highly polished black granite wall, engraved with the names of all Australian prisoners of war. The names on this 'honour roll' are listed in historical order from the Boer War in 1899, through to the Korean War in 1953. It is a testament to the contribution made by so many. Standing sentinel at the centre of the Memorial are six huge basalt obelisks, etched with the names of all the countries where Australians were held prisoner of war. The obelisks stand in a large reflective pool, set back from the central pathway, symbolising the distance that separated Australia's prisoners of war from their homes and their loved ones. Opposite the pool is a larger obelisk flanked by flagpoles and a ceremonial stone on which to lay wreaths. The central pathway is itself symbolic, with each of the paving stones cut in the shape of a railway sleeper. The pathway defines 'the journey' taken by the prisoners of war and the journey visitors take around the monument. At the end of the granite wall where the pathway ends, visitors face a large stone engraved simply 'Lest We Forget'. Water flows from beneath the stone, along the base of the granite wall and into the reflection pool in which the obelisks stand. This cycle of flowing water, symbolising spirituality, healing, cleansing, birth and rebirth, guides visitors on their journey through the Memorial." ballarat, ballarat botanical gardens, peter blizzard, ballarat north gardens, war memorial, prisoner of war, prisoners of war -
 Ballarat Heritage Services
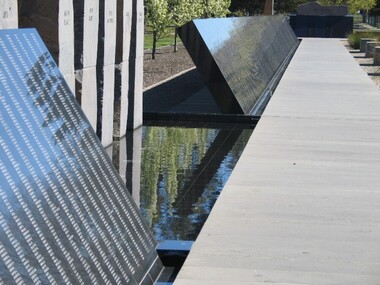
Photograph, Australian Ex-Prisoner of War Memorial, Ballarat, 04/11/2014
DESCRIPTIONColour photograph of a War Memorial designed by Peter Blizzard. The granite wall of the Australian Ex-Prisoners of War Memorial features a listing the names of Australian Prisoners and was opened on the 6th February 2004 by General Peter Cosgrove AM MC to recognise and remember over 36,000 Australians who became Prisoners of War during the Wars of the 20th Century. In 2008 the Memorial became the First Military Memorial of National Significance outside Canberra. The Memorial which was designed by Peter Blizzard OAM, symbolises that all Australian prisoners embarked on a journey to serve away from their homeland and acknowledges the hardship, deprivation, brutality, starvation and disease endured by Prisoners of War during their capture and the scars that many continued to endure upon their repatriation to Australia. Heritage Victoria describes the memorial in the following way" "A JOURNEY OF HONOUR, REMEMBRANCE AND HEALING - The Australian Ex-Prisoners of War Memorial is a dramatic and highly symbolic tribute to the sacrifice made by more than 35,000 young Australian service men and women in four theatres of war. At the heart of the monument is a stark, 130 metre long, highly polished black granite wall, engraved with the names of all Australian prisoners of war. The names on this 'honour roll' are listed in historical order from the Boer War in 1899, through to the Korean War in 1953. It is a testament to the contribution made by so many. Standing sentinel at the centre of the Memorial are six huge basalt obelisks, etched with the names of all the countries where Australians were held prisoner of war. The obelisks stand in a large reflective pool, set back from the central pathway, symbolising the distance that separated Australia's prisoners of war from their homes and their loved ones. Opposite the pool is a larger obelisk flanked by flagpoles and a ceremonial stone on which to lay wreaths. The central pathway is itself symbolic, with each of the paving stones cut in the shape of a railway sleeper. The pathway defines 'the journey' taken by the prisoners of war and the journey visitors take around the monument. At the end of the granite wall where the pathway ends, visitors face a large stone engraved simply 'Lest We Forget'. Water flows from beneath the stone, along the base of the granite wall and into the reflection pool in which the obelisks stand. This cycle of flowing water, symbolising spirituality, healing, cleansing, birth and rebirth, guides visitors on their journey through the Memorial."australian ex-prisoner of war memorial, peter blizzard, prisoner of war, ballarat north gardens -
 Ballarat Heritage Services
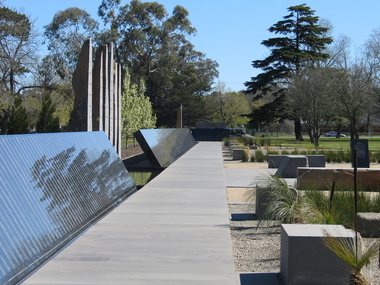
Photograph, Australian Ex-Prisoner of War Memorial, Ballarat, 2014, 04/11/2014
DESCRIPTIONColour photograph of a War Memorial designed by Peter Blizzard. The granite wall of the Australian Ex-Prisoners of War Memorial features a listing the names of Australian Prisoners and was opened on the 6th February 2004 by General Peter Cosgrove AM MC to recognise and remember over 36,000 Australians who became Prisoners of War during the Wars of the 20th Century. In 2008 the Memorial became the First Military Memorial of National Significance outside Canberra. The Memorial which was designed by Peter Blizzard OAM, symbolises that all Australian prisoners embarked on a journey to serve away from their homeland and acknowledges the hardship, deprivation, brutality, starvation and disease endured by Prisoners of War during their capture and the scars that many continued to endure upon their repatriation to Australia. Heritage Victoria describes the memorial in the following way" "A JOURNEY OF HONOUR, REMEMBRANCE AND HEALING - The Australian Ex-Prisoners of War Memorial is a dramatic and highly symbolic tribute to the sacrifice made by more than 35,000 young Australian service men and women in four theatres of war. At the heart of the monument is a stark, 130 metre long, highly polished black granite wall, engraved with the names of all Australian prisoners of war. The names on this 'honour roll' are listed in historical order from the Boer War in 1899, through to the Korean War in 1953. It is a testament to the contribution made by so many. Standing sentinel at the centre of the Memorial are six huge basalt obelisks, etched with the names of all the countries where Australians were held prisoner of war. The obelisks stand in a large reflective pool, set back from the central pathway, symbolising the distance that separated Australia's prisoners of war from their homes and their loved ones. Opposite the pool is a larger obelisk flanked by flagpoles and a ceremonial stone on which to lay wreaths. The central pathway is itself symbolic, with each of the paving stones cut in the shape of a railway sleeper. The pathway defines 'the journey' taken by the prisoners of war and the journey visitors take around the monument. At the end of the granite wall where the pathway ends, visitors face a large stone engraved simply 'Lest We Forget'. Water flows from beneath the stone, along the base of the granite wall and into the reflection pool in which the obelisks stand. This cycle of flowing water, symbolising spirituality, healing, cleansing, birth and rebirth, guides visitors on their journey through the Memorial."australian ex-prisoner of war memorial, prisoner of war, ballarat north gardens, peter blizzard -
Bendigo Historical Society Inc.
Document - TOWN HALL, THE BENDIGO CHORAL SOCIETY, 24 Apr 1928 - 27 Nov 1928
Town Hall, The Bendigo Choral Society. 3 Programs for 1928: First Concert, Second Concert & Third Concert. a/ First Concert 38th Grand Concert, Town Hall, Bendigo. Tue. April 24th, 1928. Conductor MR W C Frazier ARCO. Artists: Miss A Caddell, Mr L Bienvenu. Pianiste: Miss Eileen Hains, ATCL. Hon. Sec. E H Collett. Asst. Sec. W F Mansell. Other Artists from BCS; Miss Essa McSwiney, Miss Jean Thompson, Miss May McGauchie, Hector Taylor. Programme: Price 3d. Programme: In These Delightful Pleasant Groves, Like To A Damask Rose, When The King Went Forth To War, Lament Of Isis, Tell I Tell Me, The Princess, Autumn's Storms, Prelude (The Cycle of Life), How Fair is Thy Face, God's Son Hath Set Me Free, Jesus Christ Our Lord Is Risen, I Heav'n Above, King Arthur. b/ The Bendigo Choral Society, Season 1928. Second Concert. 39th Grand Concert. Town Hall, Bendigo. Wednesday, Sep. 19th 1928. Conductor: Mr W C Frazier ARCO. Sub-Conductor: Mr E A Miller. Artists: Coral Trenerry, Muriel Bolt, Leslie Jephcott, Eileen Hains, Bendigo Choral Society. Hon. Sec. E H Collett. Asst. Hon. Sec. W F Mansell. Programme: The Hexhamshire Lass, Prelude and Allegro, M'Appari Tutt 'Amor', Rhapsody, Sweet Stay Awhile, There is a Lady Sweet and Kind, Danse Negre, Study, Merry Andrew, Gracious and Kind Art Thou My Queen, Secrecy, Sweet Honey-Sucking Bees, Mazurka, Sigh No More, Faery Song, Fantasie, Courage Brothers. Picture of W C Frazier is on cover. c/ The Bendigo Choral Society. Season 1928. Third Concert. 40th Grand Concert. Town Hall, Bendigo, Tuesday, November 27th, 1928. Conductor: Mr W C Frazier. Artists: Gwen Prockter, Lotte Daniell, A E Sayer, Eileen Hains ATCL, Joyce Connell LTCL. Hon. Se. E H Collett, Asst. Hon. Sec. W F Mansell. Programme 3d.Programme: Rest Sweet Nymph, Fine Knacks for Ladies, Adagio, Allegro, The Maiden's Complaint, I've Been Roaming, Down in a Valley, Flora Gave Me Fairest Flowers, Gipsy Dance, Songs of Love, Elegie, Songs of Love, Moonlight, The Nut-Tree, Songs of Love, Traumerei, Zigeunertanz, Nymphs and Fauns, Romance, Budmouth Dears, Bonny Fisher Lad, Rolling Down to Rio.Boltons Print, Bendigoprogram, music, the bendigo choral society, town hall, bendigo, the bendigo choral society. 3 programs for 1928 a/ first concert 38th grand concert. tue. april 24th, 1928. conductor mr w c frazier arco. artists: miss a caddell, mr l bienvenu. pianiste: miss eileen hains, atcl. hon. sec. e h collett. asst. sec. w f mansell. other artists from bcs; miss essa mcswiney, miss jean thompson, miss may mcgauchie, hector taylor. programme: in these delightful pleasant groves, like to a damask rose, when the king went forth to war, lament of isis, tell i tell me, the princess, autumn's storms, prelude (the cycle of life), how fair is thy face, god's son hath set me free, jesus christ our lord is risen, i heav'n above, king arthur. b/ second concert. 39th grand concert. wednesday, sep. 19th 1928. sub-conductor: mr e a miller. artists: coral trenerry, muriel bolt, leslie jephcott, eileen hains, bendigo choral society. hon. sec. programme: the hexhamshire lass, prelude and allegro, m'appari tutt 'amor', rhapsody, sweet stay awhile, there is a lady sweet and kind, danse negre, study, merry andrew, gracious and kind art thou my queen, secrecy, sweet honey-sucking bees, mazurka, sigh no more, faery song, fantasie, courage brothers. picture of w c frazier is on cover. c/ the bendigo choral society. season 1928. third concert. 40th grand concert. town hall, bendigo, tuesday, november 27th, 1928. conductor: artists: gwen prockter, lotte daniell, a e sayer, eileen hains atcl, joyce connell ltcl. programme: rest sweet nymph, fine knacks for ladies, adagio, allegro, the maiden's complaint, i've been roaming, down in a valley, flora gave me fairest flowers, gipsy dance, songs of love, elegie, songs of love, moonlight, the nut-tree, songs of love, traumerei, zigeunertanz, nymphs and fauns, romance, budmouth dears, bonny fisher lad, rolling down to rio. -
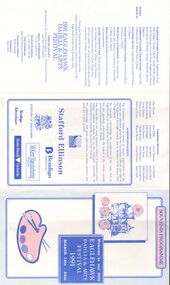 Bendigo Historical Society Inc.
Document - EAGLEHAWK DAHLIA & ARTS FESTIVAL 1991, SOUVENIR PROGRAMME, 14 March 1991
Eaglehawk Dahlia & Arts Festival 1991, Souvenir Programme, March 14th - 24th. Programme. Debutante Ball x2 Debs presented to Mayor of Eaglehawk Cr. W Carney. Music 'Gaytones'. Gala Fair, Canterbury Park. Organised by Y's Men and Menettes of Eaglehawk. Porcelain Art and Craft Show, Art Show, Stafford Ellison & McKern Awards. Display of Memorabilia, Cornish Association. Children's multi-Dimensional Art Exhibition. Flower Show, sponsored by North West Country Credit. Children's Photographic Display. Photographic Print Competition. Historic California Hill Church, open. Victorian Police Display Unit caravan open to public. Official Opening His Excellency, Dr. Davis McCaughey. A.C. Governor of Victoria. Dahlia and Arts Street Procession. Presentation of Art, Craft Photographic and Literary Awards. 9th Annual Dahlia and Arts Half-Marathon, conducted by Eaglehawk Athletic Club. Ecumenical Church Service, Combined Clergy. Speaker: Rev. Lindsay Faulkner, Eaglehawk Citizens Brass Band. Their Excellencies, the Governor of Victoria, Dr. McGaughey and Mrs McGaughey. Picnic Lunch. Free Concert. Cycling Criterium, Featuring the Tony McCaig Memorial Wheelrace. Barry Kenny Country Roundup. Family Mini Fair. Borough Bingo. Indoor Garden Party. Celebrity Concert. Rotary Club Dinner. Children's Fancy Dress Parade, sponsored by Bendigo Advertiser. Gala Charity Old Time Ball, 'Premiers Orchestra'. Traditional Cornish Concert, Eaglehawk Citizens Brass Band, Val Broad, Annette Beckwith, Steven Higgs. Traditional Cornish Service. Genealogy Society, Cornish Association Display, Walk Tours of Eaglehawk, Ray Wallace. Picnic in the Park followed by family reunions and entertainment. Aussie Clean-up Day. Croquet and Bowls Tournaments. Official Guests: His Excellency, Dr. Davis McCaughey A.C. Governor of Victoria, and Mrs McCaughey. Mayor of Eaglehawk: Cr. W Carney J.P. Festival President: Cr Lola Miller B.E.M. Vice Presidents: Alan Bull & Kevin Herdman. Executive Officer: Ruth Claridge. Treasurer: Mary Mills. Committee Members: Alan Pearce, Harold Trahair, Wendy Holland, Trevie Dineen, Wayne Evans, Rebecca Evans, Jean Tebb, Lois Locket, Pam Wright Ron Dineen, Sandie Morris, Wayne Morris, Joyce Shelton, Dot White, Ric Norris, Ron Watts, Noel Thomas, Lorna Thomas, Ted Brown, Heather Bull, Dennis Cock, Edith Mudford, Ron Mudford, Anne Scott. Acknowledgements: Councillors, Officers and Staff of the Eaglehawk Borough Council, and by members of the Rotary Club of Eaglehawk. Lions Club of Eaglehawk. Judges of various awards. Sponsors, donors of procession prizes, voluntary workers, dedicated community of Eaglehawk. Sponsors: Stafford Ellison, Borough of Eaglehawk, Bendigo Bank, KcKern Manufacturing Pty Ltd, Bendigo Advertiser, State Bank of Victoria.event, entertainment, eaglehawk dalia and arts festival, eaglehawk dahlia & arts festival 1991, programme, march 14th - 24th. programme. debutante ball x2 debs. music 'gaytones'. gala fair, canterbury park. organised by y's men and menettes of eaglehawk. porcelain art and craft show, art show, stafford ellison & mckern awards. memorabilia, cornish association. children's multi-dimensional art exhibition. flower show, sponsored by north west country credit. children's photographic display. photographic print competition. historic california hill church, . victorian police display unit caravan open to public. street procession. presentation of art, craft photographic literary awards. 9th annual dahlia and arts half-marathon, conducted by eaglehawk athletic club. ecumenical church service, combined clergy. rev. lindsay faulkner, eaglehawk excellencies, the governor of victoria, dr. mcgaughey and mrs mcgaughey. picnic lunch. free concert. cycling criterium, featuring the tony mccaig memorial wheelrace. barry kenny country roundup. family mini fair. borough bingo. indoor garden party. celebrity concert. rotary club dinner. children's fancy dress parade, sponsored by bendigo advertiser. gala charity old time ball, 'premiers orchestra'. traditional cornish concert, eaglehawk citizens brass band, val broad, annette beckwith, steven higgs. traditional cornish service. genealogy society, cornish association display, walk tours of eaglehawk, ray wallace. picnic in the park family reunions and entertainment. aussie clean-up day. croquet bowls tournaments. official guests: his excellency, dr. davis mccaughey a.c. governor of victoria, and mrs mccaughey. mayor of eaglehawk: cr. w carney j.p. festival president: cr lola miller b.e.m. vice presidents: alan bull & kevin herdman. executive officer: ruth claridge. treasurer: mary mills. committee members: alan pearce, harold trahair, wendy holland, trevie dineen, wayne evans, rebecca evans, jean tebb, lois locket, pam wright ron dineen, sandie morris, wayne morris, joyce shelton, dot white, ric norris, ron watts, noel thomas, lorna thomas, ted brown, heather bull, dennis cock, edith mudford, ron mudford, anne scott. acknowledgements: councillors, officers and staff of the eaglehawk borough council, and by members of the rotary club of eaglehawk. lions club of eaglehawk. judges of various awards. sponsors, donors of procession prizes, voluntary workers, dedicated community of eaglehawk. sponsors: stafford ellison, borough of eaglehawk, bendigo bank, kckern manufacturing pty ltd, bendigo advertiser, state bank of victoria. -
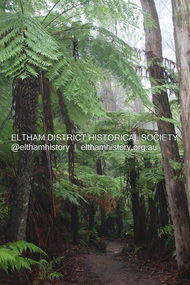 Eltham District Historical Society Inc
Photograph - Digital Photograph, Alan King, Kinglake National Park, 27 March 2008
Fern gullies around Jehosaphat Gully Covered under National Estate. Published: Nillumbik Now and Then / Marguerite Marshall 2008; photographs Alan King with Marguerite Marshall.; p125 The magnificent Kinglake National Park, fringing Nillumbik’s north, is the largest national park close to Melbourne. Thanks to the vision and hard work of a band of local people, the park was created from what was rapidly becoming degraded land. Seeing a threat to Kinglake’s indigenous flora and fauna, several prominent local people campaigned for a national park, which was established in 1928.1 Since then, the park has grown through donations and acquisitions of land, from around 13,800 acres of land (5585ha) to 22,360 hectares. The Sugarloaf and Everard Blocks – of almost 8000 hectares – stand in Nillumbik and the park extends into Mitchell and Murrundindi Shires and the City of Whittlesea. Mt Everard commemorates William Hugh Everard, State member for Evelyn when the park was established. Before 1928, European settlers had degraded the Kinglake area, which was named after the celebrated English author and lawyer, Alexander William Kinglake. Remains of gold shafts and diggings in the park are reminders of Kinglake’s first settlers, who hoped to strike it rich at the gold diggings. But like other gold fields in this shire, they proved not very lucrative and soon timber cutting replaced mining in importance. However, before long, the accessible timber supply ran out, so in the 1920s agriculture took over – particularly potatoes and berry fruits – which involved large-scale clearing.2 The park’s instigator was retired Melbourne University Professor of Music, William Laver.3 As chair of the Kinglake Progress Association he began negotiations to have crown lands on the southern scarp of the Great Dividing Range reserved as a national park. Even before the park was proclaimed, from 1927, KPA members cut tracks to the major scenic points. Professor Laver was one of several people who gave land for the park, donating around 50 acres (20ha), including the Jehosaphat Gully.4 Laver chaired the park’s first Committee of Management, which raised money to employ a ranger and provide facilities, including tracks and roads for fire protection vehicles, toilets and shelters. The committee charged fees for firewood collection, some grazing of livestock, and visitor entrance, and obtained small State Government and Eltham Shire grants. In 1957 the State Government provided revenue for national parks. Then, in 1975, the State Government took over the management and the Committee of Management became an advisory committee, which disbanded in 1978. Originally, the park covered crown land in the Shires of Eltham and Whittlesea; then Wombelano Falls in Yea and other areas were added. In 1970 the park extended into the Shires of Eltham, Healesville, Whittlesea and Yea.5 Bush fires have been an ongoing problem. In 1939 hundreds of eucalypts and acacias had to be sown around the Jehosaphat Gully to rejuvenate the forest. To manage bushfires, the Committee of Management, then the State Government, worked closely with the Forestry Commission, shire councils and local fire brigades. Early national parks focussed on recreation. But by the 1980s, conservation, education and scientific research became more important, playing a vital role in preserving representative samples of the natural environment. Each year many thousands of people use the park’s extensive network of walking tracks amongst the protected plant and animal life as well as camping, cycling and horse riding. The park, along the slopes of the Great Dividing Range, has lookouts revealing magnificent views of the Melbourne skyline, Port Phillip Bay, the Yarra Valley and the You Yangs. Vegetation in the Masons Falls area includes messmate forest, Austral grass-trees, ferns and Hazel Pomaderris. In spring, orchids, lilies, everlasting daisies, correas, grevillea and heath appear. Around Jehosaphat Gully are wet and dry forest, fern gullies and banksia. Animal life includes wallabies, kangaroos, koalas, echidnas, possums, gliders and bandicoots. Male lyrebirds can be heard mimicking in the Jehosaphat Gully, particularly in the Everard Block in winter.This collection of almost 130 photos about places and people within the Shire of Nillumbik, an urban and rural municipality in Melbourne's north, contributes to an understanding of the history of the Shire. Published in 2008 immediately prior to the Black Saturday bushfires of February 7, 2009, it documents sites that were impacted, and in some cases destroyed by the fires. It includes photographs taken especially for the publication, creating a unique time capsule representing the Shire in the early 21st century. It remains the most recent comprehenesive publication devoted to the Shire's history connecting local residents to the past. nillumbik now and then (marshall-king) collection, kinglake national park, jehosaphat gully -
 Eltham District Historical Society Inc
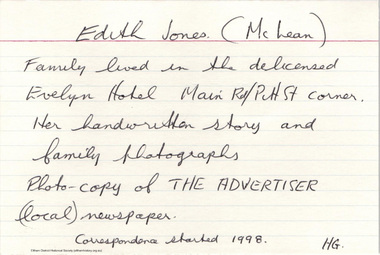
Document - Folder, McLean, 1984-1999
References to McLean family, Hector John McLean and Louisa Frances (nee Green) and six daughters who lived in Eltham during the period 1930 to 1934 inclusive. Lived in the former Evelyn Hotel at the time it was destroyed by fire and being part of the Centenary Parade in 1934 where the family won the Group Section for their entry “Pioneers of Eltham” Reminiscences provided by Edith Jones (nee M1934 flood, ballroom, baptism, barber shop, bittern, boy scouts, bremner's flat, burgoyne's shop, cable tram, cemetery road, centenary celebrations, centenary parade, christening, coach house, collis grocery, dalton street, depression, dole, dorothy jean mclean, edith jones (nee mclean), eltham fire brigade, eltham high school, eltham higher elementary school, eltham lower park, eltham railway station, eltham state school no. 209, evelyn hotel, fire damage - buildings, flinders naval depot, fordham, gladys evelyn mclean, gold mining, gwenneth mae mclean, gwladys evelyn mclean, headmistress, hector john mclean, isherwood house and shop, louisa frances mclean (nee green), metery road, methodist church, miss finnin, miss grant cottage, motor bike races, mrs barrett, mrs bremner, mrs hurley, olive isabel mclean, parade, phoebe lillian mclean, picnic, pioneers of eltham, pitt street, research fire brigade, rev. r.g. arthur, shed, shops, st margarets church hall, st margaret's church, stables, state savings bank of victoria, susso books, todaro, vinnie willet, warrandyte bridge, warrandyte, wingrove park, yarra river -
 Ballarat and District Irish Association
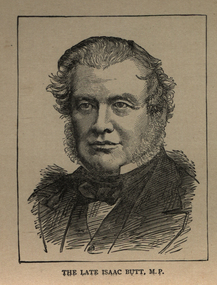
Image, Isaac Butt, c1864, 1864
An Irish barrister, politician, Member of Parliament (M.P.), and the founder and first leader of a number of Irish nationalist parties and organisations, including the Irish Metropolitan Conservative Society in 1836, the Home Government Association in 1870 and in 1873 the Home Rule League. (Wikipedia) After being called to the bar in 1838, Butt quickly established a name for himself as a brilliant barrister. He was known for his opposition to the Irish nationalist leader Daniel O'Connell's campaign for the repeal of the Act of Union.[4] He also lectured at Trinity College, Dublin, in political economy. His experiences during the Great Famine led him to move from being an Irish unionist and an Orangeman[5] to supporting a federal political system for the United Kingdom of Great Britain and Ireland that would give Ireland a greater degree of self-rule. This led to his involvement in Irish nationalist politics and the foundation of the Home Rule League. Butt was instrumental in fostering links between Constitutional and Revolutionary nationalism through his representation of members of the Fenians Society in court. (Wikipedia) He began his career as a Tory politician on Dublin Corporation. He was Member of Parliament for Youghal from 1852 to 1865, and for Limerick from 1871 to 1879 (at the 1852 general election he had also been elected for the English constituency of Harwich, but chose to sit for Youghal). The failed Fenian Rising in 1867 strengthened Butt's belief that a federal system was the only way to break the dreary cycle of inefficient administration punctuated by incompetent uprisings.[6] In 1870 he founded the Irish Home Government Association. This was in no sense a revolutionary organisation. It was designed to mobilise public opinion behind the demand for an Irish parliament, with, as he put it, "full control over our domestic affairs."[6] He believed that Home Rule would promote friendship between Ireland and her neighbour to the east. In November 1873 Butt replaced the Association with a new body, the Home Rule League, which he regarded as a pressure-group, rather than a political party. In the General Election the following year, 59 of its members were elected. However, most of those elected were men of property who were closer to the Liberal cause.[7] In the meantime Charles Stewart Parnell had joined the League, with more radical ideas than most of the incumbent Home Rulers, and was elected to Parliament in a by-election in County Meath in 1875.[8] Butt had failed to win substantial concessions at Westminster on the things that mattered to most Irish people: an amnesty for the Fenians of '67, fixity of tenure for tenant-farmers and Home Rule. Although they worked to get Home Rulers elected, many Fenians along with tenant farmers were dissatisfied with Butt's gentlemanly approach to have bills enacted, although they did not openly attack him, as his defence of the Fenian prisoners in '67 still stood in his favour.[9] However, soon a Belfast Home Ruler, Joseph Gillis Biggar (then a senior member of the IRB), began making extensive use of the ungentlemanly tactic of "obstructionism" to prevent bills being passed by the house. When Parnell entered Parliament he took his cue from John O'Connor Power and Joseph Biggar and allied himself with those Irish members who would support him in his obstructionist campaign. MPs at that time could stand up and talk for as long as they wished on any subject. This caused havoc in Parliament. In one case they talked for 45 hours non-stop, stopping any important bills from being passed. Butt, ageing, and in failing health, could not keep up with this tactic and considered it counter-productive. In July 1877 Butt threatened to resign from the party if obstruction continued, and a gulf developed between himself and Parnell, who was growing steadily in the estimation of both the Fenians and the Home Rulers.[10] The climax came in December 1878, when Parliament was recalled to discuss the war in Afghanistan. Butt considered this discussion too important to the British Empire to be interrupted by obstructionism and publicly warned the Irish members to refrain from this tactic. He was fiercely denounced by the young Nationalist John Dillon, who continued his attacks with considerable support from other Home Rulers at a meeting of the Home Rule League in February 1879. Although he defended himself with dignity, Butt, and all and sundry, knew that his role in the party was at an end.[11] Butt, who had been suffering from bronchitis, had a stroke the following May and died within a week. He was replaced by William Shaw, who in turn was replaced by Charles Stewart Parnell in 1880. (Wikipedia)Image of a man known as Isaac Butt. -
 Glen Eira Historical Society
Article - E. E. Gunn Reserve
... Cycling ...This file contains three items about this Park, formerly known as Ormond Park: An original photograph of E. E. Gunn Reserve Hall. An article from the Caulfield Contact relating to the history of E.E. Gunn Park and the achievements of the committee of management of the Park, dated January/February 1992. An article from The Leader summarising the football competition results, some of which may have been held at E.E. Gunn Park, dated 26 July 2011.e. e. gunn reserve, e.e. gunn park, ee gunn park, ormond park, caulfield south ward, foch street, malane street, ormond, ormond amateur football club, ormond/glen huntly baseball club, ormond cricket club, ormond tennis club, ormond football club, ormond park trust, caulfield, caulfield council, kilvington girls baptist grammar school, e.e. gunn committee of management, barret james, singleton clive, robertson john, gunn ernest edwin, dorothy avenue, newham grove, collegians, de la salle, st. bedes, the tigers, ajax, rupertswood, blieden gary, old camberwell, rombotis john, toolongs steve, glen eira, paterson tom, boyd glenn, demashki mark, the saints, the monds, eltham, elsternwick, albert park, the falcons, the wicks, convery james, hunter justin, power house, prahran/assumption, parks, reserves, playgrounds, sportsgrounds, football, australian rules football, sporting clubs, sports people, clubs, associations, football clubs, sports, recreations, leisure, cultural events, cultural activities, cricket club, baseball club, ovals, playing fields, club houses, scout halls, halls, tennis clubs, athletics, cycling -
 Flagstaff Hill Maritime Museum and Village
Machine - Dioptric Apparatus, mid 19th century
Before the introduction of electricity, lighthouses had a clockwork mechanism that caused the lens to rotate with a light source inside that was either powered by Kerosene or Colza oil. The mechanism consisted of a large weight attached by a cable through the centre of the lighthouse to the top where the cable wrapped around a barrel, drum or wheels that controlled the speed of the lights rotation by a clockwork mechanism. The keeper would crank the clockwork mechanism, which would lift the weight ready for the next cycle similar to an old grandfather clock mechanism. Once the weight lifted to its apex at the bottom of the first landing, the keeper would let it fall, which would pull on the cable, which would, in turn, operate a series of gears activating the rotation of the Fresnel optical lens, which would then rotate to create the lighthouse’s unique light speed of rotation characteristic. Creating a specific characteristic required a way to regulate the speed of the rotation, and was important as sailors could identify a particular light by its speed and time between flashes. The weight had to fall at a certain rate to create the proper rotation speed of the lens and a regulator within the mechanism accomplished this. History: From 1851, Chance Brothers became a major lighthouse engineering company, producing optical components, machinery, and other equipment for lighthouses around the world. James Timmins Chance pioneered placing lighthouse lamps inside a cage surrounded by Fresnel lenses to increase the available light output these cages, are known as optics and they revolutionised lighthouse design. Another important innovation from Chance Brothers was the introduction of rotating optics, allowing adjacent lighthouses to be distinguished from each other by the number of times per revolution the light flashes. The noted English physicist and engineer, John Hopkins invented this system while employed at Chance Brothers. Chance Brothers and Company was a glass works and originally based in Spon Lane, Smethwick, West Midlands England. The company became a leading glass manufacturer and a pioneer of British glass making technology. The Chance family originated in Bromsgrove as farmers and craftsmen before setting up a business in Smethwick near Birmingham in 1824. They took advantage of the skilled workers, canals and many other industrial advances taking place in the West Midlands at the time. Robert Lucas Chance (1782–1865), known as 'Lucas', bought the British Crown Glass Company's works in Spon Lane in 1824. The company specialised in making crown window glass, the company ran into difficulty and its survival was guaranteed in 1832 by investment from Chance's brother, William (1788 – 1856). William owned an iron factoring business in Great Charles Street, Birmingham. After a previous partnership that Lucas had dissolved in 1836, Lucas and William Chance became partners in the business which was renamed, Chance Brothers and Company. Chance Brothers invented many innovative processes and became known as the greatest glass manufacturer in Britain. In 1848 under the supervision of Georges Bontemps, a French glass maker from Choosy-le-Roi, a new plant was set up to manufacture crown and flint glass for lighthouse optics, telescopes and cameras. Bontemps agreed to share his processes that up to then had been secret with the Chance Brothers and stayed in England to collaborate with them for six years. In 1900 a baronetcy was created for James Timmins Chance (1814–1902), a grandson of William Chance, who had started the family business in 1771 with his brother Robert. Roberts grandson, James became head of Chance Brothers until his retirement in 1889 when the company became a public company and its name changed to Chance Brothers & Co. Ltd. Additional information: Lighthouses are equipped with unique light characteristic or flashing pattern that sailors can use to identify specific lighthouses during the night. Lighthouses can achieve distinctive light characteristics in a few different ways. A lighthouse can flash, which is when brief periods of light interrupt longer moments of darkness. The light can occult, which is when brief periods of darkness interrupt longer moments of light. The light can be fixed, which is when the light never goes dark. A lighthouse can use a combination of flashing, oscillating, or being fixed in a variety of combinations and intervals to create individual light characteristics. It is a common misconception that a lighthouse's light source changes the intensity to create a light characteristic. The light source remains constant and the rotating Fresnel lens creates the various changes in appearance. Some Fresnel lenses have "bulls-eye" panels create beams of light that, when rotated between the light and the observer, make the light appear to flash. Conversely, some lenses have metal panels that, when rotated between the light and the observer, make the light appear to go dark. This Dioptric clockwork apparatus used to turn a lighthouse optical lens is very significant as it is integral to a lighthouses operation, we can also look at the social aspect of lighthouses as being traditionally rich with symbolism and conceptual meanings. Lighthouses illustrate social concepts such as danger, risk, adversity, challenge and vigilance but they also offers guidance, salvation and safety. The glowing lamp reminds sailors that security and home are well within reach, they also symbolize the way forward and help in navigating our way through rough waters not just on the oceans of the world but in our personal lives be it financial, personal, business or spiritual in nature. Nothing else speaks of safety and security in the face of adversity and challenge quite the way a lighthouse does. Revolving dioptric clockwork apparatus used to turn a Fresnel optical lighthouse lens. A cylindrical cast metal pillar and cabinet painted green with 3 glass doors enclosing the top section. Inside the pillar/cabinet is a large clockwork mechanism used to turn and regulate a lighthouse light by means of weights and a chain attached to same. One door has the name "Adams Mare" in metallic dots similar to "Braille" to the inside edge of door frame.shipwrecked-coast, flagstaff-hill, flagstaff-hill-maritime-museum, flagstaff hill, maritime-museum, shipwreck-coast, warrnambool, flagstaff-hill-maritime-village, revolving dioptric mechanism, dioptric mechanism for lighthouse, lighthouse clockwork timing mechanism, acetylene lighthouse light mechanism, 19th century lighthouse mechanism, kerosene light, fresnel lenses, colza oil, chance brothers -
 The Beechworth Burke Museum Research Collection
Card (Series) - Index Card, George Tibbits, Ford Street, Beechworth, 1976
George Tibbits, University of Melbourne. Faculty of Architecture, Building and Town & Regional PlanningIndex system that support the research for Beechworth : historical reconstruction / [by] George Tibbits ... [et al]Arranged by street names of BeechworthEach index card includes: street name and number of property, image of property, allotment and section number, property owners and dates of ownership, description of the property according to rate records, property floor plan with dimensions.beechworth, george tibbitsbeechworth, george tibbits -
 Ringwood and District Historical Society
Packet, Gwen Reed nee Woodford family memorabilia c.1880s-c.1980s, Circa 1880s to c1980s
Collection of various family and personal documents, photographs, and early 1900s greeting cards. Papers of Gwen Reed from Edith Graham of Ware Cres, Ringwood East. (Provided by Nicki Shea, Granddaughter of Stan & Jo Bridgman of Eastwood Cycles) Contents: Hand-written notes – Woodford Family Tree, by Gwen Reed Autograph book with entries "To Gwen" Bookmark - with name "Lorrie B" Christmas card to May with love from George 1906 Christmas card from May to George 1906 Christmas card from Edie to Gwen (Cousin Ede) Christmas card from Dot to Gwen 1925 (from Dot Grundy, dc'd) Christmas card from Ollie S to Gwen 1924 Happy New Year card to Gwen from Grandma (Woodford) Christmas card from Mum & Ethel to Gwen 1926 Christmas card to Gwen from Emily (Gawith, Jeparit East) Christmas card from Olive to Gwen 1919 (Olive Janetski, Jeparit East) Christmas card from Hilda (Obst) to Gwen 1929 Postcard to Miss G Woodford "Bygalorie Park" Tullibigeal PO NSW (To Gwen from Effie - Effie Robson, Jeparit East) Christmas card to Gwennie from C. S. Graham 1915 (School teacher) Christmas card from Mum to May & George Christmas postcard from Grandfather to Gwenny Christmas card to Dear Daddie from Gwen Christmas card from May with love to George Christmas card from Nellie Parker (Nell Rodgers - Albury) to Gwen 1924 Greeting card from Hilda to Gwen 1919 (Hilda Obst Jeparit East) Christmas card from Ethel to Gwen 1927 Christmas card from Anne (MCGrath) to Gwen Christmas card from S. Hoober(?) (School teacher, Bygalorie) to Mr & Mrs Woodford, Gwen & Ollie) 1924 Christmas card from May and George to Mum and Dad 1925 Christmas card to Gwen Syd & Family from May Dad & Kiddies (Stepmother) Christmas card from George to May 1907 Postcard (signed Dulcie) to Mrs G. Reed, 9 Laurence Grove, East Ringwood Vic 3055 postmarked 1993 Envelope (only) addressed to Mrs. G. Reed, 9 Laurence Grove, Ringwood East Vic. 3135 Birth Certificate District of Balmoral, Victoria – Sonia Woodford b.1856 (Issued 1987) Death Certificate District of Stawell, Vic – Archibald Brown d.1914 Marriage Certificate District of Hamilton, Vic – John Brown & Margaret Dale m.1895 Coroner’s Post-Mortem report – Edward John Reed d.1981 Family Data Tree (Family Tree) William Walker/Elizabeth Silk, Hamilton Vic & children b.1842-1862 Newspaper clipping – May & Archibald Brown drowned at North Hamilton, 1887 Pictorial Souvenir – Selected Views of Mount Gambier to Miss L. Boyce, postmarked 1959 Hand-written poems/song lyrics by Gwen Reed (4 pages) Newspaper extract - Weekly Times Magazine Section “At Hamilton”, 1937 Photograph – “My mother standing with Foster parents” Photograph of Gracie (?) Grandma (?) Murray (?) Photograph of costumed performers Photograph of child Photograph of lady at John Mansell dispensary (Chemist at Forest Hill Vic?) Postcard photograph – Gwen & Ethel Woodford Photograph of grave – Victoria May Woodford (died 1957 aged 56 years) Photograph of grave – William Woodford and Sarah Woodford Photograph of un-named male Photograph of baby on chair Photograph – “Myself. Hope you like it May" Photograph (colour) – un-named group on train at Currumbin Qld Photograph – 2 un-named girls Autographs include Arthur Young Rosie Sturgess Joff Ellen Carlu Carter Toni Lamond Dick Curtis Billy Daniels Margaret Whiting Horrie Dargie Duo Moreno Therese Talbert Richard Gray Three Apollos Robert Leeman