Showing 2441 items
matching goldfields north
-
 Ballarat Tramway Museum
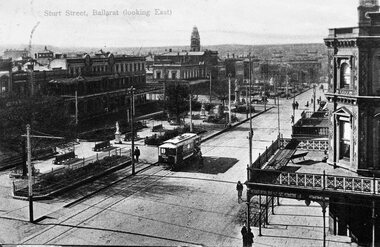
Postcard, John Phillips, Doveton St. and Sturt St
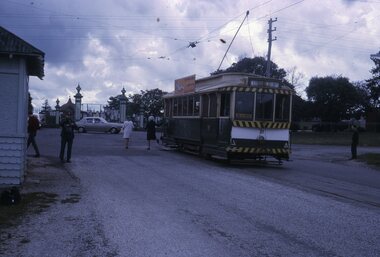
B&W print and scanned images of a coloured postcard lent to the BTM by Mr. Norm DePomeroy, Dec. 1997. Image is an ESCo tram near the intersection of Doveton St. and Sturt St. travelling west along the south side of Sturt. Steet. Photo taken soon after opening of the electric trams. Shows buildings along the north side of Sturt St. and the building at the SE corner of Doveton St. ESCo tram has destination board on the front dash of the tram. Note very similar to item 834, but shadows are different, road surface different and trees have leaves. 1 copy held at 8/98. Postcard posted 25/7/1907. See Reg item 4004 for another postcard using this image within a map of Australia. See 838i3. In top of image are the words "Sturt Street, Ballarat"trams, tramways, esco, sturt st, postcards, doveton st -
 Ballarat Tramway Museum
Slide - 35mm slide/s, Peter Moses, Jan. 1966
Photo of a bogie tram east bound in Sturt St. after leaving Hospital corner (corner of Sturt and Drummond Streets). Has curve from Drummond North into Sturt St. in the foreground. Note scanning error in the image. Kodak cardboard mount slide, taken by Peter Moses January 1966.On back of slide in blue ink in the bottom right hand corner "P. Moses".tramways, trams, hospital corner, sturt st. -
 Ballarat Tramway Museum
Slide - 35mm slide/s, Peter Moses, Jan. 1966
Photo of Drummond Street North, looking south from Macarthur St. Shows the nature of the street construction at the time. Has the hospitals in the background. Kodak cardboard mount slide, taken by Peter Moses January 1966.On back of slide in blue ink "Jan. 1966 / 125 f11" and bottom right hand corner "P. Moses".tramways, trams, drummond st nth -
 Ballarat Tramway Museum
Slide - 35mm slide/s, Peter Moses, Jan. 1966
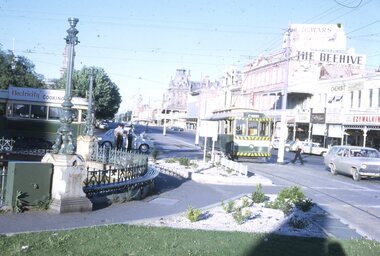
Photo of SEC Ballarat Tram No. 34 turning from Sturt St into Lydiard St. North. Tram has destination of "Lydiard St. North, SEC roof advertisement "Electric Cooking is Matchless" and small painted number above the headlight and large number under the headlight. In the background is the Town Hall, waiting shelter at the terminus and ANZ bank sign. Photo also shows track arrangements at intersection. Kodak cardboard mount slide, taken by Peter Moses January 1966.On back of both slides in blue ink "Jan. 1966, Lydiard St. Tram / 125 f11." and in bottom right hand corner "P. Moses".tramways, trams, city terminus, sturt st, lydiard st, tram 34 -
 Ballarat Tramway Museum
Slide - 35mm slide/s, Peter Moses, Aug. 1971
Colour slide - Photo of SEC Ballarat Tram No. 35 crossing Sturt St. from Lydiard St. North. Photo taken from the north side of Sturt St. Photo shows the tram stop arrangements for east bound trams in Sturt St. with passengers waiting on the seats. Tram has "Everything's under control in my all electric kitchen" SEC roof advertisement panel. Kodak cardboard mount slide, taken by Peter Moses August 1971.On back of slide in red ink "Ballarat / into Sturt St from Lydiard St." and in top left hand corner in black ink "P. Moses".tramways, trams, sturt st, lydiard st north, tram stops, tram 35 -
 Ballarat Tramway Museum
Slide - 35mm slide/s, Peter Moses, Aug. 1971
Photo of SEC Ballarat Tram No. 43 turning from Sturt St. into Lydiard St North with the ANZ Bank building in the background. No. 43 has "Everything's under control in my all electric kitchen" SEC roof advertisement panel. Also in the background is the SEC offices building. Photo shows the Brill 22E trucks turning or curving around the curve. Kodak cardboard mount slide, taken by Peter Moses August 1971.On back of slide in red ink "N43 Ballarat / Turning into Lydiard St." and in bottom right hand corner in black ink "P. Moses" on the reverse side of slidetramways, trams, sturt st, lydiard st, anz, tram 43 -
 Ballarat Tramway Museum
Slide - 35mm slide/s, Peter Moses, Aug. 1971
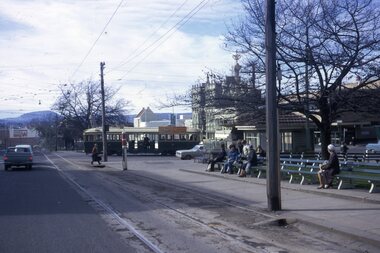
Photo of SEC Ballarat Tram No. 17 east bound in Sturt St, after crossing Doveton St. In the photograph are the buildings on the north side of Sturt St., including the CBC Bank building with a CAGA Finance sign on the top of the building . No. 17 has "Everything's under control in my all electric kitchen" SEC roof advertisement panel. Kodak cardboard mount slide, taken by Peter Moses August 1971.On back of slide in light black ink "N17 Ballarat / Sturt St. " and in bottom left hand corner in black ink "P. Moses".tramways, trams, sturt st, doveton st, cbc bank, tram 17 -
 Ballarat Tramway Museum
Slide - 35mm slide/s, Peter Moses, Aug. 1971
Photo of SEC Ballarat Tram No. 39 completing its turn from Lydiard St. North into Sturt St. with the buildings between Lydiard St and Armstrong visible in the photo including the Town Hall and the National Mutual building. Shows the median strip along Sturt St. Kodak cardboard mount slide, taken by Peter Moses August 1971.On back of slide in red ink "Ballarat / Sturt St." and in bottom left hand corner in black ink "P. Moses" .tramways, trams, sturt st, town hall, national mutual, tram 39 -
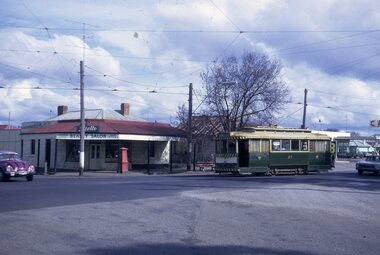 Ballarat Tramway Museum
Slide - 35mm slide/s, Peter Moses, Aug. 1971
Photo of SEC Ballarat Tram No. 27 turning from Macarthur St into Drummond St. North. Has a Beauty Salon on the corner and a service station behind the tram. Shows the Post Box in front of the Beauty Salon. Name of the Salon "?otte" Kodak cardboard mount slide, taken by Peter Moses August 1971.On back of slide in black ink "No. 27, Ballarat / Cnr Macarthur Drummond Sts Old Cemetery" .tramways, trams, macarthur st, drummond st. nth, tram 27 -
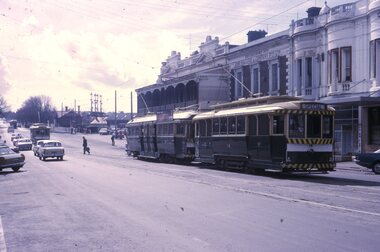 Ballarat Tramway Museum
Slide - 35mm slide/s, Peter Moses, 21/08/1971 12:00:00 AM
Photo of SEC Ballarat No. 14 and possibly No. 42 (Briquette roof advertisement and features on the same special trams in Reg. item 2064) waiting in Lydiard St. North for the arrival of the ARHS special on Saturday 21/8/1971 to undertake the last tour of Ballarat Tramways, prior to the closure of the system. The first line closure (Victoria St.) took place the following day. Has Reid's Coffee Palace building in the background and other buildings on the east side of Lydiard St. North. Two other single truck cars in the photo as are the railway gates at the station. Kodak cardboard mount slide, taken by Peter Moses 21 August 1971.On back of slide in light black ink "N14 Ballarat / ARHS / 4 trams special Lydiard St" and "P. Moses" in black ink in the upper right hand side of the slide.tramways, trams, arhs, lydiard st north, railway crossing, tram 14, tram 42 -
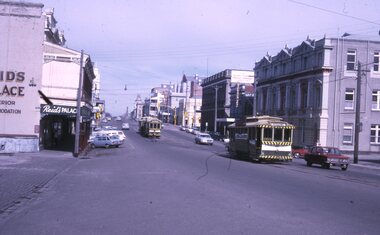 Ballarat Tramway Museum
Slide - 35mm slide/s, Peter Moses, 21/08/1971 12:00:00 AM
Photo of SEC Ballarat 26, with No. 14 and possibly No. 42 (Briquette roof advertisement and features on the same special trams in Reg. item 2064) waiting in Lydiard St. North for the arrival of the ARHS special on Saturday 21/8/1971 to undertake the last tour of Ballarat Tramways, prior to the closure of the system. The first line closure (Victoria St.) took place the following day. Has Reid's Coffee Palace building in the background and other buildings on the east and west side of Lydiard St. North. No. 26 has an SEC briquettes roof advertisement Kodak cardboard mount slide, taken by Peter Moses 21 August 1971.On back of slide in light black ink "Ballarat / ARHS outside station / special trams Lydiard St." and "P. Moses" in black ink in the upper right hand side of the slide.tramways, trams, arhs, lydiard st, tram 26 -
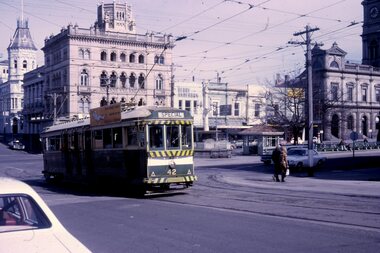 Ballarat Tramway Museum
Slide - 35mm slide/s, Peter Moses, 21/08/1971 12:00:00 AM
Photo of No. 42 waiting to turn from Lydiard St. North to Sturt St. on 21/8/1971, while running the ARHS/TMSV special trams. Has National Mutual, Town Hall and Craigs Hotel in the background. Tram is showing "Special" and is fitted with SEC roof advertisement "Everything's is under control in my all electric kitchen". Kodak cardboard mount slide, taken by Peter Moses 21 August 1971.On the rear of the slide in black ink "Ballarat / ARHS special from Lydiard St into Sturt St." and "P. Moses" in the bottom right hand corner.tramways, trams, arhs, lydiard st north, sturt st. -
 Ballarat Tramway Museum
Slide - 35mm slide/s - set of 2, Peter Moses, 21/08/1971 12:00:00 AM
Photo of SEC Ballarat No. 21 at the Lydiard St. North terminus. No. 21 fitted with a SEC "Everything's under control in my all electric kitchen" roof advertisement. .1 - Soon after arrival of the tram at the terminus. Destination showing "Lydiard St. Nth". Cemetery in the background. .2 - Waiting for departure. Destination showing "Sebastopol". Shows view down Lydiard St Nth and shelter at the terminus. Kodak cardboard mount slide, taken by Peter Moses 21 August 1971.On the rear of the slides in black ink. .1 - "N21 Ballarat / Lydiard Nth terminus" and "P. Moses" in the bottom right hand corner on the other side of the slide. .2 - "N21 Ballarat / Lydiard Nth terminus" and "P. Moses" in the bottom right hand corner on the other side of the slide.tramways, trams, lydiard st north, cemetery, tram 21 -
 Ballarat Tramway Museum
Slide - 35mm slide/s, Peter Moses, 21/08/1971 12:00:00 AM
Photo of SEC Ballarat No. 31 west bound in Victoria St. Ballarat, just past King St. North, entering the King St. loop. Tram fitted with a Twin Lakes sign, two Johnnie Walker whiskey roof advertisements and has destination of "Gardens via Sturt St. W". Note the new bus stop sign in position. This photo was taken on the 2nd last day of operation. Has St. Alipius church in the background. Kodak cardboard mount slide, taken by Peter Moses 21 August 1971.On the rear of the slides in blue ink "Ballarat / Victoria St." and "P. Moses" in the bottom left hand corner in black ink.tramways, trams, victoria st, king st, bus stops, tram stops, tram 21 -
 Ballarat Tramway Museum
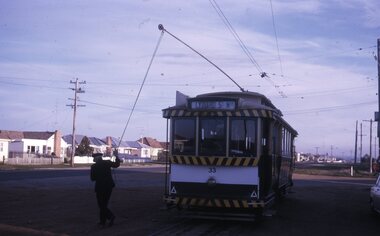
Slide - 35mm slide/s, Peter Moses, 21/08/1971 12:00:00 AM
Photo of SEC Ballarat No. 33 at the Sebastopol terminus, with the driver turning the pole. Taken just before sunset. Tram has destination of Lydiard St. North. Kodak cardboard mount slide, taken by Peter Moses 21 August 1971 - assumed to be the date.On the rear of the slides in red ink "Ballarat / changing poles Sebastopol terminus." and "P. Moses" in the top left hand corner in black ink.tramways, trams, sebastopol, tram 33 -
 Ballarat Tramway Museum
Slide - 35mm slide/s, Peter Moses, Jan. 1969
Photo of SEC Ballarat No. 31 east bound in Sturt St. with a destination of Mt. Pleasant, taken from the east of Drummond St. North. Tram about to pick up a passenger at the tram stop. Tram has two Johnnie Walker Whiskey roof advertisements. Kodak cardboard mount slide, taken by Peter Moses assumed Jan. 1969.On the rear of the slide "P. Moses" along bottom right hand corner in black ink.tramways, trams, sturt st, drummond st, tram 31 -
 Ballarat Tramway Museum
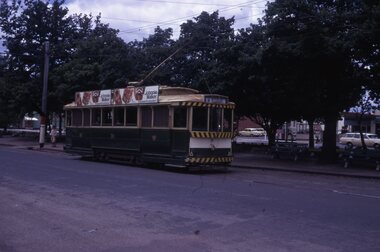
Slide - 35mm slide/s, Peter Moses, Jan. 1969
Photo of SEC Ballarat No. 14 crossing Sturt St, entering Drummond St. North with the Ballarat Base Hospital building in the background. Tram has a Cinzano roof advertisement and a Twin Lakes sign on the back of the tram. Kodak cardboard mount slide, taken by Peter Moses assumed Jan. 1969.On the rear of the slide "P. Moses" along bottom right hand corner in black ink.tramways, trams, hospital corner, sturt st, drummond st, tram 14 -
 Ballarat Tramway Museum
Slide - 35mm slide/s - set of 4, Peter Moses, Jan. 1969
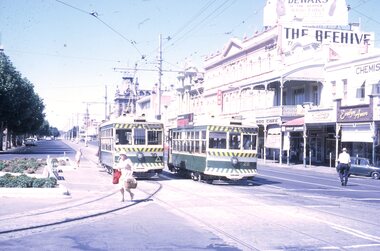
Set of four colour slides taken at Charing Cross Bendigo, Jan. 1969. .1 - Trams 30 and 28 travelling to North Bendigo and Golden Square respectively. Has the Beehive building in the background, along with W.M.I. Jones Chemist, Evelyn Amor shop, Dewars Whiskey rooftop advertisement. 28 has a SEC Briquettes roof advertisement. .2 - As above but with the front or bogie tram in the photo. Also has A. G. Treloar Optician's shop. Kodak cardboard mount slide, taken by Peter Moses, Jan. 1969. .3 - Close up photo of Birney No. 30, with 28 in the background. .4 - No. 28 leaving for Golden Square with the Plaza building, the Cenotaph, and the City Family Hotel in the background. Kodak cardboard mount slide, taken by Peter Moses, Jan. 1969.On the rear of all the slides "P. Moses" in black ink .1 - "Bendigo Charing Cross" and in red ink "19" .2 - "Bendigo three trams / Charing Cross" and in red ink "21" .3 - "Bendigo" and in red ink "23" .4 - "Bendigo Charing Cross" and in red ink "14". tramways, trams, bendigo, tram 28, tram 30 -
 Ballarat Tramway Museum
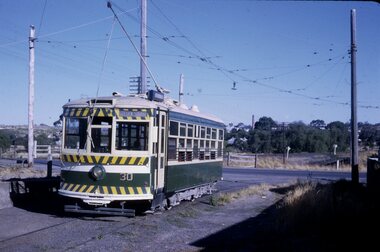
Slide - 35mm slide/s - set of 3, Peter Moses, Jan. 1969
Set of two colour slides taken at the North Bendigo terminus and another in Pall Mall, Bendigo, Jan. 1969. .1 - No. 30 at North Bendigo terminus - has destination "Golden Square" .2 - Interior view of Birney tram with crew members numbers 22, 29 and three seated passengers. .3 - View of Pall Mall looking north from the tram stop - has the Shamrock Hotel in the distance and other buildings on the east side of the street, including a 3BO (Bendigo radio) sign. Kodak cardboard mount slide, taken by Peter Moses, Jan. 1969.On the rear of all the slides "P. Moses" in black ink .1 -"Bendigo / North Bendigo terminus" in blue ink, and in red ink “12” .2 - " Jan 1969 Bendigo / Inside Brill car" in blue ink .3 - "Bendigo Pall Mall" in black ink and in red ink “7”.tramways, trams, bendigo, north bendigo, birney, tram crews, pall mall, tram 30 -
 Ballarat Tramway Museum
Slide - 35mm slide/s - set of 13, Peter Moses, 1974
Set of 13 colour slides, 7 on Kodak cardboard mounts and 6 on Agfa colour plastic mounts. .1 - Bendigo Trust, Birney trams 28 and 30 at Central Deborah Mine terminus. No. 30 has a 3BO Roof advertisement. .2 - ditto .3 - ditto with the Central Deborah mine and buildings in the background. .4 - No. 30 inbound in High St. with Sacred Heart Cathedral in the background (spire under construction) .5 - Nos. 30 and 28 crossing at Charing Cross with the Fountain Plaza building and the fountain in the background. .6 - No. 28 north bound in Pall Mall, after leaving Charing Cross with the Shamrock Hotel in the background. .7 - Photo showing track and centre poles in View St. looking west - no overhead. Has AMOCO service station near McKenzie St. .8 - No. 28 taken from cab of No. 30, in McCrae St, at end of double track. .9 - No. 28 turning from McCrae St. into Nolan St. .10 - No. 28 in Nolan St. with Lake Weeroona rowing sheds in the background. .11 - No. 19 in now Tramway Ave (then Arnold St.) running into depot .12 - No. 19 outside Bendigo depot .13 - ditto Slides taken by Peter Moses, during the winter of 1974 (no leaves on the trees).On the rear of all the slides "P. Moses" in black ink. .1 - "1974 Bendigo Central Deborah Mine" in blue ink and in red ink “16”. .2 - "1974 Bendigo two Birney cars / Central Deborah Mine" in blue ink and in red ink “18”. .3 - "1974 Bendigo trams at Central Deborah Mine" in blue ink and in red ink “17”. .4 - "1974 Bendigo High St / tram near Sacred Hearth Cathedral" in blue ink and in red ink “15”. .5 - "1974 Bendigo two Birney cars / Charing Cross" in blue ink and in red ink “20”. .6 - "1974 Bendigo No. 28 Pall Mall" in blue ink and in red ink “8”. .7 - "1974 Bendigo / Old Tramline View St." in black ink and in red ink “5”. .8 - "1974 Bendigo, McRae St. (Pall Mall)" and in red ink "9". .9 - "1974 Bendigo, Lake Weeroona, / tram " and in red ink "10". .10 - "1974 Bendigo, Lake Weeroona" and in red ink “11”. .11 - "1974 Bendigo / Outside depot" and in red ink “24”. .12 - "1974 Bendigo / Outside depot" and in red ink “25”. .13 - "1974 Bendigo / Depot" and in red ink “26”.tramways, trams, bendigo, central deborah, bendigo trust, sacred hearth cathedral, north bendigo, depot, tram 19, tram 28, tram 30 -
 Ballarat Tramway Museum
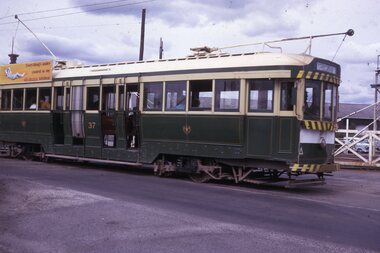
Slide - 35mm slide/s, Peter Moses, Jan. 1969
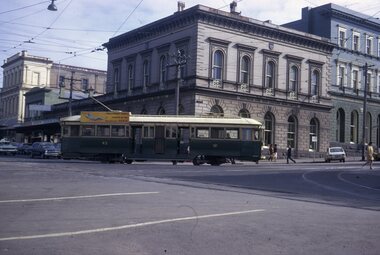
Photo of SEC Ballarat No.37 passing through the railway gates at Ballarat Railway Station, Lydiard St. North, with the destination of "Sebastopol". Tram has a SEC "Everything's under control in my all-electric kitchen". Kodak cardboard mount slide, taken by Peter Moses assumed Jan. 1969, dated only "Jan", but date lines up with Bendigo slides and type of numbering. Could be 1970.On the rear of the slides in black ink "P. Moses" along bottom left hand corner in black ink.tramways, trams, railway crossing, lydiard st, tram 37 -
 Ballarat Tramway Museum
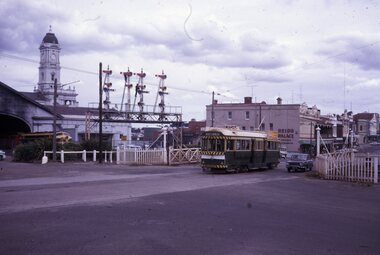
Slide - 35mm slide/s, Peter Moses, Jan. 1969
Photo of SEC Ballarat No.41 passing through the railway gates at Ballarat Railway Station, Lydiard St. North, with the destination of "Lydiard St Nth". Tram has a SEC "Everything's under control in my all-electric kitchen". Reid's Coffee Palace is in the background. Photo shows the Ballarat Railway Station clock tower, part of the train shed and the signals on the station side of the gates. A "B" class locomotive on a passenger train is standing in platform 1 of the station. Kodak cardboard mount slide, taken by Peter Moses assumed Jan. 1969, dated only "Jan", but date lines up with Bendigo slides and type of numbering. Could be 1970.On the rear of the slides in black ink "P. Moses" along bottom left hand corner in black ink.tramways, trams, railway crossing, lydiard st, railway station, reid's coffee palace, tram 41 -
 Ballarat Tramway Museum
Slide - 35mm slide/s - set of 2, Peter Moses, Jan. 1969
2059.1 - Photo of SEC Ballarat No.41 passing through the railway gates at Ballarat Railway Station, Lydiard St. North, with the destination of "Sebastopol". Tram has a SEC "Everything's under control in my all electric kitchen". Reid's Coffee Palace is the background. Photo shows the Ballarat Railway station clock tower, part of the train shed and the signals on the station side of the gates and another bogie tram waiting at the end of the double track in Lydiard St. for No. 41 to pass. 2059.2 - ditto, but with the two trams passing each other. The Provincial Hotel is also in the photograph. Kodak cardboard mount slide, taken by Peter Moses assumed Jan. 1969, dated only "Jan", but date lines up with Bendigo slides and type of numbering. Could be 1970.On the rear of the slides in black ink "P. Moses" along bottom left hand corner in black ink.tramways, trams, railway crossing, lydiard st, railway station, reid's coffee palace, provincial hotel, tram 41 -
 Ballarat Tramway Museum
Slide - 35mm slide/s, Peter Moses, Jan. 1969
Photo of SEC Bendigo No. 6 crossing Mitchell St, north bound for North Bendigo, while a bogie tram waits to depart Charing Cross, east bound for Quarry Hill. Three SEC crew members standing by the front of the bogie tram and an inspector crossing the road near No. 6. Has part of the fountain in the view. Also in the photo are The Beehive building, and advertisement for Dewars whiskey and a shop front for "Ezywalkin" shoes. The bogie tram has a SEC roof advertisement "Electricity Best for cooking". Kodak cardboard mount slide, taken by Peter Moses, Jan. 1969.On the rear of the slide "Jan. 1969 Bendigo:" in blue ink, "P. Moses" in black ink and other side of the slide in red ink “22”.tramways, trams, bendigo, charing cross, tram 6 -
 Ballarat Tramway Museum
Slide - 35mm slide/s, Mark Plummer, Dec. 1968
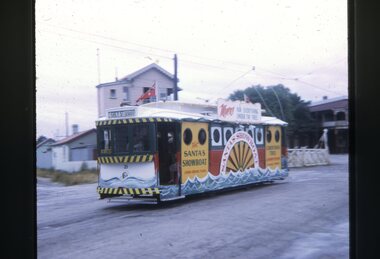
Photo of Ballarat tram No. 21, dressed as the Myers Santa Showboat tram, southbound in Lydiard St North during December 1968. Has the railway level crossing, Ballarat B signal box and the Victoria Guest house in the background. Tram has "Grey St." as the destination. Kodak cardboard mount slide, taken Mark Plummer, December 1968.tramways, trams, lydiard st north, railway crossing, myers santa tram, decorated trams, tram 21 -
 Ballarat Tramway Museum
Slide - 35mm slide/s - set of 2, Mark Plummer, Sep. 1971
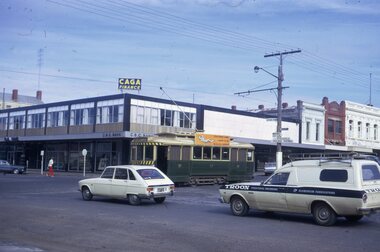
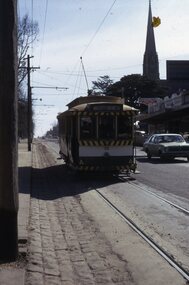
Photo of Ballarat tram No. 30 east bound or inbound in Sturt St., about to cross Doveton St. Tram has destination of Lydiard St. North. 2159.1 - shows gutter and pole arrangement in Sturt St. Has the spire of St Andrews Kirk (church) in the background. 2159.2 - photo taken just before tram crosses Doveton St. Note directional signs on the pole. Kodak cardboard mount slide, taken Mark Plummer, September 1971tramways, trams, sturt st, doveton st, tram 30 -
 Ballarat Tramway Museum
Slide - 35mm slide/s - set of 3, Mark Plummer, Sep. 1971
Series of three photos of Ballarat No. 17, northbound or inbound in Albert St. Sebastopol, approaching the Ophir St. crossing of Albert St. Note tram stop signs, aerial phone lines, the condition of the track and the gravel crossings. Tram has the destination of Lydiard St. North. Kodak cardboard mount slide, taken Mark Plummer, September 1971tramways, trams, albert st, sebastopol, ophir st, tram 17 -
 Ballarat Tramway Museum
Slide - 35mm slide/s, Mark Plummer, Sep. 1971
Photo of Ballarat tram No. 17, northbound in Albert St. Sebastopol, passing the Manchester Unity IOOF Sebastopol Hall, at 113 Albert St. Sebastopol It was originally the South Star Mine Office. Tram has destination of Lydiard St. North Kodak cardboard mount slide, taken Mark Plummer, September 1971tramways, trams, sebastopol, manchester unity, albert st, tram 17 -
 Ballarat Tramway Museum
Slide - 35mm slide/s - set of 3, Mark Plummer, Sep. 1971
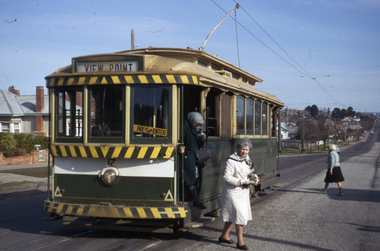
Series of three photos of Ballarat No. 17 at the Lydiard St. North terminus. 2169.1 - just after arrival, with passengers alighting and the driver changing the destination (View Point). Note the conductor's bag on the front cab window sill. 2169.2 - ditto with trolley pole being swung. Note the cemetery gate house building and the waiting room. 2169.3 - ditto, with tram about to depart. Kodak cardboard mount slides, taken Mark Plummer, September 1971tramways, trams, lydiard st. nth, lydiard st, passengers, tram 17 -
 Ballarat Tramway Museum
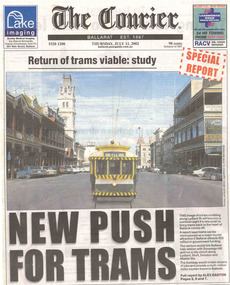
Newspaper, The Courier Ballarat, "Return of trams viable study", "New Push for Trams", "Taking tourism to the next level", "More tourists, more jobs expected", "Tram plan worthy of expected debate", 11/07/2002 12:00:00 AM
Set of three cuttings from The Courier, Ballarat dated Thursday 11/7/2002 regarding the reintroduction of trams to Ballarat. 2241.1 - Page 1 and 2 of The Courier, with page 1 titled "Return of trams viable study" and "New Push for Trams" as the commencement of a Special report showing a digitally constructed image of No. 13 in Lydiard St. North. Note the tram does not have a driver. Introduces reports by Alex Easton on pages 2, 6 and 7. On Page 2, titled "Taking tourism to the next level", has details of the Council viewpoints on the proposal, public consultation, a map of the route, and notes on the construction issues. Has a digital image of 13 crossing Sturt St. into Lydiard St. North. See images No. 1 to 3. 2241.2 - page 6 of The Courier, which joins with page 7 using the titled "More tourists, more jobs expected". Has Sections reviewing the study outcomes, benefits and a summary of the study. Page 6 has a photo of a passenger boarding No. 21, decorated as the Myers Christmas tram in Sturt St and a photo of Bridge St. in 1971 (very poor quality reproduction). See images No. 4 and 5. 2241.3 - page 7 of The Courier, has Sections detailing the history of Ballarat Trams, proposals for the City Tramway, costs, consultation, and comments from Peter Hiscock. Has a photo of Peter Hiscock and Mayor David Vendy in front of No. 13 at the BTM depot. See image No. 6. Also has a photo of Dianne Smith, Executive Director of Ballarat Tourism. On page 8, as part of The Courier's editorial Section, has comments on the proposals, titled "Tram plan worth of extended debate". Looks at the $20million cost. ballarat revival, editorial, ballarat city tramway, lydiard st. nth