Showing 780 items matching " passenger signs"
-
 Melbourne Tram Museum
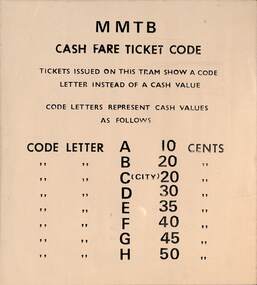
Sign, Melbourne & Metropolitan Tramways Board (MMTB), "MMTB Cash Fare Ticket Code", mid 1970's
... Trams tramways Tickets Ticket Machines Signs Passengers Sign ...Sign printed on paper with an adhesive backing, titled "MMTB Cash Fare Ticket Code", detailing tickets issued on trams giving the value for a specific alphabetical letter. Tickets issued by a ticket machine on a Z class tram.trams, tramways, tickets, ticket machines, signs, passengers -
 Melbourne Tram Museum
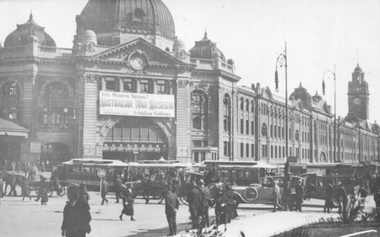
Photograph - Flinders St Station - Australian War Museum, 1922
The photograph shows the busy intersection of Flinders and Swanston St with Flinders St station, along with cable trams, motor vehicles, and pedestrians. The sign above the station entrance is advertising the "Australian War Museum" at the Exhibition Buildings. The reference dates its opening as ANZAC day 1922 and moving to Sydney in 1925. The photo was probably taken soon after it opened as the sign above the station entrance was regularly changed. Note the Safety Zone sign on the eastern side of the intersection for eastbound trams. At the time, trams stopped on either side of the intersection for passengers.Yields information the intersection of Flinders and Swanston St and the War Museum exhibition in the early 1920s.Black and White photograph - printed on plain paper.On the rear has pencil number "KM-M-008", and Ken Magor stamp.cable trams, flinders st station, war museum, flinders st, tramways, safety zone, swanston st -
 Melbourne Tram Museum
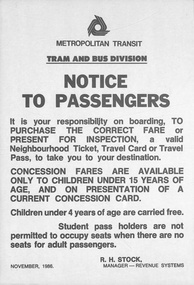
Poster, Metropolitan Transit Authority (MTA), "Notice to Passengers", Nov. 1986
Poster - printed on paper, titled "Notice to Passengers - about the need to purchase the correct fare (or ticket) and present the ticket - Neighbourhood, Travel Card or Travel Pass. Concession fares and students not to occupy seats. Issued by Metropolitan Transit, signed by R H Stock, Manager Revenue Systems Dated November 1986trams, tramways, tickets, travel cards, neighbourhood tickets, the met, travel cards -
 Ballarat Tramway Museum
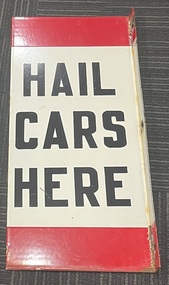
Sign, "HAIL CARS HERE", 1960's
Sign with equal red bands at top and bottom, white band with letters "HAIL CARS HERE" on both sides to indicate to drivers a request stop, that is, the intending passenger had to indicate or hail the oncoming tram for it to stop and allow them to board. The same sign was used for the same purpose in Melbourne. Has three holes for screws on the upstand or folded section. See item 7395 for a "CARS STOP HERE" version. The second image shows a comparison between the two types. Demonstrates the signage used by the SEC (and the MMTB) to indicate tram stops and in particular whether a request or compulsory tram stop. Piece of sheet steel folded to give an upstand or method of attachment to a pole, enamelled with red, white and black paint for use at tram stops. trams, tramways, ballarat, secv, tram stops, furniture -
 Melbourne Tram Museum
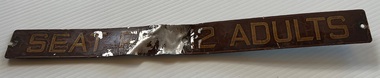
Sign, "Seat for 12 Adults", 1880s?
Possibly from a horse omnibus which was licensed to carry 12 passengers inside and 2 on the outside. Not applicable to cable tram or an electric tram.Demonstrates the method of advising the licensed capacity of a vehicle.Sign - rectangular sheet steel - provided with three screw holes - badly damaged around the centre hole where it has been removed from the original vehicle and paint damaged. Dark red background paint with yellow letters. Painted brown on the rear side.signs, public transport, horse omnibus -
 Melbourne Tram Museum
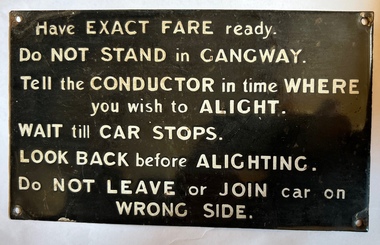
Sign - Victorian Railways - notice to passengers, Victorian Railways (VR)
Used by the Victorian Railways in their tramcars to advise passengers re payment of fares, standing in gangways, alighting and not leaving the tramcar on the wrong side.Demonstrates the method of advising passengers re their behaviour or duties.Sign - enamel white letters on a black background with screw holes in each corner.signs, trams, tramcars, victorian railways, behaviour -
 Melbourne Tram Museum
Document - Folder, Melbourne & Metropolitan Tramways Board (MMTB), "Melbourne and Metropolitan Tramways Board - By-Law 28, Tolls, Fares and Charges", 1/07/1980 12:00:00 AM
Document comprising two large manila sheets, 15 full size foolscap paper (432mm x 343mm) stapled into the manila covers and the left hand edge covered with a black adhesive tape. Carbon copy of document. Document titled - "Melbourne and Metropolitan Tramways Board - By-Law 28, Tolls, Fares and Charges", dated 1st July 1980, rescinding By-Law 27 of 4/9/1979, providing details of all tickets, tolls, fares and charges of the Board to apply from that date. Gives details of all the sections. Notes concession fares, pensioners, special trams, substituted services and passengers over-riding. On the last page has the formal seal of the Board signed by D. Snell as Chairman and W. Aird as Secretary.trams, tramways, mmtb, fares, by laws, tickets -
 Melbourne Tram Museum
Legal record, Melbourne & Metropolitan Tramways Board (MMTB), "Agreement Melbourne and Metropolitan Tramways Board with A.N. Colquhoun", May. 1948
Bound Document, two large ruled grey folded sheets with containing various schedules and letters typed onto foolscap (folio) or quarto sheets. Titled "Agreement Melbourne and Metropolitan Tramways Board with A.N. Colquhoun "signed and sealed on 18th May 1945. Bound on left hand side with green ribbon. Gave Archibald Norman Colquhoun the right to advertising on the inside of tramcars and buses and on the rear of tickets for five years. Gave details of the contract, minimum payments, rebates and conditions of the contract. Schedule A - two pages - space available in tramcars Schedule B - two pages - buses ditto Schedule C - passenger check tickets / annum - some 350million - one page Schedule D - actual tendered document, 15/4/1948 - one page Schedule E - the Specification for the tender - five pages Schedule F - Letter signed by A.N. Colquhoun, on The Reilly Advertising Co. letterhead of which has was the Managing Director giving his credentials. Schedule G - supporting letter on The Reilly Advertising Co letterhead. Schedule H - Letter from the Commercial Bank of Australia Ltd - supporting Mr A.N. Colquhoun. Schedule I - letter from MMTB advising A.N. Colquhoun of his successful bid. Schedule J - Draft agreement in tender document - five pages - signed 15/4/1948."996/7" in top left hand corner of document and stamped "Treasurer"trams, tramways, tickets, advertisements, tramcars, buses, contracts, legal agreements -
 Melbourne Tram Museum
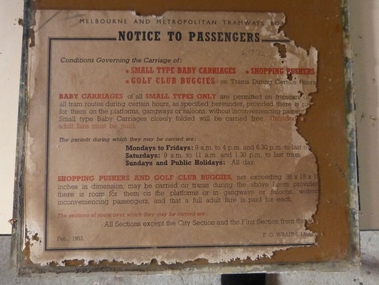
Poster, Melbourne & Metropolitan Tramways Board (MMTB), "Notice to Passengers - Conditions Governing the Carriage of Small type baby carriages, shopping pushers, golf club buggies on trams during Certain Hours", Feb. 1953
Poster - white sheet of paper, titled "Notice to Passengers - Conditions Governing the Carriage of Small type baby carriages, shopping pushers, golf club buggies on trams during Certain Hours". Signed by F. G. Wraith as Manager. Dated Feb. 1953. Provides details of times, fares and where on the system. Poster has been adhered to a sheet of glass that was backed with a sheet of brown paper. The glass was used in the driver's bulkhead of a W class tram.trams, tramways, mmtb, prams, tickets -
 Melbourne Tram Museum
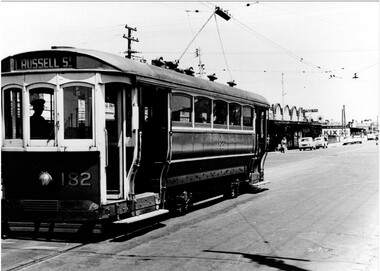
Photograph - Set of 3 Black & White Photograph/s, 1960's
A series of three Black and white photographs of tram T class 182 at the Williamstown Road terminus of the Footscray tram system, c1960. Tram photograph in Somerville Road. All showing the return destination of Russell St. .1 - Shows the shops in the background. Trolley pole reversed and appears the driver is about to enter the cab of the tram. Has the run number F6. Has a Caltex, Ampol, Kix and Caravan park sign in the background. .2 - 182 at the terminus with trolley pole reversed and under the wheel locating guard. Has Run No. F5 in the rear cabin window. .3 - ditto, but before trolley pole reversed with passengers leaving the car and one lady waiting to board. Printed on Fujichrome paper. Not known who took the photograph or when it was printed. Two copies of .1 held.Stamped in black ink on back "TMSV Sales"trams, tramways, footscray, williamstown rd, somerville rd, tram 182, t class, mmtb -
 Melbourne Tram Museum
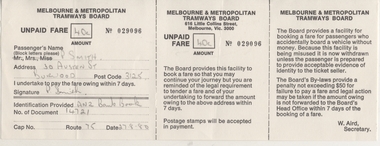
Document - Form/s, Melbourne & Metropolitan Tramways Board (MMTB), "Unpaid Fare Form", c1980
Completed Unpaid fare form, MMTB No. 29096 for 40c, completed by Carolyn Dean in pencil for P. Smith of Burwood . Dated 27-8-1980. Form printed in three portions with perforations, one for the conductor to hand in, one for the passenger and the third for information. Signed by W. Aird Secretary. See Reg Item 1841 for another form - may not be MMTBtrams, tramways, mmtb, fares, tickets, forms -
 Melbourne Tram Museum
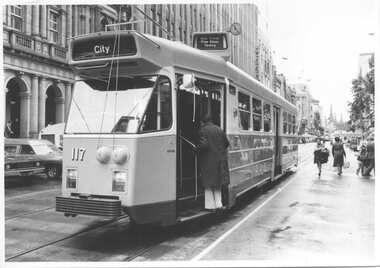
Photograph - Set of two Black & White Photograph/s, The Age, 1979
Set of two black and white photos from The Age of the first day of running Z3 117 in service. .1 -Z3 117 at the Elizabeth and Bourke St stop loading passengers. Tram has in the route number box a sign "New Trams free rides today". .2 - Interior view of tram with the conductors desk having a sign about free rides, another employee handing out pamphlets about the tram and passengers on the tram. From the Vicsig.net web site accessed 20/8/2013, gives the in service date of Z3 117 as 25/9/1979.Have "The Age" copyright stamp on the rear. In pencil, on both "Oct 1979, Z3 117 first day in service"trams, tramways, mmtb, z3 class, bourke st, tram 117 -
 Ballarat Tramway Museum
Document, State Electricity Commission of Victoria, "Tramways - Provincial City Operations", 15/9/1954
Report, or Memorandum on SECV internal paper, from the Acting Engineer Manager to the Commerical Manager, dated 18/2/1955, titled "Tramways - Provincial City Operations". Looks at various ways of cutting the loss on tramway operations in all the three Provincial cities. Includes discussions on Fares and the income, headways, one-man operation, route abandonments, including parallel bus operations, Geelong branch lines, payloads, feeder buses in Geelong, Rosters in particular broken time or broken shifts, light traffic economics. Signed by K L Murray.Yields information about the internal discussions and considerations of the SECV to cut the tramway losses in all three Provincial cities,Document or report, 5 foolscap sheets, carbon copy, stapled in top left hand corner. Draft copy (7 pages) also held.tramways, state electricity commission of victoria, geelong, tramcars, secv, operations, passenger services, ballarat, bendigo, rosters, closure, buses -
 Melbourne Tram Museum
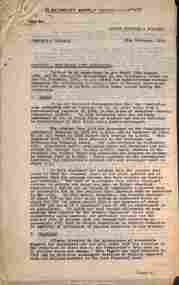
Magazine, Yarra Trams, "Yarra Connections", Dec. 2003
Demonstrates a Yarra Trams staff newsletter..1 - Magazine - 8 pages, full colour, centre stapled, printed on recycled paper, titled "Yarra Connections Issue 12, December 2003", published by Yarra Trams. Notes the launch of the "Wheelchair users guide" for tram passenger, Yarra Trams support for Wheelchair Rugby, planning for Vermont South extension, French award for CEO, Hubert Guyot, photo exhibition featuring employees by Georgia Metaxas, Boroondara residents and Travelsmart, Metlink Team Tigers Basketball, Ikea store in Richmond, pram friendly trams, feedback and return of W class trams to route 30. New track maintenance vehicle -"scrubber truck". .2 - Letter on Yarra Trams letterhead, addressed to Ron Wilson of Orange Grove Bayswater, signed by Paul Matthews Marketing Manager forwarding a copy of the magazine to Ron, noting highlights. Gives address details. .3 - Magazine - as for .1 - issue 1 dated October 1999 with a forward by the CEO Steve Macdonald , Camberwell depot, Deputy CEO Hubert Guyot, new logo designs, reduction in tram stops, tennis trams, family day, Docklands route 70 extension and competition. .4 - magazine - 3 fold A4 - issue 9, dated Nov. 2002, Notes the construction of Route 109, W class, St Vincent's Plaza, Gordon Atkins, Docklands tram services, explorer program, Feedback, Line Officers, Corporate Report and Melbourne Museum tram. .5 - magazine - issue 11 - August 2003 - 8 pages - opening of Box Hill line, Harry the Wombat, trams in the press, Welcome to Dennis Cliche, B class seating trial, Metlink, Docklands, trial information at tram stops (early TramTracker) project and route 75. .6 - magazine issue 13 - April 2004 - Australian Open tram service, Collins and Spencer Superstop, tram services, feedback, Metlink, Channel 10 - The Secret life of us, PTC Cricket Squad. .7 - issue 8 - April 2002 - Grand Prix, Box Hill update, Citadis update, Collins and Spring superstop, Australia Open, Fare Evastion and track joints. 8 - issue 10, undated - Australian Open tennis, Eurotram comes to Melbourne, Docklands joins the City Circle, route 109, Box Hill extension and what is a substation.trams, tramways, yarra trams, w class, disability services, vermont south, awards, metlink, route 30, camberwell depot, docklands, route 70, st vincent's plaza, line officers, box hill, route 109, b class, superstops, cricket, tennis, tramtracker, route 75, city circle -
 Ballarat Tramway Museum
Photograph - Colour Photograph/s - set of 11, Carolyn Dean, 8/03/1997 12:00:00 AM
Series of eleven(11) Colour photographs, postcard size, of the operation of the tramway during the 1997 Begonia Festival. Features various trams, locations, crews and nature of the working. 723.1 - 671 at Carlton St., 8/3/1997 - Richard Gilbert and Simon Green 723.2 - 671 at St Aidans Drive, 9/3/1997 - John Phillips and Clayton Giles 723.3 - Depot Junction, 8/3/1997 the signboard, John Phillips with "Hogaphone" and Travis Jeffrey 723.4 - Depot, 14, 26, 8/3/1997, Gavin Young, Paul Mong 723.5 - 27 at Depot Jtn, 8/3/1997 723.6 - 671 and 14 at Loop, 9/3/1997, John Phillips 723.7 - Gardens Loop, Richard Gilbert on the phone, 9/3/1997 723.8 - 671 coming into the loop from the south end, 9/3/1997 723.9 - Depot Junction, 8/3/1997, Travis Jeffrey 723.10 - 14 at Gardens Loop. Richard Gilbert and Paul Mong, offloading passengers, 9/3/1997 723.11 - 661, depot, with the Begonia Festival and Museum sign. See March 1997 Fares Please!On rear of all photos in blue biro " 8 or 9/.3.97" and "Photo Carolyn Dean"begonia festival, depot junction, btm, tramcar operations, tram 671, 661, 14, 27, 26 -
 Melbourne Tram Museum
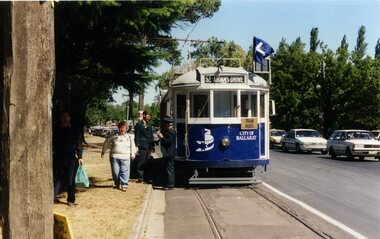
Document - Notice to Passengers, Melbourne & Metropolitan Tramways Board (MMTB), "Baby carriages on North Carlton buses", Feb 1953
Notice to passengers about the conditions of carriage of closely folded baby carriages on North Carlton buses, commencing 1/3/1953 - on trial for 3 months, carried free during off-peak hours. Signed F G Wraith as Manager.Yields information about the carriage of baby carriages on buses.Notice - printed on special size paper.Has in red ink on right hand edge "pushers N Carlton buses"tramways, buses, baby carriages, north carlton -
 Melbourne Tram Museum
Document - Notice to Passengers, Melbourne & Metropolitan Tramways Board (MMTB), "Replacement of Footscray - Moonee Ponds Bus Service by a Tram", 27/4/1954
Notice to Passengers titled "Replacement of Footscray - Moonee Ponds Bus Service by a Tram", about the opening of the section between Gordon Road and Wests Road from Sunday 2/5/1954. Provides details of the first and last trams, sections and fares and services to the Explosives Factory. Dated 27/4/1954, signed F G Wraith as Manager.Yields information about the opening of the connection between Gordon St and Wests Road.Notice - printed on foolscap size paper with handwritten initials in top left hand corner.Has "Rigaldi" in pencil.tramways, new tramways, route 82, footscray, explosives factory -
 Melbourne Tram Museum
Document - Notices to Traffic Staff, Melbourne & Metropolitan Tramways Board (MMTB), "Satchel boxes", 1953
Set of 6 notices glued to one backing sheet: 1 - "Satchel boxes" - C7567. dated 4/9/53 regarding location of Satchel boxes in the City area. 2 - ditto - to Depot Masters - dated 4/9/53 3 - ditto to Superintendents - dated 8/9/53 4 - Notice to Conductors "Transfers to St Kilda Beach from Hawthorn Road trams D7566, 4/9/1953 5 - "Method of turning buses" - City to Elgin & Lygon St - 22/12/1948 6 - Buses running into service from Central Bus Depot, to pick up passengers in Nicholson St - 10/9/1953 All signed by F G Wraith.Yields information about misc. matters of 1953 and 1948.Set of 6 notices printed, and glued to a sheet of paper on both sides.tramways, satchel boxes, correspondence, buses, nicholson st -
 Melbourne Tram Museum
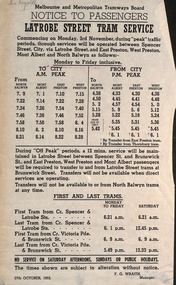
Document - Notice to Passengers, Melbourne & Metropolitan Tramways Board (MMTB), "La Trobe St tram service", 27/10/1952
Notice to Passengers titled "La Trobe St tram service" advising that from 3/11/1952 services from North Balwyn, Mont Albert, East Preston and West Preston would be operated using La Trobe St during the am and pm peaks. Gives details of the services, times, and a list of first and last trams. Dated 27/10/1952 and signed by F G Wraith as Manager.Yields information about the use of the La Trobe St line by suburban trams.Notice - printed on foolscrap size paper.Has "Mr Rigaldi" in pencil in top left hand corner.tramways, la trobe st, timetables -
 Melbourne Tram Museum
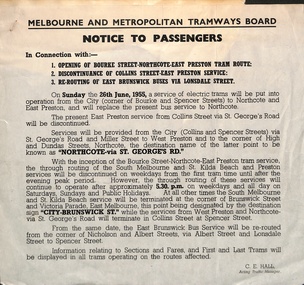
Document - Notice to Passengers, Melbourne & Metropolitan Tramways Board (MMTB), "Opening of Bourke St - Northcote - East Preston tram route", June 1955
Notice to Passengers titled ""Opening of Bourke St - Northcote - East Preston tram route", and other changes to services in connection with the opening of Bourke St lines on Sunday 26/6/1955. Details the changes to existing tram and bus services such as Northcote via St Georges Road, City-Brunwick St and the East Brunswick bus to run via Lonsdale St. Signed C E Hall Acting Traffic Manager.Yields information about the opening of the first stage of the Bourke St electric tramway.Notice - printed on special size paper.tramways, new tramways, bourke st, opening, northcote, buses -
 Melbourne Tram Museum
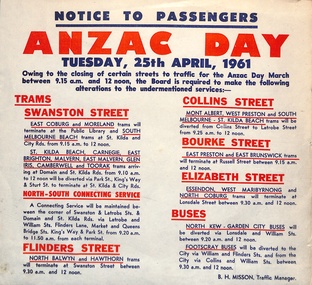
Document - Notice to Passengers, Melbourne & Metropolitan Tramways Board (MMTB), "ANZAC Day", April 1961
Notice to Passengers titled "ANZAC Day", Tuesday 25 April 1961 detailing the service alterations for the March - closure of Swanston St, diversion of trams, termination of trams, connecting services via La Trobe and William Sts, and changes to bus routes. Signed by B H Misson Traffic Manager.Yields information about the changes to the CBD Tram services for the 1961 ANZAC day march.Notice - printed on special size paper.tramways, anzac day, notices and information, timetables, services -
 Flagstaff Hill Maritime Museum and Village
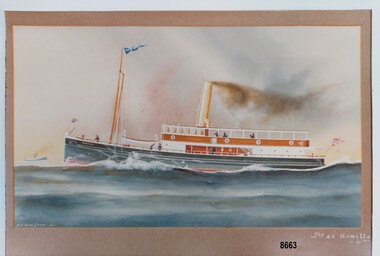
Photograph - Print of S. S. Rowitta, A.V. Gregory, 1912
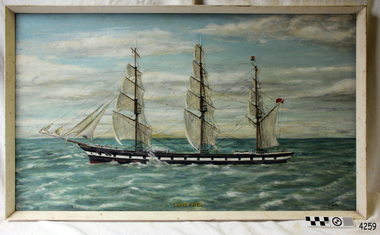
S. S. ROWITTA: - The 1909 steam ferry, S. S. Rowitta, was installed as an exhibit at Flagstaff Hill in 1975 and was enjoyed by many visitors for 40 years. S. S. Rowitta was a timber steam ferry built in Hobart in 1909 using planks of Huon and Karri wood. She was a favourite of sightseeing passengers along Tasmania’s Tamar and Derwent rivers for 30 years. The Rowitta was also known as Tarkarri and Sorrento and had worked as a coastal trading vessel between Devonport and Melbourne, and Melbourne Queenscliff and Sorrento. In 1974 the S. S. Rowitta was purchased by Flagstaff Hill to convert into a representation of the Speculant, a historic and locally significant sailing ship listed on the Victorian Heritage Database. (The Speculant was built in Scotland in 1895 and traded timber between the United Kingdom and Russia. Warrnambool’s P J McGennan & Co. then bought the vessel to trade pine timber from New Zealand to Victorian ports and cargo to Melbourne. She was the largest ship registered with Warrnambool as her home port, playing a key role in the early 1900s in the Port of Warrnambool. In 1911, on her way to Melbourne, she was wrecked near Cape Otway. None of the nine crew lost their lives.) The promised funds for converting the S. S. Rowitta into the Speculant were no longer available, so she was restored back to her original configuration. She represented the importance of coastal traders to transport, trade and communication in Australia times before rail and motor vehicles. Sadly, in 2015 the time had come to demolish the Rowitta due to her excessive deterioration and the high cost of on-going repairs. She had given over 100 years of service and pleasure to those who knew her. Arthur Victor Gregory (known as A. V. Gregory) was born in Melbourne in 1867. He was the son of George Frederick Gregory who was an established marine painter with a studio in South Melbourne. A. V. Gregory worked with his father and his elder half-brother (George Frederick Junior). They made numerous photographic reproductions of their ships' portraits, selling the originals to captains and owners and the photographic prints to the crews. A. V. Gregory inherited the business on the death of his father in 1890 and continued to paint until World War 2 when he stopped for wartime security reasons. Gregory worked mainly in watercolour and gouache. He kept all his working sketches so he could repeat earlier paintings and make more copies of the same ship. His carefully detailed portraits of every kind of vessels seen on Port Phillip Bay created a body of work regarded as a valuable record of the maritime traffic of that period.This print is a significant example of the work of the well-known and well-respected marine painter A. V. Gregory who created a detailed record of shipping in the Port Phillip Bay area in the years before W.W. 2. It is also significant as it connects the history of the S. S. Rowitta, which was a large exhibit on display at Flagstaff Hill Maritime Village from the museum’s early beginnings until the vessel’s end of life 40 years later. The S. S. Rowitta represents the importance of coastal traders to transport, trade and communication along the coast of Victoria, between states, and in Australia before rail and motor vehicles and is significant for its association with Tasmanian history from the early to mid-1900s. The vessel was an example of a ferry built in the early 20th century that served many different roles over its lifetime of over 100 years.This is a photograph of a watercolour painting of the S. S. Rowitta. It shows a steamer moving through the water. The ship has a blue, metal hull, a wooden lower and upper deck, a lifeboat and smoke coming out of a chimney. Flags are flying from the bow, the stern and the mast. Seven figures can be seen on the decks. A second boat can be seen in the distance in the far left of the picture. It has the signature "A. V. Gregory - 12" in the bottom left corner and the title "S. S. Rowitta - 121 tns" in the lower right corner.Signed "A. V. Gregory -12-" Titled "The S. S. Rowitta / -121 tns" Printed on the ships' bow - "ROWITTA"flagstaff hill maritime museum and village, warrnambool, great ocean road, shipwreck coast, s. s. rowitta, rowitta, a. v. gregory, painting, marine painting, marine painter, steamer, steam ferry, passenger ferry, alfred gregory, tarkarri, sorrento, speculant, print, photograph -
 Flagstaff Hill Maritime Museum and Village
Painting - Vessel, Sailing Ship, C Smith, artist, Loch Ard, late 20th century
HISTORY OF THE LOCH ARD The LOCH ARD belonged to the famous Loch Line which sailed many ships from England to Australia. Built in Glasgow by Barclay, Curdle and Co. in 1873, the LOCH ARD was a three-masted square rigged iron sailing ship. The ship measured 262ft 7" (79.87m) in length, 38ft (11.58m) in width, 23ft (7m) in depth and had a gross tonnage of 1693 tons. The LOCH ARD's main mast measured a massive 150ft (45.7m) in height. LOCH ARD made three trips to Australia and one trip to Calcutta before its final voyage. LOCH ARD left England on March 2, 1878, under the command of Captain Gibbs, a newly married, 29 year old. She was bound for Melbourne with a crew of 37, plus 17 passengers and a load of cargo. The general cargo reflected the affluence of Melbourne at the time. On board were straw hats, umbrella, perfumes, clay pipes, pianos, clocks, confectionary, linen and candles, as well as a heavier load of railway irons, cement, lead and copper. There were items included that intended for display in the Melbourne International Exhibition in 1880. The voyage to Port Phillip was long but uneventful. At 3am on June 1, 1878, Captain Gibbs was expecting to see land and the passengers were becoming excited as they prepared to view their new homeland in the early morning. But LOCH ARD was running into a fog which greatly reduced visibility. Captain Gibbs was becoming anxious as there was no sign of land or the Cape Otway lighthouse. At 4am the fog lifted. A man aloft announced that he could see breakers. The sheer cliffs of Victoria's west coast came into view, and Captain Gibbs realised that the ship was much closer to them than expected. He ordered as much sail to be set as time would permit and then attempted to steer the vessel out to sea. On coming head on into the wind, the ship lost momentum, the sails fell limp and LOCH ARD's bow swung back. Gibbs then ordered the anchors to be released in an attempt to hold its position. The anchors sank some 50 fathoms - but did not hold. By this time LOCH ARD was among the breakers and the tall cliffs of Mutton Bird Island rose behind the ship. Just half a mile from the coast, the ship's bow was suddenly pulled around by the anchor. The captain tried to tack out to sea, but the ship struck a reef at the base of Mutton Bird Island, near Port Campbell. Waves broke over the ship and the top deck was loosened from the hull. The masts and rigging came crashing down knocking passengers and crew overboard. When a lifeboat was finally launched, it crashed into the side of LOCH ARD and capsized. Tom Pearce, who had launched the boat, managed to cling to its overturned hull and shelter beneath it. He drifted out to sea and then on the flood tide came into what is now known as LOCH ARD Gorge. He swam to shore, bruised and dazed, and found a cave in which to shelter. Some of the crew stayed below deck to shelter from the falling rigging but drowned when the ship slipped off the reef into deeper water. Eva Carmichael had raced onto deck to find out what was happening only to be confronted by towering cliffs looming above the stricken ship. In all the chaos, Captain Gibbs grabbed Eva and said, "If you are saved Eva, let my dear wife know that I died like a sailor". That was the last Eva Carmichael saw of the captain. She was swept off the ship by a huge wave. Eva saw Tom Pearce on a small rocky beach and yelled to attract his attention. He dived in and swam to the exhausted woman and dragged her to shore. He took her to the cave and broke open case of brandy which had washed up on the beach. He opened a bottle to revive the unconscious woman. A few hours later Tom scaled a cliff in search of help. He followed hoof prints and came by chance upon two men from nearby Glenample Station three and a half miles away. In a state of exhaustion, he told the men of the tragedy. Tom returned to the gorge while the two men rode back to the station to get help. By the time they reached LOCH ARD Gorge, it was cold and dark. The two shipwreck survivors were taken to Glenample Station to recover. Eva stayed at the station for six weeks before returning to Ireland, this time by steamship. In Melbourne, Tom Pearce received a hero's welcome. He was presented with the first gold medal of the Royal Humane Society of Victoria and a £1000 cheque from the Victorian Government. Concerts were performed to honour the young man's bravery and to raise money for those who lost family in the LOCH ARD disaster. Of the 54 crew members and passengers on board, only two survived: the apprentice, Tom Pearce and the young woman passenger, Eva Carmichael, who lost all of her family in the tragedy. Ten days after the LOCH ARD tragedy, salvage rights to the wreck were sold at auction for £2,120. Cargo valued at £3,000 was salvaged and placed on the beach, but most washed back into the sea when another storm developed. The wreck of LOCH ARD still lies at the base of Mutton Bird Island. Much of the cargo has now been salvaged and some was washed up into what is now known as LOCH ARD Gorge. Cargo and artefacts have also been illegally salvaged over many years before protective legislation was introduced. One of the most unlikely pieces of cargo to have survived the shipwreck was a Minton porcelain peacock - one of only nine in the world. The peacock was destined for the Melbourne International Exhibition in 1880. It had been well packed, which gave it adequate protection during the violent storm. Today, the Minton peacock can be seen at the Flagstaff Hill Maritime Museum in Warrnambool. From Australia's most dramatic shipwreck it has now become Australia's most valuable shipwreck artefact and is one of very few 'objects' on the Victorian State Heritage Register. Flagstaff Hill’s collection of artefacts from LOCH ARD is significant for being one of the largest collections of artefacts from this shipwreck in Victoria. It is significant for its association with the shipwreck, which is on the Victorian Heritage Register (VHR S417). The collection is significant because of the relationship between the objects, as together they have a high potential to interpret the story of the LOCH ARD. The LOCH ARD collection is archaeologically significant as the remains of a large international passenger and cargo ship. The LOCH ARD collection is historically significant for representing aspects of Victoria’s shipping history and its potential to interpret sub-theme 1.5 of Victoria’s Framework of Historical Themes (living with natural processes). The collection is also historically significant for its association with the LOCH ARD, which was one of the worst and best known shipwrecks in Victoria’s history. Painting of 1873 sailing ship the "Loch Ard". Oil painting on board behind glass, framed in white painted timber. Artist is C Smith. Inscription on back. "Loch Ard launched 1873, sunk near Pt Campbell, with loss of 52 lives 1878" "C. Smith" "Loch Ard" flagstaff hill, warrnambool, shipwrecked coast, flagstaff hill maritime museum, maritime museum, shipwreck coast, flagstaff hill maritime village, great ocean road, loch line, loch ard, captain gibbs, eva carmichael, tom pearce, loch ard gorge, maritime oil painting, c. smith, sailing vessel -
 Flagstaff Hill Maritime Museum and Village
Print - Vessel, Steamship, A.V. Gregory, SS Casino off Point Lonsdale, ca. 1899-1932
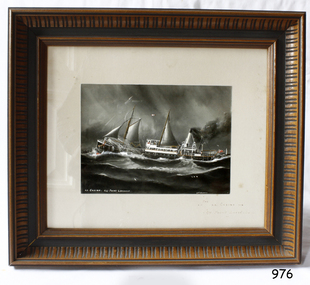
Print of a picture of the S.S. Casino, This print is from an original painting by the Australian marine artist A V Gregory (1867-1957), also known as Arthur Victor Gregory. Gregory lived and worked in South Melbourne. He took over the Gregory Studio owned by his father, George Frederick Gregory, painting actively between 1899 and 1932. He usually signed his works as ‘A V Gregory’. Some of his original works have been sold for thousands of dollars. The S.S. Casino was a passenger and freight steamer built in Dundee, Scotland, in 1882 for the Newcastle and Hunter River Steam Navigation Company of N.S.W. She weighed 425 tons gross with a length of 160.4 feet, beam of 24.1 feet and a depth of 10.2 feet. She had saloon accommodation for 35 people, a fore cabin for 25 more people, and she carried 300 tons of cargo. While on her delivery journey on May 30th 1882 the S.S. Casino called in at the Port of Warrnambool for coal ., narrowly escaping going ashore in gale force winds due to the quick action of the pilot. At that time, still at anchor, she impressed the directors of the Belfast and Koroit Steam Navigation Company so much that they bought her immediately; she was ideal for trade along the West Coast of Victoria. (The Belfast and Koroit Steam Navigation Company was first managed by Messers. Saltau and Osburne and after the passing of Mr. Osburne, by produce merchants Messers H. Sautau and Sons, who had a hay and corn store and shipping agency on the corner of Liebig and Koroit Streets in Warrnambool. ) The S.S. Casino became “the most famous steamer to operate in Victorian waters along the West Coast” by author Jack Loney. Captain Boyd was her first Master, followed by Captain Chapman, who stayed with her from 1890 until 1924. Captain W. Robertson followed for a short term, and then Captain Middleton then took command from 1925 - 1932. The S.S. Casino had several mishaps during her life. One was on 3rd January 1898 when she collided with the S.S. Flinders in Apollo Bay with minor damage. Another was on 24th October 1924 when she grounded on a reef at Point Hawdon near Grey River and most of her cargo (of Christmas goods) had to be dumped into the sea. Then in February 1929 she was ‘holed’ when she struck a submerged object as she entered Lady Bay, Warrnambool. On the morning of 10th July 1932, after attempting to berth at Apollo Bay jetty in heavy seas, Captain Middleton decided to take her out into the bay and wait until the seas abated. It was not realised that the anchor used to steady her as she manoeuvred to her berth had pierced her hull. She put about and headed for the beach but sank. Captain Middleton and nine others lost their lives; nine people were rescued including the two female passengers. Captain Middleton had been in charge of the S.S. Casino for seven years. He was the first ship’s Master to lose his life in a shipwreck in the West Coast trade. In the years following the turn of the century, the S.S. Casino remained the only regular trader with normal passenger accommodation along the West Coast. From 1882 she had made at least 2,500 voyages on the one run. Flagstaff Hill’s collection has a photograph of a portrait of Captain Chapman, , a ship model of the S.S. Casino that shows both forms of power under which she sailed, steam and sail. The ship is painted green and flies three flags. The inscription across the case of the ship model, incorrectly dated, tells the sad story of the wreck of the ship and the loss of lives on July 10th 1932 at Apollo Bay. A print in the Collection shows S.S. Casino underway in the heavy sea off Point Lonsdale, another two photographs show her at the Port of Warrnambool, leaving from the Breakwater in Lady Bay and another identifies the S.S. Casino as a ship from the Belfast and Koroit Steam Navigation Company. (Belfast is the original name for the township of Port Fairy).This print of the S.S. Casino is of significance for its association with the coastal trader S.S. Casino. The wreck of the S.S. Casino is considered an important part of Victorian and Australian cultural heritage and as such has been declared and protected as an Historic Shipwreck under State and Commonwealth Law in the Commonwealth Historic Shipwrecks Act (1976). The detailed image of the vessel depicted in this print shows one of the many sail and steam vessels painted by the renowned Victorian marine artist A V Gregory, whose original works are highly valued today by marine collectors.Print with hand-painted watercolour highlights depicting the port side steamship SS Casinounderway in a heavy sea, merchant flag flying at the stern. Mounted in a decorative wooden frame behind glass. The original painting was by A V Gregory. The title of the picture is repeated in handwritten words on the matte below the artist's signature on the print.Signed "A V Gregory" Hand painted title "SS Casino off Point Lonsdale"flagstaff hill, flagstaff hill maritime museum and village, warrnambool, maritime museum, maritime village, great ocean road, shipwreck coast, newcastle and hunter river steam navigation company, belfast and koroit steam navigation company, h. sautau and sons, s.s. casino, west coast trader s.s. casino, victorian coastal trader, captain boyd, captain w. robertson, captain chapman, captain middleton, apollo bay shipwreck, s.s. casino at lady bay warrnambool, saltau and osburne, a v gregory, arthur victor gregory, melbourne artist -
 Flagstaff Hill Maritime Museum and Village
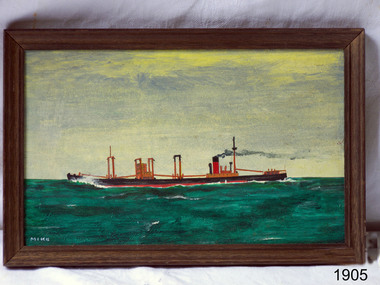
Painting - Vessel, Steamship, Mike McCrea (artist), ca 1985
This is one of a pair of paintings by artist Mike McCrea, created when he was in Warrnambool in 1985. The painting was framed and sold by Patana Galleries, Paton Place, Manly Vale, NSW. It was later purchased by athe company of Master Mariners of Australia and who donated the pair to Flagstaff Hill. The pair of paintings are significant for their association with steamships and the Master Mariners of Australia group. The paintings represent a time in local history when many steamships were sailing the coast and transporting passengers and goods.Painting, framed oil on board; cargo steamship off the coast of Warrnambool by artist Mike McCrea. Framed by Patana Galleries, Manly Vale, N.S.W. Signed by artist.Signed; "MIKE" "J15/62 McCrea" "Red. No. 390 A" Sticker with "62" "PATANA GALLERIES / PATON PLACE, MANLY VALE / PHONE 949-1535"flagstaff hill, warrnambool, shipwrecked-coast, flagstaff-hill, flagstaff-hill-maritime-museum, maritime-museum, shipwreck-coast, flagstaff-hill-maritime-village, painting, mike mccrea, steamship, master mariners of australia, patana galleries -
 Bendigo Historical Society Inc.
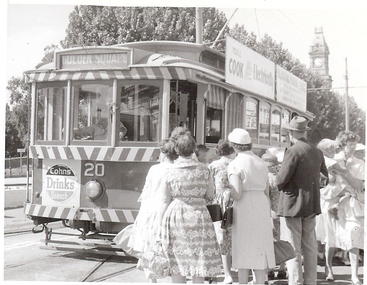
Photograph - BASIL MILLER COLLECTION: TRAM - PALL MALL, 1950 - 60's
BHS CollectionBlack and white photo of No. 20 Tram picking up passengers in Pall Mall, destination Golden Square. Post Office tower in background. Sign 'Cohns Drinks Quench' on front of tram. People boarding and leaving tram. Women's clothing indicates photograph possibly taken in 1960's. unknownbendigo tramways, pall mall bendigo, basil miller -
 Trafalgar Holden Museum
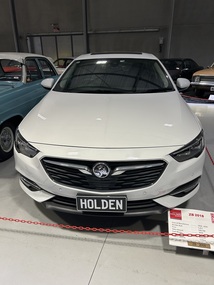
Vehicle - Holden ZB Calais
Joint project between Opel (Europe) and Holden Australia. The Australia released car differs from the European released vehicle in both handling dynamics and engines.Last car to bear both the Holden and Commodore logo'sWhite bodied four door sedan, has a factory sunroof, alloy wheels dual exhaust outlets.Holden emblem both grille centre and boot lid, Calais V boot LHS. V6 AWD sign low both driver and passenger doors.vehicle, commodore, sedan -
 Melbourne Tram Museum
Sign, Melbourne & Metropolitan Tramways Board (MMTB), "Notice it is the Conductor's Duty.....", 1920s
Sign fitted to the interior of W class trams, advising passengers that the conductor's duty to collect fares and issue a ticket. Drawing R1993 refers. "Notice. It is the Conductor's duty to issue a Ticket for every Fare taken, and to punch the same upon issue in the space denoting the STARTING POINT of the Section or Sections in respect of which the Fare is paid."Demonstrates a sign fitted to W class tramcars in the early 1920s. Sign - brass, engraved with black lettering, edge lined and four drilled holes.tramways, w class, signs, tickets, conductors -
 Ballarat Tramway Museum
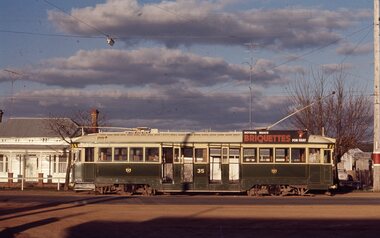
Slide - Ballarat trams - Sebastopol line - set of 9, Ron Hood, 9/1971
Set of nine colour photographs by Ron Hood in early Sept. 1971 of trams on the Sebastopol line: 1 - side on view of tram 35, in bound in Albert St. Has a briquettes roof advert. 2 - tram 40 northbound at the Urquhart St loop 3 - tram 41, shortly before crossing Albert St. 4 - tram 34 crossing Albert St at Ophir St Anglican Trinity Church in the background. 5 - tram 40 southbound in Albert St shortly before Ophir St 6 - tram 40 northbound in Albert St 7 - ditto 8 - tram 35 northbound with a very empty tram - only the conductor and driver 9 - tram 34 to Sebastopol dropping off passengers at Rubicon St. with the Ford car dealer sign in the background.Yields information about tram operations on the Sebastopol line shortly before closure of the route.Set of 9 Colour slides in plain white cardboard mounts.In ink "Sebastopol line Sept. 1971" and slide numbers 19, 29, 30, 31, 32, 33, 34, 35, & 36tramways, trams, albert st, sebastopol, urquhart st, tram 40, tram 34, tram 35, tram 41 -
 Flagstaff Hill Maritime Museum and Village
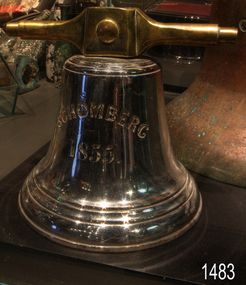
Functional object - Bell, Schomberg 1855, Before 1855
This bell was the smaller of the two bells rescued by the crew of the Schomberg when it was wrecked in 1855. All of the crew from the Schomberg wreck survived. They carried the two ship’s bells with them as they made their way along the coast, eventually arriving at the home of settler John Manning, who lived at Hopkins Point near Warrnambool. Manning acquired the Schomberg bells, presenting them to two Warrnambool churches: the smaller one to St Joseph’s Catholic Church and the larger bell to St John’s Presbyterian church. The small bell at St Joseph’s developed a crack after about a year and could no longer be used. Thomas Manifold imported a new bell for that church, and the cracked bell was stored at his farm. The property was sold years later to John Logan, who donated the discarded bell to the Warrnambool Museum when it first opened in 1886. The Curator, Joseph Archibald, displayed the bell in the entry. In 1975, the bell was transferred from the Warrnambool Art Gallery to Flagstaff Hill. THE SAILING SHIP, SCHOMBERG: - When the Schomberg was launched in 1855, she was considered the "Noblest” ship that ever floated on the water. Schomberg's owners, the Black Ball Line, had commissioned the ship for their fleet of passenger liners. She was built by Alexander Hall of Aberdeen for £43,103 and constructed with 3 skins. One planked fore and aft and two diagonally planked, fastened together with screw-threaded trunnels (wooden rails). Her First Class accommodation was simply luxurious with velvet pile carpets, large mirrors, rosewood, birds-eye maple and mahogany timbers throughout, soft furnishings of satin damask, and an oak-lined library with a piano. Overall, she had accommodation for 1000 passengers. At the launch, the Schomberg's 34-year-old master, Captain 'Bully' Forbes, had promised to reach Melbourne in sixty days, stating, "with or without the help of God." Captain James Nicol Forbes was born in Aberdeen in 1821 and rose to fame with his record-breaking voyages on the famous Black Ball Line ships, Marco Polo and Lightning. In 1852, on the ship Marco Polo, he made the record passage from London to Melbourne in 68 days. Unfortunately, there were 53 deaths on the voyage, but the great news was of the record passage by Captain Forbes. In 1854, he took the clipper “Lightning” to Melbourne in 76 days and back in 63 days; this record was never beaten by a sailing ship. He often drove his crew and ship to breaking point to beat his previous records. He cared little for the comfort of the passengers. On this, Schomberg's maiden voyage, he was determined to break existing records. Schomberg departed Liverpool on her maiden voyage on 6th October 1855, flying a sign that read "Sixty Days to Melbourne". She departed with 430 passengers and 3000 tons of cargo, including iron rails and equipment intended to build the Melbourne to Geelong Railway and a bridge over the Yarra from Melbourne to Hawthorn. She also carried a cow for fresh milk, pens for fowls and pigs, and 90,000 gallons of water for washing and drinking. She also carried 17,000 letters and 31,800 newspapers. The ship and cargo were insured for $300,000, a fortune for the time. The winds were poor as she sailed across the equator, slowing Schomberg's journey considerably. The land was first sighted on Christmas Day, at Cape Bridgewater near Portland. Captain Forbes followed the coastline towards Melbourne. Forbes was said to be playing cards when called by the third mate, Henry Keen, who reported land about 3 miles off. Due in large part to the captain's regarding a card game as more important than his ship, it eventually ran aground on a sand spit near Curdie's Inlet (about 56 km west of Cape Otway) on 26th December 1855, 78 days after leaving Liverpool. The sand spit and the currents were not marked on Forbes's map. Overnight, the crew launched a lifeboat to find a safe place to land the ship’s passengers. The scouting party returned to Schomberg and advised Forbes that it was best to wait until morning because the rough seas could easily overturn the small lifeboats. The ship’s Chief Officer spotted the SS Queen at dawn and signalled the steamer. The master of the Queen approached the stranded vessel and all of Schomberg’s passengers and crew disembarked safely. The Black Ball Line's Melbourne agent sent a steamer to retrieve the passengers' baggage from the Schomberg. Other steamers helped unload her cargo until the weather changed and prevented the salvage teams from accessing the ship. Later, one plunderer found a case of Wellington boots, but alas, all were for the left foot. Local merchants Manifold & Bostock bought the wreck and cargo but did not attempt to salvage the cargo still on board the ship. They eventually sold it on to a Melbourne businessman and two seafarers. In 186,4, after two of the men drowned when they tried to reach Schomberg, salvage efforts were abandoned. In 1870, nearly 15 years after the wreck, parts of the Schomberg had washed ashore on the south island of New Zealand. The wreck now lies in almost 9 meters of water, and although the woodwork is mostly disintegrated, the shape of the ship can still be determined due to the remaining railway irons, girders and the ship’s frame. A variety of goods and materials can be seen scattered about nearby.The bell is particularly significant in that along with other items from the wreck helped in part to having the legislation changed to protect shipwrecks, with far tighter controls being employed to oversee the salvaging of wreck sites. This bell forms part of the Schomberg collection at Flagstaff Hill maritime museum. The collection as a whole is of historical and archaeological significance at a State level. Flagstaff Hill’s collection of artefacts from the Schomberg is also significant for its association with the Victorian Heritage Registered Schomberg shipwreck (VHR S 612). The collection is of additional significance because of the relationship between the objects salvaged, as together they help us to interpret the story of the Schomberg. The collection as a whole is historically significant for representing aspects of Victoria's maritime history and its potential to interpret social and historical themes from society at the time of the wreck. A small ship’s bell. The bell bears the ship’s name and year of construction on one side and the name and address of the ship’s builders on the other. These details are deeply engraved into the metal and formed in bold, upper-case lettering. The bell has two bell stands, a left and a right side. Both stands have an Iron pipe made into an inverted ‘Y’ shape with a hole made in the single length and feet attached to a rectangular metal plate at the other two ends. Feet are bolted into a timber base that has a hole drilled through the centre for mounting. Bell's front; “SCHOMBERG” with “1855” below. Bell's back “HALL & SONS (crack splits letter “N”) / BUILDERS (in italics) / ABERDEEN” (crack splits letter “B”).flagstaff hill, flagstaff hill maritime museum and village, warrnambool, maritime museum, maritime village, great ocean road, shipwreck coast, schomberg, silver plated bell, mess bell, bell stands, captain ‘bully’ forbes, alexander hall and son, james baines and company, liverpool’s black ball line, bell, schomberg bell, ship's bell, small bell, st joseph's church, briggs marine, john manning, john logan, warrnambool museum