Showing 770 items
matching route 3
-
 Melbourne Tram Museum
Ephemera - Olympic Scrap book, "MMTB #1", 1987 to 2003
Collection of newspaper clippings pasted into the scrapbook by the donor. Covers the period 1979 to 1990 when the Melbourne tram system underwent large changes. All from The Herald Sun or The Sun, unless noted otherwise. Contains the following cuttings: 1 - New tram link proves popular - Progress Print 12/12/1979 2 - Extension for tram? Standard 28/11/1979 3 - Ban trams from mall call - Herald - 14/12/1979 4 - Its war on tram yobbos - Sun 25/4/1980 5 - A bus drivers' dream sale 6 - Art lovers in transport of delight - The Bulletin 3/4/1979 7 - Your turn: Our Red cars are gone and all but forgotten - Los Angeles Herald Examiner 21/6/1978 8 - Push for tram line - Eastern Standard - 3/12/1980 9 - Photo of the opening of Bundoora line - 19/5/1983 10 - From cable cars to electric trams - Reg Baird - City Extra 13/11/1985 11 - Louie fears he'll soon be history - Sun 12/11/1985 12 - The first tram rolls unofficially of course - Box Hill Gazette - 18/7/1978 13 - Then and now - Board looks back to 1916 - Box Hill Gazette - 18/7/1978 14 - Blockade - trams buses choke city - 20/7/1987 15 - What a clangers - Tranquil city of trammies, and a City of the Rails - 21/7/1984 16 - Trammies on the buses - 24/7/1984 17 - A tram voted a winner - Progress Press 17/10/1984 18 - A class trams - Eastern Standard 23/10/1984 19 - Danton Carson - ex cable trammie - 12/11/1985 20 - Tram line upgrade - 10/9/1985 21 - Launch of B1 2001 - 16/11/1984 22 - Home built from trams - Progress Press - 9/11/1983 23 - A shortcut on the Brunswick line - Malcolm tram on Miller St bridge - 22/8/1985 24 - Stone and brick and cable tram - The Age 2/11/1985 25 - Danton Carson article by Lahey at Large - The Age 9/11/1985 26 - Why not a City tram loop? - 21/11/1986 27 - tram route ruling angers commuters - (route 82) - 4/1/1986 28 - History back on the tracks - photo o W1 612 - 3/8/1987 29 - The last number 77 - The Age 8/1/1986 30 - Art on wheels (tram 336) - Progress Press 10/12/1986 31 - Ban on Trams - Kew Depot - Progress Press 10/12/1986 32 - The Ghosts of Brisbane Past - Brisbane Courier Mail - 9/10/1987 33 - Trammies had to be tough in the days of cable cars - The Herald - 11/11/1985 34 - Catch a vintage tram at Bylands - 11/11/1985 35 - Aboard the trams home - 26/8/1987 36 - The end of the line for a private tram fleet - 28/3/1989 37 - Jim's tram plan clangs to a halt 38 - Red nose trams in a class of their own 39 - PTC Statewide Open Day - 17/10/1991 40 - Trams a vital part of city's transport - 18/5/1988 41 - Fun tram just the ticket -15/3/1988 42 - Desire is a streetcar for Jim, a collector obsessed 0 8/3/1988 43 - Tram crash 31 hurt - 7/2/1989 44 - Tramway exhibition to roll - Progrss Report - 18/10/1989 45 - Business on the right line - Restaurant tram - 30/10/1989 46 - Experience the 'real' tram museum on a shaky ride - 17/6/1989 47 - The start of electric trams - progress press 18/10/1989 48 - Trams Back - fights erupt as trammies vote - 2/2/1990 49 - Tram row legacy to linger on - 2/2/1990 50 - Trams back, but travelers aren't - Progress Press - 14/2/1990 51 - advert by The Met - Trams operating today - 8/2/1990 52 - Trams roll - rebe;'s rage still a threat - Z33 3/2/1990 53 - An early tram catches a few passengers - Month before all trams back - 5/2/1990 Yields information about the Melbourne tram network in the 1990sScrap book - Olympic - 32 plain sheets + printed card covers, centre stapled.tramways, melbourne, newspapers, box hill, tram museums, unions, tram blockade, a class, east burwood, bundoora, cable trams, b class, route 82, route 77, danton carson, brisbane, restaurant tram, adelaide -
 Melbourne Tram Museum
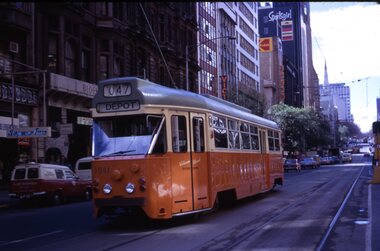
Slide - Set of 11, Ron Scholten, Tram 1041, 1973/1974
Set of 11 colour slides of PCC car 1041 taken during its early operations around Melbourne. Where the slide has a printed date, it is listed. 1 - Collins St, between Elizabeth St and Swanston St, route 47, Depot - Sept. 1973 2 - Batman Ave in Swanston St, route 15, with W2 383 alongside - Sept. 1973 3 - Elizabeth St terminus with Flinders St station in the background - route 19, North Coburg - Sept. 1973 4 - Arriving Batman Ave terminus, route 70, - Sept. 1973 5 - ditto 6 - Bourke St Mall, route 96 East Brunswick - during a trial closure of Bourke St between Elizabeth Street and Swanston Street , given the seats outside Buckley's store - Nov. 1973 7 - Night photo - TMSV slide - MP166 8 - turning from Glenferrie Road into High St - route 6 Glen Iris - a very tight turn - TMSV slide 9 - Wattle Park terminus, route 70 - 1974 10 - Flinders St -route 74 near William St with the railway viaduct in the background. 1974 11 - Interior photo - Ron Scholten - 1973Yields information about PCC car 1041, a prototype all electric tramcarSet of 11 Kodachrome colour slides, cardboard mounts.tramways, pcc class, tram 1041, collins st, elizabeth st, batman ave, st kilda rd., glenferrie road, wattle park, flinders st, interior, bourke st, route 19, route 70, route 74, route 15, route 47, w2 class, tram 383, route 6, route 96, trams -
 Melbourne Tram Museum
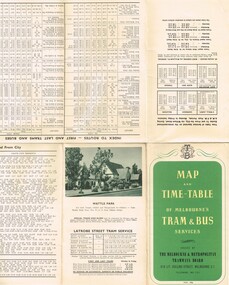
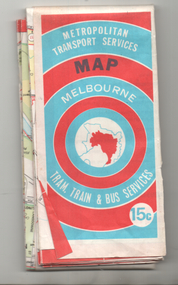
Map, Melbourne & Metropolitan Tramways Board (MMTB), "Map and timetable of Melbourne Tram and Bus Services" - May 1956", May. 1956
Fold out map (10 sections), coloured of Melbourne's Tram and Bus routes, route numbers, rail lines, municipalities boundaries and location of major places of interest. Titled - "Map and timetable of Melbourne Tram and Bus Services" - May 1956". At base of map - timetable of all night trams and bus services. On rear index to routes, 1st and last services, time of Sunday am services, LaTrobe St. services and photo of Wattle Park. Dated May 1956. Note the inset map shows Bourke St as a bus. Three copies held. 413.1 - as for above but with a pasted over section titled "Time table of all - night bus services" on the base of the map replacing the all night tram and bus services. Dated 3/7/1957. Copy from donation of Gary Butler added 3/12/15. See Reg Item 2300 for the March 1952 version.trams, tramways, melbourne, map, tram & bus services, all night services, mmtb -
 Melbourne Tram Museum
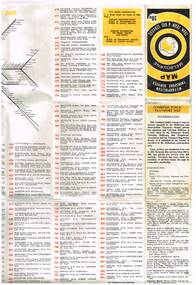
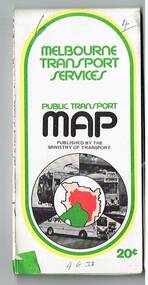
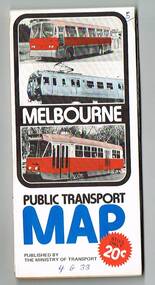
Map, Ministry of Transport, "Metropolitan Transport Services Map - Melbourne Tram, Train and Bus Services", 10/1971
Fold out map (27 sections 9 across x 3 deep), coloured of Melbourne's Tram and Bus routes, route numbers, rail lines, detailed for the central part of Melbourne. On rear description of routes, private bus routes and map of Melbourne metro lines. Has contact details for bookings and lost property etc. Priced at 10c. Launched in a newspaper advert 26/10/1971. Has map scale in miles. 2nd copy added 16/7/2014On front cover in ink "#1" in top right hand corner and "4 G 33" along bottom edge.trams, tramways, melbourne, map, tram & bus services, railways, mmtb, minister for transport -
 Melbourne Tram Museum
Map, Ministry of Transport, "Melbourne Transport Services Map - Tram, Train and Bus Services", c1975
Fold out map (27 sections 9 across x 3 deep), coloured of Melbourne's Tram and Bus routes, route numbers, rail lines, detailed for the central part of Melbourne and insert section for Frankston. On rear description of routes, private bus routes and map of Melbourne metro lines. Has contact details for bookings and lost property etc. Not priced. Not dated, but circa 1975 - has map scale in kms and route 59 to Essendon Airport still extends into Airport. 2nd copy added 16/7/2014. See Reg Item 521 for issue No.. 2, 1974.On front cover in ink "issue #3" in top right hand corner and "4 G 33" along bottom edge.trams, tramways, melbourne, map, tram & bus services, railways, mmtb, minister for transport -
 Melbourne Tram Museum
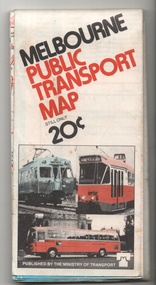
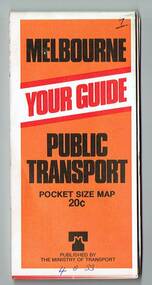
Map, Ministry of Transport, "Melbourne Public Transport Map", c1977
Fold out map (27 sections 9 across x 3 deep), coloured of Melbourne's Tram and Bus routes, route numbers, rail lines, detailed for the central part of Melbourne and insert section for Frankston. On rear description of routes, private bus routes and map of Melbourne metro lines. Has contact details for bookings and lost property etc. Priced 20c Dated 1977, says No. 6 on bottom of rear cover. Note shows route 59 being cut back to the highway.trams, tramways, melbourne, map, tram & bus services, railways, mmtb, minister for transport -
 Melbourne Tram Museum
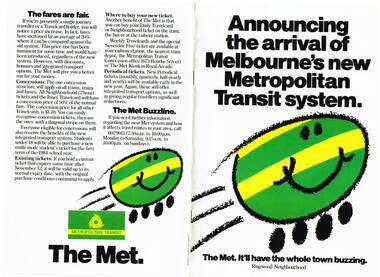
Pamphlet, The Met, "Announcing the arrival of Melbourne's new Metropolitan Transit system", late 1983
Set of 9 pamphlets about the Neighbourhood ticket system - basically the same with changes for each neighbourhood. .1 - Eight page, A4, colour printed on gloss paper, centre stapled, titled "Announcing the arrival of Melbourne's new Metropolitan Transit system - Ringwood Neighbourhood" Explains the revised ticketing system, known as Neighbourhoods, notes the formation of The Met, uses a cartoon characterisation of vehicles, explains how the system works, boundaries, various options, travel cards, concessions and introductory offers. Pamphlet focused on the Ringwood Zone, has a detailed map of the public transport routes within the zone. 2nd copy added 14-5-2016 from the estate of Charles Craig. .2 - Inner .3 - St Albans .4 - Dandenong .5 - Box Hill - (two copies held) .6 - Frankston .7 - Moorabbin .8 - Greensborough .9 - Werribee - added 26/10/2016.trams, tramways, map, the met, tickets, fares, ringwood -
 Melbourne Tram Museum
Map, Ministry of Transport, "Melbourne Transport Services Map - Tram, Train and Bus Services", c1974
Fold out map (27 sections 9 across x 3 deep), coloured of Melbourne's Tram and Bus routes, route numbers, rail lines, detailed for the central part of Melbourne and insert section for Frankston. On rear description of routes, private bus routes and map of Melbourne metro lines. Has contact details for bookings and lost property etc. Priced 15c Inscription dates the map as 1974. Two copies held.On front cover in ink "#3" in top right hand corner and "4 G 33 1974" along bottom edge of the first copy.trams, tramways, melbourne, map, tram & bus services, railways, mmtb, minister for transport -
 Melbourne Tram Museum
Map, Ministry of Transport, "Melbourne Transport Services Map - Tram, Train and Bus Services", 1975-1976
Fold out map (27 sections 9 across x 3 deep), coloured of Melbourne's Tram and Bus routes, route numbers, rail lines, detailed for the central part of Melbourne and insert section for Frankston. On rear description of routes, private bus routes and map of Melbourne metro lines. Has contact details for bookings and lost property etc. Priced 20c possible 1975-1976 - has 1041 and silver train on front cover.On front cover in ink "3" in top right hand corner and "4 G 33 " along bottom edge.trams, tramways, melbourne, map, tram & bus services, railways, mmtb, minister for transport -
 Melbourne Tram Museum
Map, Ministry of Transport, "Melbourne Transport Services Map - Tram, Train and Bus Services", 1976
Fold out map (27 sections 9 across x 3 deep), coloured of Melbourne's Tram and Bus routes, route numbers, rail lines, detailed for the central part of Melbourne and insert section for Frankston. On rear description of routes, private bus routes and map of Melbourne metro lines. Has contact details for bookings and lost property etc. Priced 20c Has a bus, silver train and a Z class tram on the cover. On bottom of outside cover, "No. 5 1976"On front cover in ink "5" in top right hand corner and "4 G 33 " along bottom edge.trams, tramways, melbourne, map, tram & bus services, railways, mmtb, minister for transport -
 Melbourne Tram Museum
Map, Ministry of Transport, "Melbourne Transport Services Map - Tram, Train and Bus Services", 1977
Fold out map (27 sections 9 across x 3 deep), coloured of Melbourne's Tram and Bus routes, route numbers, rail lines, detailed for the central part of Melbourne and insert section for Frankston. On rear description of routes, private bus routes and map of Melbourne metro lines. Map No. 7, 1977. Has contact details for bookings and lost property etc. Priced 20c. 1977, route 59 showing as terminating opposite Essendon Airport.On front cover in ink "" in top right hand corner and "4 G 33 " along bottom edge.trams, tramways, melbourne, map, tram & bus services, railways, mmtb, minister for transport -
 Melbourne Tram Museum
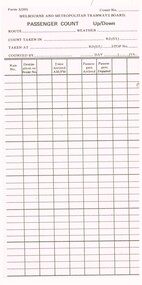
Document - Form/s, Melbourne & Metropolitan Tramways Board (MMTB), "Passenger Count", 1960's?
Printed form on off white paper title "Passenger Count", form 3/201 enabling the recording of passenger counts on tramcars - has space for count number, route, where taken, taken at, counted by and date. Each count done by Run Number, route, time, passengers arriving and passengers departing. Two further copies added 5-4-17 from G. Young. pad of forms added, source unknown 11/6/2022trams, tramways, mmtb, passengers, forms, routes -
 Melbourne Tram Museum
Letter, Ross Wilson, bus route numbers and opening dates, 18/10/1996 12:00:00 AM
Letter - from Ross Wilson of Canberra to Keith Kings regarding bus route numbers and the re-opening date for the Northcote cable tramway (23/3/1901). Industrial issues with bus routes.Has a note "Reply 31/10/95, copies of bus route no. list enclosed."trams, tramways, routes, cable trams, northcote, buses, east brunswick -
 Melbourne Tram Museum
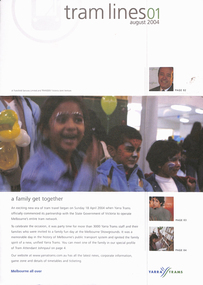
Magazine, Yarra Trams, "Tramlines", 2004 - 2009
Set of 15 issues of Yarra Trams Magazine "Tramlines" All folded A3 unless noted otherwise. 1 - Issue 1 - August 2004 - staff event, message from CEO Hubert Guyot, new control centre, route 96, Olympic torch relay, tram 431, new livery, meet Johnpaul tram attendant. .1A - Issue 2 - December 2004 - customer satisfaction, tram attendants, remembrance day, CEO message, new routes, Camberwell depot, staff profile and tramways band. .2 - issue 3 - May 2005 - Fleet operations control centre opens, (photo), Balaclava Junction upgrade, grand union, Melbourne Uni superstop, fund raising. .3 - issue 4 - August 2005 - Congratulations to Lenny Bates 50, departure of Hubert, route 75 extended to Vermont South, fare evasion, trackwork and Superstops in Flinders St and Bourke St, East Preston Depot and think tram project. .4 - Issue 5 - December 2005 - folded A3 sheet, plain paper, colour photos - with articles on congestion, advertising campaign success re fare evaders, new platform stops in Flinders St, Network improvements and getting ready for the 2006 Commonwealth games featuring a cartoon poster of a tram in a race (see Reg item 1235 for the actual poster). Has a message from Dennis Cliche - new CEO. .5 - Issue 6 - May 2006 - folded A2 sheet, gloss paper, items re Commonwealth games, Karachi W-11 tram, Remembrance day, network improvements, Grand Prix, good Friday appeal, and the forthcoming centenary celebrations. Centre page spread has a large number of photos of staff during the Commonwealth Games. .6 - Issue 7 - October 2006 - folded A2 sheet, gloss paper, colour photos of the Centenary Art Tram (5006), Myki, network improvements, memories of 1906, Luna Party Tram (1011) with centre page spread of a photo of 5006 outside Luna Park, and the various tram images featured on the tramcar. See also Reg Item 864 for details of the making of the art work. .7 - Issue 8 - December 2006 - folded A3 sheet, gloss paper, colour photos of the "Tram It 2006" event, light rail, TramTracker being launched, Essendon, Centenary celebrations and "for the love of trams". .8 - Issue 9 - May 2007 - six pages - traffic condition, green depots, Joyce Barry, plaque at Brunswick Depot, fund raising, platform stops, trackwork, TramTracker, Police tram. .9 - Issue 10 - September 2007 - MSO tram, students travels, Transport Challenge 2007, website, TramTracker by SMS. .10 - Issue 11 - Melbourne trams a heritage icon, fund raising, TramTracker, cable tram tracks in Abbotsford St, route 86 to the Waterfront City Docklands, hailing trams. 11 - Issue 12 - Mulhouse tram, Bumblebee, on the docks, fundraising, St Kilda Road upgrades, TramTracker. .12 - Issue 13 - Bumblebee C2 class trams, traffic congestion, wind power tram, Flinders St trackwork. .13 - Issue 14 - Silver Paralympians on tram, green wind powered trams. .14 - Issue 15 - TramTracker Jake, film festival, Public Transport Ombudsman - Simon Cohen, Operations Centre, .15 - Issue 16 - 6 pages - tram performance, TramTracker at tram stops and iPhones, Mike Talks, Myki. All have the Yarra Trams logo on the front cover.trams, tramways, yarra trams, tickets, commonwealth games, flinders st, grand prix, karachi w-11 tram, construction, luna park, essendon depot, centenary, tramtracker, olympic games, control centre, balaclava junction, trackwork, grand union, melbourne university, superstops, vermont south, route 75, flinders st, bourke st, brunswick depot, cable trams, docklands, mulhouse, c2 class, flinders st, environment, ombudsman, myki, tramways band -
 Melbourne Tram Museum
Functional object - Tramcar component, C. Brose Wuppertal Germany, Set of destination indicator equipment that was fitted to Z3 and A class trams, c1985
Set of destination indicator equipment that was fitted to Z3 and A class trams. Each item consists of various electronic parts contained within a metal case that could have been cabled together. Equipment manufactured by (Carl) C. Brose of Wuppertal Germany and maintained by Font Electronics of Melbourne - some items have the manufacturers details on them along with the details of the maintenance company and serial numbers etc. Photo .1 - shows the set of equipment as placed on display in the training room. .1 - set of two route number boxes, three individual controlled blinds, driven by a motor and control gear. Has a Fluro light fitted internally. See images .2 to .5 .2 - Small side destination indicator, with driven blind, electronic equipment with motor on the underside of the box - for use in Z class trams - see images .6 to .9 .3 - as for .2, but with motor mounted right side, used in A class trams, see images .10 to .12 .4 - set of two control panels with selection equipment for selecting the destination (by number) and route number with indicators and start button - see image .13 to 14 .5 - set of two long main rolls indicators, with control gear and Fluro light internally, driven by an internal electric motor - see images 17 and 18 .6 - set of two linking mechanism for the various boxes with large cables cut off for each of the four tram boxes. Would have been control panel item .4 - see image 15 and 16. See e-mail from Simon dated 17/11/2014. See reg Item 4617 for a small side destination roll.trams, tramways, destination indicators, a class, z3 class, transport equipment -
 Melbourne Tram Museum
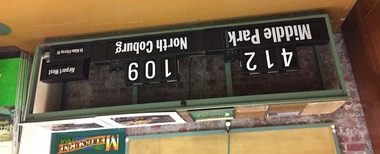
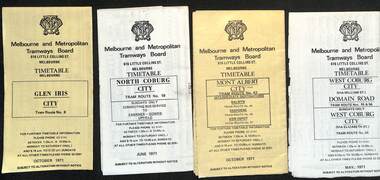
Ephemera - Timetable, Melbourne & Metropolitan Tramways Board (MMTB), MMTB Tram timetables, set of 12, 1971
... 3 - Mont Albert - City - routes 42, 44, 45, 37 - Oct. 1971 4... 3 - Mont Albert - City - routes 42, 44, 45, 37 - Oct. 1971 4 ...Timetables for specific routes, day of week giving information on tram times at specific time points, route map, sections and fares and organisation address - 616 Little Collins St. Melbourne. 1 - Glen Iris - City route 6 - Oct. 1971 2 - North Coburg with connecting bus to Fawkner and Gowrie - Upfield on Sundays - June 1971 3 - Mont Albert - City - routes 42, 44, 45, 37 - Oct. 1971 4 - West Coburg - Domain Road and West Coburg City on Sundays - routes 55, 56 and 68 - May 1971 5 - Essendon Aerodrome - City route 59 - June 1971 6 - East Brighton - City - routes 64, 65, 62, 61 - Oct. 1971 7 - Carnegie - City - routes 67, route 66 - Oct. 1971 8 - Wattle Park - City route 70, route 71 and route 76 - Oct. 1971 9 - Camberwell - City - route 72, route 73 - Oct. 1971 10 - Prahran - City, North Richmond -Prahran - St Kilda Beach, routes 77, 78 and 79 - Oct. 1971 11 - East Preston - City and East Brunswick - City - routes 88, 89, 90. 96 and 97 - Oct. 1971 12 - ditto for Sundays printed on green paper. 13 - Route 8, Toorak, Oct. 1971-*Yields information about 1971 MMTB timetables.Set of 12 1971 MMTB Tram timetables, folded sheets.trams, tramways, timetables, mont albert, route 42, route 6, route 19, upfield, route 44, route 45, route 37, route 55, route 56, route 68, route 59, route 64, route 65, route 62, route 61, route 67, route 66, route 70, route 71, route 76, route 72, route 73, route 77, route 78, route 79, route 88, route 90, route 96, route 97, route 8 -
 Melbourne Tram Museum
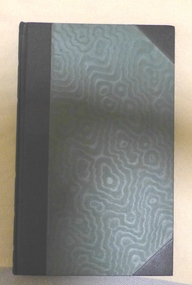
Document - Report, Hector Bell, Melbourne and Metropolitan Tramways Board, "Report of H.H. Bell Chairman on his overseas trip March - October 1938", 1939
Research Report or Overseas Tour report, Half bound in green and black Rexene with mottled end papers, 222 pages (Gestetner printed single sided), typed report - titled "Report of H.H. Bell Chairman of the Melbourne and Metropolitan Tramways Board on his overseas trip March - October 1938". Dated 31/1/1939. He was accompanied by Mr. R. A. Spencer the Board Secretary. Reg Item 3875 indicates that their wives travelled as well with them. Has an index, notes on his visits to five cities on his voyage to England, visits to 10 UK cities, Berlin, Paris and 12 USA and Canadian cities. Includes notes on buses, gas-producer engines, PCC trams, closure of tramways, technical notes, trolley buses, conversion of Bourke St cable tram routes, overhead, motors, engines and many other topics. Note pages scanned in particular have reference to Bourke St conversion and driving habits in the UK compared to Melbourne (road hogs). Inside front cover has a label from "Sands & McDougall Pty Ltd" about the job number and date of binding "6-3-1939" See Reg Item 3846 for a copy of the report re conversion of the cable tram routes and 3906 for an Oct. 1938 report on the PCC car to the Board.trams, tramways, mmtb, bourke st, conversion, double deck buses, tours, overseas tours, pcc, buses, trolley buses, uk, usa, canada -
 Melbourne Tram Museum
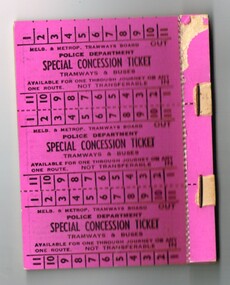
Ephemera - Ticket/s, Melbourne & Metropolitan Tramways Board (MMTB), "Police Department Special Concession Ticket", mid 1970's?
Set of 12 "Police Department Special Concession Ticket", stapled in sheets of 3, on 4 separate sheets, printed on pink card to off white cardboard. Tickets have availability for any one through journey on any one route. Not numbered. Has on the rear of the ticket blocks, the conditions of use - does not have the required cover with the Member's name. Has the remnants of the cover on the top of the block.trams, tramways, mmtb, tickets, city section, melbourne, police -
 Melbourne Tram Museum
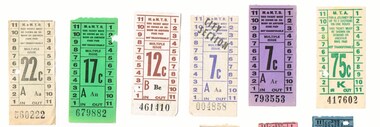
Ephemera - Ticket/s, Melbourne & Metropolitan Tramways Board (MMTB), "Restricted Weekday Ticket", c mid 1960s to 1980's
Set of six decimal currency paper tickets for use on MMTB or MTA services. Printed on off white paper unless noted. All numbers in black. .1 - 7c, over printed City Section, printed with mauve ink Aa004858 .2 - 7c, mauve paper, black ink, Ar 793553 .3 - 12c brown ink Bc461410 .4 - 17c, green paper, black ink, An 679882 .5 - 22c, black ink Aa 560222 .6 - 75c - green ink, K417602, printed by the MTA, noted on ticket that it was available for a journey on two sections on one route. Each ticket has section numbers on either side for In or Out trips.trams, tramways, mmtb, tickets, city section, mta -
 Melbourne Tram Museum
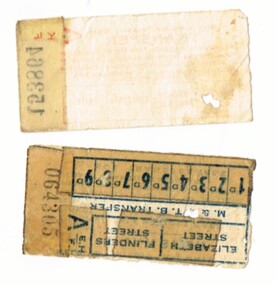
Ephemera - Ticket/s, Set of three MMTB transfer tickets, 1940's?
Set of three MMTB transfer tickets. .1 - printed in red on off white paper, with black number (A153864) for transfer to the Burwood Route, Malvern Town Hall, Esplanade or the City. Has been punched for the Burwood route. Has the conditions on the front of the ticket. .2 - printed in blue on off white paper, with black number - A EHF, 064305, for Elizabeth St and Flinders St with fares along the bottom edge ranging from 1d to 9d. Has the conditions on the rear. Has been punched for Elizabeth St and 8d. .3 - printed in green on off white paper, with black number D MCG, 948461 - has 14 different destinations on the ticket, has been punched for Gardens? Has the conditions on the rear. Could be related to the cable tram era.trams, tramways, mmtb, tickets, transfer tickets -
 Melbourne Tram Museum
Slide - set of 3, Chris Jacobson, Z class tram No 1, May 1975
Set of three Colour slides of a new Z class, No. 1 tram dated May 1975. The tram entered service on 5/5/1975 - see reference. 1 - Leaving Batman Ave terminus, route 70 for Wattle Park Elgar Road. 2 - In Wallen Road, just over the Yarra River Bridge at Hawthorn 3 - Swan St - Batman Ave intersection with the Olympic Swimming pool in the background along with a W class running a route 77.Yields information about Z class 1 and Batman Ave terminus.Set of 3 Kodachrome colour slides, cardboard mount.All have "Chris" in ink on the rear.tramways, z class, new tram, tram 1, batman ave, route 70, wallen road -
 Melbourne Tram Museum
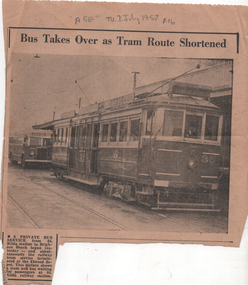
Newspaper, The Age, "Bus takes Over as Tram Route Shortened", July 1957
Photo and caption reports on the cutting back of the St Kilda - Brighton tram line to Elwood depot on 1/7/1957. Photo shows Victorian Railways tram No. 35 at St Kilda Railway station with the privately operated bus behind. The service was operated by the Brighton St Kilda Bus Lines Pty Ltd. using some half-cab buses. The service to Elwood depot was replaced by buses on 1/3/1959 See item 7195 for a print of the actual photo.Yields information about replacement of trams on the St Kilda Brighton line by buses in July 1957. Newspaper clipping titled - "Bus takes Over as Tram Route Shortened" - The Age 2/7/1957"Age" Tu 2 July 1957 p16trams, tramways, vr trams, brighton - st kilda bus lines, st kilda brighton electric tramway, closure, buses, bus replacement -
 Melbourne Tram Museum
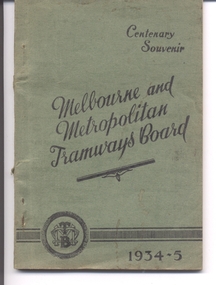
Book, Melbourne & Metropolitan Tramways Board (MMTB), "Centenary Souvenir - Melbourne and Metropolitan Tramways Board - 1934-5", 1935
Book - five sections - 80 pages, side stapled, glued within light green card covers with title "Centenary Souvenir - Melbourne and Metropolitan Tramways Board - 1934-5". Has an introduction, a preface that gives a brief history of the tramway system in Melbourne, 20 buildings and points on interest in Melbourne and how to get there, with sketches by Clive Fink, a list of electrified routes and a cable routes at the time with details of terminals and points of interest along the route. Printed by The Mail Publishers, 264 Barkly St Footscray. See Related documents for a route listing. See Reg Item 79 for a reprint version of 1967. 2nd copy added 29-8-2015 - donation of Ian Bryant. 3rd copy from the McComb Collection added 30-12-2016. Copy 4 donated by Kevin Tiernay - 11-06-2022 Pdf copy added 5/5/2019 as image i2 and images i2 to i4 removed.Has "19" in red ink on inside title page, Copy 3 - has H. S. McComb in pencil along the top of the front cover.trams, tramways, mmtb, melbourne, routes, cable trams -
 Melbourne Tram Museum
Photograph - Set of two Colour Prints, Melbourne & Metropolitan Tramways Board (MMTB), c1973
Colour photograph of tram 1041 crossing under the railway at Royal Park, with a Hitachi silver train passing overhead, front car appears to be 8M. Photograph Official VR / MMTB, c1973, when both vehicles relatively new. Train has destination of Gowrie and 1041, route 55, West Coburg. .1 - 3/4 view of tram with just one carriage of the train in the view. .2 - ditto, but with the whole train in the view.trams, tramways, mmtb, vr, hitachi silver train, 1041, tram 1041 -
 Melbourne Tram Museum
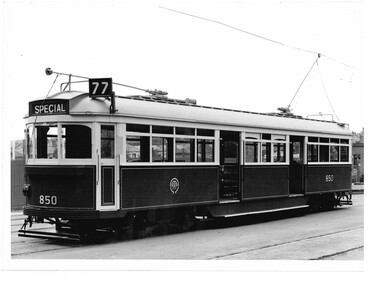
Photograph - Set of 3 Black & White Photograph/s, Sutcliffe Pty Ltd, 1939
Black and white photograph of the first of SW6 class tramcars, No. 850 at South Melbourne Depot following its construction showing the tail light and the dash canopy lighting. The photograph does not have the sign "This is your car use it" as shown on the other official photograph of this tram - see page 41 of the 5th Edition of Destination City. Tram shows route 77 with the destination of Special. Photograph by Sutcliffe Pty Ltd, Illustrative Photographers of 94 Elizabeth St Melbourne. .1 - as above - from the Keith Kings collection - added 4/4/2019. .2 - as above but with the sign "This is your car use it" - added 4/4/2019. See Reg Item 3558 for another print within an album.Stamped on rear in red, with the photo number in black "Sutcliffe Pty Ltd, / Illustrative Photographers / No. 3 / 94 Elizabeth St Melbourne / CENT 1500 - 2601" (Their Melbourne central exchange phone number) .1 - Has the photographers stamp, along with Keith's details in ink on the rear "M&MTB S-A947 / SW6 - 850 / South Melbourne Depot 1939 / Note: Tail-lights & Dash Canopy Lighting, Roller Bearing Axle Boxes". Date stamp 12 Jan. 1948. .2 - Has the photographers stamp, along with Keith's details in ink on the rear "M&MTB S-A946 / SW6 - 850 / South Melbourne Depot 1939 / Note: Tail-lights & Dash Canopy Lighting, Dash Advert, Roller Bearing Axle Boxes". Date stamp 12 Jan. 1948.trams, tramways, mmtb, sw6 class, new trams, south melbourne depot, route 77, tram 850 -
 Melbourne Tram Museum
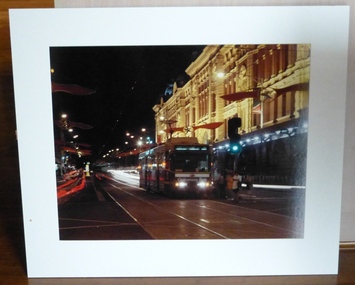
Photograph - Colour photograph - mounted, Yarra Trams or PTC?, mid 1990's?
Colour print mounted within a large card frame of B class 2050 inbound on Flinders St to Latrobe St running a route 75. Has a Bank of Melbourne advertisement on the front of the tram, along with a run on its side in the front window. Tram at the Elizabeth St stop with Flinders St station in the background. In Flinders St, Christmas decorations have been strung on the span wire. Has been wall mounted or mounted within a larger frame - tape tear marks on the rear. The Wikipedia page for Bank of Melbourne (accessed 3/12/14 - http://en.wikipedia.org/wiki/Bank_of_Melbourne_%281989%29) - The Bank of Melbourne is a financial institution based in Melbourne, Australia, established in 1989 and taken over by the Westpac Banking Corporation (Westpac) in 1997.trams, tramways, collins st, b class, tram 2050 -
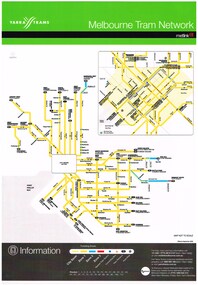 Melbourne Tram Museum
Poster, Yarra Trams, "Melbourne Tram Network", Sep. 2006
Full colour poster, A3 size, printed on laminated sheet - titled "Melbourne Tram Network. Shows a diagrammatic layout of the Melbourne tram system, shows zones (3 zones), CBD, tram terminuses, train station, park and ride locations. Has the Yarra Trams and Metlink logos. Provides contact information including a website. Notes where Metcards are available. Two copies held. Vertical format of Reg Item 719. Dated Effective September 2006. 720.2 - dated Jan. 2005 - shows the Vermont South extension under construction - see image i2. Item added 11-8-2016. 720.3 - undated - prior to Vermont South opened in 2005 - has route 112 and docklands tram line - c2004. Does not have a Yarra Trams logo.trams, tramways, yarra trams, metlink, maps, metcard, vermont south -
 Melbourne Tram Museum
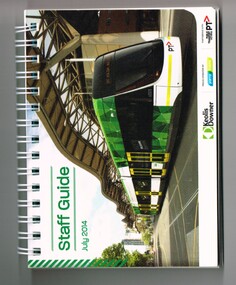
Document - Guide Book/notes, Yarra Trams, "Staff Guide July 2014", 2014
Book, 146 pages, including card covers, white spiral bound titled "Staff Guide July 2014", with a photo of E 6001 at Southern Cross on the front cover along with logos for Keolis Downer, Yarra Trams and Public Transport Victoria (PTV). Has a message from the CEO, Clement Michel, listing of contents on page 3 including Myki, location information of Melbourne facilities eg churches, hotels, museums etc, including route designation, TramTracker, tram stops by route and useful numbers.trams, tramways, yarra trams, routes, myki, melbourne, tram stops, staff, tram 6001 -
 Melbourne Tram Museum
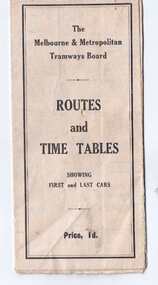
Map, Melbourne & Metropolitan Tramways Board (MMTB), "Routes and Time tables showing first and last cars", c1927
Folded map (5 x 3) by Melbourne and Metropolitan Tramways Board, c1927, of Melbourne tramways, showing tram routes (cable, electric and VR), railway lines, major points of interest and major streets. Titled "Routes and Time tables showing first and last cars". On rear shows maps of lines for the Eastern, Southern, Connection to Beaches and the Essendon, Maribyrnong and West Coburg lines. Dated c1927, shows the St Kilda Road lines to electric. On the bottom right hand corner has a reference to the Tramway Tourist Car - and the tours it does. (Reg Item 800 dated March 1927, shows the tram under construction). Second copy from Keith Kings Collection - in poor condition - added 10/8/2017The VR line has various hand written notations indicating it.trams, tramways, map, mmtb, tourist trams, y class, vr, cable trams, routes, timetables -
 Melbourne Tram Museum
Book, Melbourne & Metropolitan Tramways Board (MMTB), "MMTB Electric Tramways and Motor Omnibuses Sections and Fares", 1969
Blue cloth covered book, 108 pages + covers and end pages, "MMTB Electric Tramways and Motor Omnibuses Sections and Fares", dated January 1969. Details the various section stages and fares for each tram and bus route, General instructions, concession fares and has photos or drawings of the various special tickets, eg passes or prepaid tickets. Book consists of four sections, sewn with end papers part of the covers. Second copy added 15-6-2015 - from Ron Scholten donation of 11-4-2015 - has an amendment sheet re Seeing Eye Dogs" pasted in over another sheet on the inside front cover. Third copy added 14-12-2015 from donation of Norm Cross 11-10-2009.Copy 1 - Has two numbers written in ink on the inside front cover. Copy 3 - "Lees 18/2/69" written in red pencil on inside of front cover.trams, tramways, tickets, fares, sections, passes