Showing 5050 items
matching kodak
-
 Ballaarat Mechanics' Institute (BMI Ballarat)
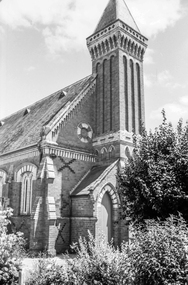
Film - Photograph by Herb Richmond. ca 1971, Old Lutheran Church, Doveton St, Ballarat
Ballarat History35mm B&W Kodak Panatomic X Filmballarat, ballaraat, lutheran, church -
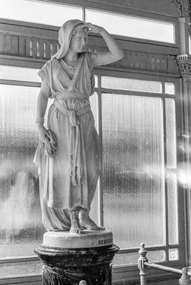
 Ballaarat Mechanics' Institute (BMI Ballarat)
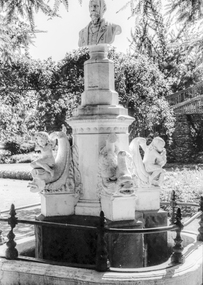
Film - Photograph by Herb Richmond. ca 1971, Statue, Ballarat Botanical Gardens
Ballarat History35mm B&W Kodak Panatomic X Filmballarat, ballaraat, statue, botanical, gardens -
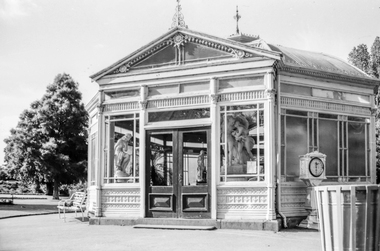
 Ballaarat Mechanics' Institute (BMI Ballarat)
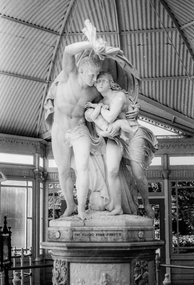
Film - Photograph by Herb Richmond. ca 1971, Statuary Pavilion, Ballarat Botanical Gardens
Ballarat History35mm B&W Kodak Panatomic X Filmballarat, ballaraat, statuary, pavilion, botanical, gardens -
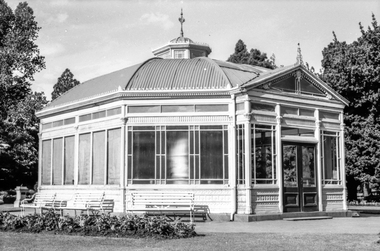
 Ballaarat Mechanics' Institute (BMI Ballarat)
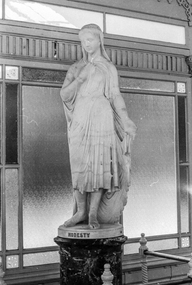
Film - Photograph by Herb Richmond. ca 1971, Statuary Pavilion, Ballarat Botanical Gardens
Ballarat History35mm B&W Kodak Panatomic X Filmballarat, ballaraat, statuary, pavilion, botanical, gardens -
 Ballaarat Mechanics' Institute (BMI Ballarat)
Film - Photograph by Herb Richmond. ca 1971, Statuary Pavilion, Ballarat Botanical Gardens
Ballarat History35mm B&W Kodak Panatomic X Filmballarat, ballaraat, statuary, pavilion, botanical, gardens -
 Ballaarat Mechanics' Institute (BMI Ballarat)
Film - Photograph by Herb Richmond. ca 1971, Statuary Pavilion, Ballarat Botanical Gardens
Ballarat History35mm B&W Kodak Panatomic X Filmballarat, ballaraat, statuary, pavilion, botanical, gardens -
 Ballaarat Mechanics' Institute (BMI Ballarat)
Film - Photograph by Herb Richmond. ca 1971, Statuary Pavilion, Ballarat Botanical Gardens
Ballarat History35mm B&W Kodak Panatomic X Filmballarat, ballaraat, statuary, pavilion, botanical, gardens -
 Ballaarat Mechanics' Institute (BMI Ballarat)
Film - Photograph by Herb Richmond. ca 1971, Fire Station, Ballarat
Ballarat History35mm B&W Kodak Panatomic X Filmballarat, ballaraat, fire station -
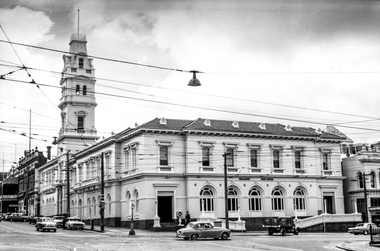 Ballaarat Mechanics' Institute (BMI Ballarat)
Film - Photograph by Herb Richmond. ca 1971, Post Office, Ballarat
Ballarat History35mm B&W Kodak Panatomic X Filmballarat, ballaraat, post office -
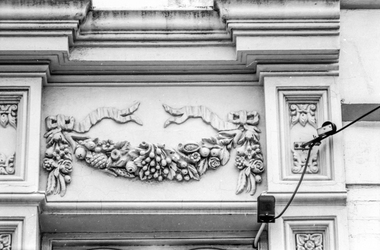 Ballaarat Mechanics' Institute (BMI Ballarat)
Film - Photograph by Herb Richmond. ca 1971, Unknown building
Ballarat History35mm B&W Kodak Panatomic X Filmballarat, ballaraat, building -
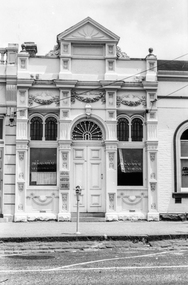 Ballaarat Mechanics' Institute (BMI Ballarat)
Film - Photograph by Herb Richmond. ca 1971, Unknown building
Ballarat History35mm B&W Kodak Panatomic X Filmballarat, ballaraat, building -
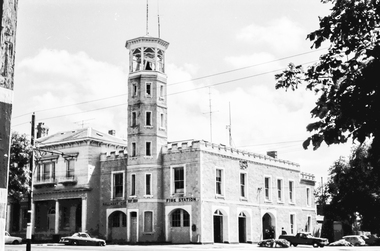
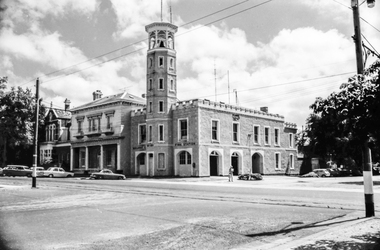 Ballaarat Mechanics' Institute (BMI Ballarat)
Film - Photograph by Herb Richmond. ca 1971, City Fire Station, Ballarat
Ballarat History35mm B&W Kodak Panatomic X Filmballarat, ballaraat, fire, station -
 Ballaarat Mechanics' Institute (BMI Ballarat)
Film - Photograph by Herb Richmond. ca 1971, City Fire Station, Ballarat
Ballarat History35mm B&W Kodak Panatomic X Filmballarat, ballaraat, fire, station -
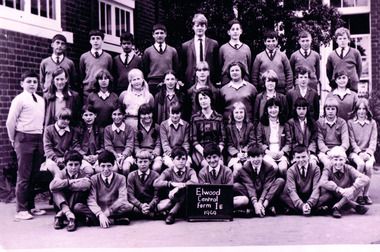 St Kilda Historical Society
Photograph, Form 1E, Elwood Central School, 1969
Kodak black and white photograph unmounted fair conditionElwood Central Form 1E 1969. Elwood Central Primary School 1969. -
 Ballarat Tramway Museum
Photograph - Colour prints - trams 661 and 38 Wendouree Parade, 7-12-1994
Set of six colour prints of a tram tour on 7-12-1994 of trams 661 and 38. 1 - Tram 38 running a Special service at St Aidans Drive 2 - Trams 38 and 661 crossing at Gardens Loop 3 - Trams 38 and 661 at St Aidans Drive 4 - Trams 38 and 661 at St Aidans Drive 5 - Tram 661 arriving St Aidans Drive 6 - St Aidans Drive with tram 38 and the "Warning oncoming trams" signYields information about tram operations by the Ballarat Tramway Preservation Society.Set of 6 colour prints printed on Kodak paper.tramways, trams, btps, tram 38, tram 661, wendouree parade, signs -
 Ballarat Tramway Museum
Photograph - ESCo cross bench tram No. 20 and ESCo 2, Wal Jack, c1910
Photo of ESCo cross bench tram No. 20 and ESCo 2 at the intersection of Sturt and Lydiard Streets, with the Post Office, along with the Summerscales offices, Robbie Burns statue, Vita Studio, and George Payne Jewellers in the background. The conductor on the rear of No. 2 is holding the trolley rope, while the driver of No. 20 is watching the road closely. The conductor of the tram is reboarding or about to alight. No. 20 has the destination of Gardens via Convent. Other trams are in the background. Wal has dated the photograph about 1909. Note the point frog or pan in the overhead above No. 20 and in particular notes the type of destination box and that the tram is going to the Gardens via the Convent. See item 5132 for a copy negative and digital image.Yields information about the use of ESCo trams c1910 and the overhead.Black and white print on Kodak paper with notes on rear.See rear image.trams, tramways, esco, cross bench tram, sturt st, post office, lydiard st, tram 20, tram 2 -
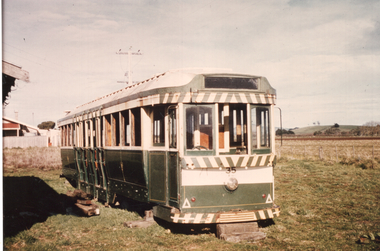 Ballarat Tramway Museum
Photograph - Tram 35 at Bungaree - set of 3, Bob Lilburn, 5-6-1978
Set of 3 colour prints of tram 35, after it had been obtained from Ballarat College by the BTPS at the Bungaree site 5-6-1978, Some photos show the body of ex MMTB No. 121 alongside. The body was in poor condition and later dismantled.Yields information about the status of tram 35 in 1978.Set of 3 colour prints - two on Kodak paper.tramcars, tram 35, bungaree -
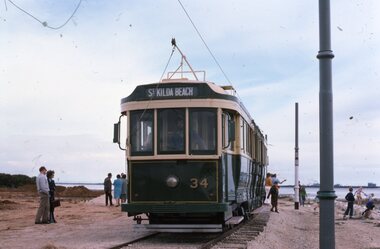 Ballarat Tramway Museum
Slide, EX SEC tram 34 - Adelaide Tramway Museum, c1972
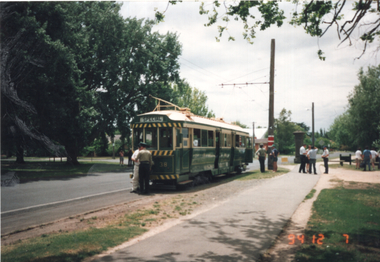
Colour duplicate slide of EX SEC Ballarat tram 34 - Adelaide Tramway Museum, operated by the Australian Electric Traction Museum at St Kilda Adelaide. Tram is in the SEC livery with the dash canopy lighting and tiger stripe panels removed. Photo taken at the the then St Kilda Beach terminus. Slide by the Tramway Museum Society of Victoria, probably 1972. Yields information about Ballarat tram 34 which was donated to the AETM following closure of the SEC system.Colour Kodak duplicate slide - white cardboard mountaetm, tramcars, tramway museums, tram 34, st kilda beach -
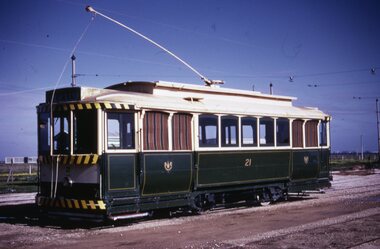 Ballarat Tramway Museum
Slide, EX SEC tram 21 - Adelaide Tramway Museum, c1972
Colour duplicate slide of EX SEC Ballarat tram 21 - Adelaide Tramway Museum, operated by the Australian Electric Traction Museum at St Kilda Adelaide in the SEC livery. Photo taken at the AETM Depot. Slide by the Tramway Museum Society of Victoria, probably 1972. Yields information about Ballarat tram 21 which was donated to the AETM following closure of the SEC system.Colour Kodak duplicate slide - white cardboard mountaetm, tram 21, tramcars, tramway museums -
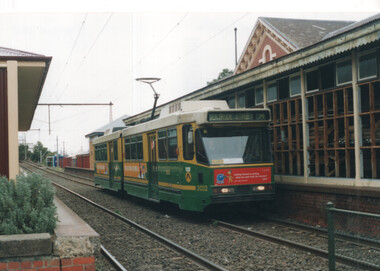
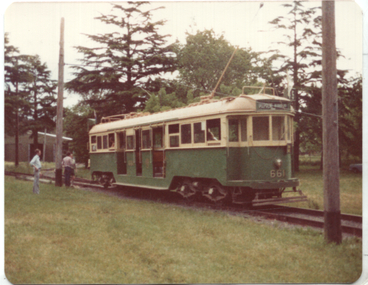 Ballarat Tramway Museum
Photograph - BTPS - W3 class 661, 2/1982
The set of two photographs show BTPS, ex MMTB W3 class No. 661 in its green and cream colour scheme running in prior to being repainted in the MMTB Chocolate scheme. Possibly 13/2/1982. The car record book shows it was withdrawn on 6/3/1982 for repainting.Yields information about tram 661 prior to repainting during 1982-83Colour print on Kodak paper dated Apr 82tramcars, trams, btps, w3 class, tram 661, access track -
 St Vincent's Hospital Melbourne Archives
Photograph - Ceremony of laying the foundation stone of St Vincent's Hospital Melbourne, in 1928
"View of the balcony of the 1st St V's. Drs quarters are in front. Taken at the laying of the foundation of the 1st addition"st vincent's hospital melbourne, healy wing -
 Melbourne Tram Museum
slide - Colour - W6 983 Spencer and Bourke Streets, David Verrier, 20-9-2002
Photos show W6 983 (Route 12 - South Melbourne St Kilda Beach) at the intersection with Bourke St. Tram has been diverted to run via La Trobe St, normally runs via Collins St. Has the Mail Exchange and The Age buildings in the background, 20-9-2002Yields information about a diverted tram during 2002.Set of two colour Sides - white Kodak KodachromeSlide marked with date and details.tramways, tram 983, w6 class, spencer st, mail exchange, route 12, diversion -
 Melbourne Tram Museum
slide - Colour - Melbourne trams - Collins St, David Verrier, 7-11-2002
1 - C1 3032 at Collins and King St. Note the Collins St over bridge and the tram stops at King St intersection. 2 - City Circle car 925 at corner of Spencer and Collins Sts 3 - C1 3024 westbound at corner of King and Collins St. 4 - W7 1021 (Route 12) in Collins StYields information about Collins Street services and the City Circle tram.Set of four colour Sides - white Kodak KodachromeSlide marked with date and details.tramways, trams, tram 3032, king street, spencer street, c1 class, tram 3024, tram 1021, route 12, tram 925, city circle, collins st -
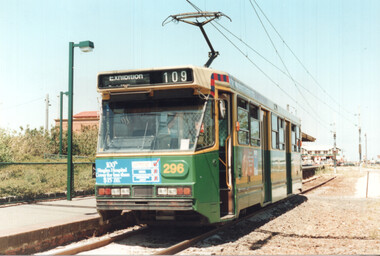 Melbourne Tram Museum
Photograph - Set of 6 colour prints - Melbourne Seaside trams, George Bishop, 24-2-1995
Set of six photographs taken by George Bishop on 24-2-1995 1 - A 296 (Route 109) at Port Melbourne terminus 2 - Z3 197 at South Melbourne Beach, advertising MBF (Medical Benefits Fund) on an East Coburg service - note the "temporary" sign in front of the tram giving the destination. 3 - Z2 2119 (Route 96) at the former St Kilda Railway Station 4 - Z2 2028 (Route 96) St Kilda beach, The Esplanade 5 - Z2 2058 (Route 96) St Kilda beach, The Esplanade 6 - W7 1021 (Route 15) St Kildas beach, The EsplanadeYields information about the operation of Melbourne trams during early 1995.Set of six colour prints printed on Kodak paperDetails of the photograph and photographer on the rear in ink.trams, tramways, st kilda, south melbourne, port melbourne, a class, b2 class, z3 class, w7 class, tram 296, tram 197, tram 2119, tram 2028, tram 2058, tram 1021 -
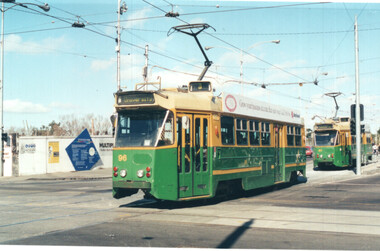
 Melbourne Tram Museum
Photograph - Set of 3 colour prints - St Kilda light rail, George Bishop, April 1999
Set of three photographs taken by George Bishop on April 1999 - All route 96 - East Brunswick to St Kilda Beach 1 - B2 2032 at the former Albert Park Railway Station 2 - B1 2001 at Albert Park 3 - B2 2057 Albert ParkYields information about the operation of Melbourne trams during early 1995.Set of three colour prints printed on Kodak paperDetails of the photograph and photographer on the rear in ink.trams, tramways, st kilda, b2 class, b1 class, tram 2032, tram 2001, tram 2057, albert park, st kilda light rail, light rail -
 Melbourne Tram Museum
Photograph - Set of 6 colour prints of trams at Corner of Flinders and Swanston Streets, George Bishop, c1999
Set of six colour photographs of trams at the corner of Swanston and Flinders Streets. In the background can be seen the construction of the Federation Square project which commenced in 1999. 1 - Z 96 (Route 3, University) at Flinders and Swanston Streets. 2 - Z 37 (University route 5) 3 - SW6 888, City Circle, westbound. 4 - Z3 140 (East Coburg Route 1) - would appear that the car is not doing their hook turn properly 5 - B2 2037 westbound (Route 70, City Flinders St) 6 - Z 41 (Route 72, University)Yields information about the operation of Melbourne trams during the late 1990s.Set of six Colour prints printed on Kodak paperDetails of the photograph and photographer on the rear in ink.trams, tramways, z3 class, z class, tram 96, tram 37, city circle, tram 888, hook turns, tram 140, b2 class, tram 2037 -
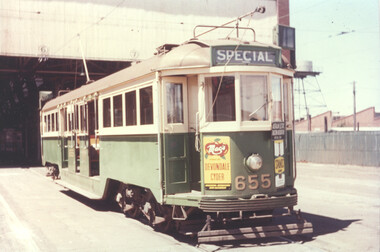 Melbourne Tram Museum
Photograph - Set of five colour prints - last day of Footscary - AETA tour, 10/2/1962
Colour prints show the trams used by the AETA (Australian Electric Traction Association) on 10/2/1962 to mark the closure of the local routes at Footscray. 1 - W3 655 at South Melbourne depot 2 - W3 655 shunting at Moonee Ponds Junction 3 - W4 670 followed by W3 655 crossing the Maribyrnong Road Bridge. 4 - The two trams at Footscray Station 5 - At Footscray tram depot with local cars. See item 3992 for other photographs. Yields information about the AETA tour to mark the closure of the Footscray local system. Set of five Colour print on Kodak Royal paper.trams, tramways, w3 class, w4 class, tram 655, tram 670, footscray, maribyrnong road, moonee ponds junction, south melbourne depot, footscray depot, leeds st, aeta -
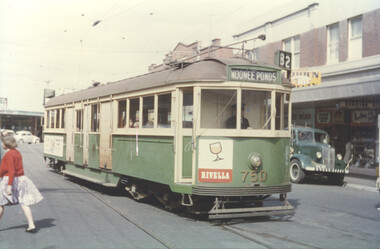 Melbourne Tram Museum
Photograph - Set of two photos - route 82 cars on the day of the closure of the Footscray local routes, 10/2/1962
Colour prints showing two of the service cars running route 82 on the day of the closure of the Footscray local routes 10-2-1962: 1 - W5 750 (Moonee Ponds, route 82) at the Footscray terminus in Leeds St. 2 - VR 52 (Moonee Ponds, route 82) turning from Ballarat Road into Gordon St.Yields information about route 82 service cars on the day of the closure of the Footscray local routes. Set of two Colour print on Kodak Royal paper.trams, tramways, ballarat road, leeds st, footscray, w5 class, vr class, tram 52, tram 750 -
 Melbourne Tram Museum
Photograph - Set of six colour prints - last day of local Footscary lines, 10/2/1962
Colour prints showing some of the trams used on the last day of local Footscray services. 1 - X1 459 - picking up a passenger in Ballarat Road - has a service station in the background and the Footscray Hospital 2 - X1 459 and another X2 in Leeds St Footscray. 3 - X1 467, and another X1 and X2 677 at Footscray Tram depot for the AETA tour. (Reference provides information that X2 468 was the second car) 4 - X1 468 with the destination of Williamstown Road turning into Leeds St from Hopkins St 5 - X2 677 and two X1s at Footscray Station in Leeds St. - on the AETA tour. 6 - X2 678 turning from Ballarat Road into Droop St showing the "Ballarat Road" destination. Note Kinnears Rope works building behind the tram.Yields information about the AETA tour to mark the closure of the Footscray local system. Set of six Colour print on Kodak Royal paper.trams, tramways, footscray, ballarat road, leeds st, x1 class, x2 class, aeta tours, tram 459, tram 678, tram 467, tram 468, tram 677, mmtb, footscray depot -
 Melbourne Tram Museum
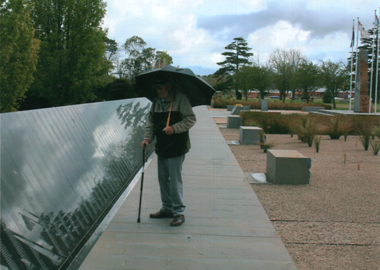
Photograph - Norm Maddock - Ballarat War Memorial, 6/10/2009
Photo of Norm Maddock, an ex Prisoner of War visiting the Australian Ex-Prisoners of War Memorial on 6/10/2009 and another photo of the memorial looking the other way. Date from Ballarat Tramway Museum item No 4498. Not known who took the photo.Has a close association with Norm Maddock and his visit to Ballarat ex-Prisioner's of War Memorial.Set of two colour prints on Kodak Xtralife paper.trams, tramways, norm maddock, ballarat