Showing 1217 items matching " railway buildings"
-
 Numurkah & District Historical Society
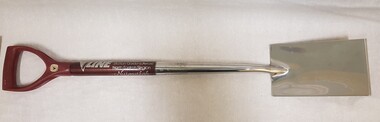
Tool - Commemorative Spade - V/Line Award for Railway Gardens
Part of a railway collection from the closed Numurkah Railway StationSilver plated spade with wooden & plastic handlesee photo -
 Numurkah & District Historical Society
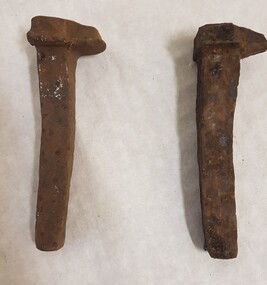
Equipment - Rail Line Spikes
2x metal spikes used to secure plates on railway tracks to sleepers -
 Mt Dandenong & District Historical Society Inc.
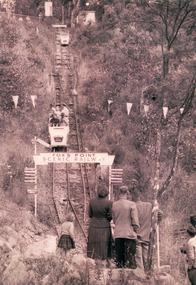
Photograph, Fox's Point Scenic Railway c1955, c1955
Shows tracks up the hillside with passengers riding in carriage down the short course railway at Kalorama. The railway was built around 1950, initially to carry building materials. It was burnt in the 1962 bushfires. Phil McClure gave a talk to the Historical Society 15/8/2009. As a teenager he had assisted with 'Foxie's' operation of the railway.fox's point, scenic railway, stanley neil fox-croft, kalorama -
 Mt Dandenong & District Historical Society Inc.
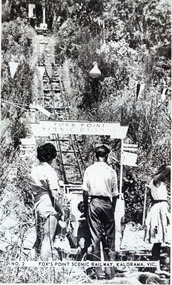
Photograph, Fox's Point Scenic Railway Kalorama c1955, c1955
Built by Stanley Neil Fox-Croft to convey building materials. Later developed for passengersfox's point, scenic railway, stanley neil fox-croft -
 Southern Sherbrooke Historical Society Inc.
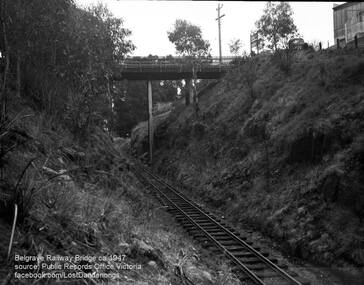
Photograph, Belgrave Railway Bridge, 1947
Belgrave Railway Bridge seen from near railway line on the east side. Photo shows the bridge over a scrubby railway cutting. There are small trees. A truck is parked on the right side of the bridge and perpendicular to the bridge. To the right is a building, presumably US Motors. A sign visible on right end of the bridge is also visible on VSSHP0069.02. -
 Southern Sherbrooke Historical Society Inc.
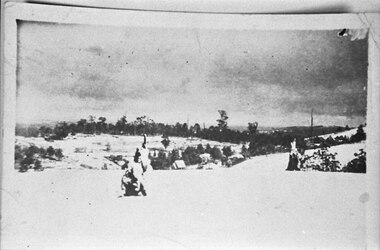
Photograph - A little bit of “Aura” snow
Photograph taken from the hill to the north of Menzies Creek. There has been a heavy snowfall and dark clouds are in the sky. In the centre of the photo St Cuthberts Church is visible in the distance, with houses beyond it. Buildings are also visible in the vicinity of the railway station. An indistinct object in the foreground of the photo may be two children playing. -
 Melbourne Legacy
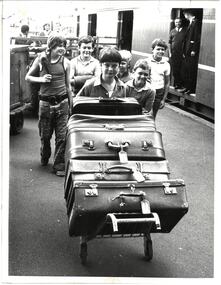
Photograph - Junior legatee outing, Somers Camp 1973, 01/1973
A photo of 6 boys with a trolley of suitcases at Spencer Street Railway Station, Melbourne (since renamed Southern Cross Station). They have arrived from country towns to attend Legacy Somers Camp in January 1973. It came from an envelope with other camp photos. The Legacy envelope was marked "P6 Junior Legatee Camps and Hols" in red pen, and dated Jan 1977 in pencil. The envelope contents are items 00418 to 00425. Melbourne Legacy provided camps for junior legatees - the children of deceased servicemen. It started with outings to the property of Legacy founder, Legatee Stan Savige, who had a place in Balnarring. Permanent camp buildings were built and with an association with Lord Somers (Governor of Victoria) it was called Somers Camp. The camps gave the children an opportunity of a summer beach holiday with other Legacy children.A record of Junior Legatee camps and shows style of suitcase used for travelling in 1970s.Black and white photo of children with their suitcases at Spencer St station.Handwritten on the back "P6 Incoming Camps and Hols / Legacy" in blue pen. Stamped "The Property of Melbourne Legacy" in purple ink. Stamped "Copyright The Herald and Weekly Times" in blue ink. Green paper label says "Country Junior Legatees, having arrived at Spencer Street Railway Station, Melbourne, move on to Somers for fun and games at Legacy's recent annual Holiday Camp held in January 1973."somers camp, junior legatee outing, trains -
 Ballarat Tramway Museum
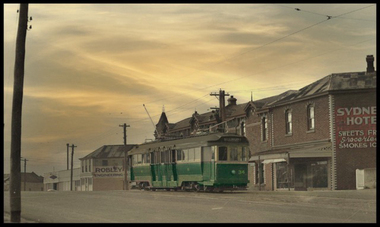
Photograph - Digital image, mid 1950's
Digital Image from a coloured postcard of Geelong 34 in Mercer St between Corio and Bayley St, just where the railway line to Cunningham Period went underneath. Tram has destination of Belmont. In the background are a building for Robley Engineering and the Sydney Hotel. trams, tramways, geelong, mercer st, bogie trams, tram 34 -
 Ballarat Tramway Museum
Photograph - Digital image, Chris Phillips, c1970
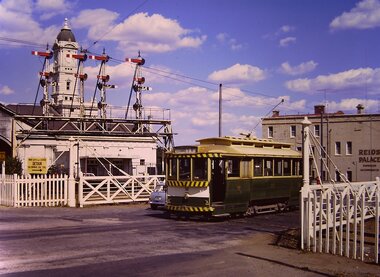
Yields information about the tram operations at the Lydiard St level crossing and the Ballarat Railway Station.Digital image of No. 32 crossing the Lydiard St North level crossing at Ballarat Railway Station . Tram has the destination Lydiard St North. In the background is the station building, clock tower and the signal gantry. On the right hand side is Reids Coffee Palace.trams, tramways, lydiard st north, level crossings, ballarat railway station, tram 32 -
 Ballarat Tramway Museum
Photograph - Digital image, Chris Phillips, late 1950's?
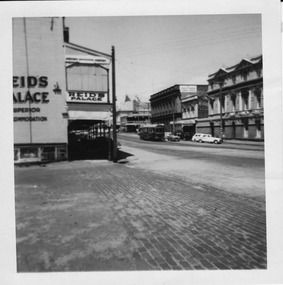
Yields information about the tram operations in Lydiard St North during the 1950's and the appearance of the buildings.Digital image, black and white, of a bogie tram north bound in Lydiard St North with the various buildings on the west side of the street - 1950's photo, prior to the installation of the lights on the tramcars. Has Reid's Coffee Palace in the photograph. Taken from the Railway Station entry.trams, tramways, lydiard st north, tram 13 -
 Ballarat Tramway Museum
Photograph - Digital image Set of 2, Doug Colquhoun, c1955
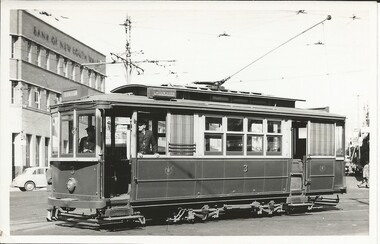
Set of six digital images of Geelong trams photographed by Doug Colquhoun. .1 - No. 3 with destination of Station turning from Ryrie into Moorabool St with the Bank of New South Wales in the background. The conductor is watching the traffic. .2 - No. 4 - at the Railway Station or Beach terminus? .3 - No. 5 - in Ryrie St? .4 - No. 19 in St. with E. R. Sparrow & Co Auctioneer and Wool Broker building in the background - Moorabool St, tram has the destination of Beach. .5 - No. 23 with the conductor leaning against the bumper bar chatting to a man. Tram has the destination of North. Has a Kodak - E. A. O'Meara Chemist shop in the background. Ryrie and Moorabool Streets Geelong looking south along Moorabool St, along with a Safety Zone sign. .6 - No. 34 with the destination of Belmont.trams, tramways, geelong, ryrie st, moorabool st, conductors, north, beach, belmont, safety zone, tram 3, tram 4, tram 5, tram 19, tram 23, tram 34 -
 Ballarat Tramway Museum
Photograph - Digital Image, Peter Knife, VR Tram 41 on display, 5/9/2023
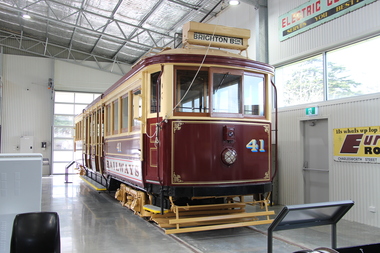
Digital image of the Melbourne Tramcar Preservation Association Victorian Railways Tram No. 41 on display in the Ballarat Tramway Museum, new building. Photo by Peter Knife 5/9/2023.Yields information about Victorian Railways tram 41.Digital image of VR 41tramways, tramcars, btm, mtpa, tram 41, vr class tramcars -
 Ballarat Tramway Museum
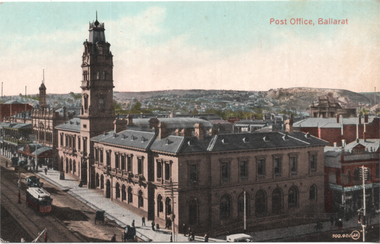
Postcard, Post Office Ballarat, c1910
Coloured image of the intersection of Sturt and Lydiard Streets looking north along Lydiard St. North giving a high view of the Post Office building with its tower. Has an ESCo tram southbound in Lydiard St North, a motor car and several horse-drawn vehicles. Shows the verandahs along Lydiard St, centre poles, and looks towards a rather desolate Black Hill following extensive mining works. The Post Office time ball is in the down position. Possibly c1910. Summerscales building - photographer, postcards is next door to the Post Office in Sturt St. On the rear is a handwritten note from Wal Jack to Ken Magor about the tram in the photo, the time ball on the post office flagstaff, Railway station tower to the left of the Post Office, carriage sheds in the long building behind the oval type roof of old mining exchange. See item 8411 for a coloured version. Yields information about the intersection of Sturt and Lydiard Streets in the early ESCo era and the Post Office building.Postcard - black and white- divided back, undated - Valentine & Sons, Printed in Great Britain. Card Number "20-2"Notes by Wal Jack on the rear - see image 2nd image.sturt street, post office, ballarat, tramways, lydiard st, esco, black hill -
 Ballarat Tramway Museum
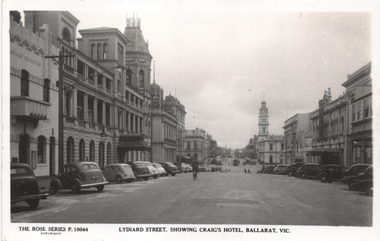
Postcard, Rose Stereograph Co, "Lydiard Street, showing Craig's Hotel, Ballarat Vic", late 1940s
The photo shows a view looking north from Lydiard St South with a tram in the far distance. Rose Series P10044. In the view are the buildings of Franklin Chambers, Craigs Hotel, and the Post Office. The Franklin Chambers Building with its Art Deco front has been refaced since this photo was taken. On the rear, Wal Jack in a note to Ken Magor has written "4-wheeler tram from Lydiard St North is about to turn left into Sturt St. Another tram seen in the background is just over the level crossing outside Ballarat Railway Station. Photo taken from Lydiard St South, about 1939-1940". Item 5463 has a poor-quality negative with a similar image to this postcard. See 8977 for a similar image also by Rose. Yields information about Lydiard St south during the 1940s.Postcard black and white, divided back, with a handwritten note on rear.See image 2 for details of the handwritten note by Wal Jack on the rear. tramways, trams, lydiard st south, criags hotel -
 Ballarat Tramway Museum
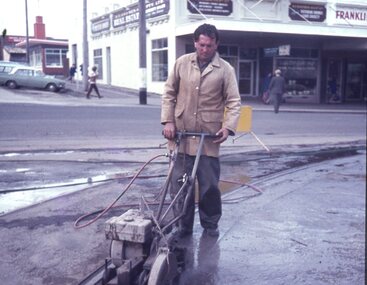
Slide - 27 mm sq slide/s - set of 7 - track removal, Lilian Butler, c1971 to 1972
Series of 7 photos showing track removal following the closure of the Ballarat Tram system.Yields information about the removal of the tram tracks in the city area.Set of 7 colour slides - 1 x Agfa blue and white plastic slide mount, 4 Hanimex cardboard mounts and 2 Kodachrome cardboard mounts of track removal works in Ballarat, c1971 to 1972 .1 - Saw cutting the road pavement at the Dawson St Crossover. .2 - Rolling the crushed rock pavement in Sturt St after track removal - near Doveton St. .3 - Track repairs or starting to remove the railway crossing at Lydiard St North - has an SEC truck in the background and the Kennedy Murray Pty Ltd General Carriers building in the background. .4 - commencing work on the Dawson St Crossover removal with St Patrick's Cathedral in the background. .5 - as for .2 .6 - L. G. Pearce excavating track near Dawson St. .7 - ditto Photo from the collection of Lilian Butler. ballarat, tramways, trams, track removal, dawson st, trackwork, sturt st, level crossings, lydiard st north -
 Ballarat Tramway Museum
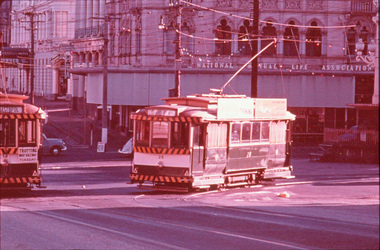
Slide - 35mm slide/s, Dave Macartney, No. 28 turning from Sturt St into Lydiard St North, Sep. 1971
Yields information about the intersection of Sturt and Lydiard St and the operation of trams prior to the closure of the SEC system. Has a strong association with the work of the Association of Railway Enthusiasts.AGFA blue and white plastic mount, 35mm slide, from the Association of Railway Enthusiast's film strip titled "Provincial Tramway Film Strip" of h, while No 13, turns into Sturt St from Lydiard St Photo taken Sept. 1971. Tram 13 has a "Trotting Bray Raceway Tuesday" sign on the rear of the tram. The National Mutual Life Association building in the background. The film strip notes (Reg. Item 2560), provided the following caption details: "The late afternoon sun catches No. 28, outbound to Lydiard St Nth, passing No. 13 inbound at the Sturt St junction - Dec. '67" Photo by Dave Macartney. "Slide No. 6" Various notations by John as to the slide number and the trams in pencil and ink.tramways, trams, are, film strip, sturt st, lydiard st north, bray raceway, tram 28, tram 13 -
 Ballarat Tramway Museum
Negative - Set of 4, Campbell Duncan, 2/07/1971 12:00:00 AM
Set of 4 photographs taken on 28/2/1971 by Campbell Duncan of trams on the Lydiard St North line between Sturt St and the Railway Station. .1 - No. 40 just after entering Lydiard St Nth, with Craigs Hotel, National Mutual Building and the ANZ bank in the background. .2 No. 36 entering the double track near the railway station with No. 40 waiting. Has buildings on the east side of the street, including JJ Coller & Co and Reid's Coffee Palace in the background. .3 - ditto .4 - Nos 36 and 40 crossing on the double track in Lydiard St North,trams, tramways, lydiard st north, tram 36 tram 40 -
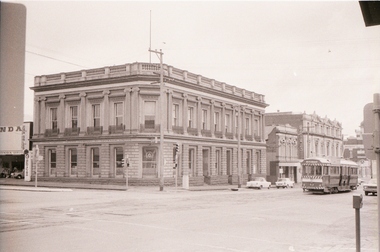 Ballarat Tramway Museum
Negative - Set of 2, Campbell Duncan, 10/08/1971 12:00:00 AM
Yields information about tram operations and the street views in Lydiard St near the railway station.Set of 2 photographs taken on 10/8/1971 by Campbell Duncan of trams in Lydiard St North. .1 - No. 43 inbound at Mair St with the Union Fidelity Insurance Company of Australasia Limited building in the background. Note the street fire alarm on the right hand side of the photograph. .2 - No. 34, outbound at Seymour St photographed through the verandah supports of the North Star Hotel - now (2016) Seymour's on Lydiard.trams, tramways, lydiard st north, traffic lights, mair st, seymour st, tram 43 -
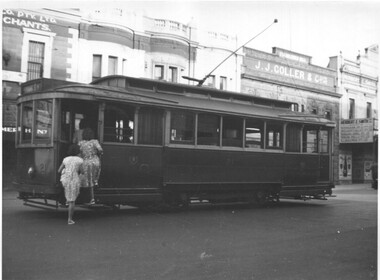 Ballarat Tramway Museum
Photograph - Black & White Photograph/s, Charles Craig, early 1950's?
Yields information about the use of the trams and the appearance of Lydiard St North buildings during the early 1950's.Photograph of No. 21, in Lydiard St North, near the Railway Station, boarding two lady passengers. Has J. J. Coller & Co. building and the Hersert E Smith building and sign in the view. Early 1950's? photo by Charles Craig. trams, tramways, lydiard st north, tram 21 -
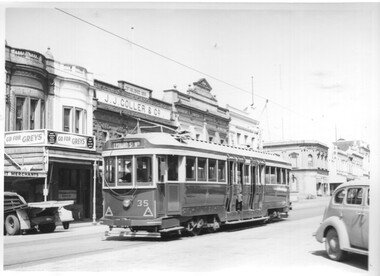 Ballarat Tramway Museum
Photograph - Black & White Photograph/s, Charles Craig, 1950's
Yields information about the use of the appearance of tram 35 and Lydiard St North between Mair St and the railway station during the late 1950's.Black and white photograph of Ballarat tram 35, northbound in Lydiard St North with the J J Coller & Co building, Herbert E Smith Merchant in the background. Advert for Greys cigarettes in the view. The buildings on the corner of Mair St are in the view as well. Photo by Charles Craig possibly late 1950's. trams, tramways, lydiard st north, mair st, tram 35 -
 Ballarat Tramway Museum
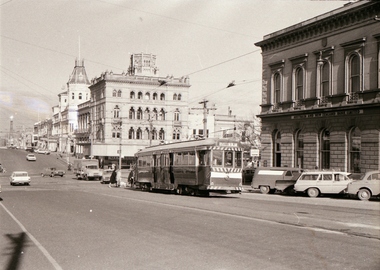
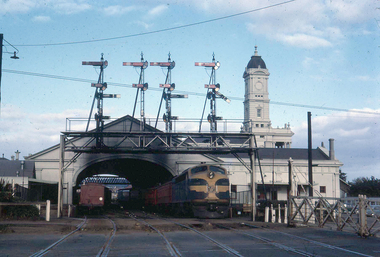
Photograph - Digital image, W. J. Llewelyn, late 1960s
Set of three colour digital images taken by W. J. Llewelyn of the Ballarat Railway Station at Lydiard St North. .1 - Possibly a S class loco on the Horsham / Dimboola/Serviceton St, about to leave Ballarat station during the late 1960's or early 1970's. A freight train is on platform 2. Note the Parcels Office and that the clock had not been fitted to the station building. .2 - S305? shunting at Ballarat station, during the late 1960's or early 1970's. Photos taken from the signal box. .3 - R766 on a special train at the station - late 1980's. Has the failed Melbourne - Canberra - Sydney tourism venture carriages at the rear.trams, tramways, railway station, level crossings, lydiard st north, steam locomotive -
 Ballarat Tramway Museum
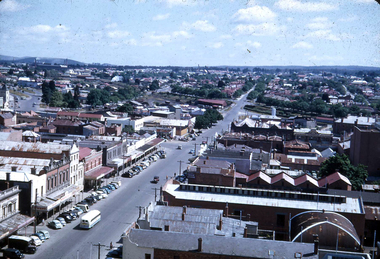
Photograph - Digital image, W. J. Llewelyn, c1955
Set of two colour digital images taken by W. J. Llewelyn. .1 - Armstrong Street from the Town Hall tower - shows the street view, car parking arrangements prior to the construction of the Ballarat City Hall, c1955. The new Civic Hall was opened in 1956. Shows the railway timber yard. .2 - Sturt St showing Town Hall and the Myers building late 1950's? trams, tramways, armstrong st, railway, town hall, myers -
 Ballarat Tramway Museum
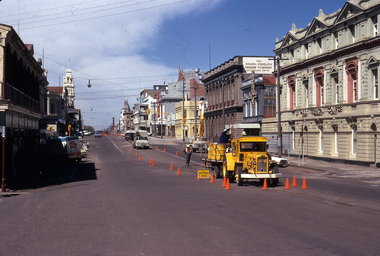
Photograph - Digital image, W. J. Llewelyn, late 1971
Yields information about the removal of the overhead in Lydiard St North, following the closure of the SEC operated tram system in Sept. 1971Set of two colour digital images taken by W. J. Llewelyn of the removal and cutting up of the overhead and cutting the copper trolley wire in Lydiard St North - Oct. 1971? Shows the method and equipment used. Has a van marked "Arch Smallgoods" in Lydiard St North. Shows the Mair St traffic light, and Railway Hotel on the corner. In the background is the George Hotel, St Paul's Technical College, and Union Fidelity Trustee Company buildings in the background. Warren Doubleday remembers being there at the time, but can't find a photograph of it and date.trams, tramways, lydiard st, closure, secv, overhead, demolition -
 Ballarat Tramway Museum
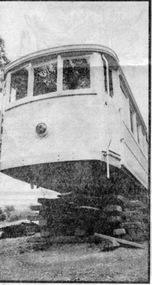
Newspaper, The Age, "Where have all the old trams gone?", 30/05/1970 12:00:00 AM
Newspaper clipping from The Age, Saturday Magazine of 30/5/1970 about old tramcars, where they have gone, TMSV, Bylands and Bob Prentice. Has four photographs. Notes that the trams are earmarked for the TMSV's collection, has leased land south of Kilmore and negotiating for a building at Bylands. 1086i1 - ex St. Kilda Railway - Brighton Beach VR 3 at Yarrambat 1086i2 - X1 and X2 at Wantirna 1086i3 - Barry George driver at Glen Huntly showing Peter Stoneham controls of a tram 1086i4 - X1 217 at Malvern Depot Story by Michael Hudson, Pictures Neil Town.In red ink about the X1 X2 photo "30/5/70".trams, tramways, tmsv, tramcar preservation, bylands, mr. r. prentice -
 Ballarat Tramway Museum
Slide - 35mm slide/s - set of 5, Noel Simons, 19/11/1962 12:00:00 AM
Set of 5 transparencies taken on 19/11/1962 on Kodak mounts. 1186.1 - Bendigo 21 bound for Golden Square at Charing Cross with The Beehive buildings and shops in Pall Mall in the background. Trams has an ad for Cohns drinks on front bumper, SEC Best for Cooking roof ad. and Mamouney's furniture roof ad. Two women passengers boarding. 1186.2 - Bendigo 26 crossing Pall Mall from Mitchell St. bound for Eaglehawk with "Ezywalkin" shop in background. Tram has an SEC 'Electric Cooking' roof ad and a 'Streets Ice cream' ad on front dash. 1186.3 - Bendigo 7 arriving at the Charing Cross stop, bound for North Bendigo. Has a Huttons dash panel ad, a Castrol roof ad. Buildings as for 1186.1. Passengers waiting at the stop. 1186.4 - Bendigo 19 leaving Charing Cross for Golden Square with City Club Hotel alongside and other buildings as for 1186.1 in the background. Tram has Briquettes ad on front dash and SEC 'Electric Cooking' roof ad. 1186.5 - Bendigo 21in High St. at corner of Short St. heading for Charing Cross. Destination half way between Depot and Railway Station. Tram has ads for Cohns Drinks on dash panel, SEC 'Cook with Electricity' and a Sandhurst Milk roof ads.Information written on in black ink and date stamped in purple ink. 1186.1 - "No. 21 in Pall Mall at Charing Cross, Bendigo" 1186.2 - "No. 26 arriving at Alexandra Fountain, Charing Cross, Bendigo" 1186.3 - "No. 7 in Pall Mall at Charing Cross, Bendigo" 1186.4 - "No. 19 in High St., Bendigo, leaving Charing Cross for Golden Square" 1186.5 - "No. 21 in High St. Bendigo, at corner of Short St." tramways, trams, bendigo, charing cross, pall mall, high st., tram 7, tram 19, tram 21, tram 26 -
 Ballarat Tramway Museum
Slide - 35mm slide/s - set of 17, Noel Simons, 20/11/1962 12:00:00 AM
Set of 17 transparencies taken on 20/11/1962 on Kodak mounts. 1187.1 - Bendigo No. 2 at the Quarry Hill terminus, showing destination of Quarry Hill. Has Cohns Drinks and Streets Ice Cream ads on dash panel, a SEC 'electric cooking' roof ad and another roof ad. Shows the Y terminus at this location, but tram standing just before it. Overhead in position. 1187.2 - as above, but closer up. 1187.3 - as above, but from the north side, showing cemetery in the background. 1187.4 - Bendigo No.3 at Eaglehawk terminus. Tram showing destination of Quarry Hill. Has the various buildings at Eaglehawk in the background including the Foodland store. Has Streets Ice cream and White Horse Whiskey ads on the dash panel. 1187.5 - Bendigo No. 18 at Garden Gully crossing loop, in bound, with destination of Eaglehawk. Passengers waiting for an Eaglehawk tram at the stop. Has a white horse whiskey ad on dash panel and SEC roof ads. Conductor standing in doorway looking out. 1187.6 - Bendigo No. 7 inbound in Nolan St. at cnr of McCrae St. showing destination of Golden Square. Has Streets Ice cream ad on dash panel and a Castrol Roof ad. 1187.7 - Bendigo No. 19 at the North Bendigo terminus with railway level crossing in background. Tram has a Cohns Drinks ad and an SEC 'Electric Cooking' roof ad. 1187.8 - Bendigo No. 2 at the Quarry Hill terminus, looking back into Bendigo, showing destination of Eaglehawk. 1187.9 - Bendigo No. 21 in McCrae St, near Nolan St outbound for North Bendigo. Photo taken after tram has passed photographer. 1187.10 - Bendigo Nos. 4 and 26 at Charing Cross in View St. with fountain alongside and the Beehive, Ezywalkin Buildings in the background. No. 26 has a Sandhurst Milk and SEC 'Electric Cooking' roof ad. 1187.11 - close up of 22E maximum traction truck and folded footstep. 1187.12 - Bendigo No. 19 at Charing Cross terminus, after tram has passed photographer, showing destination of North Bendigo, with the Beehive building in the background and passengers boarding tram. 1187.13 - Bendigo No. 11, turning from View St. into Pall Mall, showing Special with the conductor holding point bar. Has the Beehive and Ezywalkin Buildings in the background. 1187.14 - No. 7 at Charing Cross terminus, in Pall Mall, bound for Golden Square. Has the Beehive and Ezywalkin buildings in the background and passengers waiting at the tram stop. 1187.15 - No. 18 at the Charing Cross terminus, bound for Eaglehawk. Has the Beehive and Ezywalkin buildings in the background and passengers waiting at the tram stop. Also has the 'Safety Zone' sign in the photograph. 1187.16 - No. 2 at Quarry Hill terminus, night or dusk photo. Tram showing destination of Depot. 1187.17 - No. 26 at Charing Cross, night photo. Tram has destination of Quarry Hill, but is on the line for Eaglehawk. Photo looks along Mitchell St. Also shows Safety Zone sign. Information written on in black ink and date stamped on purple ink. 1187.1 - "No. 2 at Quarry Hill terminus Bendigo" 1187.2 - "No. 2 at Quarry Hill terminus Bendigo" 1187.3 - "No. 2 at Quarry Hill terminus Bendigo" 1187.4 - "No. 3 at Eaglehawk terminus" 1187.5 - "No. 18 in Mt Korong Road, Long Gully at cnr of Havilah Road (Eaglehawk Route)" 1187.6 - "No. 7 in Nolan St. Bendigo, at Cnr of McCrae St., near lake Weeroona, (North Bendigo Route)' 1187.7 - "No. 19 at North Bendigo terminus" 1187.8 - "No. 2 at Quarry Hill terminus" 1187.9 - "No. 21 in McCrae St. Bendigo, near Nolan St. (North Bendigo Route) 1187.10 - "4 and 26 at Alexandra Fountain, Charing Cross Bendigo" 1187.11 - "Truck of Bogie Car, Bendigo Tramways" 1187.12 - "No. 19 in Pall Mall at Charing Cross, Bendigo" 1187.13 - "Birney car No. 11 entering Pall Mall from View St. at Charing Cross Bendigo" 1187.14 - "No. 7 in Pall Mall at Charing Cross, Bendigo" 1187.15 - "No. 18 at Alexandra Fountain, Charing Cross, Bendigo" 1187.16 - "No. 2 at Quarry Hill terminus, Bendigo" 1187.17 - "No. 26 at Alexandra Fountain, Charing Cross, Bendigo" tramways, trams, bendigo, quarry hill, eaglehawk, north bendigo, maximum traction, night photo, tram 2, tram 3, tram 4, tram 7, tram 11, tram 18, tram 19, tram 21, tram 26 -
 Ballarat Tramway Museum
Slide - 35mm slide/s, Noel Simons, 21/11/1962 12:00:00 AM
Set of 6 transparencies taken on 21/11/1962 on Kodak mounts. 1189.1 - Bendigo No.11 at Quarry Hill terminus. Photo taken looking in along the route. Tram has destination of North Bendigo. 1189.2 - No. 21 in Pall Mall bound for North Bendigo. Tram has roof ads for Mamouney's furniture and SEC. In the background are the National Bank building, Dad and Dave's Cafe and the Beehive Buildings and the London Pharmacy. 1189.3 - No. 2 in Mitchell St, just after crossing over railway bridge. Photo taken after tram has passed photographer. Has what appears to be an SEC road works crew in the background. Has destination of Quarry Hill. 1189.4 - No. 17 climbing Mitchell St. on the start of the single track section, just before crossing the railway bridge. Has destination of Quarry Hill and the large Maples building sign in the background. 1189.5 - as for 1189.4 but after tram has passed photographer. Has an Ilford film roof ad and an SEC roof ad. Railway bridge in the background. 1189.6 - No. 21 at Charing Cross with passengers boarding. Tram has destination of North Bendigo and roof ads for SEC 'Electric Cooking' and Sandhurst Milk. In background are the buildings on the south side of High St. Also has a SEC worker in white overalls sweeping the track.Information written on in black ink and date stamped on purple ink. 1189.1 - "Birney car No. 11 in High St. Bendigo at Golden Square terminus" 1189.2 - "No. 21 in Pall Mall Bendigo near Charing Cross" 1189.3 - "No. 2 in Mitchell St. Bendigo, just after crossing bridge over railway line (Quarry Hill route)" 1189.4 - "No. 17 in Mitchell St. Bendigo, climbing the hill the bridge over the railway line. (Quarry Hill route)" 1189.5 - "No. 17 in Mitchell St., Bendigo approaching bridge over Railway line (Quarry Hill route)" 1189.6 - "No. 21 at Charing Cross, Bendigo"tramways, trams, bendigo, golden square, pall mall, mitchell st., quarry hill, tram 2, tram 11, tram 17, tram 21 -
 Ballarat Tramway Museum
Photograph - Black & White Photograph/s, Harvey Studios, 18/02/1953 12:00:00 AM
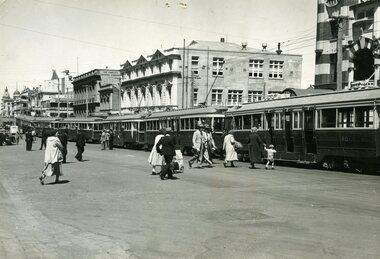
Yields information about the tram arrangements for a large group from Geelong and the Geelong wharfies made for their picnic - probably at the Gardens. Demonstrates transport arrangements in the 1950's.Black and white photograph of seven bogie trams lined up with passengers boarding in Lydiard St. North, between Mair St and the Railway Station for the Geelong Waterside Workers picnic day on Wednesday 18/2/1953. Closest tram is No. 40. Photo taken from the Railway Station car park entrance. Provincial Hotel and other buildings on west side of Lydiard St. in photo. Published in the Courier 19/2/1953 - advised by Alan Bradley - 15/3/2003. 1880.1 - Digital image of the same photo from the Wal Jack Album. See images i2 and i3 for details, i3 for the rear of the photograph. Wal Jack notes identifies the trams as Nos. 15, 35, 39, 38, 34, 37, 40"On rear in blue ink "10 - Special trams chartered to convey Geelong Waterside Workers Picnic participants from Railway Station to Lake Wendouree Botanical Gardens o Wednesday 18 Feby '53". Under writing is word "Ballarat" in pencil. In top right hand corner, in a purple ink hand stamp is "N.L. Harvey (Photo Press Service) A.M.P. Chambers Lydiard St. N Ballarat" On rear of .1 is the N.L.Harvey stamp and Wal's notes "SEC Ballarat Geelong Wharfies Specials, Lydiard St Nth at 11.5am, 18-2-53, Nos. 15, 35, 39, 38, 34, 37, 40"trams, tramways, picnics, lydiard st. nth, geelong waterside workers, charters, tram hire, tram 40 -
 Ballarat Tramway Museum
Photograph - Illustration/s, Ballarat 37
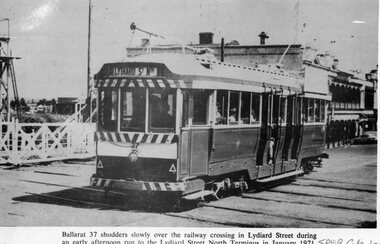
Black and white illustration from the South Pacific Electric Railway Co-op (Sydney Tramway Museum) - Feb. 1974 calendar of Ballarat tram No. 37 crossing the railway crossing in Lydiard St. North, January 1971. Photo by D.Cooke. Tram showing destination of "Lydiard St. Nth." Has buildings on the east side of Lydiard St. in background and railway gates.On bottom right hand corner "SPER Calendar February 1974"trams, tramways, ballarat, lydiard st. nth, railway crossing -
 Ballarat Tramway Museum
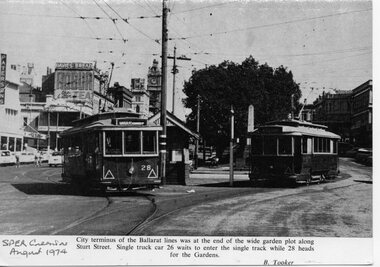
Photograph - Illustration/s, Grenville St. and Sturt St. Ballarat
Black and white illustration from the South Pacific Electric Railway Co-op (Sydney Tramway Museum) - Aug. 1974 calendar of Ballarat trams 26 and 28 at the intersection of Grenville St. and Sturt St. Tram 28 proceeding to the Gardens via Drummond St., while 26 waits for 28 to clear and proceed to what appears on the destination to be Mt. Pleasant. Photo undated, but prior to the fitting of marker lights on the drivers canopy window sills - during the 1950's. Photo caption mentions that this was the City terminus of the system - incorrect during the SEC operational days. Photo by B. Tooker. Has buildings on either side of Sturt St. in background.On bottom right hand corner "SPER Calendar Aug. 1974"trams, tramways, ballarat, sturt st., grenville st.