Showing 1370 items matching " victoria hotel"
-
 Ballarat Tramway Museum
Slide - 35mm slide/s, David Verrier, 6/10/1964 12:00:00 AM
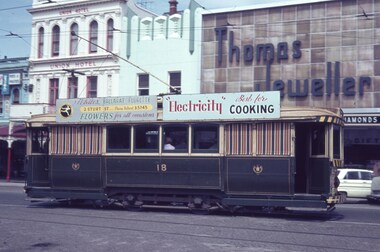
Yields information about the appearance of tram 18 in Sturt St mid 1960's.Agfa colour slide, white blue plastic mount. Photograph by David Verrier of No. 18 in Sturt St lower, with the Union Hotel and Thomas Jeweller's building in the background. The tram has a good set of blinds, with roof advertisements for Whites Flowers and Electricity best for cooking. Photo taken 6/10/1964.On back of slide in pencil "Tues 6/10/64 Ballarat, Sturt St, from Victoria St."tramways, trams, sturt st, tram 18 -
 Ballarat Tramway Museum
Photograph - Black & White Photograph/s - set of 2, Richard Gilbert, c August 1971
Yields information about tramway operations at Hospital corner. Series of 2 Black and white photographs of trams using the Hospital corner curves. .1 - tram 13 inbound to Victoria St, with the J A Malpass, Rimmington Bros and the Southern Cross Hotel in background. .2 - tram 14 showing Depot via Drummond North crossing the trackwork at Hospital corner.. trams, tramways, hospital corner, sturt st, drummond st nth, victoria st, tram 13, tram 14 -
 Ballarat Tramway Museum
Slide - 35mm slide/s - set of 14, Noel Simons, 23/11/1962 12:00:00 AM
Set of 14 Kodachrome transparencies taken on 23/11/1962. 1162.1 - tram 38 turning into Lydiard St. North from Sturt St. with tram 20 in background. Many motor vehicles in photo. 1162.2 - as above, but a minute of so later. Has Mutual Life building in background as well as Town Hall. 1162.3 - No. 40 entering Albert St. from Skipton St. outbound to Sebastopol. 1162.4 - No. 40 near start of side of the road running in Albert St. heading to Sebastopol. 1162.5 - No. 40 at the City terminus, on the South side of Sturt St. Has Town Hall and other buildings along the south side of Sturt St. in the background. 1162.6 - No. 40 at Sebastopol terminus - shows arrangement of the signs at the terminus. 1162.7 - No. 40 and No. 38 crossing at loop between Sayle and Grey St. No. 40 inbound. 1162.8 - No. 40 turning from Drummond St. South to Sturt St. at Hospital Corner with Southern Cross Hotel in background. 1162.9 - No. 18 in Wendouree Parade near Forest St. heading east with destination of "Victoria St." 1162.10 - Nos 41 and 39 at Depot Junction. Both trams have SEC ads. 1162.11 - No. 39 turning into the depot from Wendouree Parade - showing destination of "Gardens via Drummond Nth" 1162.12- No. 17 at Lydiard St. North terminus, showing destination of "Grey St. Sebas". Has a Twin Lakes sign 1162.13 - ditto, but with trolley pole turned around. Has SEC Briquettes roof ad and Whitehorse whiskey ad on rear dash panel. 1162.14 - No. 40 outbound to Sebastopol crossing Albert St. 1162.1 -"Nos. 38 and 20 in Sturt St. Ballarat at corner of Lydiard St." 1162.2 - "No. 38 turns into Lydiard St. as No. 20 waits at stop in Sturt St. Ballarat" 1162.3 - "No. 40 entering Albert St. from Skipton St. Redan on Sebastopol route." 1162.4 - "No 40 at beginning of reserved track on Sebastopol route, Albert St. Redan." 1162.5 - "No. 40 in Sturt St. Ballarat near cnr. of Armstrong St." 1162.6 - "No. 40 at Sebastopol terminus" 1162.7 - "No. 38 and 40 crossing at Sayle St. Loop on Albert St. reserved track, Sebastopol route" 1162.8 - "No. 40 turning into Sturt St. from Drummond St." 1162.9 - "No. 18 in Wendouree Pde. Ballarat near tramway depot" 1162.10 - "No. 41 and 39 outside Ballarat tramway depot, Lake Wendouree in background" 1162.11 - "No. 39 entering tramway depot from Wendouree Parade, Ballarat" 1162.12 - "No 17 at Lydiard St. North terminus, Ballarat North" 1162.13 - "No 17 at Lydiard St. North terminus, Ballarat North" 1162.14 - "No. 40 crossing Albert St. Sebastopol as reserved track switches from left to right of road" All have date stamp of "23 Nov. 1962" in purple ink. All black ink unless otherwise noted.tramways, trams, ballarat, albert st., sturt st., sebastopol, grey st., hospital corner, wendouree parade, depot junction, lydiard st. north, tram 17, tram 18, tram 20, tram 38, tram 39, tram 40, tram 41 -
 Ballarat Tramway Museum
Slide - 35mm slide/s - set of 13, Noel Simons, 28/04/1971 12:00:00 AM
Set of 13 transparencies taken on 28/4/1971 on PAKON mounts. 1168.1 - No. 21 at City terminus - taken from North side of street. Has Boer War statue on right side and National Mutual building in the background. 1168.2 - No. 34 with destination "Sebastopol" in Sturt St., outside Town Hall, with National Mutual building in background. 1168.3 - No. 18 at corner of Sturt and Lydiard Sts with National Mutual building and Craigs Hotel in background. 1168.4 - 18 at intersection of Sturt and Dawson St. 1168.5 - No. 30 at intersection of Armstrong St and Sturt St. with Fletcher Jones building in background. 1168.6 - No. 14 at City Terminus, showing destination of "Victoria St." with Town Hall in the background. 1168.7 - No. 11 bound for Mt Pleasant, opposite Titanic Bandstand in Sturt St. Has a Twin Lakes advertisement on the front dash panel and an unknown roof advertisement. 1168.8 - No. 21 at bottom of Sturt St. approaching the Grenville St. junction, with Dickins Food Store and the Spot Cafe in the background. Tram has destination of "Victoria St". and a roof advertisement for a cigarette? company. 1168.9 - No. 26 and three other trams in City Loop, looking west along Sturt St., just after a heavy hail storm. 1168.10 - No. 21 at the intersection of Sturt St and Dawson St. with Golden City Hotel and the Ritzy Cafe in the background. Can see the Dawson St. crossover track, just after a heavy hail storm. 1168.11 - No. 21 and three other trams at City Loop looking east along the south side of Sturt St. See also image 1168i1a - cleaned up and edited by Peter Waugh April 2024 - used in the April 2024 issue of Fares Please. 1168.12 - No. 14 entering the South side of Sturt St. from Bridge St. with Dickins Store in the background and the Grenville St. shelter alongside the tram. 1168.13 - No. 37 at Sturt and Dawson St., eastbound, showing "Lydiard St. Nth" Has SEC roof advertisement on the side of the tram.1168.1 -"Sturt & Lydiard Sts" 1168.2 - "Town Hall" 1168.3 - "Sturt St & Dawson Sts" 1168.4 - "Sturt and Lydiard Sts" 1168.5 - "Sturt St." 1168.6 - "Sturt and Lydiard Sts" 1168.7 - "Sturt St." 1168.8 - "Bridge St." 1168.9 - "City Loop" 1168.10 -"Dawson & Sturt Sts." 1168.11 - "City Loop" 1168.12 - "Bridge St." All have date stamp of "28 Apr 1971" in purple ink on base. All blue ink unless otherwise noted.tramways, trams, town hall, sturt st., dawson st, armstrong st., grenville st, bridge st., titanic bandstand, tram 11, tram 14, tram 18, tram 21, tram 26, tram 30, tram 34, tram 37 -
 Ballarat Tramway Museum
Slide - 35mm slide/s - set of 11, Noel Simons, 23/10/1965 12:00:00 AM
Set of 11 Kodachrome transparencies taken on 23/10/1965 in Melbourne. 1178.1 - W7 1020 (on route 9A, Northcote via St Georges Road) with a W2 536 (Deepdene) behind at the corner of Victoria Parade and Brunswick St. East Melbourne or Fitzroy. Has Eastern Hill fire station and ICI building in background. 1020 has front dash panel ads for Queens Bridge Motors and Bridgestone tyres. 1178.2 - W5 759 (route 19, North Coburg) and W5 807 in Elizabeth St. Melbourne at the intersection of Bourke St. with the State Savings Bank building in the background. 759 has side ads, one of which is for CASTROL. 1178.3 -SW6 903 crossing Brunswick St. in Victoria Parade, Fitzroy bound for Deepdene, route 45. Photo taken after tram has passed photographer. 1178.4 - W7 1019 (route 96, East Brunswick Blyth St.) and W7 1010 (route 88 East Preston) in Nicholson St at intersection with Victoria Parade. A Herald newspaper truck is alongside 1019. 1178.5 - W7 1040 (route 96, East Brunswick Blyth St.) in Nicholson St at intersection with Albert St. Has Princess Theatre in the background. (High res scan added 26/10/2008 - copy to FOHTD) .1178.6 - W6 974 (route 89 East Preston Bell St.) in Bourke St. about to turn into Spring St. Has buildings on the south side of Bourke St in background, including Southern Cross Hotel. Note trees in tubs and red phone box by Windsor Hotel. 1178.7 - as for same location as 1178.6 - SW6 967 (route 96) and W6 971 (inbound - route 90 - City Spencer St.) 967 has Lucas ad on front dash. 1178.8 - W7 1013 (route 88 East Preston) photographed from W6 991 in Bourke St at corner of Russell St. Has Normans corner store, Treadways and Foys in background. 1178.9 - W2 553 (route 1 East Coburg) at the corner of Elizabeth St and Bourke St. Has the Leviathan, Roger David and Ezywalkin shops in the background. 1178.10 - W6 991 (route 88) and W7 (route 96) in Bourke St. at corner with Elizabeth St. Photo taken from the GPO steps. 991 has ads for BIC pens and CASTROL. In background are the State Savings Bank, Halls Books and McEwans shops. 1178.11 - Line up of north bound trams (3 +) lead by W2 449and southbound in Elizabeth St at corner of Collins St. Has Flinders St. station building in the background. Hi -res image of .10 added 22-12-2018All have date stamp of "23 Oct 1965" in purple ink. All black ink unless otherwise noted. 1178.1 - "W7 1020 turning into Brunswick St. from Victoria parade, East Melbourne (followed by W2 536) 1178.2 - "W5 799 and 807 in Elizabeth St. Melbourne at cnr. of Bourke St." 1178.3 - "SW6 903 entering reserved track in Victoria Parade, East Melbourne" 1178.4 - "W7 1019 and 1010 in Nicholson St. East Melbourne at Victoria Pde intersection" 1178.5 - "W7 1040 Melbourne's last tram (to date) in Nicholson St. at Albert St. intersection." 1178.6 - "W6 974 in Bourke St. Melbourne, about to turn into Spring St." 1178.7 - "W6 971 entering Bourke St. from Spring St. Melbourne, passes SW6 967 outward bound for East Brunswick" 1178.8 - "W7 1013 (seen from W6 991) in Bourke St. Melbourne crossing Russell St." 1178. 9 -"W2 553 in Elizabeth St. Melbourne at cnr of Bourke St." 1178.10 - "W6 991 and W7 1005 in Bourke St. Melbourne at cnr of Elizabeth St." 1178.11 - "W2 449 leads a line of Peak hour cars along Elizabeth St. Melbourne (at Collins St. corner)"tramways, trams, melbourne, victoria parade, nicholson st., brunswick st., bourke st, elizabeth st, tram 1020, tram 536, tram 799, tram 807, tram 903, tram 1019, tram 1010, tram 1040, tram 974, tram 967, tram 971, tram 1013, tram 553, tram 991, tram 1005, tram 449 -
 Ballarat Tramway Museum
Slide - 35mm slide/s - set of 7, Noel Simons, 23/10/1965 12:00:00 AM
Set of 7 Kodachrome transparencies taken on 23/10/1965 in Melbourne. 1179.1 - W2 488 (route 42, Mont Albert) at the corner of High St. and Cotham Road Kew. Taken from Kew Post Office, has Bank of New South Wales in the background, CBC bank and the Greyhound Hotel. Tram has ads for Kolotex stockings and Ryco oil filters. 1179.2 - SW2 436, in bound (route 45, City) leaving Cotham Road, about to join High St, Kew. Buildings on the south side of Cotham Road in photo. Tram has an ad along with others for Vincent's powders. 1179.3 - W2 545 (route 48, North Balwyn) in High St. Kew. Has Commercial bank in background along with other shops. 1179.4 - W2 648 (route 42, Mont Albert) turning from High St. South into High St at Kew Junction, with Clifton Hotel in background. Tram has an ad for Kenric clothes. Note an MFBB street fire alarm by the tram stop. 1179.5 - W2 566 (inbound route 42, City) at same location as 1179.5. Tram has a Jex and a Remy Martin Brandy ads. on front dash panel. 1179.6 - W2 572 entering Victoria Parade from Brunswick St. Fitzroy. Tram has a Jex and a Remy Martin Brandy ads. on front dash panel. Eastern Hill Fire Station and ICI building in background. 1179.7 - W2 378 (inbound, route 45, City) and W2 572, inbound, in Victoria Parade between Brunswick St and Gismo St. East Melbourne. Otherwise as for 1179.6.All have date stamp of "23 Oct 1965" in purple ink. All black ink unless otherwise noted. 1179.1 - "W2 488 Entering Cotham Rd. from High St. Kew" 1179.2 - "SW2 436 in Cotham Rd., Kew, about to enter High St." 1179.3 - "W2 545 in High Street Kew, nearly opposite Cotham Road" 1179.4 - "W2 648 entering High Street from High Street South, Kew". 1179.5 - "W2 566 entering High St. South from High St. Kew" 1179.6 - "W2 572 entering Victoria Pde from Brunswick St. East Melbourne" 1179.7 - "W2 378 and 572 in Victoria Pde between Brunswick and Gisborne Sts. East Melbourne."tramways, trams, kew, high st kew, cotham road, victoria parade, melbourne, tram 545, tram 488, tram 436, tram 648, tram 566, tram 572, tram 378 -
 Ballarat Tramway Museum
Document - Photocopies, Alan Bradley, "One Man Farebox cars, tokens and statistics of the Ballarat Tramways", 18/07/2001 12:00:00 AM
Photocopies of an article written by Bob Prentice made by Alan Bradley in relation to the use of Fare Tokens by the Electric Supply Co. of Victoria - See Reg. Item 1794. Photocopies made 18.07.2001. Photocopy of the article from his collection. Comprises three sheets stapled together in top left hand corner. Article contains details of the use of tokens, colours of discs or lights used on trams while running on the various routes, fares, sections, fare box operation, and when and where tokens were issued. Includes a photograph of Barkly St. looking South from the fire station tower. Also gives details of tokens in use, cost of manufacture from other materials (Haxite and Crystalate) and the number in circulation. Has copy of an advertisement for the Southern Cross Hotel, S.A. Brabner, Proprietor, notes that all trams STOP. See Reg. Item 2514 for H.P. James notes on the token system.Parts of letter have been highlighted by Alan re tokens and other interesting points.trams, tramways, tokens, fares, tickets, esco, southern cross hotel, costs -
 Ballarat Tramway Museum
Photograph - Miscellaneous Images, Set of 15 (Only three photos in archive, .5, .6 and .7. Location of remaining 12 photos under investigation), 1960s
Set of 15 items personally collected or given to Les Denmead by visiting Tramway enthusiasts or other interested people to Ballarat. Retained as a sample of images or other mementoes given by people though not directly of Ballarat. The following items are a summary only: 1901.1 - Postcard from South Pacific Electric Railway of L/P class tram No. 154 on SPER track , SPER-1 - Nucolorvue. 1901.2 - Photograph of Brisbane FM 440? and drop centre behind - CBD area Brisbane. Has 'Brisbane' written on back. 1901.3 - Photograph of Brisbane FM 473, showing Grange, as for 1901.2. 1901.4 - Photograph of Brisbane FM 422, showing Chermside, Brisbane CBD area, has "Brisbane May 1955' written on front of photo. 1901.5 - Illustration of Christchurch Horse Tram, Tramway Historical Society / Shell Oil company produced card, full details on rear. 1901.6 - Illustration of Wellington 'Fiducia' tram No. 238, operating on Wellington Tramway Museum track. Produced by Museum, with full details on rear. 1901.7 - Colour illustration of Wellington tram No. 257, central or downtown Wellington, outside the Parliament grounds. Full details on rear of card - produced by Shell Oil Company? 1901.8 - Photo of four H class trams at Victoria Sq. Adelaide, 25/3/1967. Taken by Douglas A. Colquhoun. On left hand side is a single car 378 and on the other track a three car set 366, 367 and 368. 1901.9 - Photo of Adelaide E1 111, crossing the Holland St. Bridge, 24.10.1953. Photo by Douglas A. Colquhoun. 1901.10 - Photo of Adelaide A 82, Wayville Junction, Feb. 1952. Photo by Douglas A. Colquhoun. 1901.11 - Photo of Adelaide A 10, later SEC Ballarat 21, in Adelaide CBD, with Ferors Gresham Hotel alongside. Has written note on background re tram. 1901.12 - Two prints of the front vestibule of a Toronto PCC tram, with operator (driver) seated. 1901.13 - Two prints of Toronto PCC 4400 and 4404, coupled together, 9/8/1949 with a depot? or carbarn building in the background. Has caption on the base of the photograph - copy photograph. 1901.14 - Two prints of a close up photograph of the coupling between the two cars in 1901.13. 1901.15 - Photograph of a Fare Box on a Toronto Streetcar. (1901.13 to .14) have "Canada" written on the back. 1trams, tramways, sydney, brisbane, adelaide, wellington, christchurch, toronto, pcc, victoria sq., tram 21 -
 Ballarat Tramway Museum
Photograph - Private bus in Swanston St with Foys in the background, Ron E. Fluck, 10/04/1950
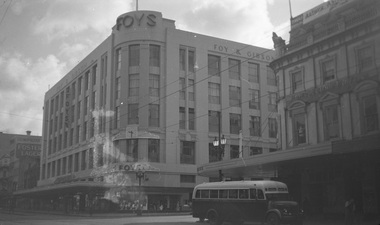
Photo of a privately operated bus in Swanston St. Melbourne at the intersection of Bourke St., with Foys (Foy and Gibson) department store in the background. Bourke St. trams yet to be built. Photo taken 10-4-1950. Also has the Cosmopolitan Hotel in the background. From information provided by the Bus and Coach Society of Victoria: "The bus outside Foys belongs to Lew Page who was one of the multiple operators on Route 1 in 1950 ( he also had one bus on Route 2) which was four years before they amalgamated to form Melbourne - Brighton Bus Lines. The bus is a Reo with a Giles body. Giles Motor Body Works was based in New Street Brighton and built bodies for commercial vehicles but not a lot of buses. Their half a dozen post-war buses mainly went to operators in Routes 1 and 2. Being on Route 1, the bus would have been red and cream." Yields information about private bus lines in Melbourne and the Foy & Gibson building.Black and white print and hi res scan of a donated negative. tramways, trams, melbourne, swanston st, foy & gibson, bourke st., lew page, giles, melbourne brighton bus -
 Ballarat Tramway Museum
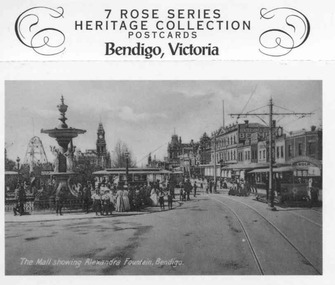
Postcard - Folder set, Rose Stereograph Co, "7 Rose Series Heritage Collection Postcards - Bendigo Victoria", c1990
Set of seven Rose Series Heritage postcards in a strip production featuring Bendigo Victoria. Each black and white postcard features an historic view of Bendigo from older Rose Series or Valentine's postcards and are perforated on the top and bottom so they can be separately used. On the rear of each card are areas for address, stamps, title, Rose logo and copyright note. Each card has been given a new Rose Series Number. On the top of the set of cards is a short history profile on the Rose Stereograph Co. 1. Photo of the Mall showing two ESCo trams, and the Alexandra Fountain with a third tram in the background c1908. Rose series Number 2764. Photo supplied by Rod Aikman - see image btm1662i1. 2. Photo of mining operations , c1900. Rose series Number 2765. Photo supplied by Rod Aikman 3. Image of Pall Mall, Law courts and Post office building. Rose series Number 2766. Photo supplied by Rod Aikman. Was Rose Series P3213. 4. Photo of Mitchell St. looking west from Pall Mall with fountain on right and two ESCo trams c1906.Rose series Number 2767. Photo supplied by Rod Aikman - see image btm1662i2. 5. Photo of Alexandra Fountain - was Valentine Series No. 1393 c1920's. - now Rose Series 2768. 6. Photo of Chinese Dragon "Loong", now Rose Series 2769 c1950 - was P2846. 7. Photo of Williamson Street Bendigo, showing Shamrock Hotel c1920- now Rose Series 2770 - was Valentine's M5710. trams, tramways, bendigo, pall mall, esco, mitchell st. -
 Ballarat Tramway Museum
Slide - 35mm slide/s, Travis Jeffrey, late 1960's
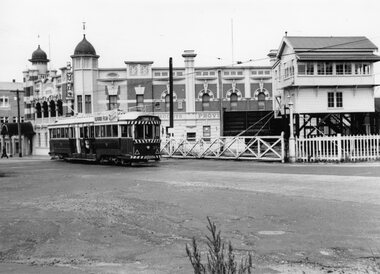
Agfa plastic mount (blue base, white cover) of a photograph of No. 43 southbound in Lydiard St Nth entering the double track section. Photo taken late 1960's. Has the Provincial Hotel, Reid's Coffee Palace and the rail level crossing gates and Victoria House in the background. Tramcar has an "Everything's under control in my all electric kitchen" roof advertisement. Slide rescanned at 3200 dpi 25-10-2020, jpg replaced, tiff file retained. This file was scanned in 2003 and may show colour changes."BAS 48" in penciltramways, trams, railway station, lydiard st nth, tram 43 -
 Ballarat Tramway Museum
Negative - Black and white print from negative, Travis Jeffrey, 12/12/1958?
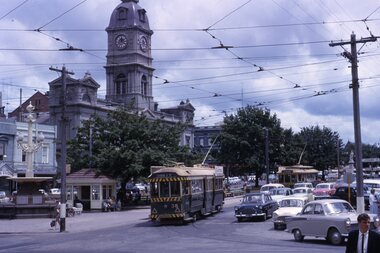
Negative No. N375 and black and white print made by a laser printer (stored in folder) of Ballarat No. 12 in City or Grenville St Loop with Grenville St and Bridge St. in the background. Date thought to be 12/12/1958. Tram has destination of City. Can see the Bucks Head Hotel in the background and the full length of Bridge St., with Victoria St. hill as well. W. Gribble & Co. building on the right hand side of the photograph. Although folder dated 23/2/62, the photo is taken before 12/1960, as tram has not been fitted with dash canopy lights, so date taken as for photograph BA1, Reg. No. 2381 - note angle of shadow. hi res scan made and image updated 23/5/2020. Paper folder that contained the negative had "NR64A" in red ink, "BA2" in pencil, date stamp of "23 Sep 62" on front, and on rear date stamps "26 Sep 1962" and "6 Oct 1962".trams, tramways, city loop, grenville st, bridge st, sturt st, tram 12 -
 Ballarat Tramway Museum
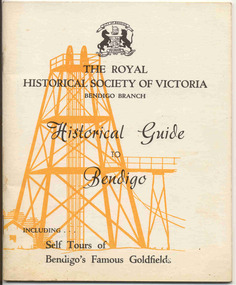
Book, Royal Historical Society of Vic - Bendigo Branch, "Historical Guide to Bendigo", 1968
Yields information about the appearance of SEC single truck trams during 1938. Has a strong association with Wal Jack.Book - 200gsm card cover - two colours, 36 pages off white paper printed with text and 8 pages of black and white photos printed onto gloss paper, centre stapled titled "Historical Guide to Bendigo". Published by the Royal Historical Society of Victoria Bendigo Branch, 1968. Contents: Derivation of the name of Bendigo, historical facts. mining guide, post offices, early Bendigo Hotels, Bendigo Tramways, Eaglehawk, the Lonely Grave. Has photos on the Battery Tram, Steam Tram and ESCo No. 2, Pall Mall, various mines, Golden Square and the Lonely Grave. Bendigo Tram item written by H. Biggs.On page 3 in black ink "Ballarat Tramway Preservation Society, Catalogue No. 119"trams, tramways, bendigo, eaglehawk, mining, post office -
 Ballarat Tramway Museum
Film - Movie Film & Box, Kodak, 1960
Yields information in movie film format of Ballarat trams in 1960, how the system operated and was used by people., Yields information in movie film format of Ballarat trams in 1960, how the system operated and was used by people.Movie film - 8mm, approx. 30mins, with leader strip on a plastic reel, within a black and white plastic box, titled "Ballarat No. 1. 1960". Has been transferred to DVD - see Reg item 4100 as Segment No. 2. Made by Ben Parle. Also transferred to DVD by Rod Cook Oct. 2015, via Roger Greenwood for use in his DVD, "The City of Ballarat Trams, Gardens & Gold" of 2016. See Reg Item 6883. Synopsis: based on time. 0:00 View of typed introduction, noting that this is a pictorial record of Ballarat. 0:10 Title “The Tramways of Ballarat 1960, Part 1” 0:16 13, showing “View Point” at Stones Corner, Bridge St, east end, with trolley pole being turned, while another single trucker heads out towards Mt Pleasant. 0:25 13 leaving Stones Corner, short approach and then longer trailing shot of the tram going towards the City in Bridge St. 0:44 View out of front of tram in Bridge St heading towards the City, with cars in the photo, then passing through city Loop, no trams in the loop and running up to Lydiard St Nth and crossing the road. 1:22 Running up Sturt St from Armstrong St, passes over Dawson St X-over and up to the next intersection, Lyons St. 1:54 Title “The View Point Line” 1:59 19 inbound, in Ripon St, from crossing Mair St, towards camera and then passing away and turning into Sturt St. 2:49 View of a “Warning Oncoming Trams” sign 2:52 19 in Ripon St, going to View Point, crossing Webster St towards camera, then going away through the disconnected Victoria Ave loop, pass the “Warning Oncoming Trams” sign. Note very windy scene with people running across roads. 3:17 19 in Wendouree Parade, in bound, though showing destination View Point, going away from the camera, past the View Point Hotel. 3:39 19 coming towards camera near Excerpt or Devon St and then going away towards the terminus. 4:04 19 at the terminus, stationary, with a single trucker 3?, passing from Macarthur St into Wendouree Parade, behind 19. 4:20 33 coming towards camera in Wendouree Parade from St Aidans Drive, stopping to pick up passenger at Forest St and then going away towards the City, photographed from near the depot, on a wet and windy day. 4:54 35 in Wendouree Parade, coming towards the Camera from St Aidans Drive and then going away with the Gardens Loop area in the background. Tram stops at stop to let a passenger off. 5:28 21 leaving Gardens Loop for the City via the Depot, green light in signal can be seen. 5:43 28?, closely followed by 26 turn from Drummond St South into Sturt St. 6:18 Scene opens with shot of “Sebastopol” destination on a bogie tram. 6:21 Title “The Sebastopol Line” 6:24 21 turning from Sturt St into Drummond St Sth with destination of Bell St and then going away from the camera. 6:55 38 in Drummond St Sth, coming towards the camera and then passing the camera with Sturt St just in the view. 7:10 21, showing Gregory St, in Drummond St Sth, approaching and then going away, entering the Urquhart St Loop, 7:39 34 in Drummond St Sth (location check required (Latrobe?)), approaches camera, picks up passengers and the goes away. 8:09 39 at ? Street, turns from Drummond St Sth into Skipton St, after picking up and setting down passengers, bound for Sebastopol 8:55 35 inbound in Skipton St passes through the Bell Street Loop, and then goes away from the camera. 9:33 42 outbound in Skipton St, approaches the camera, passes and then crosses over the half the road into Albert St. 10:00 39 inbound in Albert St – location? 10:31 34 outbound for Sebastopol, approaches camera and just starts to pass by. 10:36 34 in Grey St crossing loop, crosses 42 inbound. 10:59 39 outbound in Albert St, with shopping centre in bound, approaches camera, passes and then crosses over Albert St. Mid morning scene. 11:39 39 inbound, Albert St south, approaches camera and then passes and the crosses over Albert St. 12:16 41 outbound in Albert St passes the camera, and pulls into the terminus with the conductor getting out on the back bumper to pull the pole down as the tram stops and a passenger walks into the Royal Hotel. 12:39 Title “The Lydiard Street North Line” 12:44 Filmed from the Hotel balcony, 21 inbound in Lydiard St Nth passes over Mair St, stops while 33 passes in the other direction. 13:18 With the red light showing on the Seymour St loop signal, 33 inbound for Sebastopol stops and picks up many passengers, passes the camera and runs past the VRI building in the background and through the loop. Possibly filmed on a Sunday given the ladies dresses and quieter streets. 14:01 30 outbound, passes the camera and stops at Macarthur St. Filmed alongside the brick wall of the cutting. 14:28 30 inbound arrives, passes through the Gregory St loop and then proceeds past the camera, making a stop to pick up passengers. 15:14 28 in Lydiard St Nth – location?, approaches and goes away from the camera, north of Gregory St. 15:34 28 ditto location? 15:53 21 arrives at the terminus with passengers getting on and off. 16:11 View of the a vertical positioned “End of Section” sign on a pole at the terminus and then lifting the camera to see the timetable board and the stop sign. 16:33 31 in Bridge St passing Morseheads and then turning into Sturt St, stops at the Grenville St stop, while another single trucker comes down to the stop from the City. 16:58 31 outbound in Bridge St, with destination of Victoria St. 17:14 Title “The Victoria Street Line” 17:18 31 outbound to Victoria St from Stones Corner. Starts with an overhead shot, shows clock at the Caltex service station,. 17:37 31 inbound approaching Bakery Hill and then descending to the junction after it passes camera. 18:09 25 climbing outbound in Victoria St, passing the camera, to then pass through the King St loop. 18:47 25 inbound in Victoria St, passing the camera, then pass through the King St loop, with St Alypius Church in the background. 19:36 14 approaching the rail bridge in Victoria St and stopping at the 2nd last stop to left of passengers. 20:01 14 leaving the terminus and approaching the camera and the a short sequence going away, to the next stop to pick up quite a few passengers. 20:14 “Trams Stop Here” sign, metal wrap around on a steel pole. 20:16 Title “The Mount Pleasant Line” 20:21 11 inbound in Main St, with a passenger leaping off the tramcar and another getting off just before the junction. 20:45 11 passes the junction and then proceeds away from the camera in Bridge St. 21:04 30 outbound in Main St, then turns into Barkly St, a bus (Eclipse Motors) passes in Main St just before the sequence ends. 21:31 30 inbound near Steinfield St. (exact location?) 21:49 25 approaches the camera, then proceeds away and passes through the Grant St. loop. 22:29 25 inbound, windy day, between Grant and Cobden, (exact location?), with a horse drawn bread van in the view and the breadman walking behind the tram as it passes. 23:02 11 outbound in Barkly St, (exact location?) 23:37 11 inbound in Barkly St (exact location?) 23:44 Mt Pleasant terminus signage 23:50 30 approaches the terminus and then stops with the conductor alighting turning the pole, passengers getting on and off and the driver appearing at the other end. 24:32 Title “The Gardens Via Sturt St. West Line” 24:35 21 outbound in Sturt St near Raglan St, approaches and passes the Camera. 25:09 12, showing City Oval, approaches and passes the camera, outbound near Windermere St. 25:33 13 showing View Point, goes away from the camera – location? 25:44 12 comes from St. West, inbound passes the camera and then stop as the next stop next Talbot St? 26:21 Short sequence of a “Warning Oncoming Trams” sign 26:28 42 inbound in Sturt St West, just before Ripon St, view coming towards camera and then going away to cross Ripon St. 27:10 34 passes through the Parker St loop 27:25 35 or 39 inbound past the college in Sturt St West 28:04 41 outbound at the Russell St curve, passes away from the camera. 28:11 35? inbound passes away from the camera through the Victoria Park or Morrison St loop, swinging out into the roadway. 28:29 View of timetable sign at Hamilton Ave. 28:37 35 turning from Sturt St West into Hamilton Ave, can see the conductor changing over the barrier rails. 29:11 42 inbound, crosses another bogie tram (35?) at Carlton St loop then passes the camera and goes past the Olympic rings monument. 29:42 12 approaches the Carlton St gates. 30:07 12 outbound, crosses a bogie tram in the loop with both trams then leaving the loop. 30:20 Title “End of Part One” Written labels giving title information on outside of box.trams, tramways, ballarat, sebastopol, lydiard st north, victoria st, mt pleasant, sturt st west -
 Ballarat Tramway Museum
Photograph - B&W print of donated negative, John Webster, 11/4/1953
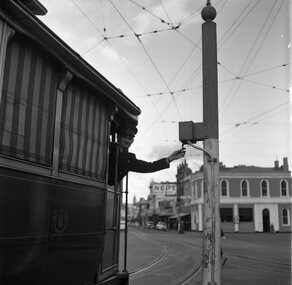
Yields information about the Bucks Head Hotel and demonstrates the way the signals were set in Bridge St for either the Mt Pleasant or Victoria St routesBlack and digital white print from a scan of a donated negative of a driver leaning out from a single trucker to set the switch on the signal for either the Victoria St or Mt Pleasant routes. Has the Bucks Head Hotel in the background. Shows the pole the signal controller or switch was mounted on. Black and White print made from scan of negative. Original Negative stored with Negatives. Image rescanned from copy neg and updated 31/5/2020. See On this basis, the envelope and marking matches that of Reg Item 4158, photo of No. 40, by John Webster and assumed taken on the same day as Item 4157, 4158, 4168, 4178 - 11/4/1953. Contained within Envelope No. 33.On left hand side of the negative in ink is "EI 35".tramways, trams, sturt st, grenville st, signals, bridge st -
 Ballarat Tramway Museum
Photograph - Black & White Photograph/s, Ron Hann, Jan. 1963
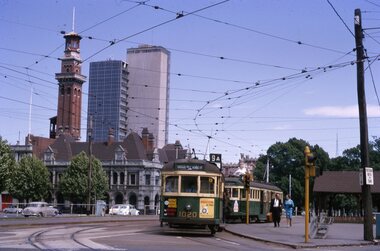
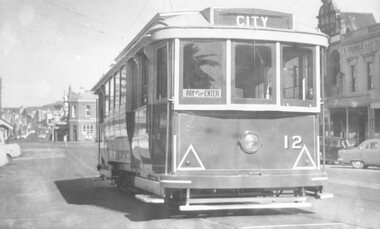
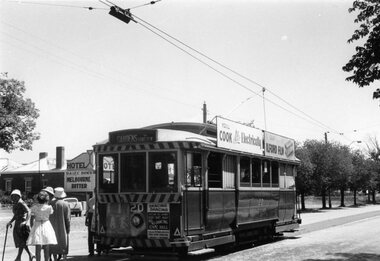
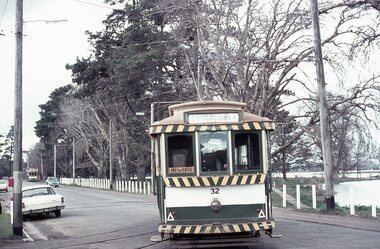
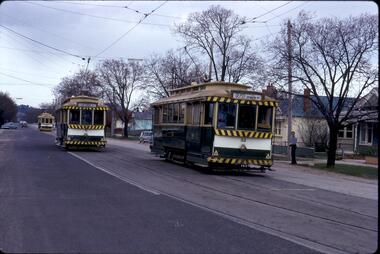
... . tramways trams Victoria St Hotels tram 20 On rear in pencil "20 ...Yields information about the Victoria St terminus, passengers and the tram liveries in 1963.Black and white print on heavy matt photographic paper of No. 20 at the Victoria St terminus, c1963. Tram has the destination of Gardens, a Cook with Electricity and Ilford Film roof advertisements and one for dancing at the Civil Hall on the front dash panel. A number of ladies, including one using a walking stick, walking away from the tram. The Meagher's Hotel is in the background, with the names DA and FC Dowd on the wall and an advertisement for Melbourne Bitter. 2nd copy - laser print - with date etc on rear - added 22/2/2010, copy from Ron Hann. Printed on Fujifilm, Fujicolour Crystal Archive for Frontier"On rear in pencil "20 Victoria St 1963" 2nd copy has label "Reference 6/113/10 Photo by Ron Hann" and another label "Ballarat 01.63"tramways, trams, victoria st, hotels, tram 20 -
 Ballarat Tramway Museum
Photograph - Black & White Photograph/s and Black and White photograph/s - mounted, John Phillips, 1968
Yields information about the use of the trams in Bridge St - the major shopping strip at the time in Ballarat, shows the nature of the strip, the passengers (all ladies) and the motor cars in use at the time.Black and white print of No. 28, picking up four lady passengers at the junction in Bridge St, Stones Corner. Tram has the destination of Victoria St. Photo taken late 1960's, early 1970's. In the photo are the Bank of NSW buildings, Gear Chemist and Hotel on the Corner of Peel and Bridge Sts. Print and photo by John Phillips. Second copy added 13/4/2009 - see history .1 - Black and White photograph mounted on heavy cardboard backing, used for display purposes. On rear of second print - "Copyright John Phillips 1968 Bridge St" and in bottom right hand corner "William Scott" and address label.tramways, trams, bridge st, stones corner, passengers, tram 28 -
 Ballarat Tramway Museum
Book, Ballarat Litho & Printing Co, "The Picturesque Folio of Ballarat - 'The Modern Athens", 1904
Forty two page book with red covers, titled "The Picturesque Folio of Ballarat - 'The Modern Athens". Sheets have been individually printed both sides, stapled and then glued to the covers. Cover - gives title and printer details First sheet - with a greetings sheet for Good wishes and seasons greetings. Has a printed date of 1905. See Inscriptions. Dated 22/11/1904. Pages 3 - 10 - a historical sketch of Ballarat, compiled by Lieut-Colonel R. W. Williams V.D. Pages 12 - 41 - photos of Ballarat and district - such as: Sturt St The Lakes Post Office - note the trams clock board - taken at corner of Lydiard and Sturt Streets, looking east. The Gardens Queen Victoria Square Lydiard and Sturt St with a horse tram in the photo Victoria Park Eureka Monument The Statues Botanical Gardens Benevolent Asylum Hospital The City Oval - Richards & Co Photograph Fairy Land - the Lake Railway Station with a D class loco waiting for a signal, 3 post home before the level crossing. Has Irwin's Provincial hotel in view. Gong Gong Lake School of Mines and Methodist Church Lake Fountain A Ballarat view - 1853 - 54. View Point Gong Gong reservoir embankment South Star Mine Lal Lal Falls Band & Loch Mine On last page has the logo for the printers - Ballarat Litho & Printing Co, successors to F. W. Niven & Co. 56 and 58 Lydiard St. Ballarat. PDF scan of book added 21/9/2019 as btm3326i.pdfOn first page in black ink " to Chorus? Dodds, from Robert Dodds, and dated 22 Nov 1904.trams, tramways, ballarat, horse trams, sturt st, gardens, railway station, hospital -
 Ballarat Tramway Museum
Document - Photocopies, Alan Bradley, "The Ballaarat Tramway Company Limited - Half Yearly Reports", c1995
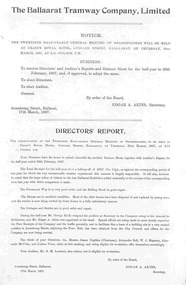
Set of A4 photocopies of 6 years of half yearly reports of The Ballaarat Tramway Company Limited (Horse Trams) from 3/1897 to 9/1902. All reports except the last one comprise a two sheet printed or typeset report giving notice of meeting, directors report, statement of assets and liabilities, share structure and profit and loss account. The last report 9/1902 is typed, and lists assets and credits only on the profit and loss account. Meetings were held at Craig's Hotel, Lydiard St. The Directors report from 9/1900 note the forthcoming sale of the company to the British Insulated Wire Company Limited and the problems of finalising the sale. Photocopies from the Public Records Office of Victoria, Company Reports, obtained by Alan Bradley c1995. .1 - 3/1897 .2 - 9/1897 .3 - 3/1898 .4 - 9/1898 .5 - 3/1899 .6 - 9/1899 .7 - 3/1900 .8 - 9/1900 .9 - 4/1901 .10 - 10/1901 .11 - 3/1902 .12 - 9/1902 All reports signed by the Company Secretary Edgar A. Akins, except the last one, Geo A Grace. The report notes that Mr. Akins had passed away. Geo. Grace was appointed as Secretary Pro-tem. Items separated by yellow coloured A4 sheets.trams, tramways, ballaarat tramway company, horse tram, esco, british insulated wire company, annual reports, directors reports -
 Ballarat Tramway Museum
Slide - 35mm slide/s, Ben Parle, Jan. 1954
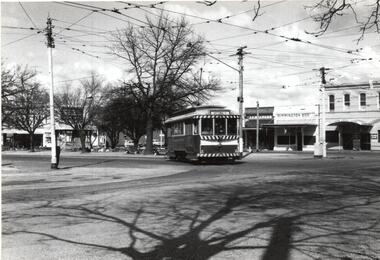
Kodachrome Transparency - 35mm slide - cardboard mount, with one side with red border and words "Kodachrome Transparency" top and bottom. On the other side is "Made in England" and "View from this side". Photo taken by Ben Parle 1/1954. Photo of Ballarat No. 14, leaving the Victoria Ave. or View Point Loop, Wendouree Parade, northbound past the View Point Hotel to the View Point terminus. Note the wiring through the loop has been altered to run via the straight track only. See Reg Item 5514 for Wal Jacks notes on this removal of the trolley wire. "View Point Ballarat" "1/54"tramways, trams, wendouree parade, view point, victoria ave loop, tram 14 -
 Ballarat Tramway Museum
Slide - 35mm slide/s, Ben Parle, 5/04/1958 12:00:00 AM
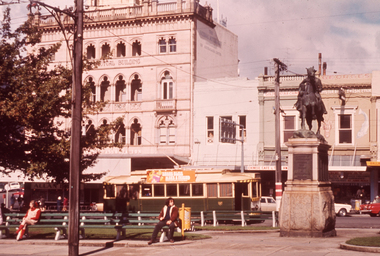
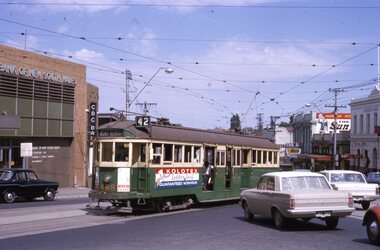
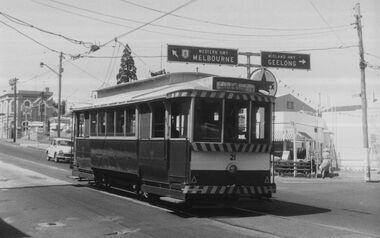
Kodachrome Transparency - 35mm slide - cardboard mount, with one side with red border and words "Kodachrome Transparency / Processed by Kodak" top and bottom. Photo taken by Ben Parle 5/4/1958. Has slide No. "16" stamped in red in top corner. Photo of the No. 41 and 21 at the Victoria St terminus, with another single truck tram behind. No. 21 has destination of Special. Both trams are carrying the AETA special car auxiliary signs. Passengers are walking across to the service car - note the level of traffic on the main highway to Melbourne. Group of AETA travellers standing on the right hand side of the photo. Meagher's Hotel can be seen on the left hand side. Note the tram stop signage at the terminus. For high resolution scan see btm2849h.tif"Victoria St line" "5-4-58"tramways, trams, victoria st, aeta, tram 21, tram 41 -
 Ballarat Tramway Museum
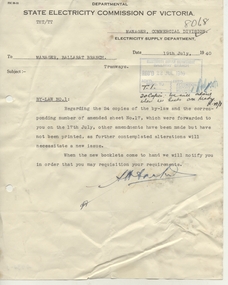
Document - Letter/s, State Electricity Commission of Victoria (SECV), "Tramways By-Law No. 1", Nov. 1940
Yields information about the distribution of the SEC tramway by-laws to workers and need to bring to attention to tramway staff, the rules regarding entering hotels and being intoxicated.Set of three letters or copies that involved the publication of the SEC's "Tramways by-Law No. 1" and Rules Governing Employees in 1940. .1 - From Manager Commercial Division, to Manager Ballarat - regarding amendments to the By-Laws (Sheet 17) and future documents - quarto paper, typed, 19/7/1940. .2 - Engineer and Manager (Head Office) regarding reminding employees of Rule No. 23, Rules Governing Employees - about entering hotels and intoxicating liquors, following up a recent case and asking him to send a memo out. Quarto paper, typed, 15/11/1940. .3 - Copy of Memo re above, dated 19/11/1940. to the Tramway Inspectors, quarto, carbon copy - green paper.trams, tramways, by laws, sec, hotels, rules, alcohol -
 Ballarat Tramway Museum
Film - Movie Film & Box, Kodak, 1960 to 1971
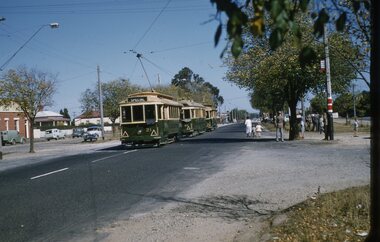
Yields information in movie film format of Ballarat trams in 1960 through to 1971, how the system operated and was used by people, including special trams., Yields information in movie film format of Ballarat trams in 1960 through to 1971, how the system operated and was used by people, including special trams.Movie film - 8mm, approx. 15 mins, without leader strip on a plastic reel, within a clear plastic case - Standard 8, titled "Ballarat Trams". See Reg Item 4957 for DVD and Mini DVD. Has been transferred to DVD - see Reg item 4957 Made by Arthur Hill. Also transferred to DVD by Rod Cook Oct. 2015, via Roger Greenwood for use in his DVD, "The City of Ballarat Trams, Gardens & Gold" of 2016. See Reg Item 6883. In Arthur's letter - on file - Made between 1960 and August 1971. Synopsis: based on time. Between 1960 and 1968 0:00 Trams Ahead sign before the Victoria St terminus with 20 at terminus 0.14 - No. 20 leaving Victoria St terminus and being followed along Victoria St by car and then passengers jointing the tram at a tram stop. 00.40 - No. 12 (c1960) in bound along Lydiard St North and arriving in the Gregory St loop. 00.56 - No. 12 and 14 crossing at Gregory St. 01.20 - No. 33 and a bogie car crossing at depot loop. 01.31 - No. 18 travelling along Wendouree Parade with the Lake in the background. 01.42 - No 41 at depot junction and running into the depot No. 2 road with a short sequence of a tramway signal. 02.17 - SEC Sign at the depot gate, shot of 41 in No. 2 road, with the lights other way around, Caution beware of trams sign and a red signal. 02.31- Timetable sign at Gardens Loop 02.36 - No. 30 arriving at Loop and view of a signal with no lights showing. 02.48 - Destination roll being changed through a number of destinations. 03.26 - No. 20 arriving at Carlton St loop with the Olympic monument in the background and the red signal light going out. 03.31 - a lady standing at the front of No. 20, with an ice cream in hand, and No. 17 arriving at the Carlton St loop with a short sped up sequence and No. 20 departing from the loop, followed by No. 17 leaving the loop, heading into the city. 03.41 - No. 13 inbound from Sebastopol crossing Albert St and heading into the city. 04.12 - view of signal and contactor, the light going green and the tram passing underneath. 04.24 - No. 12 at the Sebastopol terminus and departing. 04.51 - No. 12 crossing Albert St Sebastopol. 05.16 - Following No. 12 along Albert St, with Borough Offices in background initially. 05.28 - No. 12 arriving at the Grey St loop with No. 14 arriving at the loop from the city and both trams departing. March 1971 05.58 - No. 30 being followed along Barkly St, Mt Pleasant and the pole being turned at the terminus 06.32 - No. 30 picking up a lady passenger. 06.38 - view from the front of a tram, with the drivers hand and a cigarette, view from the back of the tram, along the Mt Pleasant route and running through the loop and then turning into Main St - has the Ballarat (East) fire station in one sequence, and finally running along Main St. 07.35 - view from tram, with car turning into Bridge St. and then running into Sturt St passed the Parking Loop, and along Sturt St. 08.32 - Points at Drummond St North being changed, doors changed over and the tram running along Drummond St. North, through the Mill St loop and into Macarthur St and in Wendouree Parade, with the Lake Wendouree in view and crossing No. 12 at the Depot Loop, with crews chatting, past the depot, a lady passenger getting off the tram near Forest St., and arriving at Gardens Loop with the same lady passenger who got on in Barkly St, getting off the tram. 11.09 - view of No. 30 at Gardens Loop, departing the loop. August 1971 11.30 - R761 crossing Melton (Exford Wier) on the special train to Ballarat and then the bridge between Ballan and Gordon Stations. 12.16 - View from the front of a tram, following No. 26 along Lydiard St North, crossing at Gregory St and returning to the City. 12.39 - No. 14 and one other tram running along Albert St to Sebastopol, crossing No. 21 at Grey St and then to Sebastopol terminus, crossing Albert St and return and running along Albert St. 13.36 - No. 26, 39 crossing 13 at Gardens Loop. 14.00 - view looking across Lake Wendouree. 14.07 - 26 arriving at Victoria St, running part of Destination roll, passengers getting off with hotel in the background, trolley pole being turned and then with 39 following tram along Victoria St, crossing at the King St Loop. 15.07 - view of a trolley pole tracking through the overhead at curve 15.10 - end. Written labels giving title information on reel.trams, tramways, ballarat, sebastopol, lydiard st north, victoria st, mt pleasant, lake wendouree, depot, tram 12, tram 13, tram 14, tram 17, tram 18, tram 21, tram 26, tram 33, tram 39, tram 41 -
 Ballarat Tramway Museum
Photograph - Digital image Set of 11, Stuart Loddington, 10 images of Ballarat trams prior to closure, 1971
Yields information about Ballarat Tramways and trams prior to the closure of the tramway system.Set of 11 digital images, comprising 1 donation text image and 10 images of Ballarat trams prior to closure, scanned from original slides by Stuart Lodington, 1971 prior to closure of the system. .1 - Donation text slide. .2 - No. 26 southbound in Lydiard St North, with the Ballarat Railway Station level crossing gates in the background. .3 - No. 27 and 30 crossing at Bell St Loop, Skipton St. (see also btm4976i4) .4 - No. 17 Wendouree Parade, near Gardens Loop .5 - Single truck tram at Victoria St terminus, taken from the west side of the Buninyong Rail line bridge, with CRB Roadwork sign, Eureka Caravan Park and Meagher Hotel in the background, possibly No. 11, see entry for .10 .6 - No. 12 and 30 crossing at the Urquhart St Loop, Drummond St South. .7 - No. 12 westbound in Sturt St, with Grenville St in the background. .8 - No. 17 at Gardens Loop with the Trolley pole being reversed. .9 - No. 30, Lydiard St North with Reid's Palace building in the background. .10 - No. 11 passing over the Buninyong rail line bridge, with Gardens via Sturt St West and a Twin Lakes sign. Has a number of children alongside the driver. .11 - No. 21 heading northbound in Wendouree Parade, Gardens, just to the north of the now BTM depot junction.trams, tramways, ballarat, level crossings, buninyong railway, lydiard st north, bell st, victoria st, wendouree parade, gardens, drummond st, sturt st, tram 26, tram 27, tram 30, tram 17, tram 12, tram 21, tram 11 -
 Ballarat Tramway Museum
Photograph - Digital image Set of 10, Stuart Lodington, 1971
Set of 10 digital images of Ballarat trams prior to closure, scanned from original slides by Stuart Lodington, 1971 prior to closure of the system. .1 - No. 32 entering the depot from Wendouree Parade, with the Lake in the background. Shows the depot fire alarm on an adjacent pole. .2 - No. 26 at Sebastopol, before turning the pole. Has a bus stop sign on a pole already. .3 - No. 27 and 26? crossing at the Bell St loop in Skipton St. No. 27 has a Twin Lakes sign. .4 - No. 32 outbound to the Gardens in Hamilton Ave about to enter Wendouree Parade with Loreto convent and Olympic monument the background. .5 - No. 26, Albert St Sebastopol, approaching the Sebastopol terminus, with Sebastopol Food Stores building on the left of the photo. .6 - No. 12 leaving the Parker St. Loop, Sturt St West after crossing a tram. No. 12 has destination of Victoria St. .7 - No. 12 inward bound in Lydiard St North with Fine Art Gallery in the background, 3BA. No. 12 has destination of Sebastopol and has a Twin Lakes sign. .8 - No. 12 inward bound, Sturt St West, No. 12 has destination of Victoria St and has a Twin Lakes sign. .9 - No. 26 at Sebastopol terminus, outside the Royal Mail Hotel, has a bus stop sign on a pole. Tram pole yet to be turned, but destination adjusted to Lydiard St. North. .10 - No. 12 at Sebastopol terminus, outside the Royal Mail Hotel. No. 12 has destination of Lydiard St Nth and has a Twin Lakes sign.trams, tramways, ballarat, sturt st west, sebastopol, skipton st, wendouree parade, hamilton ave, depot, depot junction, parker st loop, bell st, lydiard st nth, tram 32, tram 26, tram 27, tram 12 -
 Ballarat Tramway Museum
Photograph - Digital image Set of 8, 21/08/1971 12:00:00 AM
Yields information about the SEC Ballarat trams in the months before the closure of the SEC Tramway system. Yields information about the streetscape. Set of 8 Digital images, scanned from slides by Graeme Cleak, scanning by Peter Winspur 9/2011. .1 - Slide FS14 - No. 31 and 32 crossing at the High St Loop in Macarthur St. Tram 31 has the destination of Victoria St. Geoff Dean and his mini on the right hand side of the photograph. Another depot bound single trucker in the photograph, .2 - Slide FS3 - 31 outbound in Victoria St, with St Alipius church in the background. .3 - Slide FS5 - No. 31, and four other trams, some running special at Sturt and Lydiard Sts during the ARHS tour of that day. Has the ANZ Bank and SEC offices in the background. .4 - Slide FS9 - Nos. 39, 26 and two other trams in Lydiard St for the ARHS tour with Reid's Palace, Macleod & Co and J.J. Collier buildings in the background along with other buildings in Lydiard St North. Taken from the Provincial Hotel. .5 - Slide FS11 - No. 26 northbound showing Special running through the level crossing at Ballarat with the Kennedy Murray General Carrier in the background. Taken from the Provincial Hotel. .6 - Slide FS13 - No. 32 turning from Sturt St into Drummond Street North showing Depot via Drummond North, with the Southern Cross Hotel, Rimmington Bros and J.A, Malpass(?) buildings in the background. .7 - Slide FR35 - night shot of No. 17 (with Twin Lakes sign) and No. 32 in Nos 3 and 4 roads at the depot. .8 - Slide FR34 - night shot of the front of the depot - as above and No. 43 on "0" road. All photos 21-8-1971 trams, tramways, railway station, macarthur st, victoria st, sturt st, lydiard st north, level crossings, depot, tram 31, tram 32, tram 39, tram 26, tram 17, tram 43 -
 Ballarat Tramway Museum
Photograph - Digital image, c1971
Yields information about Ballarat streetscape and its trams in the closing days of the SEC tramway system.Digital image from a black and white print of tram 21 at the intersection of Bridge, Victoria Streets and Main Road, inbound to the Gardens via Sturt St West. Has the Caltex service station, the Munster Arms Hotel in the background. CRB Road signage for Melbourne and Geelong over the tram. At Stones Corner. Photo by Marc Dahlstrom c1971. On rear is the Marc Dahlstrom stamp.trams, tramways, bridge st, victoria st, main st, stones corner, tram 21 -
 Ballarat Tramway Museum
Postcard, V.S.M. Melbourne, ESCo crossbench car No. 19, c1906
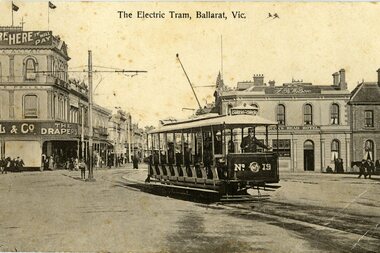
Demonstrates the early days of the Electric Supply Co of Victoria tram's in Ballarat, the use of cross bench or toast rack trams and the intersection of Grenville, Bridge and Sturt Sts Ballarat.Sepia toned photograph of ESCo crossbench car No. 19, at Sturt and Grenville Sts. with the Bucks Head Hotel in the background and Cowdell Tonner and Ellis drapers store on the corner of Bridge and Grenville St. The tram has the destination of Convent/Gardens. See Reg item 3885 for a photo of the store and a Toastrack tram. On the rear, divided areas for a message and address, place for a stamp and two 1d Australian postage stamps in the bottom right hand corner. In the stamp area, has the words "printed in Prussia" in very small type. On rear of card in top left hand corner "28)", along top edge "9383H $25" and in bottom right hand corner a "William F Scott" address label and "WFS Collection"trams, tramways, esco, toastrack tram, grenville st, bridge st, sturt st, tram 470 -
 Ballarat Tramway Museum
Photograph - Black & White Photograph/s, Wal Jack, 18/11/1961 12:00:00 AM
Yields information about Ballarat's trams in the late 1960'ss and the street scape in Victoria St?, Yields information about Ballarat's trams in the late 1960'ss and the street scape in Victoria St?Black and white print of Ballarat 35, northbound to Lydiard St North, crossing the Railway level crossing with Moodys Provincial Hotel and the Ballarat "B" signal box in the background. The tram has a roof advertisement for Ilford film. Note the entry canopy to the hotel. Two copies. Photo by Wal jack, 18/11/1961. Photo print courtesy of Port Dock Railway Museum, now the National Railway Museum. See worksheet 4311 for letter and details of prints sent to Bill Scott, 19/10/2001. Any photo credit to mention NRM Collection.On rear of copy 1 "SEC Ballarat / 35 / Lydiard St North / 18/11/61 2920 / Wal Jack " Copy 2 "DAC" in ink, bottom right hand corner.trams, tramways, lydiard st, ballarat railway station, level crossings, tram 35 -
 Ballarat Tramway Museum
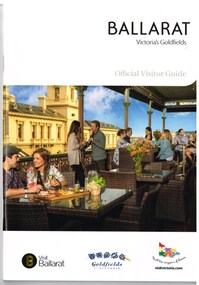
Book, The Ballarat Visitor Information Centre, "Ballarat Victoria's goldfields Official Visitor Guide", 2015
Full colour, 84 page, book, A5 size titled "Ballarat Victoria's goldfields Official Visitor Guide", with a photo of a people eating on the verandah of the hotel opposite the old post office. Gives details, maps accommodation listing, attractions etc of the Ballarat area. Page 14 detail the Ballarat Tramway Museum. Inside rear cover is a fold out map of the district, city centre, Buninyong and Mt Helen and Ballarat and Surrounds. Published 2015 by The Ballarat Visitor Information Centre. trams, tramways, ballarat, visitors, tourist guides, btm, gardens