Showing 1440 items
matching black photo album
-
 Ballarat Tramway Museum
Photograph - Black & White Photograph/s - set of 2, Keith Kings, 6/03/1954 12:00:00 AM
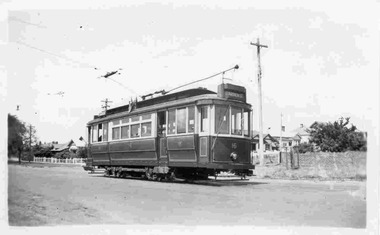
Black and White photograph contained with Reg. Item 1902 - Photo Album from Keith Kings to Les Denmead 1970. Photograph of SEC Geelong, No 16 at the Eastern Park terminus on 6/3/1954. Tram showing destination of "Garden St" Keith Kings No. I(x)(8) Scanning: i - image file, p - presentation file, b - back of photograph. 1929.1 - same photograph from the Wal Jack album, see Reg Item 5003, added 12/8/2013.Stamp in top left hand corner and handwritten number with "K.S. Kings No. I(x)(8) Copyright reserved". In blue ink "Geelong / No. 16 / "Pengelley" car as converted for "one-man" operation / Eastern Park terminus 6/3/54". 1929.1 - Stamp in top left hand corner and handwritten number with "K.S. Kings No. I(x)(viii) Copyright reserved". In blue ink "Geelong / No. 16 at Eastern Park terminus Royal visit day. / Note: Flags on roof."trams, tramways, geelong, eastern park, tram 16 -
 Ballarat Tramway Museum
Photograph - Black & White Photograph/s, Keith Kings, Geelong 28 on depot fan, 21/08/1955
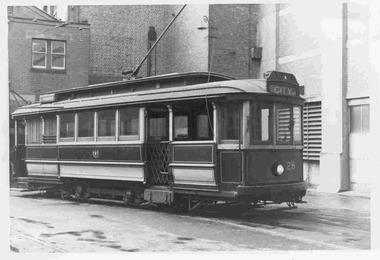
Photograph of SEC Geelong, No 28 on the depot fan, 21/8/1955. Tram showing the destination of "City". Has depot buildings and power station walls in the background. See item 8879 for a colour version. Keith Kings No. P(e)(4)Black and White photograph contained with Reg. Item 1902 - Photo Album from Keith Kings to Les Denmead 1970. Stamp in top left hand corner and handwritten number with "K.S. Kings No. P(e)(4) Copyright reserved". In blue ink "Geelong / No. 28 / Ex-Melbourne car, as altered for "one-man" operation / Depot / 21/8/55".trams, tramways, geelong, depot, tram 28 -
 Ballarat Tramway Museum
Photograph - Black & White Photograph/s, Keith Kings, 28/08/1948 12:00:00 AM
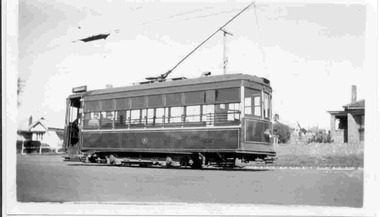
Black and White photograph contained with Reg. Item 1902 - Photo Album from Keith Kings to Les Denmead 1970. Photograph of SEC Geelong, No 14 at the Eastern Park terminus, 28/8/1948. Has some houses in the background. Keith Kings No. B(m)(6) Scanning: i - image file, p - presentation file, b - back of photograph.Stamp in top left hand corner and handwritten number with "K.S. Kings No. B(m)(6) Copyright reserved". In blue ink "Geelong / No. 14 / Birney Safety Car / Eastern Park Terminus / 28/8/48"trams, tramways, geelong, eastern park, tram 14 -
 Ballarat Tramway Museum
Photograph - Black & White Photograph/s, Keith Kings, Feb. 1951
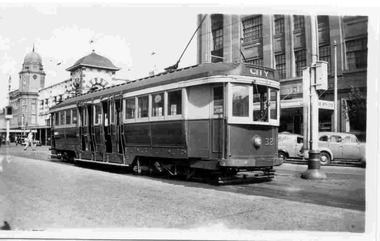
Black and White photograph contained with Reg. Item 1902 - Photo Album from Keith Kings to Les Denmead 1970. Photograph of SEC Geelong, 32 in Malop St at Moorabool St. City, 2/51. Has CML building in the background and other buildings in Malop St. Also has a bar style traffic light in the left hand edge of the photo. Keith Kings No. E(q)(1) Scanning: i - image file, p - presentation file, b - back of photograph.Stamp in top left hand corner and handwritten number with "K.S. Kings No. E(q)(1) Copyright reserved". In blue ink "Geelong / No. 32 / Malop St. at Moorabool St., City / 2/51"trams, tramways, geelong, malop st, moorabool st, tram 32 -
 Ballarat Tramway Museum
Photograph - Black & White Photograph/s - set of 2, Keith Kings, 21/08/1955 12:00:00 AM
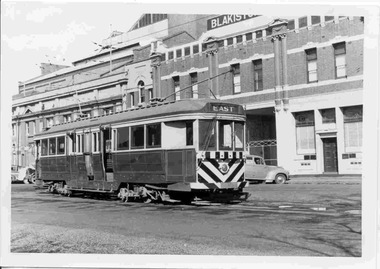
.1 - Black and White photograph contained with Reg. Item 1902 - Photo Album from Keith Kings to Les Denmead 1970. Photograph of SEC Geelong, 37, fitted with dash canopy lighting and tiger stripes outside the depot, 21/8/1955. Tram has destination of "East". Name of "Blakistons" on building in background. Photo on back has number "l 012A and 14.5.70" in black ink, possibly indicating date of making print. Keith Kings No. P(d)(5) .2 - Black and White print contained within the Wal Jack Bendigo and Geelong Album, see Reg Item 5003 for more details. Details as above..1 - Stamp in top left hand corner and handwritten number with "K.S. Kings No. P(d)(5) Copyright reserved". In blue ink "Geelong / No. 37 / As fitted with dash lighting / Outside depot / 21/8/55". .2 - Stamp as above. In blue ink "Geelong No. 37 Zebra painted ends and canopy. Only ex P&MTT bogie thus. (All ex HTT bogies thus) 21/8/55". trams, tramways, geelong, depot, blakistons, tram 37 -
 Ballarat Tramway Museum
Photograph - Black & White Photograph/s, Keith Kings, 8/01/1955 12:00:00 AM
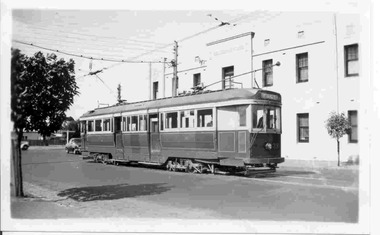
Black and White photograph contained with Reg. Item 1902 - Photo Album from Keith Kings to Les Denmead 1970. Photograph of SEC Geelong, 39 at West terminus. Date of photograph 8/1/1955. Tram has destination of "EAST". Keith Kings No. L(k)(8) Scanning: i - image file, p - presentation file, b - back of photograph.Stamp in top left hand corner and handwritten number with "K.S. Kings No. L(k)(8) Copyright reserved". In blue ink "Geelong / No. 39 / As converted for "one-man" operation. / West terminus 8/1/55."trams, tramways, geelong, west, tram 39 -
 Ballarat Tramway Museum
Photograph - Leaf from a photo album, 1920s
... Leaf from a photo album containing 4 black and white... album containing 4 black and white photographs pasted onto sheet ...Leaf from a photo album containing 4 black and white photographs pasted onto sheet of brown/grey cardboard with two punch holes at one end. Photos taken early 1920's or just after construction of the Memorial Arch. Photo 1 - "Ballarat" handwritten in pencil at top - Town Hall from the North West taken from a building near Doveton St. Has a Sebastopol tram west bound in Sturt St. passing Town Hall. Photo 2 - "Sturt Street Ballarat" handwritten in pencil at base - Sturt St. Ballarat looking east from most likely the Ballarat City fire station lookout tower. Has a Sebastopol tram travelling eastbound in the photograph. Town Hall in background. No motor vehicles in photograph. Photo 3 - "Memorial Arch, Ballarat" handwritten in pencil at top - photo of the new Memorial Arch at the start of the Avenue of Honour. Photo 4 - "Eureka Stockade, Ballarat" - photo of the Eureka Stockade monument the park.trams, tramways, ballarat, sturt st, memorial arch - avenue of honour, eureka -
 Ballarat Tramway Museum
Photograph - Leaf from a photo album, 1920s
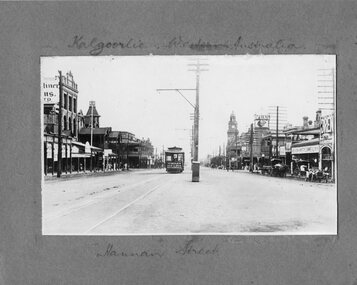
... Leaf from a photo album containing 2 black and white... Springs Kalgoorlie Hannan St Leaf from a photo album containing 2 ...Leaf from a photo album containing 2 black and white photographs pasted onto sheet of brown/grey cardboard with two punch holes at one end. Photos taken early 1920's? Photo 1 - "Kalgoorlie Western Australia" in pencil on top of photo, and "Hannan Street" on bottom. Photo shows a tram traveling along Hannan Street with buildings on either side of photograph. Has poles down the centre of the street to support the bracket arms for the tramway and other power lines. Tram has "Nestles Milk" advertisement on dash panel. Photo 2 - "Breakneck Gorge Hepburn" in pencil at base of photograph.trams, tramways, hepburn springs, kalgoorlie, hannan st -
 Ballarat Tramway Museum
Photograph - Black & White, The Courier Ballarat, Tram 17 and S E Dickins, 1/10/1949 12:00:00 AM
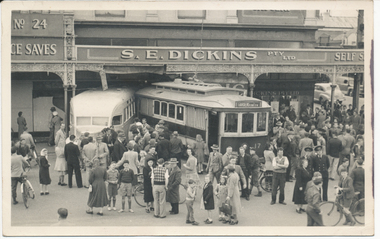
SEC Tram 17 and a former bus used as a food vendor stand, that has finished up in the front of S.E. Dickins Pty Ltd. (Grocers) store 1/10/1949. The tram derailed at the intersection of Sturt and Grenville St. collided with the bus and pushed it into the front of the store. Many people standing around the incident, including two trammies in front of the tram. Thought to be a Ballarat Courier Photograph. Wal Jack's caption advises the Bedford van was a doughnut kitchen. 1020.1 - added 3/06/2006 - small newspaper cutting with the same photo and a caption "While the driver was picking up lunch at Ashkar's pie shop, his tram ploughed into Dickin's grocery, on the present site of Norwich Plaza". Probably from The Courier, and date unknown. 1020.3 - as for 1020, from the Jack Richardson Collection with Wal Jack comments on rear. Comments on rear - see btm1020i4. Photo caption advised 1/10/1949. On Kodak Velox paper. See Reg Item 5587 for newspaper reports and 6858 for other photographs. See image i7 for high res scan of album photograph. See image i8 for high res scan of negative - on a large format size neg - most likely purchased from The Courier. Scanned at 3200dpi. Yields information about Ballarat 17 in an accident with a bus used a doughnut kitchen and S.E. Dickins Store, Bridge St Ballarat.Set of images and a copy negative of a Black and white photograph of an accident.See image trams, tramways, grenville st., accidents, s.e. dickins, tram 17 -
 Ballarat Tramway Museum
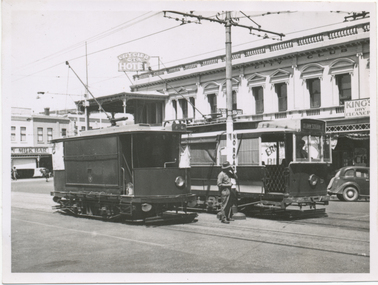
Photograph - Black & White Photograph/s, John Buckland, 23/12/1946 12:00:00 AM
Black and white photograph of Bendigo track cleaner/sprinkler and ESCo No. 9 at the Pall Mall tram stop just to the south of the Fountain at Charing Cross. ESCo 9 has been modified (See Kings Bendigo Tramways p54). Sprinkler car has trolley pole facing Golden Square, as has No. 9. Pole by the trams have signs "ALL CARS STOP HERE" and a "NO ROAD" sign. Photo taken 23/12/1946. 676.1 - Black and White print contained within the Wal Jack Bendigo and Geelong Album, see Reg Item 5003 for more details. Added 2/7/2013. See The Bendigo Tramways, K.S.Kings On rear typed is "SECV Bendigo Tramways Car 9 and Track Grinder at Charing Cross 23/12/1946" and stamped in but rh corner "Photograph by John Buckland" trams, tramways, bendigo, esco, work trams, tram sprinkler, scrubber, tram 9 -
 Ballarat Tramway Museum
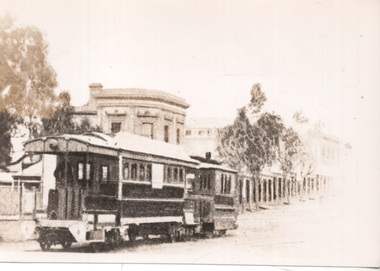
Photograph - Bendigo Steam tram View St, Between 1890 and 1903
Photograph of a steam hauled tram in Bendigo - View St. Steam tram is hauling a bogie trailer. Rear view, trailer closest to the camera. Shops and offices in background. Outside edges of older photograph are apparent in the photograph. Photographer assumed to be G.Eardley, same handwriting as for 678 or from his collection. 677.1 - Black and White copy print contained within the Wal Jack Bendigo and Geelong Album, see Reg Item 5003 for more details. Added 1/7/2013 Copy negative from the Wal Jack collection of negatives added 11/6/2020 - scanned at hires - see image i4. See The Bendigo Tramways, K.S.KingsYields information about Bendigo Steam tram operations.Black and white photo copy print.On rear in ink "Bendigo Steam Tram" & "G.H.Eardley Collection" .1 - "Bendigo steam tram and trailer in View St Bendigo"trams, tramways, bendigo, steam trams, view st -
 Ballarat Tramway Museum
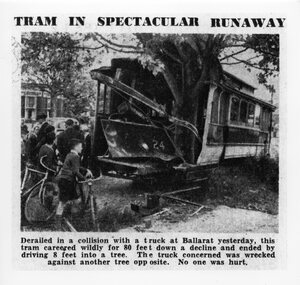
Photograph - Black & White Photograph/s, The Age, 2/12/1941 or 1/12/1941
Yields information about the accident that involved a tram hitting a tree after being derailed and amount of damage done at the time.Black and white photographic reproduction print of a photograph that appeared in The Age Newspaper on 3/12/1941 of an accident involving Ballarat Tram No. 24 running away following a collision in Drummond St. South and hitting a tree at the corner of Dana St. on 2/12/1941. Photograph has the heading and caption. Made in March 2000 by the State Library of Victoria from a copy of the newspaper held in their collection. A similar photograph also appeared in the Courier. The Age copy was in better condition. Hi Res scan added 25/3/2011. See Reg item 5306 for a different photo, but a very good photo, original print - Wal Jack album and gives date as 1-12-1941.On rear of photograph at the bottom is a sticker - "Reproduction rights reserved - Copied by State Library of Victoria"trams, tramways, accidents, ballarat, drummond st, runaway, tram 24 -
 Ballarat Tramway Museum
Photograph - B&W print of donated negative - set of 4, State Electricity Commission of Victoria (SECV), 1938
Yields information about Ballarat 's 23, ex Adelaide when decorated for the 1938 state celebrations, school children on the tram and conductors, a view of the tram at night and the formal launch of the tram by the SECSet of three Black and white photo prints from a collected negative of Ballarat (SEC 1st) No. 23 decorated for the centenary of settlement in the Ballarat district in 1938. 1362.1 - Photographed in the depot fan, showing 'SPECIAL', has depot buildings in the background. 1362.2 - Night photograph of the tram at a loop - showing "Lydiard St. North'. 1362.3 - Night photograph, possibly at the Official Launch, with a large group of mainly hatted gentlemen standing for the photo by the tramcar, with the Motorman at the controls. 1362.4 - same print as 1362.1, but taken from a photograph album - 3 copies, added 15/6/2009, donation ex William F. Scott. See also Reg Items 1021, 1361 and 3813 for other photographs of this tram and 2524 for notes regarding the Official Launch and another photograph.. Copy 2 - of all above photographs added 31/7/2007, ex Alan Bradley 5/2007 - larger size prints. See Reg Item 3909 for an original mounted print of 1362.3. See Reg Item 3910 for an original mounted print of 1362.2. See Reg Item 3911 for an original mounted print of 1362.1. High res scans of negatives changed over 13/5/2020. See page 70 & 71 of "The Golden City and its Tramways" for these photographs and others in use and notes.1362.4 - "Ballarat car 23 / Basil W. Miller Collection"tramways, trams, centenary, decorated trams, special trams, floral tram, tram 23 -
 Ballarat Tramway Museum
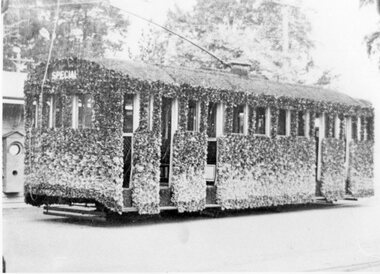
Photograph - Black & White Photograph/s, State Electricity Commission of Victoria (SECV), 1939
Yields information about Ballarat 's 29 decorated for the 1939 Ballarat Floral Festival and its appearance.Black and white photograph of SEC No. 29, decorated for the 1939 Floral Festival. Photographed in the depot yard, with the depot buildings and Bundy Clock in the background. See also Reg. Item 1363 for another photo of the tram at Depot Junction. Tram showing "SPECIAL". See Reg. Item 2911 for a Newspaper photograph of this tram with hostesses. Colour photocopy, laminated, of this photograph on display 5/2000 at 02-02-06 Copy 2 - added 31/7/2007, ex Alan Bradley collection of photographs 5/2007, poor print. Very similar photo from the Wal Jack album see - btm5189.trams, tramways, 1939 floral festival, floral tram, decorated trams, special trams, depot, tram 29 -
 Ballarat Tramway Museum
Photograph - Black & White Photograph/s, Wal Jack, Ballarat 25 leaving for Bendigo
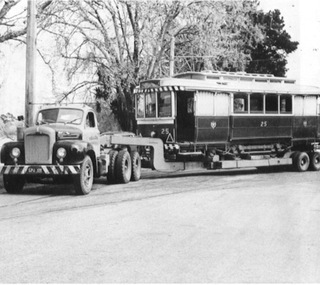
Yields information about the loading and departure of Ballarat No. 25 to Bendigo in 1960.Reproduction of illustration of Ballarat No. 25 leaving the Wendouree Parade depot for Bendigo on 6/10/1960. As printed in Newsrail, April 1984 issue on page 111. Photo shows Yellow Express Mack prime mover GPU 328 with Ballarat Tram No. 25 loaded and leaving the depot. Tram has destination box removed. Also the process of fitting the dash canopy lighting had commenced, with the small white stripe painted under the windows. Also would appear trolley pole base has been removed. Gives photographer as Doug Colquhoun Pages 111 to 114 of the magazine, centre page of the April issue only. Centre page photo of train at the Apex siding, Kilmore East. 1478.1 - Same photo - digital image from the Wal Jack album. Wal's notes gives the time of the photograph as 10.40am. 1478.2 - same photo - print supplied to Alan Bradley by Doug Colquhoun. See image i4 for the rear of the photograph. See Reg Items 1478, 5241, 5242, 7759 and 7766 for a series of 5 photos of this event..1 - On rear of photograph in ink "SEC, Ballarat Loading No. 25 on Yellow Express Loader outside Wendouree Depot before leaving for Bendigo. 6-10-1960." and in top Right hand corner Wal Jack stamp with "Neg to Doug" written in. .2 - has Douglas A. Colquhoun stamp on rear - with details - see image i4. trams, tramways, yellow express, transporting trams, moving trams, bendigo -
 Ballarat Tramway Museum
Postcard, Valentine & Sons Publishing Co, Sturt St. from top of the Nichol and Allen Building in Grenville St, c1910
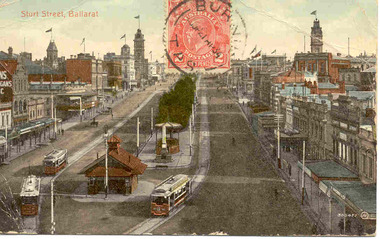
Printed colour postcard of the east end of Sturt St. from top of the Nichol and Allen Building in Grenville St looking west. Titled "Sturt St Ballarat" in the top left-hand corner. Has three ESCo trams in the image, at the east end of Sturt St. In the bottom left-hand corner is the number "300477" and the initials "JV" within a circle. A 2d Australian stamp, cancelled with the postmark "Burnie Tas 21Ap 34" is in the top centre of the postcard. Image taken early in the days of the Ballarat electric trams, with no windows and no rooftop destinations. Appears to be the same tram possibly three times - looking at the number on the tram in detail. On the rear of the postcard is the address to a "Mme Helen Ferrando, Sori, Genova Italy" in black handwritten ink, while in the left-hand half of the postcard, typed in light purple ink is "Arthur H. Rubock, 23 Wilmot St., Burnie, Tasmania USCE 23897" (could be US Corps of Engineers) and the postmark of "Sori Genova. / 28.5.34". The printer of the card is "The Valentine & Sons Publishing Co. Ltd, Melbourne and Sydney" 2433.1 - Digital image of the same postcard from the Wal Jack album of Ballarat Photos - 5100-7-C, scanned as images .3 and .4 and high-resolution scans. On the rear in ink "Ballarat about 1912" and "Old type trams" 2433.2 - Card from Wal Jack to Ken Magor - see image 6 for a scan of the rear. Wal notes that the front of the cars have been outlined incorrectly. Yields information the buildings, buildings and scene at the intersection from Grenville and Sturt Sts looking west with three trams.Postcard - divided back, used with postage stamp on front. Two copies held along with a digital image. On the second copy, has Ken Magor's stamp and a note from Wal Jack to Ken.See images.trams, tramways, esco, sturt st, postcards, grenville st -
 Ballarat Tramway Museum
Album - Photo Album, State Electricity Commission of Victoria (SECV), "Photographs of Ballarat Tramways Rolling Stock & Track Reconditioning Works", 1935
Yields information about the condition of the ESCo tram fleet at the time of the SEC takeover of the operations their appearance, the reconstruction work and trackwork to rehabilitate the system. Demonstrates an important era of the Ballarat Tramways through the SEC preparing an album of photographs. The completeness of the record adds to the significance.Photo Album - comprising folded manila card covers, 11 photo sheets each with two, one with three black and white photos. Has three metal - steel fold back clips holding the sheets together. Folded so that the metal clips are not exposed on the outside. Has the title "Photographs of Ballarat Tramways Rolling Stock & Track Reconditioning Works". Album contains 23 photos, glued to the manila sheets - assembled by the SEC. All SEC photos except as noted below. Each of the photographs have been separately registered, as shown in the table below. Scanned images made of photos. Conservation Notes prepared - within the cataloguing sheet. Inside cover Typed notes, dated 1935, of the early trams of Ballarat, trailers ex Sydney, new trams ex Melbourne in 1930, and a further 5 in 1931. Lists the original Brill trams still in service (9 Number), and a noted on the recent scrapping of No. 11. Also had a note re the Sebastopol cars and the timber quality used in their construction - see hi Res image btm3000h-cover.jpg (added 16-12-2015) Folio Reg. Notes Item No. 1 3001 ESCo 14 see also Reg Item Image 755 for early copy. 3002 ESCo 21 ditto 1354. 2 3003 ESCo 1 ditto 756 3004 ESCo 1 ditto 758 3 3005 SEC 30 1357 and N204 3006.1 Interior photo 3006.2 Interior photo 4 3007 189 1356 and N203 3008 SEC car? 5 3009.1 Track work at Grenville St 3009.2 Track work at Grenville St with 27 in photo. 6 3010 Official party for launch of new rolling stock 1935 - Richards & Co photo 3011 No 30 on ditto - Richards & Co photo 7 3012.1 Interior photo of ex MMTB car 3012.2 ditto 8 3013.1 Track reconstruction photo 3013.2 ditto 9 3013.3 ditto 3013.4 ditto 10 3013.5 ditto 3013.6 ditto 11 3009.3 ditto - City Loop (See note below) 3009.4 ditto - Grenville St It would appear or is possible that folio 5 is out of position relative to No. 10 and 11. This is given the location of the photographs contained and would be more consistent with that of No. 11. Also the silverfish damage to the photographs would be consistent. The folio arrangement has been left as found, although catalogued to the follow style of photographs. Photos not to be taken out of the album unless for photographic copying. Use image files.Handwritten notes re trams history under each photo on sheet 1 in pencil., On front cover in ink "Ballarat Tramway Preservation Society Catalogue No. 601"trams, tramways, ballarat, reconstruction, tramcars, esco, mmtb, new trams -
 Ballarat Tramway Museum
Photograph - Black & White Photograph/s, State Electricity Commission of Victoria (SECV), 1935
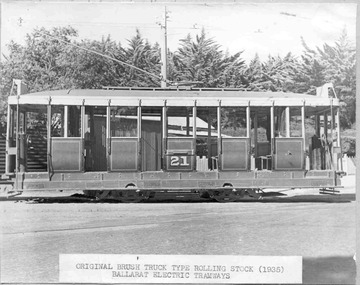
Yields information about the condition of the ESCo tram fleet at the time of the SEC takeover of the operations their appearance and in particular tram Sebastopol type car No. 21.Black and White photograph contained within Reg. Item 3000 - Photo Album produced by the SEC in 1935 titled "Photographs of Ballarat Tramways Rolling Stock & Track Reconditioning Works". Photo of Ballarat tram (ESCo or Sebastopol type) No. 21 on the depot fan at Ballarat. Side on photograph with caption "Original Brush truck type rolling stock (1935) Ballarat Electric Tramways". Taken by the SEC to illustrate the type of equipment on site in 1935. The caption has been adhered to the photograph. See also Reg. Item 1354 for copy prints. 3002i1 - digital image of photograph with pencil notes around the edge of the photograph included added 15-7-2014. Photos not to be taken out of the album unless for photographic copying. Use image files. Handwritten notes re tram history under photo in pencil - "Specially built 1913 for Sebastopoltramways, trams, esco, secv, tramcars, ballarat, tram 21 -
 Ballarat Tramway Museum
Photograph - Black & White Photograph/s, State Electricity Commission of Victoria (SECV), 1935
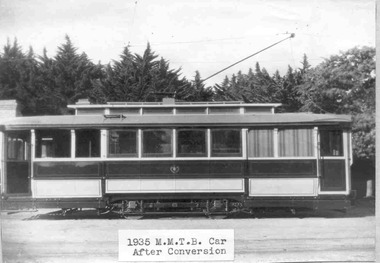
Yields information about the rehabilitation of the Ballarat ESCo trams and new trams acquired and refurbished by the SEC from Melbourne and in particular No. 30.Black and White photograph contained within Reg. Item 3000 - Photo Album produced by the SEC in 1935 titled "Photographs of Ballarat Tramways Rolling Stock & Track Reconditioning Works". Black and white photograph, Ballarat No. 30 following conversion work by the SEC to enclose the ends of the car for Ballarat conditions. Photographed in the depot yard 1935. Has a typed caption on the photograph "M.M.T.B. Car 1935. After Conversion. "The caption has been adhered to the photograph. See also Reg. Item 1357 for copy prints. tramways, trams, mmtb, secv, tramcars, ballarat, depot, tram 30 -
 Ballarat Tramway Museum
Photograph - Black & White Photograph/s - set of 2, State Electricity Commission of Victoria (SECV), 1935
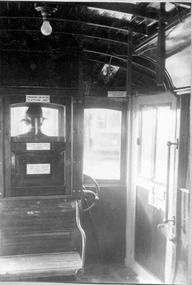
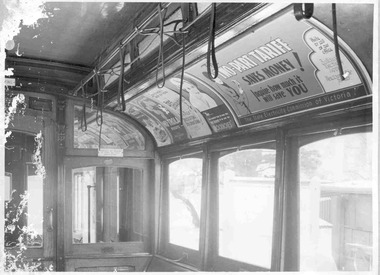
Yields information about the rehabilitation of the Ballarat ESCo trams and new trams acquired and refurbished by the SEC from Melbourne and the interiors of these trams.Two Black and White photographs contained within Reg. Item 3000 - Photo Album produced by the SEC in 1935 titled "Photographs of Ballarat Tramways Rolling Stock & Track Reconditioning Works". Two photographs of the front of a ex Melbourne M class car (one of the 30 - 33 series, most likely No. 30) given the seat behind the driver showing the re-arranged doors etc of these cars, following conversion. Shows the arrangement of the signs behind the driver, bells, doorways etc. Have an officer with hat sitting in the drivers position. Caption to the photograph typed on a piece of paper and adhered to the sheet under the two photographs is "Interior Views M.M.T.B. Car showing arrangement of entrances." tramways, trams, mmtb, secv, tramcars, ballarat, tram 30? -
 Ballarat Tramway Museum
Photograph - Black & White Photograph/s, State Electricity Commission of Victoria (SECV), 1935
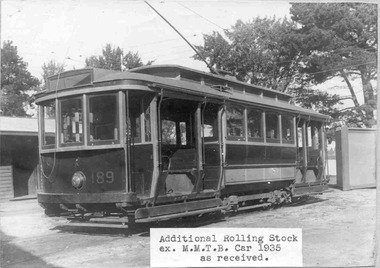
Yields information about the rehabilitation of the Ballarat tram fleet and the condition and appearance of the trams that were received from Melbourne to enable this.Black and White photograph contained within Reg. Item 3000 - Photo Album produced by the SEC in 1935 titled "Photographs of Ballarat Tramways Rolling Stock & Track Reconditioning Works". Black and white photograph, of ex Melbourne and Metropolitan Tramways Board No. 189, later to become SEC No. 33, in the Ballarat depot yard in 1935. Has caption on photograph of "Additional Rollingstock ex M.M.T.B. Car 1935 as received." Shows arrangement prior to any conversion work. "The caption has been adhered to the photograph. See also Reg. Item 1356 for copy prints. tramways, trams, mmtb, secv, tramcars, ballarat, rehabilitation, conversion, tram 189, tram 33 -
 Ballarat Tramway Museum
Photograph - Black & White Photograph/s, State Electricity Commission of Victoria (SECV), 1935
Yields information about the rehabilitation of the Ballarat ESCo trams and new trams acquired and refurbished by the SEC from Melbourne and in particular No. 30.Black and White photograph contained within Reg. Item 3000 - Photo Album produced by the SEC in 1935 titled "Photographs of Ballarat Tramways Rolling Stock & Track Reconditioning Works". Black and white photograph, of ex MMTB M class tram following its conversion into the Ballarat style of entries and repainting. Could be No. 30. Has caption on the bottom of the photograph "1935 M.M.T.B. Car after Conversion" The caption has been adhered to the photograph. See also Reg. Item 1357 for copy prints. tramways, trams, mmtb, secv, tramcars, ballarat, rehabilitation, conversion -
 Ballarat Tramway Museum
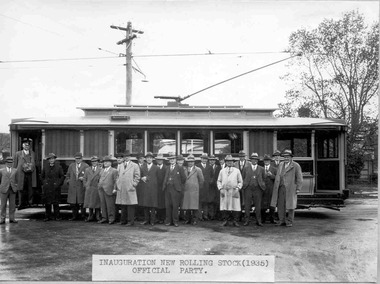
Photograph - Black & White Photograph/s, Richards & Co Ballarat, Inauguration of the new rolling stock, Sep. 1935
Black and white photograph, of a large group of gentlemen (Official Party) standing along No. 30 (see Reg. Item 3011 for launch photo) during the inauguration of the new rolling stock during 1935. Note the Mayor Cr. Martin standing in the front doorway of the tram wearing a cap and a conductor's bag. Has a caption "Inauguration New Rolling Stock (1935) - Official Party", which has been adhered to the bottom of the photograph. In the bottom right hand corner of the photograph has the imprint "Richards & Co Ballarat". See Reg. Item 2965 for date of photo - 9/1935. Photos not to be taken out of the album unless for photographic copying. Use image files. Yields information about the rehabilitation of the Ballarat ESCo trams and new trams acquired and refurbished by the SEC from Melbourne and in particular No. 30 and the official launch of the tram by the SEC with a large number of officials and invited guests.Black and White photograph contained within Reg. Item 3000 - Photo Album produced by the SEC in 1935 titled "Photographs of Ballarat Tramways Rolling Stock & Track Reconditioning Works".tramways, trams, secv, tramcars, ballarat, rehabilitation, conversion, tram 30 -
 Ballarat Tramway Museum
Photograph, Richards & Co Ballarat, Inauguration of the new rolling stock, Sep. 1935
Black and white photograph, of Cr. M. Martin driving No. 30 during the inauguration of the new Ballarat rolling stock during 1935. The Councillor is wearing a SEC drivers cap and a conductors cash bag. See also Reg. Item 3010 for the Official Party photograph. Photographed in Drummond St. North? with a crossing loop behind. Tram has "Special" showing. In the bottom right hand corner of the photograph has the imprint "Richards & Co Ballarat". See Reg Item 2965 for the same photo of this item in SEC May 1936 issue of "Contact", which gave the date of September 1935. 3011.1 - Digital image from the Wal Jack Ballarat Album of the same photograph. Photos not to be taken out of the album unless for photographic copying. Use image files. Yields information about the rehabilitation of the Ballarat tram fleet and new trams acquired and refurbished by the SEC from Melbourne, in particular No. 30. Taken at the time of the official launch of the tram by the SEC with the Mayor of Ballarat at the front of the tram.Black and White photograph contained within Reg. Item 3000 - Photo Album produced by the SEC in 1935 titled "Photographs of Ballarat Tramways Rolling Stock & Track Reconditioning Works".Has a TMSV Copyright stamp on the rear, which has been crossed out.tramways, trams, secv, tramcars, ballarat, rehabilitation, conversion, launch, drummond st nth?, tram 30 -
 Ballarat Tramway Museum
Photograph - Black & White Photograph/s - set of 2, State Electricity Commission of Victoria (SECV), 1936
Yields information about the rehabilitation of the Ballarat ESCo trams and new trams acquired and refurbished by the SEC from Melbourne and the interiors of these trams.Two Black and White photograph contained within Reg. Item 3000 - Photo Album produced by the SEC in 1935 titled "Photographs of Ballarat Tramways Rolling Stock & Track Reconditioning Works". Black and white photographs of the interior of No. 12, showing advertising racks in the roof and the general arrangement of the doors etc. Shows signs, seats, bell chords, strap hangers and mirrors. 3012.1 has roof advertisements for the SEC, Brockhoff's, Nu-Trola biscuits and other advertisements. Has the Caption of "M.M.T.B. Car after conversion 1936 showing system of advertising." under the photograph. 3012.2 - has caption of "M.M.T.B. Car after conversion 1936 showing seats and drivers cabin" under the photograph. Photos not to be taken out of the album unless for photographic copying. Use image files.tramways, trams, secv, tramcars, ballarat, rehabilitation, conversion, mmtb, tram 12 -
 Ballarat Tramway Museum
Photograph - Black & White Photograph/s - set of 2, 1978
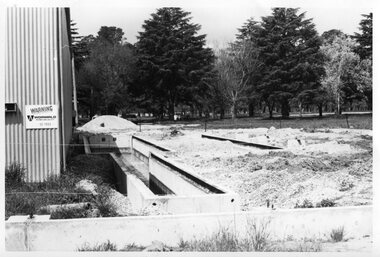
Yields information about the construction of the BTPS Depot in the Gardens.Black and white photograph of the two stages of the extension of the BTPS depot in 1978/1979. The first photograph shows the depot pits constructed and the building foundations in position. The second photograph of the first stage of the steel erection. Reference Annual reports - 1977 - 1978 - concrete finished except for backfiring. 1978 - 1979 - steel partially up - Christmas 1978, started November 1978. Photographer of item 2 (and may be other photos ex the album) was Graham Jordan - see history of the object. See BTPS Annual Reports, 1977-78 and 1978 - 1979.tramways, trams, btps, depot extensions, depot -
 Ballarat Tramway Museum
Negative - Print, Wal Jack, No. 35, turning from Drummond St Sth into Sturt St, 30-3-1951
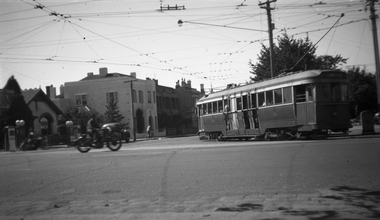
No. 35, turning from Drummond St Sth into Sturt St. Has buildings on the north side of the street photograph and the Shell petrol pumps on the street. At Hospital Corner. Taken on 30.03.1951Yields information about Ballarat 's bogie trams and the scene at Hospital corner.Copy negative of a black and white photograph from Ray Pearson Collection, taken by Dave Macartney in 1975c of a bogie tram, No. 35, turning from Drummond St Sth into Sturt St. Has buildings on the north side of the street photograph and the Shell petrol pumps on the street. At Hospital Corner. Taken on 30.03.1951, see notes around the photo in the hi res image. Image revised from actual hi res scan of original print from the Ray Pearson Album 30/5/2020 and scan of the original Wal Jack 125 negative on 125 film added as image i3 15/7/2020. Print also held. Image i2 - hi res scan of the photo from the Album with notes. trams, tramways, sturt st, drummond st sth, hospital corner -
 Ballarat Tramway Museum
Photograph - Black & White Photograph/s and Digital Image, Wal Jack, 20/08/1955 12:00:00 AM
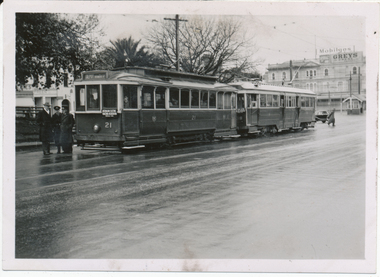
Yields information about the trams used by the AETA for a Ballarat tour to celebrate the Golden Jubilee of electric trams.Black and white photograph of 38 and 21, AETA Golden Jubilee of Electric Tramways in Ballarat, City Loop prior to the tour, 20/8/1955, photo by Keith Kings. Has the Grenville St buildings in the background in the background. Advertisements on the buildings feature Mobilgas and Greys cigarettes. 4159.1 - - same photograph from the Wal jack Album - see i3 and i4 for front and rear details.On rear in ink. "AETA; Ballarat - Golden Jubilee of Electric Tramways; Passenger car 31 and Specials 38 and 21 Sturt St parking loop before tour; 28/8/55" and Keith Kings stamp with number P(c)(2) in ink. 4159.1 - AETA; Ballarat - Golden Jubilee of Electric Tramways; Specials 38 and 21 Sturt St parking loop before tour; 28/8/55" and Keith Kings stamp with number P(c)(2) in inktramways, trams, city loop, sturt st, aeta, tram 38, tram 21 -
 Ballarat Tramway Museum
Photograph - Black & White Photograph/s and Digital Image, Wal Jack, 20/08/1955 12:00:00 AM
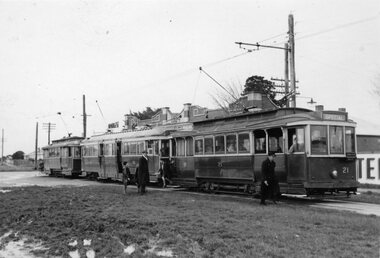
Yields information about the trams used in an AETA 1955 tour and the appearance of the terminal area at the time.Black and white photograph of three Ballarat trams at the Sebastopol terminus, 31, 38 and 21, AETA Golden Jubilee of Electric Tramways in Ballarat, 20/8/1955, photo by Keith Kings. Has the Royal Mail Hotel in the background. The foreground is very muddy. 4176.1 - same photograph from the Wal jack Album - see i2 and i3 for front and rear details.On rear in ink. "AETA; Ballarat - Golden Jubilee of Electric Tramways; Passenger car 31 and Specials 38 and 21 at Sebastopol terminus; 28/8/55" and Keith Kings stamp with number P(c)(6) in ink. 4176.1 - as above. tramways, trams, sebastopol, aeta, tram 31, tram 38, tram 21 -
 Ballarat Tramway Museum
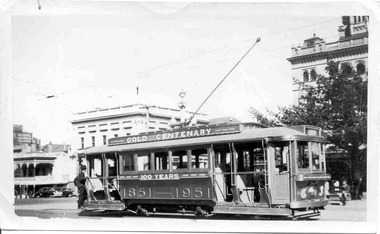
Photograph - Black & White Photograph/s and Digital Image, Wal Jack, No. 23 painted as the Gold Tram in 1951, at the corner of Sturt and Lydiard St, 1951
Yields information about Ballarat 's No. 23 operating as the Gold Tram in 1951 and the dates of operation.Black and white photograph of No. 23 painted as the Gold Tram in 1951, at the corner of Sturt and Lydiard St, looking south east, with a driver boarding the tram. Has the Commonwealth Bank building in the background. Wal Jack photograph, 25-3-1951. Photo used on page 9 of Destination Eaglehawk. See Reg Item 3583 for a copy negative of this photograph. 4185.1 - digital image of the same photograph from the Wal Jack Album - see image i3 and i4 for the rear of the photo. Image i5 scanned from original 125 size negative - added 11/7/2020On rear in ink "SEC Ballarat 9263# No. 23 (ex Adelaide "A" 69) painted golden bronze in connection with the Gold Centenary 1851 - 1951. Car ran from 16/3/1951 to Easter Monday 26-3-1951. Snapped in Sturt St (tram centre), Easter Monday 25-3-51 Wal Jack Photo T1/PC." In bottom left hand corner - stamped "Traction Publications, PO Box 438 Canberra (City) ACT" .1 - on rear in ink "SEC Ballarat No. 23 painted gold for Gold Centenary 1951. Ran from 16/3/1951 to Easter Monday 26-3-1951. Snapped in Sturt St (tram centre), Easter Sunday 25-3-51 Wal Jack Photo T1/PC."tramways, trams, sturt st, gold tram, gold, centenary of gold, decorated trams, tram 23