Showing 6732 items matching "negative"
-
 Ballarat Tramway Museum
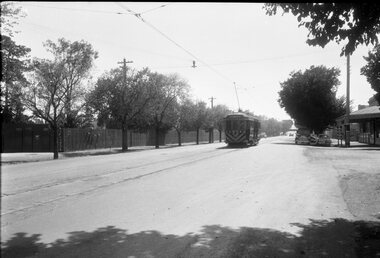
Negative - Geelong tram 36 Mercer St, Laurie Gallop, early 1956
Photo shows Geelong tram 36 outbound to North in Mercer St at Ginn St. In the background is a shop selling Franklins Lemon Swish, a four & Twenty Pie shop, Toppa Ice cream, a Coca Cola truck, a Hotel advertising Richmond Lager, three parked buses and a shop advertising hot pies. On the pole is a tram stop with a metal "CARS STOP HERE" sign. On the left-hand side of the photograph a surveyor can be seen at work.Yields information about the Geelong operations toward the closure of the tram system.Black and white Negative - 120 sizetramways, geelong, mercer st, tram 36, tram stops -
 Ballarat Tramway Museum
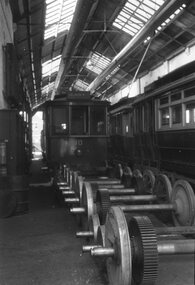
Negative - Geelong depot tram 10 and wheels, Laurie Gallop, early 1956
Photo shows Geelong tram 10 in the depot showing a destination of East with 6 wheelsets in front of it and other tramcars alongside. Wheel flanges appear to be worn and may have been readied to go to Ballarat or Bendigo for further use after turning.Yields information about the Geelong operations toward the closure of the tram system.Black and white Negative - 120 sizetramways, geelong, depot, tram 10, wheels -
 Ballarat Tramway Museum
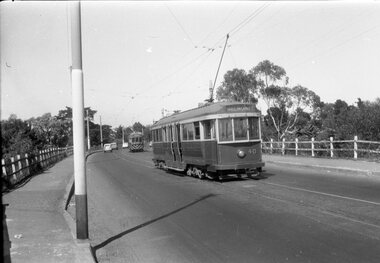
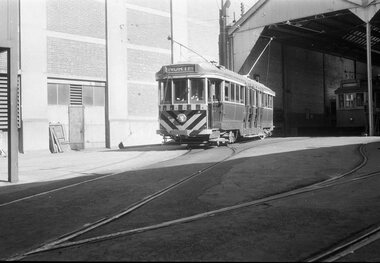
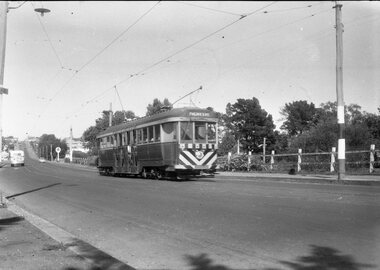
Negative - Geelong trams 33 & 40 Barwon Bridge, Laurie Gallop, early 1956
Photo shows Geelong trams 33 & 40 in Moorabool St just south of the Barwon Bridge on the long crossing loop. Based on the running board at item 8267, most likely tram No. 33. One of a set of photos was taken between 15/2/1956 and 3/3/1956 when services operated only between Belmont and North before the final closure of the Belmont route on 25/31956 and that bogie tram 31 is not shown on the board, having gone to Ballarat on 15/2/1956 - see item 5554. See item 8213 for an article on the Geelong system by Keith Kings. Yields information about the Geelong operations toward the closure of the tram system.Black and white Negative - 120 sizetramways, geelong, moorabool st, tram 33, tram 40, barwon river -
 Ballarat Tramway Museum
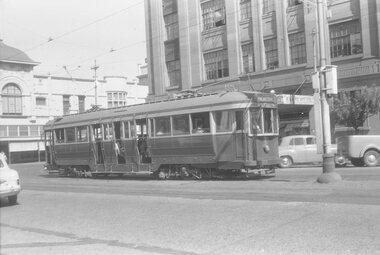
Negative - Tram 40 - Moorabool & Malop Streets, Laurie Gallop, early 1956
Photo shows Geelong 40 on its way to North Geelong, turning from Moorabool St into Malop St. In the background are now the National Mutual and Market Square buildings. One of a set of photos was taken between 15/2/1956 and 3/3/1956 when services operated only between Belmont and North before the final closure of the Belmont route on 25/31956 and that bogie tram 31 is not shown on the board, having gone to Ballarat on 15/2/1956 - see item 5554. See item 8213 for an article on the Geelong system by Keith Kings. Yields information about the Geelong operations toward the closure of the tram system.Black and white Negative - 120 sizetramways, geelong, moorabool st, malop st, tram 40 -
 Ballarat Tramway Museum
Negative - Geelong scrubber at depot, Laurie Gallop, early 1956
The photo shows the Geelong scrubber on the front of No. 2 road with No. 16 behind and No. 19 alongside. One of a set of photos was taken between 15/2/1956 and 3/3/1956 when services operated only between Belmont and North before the final closure of the Belmont route on 25/31956 and that bogie tram 31 is not shown on the board, having gone to Ballarat on 15/2/1956 - see item 5554. See item 8213 for an article on the Geelong system by Keith Kings. Yields information about the Geelong operations toward the closure of the tram system and in particular the Geelong scrubber or track cleaning tram.Black and white Negative - 120 sizetramways, geelong, geelong depot, scrubber, geelong 16, geelong 19 -
 Ballarat Tramway Museum
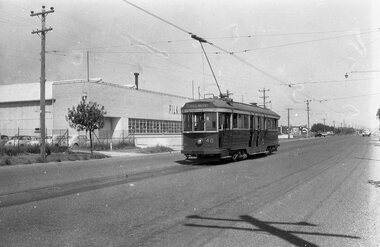
Negative - Tram 40 at the North terminus, Laurie Gallop, early 1956
Photo shows Geelong tram 40 at the North Terminus, with the Pilkington glass factory behind. The tram has the destination of Belmont. One of a set of photos was taken between 15/2/1956 and 3/3/1956 when services operated only between Belmont and North before the final closure of the Belmont route on 25/31956 and that bogie tram 31 is not shown on the board, having gone to Ballarat on 15/2/1956 - see item 5554. See item 8213 for an article on the Geelong system by Keith Kings. Yields information about the Geelong operations toward the closure of the tram system and the North terminus.Black and white Negative - 120 sizetramways, geelong, geelong depot, tram 40, north -
 Ballarat Tramway Museum
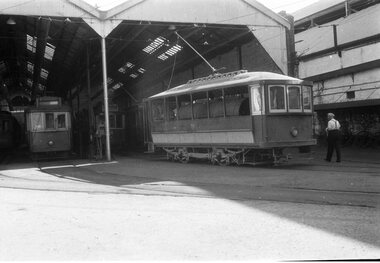
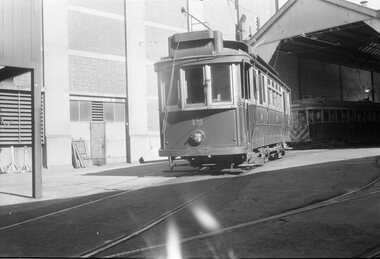
Negative - Tram 33 Geelong depot, Laurie Gallop, early 1956
Photo shows Geelong 33 on No. 5 road at Geelong depot being driven out with the destination set to North. One of a set of photos was taken between 15/2/1956 and 3/3/1956 when services operated only between Belmont and North before the final closure of the Belmont route on 25/31956 and that bogie tram 31 is not shown on the board, having gone to Ballarat on 15/2/1956 - see item 5554. See item 8213 for an article on the Geelong system by Keith Kings. Yields information about the Geelong operations toward the closure of the tram system.Black and white Negative - 120 sizetramways, geelong, geelong depot, tram 33 -
 Ballarat Tramway Museum
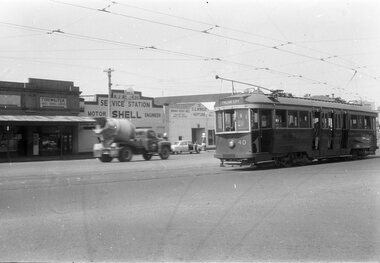
Negative - Tram 40 - Mercer St, city end, early 1956
Photo shows Geelong tram 40 Mercer St, city end. The tram has the destination of North. In the background is a typewriter shop, R J Reynolds? Shell service station and S G Winkler Service station with a Neptune sign. The driver has his hand on the air brake and the controller with the front driver's window open. One of a set of photos was taken between 15/2/1956 and 3/3/1956 when services operated only between Belmont and North before the final closure of the Belmont route on 25/31956 and that bogie tram 31 is not shown on the board, having gone to Ballarat on 15/2/1956 - see item 5554. See item 8213 for an article on the Geelong system by Keith Kings. Yields information about the Geelong operations toward the closure of the tram system.Black and white Negative - 120 sizetramways, geelong, tram 40, north, mercer st -
 Ballarat Tramway Museum
Negative - Tram 38 Mercer Street, Laurie Gallop, early 1956
Photo shows Tram 38 Mercer Street, near The Esplanade with the destination of Belmont. One of a set of photos was taken between 15/2/1956 and 3/3/1956 when services operated only between Belmont and North before the final closure of the Belmont route on 25/31956 and that bogie tram 31 is not shown on the board, having gone to Ballarat on 15/2/1956 - see item 5554. See item 8213 for an article on the Geelong system by Keith Kings. Yields information about the Geelong operations toward the closure of the tram system.Black and white Negative - 120 sizetramways, geelong, tram 38, mercer st -
 Ballarat Tramway Museum
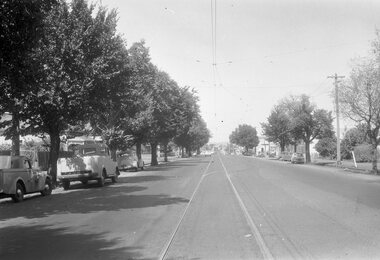
Negative - Moorabool St, looking south at the Kardinia Park loop, Laurie Gallop, early 1956
Photo shows Moorabool St, looking south at the Kardinia Park loop. One of a set of photos was taken between 15/2/1956 and 3/3/1956 when services operated only between Belmont and North before the final closure of the Belmont route on 25/31956 and that bogie tram 31 is not shown on the board, having gone to Ballarat on 15/2/1956 - see item 5554. See item 8213 for an article on the Geelong system by Keith Kings. Yields information about the Geelong tram system.Black and white Negative - 120 sizetramways, geelong, moorabool st, kardinia park loop -
 Ballarat Tramway Museum
Negative - Tram 19 at Geelong Depot, Laurie Gallop, early 1956
Photo shows Tram 19 at Geelong Depot One of a set of photos was taken between 15/2/1956 and 3/3/1956 when services operated only between Belmont and North before the final closure of the Belmont route on 25/31956 and that bogie tram 31 is not shown on the board, having gone to Ballarat on 15/2/1956 - see item 5554. See item 8213 for an article on the Geelong system by Keith Kings. Yields information about the Geelong operations toward the closure of the tram system.Black and white Negative - 120 sizetramways, geelong, geelong depot, tram 19 -
 Ballarat Tramway Museum
Negative - Geelong 38 and welding truck - Moorabool St, Laurie Gallop, early 1956
Photo shows Geelong 38 south bound to Belmont and welding truck - Moorabool St between Myers and McKillop Streets. The welding with the power supply from the overhead would most likely be repairing a broken joint. One of a set of photos was taken between 15/2/1956 and 3/3/1956 when services operated only between Belmont and North before the final closure of the Belmont route on 25/31956 and that bogie tram 31 is not shown on the board, having gone to Ballarat on 15/2/1956 - see item 5554. See item 8213 for an article on the Geelong system by Keith Kings. Yields information about the Geelong operations toward the closure of the tram system.Black and white Negative - 120 sizetramways, geelong, tram 38, moorabool st, welding truck, track repairs -
 Ballarat Tramway Museum
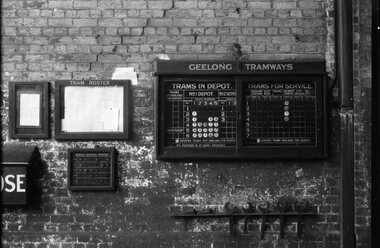
Negative - Tramcar allocation board - Geelong, Laurie Gallop, early 1956
Photo shows the Tramcar allocation board - in the Geelong depot. Shows the four bogie cars in operation or available on the day the photograph was taken. Shows that some of the Meadowbank-built trams and bogie trams had already left the depot. One of a set of photos was taken between 15/2/1956 and 3/3/1956 when services operated only between Belmont and North before the final closure of the Belmont route on 25/31956 and that bogie tram 31 is not shown on the board, having gone to Ballarat on 15/2/1956 - see item 5554. See item 8213 for an article on the Geelong system by Keith Kings. Yields information about the Geelong depot allocation board that showed the location and use of the tramcars on the day.Black and white Negative - 120 sizetramways, geelong, depot, depot allocation, tramcar allocation -
 Ballarat Tramway Museum
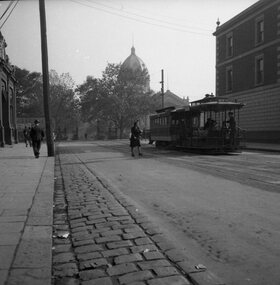
Negative - Geelong tram inbound Mercer Street, Laurie Gallop, early 1956
Photo shows a Geelong tram inbound in Mercer Street, near The Esplanade. Tram has the destination of Belmont. Based on the running board at item 8267, most likely No. 33. One of a set of photos was taken between 15/2/1956 and 3/3/1956 when services operated only between Belmont and North before the final closure of the Belmont route on 25/31956 and that bogie tram 31 is not shown on the board, having gone to Ballarat on 15/2/1956 - see item 5554. See item 8213 for an article on the Geelong system by Keith Kings. Yields information about tramway operations prior to closure of the Geelong system.Black and white Negative - 120 sizetram stops, tramways, geelong, mercer st, tram 33 -
 Ballarat Tramway Museum
Negative - Geelong tram at Balliang St loop in Moorabool St, Laurie Gallop, early 1956
Photo shows a Geelong tram to North in Moorabool St at the Balliang St / Forser St loop in Moorabool St. In the background is a Caltex Service station and a bus. See also item 8299 for the trailing photograph.Yields information about the Geelong operations toward the closure of the tram system.Black and white Negative - 120 sizetramways, geelong, belmont, moorabool st, crossing loop -
 Ballarat Tramway Museum
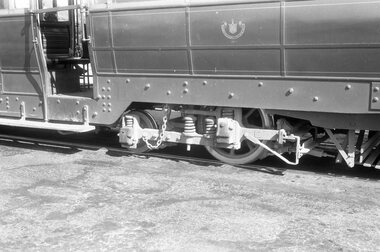
Negative - Brill 22E bogie or truck - Geelong tramcar, Laurie Gallop, early 1956
Photo shows Brill 22E Maximum Traction bogie or truck - Geelong tramcar, has the SEC logo on the side of the tramcar in the view. One of a set of photos was taken between 15/2/1956 and 3/3/1956 when services operated only between Belmont and North before the final closure of the Belmont route on 25/31956 and that bogie tram 31 is not shown on the board, having gone to Ballarat on 15/2/1956 - see item 5554. See item 8213 for an article on the Geelong system by Keith Kings. Yields information about the Geelong bogie trams.Black and white Negative - 120 sizetramways, geelong, brill 22e, maximum traction, bogie trams -
 Ballarat Tramway Museum
Negative - Geelong tram at Balliang St loop in Moorabool St, Laurie Gallop, early 1956
Photo shows a Geelong tram to North in Moorabool St at the Balliang St / Forser St loop in Moorabool St. Has the rail over bridge in the far distance. See also item 8298 for the approaching photo.Yields information about the Geelong operations toward the closure of the tram system.Black and white Negative - 120 sizetramways, geelong, belmont, moorabool st -
 Ballarat Tramway Museum
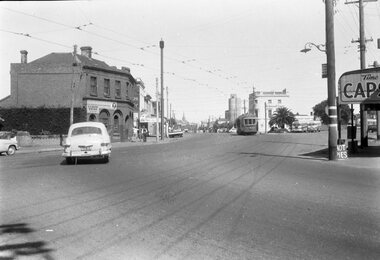
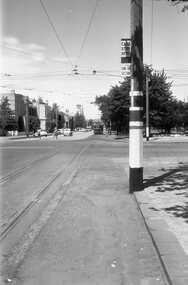
Negative - Corner Drummond and Sturt Street tram stop, Laurie Gallop, mid 1950s
Photo shows the inbound tram stop pole on the Northwest corner of Sturt and Drummond Streets in Ballarat. Note the vertical "End Section" sign along with the usual "End of Section" and "Cars stop here" sign at this compulsory tram stop. Another stop can be see on the other side of Drummond St along with No. 14 on its way to the City. Yields information about the tram stop at the corner of Sturt and Drummond St and signage.Black and white Negative - 120 sizetram stops, tramways, sturt st, drummond st, end of section sign, tram stop, sign -
 Melbourne Tram Museum
Negative - Copy - CW5 685 Hawthorn Road, Balaclava Junction, early to mid 1940s
Black and white photograph of CW5 685 in Hawthorn Road with Caulfield Park in the background, just before Balaclava Junction. Tram has white strips on the bumper and under the cab windows. Photo during the early to mid 1940's. Tram has an Auxiliary board "Via Dandenong Rd" and showing, Route 67. At the time, Route 67 ran from St Kilda ran from Balaclava Junction to St Kilda, Acland St via Dandenong Road. Ceased in 1955. See 3599 for a poor print.Yields information about the use of L class trams.Copy negative of a black and white photographtramcars, tramways, caulfield, hawthorn road, cw5 class, balaclava junction, route 67., tram 685 -
 Melbourne Tram Museum
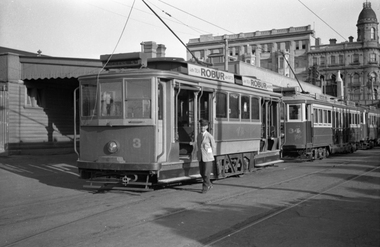
Negative - Set of 2 - St Kilda station - tram 3, Wal Jack, 30/12/1940
Set of two Photo of Victorian Railways trams 3, 34 and 40 at the St Kilda Railway station, with a driver in the view. Photo in the Wal Jack Victorian Railways Album - dated 30-12-1940.Yields information about VR trams at the St Kilda Railway Station during Dec. 1940.Set of two Black and white negatives.trams, tramways, victorian railways, vr trams, brighton, tram 3, tram 34, tram 40, crews, uniforms -
 Melbourne Tram Museum
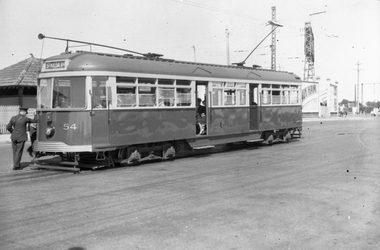
Negative - Set of 2 - VR TRam 54, Wal Jack, 30/12/1942
Photo of Victorian Railways trams 54 at Brighton terminus. Head on photo of No. 54 included. Has the destination of St Kilda Rly. Photo in the Wal Jack Victorian Railways Album - dated 30-12-1942.Yields information about VR tram 54 and the Brighton Beach terminus.Set of two Black and white negatives.trams, tramways, victorian railways, vr trams, brighton, shelters, tram 54 -
 Ballarat Tramway Museum
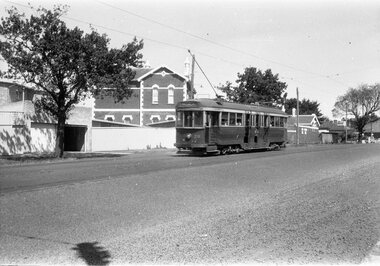
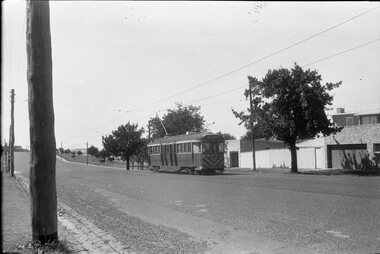
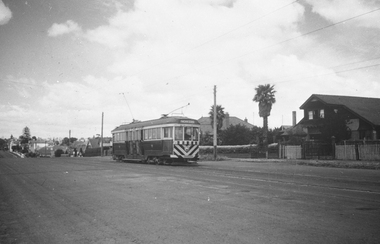
Negative - Geelong 31 in LaTrobe Tce, Drumcondra, 1955 or 1956
Photograph shows Geelong possibly No. 31, northbound in LaTrobe Tce near The Esplanade to "North", in the suburb of Drumcondra, 1955 or 1956.Yields information about tram 31 in LaTrobe Tce.120 size black and white negative.geelong, tramways, tramcars, tram 31 -
 Ballarat Tramway Museum
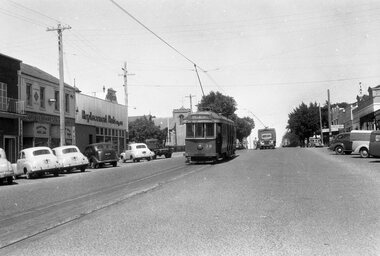
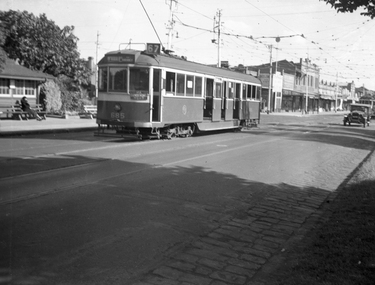
Negative - Geelong 23 in Moorabool St for Belmont, early 1950s
Photograph shows Geelong tram No. 23, south bound to Belmont in Moorabool St at Little Ryrie St. Has Ising's store, the White Hart Hotel, Alexander frocks and coats in the view. The T&G building and the Bank of NSW are in the background. Photo early 1950s. Photographer unknown.Yields information about tram 23 and Moorabool St in the early 1950s, prior to the closure of the Geelong tram system in 1956.120 size black and white negative.moorabool st, geelong, tramways, tramcars, tram 23 -
 University of Melbourne, Burnley Campus Archives
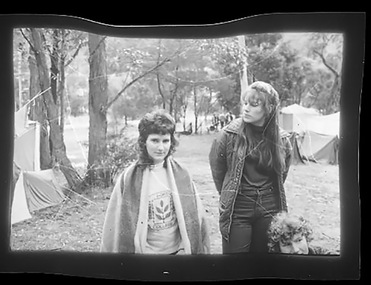
Negative - Black and white negative, Dennis Gedye, Excursion, c. 1971
Dennis Gedye Graduated 19725 negatives, probably of an excursion or camp. In an envelope with, "Dennis Gedye Graduated 1972." handwritten.excursion, camp, dennis gedye -
 Melbourne Tram Museum
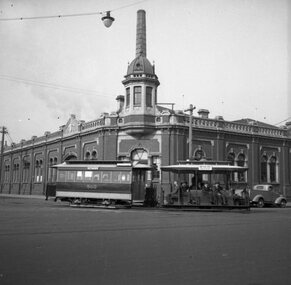
Negative - Cable trams Nicholson St winding or engine house, Wal Larsen, 6/5/1940
Photograph of No. 560 and grip turning from Gertrude St into Nicholson St, May 1940. In the background is the Winding house and associated chimney. Photo Wal Larsen.Yields information about the Nicholson and Gertrude St cable trams and the associated engine or power house.Negative of a photograph. Print also held.Written on the back of the album print "Cable tram No. 560 from Northcote at junction of Nicholson & Gertrude Sts, passing power house May 1940" On second copy of print - "Swinging out of Gertrude St onto Nicholson, power house in background, 6/5/40 photo Wal Larsen" and "16" in top right hand corner.trams, tramways, cable trams, nicholson st, gertrude st, winding houses, tram 560 -
 Melbourne Tram Museum
Negative, Wal Larsen, Cable trams Gertrude St, 6/5/1940
Photograph of a cable tram set in Gertrude St Fitzroy, alongside the winding house. Has a two uniformed men on the Grip car. In the background is the Royal Exhibition Buildings.Yields information about Gertrude St Fitzroy and cable trams.Negative of a photograph. Print also held.Notes on rear of print "Northcote tram outside Nicholson Street power house, trailer 574, 6 May 1940, Photo Wal Larsen" . Has number 180 in pencil in top right hand corner and No. 142 in ink in bottom left hand corner.trams, tramways, cable trams, nicholson st, gertrude st, winding houses -
 University of Melbourne, Burnley Campus Archives
Negative - Black and white negative, Glasshouse, Unknown
11 negatives of a glasshouse not at Burnley. Not digitised.glasshouses, plants -
 Port Fairy Historical Society Museum and Archives
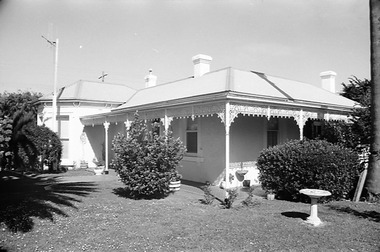
Negative - Photograph
The construction of Seaview commenced in 1860, after David Talbot, purchased the land from James Atkinson,It had been suggested that it was intended to be double storied but there is no evidence of how that would have been accomplished. Following Talbot’s insolvency, Michael O’Reilly leased the house in 1862 until 1876 when he left for Melbourne.William Powling (Solicitor) acquired the house for Eight hundred and twenty three pounds in 1890 and lived there the rest of his life. His son Ernest Powling continued living there before selling it to Matthew Cathcart in 1917.negative, seaview, house -
Stawell Historical Society Inc
Photograph, Mick Walsh, Mick Walsh Stawell Studio Colour Negatives, 1975 to 1986
Negatives from Stawell Photographer. Discarded from Penna Print Ararat. Son contacted and gave approval for Stawell Historical Society to keep them. Only those of a non personal nature scanned. Eric Lewis Family Jenny Ridd & Stuart Supple Mr & Mrs Joe Price Shelly Dowsett & Phillip Cane Lorraine Stewart & Ian Wedding Carol Driscoll & Peter McGregor Robson Peary Wedding Bev Warren Family Marie Freeman & Michael Fay Robyn Slorach & Geoffery Billett Mr & Mrs Jack Hall Golden Wedding Jack Hall Golden Wedding Anniversary Julie Webb & Shane Young Carthew & Travagline Ararat 1980 Tris Mulveeny & Wayne Kirk Patricia Marshall & Anthony Milverton Kay Court & Leigh Cadzow Marie Hunt & Ross McAllister Colour negatives of families, weddings and other. Nineteen Lever Arch Folders Mick Walsh 52 Patrick Street Stawellphotography -
Stawell Historical Society Inc
Photograph, Mick Walsh, Mick Walsh Stawell Studio Colour Negatives, 1975 to 1986
Negatives from Stawell Photographer. Discarded from Penna Print Ararat. Son contacted and gave approval for Stawell Historical Society to keep them. Only those of a non personal nature scanned. Marge Howard Gay Wedding Commercial Hotel Dunn & Gardner Karen Dey & Don Grellet Neil Pickering Ute Great Western Races 1985 Suzanne Veale & Peter Clark Libby Morris & Joel Woodgate Neils Car Noeline Hately Family Cooper Baby Erwin 21st Grandchildren Dec 1984 Pomonal Back to Neil Lamb Child Pam Curran Helen Maree Smith Baby 3 Generations Newton Ryans at Goldmine Shirley Cheesman & Richards Sandra Miller & Jim Leith Ararat Bullens House Debra Jenkins 21st Lee & Thomas Rhonda & Family Colour negatives of families, weddings and other. Nineteen Lever Arch Folders Mick Walsh 52 Patrick Street Stawellphotography