Showing 765 items matching "ship rigging"
-
 Flagstaff Hill Maritime Museum and Village
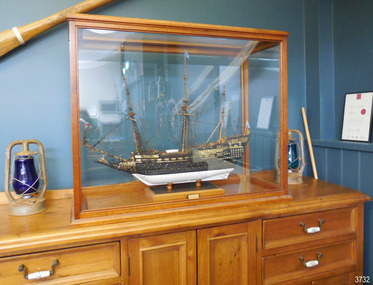
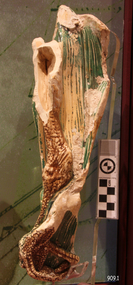
Craft - Ship Model, Sovereign of the Seas, Made between 1930-1955
This meticulously hand crafted ship model is one of the most intricate and challenging projects for a ship modeller to create. Jim Williams took up the challenge, choosing to make all of the components by hand, following a plan of the ship rather than purchasing a pre-made kit. He even made his own tools specifically for working with this model. The “Sovereign of the Seas” 1637-1697 - The magnificent ship “Sovereign of the Seas” was ordered by Charles I of England, who desired a giant Great Ship to be built. It was built by Peter Pett under the guidance of his father Phineas, the King's master shipwright, and launched with 102-guns at Woolwich Dockyard on 13th October 1637, as the Navy’s second three-decker first-rate ship. It was the most extravagantly decorated warship in the Royal Navy, bought with the help of a special 'Ship Money' tax imposed by the King. Soon afterwards the ship was remodelled and cut down to a safer and faster ship. Over the ship’s lifetime it was renamed “Commonwealth”, then in 1650 it became simply “Sovereign” then again after a rebuild in 1660 it was named “Royal Sovereign”. By 1642 the ship’s armament had been reduced to 90 guns. In 1651 Sovereign was made more manoeuvrable by reducing the upper works. It served throughout the wars of the Commonwealth and became the flagship of General Robert Blake. It was involved in all of the great English naval conflicts fought against the United Provinces and France and was referred to as 'The Golden Devil' by the Dutch. By 1660 the armament was changed attain to 100 guns. After the English Restoration, it was rebuilt as a first-rate ship of the line, with flatter gun decks and 100 guns, and most of the carvings were removed. During the First Anglo-Dutch War, in a secret session on 21 October 1652, the States-General of the Netherlands announced reward money for the crews of fire ships that succeeded in destroying enemy vessels; the Sovereign was singled out with an extra prize of 3000 guilders to sink or ruin it. Although repeatedly occupied by the Dutch, the Sovereign was retaken every time by the British and remained in service for nearly sixty years as the best ship in the English fleet. The Sovereign was in regular service during the three Anglo-Dutch Wars, surviving the Raid on the Medway in 1667. After a second rebuild in 1685 the Sovereign was relaunched as a first-rate ship of 100 guns, before taking part in the outset of the War of the Grand Alliance against Louis XIV of France, venturing into the Irish Sea, and later participating in the Battle of Beachy Head in 1690 and the Battle of La Hougue. At this time she was more than fifty years old. It was the first ship in history to fly ‘royals’ above the topgallant sails and a top gallant sail on the jigger-mast. The Sovereign eventually became leaky and defective with age and was laid up at Chatham when, on 27th January 1697, the famous ship caught fire, burning to the waterline. Jim Williams, the model’s maker - Jim (James Bernard) Williams was born in 1888 at The Forth in Scotland. He lived in Tasmania for some time and enlisted to fight in France in WW1. After the war he moved to Warrnambool, Victoria, where he worked at the Cramond & Dickson clothing store until the Great Depression in the 1930’s. He was later employed at Fletcher Jones Menswear, where he worked for 27 years until just before his death in 1959. Jim was a passionate ship model builder. He worked on his model ships between 1930 and 1955, including The Endeavour and The Sovereign of the Seas, which was one of the most intricate historic ship models to build. He had a table set up in a bay window and worked on them on and off using a jeweller's eye glass on the finer pieces. Jim’s long-time employer, Fletcher Jones, knew of Jim’s hobby and skill as a ship model builder and requested Jim to describe the model, Sovereign of the Seas, with the view of putting it on display. When the model was finished there was a full article and photo in The Standard newspaper. Jim described his work on the ship mode “Sovereign of the Seas” in correspondence to his then employer, Fletcher Jones. The document gives us an insight into his skill, patience, and regard for replicating the details of the original ship. Some of the details are: "In making the model the time taken to make certain items might be of interest. For instance "The Great Lantern" on the stern, four weeks, a similar time for the figurehead of St George & the Dragon. "The lower shrouds three to each side about six weeks & the rigging as whole several months. There are nearly 300 blocks and pulleys ranging from nearly 1 / 16 inch in diameter. Dead eyes were bored with 3 to 5 holes. To do this needles of different sizes, set in handles & ground to wedge ends were used. Glass cut and ground to shape were used windows. All gun-port covers (74) hinged. "All guns and anchors made of wood. Nothing for the model was purchased ready-made; everything hand made." Jim’s family donated the ship model along with many associated tools, accessories and papers. The model represents the Sovereign of the Seas. The Royal Navy ship of the line launched in 1637 has a significant British maritime heritage. These days the Sovereign of the Seas still remains one of the most intricate historic ship models to build, representing to the model enthusiast a true challenge to the art of model shipbuilding. The model of Sovereign of the Seas in Flagstaff Hill's collection is an exemplary example of a ship model built and hand crafted from a plan with the making of every item on the model, not a model kit with prefabricated parts. It was made by a local Warrnambool man Jim Williams as a leisure activity in the mid 20th century. The hobby and craft of ship model making has resulted in visual representations of the changes in maritime technology and advances in world-wide navigation. Ship model of HMS Sovereign of the Seas, a 17th century British warship. The handmade model is in wooden framed, airtight glass case. All components were hand crafted. Many of the tools used were made by the model maker, Jim Williams. An inscribed plaque is within the case. Inscribed on plaque "SOVEREIGN OF THE SEAS / 102 GUNS - 1634"flagstaff hill, warrnambool, shipwrecked coast, flagstaff hill maritime museum, maritime museum, shipwreck coast, flagstaff hill maritime village, great ocean road, model ship, vessel sovereign of the seas, jim williams, james bernard williams, the forth tasmania, freda williams, heather williams, phyllis bowditch, fletcher jones staff 1936, 17th century sailing ship, cramond and dickson, sovereign of the seas, royal sovereign, sovereign, charles 1, ship model -
 Flagstaff Hill Maritime Museum and Village
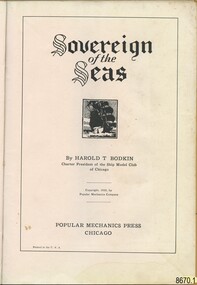
Book - "Sovereign of the Seas" book or manual for the ship model hobby enthusiast, Harold T. Bodkin, 1933, "Sovereign of the Seas", Popular Mechanics Press
Jim (James Bernard) Williams, who was the owner of this manual, was a long-time resident of Warrnambool having the opportunity to work at two notable historical businesses of the town. The first, Cramond & Dickson a drapier store established around 1852-1855 and which remained a store that traded under the same name for the longest in Victoria, before it closed its doors in 1974. The second business was Fletcher Jones a highly successful textile and clothing Australian business. Some of Jim’s spare time was devoted to the model ship making which would conjure up many fascinating stories of maritime history. In addition to Jim witnessing the tail end of ships at port in Warrnambool, his "father was as sea captain and operated his vessel in Bass Strait coastal trade between Tasmania and Victoria". The intricately detailed model made by Jim is full of precise detail. The manual and the blueprints held by Flagstaff Hill Maritime Village also reflect the intricate process and devotion to the task completed by Jim. The history of the shipwreck and maritime stories of the Victorian Southwest coast surrounding Warrnambool would have continued to inspire his passion. Three photos of the model and Jim, like the photo of Harold T. Bodkin in the manual, attest to the enthusiasm and enjoyment that was gained by him through this hobby. The manual opens to a photo of “Mr. Harold T. Bodkin adding finishing touches to model of the “Sovereign of the Seas”. The “Forward to Reader” which is on the next page is written by “E. R. HAAN, Technical Editor, Popular Mechanics Magazine. The forward explains the methodology used to achieve the fine detail that is part of the body of the model, by “applying imitation carvings”, and is cited as “a museum type of model”. The following page “Blueprints and Craftmats on the ‘Sovereign of the Seas’” discusses the availability of a set of blueprints to purchase separately. Followed by a description of the moulding process for the “miniature carvings”. “Historical Notes of Interest on the “Sovereign of the Seas (1637)” follow on the next page. The manual is divided into the following parts from pages 8 to 71: “Part I – Shaping the Hull/Part II – The Rudder, Quarter Galleries and Gunports/Part III Wales, Gunport Covers and Initial Ornamentation/Part V – Beakhead Decoration, Bulkhead and Rails, Etc./Part VI Carvings, Lanterns, Knights, Bitts and Painting/Part VII – Details of Mast Construction/Part VIII – Standing Rigging/Part IX – Running Rigging and Final Details. All of these instructions include photographs and detailed graphs. Then instructions on “How to Read and Use Ship-Model Drawings”, “The Shop-Model Maker’s Tools”, and “Simplified Ship-in-a-Bottle”. This is finished off with “Helpful Hints….” And numerous pages of advertising. Some adverts include aids for completing the “Sovereign of the Seas” model. Part I uses blue and black ink to illustrate a dramatic picture of the “Sovereign”, otherwise all print is in black ink on buff paper. This book in significant to the collection as it was donated along with other tools and blueprints which have been used by the donor of the "Sovereign of the Seas" model ship. It also connects with the wider community in that it is related to historical maritime interest and the donor, Jim Williams is also connected to other significant retail and manufacturing businesses of the past in Warrnambool. This manual has been covered with brown paper, including an extra strip for the spine. The front has a watermark at the top middle, some pencilled compass circles segmented into eight parts across the area and a small amount of script writing. The back also has the same type of compass circles and some other small shapes. There are also grease marks. The cover has a patina adding to variations of colour to the paper indicative of the book being handled often. The title page reads “Sovereign of the Seas” in an Old English font. This is followed by a lithograph print around 1 inch square of a ship at full sale. By HAROLD T. BODKIN/Charter President of the Ship Model Club of Chicago/Copyright, 1933, By Popular Mechanics Company/POPULAR MECHANICS PRESS/CHICAGO/Printed in the U.S.A. By HAROLD T. BODKIN/Charter President of the Ship Model Club of Chicago/Copyright, 1933, By Popular Mechanics Company/POPULAR MECHANICS PRESS/CHICAGO/Printed in the U.S.A.flagstaff hill, warrnambool, shipwrecked coast, flagstaff hill maritime museum, maritime museum, shipwreck coast, flagstaff hill maritime village, great ocean road, model ship, vessel sovereign of the seas, jim williams, james bernard williams, the forth tasmania, freda williams, heather williams, phyllis bowditch, fletcher jones staff 1936, 17th century sailing ship, cramond and dickson, sovereign of the seas, royal sovereign, sovereign, charles 1, fletcher jones, warrnambool breakwater -
 Flagstaff Hill Maritime Museum and Village
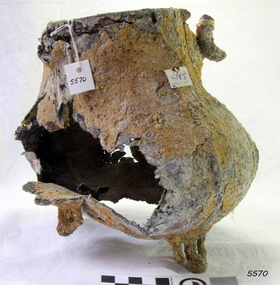
Furniture - Door, 1871 or earlier
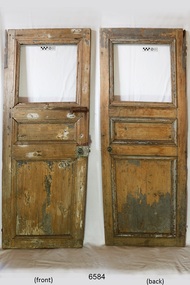
The wooden door was salvaged from the wreck of the sailing ship Eric the Red, which was a wooden, three masted clipper ship. Eric the Red was the largest full-rigged ship built at Bath, Maine, USA in 1871, having had a 1,580 tons register. She was built and registered by Arthur Sewall, later to become the partnership E. & A. Sewall, the 51st ship built by this company. The annually-published List of Merchant Vessels of the U.S. shows Bath was still the home port of Eric the Red in 1880. The vessel was named after the Viking discoverer, Eric the Red, who was the first European to reach the shores of North America (in 980AD). The ship Eric the Red at first traded in coal between America and Britain, and later traded in guano nitrates from South America. In 1879 she was re-metalled and was in first class condition. On 10th June 1880 (some records say 12th June) Eric the Red departed New York for Melbourne and then Sydney. She had been commissioned by American trade representatives to carry a special cargo of 500 exhibits (1400 tons) – about a quarter to a third of America’s total exhibits - from America for the U.S.A. pavilion at Melbourne’s first International Exhibition. The exhibits included furniture, ironmongery, wines, chemicals, dental and surgical instruments, paper, cages, bronze lamp trimmings, axles, stamped ware, astronomical and time globes, samples of corn and the choicest of leaf tobacco. Other general cargo included merchandise such as cases of kerosene and turpentine, brooms, Bristol's Sarsaparilla, Wheeler and Wilson sewing machines, Wheeler’s thresher machine, axe handles and tools, cases of silver plate, toys, pianos and organs, carriages and Yankee notions. The Eric the Red left New York under the command of Captain Z. Allen (or some records say Captain Jacques Allen) and 24 other crew including the owner’s son third mate Ned Sewall. There were 2 saloon passengers also. The ship had been sailing for an uneventful 85 days and the voyage was almost at its end. On 4th September 1880 the Eric the Red approached Cape Otway with a moderate north-west wind and hazy and overcast atmosphere. Around 1:30am Captain Allen sighted the Cape Otway light and was keeping the ship 5-6 miles offshore to stay clear of the hazardous Otway Reef. However he had badly misjudged his position. The ship hit the Otway Reef about 2 miles out to sea, south west of the Cape Otway light station. He ordered the wheel to be put ‘hard up’ thinking that she might float off the reef. A heavy sea knocked the man away from the wheel, broke the wheel ropes and carried away the rudder. The sea swamped the lifeboats. The mizzenmast fell, with all of its rigging, then the mainmast also fell and the ship broke in two. Some said that the passenger Vaughan, who was travelling for his health and not very strong, was washed overboard and never seen again. The ship started breaking up. The forward house came adrift with three of the crew on it as well as a longboat, which the men succeeded in launching and keeping afloat by continually bailing with their sea boots. The captain, the third mate (the owner’s son) and others clung to the mizzenmast in the sea. Then the owner’s son was washed away off the mast. Within 10 minutes the rest of the ship was in pieces, completely wrecked, with cargo and wreckage floating in the sea. The captain encouraged the second mate to swim with him to the deckhouse where there were other crew but the second mate wouldn’t go with him. Eventually the Captain made it to the deckhouse and the men pulled him up. At about 4:30am the group of men on the deckhouse saw the lights of a steamer and called for help. At the same time they noticed the second mate and the other man had drifted nearby, still on the spur, and pulled them both onto the wreck. The coastal steamer Dawn was returning to Warrnambool from Melbourne, its sailing time different to its usual schedule. Captain Jones sent out two life boats, and fired off rockets and blue lights to illuminate the area. They picked up the three survivors who were in the long boat from Eric the Red. Two men were picked up out of the water, one being the owner’s son who was clinging to floating kerosene boxes. At daylight the Dawn then rescued the 18 men from the floating portion of the deckhouse, which had drifted about 4 miles from where they’d struck the reef. Shortly after the rescue the deckhouse drifted onto breakers and was thrown onto rocks at Point Franklin, about 2 miles east of Cape Otway. Captain Jones had signalled to Cape Otway lighthouse the number of the Eric the Red and later signalled that there was a wreck at Otway Reef but there was no response from the lighthouse. The captain and crew of the Dawn spent several more hours searching unsuccessfully for more survivors, even going back as far as Apollo Bay. On board the Dawn the exhausted men received care and attention to their needs and wants, including much needed clothing. Captain Allen was amongst the 23 battered and injured men who were rescued and later taken to Warrnambool for care. Warrnambool’s mayor and town clerk offered them all hospitality, the three badly injured men going to the hospital for care and others to the Olive Branch Hotel, then on to Melbourne. Captain Allen’s leg injury prevented him from going ashore so he and three other men travelled on the Dawn to Portland. They were met by the mayor who also treated them all with great kindness. Captain Allen took the train back to Melbourne then returned to America. Those saved were Captain Z. Allen (or Jacques Allen), J. Darcy chief mate, James F. Lawrence second mate, Ned Sewall third mate and owner’s son, John French the cook, C. Nelson sail maker, Clarence W. New passenger, and the able seamen Dickenson, J. Black, Denis White, C. Herbert, C. Thompson, A. Brooks, D. Wilson, J. Ellis, Q. Thompson, C. Newman, W. Paul, J. Davis, M. Horenleng, J. Ogduff, T. W. Drew, R. Richardson. Four men had lost their lives; three of them were crew (Gus Dahlgreen ship’s carpenter, H. Ackman steward, who drowned in his cabin, and George Silver seaman) and one a passenger (J. B. Vaughan). The body of one of them had been found washed up at Cape Otway and was later buried in the lighthouse cemetery; another body was seen on an inaccessible ledge. Twelve months later the second mate James F. Lawrence, from Nova Scotia, passed away in the Warrnambool district; an obituary was displayed in the local paper. The captain and crew of the Dawn were recognised by the United States Government in July 1881 for their humane efforts, being thanked and presented with substantial monetary rewards, medals and gifts. Neither the ship, nor its cargo, was insured. The ship was worth about £15,000 and the cargo was reportedly worth £40,000; only about £2,000 worth had been recovered. Cargo and wreckage washed up at Apollo Bay, Peterborough, Port Campbell, Western Port and according to some reports, even as far away as the beaches of New Zealand. The day after the wreck the government steam ship Pharos was sent from Queenscliff to clear the shipping lanes of debris that could be a danger to ships. The large midship deckhouse of the ship was found floating in a calm sea near Henty Reef. Items such as an American chair, a ladder and a nest of boxes were all on top of the deckhouse. As it was so large and could cause danger to passing ships, Captain Payne had the deckhouse towed towards the shore just beyond Apollo Bay. Between Apollo Bay and Blanket Bay the captain and crew of Pharos collected Wheeler and Wilson sewing machines, nests of boxes, bottles of Bristol’s sarsaparilla, pieces of common American chairs, axe handles, a Wheelers’ Patent thresher and a sailor’s trunk with the words “A. James” on the front. A ship’s flag-board bearing the words “Eric the Red” was found on the deckhouse; finally those on board the Pharos had the name of the wrecked vessel. During this operation Pharos came across the government steamer Victoria and also a steamer S.S. Otway, both of which were picking up flotsam and wreckage. A whole side of the hull and three large pieces of the other side of the hull, with some of the copper sheathing stripped off, had floated on to Point Franklin. Some of the vessels yards and portions of her masts were on shore. The pieces of canvas attached to the yards and masts confirmed that the vessel had been under sail. The beach there was piled with debris several feet high. There were many cases of Diamond Oil kerosene, labelled R. W. Cameron and Company, New York. There were also many large planks of red pine, portions of a small white boat and a large, well-used oar. Other items found ashore included sewing machines (some consigned to ‘Long and Co.”) and notions, axe and scythe handles, hay forks, wooden pegs, rolls of wire (some branded “T.S” and Co, Melbourne”), kegs of nails branded “A.T. and Co.” from the factory of A. Field and Son, Taunton, Massachusetts, croquet balls and mallets, buggy fittings, rat traps, perfumery, cutlery and Douay Bibles, clocks, bicycles, chairs, a fly wheel, a cooking stove, timber, boxes, pianos, organs and a ladder. (Wooden clothes pegs drifted in for many years). There seemed to be no personal luggage or clothing. The Pharos encountered a long line, about one and a half miles, of floating wreckage about 10 miles off land, south east of Cape Otway, and in some places about 40 feet wide. It seemed that more than half of it was from Eric the Red. The ship’s crew rescued 3 cases that were for the Melbourne Exhibition and other items from amongst the debris. There were also chairs, doors, musical instruments, washing boards, nests of trunks and fly catchers floating in the sea. Most of the goods were saturated and smelt of kerosene. A section of the hull lies buried in the sand at Parker River Beach. An anchor with chain is embedded in the rocks east of Point Franklin and a second anchor, thought to be from Eric the Red, is on display at the Cape Otway light station. (There is a photograph of a life belt on the verandah of Rivernook Guest House in Princetown with the words “ERIC THE RED / BOSTON”. This is rather a mystery as the ship was registered in Bath, Maine, USA.) Parts of the ship are on display at Bimbi Park Caravan Park and at Apollo Bay Museum. Flagstaff Hill Maritime Village also has part of the helm (steering wheel), a carved wooden sword (said to be the only remaining portion of the ship’s figurehead; further research is currently being carried out), a door, a metal rod and samples of wood. Much of the wreckage was recovered by the local residents before police and other authorities arrived at the scene. Looters went to great effort to salvage goods, being lowered down the high cliff faces to areas with little or no beach to collect items from the wreckage, their mates above watching out for dangerous waves. A Tasmanian newspaper reports on a court case in Stawell, Victoria, noting a man who was caught 2 months later selling tobacco from the wreckage of Eric the Red. Some of the silverware is still treasured by descendants of Mr Mackenzie who was given these items by officials for his help in securing the cargo. The gifts included silver coffee and tea pots, half a dozen silver serviette rings and two sewing machines. The wreck and cargo were sold to a Melbourne man who salvaged a quantity of high quality tobacco and dental and surgical instruments. Timbers from the ship were salvaged and used in the construction of houses and sheds around Apollo Bay, including a guest house, Milford House (since burnt down in bushfires), which had furniture, fittings and timber on the dining room floor from the ship. A 39.7 foot long trading ketch, the Apollo, was also built from its timbers by Mr Burgess in 1883 and subsequently used in Tasmanian waters. It was the first attempt at ship building in Apollo bay. In 1881 a red light was installed about 300 feet above sea level at the base of the Cape Otway lighthouse to warn ships when they were too close to shore; It would not be visible unless a ship came within 3 miles from it. This has proved to be an effective warning. The State Library of Victoria has a lithograph in its collection depicting the steamer Dawn and the shipwrecked men, titled. "Wreck of the ship Eric the Red, Cape Otway: rescue of the crew by the Dawn". “The Eric the Red is historically significant as one of Victoria's major 19th century shipwrecks. (Heritage Victoria Eric the Red; HV ID 239) The wreck led to the provision of an additional warning light placed below the Cape Otway lighthouse to alert mariners to the location of Otway Reef. The site is archaeologically significant for its remains of a large and varied cargo and ship's fittings being scattered over a wide area. The site is recreationally and aesthetically significant as it is one of the few sites along this coast where tourists can visit identifiable remains of a large wooden shipwreck, and for its location set against the background of Cape Otway, Bass Strait, and the Cape Otway lighthouse.“ (Victorian Heritage Database Registration Number S239, Official Number 8745 USA) Door from the wreck of the ship Eric the Red. The wooden singular rectangular door includes three insert panel sections. The top section is square shaped and is missing its panel or glass. The centre timber panel is about a third of the height of the top panel and the bottom timber panel is approximately equal in height to the total height of the two upper panels. The door fastenings include both a metal door latch and traditional door bolt. They are both attached to the front right hand side of the door. The bolt is just below the top panel, and the door latch is in approximately the centre of that side. The door latch has a round mark where a handle could have been attached. The wood of the door has scraping marks in a semi-circle around the door latch where the latch has swung around on its one remaining fastening and grazed the surface. There is a metal hinge at the top section of the door on the opposite side to the latch. The painted surface has been scraped back to expose the wood. The door is shorter than the average height of a person. On the reverse of the door there are lines on the panels, just inside their edges, is what appears to be pencil. The door is not aligned straight but is skew to centre.warrnambool, flagstaff hill, flagstaff hill maritime village, maritime museum, shipwreck coast, great ocean road, shipwreck artefact, eric the red, jaques allen, sewall, 1880, melbourne exhibition 1880, cape otway, otway reef, victorian shipwreck, bass strait, eric-the-red, door -
 Flagstaff Hill Maritime Museum and Village
Award - Medal, Nelson Johnson, November 1880
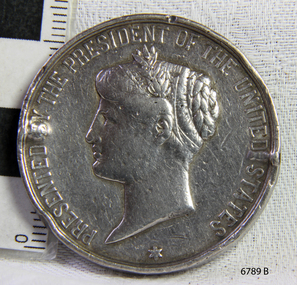
This medal for bravery, for rescue of the crew from the shipwreck “Eric the Red” on 4th September 1880, was awarded to one of the crew of the steamer S.S. Dawn by the President of the United States in July 1881. The medal is engraved with the name “Nelson Johnson” (the anglicised version of his Swedish name Neils Frederick Yohnson). It was donated to Flagstaff Hill Maritime Village in 2013 by Nelson’s granddaughter. Nelson had migrated from Sweden to Sydney in 1879. The next year in 1880, aged 24, he was a seaman on the steamship Dawn and involved in the rescue of the survivors of the Eric the Red. Nelson Johnson was a crew member of the S.S. Dawn and was one of the rescue team in the dinghy in the early morning of September 4th 1880. Medals were awarded to the Captain and crew of the S.S. Dawn by the President of the United States, through the Consul-general (Mr Oliver M. Spencer), in July 1881 “ … in recognition of their humane efforts in rescuing the 23 survivors of the American built wooden sailing ship, the Eric the Red, on 4th September 1880.” The men were also presented with substantial monetary rewards and gifts. The city of Warrnambool’s care of the survivors was also mentioned by the President at the presentation, saying that “the city hosted and supported the crew ‘most graciously’. Previously, a week after the shipwreck, the Australian Government had also conveyed its thanks to the Captain and crew of the S.S. Dawn “Captain Griffith Jones, S.S. Dawn, The Hon. Mr Clark desires that the thanks of the Government should be conveyed to you for the prompt, persevering and seamanlike qualities displayed by you, your officers and crew in saving the number of lives you did on the occasion referred to. The hon. The Commissioner has also been pleased to award you a souvenir in commemoration of the occasion, and a sum of 65 pounds to be awarded to your officers and crew according to annexed scale. I am, &c, W Collins Rees, for and in the absence of the Chief Harbour Master.” The Awards are as follows: - Crew of DAWN'S lifeboat-Chief Officer, Mr G. Peat, 15 pounds; boat's crew-G. Sterge, A.B., 5 pounds; T. Hammond, A.B., 5 pounds; J. Black, A.B., 5 pounds; H. Edwards, A.B., 5 pounds. Dinghy's Crew-Second Officer, Mr Christie, 10 pounds; boat's crew -F. Lafer, A.B., 5 pounds; W. Johnstone, A.B., 5 pounds; Mr Lear, provedore, 5 pounds; Mr Dove, purser, 5 pounds. Captain Jones receives a piece of plate. (from “Wreck of the ship Eric the Red” by Jack Loney) The medal’s history, according to the Editor of ‘E-Sylum’ (the newsletter of The Numismatic Bibliomania Society “… appears to be an example of an 1880 State Department medal, catalogued as LS-3 (page 322 of R. W. Julian's book, Medals of the United States Mint: The First Century 1792-1892). The reverse is mostly blank for engraving, surrounded by a thin wreath. It was designed by George Morgan, chief engraver for the Philadelphia Mint, and struck in gold, silver and bronze. The one pictured here (in The Standard newspaper, 2nd July 2013) appears to be silver.” The following is an account of the events which led to the awarding of this medal. The American ship Eric the Red was a wooden, three-masted clipper ship. She had 1,580 tons register and was the largest full-rigged ship built at Bath, Maine, USA in 1871. She was built and registered by Arthur Sewall, later to become the partnership E. & A. Sewall, the 51st ship built by this company. The annually-published List of Merchant Vessels of the U.S. shows Bath was still the home port of Eric the Red in 1880. The vessel was named after the Viking discoverer, Eric ‘the Red-haired’ Thorvaldsson, who was the first European to reach the shores of North America (in 980AD). The ship Eric the Red at first traded in coal between America and Britain, and later traded in guano nitrates from South America. In 1879 she was re-metalled and was in first-class condition. On 10th June 1880 (some records say 12th June) Eric the Red departed New York for Melbourne and then Sydney. She had been commissioned by American trade representatives to carry a special cargo of 500 exhibits (1400 tons) – about a quarter to a third of America’s total exhibits - for the U.S.A. pavilion at Melbourne’s first International Exhibition. The exhibits included furniture, ironmongery, wines, chemicals, dental and surgical instruments, paper, cages, bronze lamp trimmings, axles, stamped ware, astronomical and time globes, samples of corn and the choicest of leaf tobacco. Other general cargo included merchandise such as cases of kerosene and turpentine, brooms, Bristol's Sarsaparilla, Wheeler and Wilson sewing machines, Wheeler’s thresher machine, axe handles and tools, cases of silver plate, toys, pianos and organs, carriages and Yankee notions. The Eric the Red left New York under the command of Captain Zaccheus Allen (or some records say Captain Jacques Allen) and 24 other crew including the owner’s son third mate Ned Sewall. There were also 2 saloon passengers on board. The ship had been sailing for an uneventful 85 days and the voyage was almost at its end. As Eric the Red approached Cape Otway there was a moderate north-west wind and a hazy and overcast atmosphere. On 4th September 1880 at about 1:30 am Captain Allen sighted the Cape Otway light and was keeping the ship 5-6 miles offshore to stay clear of the hazardous Otway Reef. However, he had badly misjudged his position. The ship hit the Otway Reef about 2 miles out to sea, southwest of the Cape Otway light station. Captain Allen ordered the wheel to be put ‘hard up’ thinking that she might float off the reef. The sea knocked the helmsman away from the wheel, broke the wheel ropes and carried away the rudder. The lifeboats were swamped, the mizzenmast fell, with all of its riggings, then the mainmast also fell and the ship broke in two. Some said that the passenger Vaughan, who was travelling for his health and not very strong, was washed overboard and never seen again. The ship started breaking up. The forward house came adrift with three of the crew on it as well as a longboat, which the men succeeded in launching and keeping afloat by continually bailing with their sea boots. The captain, the third mate (the owner’s son) and others clung to the mizzenmast in the sea. Then the owner’s son was washed away off the mast. Within 10 minutes the rest of the ship was in pieces, completely wrecked, with cargo and wreckage floating in the sea. The captain encouraged the second mate to swim with him to the deckhouse where there were other crew but the second mate wouldn’t go with him. Eventually, the Captain made it to the deckhouse and the men pulled him up. At about 4:30 am the group of men on the deckhouse saw the lights of a steamer and called for help. At the same time, they noticed the second mate and the other man had drifted nearby, still on the spur, and pulled them both onto the wreck. The coastal steamer SS Dawn was returning to Warrnambool from Melbourne, and its sailing time was different to its usual schedule. She was built in 1876 and bought by the Portland and Belfast Steam Navigation Co. in 1877. At the time of this journey, she was commanded by Captain Jones and was sailing between Melbourne and Portland via Warrnambool. The provedore the Dawn, Benjamin Lear, heard cries of distress coming through the portholes of the saloon. He gave the alarm and the engines were stopped. Cries could be heard clearly, coming from the land. Captain Jones sent out crew in two boats and fired off rockets and blue lights to illuminate the area. They picked up the three survivors who were in the long boat from Eric the Red. Two men were picked up out of the water, one being the owner’s son who was clinging to floating kerosene boxes. At daylight, the Dawn then rescued the 18 men from the floating portion of the deckhouse, which had drifted about 4 miles from where they’d struck the reef. Shortly after the rescue the deckhouse drifted onto breakers and was thrown onto rocks at Point Franklin, about 2 miles east of Cape Otway. Captain Jones had signalled to Cape Otway lighthouse the number of the Eric the Red and later signalled that there was a wreck at Otway Reef but there was no response from the lighthouse. The captain and crew of the Dawn spent several more hours searching unsuccessfully for more survivors, even going back as far as Apollo Bay. On board the Dawn the exhausted men received care and attention to their needs and wants, including much-needed clothing. Captain Allen was amongst the 23 battered and injured men who were rescued and later taken to Warrnambool for care. Warrnambool’s mayor and town clerk offered them all hospitality, the three badly injured men going to the hospital for care and others to the Olive Branch Hotel, then on to Melbourne. Captain Allen’s leg injury prevented him from going ashore so he and three other men travelled on the Dawn to Portland. They were met by the mayor who also treated them all with great kindness. Captain Allen took the train back to Melbourne then returned to America. Those saved were Captain Zaccheus Allen (or Jacques Allen), J. Darcy chief mate, James F. Lawrence second mate, Ned Sewall third mate and owner’s son, John French the cook, C. Nelson sail maker, Clarence W. New passenger, and able seamen Dickenson, J. Black, Denis White, C. Herbert, C. Thompson, A. Brooks, D. Wilson, J. Ellis, Q. Thompson, C. Newman, W. Paul, J. Davis, M. Horenleng, J. Ogduff, T. W. Drew, R. Richardson. Four men had lost their lives; three of them were crew (Gus Dahlgreen ship’s carpenter, H. Ackman steward, who drowned in his cabin, and George Silver seaman) and one a passenger (J. B. Vaughan). The body of one of them had been found washed up at Cape Otway and was later buried in the lighthouse cemetery; another body was seen on an inaccessible ledge. Twelve months later the second mate James F. Lawrence, from Nova Scotia passed away in the Warrnambool district; an obituary was displayed in the local paper. Neither the ship nor its cargo was insured. The ship was worth about £15,000 and the cargo was reportedly worth £40,000; only about £2,000 worth had been recovered. Cargo and wreckage washed up at Apollo Bay, Peterborough, Port Campbell, Western Port and according to some reports, even as far away as the beaches of New Zealand. The day after the wreck the government steamship Pharos was sent from Queenscliff to clear the shipping lanes of debris that could be a danger to ships. The large midship deckhouse of the ship was found floating in a calm sea near Henty Reef. Items such as an American chair, a ladder and a nest of boxes were all on top of the deckhouse. As it was so large and could cause danger to passing ships, Captain Payne had the deckhouse towed towards the shore just beyond Apollo Bay. Between Apollo Bay and Blanket Bay, the captain and crew of Pharos collected Wheeler and Wilson sewing machines, nests of boxes, bottles of Bristol’s sarsaparilla, pieces of common American chairs, axe handles, a Wheelers’ Patent thresher and a sailor’s trunk with the words “A. James” on the front. A ship’s flag-board bearing the words “Eric the Red” was found on the deckhouse; finally, those on board the Pharos had the name of the wrecked vessel. During this operation, Pharos came across the government steamer Victoria and also a steamer S.S. Otway, both of which were picking up flotsam and wreckage. A whole side of the hull and three large pieces of the other side of the hull, with some of the copper sheathing stripped off, had floated onto Point Franklin. Some of the vessels' yards and portions of her masts were on shore. The pieces of canvas attached to the yards and masts confirmed that the vessel had been under sail. The beach there was piled with debris several feet high. There were many cases of Diamond Oil kerosene, labelled R. W. Cameron and Company, New York. There were also many large planks of red pine, portions of a small white boat and a large, well-used oar. Other items found ashore included sewing machines (some consigned to ‘Long and Co.”) and notions, axe and scythe handles, hay forks, wooden pegs, rolls of wire (some branded “T.S” and Co, Melbourne”), kegs of nails branded “A.T. and Co.” from the factory of A. Field and Son, Taunton, Massachusetts, croquet balls and mallets, buggy fittings, rat traps, perfumery, cutlery and Douay Bibles, clocks, bicycles, chairs, a fly wheel, a cooking stove, timber, boxes, pianos, organs and a ladder. (Wooden clothes pegs drifted in for many years). There seemed to be no personal luggage or clothing. The Pharos encountered a long line, about one and a half miles, of f locating wreckage about 10 miles off land, southeast of Cape Otway, and in some places about 40 feet wide. It seemed that more than half of it was from Eric the Red. The ship’s crew rescued 3 cases that were for the Melbourne Exhibition and other items from amongst the debris. There were also chairs, doors, musical instruments, washing boards, nests of trunks and flycatchers floating in the sea. Most of the goods were saturated and smelt of kerosene. A section of the hull lies buried in the sand at Parker River Beach. An anchor with a chain is embedded in the rocks east of Point Franklin and a second anchor, thought to be from Eric the Red, is on display at the Cape Otway light station. (There is a photograph of a life belt on the verandah of Rivernook Guest House in Princetown with the words “ERIC THE RED / BOSTON”. This is rather a mystery as the ship was registered in Bath, Maine, USA.) Parts of the ship are on display at Bimbi Park Caravan Park and at Apollo Bay Museum. Flagstaff Hill Maritime Village also has part of the helm (steering wheel), a carved wooden sword (said to be the only remaining portion of the ship’s figurehead; further research is currently being carried out), a door, a metal rod, samples of wood and this medal awarded for the rescue of the crew. Much of the wreckage was recovered by the local residents before police and other authorities arrived at the scene. Looters went to great effort to salvage goods, being lowered down the high cliff faces to areas with little or no beach to collect items from the wreckage, their mates above watching out for dangerous waves. A Tasmanian newspaper reports on a court case in Stawell, Victoria, noting a man who was caught 2 months later selling tobacco from the wreckage of Eric the Red. Some of the silverware is still treasured by descendants of Mr Mackenzie who was given these items by officials for his help in securing the cargo. The gifts included silver coffee and teapots, half a dozen silver serviette rings and two sewing machines. A Mr G.W. Black has in his possession a medal and a purse that was awarded to his father, another Dawn crew member who was part of the rescue team. The medal is similarly inscribed and named “To John Black ….” (from “Shipwrecks” by Margaret E. Mackenzie, 3rd edition, published 1964). The wreck and cargo were sold to a Melbourne man who salvaged a quantity of high-quality tobacco and dental and surgical instruments. Timbers from the ship were salvaged and used in the construction of houses and shed around Apollo Bay, including a guest house, Milford House (since burnt down in bushfires), which had furniture, fittings and timber on the dining room floor from the ship. A 39.7-foot-long trading ketch, the Apollo, was also built from its timbers by Mr Burgess in 1883 and subsequently used in Tasmanian waters. It was the first attempt at shipbuilding in Apollo Bay. In 1881 a red light was installed about 300 feet above sea level at the base of the Cape Otway lighthouse to warn ships when they were too close to shore; It would not be visible unless a ship came within 3 miles from it. This has proved to be an effective warning. Nelson Johnson married Elizabeth Howard in 1881 and they had 10 children, the father of the medal’s donor being the youngest. They lived in 13 Tichbourne Place, South Melbourne, Victoria. Nelson died in 1922 in Fitzroy Victoria, age 66. In 1895 the owners of the S.S. Dawn, the Portland and Belfast Steam Navigation Co., wound up and sold out to the Belfast Company who took over the Dawn for one year before selling her to Howard Smith. She was condemned and sunk in Suva in 1928. The State Library of Victoria has a lithograph in its collection depicting the steamer Dawn and the shipwrecked men, titled. "Wreck of the ship Eric the Red, Cape Otway: rescue of the crew by the Dawn". The medal for bravery is associated with the ship the “The Eric the Red which is historically significant as one of Victoria's major 19th century shipwrecks. (Heritage Victoria Eric the Red; HV ID 239) The wreck led to the provision of an additional warning light placed below the Cape Otway lighthouse to alert mariners to the location of Otway Reef. The site is archaeologically significant for its remains of a large and varied cargo and ship's fittings being scattered over a wide area. The site is recreationally and aesthetically significant as it is one of the few sites along this coast where tourists can visit identifiable remains of a large wooden shipwreck, and for its location set against the background of Cape Otway, Bass Strait, and the Cape Otway lighthouse.“ (Victorian Heritage Database Registration Number S239, Official Number 8745 USA) This medal was awarded to Nelson Johnson by the U.S. President for bravery in the rescue of the Eric the Red crew. The obverse of the round, solid silver medal has an inscription around the rim. In the centre of the medal is the head of Liberty to the left, hair in a bun, with a sprig of leaves in the top left of a band around her head. There is a 6-pointed star below the portrait, between the start and end of the inscription. There are two raised areas on the rim, horizontally opposite each other, from the edge to just below the lettering and coinciding with the holes drilled in the edge. Slightly right of the top is a round indentation in the rim. The reverse has a wreath of leaves as a border, joined at the bottom by a ribbon bow. In the centre of the medal is an inscription, decorated with 3-pronged design and dots. The edge is plain with 2 small, rough and uneven holes horizontally opposite to each other, as though they had been used for mounting the medal at some stage. The medal has a matte finish on both sides and is slightly pitted and scratched.“PRESENTED BY THE PRESIDENT OF THE UNITED STATES” around the perimeter of the obverse of the medal. “TO / Nelson Johnson, / seaman of the British, / str “Dawn”, for bravery, / at risk of life, / in / rescuing the crew of / the American Ship / “Eric the Red.” “M” on obverse, truncation of the portraitwarrnambool, flagstaff hill, flagstaff hill maritime village, maritime museum, shipwreck coast, great ocean road, shipwreck artefact, eric the red, zaccheus allen, sewall, 1880, melbourne exhibition, cape otway, otway reef, victorian shipwreck, medal, nelson johnson, neils frederick yohnson, s.s. dawn, george morgan, hero -
 Flagstaff Hill Maritime Museum and Village
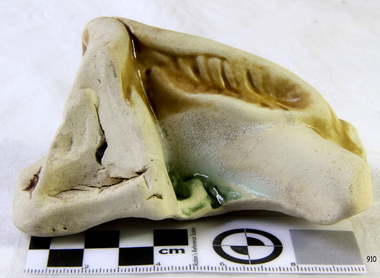
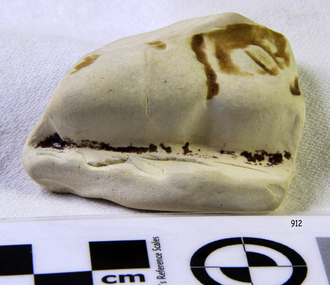
Ceramic - Ceramic Pieces, Minton Potteries, 1877
The ceramic pieces are two of five porcelain fragments washed up from the Loch Ard wreck near Port Campbell, Victoria. These fragments resemble the foot and leg of a large bird, and legend has it that another bird had drifted ashore at the same time as the Loch Ard peacock. This figurine is displayed at Flagstaff Hill Maritime Museum and regarded as the most valuable shipwreck relic. It is believed that all five fragments could belong to another peacock or a Minton porcelain stock that had been photographed in a Home Beautiful magazine in 1928. This stork appeared to be missing a leg and foot, and experts have hypothesised that the fragments could belong to this stork, the whereabouts of which are currently unknown. History of the Loch Ard: The Loch Ard got its name from ”Loch Ard”, a loch which lies to the west of Aberfoyle, and to the east of Loch Lomond. It means "high lake" in Scottish Gaelic. The vessel belonged to the famous Loch Line, which sailed many vessels from England to Australia. The Loch Ard was built in Glasgow by Barclay, Curdle and Co. in 1873, the vessel was a three-masted square-rigged iron sailing ship that measured 79.87 meters in length, 11.58 m in width, and 7 m in depth with a gross tonnage of 1693 tons with a mainmast that measured a massive 45.7 m in height. Loch Ard made three trips to Australia and one trip to Calcutta before its fateful voyage. Loch Ard left England on March 2, 1878, under the command of 29-year-old Captain Gibbs, who was newly married. The ship was bound for Melbourne with a crew of 37, plus 17 passengers. The general cargo reflected the affluence of Melbourne at the time. Onboard were straw hats, umbrellas, perfumes, clay pipes, pianos, clocks, confectionery, linen and candles, as well as a heavier load of railway irons, cement, lead and copper. There were other items included that were intended for display in the Melbourne International Exhibition of 1880. The voyage to Port Phillip was long but uneventful. Then at 3 am on June 1, 1878, Captain Gibbs was expecting to see land. But the Loch Ard was running into a fog, which greatly reduced visibility. Captain Gibbs was becoming anxious as there was no sign of land or the Cape Otway lighthouse. At 4 am, the fog lifted, and a lookout aloft announced that he could see breakers. The sheer cliffs of Victoria's west coast came into view, and Captain Gibbs realised that the ship was much closer to them than expected. He ordered as much sail to be set as time would permit and then attempted to steer the vessel out to sea. On coming head-on into the wind, the ship lost momentum, the sails fell limp, and Loch Ard's bow swung back towards land. Gibbs then ordered the anchors to be released in an attempt to hold their position. The anchors sank some 50 fathoms - but did not hold. By this time, the ship was among the breakers, and the tall cliffs of Mutton Bird Island rose behind. Just half a mile from the coast, the ship's bow was suddenly pulled around by the anchor. The captain tried to tack out to sea, but the ship struck a reef at the base of Mutton Bird Island, near Port Campbell. Waves subsequently broke over the ship, and the top deck became loose from the hull. The masts and rigging came crashing down, knocking passengers and crew overboard. When a lifeboat was finally launched, it crashed into the side of Loch Ard and capsized. Tom Pearce, who had launched the boat, managed to cling to its overturned hull and shelter beneath it. He drifted out to sea and then, on the flood tide, came into what is now known as Loch Ard Gorge. He swam to shore, bruised and dazed, and found a cave for shelter. Some of the crew stayed below deck to shelter from the falling rigging, but drowned when the ship slipped off the reef into deeper water. Eva Carmichael, a passenger, had raced onto the deck to find out what was happening, only to be confronted by towering cliffs looming above the stricken ship. In all the chaos, Captain Gibbs grabbed Eva and said, "If you are saved, Eva, let my dear wife know that I died like a sailor". That was the last Eva Carmichael saw of the captain. She was swept off the ship by a huge wave. Eva saw Tom Pearce on a small rocky beach and yelled to attract his attention. He dived in and swam to the exhausted woman and dragged her to shore. He took her to the cave and broke open the case of brandy, which had washed up on the beach. He opened a bottle to revive the unconscious woman. A few hours later, Tom scaled a cliff in search of help. He followed hoof prints and came by chance upon two men from nearby Glenample Station, three and a half miles away. In a complete state of exhaustion, he told the men of the tragedy. Tom then returned to the gorge while the two men rode back to the station to get help. By the time they reached Loch Ard Gorge, it was cold and dark. The two shipwreck survivors were taken to Glenample Station to recover. Eva stayed at the station for six weeks before returning to Ireland by steamship. In Melbourne, Tom Pearce received a hero's welcome. He was presented with the first gold medal of the Royal Humane Society of Victoria and a £1000 cheque from the Victorian Government. Concerts were performed to honour the young man's bravery and to raise money for those who lost family in the disaster. Of the 54 crew members and passengers on board, only two survived: the apprentice, Tom Pearce and the young woman passenger, Eva Carmichael, who lost her family in the tragedy. Ten days after the Loch Ard tragedy, salvage rights to the wreck were sold at auction for £2,120. Cargo valued at £3,000 was salvaged and placed on the beach, but most washed back into the sea when another storm developed. The wreck of Loch Ard still lies at the base of Mutton Bird Island. Much of the cargo has now been salvaged, and some items washed up into Loch Ard Gorge. Cargo and artefacts have also been illegally salvaged over many years before protective legislation was introduced in March 1982. One of the most unlikely pieces of cargo to have survived the shipwreck was a Minton majolica peacock- one of only nine in the world. The peacock was destined for the Melbourne 1880 International Exhibition. It had been well packed, which gave it adequate protection during the violent storm. Today, the Minton peacock can be seen at the Flagstaff Hill Maritime Museum in Warrnambool. From Australia's most dramatic shipwreck, it has now become Australia's most valuable shipwreck artifact and is one of the very few 'objects' on the Victorian State Heritage Register.The shipwreck of the Loch Ard is of significance for Victoria and is registered on the Victorian Heritage Register ( S 417). Flagstaff Hill has a varied collection of artefacts from Loch Ard and its collection is significant for being one of the largest accumulation of artefacts from this notable Victorian shipwreck. The collections object is to also give us a snapshot into history so we can interpret the story of this tragic event. The collection is also archaeologically significant as it represents aspects of Victoria's shipping history that allows us to interpret Victoria's social and historical themes of the time. The collections historically significance is that it is associated unfortunately with the worst and best-known shipwreck in Victoria's history. Glazed ceramic fragments; the two fragments fit together. They appear to be a leg section with foliage.flagstaff hill, flagstaff hill maritime museum and village, warrnambool, maritime museum, maritime village, great ocean road, shipwreck coast, ceramic, porcelain, piece, fragment, ceramic bird, loch ard, shipwreck, salvage, recover, 1877, 1878, minton, shard -
 Flagstaff Hill Maritime Museum and Village
Domestic object - Teapot, 1878
History of the Loch Ard: The Loch Ard got its name from ”Loch Ard” a loch which lies to the west of Aberfoyle, and the east of Loch Lomond. It means "high lake" in Scottish Gaelic. The vessel belonged to the famous Loch Line which sailed many vessels from England to Australia. The Loch Ard was built in Glasgow by Barclay, Curdle and Co. in 1873, the vessel was a three-masted square-rigged iron sailing ship that measured 79.87 meters in length, 11.58 m in width, and 7 m in depth with a gross tonnage of 1693 tons with a mainmast that measured a massive 45.7 m in height. Loch Ard made three trips to Australia and one trip to Calcutta before its fateful voyage. Loch Ard left England on March 2, 1878, under the command of 29-year-old Captain Gibbs, who was newly married. The ship was bound for Melbourne with a crew of 37, plus 17 passengers. The general cargo reflected the affluence of Melbourne at the time. Onboard were straw hats, umbrella, perfumes, clay pipes, pianos, clocks, confectionery, linen and candles, as well as a heavier load of railway irons, cement, lead and copper. There were other items included that were intended for display in the Melbourne International Exhibition of 1880. The voyage to Port Phillip was long but uneventful. Then at 3 am on June 1, 1878, Captain Gibbs was expecting to see land. But the Loch Ard was running into a fog which greatly reduced visibility. Captain Gibbs was becoming anxious as there was no sign of land or the Cape Otway lighthouse. At 4 am the fog lifted and a lookout aloft announced that he could see breakers. The sheer cliffs of Victoria's west coast came into view, and Captain Gibbs realised that the ship was much closer to them than expected. He ordered as much sail to be set as time would permit and then attempted to steer the vessel out to sea. On coming head-on into the wind, the ship lost momentum, the sails fell limp and Loch Ard's bow swung back towards land. Gibbs then ordered the anchors to be released in an attempt to hold its position. The anchors sank some 50 fathoms - but did not hold. By this time the ship was among the breakers and the tall cliffs of Mutton Bird Island rose behind. Just half a mile from the coast, the ship's bow was suddenly pulled around by the anchor. The captain tried to tack out to sea, but the ship struck a reef at the base of Mutton Bird Island, near Port Campbell. Waves subsequently broke over the ship and the top deck became loosened from the hull. The masts and rigging came crashing down knocking passengers and crew overboard. When a lifeboat was finally launched, it crashed into the side of Loch Ard and capsized. Tom Pearce, who had launched the boat, managed to cling to its overturned hull and shelter beneath it. He drifted out to sea and then on the flood tide came into what is now known as Loch Ard Gorge. He swam to shore, bruised and dazed, and found a cave in which to shelter. Some of the crew stayed below deck to shelter from the falling rigging but drowned when the ship slipped off the reef into deeper water. Eva Carmichael a passenger had raced onto the deck to find out what was happening only to be confronted by towering cliffs looming above the stricken ship. In all the chaos, Captain Gibbs grabbed Eva and said, "If you are saved Eva, let my dear wife know that I died like a sailor". That was the last Eva Carmichael saw of the captain. She was swept off the ship by a huge wave. Eva saw Tom Pearce on a small rocky beach and yelled to attract his attention. He dived in and swam to the exhausted woman and dragged her to shore. He took her to the cave and broke the open case of brandy which had washed up on the beach. He opened a bottle to revive the unconscious woman. A few hours later Tom scaled a cliff in search of help. He followed hoof prints and came by chance upon two men from nearby Glenample Station three and a half miles away. In a complete state of exhaustion, he told the men of the tragedy. Tom then returned to the gorge while the two men rode back to the station to get help. By the time they reached Loch Ard Gorge, it was cold and dark. The two shipwreck survivors were taken to Glenample Station to recover. Eva stayed at the station for six weeks before returning to Ireland by steamship. In Melbourne, Tom Pearce received a hero's welcome. He was presented with the first gold medal of the Royal Humane Society of Victoria and a £1000 cheque from the Victorian Government. Concerts were performed to honour the young man's bravery and to raise money for those who lost family in the disaster. Of the 54 crew members and passengers on board, only two survived: the apprentice, Tom Pearce and the young woman passenger, Eva Carmichael, who lost her family in the tragedy. Ten days after the Loch Ard tragedy, salvage rights to the wreck were sold at auction for £2,120. Cargo valued at £3,000 was salvaged and placed on the beach, but most washed back into the sea when another storm developed. The wreck of Loch Ard still lies at the base of Mutton Bird Island. Much of the cargo has now been salvaged and some items were washed up into Loch Ard Gorge. Cargo and artefacts have also been illegally salvaged over many years before protective legislation was introduced in March 1982. One of the most unlikely pieces of cargo to have survived the shipwreck was a Minton majolica peacock- one of only nine in the world. The peacock was destined for the Melbourne 1880 International Exhibition in. It had been well packed, which gave it adequate protection during the violent storm. Today the Minton peacock can be seen at the Flagstaff Hill Maritime Museum in Warrnambool. From Australia's most dramatic shipwreck it has now become Australia's most valuable shipwreck artifact and is one of very few 'objects' on the Victorian State Heritage Register.The shipwreck of the Loch Ard is of significance for Victoria and is registered on the Victorian Heritage Register ( S 417). Flagstaff Hill has a varied collection of artefacts from Loch Ard and its collection is significant for being one of the largest accumulation of artefacts from this notable Victorian shipwreck. The collections object is to also give us a snapshot into history so we can interpret the story of this tragic event. The collection is also archaeologically significant as it represents aspects of Victoria's shipping history that allows us to interpret Victoria's social and historical themes of the time. The collections historically significance is that it is associated unfortunately with the worst and best-known shipwreck in Victoria's history. Pewter teapot, recovered from the wreck of the Loch Ard. It has four legs; one is bent upwards. The metal is sometimes referred to as 'Britannia Metal'. The surface is encrusted, and the metal is broken in places.flagstaff hill, warrnambool, shipwrecked coast, flagstaff hill maritime museum, maritime museum, shipwreck coast, flagstaff hill maritime village, great ocean road, loch line, loch ard, captain gibbs, eva carmichael, tom pearce, glenample station, mutton bird island, loch ard gorge, pewter teapot, britannia metal teapot, teapot -
 Flagstaff Hill Maritime Museum and Village
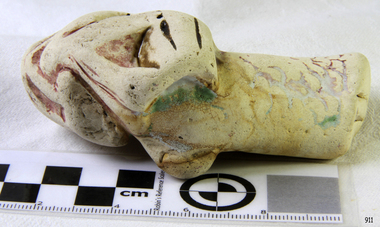
Ceramic - Ceramic Piece, Minton Potteries, ca. 1877
The ceramic piece is one of five porcelain fragments washed up from the Loch Ard wreck near Port Campbell, Victoria. These shards resemble the foot and leg of a large bird, and legend has it that another bird had drifted ashore at the same time as the Loch Ard peacock. This figurine is on display at Flagstaff Hill Maritime Museum and regarded as the most valuable shipwreck relic. It is believed that all five fragments could belong to another peacock or a Minton porcelain stork that had been photographed in a Home Beautiful magazine in 1928. This stork appeared to be missing a leg and foot, and experts have hypothesised that the five fragments could belong to this stork, the whereabouts of which are currently unknown. History of the Loch Ard: The Loch Ard got its name from ”Loch Ard” a loch which lies to the west of Aberfoyle, and the east of Loch Lomond. It means "high lake" in Scottish Gaelic. The vessel belonged to the famous Loch Line which sailed many vessels from England to Australia. The Loch Ard was built in Glasgow by Barclay, Curdle and Co. in 1873, the vessel was a three-masted square-rigged iron sailing ship that measured 79.87 meters in length, 11.58 m in width, and 7 m in depth with a gross tonnage of 1693 tons with a mainmast that measured a massive 45.7 m in height. Loch Ard made three trips to Australia and one trip to Calcutta before its fateful voyage. Loch Ard left England on March 2, 1878, under the command of 29-year-old Captain Gibbs, who was newly married. The ship was bound for Melbourne with a crew of 37, plus 17 passengers. The general cargo reflected the affluence of Melbourne at the time. Onboard were straw hats, umbrella, perfumes, clay pipes, pianos, clocks, confectionery, linen and candles, as well as a heavier load of railway irons, cement, lead and copper. There were other items included that were intended for display in the Melbourne International Exhibition of 1880. The voyage to Port Phillip was long but uneventful. Then at 3 am on June 1, 1878, Captain Gibbs was expecting to see land. But the Loch Ard was running into a fog which greatly reduced visibility. Captain Gibbs was becoming anxious as there was no sign of land or the Cape Otway lighthouse. At 4 am the fog lifted and a lookout aloft announced that he could see breakers. The sheer cliffs of Victoria's west coast came into view, and Captain Gibbs realised that the ship was much closer to them than expected. He ordered as much sail to be set as time would permit and then attempted to steer the vessel out to sea. On coming head-on into the wind, the ship lost momentum, the sails fell limp and Loch Ard's bow swung back towards land. Gibbs then ordered the anchors to be released in an attempt to hold its position. The anchors sank some 50 fathoms - but did not hold. By this time the ship was among the breakers and the tall cliffs of Mutton Bird Island rose behind. Just half a mile from the coast, the ship's bow was suddenly pulled around by the anchor. The captain tried to tack out to sea, but the ship struck a reef at the base of Mutton Bird Island, near Port Campbell. Waves subsequently broke over the ship and the top deck became loosened from the hull. The masts and rigging came crashing down knocking passengers and crew overboard. When a lifeboat was finally launched, it crashed into the side of Loch Ard and capsized. Tom Pearce, who had launched the boat, managed to cling to its overturned hull and shelter beneath it. He drifted out to sea and then on the flood tide came into what is now known as Loch Ard Gorge. He swam to shore, bruised and dazed, and found a cave in which to shelter. Some of the crew stayed below deck to shelter from the falling rigging but drowned when the ship slipped off the reef into deeper water. Eva Carmichael a passenger had raced onto the deck to find out what was happening only to be confronted by towering cliffs looming above the stricken ship. In all the chaos, Captain Gibbs grabbed Eva and said, "If you are saved Eva, let my dear wife know that I died like a sailor". That was the last Eva Carmichael saw of the captain. She was swept off the ship by a huge wave. Eva saw Tom Pearce on a small rocky beach and yelled to attract his attention. He dived in and swam to the exhausted woman and dragged her to shore. He took her to the cave and broke the open case of brandy which had washed up on the beach. He opened a bottle to revive the unconscious woman. A few hours later Tom scaled a cliff in search of help. He followed hoof prints and came by chance upon two men from nearby Glenample Station three and a half miles away. In a complete state of exhaustion, he told the men of the tragedy. Tom then returned to the gorge while the two men rode back to the station to get help. By the time they reached Loch Ard Gorge, it was cold and dark. The two shipwreck survivors were taken to Glenample Station to recover. Eva stayed at the station for six weeks before returning to Ireland by steamship. In Melbourne, Tom Pearce received a hero's welcome. He was presented with the first gold medal of the Royal Humane Society of Victoria and a £1000 cheque from the Victorian Government. Concerts were performed to honour the young man's bravery and to raise money for those who lost family in the disaster. Of the 54 crew members and passengers on board, only two survived: the apprentice, Tom Pearce and the young woman passenger, Eva Carmichael, who lost her family in the tragedy. Ten days after the Loch Ard tragedy, salvage rights to the wreck were sold at auction for £2,120. Cargo valued at £3,000 was salvaged and placed on the beach, but most washed back into the sea when another storm developed. The wreck of Loch Ard still lies at the base of Mutton Bird Island. Much of the cargo has now been salvaged and some items were washed up into Loch Ard Gorge. Cargo and artefacts have also been illegally salvaged over many years before protective legislation was introduced in March 1982. One of the most unlikely pieces of cargo to have survived the shipwreck was a Minton majolica peacock- one of only nine in the world. The peacock was destined for the Melbourne 1880 International Exhibition in. It had been well packed, which gave it adequate protection during the violent storm. Today the Minton peacock can be seen at the Flagstaff Hill Maritime Museum in Warrnambool. From Australia's most dramatic shipwreck it has now become Australia's most valuable shipwreck artefact and is one of very few 'objects' on the Victorian State Heritage Register.The shipwreck of the Loch Ard is of significance for Victoria and is registered on the Victorian Heritage Register ( S 417). Flagstaff Hill has a varied collection of artefacts from Loch Ard and its collection is significant for being one of the largest accumulation of artefacts from this notable Victorian shipwreck. The collections object is to also give us a snapshot into history so we can interpret the story of this tragic event. The collection is also archaeologically significant as it represents aspects of Victoria's shipping history that allows us to interpret Victoria's social and historical themes of the time. The collections historically significance is that it is associated unfortunately with the worst and best-known shipwreck in Victoria's history.Ceramic shard, broken piece of pottery with some diagonally carved features. It is possibly a peacock leg section and green foliage. The ceramic piece has remnants of a coloured glaze.flagstaff hill, flagstaff hill maritime museum and village, warrnambool, maritime museum, maritime village, great ocean road, shipwreck coast, ceramic, porcelain, piece, fragment, ceramic bird, loch ard, shipwreck, salvage, recover, 1877, 1878, minton, shard -
 Flagstaff Hill Maritime Museum and Village
Ceramic - Ceramic Piece, Minton Potteries, ca 1877
The ceramic piece is one of five porcelain fragments washed up from the Loch Ard wreck near Port Campbell, Victoria. These fragments resemble the foot and leg of a large bird, and legend has it that another bird had drifted ashore at the same time as the Loch Ard peacock. This figurine is on display at Flagstaff Hill Maritime Museum and regarded as the most valuable shipwreck relic. It is believed that all five fragments could belong to another peacock or a Minton porcelain stork that had been photographed in a Home Beautiful magazine in 1928. This stork appeared to be missing a leg and foot, and experts have hypothesised that the five fragments could belong to this stork, the whereabouts of which are currently unknown. A brief history of the Loch Ard (1873-1878): - The sailing ship Loch Ard was one of the famous Loch Line of ships that sailed the long voyage from England to Australia. Barclay, Curdle and Co. built the three-masted iron vessel in Glasgow in 1873. It had sailed three trips to Australia and one trip to Calcutta before its fateful voyage. Loch Ard left England on March 2, 1878, under the command of recently married, 29-year-old Captain Gibbs. It was bound for Melbourne with a crew of 37, plus 17 passengers. The general cargo reflected the affluence of Melbourne at the time. Onboard were straw hats, umbrellas, perfumes, clay pipes, pianos, clocks, confectionery, linen and candles, and a heavier load of railway irons, cement, lead and copper. Other cargo included items intended for display in the Melbourne International Exhibition of 1880. The Loch Ard had been sailing for three months and was close to its destination on June 1, 1878. Captain Gibbs had expected to see land at about 3 am, but the Loch Ard ran into a fog that greatly reduced visibility, and there was no sign of land or the Cape Otway lighthouse. The fog lifted at 4 am, and the sheer cliffs of Victoria's west coast were much closer to them than Captain Gibbs expected. He tried to manage the vessel but failed, and the ship struck a reef at the base of Mutton Bird Island, near Port Campbell. The top deck loosened from the hull, and the masts and rigging crashed down, knocking passengers and crew overboard. The lifeboat was launched by Tom Pearce but crashed into the side of Loch Ard and capsized. He clung onto its overturned hull and sheltered under it. He drifted out to sea, and the tide brought him back to what is now called Loch Ard Gorge. He swam to shore and found a cave for shelter. A passenger, Eva Carmichael, had raced onto the deck to find out what was happening and was confronted by towering cliffs above the ship. She was soon swept off the ship by a huge wave. Eva saw Tom Pearce on a small rocky beach and yelled to attract his attention. He swam out and dragged her to the shelter of the cave. He revived her with a bottle of brandy from a case that had washed up on the beach. Tom scaled a cliff in search of help and followed some horse hoof prints. He came from two men from Glenample Station, three and a half miles away. He told the men of the tragedy and then returned to the gorge while the two men rode back to the station to get help. They reached Loch Ard Gorge and took the two shipwreck survivors to Glenample Station to recover. Eva stayed at the station for six weeks before returning to Ireland by steamship. In Melbourne, Tom Pearce received a hero's welcome and was presented with a medal and some money. Of the 54 crew members and passengers on board, only two survived: the apprentice, Tom Pearce and the young woman passenger, Eva Carmichael, who lost her family in the tragedy. The shipwreck of the Loch Ard is of significance for Victoria and is registered on the Victorian Heritage Register ( S 417). Flagstaff Hill has a varied collection of artefacts from Loch Ard and its collection is significant for being one of the largest accumulation of artefacts from this notable Victorian shipwreck. The collections object is to also give us a snapshot into history so we can interpret the story of this tragic event. The collection is also archaeologically significant as it represents aspects of Victoria's shipping history that allows us to interpret Victoria's social and historical themes of the time. The collections historically significance is that it is associated unfortunately with the worst and best-known shipwreck in Victoria's history.Ceramic piece, broken, with remnants of burgundy, green and yellow glaze. The piece has been shaped. It could be a peacock leg section with green foliage with glaze. Noneflagstaff hill, flagstaff hill maritime museum and village, warrnambool, maritime museum, maritime village, great ocean road, shipwreck coast, ceramic, porcelain, piece, fragment, ceramic bird, loch ard, shipwreck, salvage, recover, 1877, 1878, minton, shard -
 Flagstaff Hill Maritime Museum and Village
Ceramic - Ceramic Piece, Minton Potteries, ca 1877
The ceramic piece is one of five porcelain fragments washed up from the Loch Ard wreck near Port Campbell, Victoria. These fragments resemble the foot and leg of a large bird, and legend has it that another bird had drifted ashore at the same time as the Loch Ard peacock. This figurine is on display at Flagstaff Hill Maritime Museum and regarded as the most valuable shipwreck relic. It is believed that all five fragments could belong to another peacock or a Minton porcelain stork that had been photographed in a Home Beautiful magazine in 1928. This stork appeared to be missing a leg and foot, and experts have hypothesised that the five fragments could belong to this stork, the whereabouts of which are currently unknown. A brief history of the Loch Ard (1873-1878): - The sailing ship Loch Ard was one of the famous Loch Line of ships that sailed the long voyage from England to Australia. Barclay, Curdle and Co. built the three-masted iron vessel in Glasgow in 1873. It had sailed three trips to Australia and one trip to Calcutta before its fateful voyage. Loch Ard left England on March 2, 1878, under the command of recently married, 29-year-old Captain Gibbs. It was bound for Melbourne with a crew of 37, plus 17 passengers. The general cargo reflected the affluence of Melbourne at the time. Onboard were straw hats, umbrellas, perfumes, clay pipes, pianos, clocks, confectionery, linen and candles, and a heavier load of railway irons, cement, lead and copper. Other cargo included items intended for display in the Melbourne International Exhibition of 1880. The Loch Ard had been sailing for three months and was close to its destination on June 1, 1878. Captain Gibbs had expected to see land at about 3 am, but the Loch Ard ran into a fog that greatly reduced visibility, and there was no sign of land or the Cape Otway lighthouse. The fog lifted at 4 am, and the sheer cliffs of Victoria's west coast were much closer to them than Captain Gibbs expected. He tried to manage the vessel but failed, and the ship struck a reef at the base of Mutton Bird Island, near Port Campbell. The top deck loosened from the hull, and the masts and rigging crashed down, knocking passengers and crew overboard. The lifeboat was launched by Tom Pearce but crashed into the side of Loch Ard and capsized. He clung onto its overturned hull and sheltered under it. He drifted out to sea, and the tide brought him back to what is now called Loch Ard Gorge. He swam to shore and found a cave for shelter. A passenger, Eva Carmichael, had raced onto the deck to find out what was happening and was confronted by towering cliffs above the ship. She was soon swept off the ship by a huge wave. Eva saw Tom Pearce on a small rocky beach and yelled to attract his attention. He swam out and dragged her to the shelter of the cave. He revived her with a bottle of brandy from a case that had washed up on the beach. Tom scaled a cliff in search of help and followed some horse hoof prints. He came from two men from Glenample Station, three and a half miles away. He told the men of the tragedy and then returned to the gorge while the two men rode back to the station to get help. They reached Loch Ard Gorge and took the two shipwreck survivors to Glenample Station to recover. Eva stayed at the station for six weeks before returning to Ireland by steamship. In Melbourne, Tom Pearce received a hero's welcome and was presented with a medal and some money. Of the 54 crew members and passengers on board, only two survived: the apprentice, Tom Pearce and the young woman passenger, Eva Carmichael, who lost her family in the tragedy. The shipwreck of the Loch Ard is of significance for Victoria and is registered on the Victorian Heritage Register ( S 417). Flagstaff Hill has a varied collection of artefacts from Loch Ard and its collection is significant for being one of the largest accumulation of artefacts from this notable Victorian shipwreck. The collections object is to also give us a snapshot into history so we can interpret the story of this tragic event. The collection is also archaeologically significant as it represents aspects of Victoria's shipping history that allows us to interpret Victoria's social and historical themes of the time. The collections historically significance is that it is associated unfortunately with the worst and best-known shipwreck in Victoria's history.Ceramic piece, broken with remnants of glaze. It has been shaped. It may be from a peacock leg section.Noneflagstaff hill, flagstaff hill maritime museum and village, warrnambool, maritime museum, maritime village, great ocean road, shipwreck coast, ceramic, porcelain, piece, fragment, ceramic bird, loch ard, shipwreck, salvage, recover, 1877, 1878, minton, shard -
 Flagstaff Hill Maritime Museum and Village
Photograph - Vessel "Strathgryfe", late 19th or early 20th century
This photograph was one of ten photographs donated to Flagstaff Hill Maritime Museum and Village by Fred Trewartha. Frederick John Fox Trewartha (Fred) was a well-known Warrnambool businessman. He was born in Beeac near Geelong in 1920 and came to Warrnambool with his family as a very young child. He was apprenticed to his father John, as a saddler and later opened his own shop on Raglan Parade. He then moved into working with tarpaulins and canvases for the trucking industry. Fred was keenly interested in photography (and was a member of the Warrnambool Cine Club), yachting and boat building. He kept his yacht moored at Port Fairy for many years and participated in sailing events locally and interstate. He also built boats with his sons. He had the opportunity to meet many older sailors and it's thought this photo (and others in the set) may have been given to him by one of these men. Fred Trewartha died in 2016 in Warrnambool. The "Strathgryfe" was a four masted steel barque built in 1890 by "Russell and Company", Port Glasgow and was owned by Duncan McGillivray (The Strathgryfe Ship Company Limited), Greenock. It arrived in Melbourne in December 1891 from New York. Between 1891 and 1910 it carried merchandise in and out of Australia to ports around the world - Melbourne to London (1892), Newcastle to San Francisco (1894), Capetown to Newcastle (1894), New York to Shanghai (1897), New York to Melbourne (1898), Frederickstadt to Melbourne (1899), Liverpool to Sydney (1900), San Francisco to Brisbane (1903), Newcastle to Pisagna, Chile (1905) and Rotterdam to Melbourne (1910). It carried breadstuffs from San Francisco, coal from Newcastle, wool from Sydney, saltpetre from Hamburg and wheat from Brisbane and Melbourne as well as a variety of general merchandise. In 1898, whilst on route between New York and Melbourne, it came across the Captain and crew of the missing barque "Glen Huntley" which had been reported as "lost" several months earlier. They had been marooned at Tristan D'Acunha (a remote group of volcanic islands in the South Atlantic ocean). Captain McIntyre, of the Strathgryfe, offered to bring Captain Shaw (of the Glen Huntly) on to Melbourne with them but the "old mariner" decided to stay on with his crew till arrangements could be made for rescuing the whole of them. In 1899, when in Melbourne, seven of its crew refused to go to sea in it due to its unsafe conditions. They said the vessel was unseaworthy and that the rigging was unsafe and the lifeboats, not watertight. The Captain (Donald McIntyre) denied the allegations and produced a marine surveyor's certificate as evidence of the condition of the vessel. The men were sentenced to three weeks imprisonment. In 1901 there was a fire on board the Strathgryfe just after it left Sydney for London which resulted in many bales of wool being destroyed. In 1902 it was beached at Shellback island (near Wilson's promontory) for several weeks and had to be considerably dismantled in order to lighten its load enough to allow tugs to pull it back into deep water. In 1910 it was sold to a German firm and renamed "Margretha". It continued to operate in Australian ports until 1914 when it left Sydney for the English Channel with 42,438 bags of wheat. However owing to W.W.1 breaking out, it made for the port of St Michael's where it remained for twenty-one months. Later it was seized by the Portuguese Government and renamed "Graciosa" and was leased back to the English Government. It was sunk by two German submarines in 1918.This photograph is significant as a record of the world wide mercantile trade Australia was engaged in at the end of the nineteenth century and beginning of the twentieth century.Black and white photograph of a four masted barque moored at a dock. The rigging and two lifeboats are clearly visible. Three large timber logs are in the foreground. On the back of the photograph, the donor's name and telephone number have been written in black ballpoint pen and the name of the ship has been handwritten (incorrectly) in pencil in cursive script.Back of Photo - donor's name and telephone number "Strarthgryfe" [Strathgryfe] / "late" / "Margurita" [Margretha]flagstaff hill maritime museum and village, warrnambool, great ocean road, shipwreck coast, strathgryfe, barque, steel barque, margretha, graciosa, frederick trewartha, mercantile trade, russell and company, merchandise, cargo ship, glen huntly, w. w. 1 -
 Flagstaff Hill Maritime Museum and Village
Functional object - Brass rod, Russell & Co, Circa 1886
In the 19th century, the Industrial Revolution meant that shipbuilders could build ships using iron. These iron ships could be much larger, with more space for cargo and they didn't need as much work to keep them in good condition. Isambard Kingdom Brunel's "Great Britain" built in 1843, was the first ship to be built entirely of wrought iron. In the 1880's steel began to be used instead of iron. Ships also began to be fitted with steam engines although a great deal of coal was needed to travel even short distances. For this reason, ships continued to be fitted out with sails even though some came with engines. The iron-hulled, four-masted barque, the Falls of Halladale, was a bulk carrier of general cargo. She left New York in August 1908 on her way to Melbourne and Sydney. In her hold, along with 56,763 tiles of unusual beautiful green American slates (roofing tiles), 5,673 coils of barbed wire, 600 stoves, 500 sewing machines, 6500 gallons of oil, 14400 gallons of benzene, and many other manufactured items, were 117 cases of crockery and glassware. Three months later and close to her destination, a navigational error caused the Falls of Halladale to be wrecked on a reef off the Peterborough headland at 3 am on the morning of the 15th of November, 1908. The captain and 29 crew members all survived, but her valuable cargo was largely lost, despite two salvage attempts in 1908-09 and 1910. ABOUT THE ‘FALLS OF HALLADALE’ (1886 - 1908) Built: in1886 by Russell & Co., Greenock shipyards, River Clyde, Scotland, UK. The company was founded in 1870 (or 1873) as a partnership between Joseph Russell (1834-1917), Anderson Rodger and William Todd Lithgow. During the period 1882-92 Russell & Co., standardised designs, which sped up their building process so much that they were able to build 271 ships over that time. In 1886 they introduced a 3000 ton class of sailing vessel with auxiliary engines and brace halyard winches. In 1890 they broke the world output record. Owner: Falls Line, Wright, Breakenridge & Co, 111 Union Street, Glasgow, Scotland. Configuration: Four masted sailing ship; iron-hulled barque; iron masts, wire rigging, fore & aft lifting bridges. Size: Length 83.87m x Breadth 12.6m x Depth 7.23m, Gross tonnage 2085 ton Wrecked: the night of 14th November 1908, Curdies Inlet, Peterborough south west Victoria Crew: 29 The Falls of Halladale was a four-masted sailing ship built-in 1886 in Glasgow, Scotland, for the long-distance cargo trade and was mostly used for Pacific grain trade. She was owned by Wright, Breakenridge & Co of Glasgow and was one of several Falls Line ships, all of which were named after waterfalls in Scotland. The lines flag was of red, blue and white vertical stripes. The Falls of Halladale had a sturdy construction built to carry maximum cargo and able to maintain full sail in heavy gales, one of the last of the ‘windjammers’ that sailed the Trade Route. She and her sister ship, the Falls of Garry, were the first ships in the world to include fore and aft lifting bridges. Previous to this, heavily loaded vessels could have heavy seas break along the full length of the deck, causing serious injury or even death to those on deck. The new, raised catwalk-type decking allowed the crew to move above the deck stormy conditions. This idea is still used today on the most modern tankers and cargo vessels and has proved to be an important step forward in the safety of men at sea. On 4th August 1908, with new sails, 29 crew, and 2800 tons of cargo, the Falls of Halladale left New York, bound for Melbourne and Sydney via the Cape of Good Hope. The cargo on board was valued at £35,000 and included 56,763 tiles of American slate roofing tiles (roof slates), 5,673 coils of barbed wire, 600 stoves, 500 sewing machines, 6,500 gallons of oil, 14,400 gallons of benzene, plumbing iron, 117 cases of crockery and glassware and many other manufactured items. The Falls of Halladale had been at sail for 102 days when, at 3 am on the night of 14th November 1908, under full sail in calm seas with a six knots breeze behind and misleading fog along the coast, the great vessel rose upon an ocean swell and settled on top of a submerged reef near Peterborough on the south-west Victoria’s coast. The ship was jammed on the rocks and began filling with water. The crew launched the two lifeboats and all 29 crew landed safely on the beach over 4 miles away at the Bay of Islands. The postmistress at Peterborough, who kept a watch for vessels in distress, saw the stranding and sent out an alert to the local people. A rescue party went to the aid of the sailors and the Port Campbell rocket crew was dispatched, but the crew had all managed to reach shore safely by the time help arrived. The ship stayed in full sail on the rocky shelf for nearly two months, attracting hundreds of sightseers who watched her slowly disintegrate until the pounding seas and dynamiting by salvagers finally broke her back, and her remains disappeared back into deeper water. The valuable cargo was largely lost, despite two salvage attempts in 1908-09 and 1910. Further salvage operations were made from 1974-1986, during which time 22,000 slate tiles were recovered with the help of 14 oil drums to float them, plus personal artefacts, ship fittings, reams of paper and other items. The Court of Marine Inquiry in Melbourne ruled that the foundering of the ship was entirely due to Captain David Wood Thomson’s navigational error, not too technical failure of the Clyde-built ship. The shipwreck is a popular site for divers, about 300m offshore and in 3 – 15m of water. Some of the original cargo can be seen at the site, including pieces of roof slate and coils of barbed wire. This particular artefact was one of many found by John Laidlaw (a local Warrnambool diver) when diving on the Falls of Halladale in the 1960's. In August 1973, John Laidlaw and Stan McPhee went on to discover the underwater location of the Schomberg - a passenger ship that ran aground on December 26th 1855 near Peterborough which now lies in almost 9 metres of water. When John Laidlaw died, his family donated a number of artefacts to Flagstaff Hill.This item is significant as it was recovered by a local diver from the Falls of Halladale. The Falls of Halladale shipwreck is listed on the Victorian Heritage Register (No. S255). She was one of the last ships to sail the Trade Routes. She is one of the first vessels to have fore and aft lifting bridges. She is an example of the remains of an International Cargo Ship and also represents aspects of Victoria’s shipping industry. The wreck is protected as a Historic Shipwreck under the Commonwealth Historic Shipwrecks Act (1976).Long, slender, smooth brass rod tapering from 1.5 cm diameter at one end to .8 cm and widening back out to 1.5 cm at opposite end. One end has a smooth, rounded edge and the other end curves in and out with the end showing evidence of a piece having been broken off.flagstaff hill, flagstaff hill maritime museum and village, flagstaff hill divers, great ocean road, shipwreck coast, warrnambool, falls of halladale, falls of halladale wreck, shipwreck artefact, artefact, brass artefact, brass rod, brass fitting, diver, john laidlaw -
 Flagstaff Hill Maritime Museum and Village
Decorative object - Brass Finial, Russell & Co, circa 1886
In the 19th century, the Industrial Revolution meant that shipbuilders could build ships using iron. These iron ships could be much larger, with more space for cargo, and they didn't need as much work to keep them in good condition. Isambard Kingdom Brunel's "Great Britain" built in 1843, was the first ship to be built entirely of wrought iron. In the 1880's steel began to be used instead of iron. Ships also began to be fitted with steam engines, although a great deal of coal was needed to travel even short distances. For this reason, ships continued to be fitted out with sails even though many came with engines. The iron-hulled, four-masted barque, the Falls of Halladale, was a bulk carrier of general cargo. She left New York in August 1908 on her way to Melbourne and Sydney. In her hold, along with 56,763 tiles of unusual, beautiful green American slates (roofing tiles), 5,673 coils of barbed wire, 600 stoves, 500 sewing machines, 6500 gallons of oil, 14400 gallons of benzene, and many other manufactured items, were 117 cases of crockery and glassware. Three months later and close to her destination, a navigational error caused the Falls of Halladale to be wrecked on a reef off the Peterborough headland at 3 am on the morning of the 15th of November, 1908. The captain and 29 crew members all survived, but her valuable cargo was largely lost, despite two salvage attempts in 1908-09 and 1910. ABOUT THE ‘FALLS OF HALLADALE’ (1886 - 1908): - Built: in1886 by Russell & Co., Greenock shipyards, River Clyde, Scotland, UK. The company was founded in 1870 (or 1873) as a partnership between Joseph Russell (1834-1917), Anderson Rodger and William Todd Lithgow. During the period 1882-92, Russell & Co. standardised designs, which sped up their building process so much that they were able to build 271 ships over that time. In 1886, they introduced a 3000-ton class of sailing vessel with auxiliary engines and brace halyard winches. In 1890, they broke the world output record. Owner: Falls Line, Wright, Breakenridge & Co, 111 Union Street, Glasgow, Scotland. Configuration: Four-masted sailing ship; iron-hulled barque; iron masts, wire rigging, fore & aft lifting bridges. Size: Length 83.87m x Breadth 12.6m x Depth 7.23m, Gross tonnage 2085 ton Wrecked: the night of 14th November 1908, Curdies Inlet, Peterborough, south west Victoria Crew: 29 The Falls of Halladale was a four-masted sailing ship built in 1886 in Glasgow, Scotland, for the long-distance cargo trade and was mostly used for Pacific grain trade. She was owned by Wright, Breakenridge & Co of Glasgow and was one of several Falls Line ships, all of which were named after waterfalls in Scotland. The lines flag was of red, blue and white vertical stripes. The Falls of Halladale had a sturdy construction built to carry maximum cargo and was able to maintain full sail in heavy gales, one of the last of the ‘windjammers’ that sailed the Trade Route. She and her sister ship, the Falls of Garry, were the first ships in the world to include fore and aft lifting bridges. Previous to this, heavily loaded vessels could have heavy seas break along the full length of the deck, causing serious injury or even death to those on deck. The new, raised catwalk-type decking allowed the crew to move above the deck in stormy conditions. This idea is still used today on the most modern tankers and cargo vessels and has proved to be an important step forward in the safety of men at sea. On 4th August 1908, with new sails, 29 crew, and 2800 tons of cargo, the Falls of Halladale left New York, bound for Melbourne and Sydney via the Cape of Good Hope. The cargo on board was valued at £35,000 and included 56,763 tiles of American slate roofing tiles (roof slates), 5,673 coils of barbed wire, 600 stoves, 500 sewing machines, 6,500 gallons of oil, 14,400 gallons of benzene, plumbing iron, 117 cases of crockery and glassware and many other manufactured items. The Falls of Halladale had been at sail for 102 days when, at 3 am on the night of 14th November 1908, under full sail in calm seas with a six knots breeze behind and misleading fog along the coast, the great vessel rose upon an ocean swell and settled on top of a submerged reef near Peterborough on the south-west Victoria’s coast. The ship was jammed on the rocks and began filling with water. The crew launched the two lifeboats and all 29 crew landed safely on the beach over 4 miles away at the Bay of Islands. The postmistress at Peterborough, who kept a watch for vessels in distress, saw the stranding and sent out an alert to the local people. A rescue party went to the aid of the sailors, and the Port Campbell rocket crew was dispatched, but the crew had all managed to reach shore safely by the time help arrived. The ship stayed in full sail on the rocky shelf for nearly two months, attracting hundreds of sightseers who watched her slowly disintegrate until the pounding seas and dynamiting by salvagers finally broke her back, and her remains disappeared back into deeper water. The valuable cargo was largely lost, despite two salvage attempts in 1908-09 and 1910. Further salvage operations were made from 1974-1986, during which time 22,000 slate tiles were recovered with the help of 14 oil drums to float them, plus personal artefacts, ship fittings, reams of paper and other items. The Court of Marine Inquiry in Melbourne ruled that the foundering of the ship was entirely due to Captain David Wood Thomson’s navigational error, not too technical failure of the Clyde-built ship. The shipwreck is a popular site for divers, about 300m offshore and in 3 – 15m of water. Some of the original cargo can be seen at the site, including pieces of roof slate and coils of barbed wire. This particular artefact was one of many found by John Laidlaw (a local Warrnambool diver) when diving on the Falls of Halladale in the 1960's. In August 1973, John Laidlaw and Stan McPhee went on to discover the underwater location of the Schomberg - a passenger ship that ran aground on December 26th 1855 near Peterborough and which now lies in almost 9 metres of water. When John Laidlaw died, his family donated a number of artefacts to Flagstaff Hill. The brass finial may have been part of a larger decorative item such as a lamp or clock bracket.This item is significant as it was taken from the Falls of Halladale shipwreck which is listed on the Victorian Heritage Register (No. S255). She was one of the last ships to sail the Trade Routes. She is one of the first vessels to have fore and aft lifting bridges. She is an example of the remains of an International Cargo Ship and also represents aspects of Victoria’s shipping industry. The wreck is protected as a Historic Shipwreck under the Commonwealth Historic Shipwrecks Act (1976)A brass, bell-shaped object with a body approximately 3 cm high. It has an outer lip, straight sides that taper in and a flat "cap". The inside of the object is plain with evidence of vertigris. It has a decorative topping almost 2 cm high, which has a double concave hollow neck.flagstaff hill, flagstaff hill divers, flagstaff hill maritime museum and village, great ocean road, warrnambool, falls of halladale, falls of halladale wreck, shipwreck artefact, artefact, brass artefact, brass finial, brass fitting, shipwreck coast, diver, john laidlaw, finial, brass decoration, handmade -
 Flagstaff Hill Maritime Museum and Village
Functional object - Metal ship's bolt, Russell & Co, Circa 1886
In the 19th century, the Industrial Revolution meant that shipbuilders could build ships using iron. These iron ships could be much larger, with more space for cargo and they didn't need as much work to keep them in good condition. Isambard Kingdom Brunel's "Great Britain" built in 1843, was the first ship to be built entirely of wrought iron. In the 1880's steel began to be used instead of iron. Ships also began to be fitted with steam engines although a great deal of coal was needed to travel even short distances. For this reason, ships continued to be fitted out with sails even though some came with engines. The iron-hulled, four-masted barque, the Falls of Halladale, was a bulk carrier of general cargo. She left New York in August 1908 on her way to Melbourne and Sydney. In her hold, along with 56,763 tiles of unusual beautiful green American slates (roofing tiles), 5,673 coils of barbed wire, 600 stoves, 500 sewing machines, 6500 gallons of oil, 14400 gallons of benzene, and many other manufactured items, were 117 cases of crockery and glassware. Three months later and close to her destination, a navigational error caused the Falls of Halladale to be wrecked on a reef off the Peterborough headland at 3 am on the morning of the 15th of November, 1908. The captain and 29 crew members all survived, but her valuable cargo was largely lost, despite two salvage attempts in 1908-09 and 1910. ABOUT THE ‘FALLS OF HALLADALE’ (1886 - 1908) Built: in1886 by Russell & Co., Greenock shipyards, River Clyde, Scotland, UK. The company was founded in 1870 (or 1873) as a partnership between Joseph Russell (1834-1917), Anderson Rodger and William Todd Lithgow. During the period 1882-92 Russell & Co., standardised designs, which sped up their building process so much that they were able to build 271 ships over that time. In 1886 they introduced a 3000 ton class of sailing vessel with auxiliary engines and brace halyard winches. In 1890 they broke the world output record. Owner: Falls Line, Wright, Breakenridge & Co, 111 Union Street, Glasgow, Scotland. Configuration: Four masted sailing ship; iron-hulled barque; iron masts, wire rigging, fore & aft lifting bridges. Size: Length 83.87m x Breadth 12.6m x Depth 7.23m, Gross tonnage 2085 ton Wrecked: the night of 14th November 1908, Curdies Inlet, Peterborough south west Victoria Crew: 29 The Falls of Halladale was a four-masted sailing ship built-in 1886 in Glasgow, Scotland, for the long-distance cargo trade and was mostly used for Pacific grain trade. She was owned by Wright, Breakenridge & Co of Glasgow and was one of several Falls Line ships, all of which were named after waterfalls in Scotland. The lines flag was of red, blue and white vertical stripes. The Falls of Halladale had a sturdy construction built to carry maximum cargo and able to maintain full sail in heavy gales, one of the last of the ‘windjammers’ that sailed the Trade Route. She and her sister ship, the Falls of Garry, were the first ships in the world to include fore and aft lifting bridges. Previous to this, heavily loaded vessels could have heavy seas break along the full length of the deck, causing serious injury or even death to those on deck. The new, raised catwalk-type decking allowed the crew to move above the deck stormy conditions. This idea is still used today on the most modern tankers and cargo vessels and has proved to be an important step forward in the safety of men at sea. On 4th August 1908, with new sails, 29 crew, and 2800 tons of cargo, the Falls of Halladale left New York, bound for Melbourne and Sydney via the Cape of Good Hope. The cargo on board was valued at £35,000 and included 56,763 tiles of American slate roofing tiles (roof slates), 5,673 coils of barbed wire, 600 stoves, 500 sewing machines, 6,500 gallons of oil, 14,400 gallons of benzene, plumbing iron, 117 cases of crockery and glassware and many other manufactured items. The Falls of Halladale had been at sail for 102 days when, at 3 am on the night of 14th November 1908, under full sail in calm seas with a six knots breeze behind and misleading fog along the coast, the great vessel rose upon an ocean swell and settled on top of a submerged reef near Peterborough on the south-west Victoria’s coast. The ship was jammed on the rocks and began filling with water. The crew launched the two lifeboats and all 29 crew landed safely on the beach over 4 miles away at the Bay of Islands. The postmistress at Peterborough, who kept a watch for vessels in distress, saw the stranding and sent out an alert to the local people. A rescue party went to the aid of the sailors and the Port Campbell rocket crew was dispatched, but the crew had all managed to reach shore safely by the time help arrived. The ship stayed in full sail on the rocky shelf for nearly two months, attracting hundreds of sightseers who watched her slowly disintegrate until the pounding seas and dynamiting by salvagers finally broke her back, and her remains disappeared back into deeper water. The valuable cargo was largely lost, despite two salvage attempts in 1908-09 and 1910. Further salvage operations were made from 1974-1986, during which time 22,000 slate tiles were recovered with the help of 14 oil drums to float them, plus personal artefacts, ship fittings, reams of paper and other items. The Court of Marine Inquiry in Melbourne ruled that the foundering of the ship was entirely due to Captain David Wood Thomson’s navigational error, not too technical failure of the Clyde-built ship. The shipwreck is a popular site for divers, about 300m offshore and in 3 – 15m of water. Some of the original cargo can be seen at the site, including pieces of roof slate and coils of barbed wire. This particular artefact was one of many found by John Laidlaw (a local Warrnambool diver) when diving on the Falls of Halladale in the 1960's. In August 1973, John Laidlaw and Stan McPhee went on to discover the underwater location of the Schomberg - a passenger ship sailing from Liverpool that ran aground on December 26th 1855 near Peterborough which now lies in almost 9 metres of water. When John Laidlaw died, his family donated a number of artefacts to Flagstaff Hill.This item is significant as it was recovered from the Falls of Halladale by a local diver. The Falls of Halladale shipwreck is listed on the Victorian Heritage Register (No. S255). She was one of the last ships to sail the Trade Routes. She is one of the first vessels to have fore and aft lifting bridges. She is an example of the remains of an International Cargo Ship and also represents aspects of Victoria’s shipping industry. The wreck is protected as a Historic Shipwreck under the Commonwealth Historic Shipwrecks Act (1976).A thick metal bolt with a flattened head at one end, a smooth shaft approximately 4 cm long followed by a 6 cm long screw section - some of which is damaged and flattened. The end appears to have had a part broken off and is showing rust damage. flagstaff hill, flagstaff hill divers, flagstaff hill maritime museum & village, great ocean road, warrnambool, shipwreck coast, falls of halladale, falls of halladale wreck, shipwreck artefact, artefact, diver, john laidlaw, bolt, metal bolt, metal artefact, ship's bolt -
 Flagstaff Hill Maritime Museum and Village
Letter - William Ferrier, 14th November 1905
The letter to William Ferrier of South Warrnambool from the Prime Minister and the Parliament of the Commonwealth recognised the significance of William’s brave and courageous lifesaving act to the people of Australia; “They all feel that your conduct was worthy of the best deeds done by British sailors in the past and they are proud to know that Australia can produce such as you.” The story of that brave rescue follows on below … The ship from which the sailors were rescued was the three-masted, iron and steel barquentine the La Bella, built in Norway in 1893. She was one of two iron and steel ships by Johan Smith, The company was one of the leading shipping families in Tvedestrand, Norway. She was significant to Norwegian shipping, being one of only 27 iron and steel ships ever built in Norway. She was registered in New Zealand and engaged from 1902 in inter-colonial trading of timber in the Pacific, between New Zealand and Australia and was often in Port Phillip Bay, Victoria. On 5th October 1905, the twelve-year-old La Bella left Lyttleton, New Zealand carrying a cargo of timber bound for Warrnambool, Australia. She was manned by a crew of twelve: the Master, (Captain Mylius, previously 1st Mate of La Bella, appointed Captain to La Bella on 6th February 1903) 2 Mates, Cook, six able seamen, one ordinary seaman and a boy. Bad weather en route caused her to shelter at Burnie on Tasmania's North West coast. On November 10th, the 37th day of her journey, La Bella approached Warrnambool. Captain Mylius steered her towards Lady Bay Channel in heavy south-west seas and evening mist. He ordered the helmsman to steer for the light. As the ship came round, a tremendous sea struck her on the port quarter, causing her to breach broadside in a north-westerly direction into breakers. The helm was brought round twice more, but each time heavy seas broke over her, the third time throwing the La Bella on to a submerged reef in Lady Bay now known as La Bella Reef (about 100 yards from the Warrnambool breakwater). The sea was so rough that it even wrenched a one-and-a-half ton anchor from its fastenings and into the sea. As Captain Mylius headed to the steel wheelhouse, intending to send up a rocket flare, a huge sea slammed the steel door into him (resulting in massive bruising front and back) Despite his injuries he still managed to set off a blue light, which he held up in his hands. La Bella’s lifeboats were filled with seawater and broke up on their chocks. The blue light was the first indication to people on the shore that there was a ship in distress. The Harbour Master, Captain Roe (who lived in the Harbour Master’s House opposite Flagstaff Hill), organised a group of volunteers to crew the lifeboat because the trained crew was unavailable; the crewmen were working on a steamer in Port Fairy at the time. He then poured oil onto the water to try and smooth the sea. At around 11 pm three of the crew took shelter in the steel forecastle but the sea crashed into it and broke it up. While the rest of the crew and onlookers watched helplessly in the moonlight the bodies were washed away into the sea, never to be seen again. Some of the crew lashed themselves to the weather rail to keep from being washed away. Watson, the ordinary seaman, became tangled in the rigging lines and was too weak to move, so the 2nd Mate, Robertson, put a line onto him so that he wouldn’t wash off. Around 11 pm three of the crew were unconscious from exhaustion. The situation on La Bella was becoming dangerous. The 2nd Mate moved to the ‘house’ and soon afterwards the ship slipped in the heavy sea. The lashings of the 1st Mate and the ‘boy’ Denham had kept them safe until about 2 am when they were washed overboard; no one was able to help. One by one, the exhausted crew were being washed overboard, too weak to hold on any longer. During the night the La Bella had broken into two and the deckhouse ran out towards the sea. Two more men drowned when trying to reach the lifeboat. By sunrise, the only survivors of the twelve were the Master, 2nd Mate and three seamen. Early in the morning, Captain Roe used the rocket apparatus on shore to try and shoot a line to the ship for a safer rescue but each attempt fell short of the target. Several attempts were made by the lifeboat to rescue the stricken sailors, but the rough conditions made this difficult for the boat to get close enough to the ship and the lifeboat had to return to shore. During a final attempt to reach the ship Captain Mylius ordered his men to jump into the sea. Leonard Robertson, 2nd mate, jumped and swam towards the lifeboat, taking hold of the boat hook offered to him. Oscar Rosenholme managed to reach the boat floating on a piece of timber from the ship’s load and a third survivor, Noake, also made the boat. Along with the lifeboat rescue crew, 25-year-old William Ferrier rowed his small dingy through the heavy seas and managed to rescue the Captain, whom he landed on the breakwater. Ferrier then returned to the ship to attempt a final rescue, losing his oars and rowlocks into the high sea. Using just a spare paddle he skulled towards the La Bella, reaching her stern in time to cut loose the lone surviving sailor, Payne, from the lashing that held him to the ship; the terrified sailor dropped from the ship and into the dingy. Shortly after the last man was rescued, the La Bella was lifted by a huge wave and crashed back down on the reef; she broke up and sank. The ordeal had lasted ten hours. The survivors were taken to the nearby Bay View Hotel and gratefully received warm food and clothing, medical attention and a place to sleep. In the following days, an unidentified body of a young person has washed ashore; it was either Watson or Denham. The body was buried in the Warrnambool cemetery with an appropriate gravestone and inscription. William Ferrier became a national hero as news of the daring rescue spread. In recognition of his bravery in the two daring rescues, he was awarded the Silver Medal for Bravery by the Royal Humane Society and was honoured in the letter from the Prime Minister and the Parliament of the Commonwealth, telegrams and a cheque for £20 from the Governor-General, over £150 subscribed by the public, including Warrnambool and district and readers of The Argus, and a gold medal from the Glenelg Dinghy Club of South Australia. Ferrier’s rescue efforts are one of the most heroic in Victoria’s shipwreck history. (William Ferrier’s son, Frank, received a similar award almost fifty years later when he helped rescue four members of the crew on the yacht Merlan after it ran on to a reef near the Point Lonsdale Lighthouse. ) The wreck of La Bella now lies on her port side in 13 metres of sheltered water inside the reef she struck. The bow section is relatively intact and part of the stern has drifted north-easterly towards the mouth of the Hopkins River. The reef the La Bella struck now bears its name. Those five rescued from the La Bella were Captain George Mylius, Leonard Robertson (2nd Mate, 21 years old), R. Payne, Oscar Rosenholme and Jack Noake. Those seven who lost their lives were Mr Coulson (1st mate), Charles Jackman (cook) Gustave Johnson, Pierre Johann and Robert Gent (all able seamen), Harry Watson (ordinary seaman) and Jack Denham (ship’s boy), Captain Mylius was found guilty of careless navigation; he had sailed into the bay without the services of a pilot. His Master Certificate was suspended for twelve months. Later he was also charged with the manslaughter of one of the crew who had died when the La Bella was wrecked but found not guilty. The event’s adverse publicity and damage to his career took a toll on his health and he died of a heart attack six months after the wreck; he was only thirty-seven. His body was buried in the Melbourne General Cemetery. The La Bella was “the best documented of all sailing ships owned in New Zealand”. Her record books, ship logs, correspondence and supporting papers are still available. At the time of the tragedy, she was owned by Messers David C.Turnbull and Co. of Timaru, New Zealand timber merchants and shipping agents, who had purchased her on 13th December 1901. A detailed account of the last journey of La Bella can be read in “Leonard Robertson, the Whangaroa & La Bella” written by Jack Churchouse, published in 1982 by Millwood Press Ltd, Wellington, NZ. As well as this letter, Flagstaff Hill’s La Bella Collection includes a photograph of the wrecked La Bella, a brass rail holder and a postcard of William Ferrier with four of the survivors. Some 15 – 17 ships are believed to have sunk in Lady Bay, but only two have been discovered on the seafloor; the “La Bella” and the “Edinburgh Castle”. Both wrecks are popular diving sites and are preserved as significant historical marine and marine archaeological sites. This original congratulatory letter sent to William Ferrier by the Prime Minister and Government of Australia demonstrates the importance attached to his efforts for Victoria and to Australia. The letter is part of the La Bella Collection and is significant at both a local and state level. Its connection to the La Bella shipwreck and the rescue of five survivors highlights the dangers of Victoria’s Shipwreck Coast. The letter to William Ferrier from the Australian Government acknowledges the bravery of ordinary Australians who risked their lives to save victims of shipwrecks along the coast. The letter is significant to the history of Warrnambool as it honours William Ferrier, a local fisherman whose descendants continue to live in the area. It highlights the way of life of people who lived in coastal towns in 19th century Victoria and the effects of shipwrecks upon them. The letter connects to the postcard of William Ferrier with four of the five rescued crew, the photograph of the wreck of the La Bella and the artefact from the wreck, the rail holder. This letter is significant because of its association with the sailing ship “La Bella”. The “La Bella” is of local and state and national significance. It is one of the only two shipwrecks discovered in Lady Bay, Warrnambool, out of the 15-17 shipwrecks in the bay. Letter to William Ferrier of South Warrnambool from the Prime Minister and Members of Parliament commending him on his bravery. The printed letterhead includes a coat of arms in the top centre and the official address. The letter is very neatly hand written in black pen and includes 4 signatures of Members of Parliament. The rectangular paper is cream coloured with some yellow/brown discolouring. It has the letterhead on the right hand side of it and the written letter begins below the letterhead. The paper has been folded so that the right side becomes the cover page of the letter. The writing is continued onto the inside right hand page of the folded paper and the writing ends here. There is more recent writing on the bottom right hand corner of the back page. The paper has been officially folded in half a total 3 times and there is heavy discolouration on the sections that form the front and back of the folded letter. There is a 4th fold line that is less pronounced that the other folds and would make the paper the size to fit into a pocket. At several fold creases the paper has worn through. The edges of the paper have minor tears. The printed coat of arms is that of the House of Representatives. Underneath is printed “The Parliament of the Commonwealth, / Parliament House / Melbourne”. The hand written, letter is dated “14th November, 1905” and addressed to “Mr. William Ferrier / South Warrnambool” The letter begins “The Speaker, the Prime Minister and Members of the Ministry and its supporters, the Leader and Members of the Opposition, the Leader and Members of the Labour Party, being all the Members of the House of Representatives of the Federal Parliament of Australia” … It continues “desire to express to you their appreciation of your bravery in skulling out to the wreck of the “La Bella” at Warrnambool on Saturday, 11th November, 1905, and recovering therefrom two of the crew who were in imminent danger of their lives. They all feel that your conduct was worthy of the best deeds done by British sailors in the past and they are proud to know that Australia can produce such as you.” The letter is “Signed on behalf of the Members – Speaker (Frederick Holder ), Deputy Leader of the Opposition (Joseph Cook ), Prime Minister (Alfred Deakin), Leader of the Labour Party ( J.C. Watson)” On the back of the letter is blue ink handwriting “OWNER / G. FERRIER / TO. BE. PHOTOGRAPHED / 27-4-76”la bella, william ferrier, bill ferrier, lady bay, 1905, 10th november 1905, 11th november 1905, parliament of the commonwealth, prime minister, australian government, new zealand, flagstaff hill, warrnambool, shipwrecked coast, flagstaff hill maritime museum, maritime museum, shipwreck coast, flagstaff hill maritime village -
 Flagstaff Hill Maritime Museum and Village
Tool - Hook, Mid-20th century
A cast iron hook was made for lifting heavy loads in a marine or warehouse environment. The hook would be attached to the end of a chain or rope around a heavy load such as a pallet or container. The other end may have been joined to a pulley or crane for lifting and moving it around. The inscription on the hook shows the SWL or Safe Working Load as 3 Ton. The SWL was used in the industry for many years to rate safe loads but it is no longer used to identify the maximum capacity of equipment. In 2002 the Australian Standard AS 1418 for Cranes, Hoists and Winches changed, and the term Safe Work Load was changed to Rated Capacity, which was defined differently.The hook represents the equipment needed on a ship or at a port, railyard, transport depot or warehouse in the 19th and 20th centuries to move cargo and loads. The inscription of SWL on the hook is significant for its use as a guide for many years to work out the weight of the load the hook could safely hold. However, time and experience have led to a change in Australian Standards and the load is now measured by another formula that gives the load's Rated Capacity.Hook; large iron hook with a ring formed in the top. Inscription stamped into the metal and indicates that the Safe Working Load (SWL) for the hook to lift is 3 Ton.Marked "ani" "SWL 3TON"warrnambool, shipwreck coast, flagstaff hill, flagstaff hill maritime museum, flagstaff hill maritime village, lifting hook, maritime equipment, lifting equipment, warehousing, cargo, loads, rigging, marine technology, swl, safe working load, 3 ton, rated capacity, load limit