Showing 1218 items matching " railway buildings"
-
 Ballarat Tramway Museum
Photograph - Illustration/s, Grenville St. and Sturt St. Ballarat
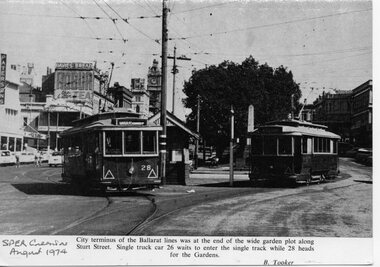
Black and white illustration from the South Pacific Electric Railway Co-op (Sydney Tramway Museum) - Aug. 1974 calendar of Ballarat trams 26 and 28 at the intersection of Grenville St. and Sturt St. Tram 28 proceeding to the Gardens via Drummond St., while 26 waits for 28 to clear and proceed to what appears on the destination to be Mt. Pleasant. Photo undated, but prior to the fitting of marker lights on the drivers canopy window sills - during the 1950's. Photo caption mentions that this was the City terminus of the system - incorrect during the SEC operational days. Photo by B. Tooker. Has buildings on either side of Sturt St. in background.On bottom right hand corner "SPER Calendar Aug. 1974"trams, tramways, ballarat, sturt st., grenville st. -
 Ballarat Tramway Museum
Newspaper, The Courier Ballarat, "Lydiard St. rail crossing repaired", 25/10/1971 12:00:00 AM
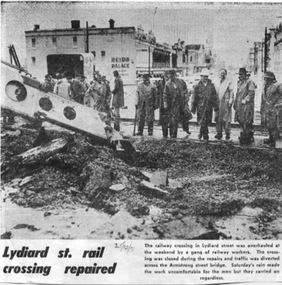
Newspaper clipping from The Courier, 25/10/1971 of a photo and caption of railway workers replacing the level crossing track at the Lydiard St. North rail crossing, in order to remove the tramway track. Has a photo showing workmen in the rain, a Gradall excavator and buildings in Lydiard St. in the background, including Reid's Palace.On top edge in blue ink "Taking up the tram lines" and on bottom "25/10/71".trams, tramways, railway crossing, tram track, lydiard st. north -
 Ballarat Tramway Museum
Photograph - Black & White Photograph/s, Wal Jack, 1935
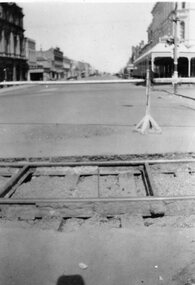
Black and white photograph of the former Phoenix Foundry railway line in Armstrong St. Ballarat crossing the Sturt St. (north side) tram line, looking south. Has Town Hall and Myer (formally Snows) building in the background, along with a tram stop on the corner. Track has been dug out, exposing the sleepers and one tie bar. Has road barriers in background. Photo taken1935, during the reconstruction of the tramway system. On Velox photo paper.On rear in top right hand corner in blue ink "12004". Above main writing in pencil is the number "74". On bottom half in light black ink "The old piece of Rly line in Armstrong St. crossing Sturt St. tram line Ballarat (1935)" In Wal Jack's handwriting.trams, tramways, phoenix foundry, armstrong st, sturt st, railway siding -
 Ballarat Tramway Museum
Book, "Ballarat Illustrated", 1972
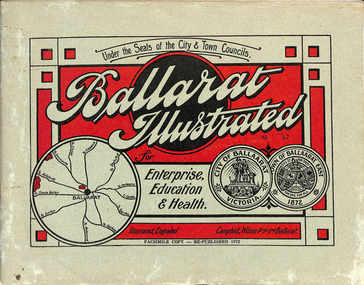
Original c 1914 (see below), facsimile copy - re-published 1972. Original features photos of Ballarat City and Town, its buildings, parks and the various industries and organisations that were in Ballarat at the time of publication, including ESCo. Many photos features ESCo trams. Photos sepia toned. Has some red colour block printing on the front cover and rear, for Star Oil Engines. On inside back cover is a map with the places of interest and tram route map, marked in red. Pages are un-numbered. Original published by Ballarat East Town Council and Ballaarat City Council. On cover has number stamped in black in, "No. 87" (assume facsimile copy No.). Photos with publication show tram No. 21, built 1913 and ESCo photo page shows Mr. Pringle as Manager. Mr Pringle became manager in January 1911, As there is no photos of the "Avenue of Honour", or other mention of the first world war, assume original published about 1913 or 1914. Original shows Engravings and printing by "Campbell Wilson Prop Ltd, Ballarat". See Other Information as well for more listing details. High Resolution image added 31/8/2012 of i2 of ESCo page and i3 for Ballarat identies and sheet i4 extracted for Mr Pringle. PDF scan of full document added 21/5/2019 - see images btm633-1i.pdf and btm633-2i.pdf Notes on "Ballarat Illustrated" Reg. Item No. 733 From notes made by Neville Gower 12/1/1997 Cover: Inside front cover: Last paragraph, "Facilities for Travelling" - Electric trams serve all parts of Ballarat. Page 3: Street Scene, Municipal Town Hall, showing tram wiring Page 7: Street Scene, Lydiard St. North, intersection and tramway centre, with ESCo tram No. 21 in the bottom photo. Other photos features trams as well in Sturt St and Lydiard St. North. Page 9: Street Scene, Top photo of Sturt St. from Lydiard St. looking east, shows piles on right-hand side of road. Car parked by Post Office has a car registration number "9007". Bottom photo, an tram climbing hill, shows double trolley in the street, with early English type of pull offs. Page 13: Street Scenes and Historic Buildings: One of five photos, shows Victoria St. looking East, with tram track prominent in photo and how stone work was set up about the rails and overhead poles. Page 23: Street scene, Gardens North Entrance gates, shows details of gates near St. Aidans Drive. Note double trolley wire on poles, and style of insulators. No trams in photo, three ladies walking down the track. Page 37: Street Scene; Lydiard St views, top left hand photo, shows Railway station and railway gates with signal gantry and horse drawn vehicles. Tram tracks apparent. Bottom left hand photo shows Lydiard St. North, near Post Office, double track with centre poles - Single wire per track. Top right hand photo, showing Cemetery gates in background. Bottom right hand photo - from north end of Lydiard St. South, looking north, with an ESCo tram in background. Also has a parked car on left hand side. Page 45: Street Scenes - Bridge St; top photo at west end of Bridge St. with ESCo No. 11 with possibly double trolley wire in photo. Bottom photo at east end of Bridge St. with tram in background, shows junction. Double trolley heading out to Mt. Pleasant, single trolley for Victoria St. Page 45: Street Scenes - Bridge St; top photo at west end of Bridge St. with ESCo No. 11 with possibly double trolley wire in photo. Bottom photo at east end of Bridge St. with tram in background, shows junction. Double trolley heading out to Mt. Pleasant, single trolley for Victoria St. Page 61: Street Scenes and Historic Buildings - Public Institutions Ballarat - top left hand photo of the Hospital shows some tram track in foreground, with double trolley wire. Top right photo is of the Orphanage, the name of the tram terminus for many years. Page 68: Electric Supply Co. of Victoria's pages - top photo showing powerhouse in background, across the lake, can hardly see anything for the trees, except for the chimney. Bottom photos of the steam Turbo Generators and the switchboard. Gives Mr. P.J. Pringle as Chief Engineer and General Manager. He took over in Jan. 1911. Page 69: Ballarat East Views - features photo of Black Hill open cut, Ballarat East Railway Station, Ballarat Fire Station and "Victoria St. looking East", repeat of photo printed on page 12, but slightly darker. Image on system includes fire station and railway station, - Ballarat East. Page 78: Series of photos of various Ballarat VIP's of the era, fourth one in on top line features "P.J.Pringle, Electric Supply Co." Inside Back cover - map of Ballarat including tram lines and places of interest marked in red. Gives a detailed photographic presentation of Ballarat in 1914.80 page book with, in addition, light green card covers, titled "Ballarat Illustrated". Loose copy of page 9 and 10 held.trams, tramways, ballarat, local history, heritage buildings, esco -
 Ballarat Tramway Museum
Photograph - B&W print of donated negative, Ron E. Fluck, 2/01/1959 12:00:00 AM
Black and white print of a donated negative. Print made 8/1998. Photo of SEC bogie tram 35, north bound in Lydiard St. North, about to cross the railway level crossing. Has the signal gantry in the background with part of the railway gates and Kennedy Murray Pty Ltd. General Carriers building in the background as well. Photo taken 2-1-1959. High Res scan of copy negative added 17/1/2019tramways, trams, railway station, lydiard st. north, ballarat, tram 35 -
 Ballarat Tramway Museum
Slide - 35mm slide/s, Peter Moses, 21/08/1971 12:00:00 AM
Photo of SEC Ballarat No. 14 and possibly No. 42 (Briquette roof advertisement and features on the same special trams in Reg. item 2064) waiting in Lydiard St. North for the arrival of the ARHS special on Saturday 21/8/1971 to undertake the last tour of Ballarat Tramways, prior to the closure of the system. The first line closure (Victoria St.) took place the following day. Has Reid's Coffee Palace building in the background and other buildings on the east side of Lydiard St. North. Two other single truck cars in the photo as are the railway gates at the station. Kodak cardboard mount slide, taken by Peter Moses 21 August 1971.On back of slide in light black ink "N14 Ballarat / ARHS / 4 trams special Lydiard St" and "P. Moses" in black ink in the upper right hand side of the slide.tramways, trams, arhs, lydiard st north, railway crossing, tram 14, tram 42 -
 Ballarat Tramway Museum
Photograph - Black & White Photograph/s - set of 3, Dave Macartney, 23/12/1967 12:00:00 AM
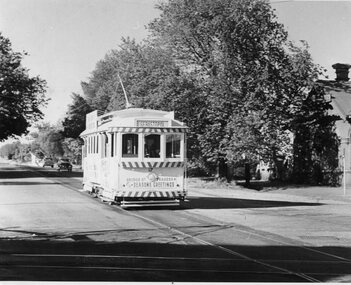
... buildings in the railway yard and part of the railway goods shed... buildings in the railway yard and part of the railway goods shed ...Yields information about decorated trams, Bridge St traders Christmas tram and the area near the Ballarat level crossing.Black and white photograph of SEC Ballarat No. 17 about to cross the railway lines in Lydiard St. North. Has destination of "SEBASTOPOL". Tram decorated for Bridge St. Traders and has been painted white, except for warning stripes on front of tramcar. Sign on front says "BRIDGE ST TRADERS/SEASON GREETINGS". Photo taken 23/12/1967. 583.1 - as above but a wider view to the right, showing Kennedy Murray Pty Ltd, General Carriers buildings in the railway yard and part of the railway goods shed. .2 - as for .2.2 - has stamp on back "Ronald and Jennifer Burzacott, 22 Howard St, Sebastopol Vic 3356"trams, tramways, ballarat, bridge st. traders, lydiard st. north, christmas trams, railway , tram 17 -
 Ballarat Tramway Museum
Slide - 35mm slide/s, Glen Mills, Nov. 1970
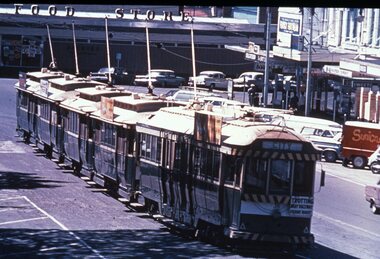
Agfa plastic mount (blue base, white cover) of a photograph of No. 36 and four single truckers at City or Grenville St Loop, with the buildings at the south east end of Sturt St. in the background is Dickins Food Store. A number of the trams have SEC roof advertisements and one unidentified one. Tram 36 has the "Trotting Bray Raceway Friday Night" auxiliary boards and is showing the destination of "CITY". Photo taken Nov 1970. One of a set of 20 slides made by the Association of Railway Enthusiast Provincial Tramways film strip. Reference Item 2560 details the ARE Film Strip and provide references to other slides. Slide rescanned at 3200 dpi 25-10-2020, jpg replaced, tiff file retained. This file was scanned in 2003 and may show colour changes."BAS 62" in pencil.tramways, trams, sturt st, city loop, grenville st., tram 36 -
 Ballarat Tramway Museum
Magazine, Jack Richardson, "Tram Tracks - The Electric Traction Monthly", July to Dec 1948
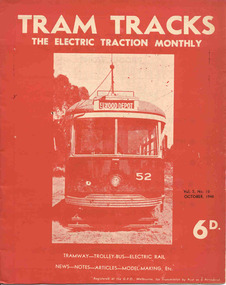
Three issues of "Tram Tracks - The Electric Traction Monthly" of the Australian Electric Traction Association. Each issue has a standard cover, of the magazine name etc, and featuring a front end photo of Victorian Railways tram No. 52 with the destination of Elwood but are in different colours, all have been saddled stapled with a single staple. The Volume and date details have been over printed. Back covers inside covers have the same advertisements. The three issues contain advertisements for the Wee Folks productions, Wattle Park, G&R model railway parts, Richard Noble model electric motors, Hobbyco, Fleet scale model railway equipment, Masseys Sports, Lloyd's Hobbycraft, John Martin Ltd, Johnson's Variety Store, the ARLHS, Barnes Tennis Centre, The Model Dockyard, the American Subscription Agency, Robilt Models, Meadmore Model Engineering and Austral Bronze Pty Ltd, Hearns Hobbies, Christie Scale Model Railway Products and Traction Publications. 2466.1 - Vol. 3 No. 10 - 20 pages, Oct. 1948, with cover printed in red ink. Has articles on anti-tram propaganda, Alphington - Heidelberg duplication and Sydney's early electric trams - C and D class. Also has news items on Brisbane, Newcastle, Sydney, Melbourne, Sandringham - Black Rock, Hobart, Launceston, Perth, Sydney and Melbourne electric trains, Launceston Trolley Buses, AETA notes, and a caricature of the Editor, Jack Richardson. 2466.2 - Vol. 3 No. 11 - 24 pages, Nov. 1948, with cover printed in blue ink. Has articles on construction of tram track in Melbourne (Victoria Parade), Bourke St., tram-bus controversy, (Reg Ansett, Noel Gipps and USNR Commander Quinby), Sydney's early electric trams - C and D class continued. Also news items on Last tram to Mayfield, Sydney, Latrobe St. Melbourne, Adelaide, opening to Alamein, Melbourne show traffic, VR Trams and AETA notes. 2466.3 - Vol. 3 No. 12 - 16 pages, Dec. 1948, with cover printed in green ink. Has articles on Sydney's electric railways, Brisbane Tramways and an AETA Melbourne tour. News items cover Sydney, Newcastle, Melbourne, Geelong, Bendigo, Kalgoorlie, Melbourne and Sydney trains and AETA news. 2466.4 - Vol 3 - No. 7 - 20 pages - July 1948 with cover printed in red ink. Has articles on cost of building trams for Brisbane, Sydney and Melbourne, abandonment of VR trams, Newcastle, Sydney, centre page photo of Y1 611, Sydney Electric train system including map and AETA news. 2466.5 - Vol 3 - No. 9 - 20 pages - Sep 1948 with cover printed in blue ink. Has articles on Mr. T. G. Patterson, Acting Director of Commonwealth Road Transport and Chairman of Federal Road Safety Council (very anti tram), news from Brisbane, Launceston, Sydney, Newcastle, Burwood, cost of trams, impressions of transport in Europe and North America, Melbourne and Sydney electric trains, tramways of Newcastle and model notes and AETA news. 2466.6 - Vol. 3, No. 1 - Jan 1948 - 16 pages with photo of Brisbane 407, political news, direct Melbourne to Footscray line proposal, new trams, bogie trams in Ballarat, article on Melbourne cable trams, electric trains, AETA outing in Melbourne and various adverts for model railways. 2466.7 - Vol 3 No. 2 - Feb. 1948 - 16 pages - political news, Ballarat news, traffic in Sturt St and new bogie cars, Christchurch closure, cartoon by Mercier on Sydney Honesty box, Brisbane suburban electrification, general tramway and electric railway news and various adverts for model railways. 2466.8 - Vol. 3 No. 3 - March 1948, with photo of VR 52 on front cover, 16 pages, political news, closures, Reg Ansett offer to buy the Melbourne bus system, Newcastle News, SEC Transfer of cars between the three systems, tramways in the Maribyrnong area, map of Melbourne trams, cartoon by Mercier, Brisbane train electrification and general news. 2466.9 - Vol. 3 No. 6 - June 1948 - 12 pages - MMTB political news, new trams for Sydney, tramways of Newcastle, Invercargill, Sydney Suburban trains, and AETA General news. .6 to .9 added 24-3-18 - from consolidation of Melbourne Tram Museum and BTM collections - ex AETA. trams, tramways, electric traction, aeta, models, australian tramways, melbourne, sydney, brisbane, newcastle, costs, ballarat, footscray -
 Ballarat Tramway Museum
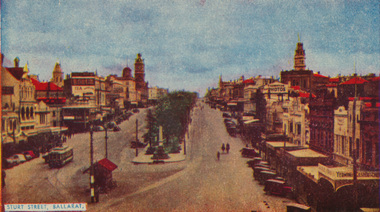
Postcard, Sturt St. in the mid 1940's
Printed colour postcard of photograph of Sturt St. in the mid 1940's looking from the top of a building in Grenville St. towards the West. Has a number of parked vehicles in kerbs, two people riding horses, a Vacuum Oil Co. truck in the bottom right hand corner and an SEC tram travelling west, just past the City Loop points. See Reg Item 675 for the same photograph - slightly cropped. Victorian Railways photograph. On rear the card has been ruled for address, stamp and titled postcard. Along the bottom edge is the publication details "ANSCOL - Australian Natural Scenic Colour - Thomas Tennant, 14 Jaques St., Chatswood N.S.W." trams, tramways, sturt st, postcards, sec, grenville st, tram 4 -
 Ballarat Tramway Museum
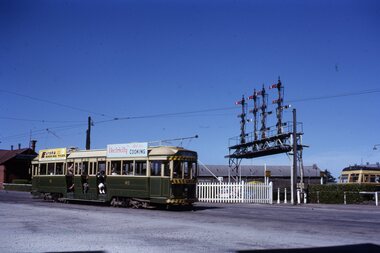
Slide - 35mm slide/s, Eldon Hogan, early 1960's
35mm Kodachrome cardboard mount slide of Ballarat No. 40 southbound in Lydiard St North, crossing the railway level crossing. In the background is Kennedy Murray General Carters building, the main signal gantry and a Walker Rail car - 280HP?. No. 40 has roof advertisements for Eureka Roofing Tiles and "Electricity Best for Cooking". Photo taken early 1960's. Photo from the Eldon Hogan collection. See email with worksheet from R.Gilbert date 29/12/2000 and Fares Please!, May 1995. In ink on the top of the slide "Bogie car at Ballarat Station"tramways, trams, railway station, lydiard st north, signals, tram 40 -
 Ballarat Tramway Museum
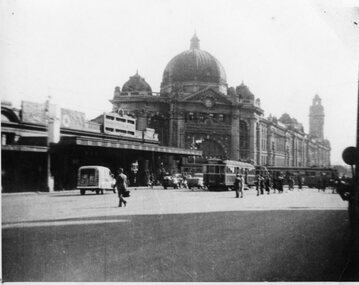
Photograph - Black & White Photograph/s, early 1950's?
... . Shows both railway station buildings and traffic. tramways trams ...Yields information through a photograph of Flinders St in of the nature of traffic in the 1950's. Shows both railway station buildings and traffic. Black and white photograph of a scene in Flinders St Melbourne, during the 1950's, showing Flinders St and Princes Bridge Railway Station. Shows W2's in Flinders St and Swanston St, a few motor vehicles, but many people. Photographer unknown.tramways, trams, flinders st station, mmtb, princes bridge station -
 Ballarat Tramway Museum
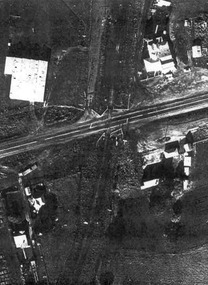
Document - Photocopies, John Phillips, Bungaree Aerial photo, 1980's
Demonstrates the use of bogie trams on the Lydiard St North route and the crossing of trams at Seymour St loop.Two sets of three copies of the Victorian Railways aerial photographs of Bungaree Railway station late 1960's early 1970's. Shows tennis court, station buildings, houses and sheds in the station yard. The level crossing does not appear to have any flashing lights installed on it.trams, tramways, bungaree, aerial views, victorian railways -
 Ballarat Tramway Museum
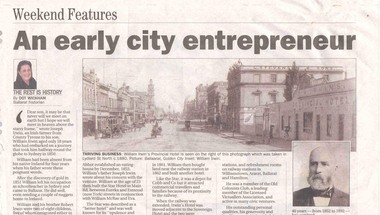
Newspaper, Dot Wickham, "An early city entrepreneur", 5/03/2005 12:00:00 AM
Yields information about William Irwin, Irwins Provincial Hotel and the tram line in Lydiard St Nth.Newspaper clipping from The Courier, 5 March 2005, titled "An early city entrepreneur" written by Dot Wickham about William Irwin, the proprietor of Irwin's Provincial Hotel. Gives a brief history of William Irwin, his Ballarat hotels, his local and other activities. Features a photo of Lydiard St Nth looking south from the railway level crossing with the horse tram lines in the photograph and Irwins Provincial Hotel on the right hand side, before reconstruction to a two story building.hotels, lydiard st nth -
 Ballarat Tramway Museum
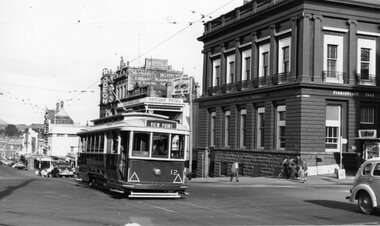
Postcard, Ron Scholten, Ballarat No. 18 waiting at the Lydiard St. gates, 1960s
Photo of Ballarat No. 18 waiting at the Lydiard St. gates with the Ballarat station building in the background, and a R class hauled train in No. 2 platform. Shows the signal gantry. No. 18 has the destination of city and has a an auxiliary board advertising a Fete - see also Reg. Item 2020 for 18 with the same sign.Colour photograph, printed on a postcard back format.On the rear in pencil "Ball 18 Railway Stn / Ron Scholten Collection for BTM archives".trams, tramways, railway station, lydiard st nth, tram 18 -
 Ballarat Tramway Museum
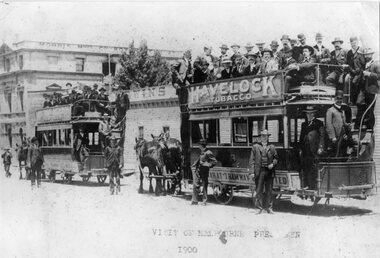
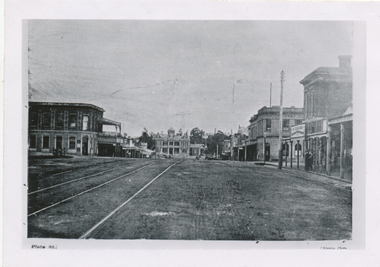
Photograph - Black & White Photograph/s - set of 2, 1900
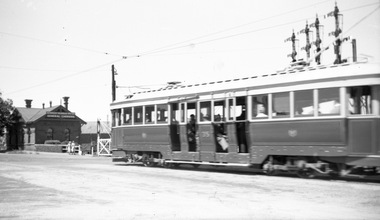
Yields information about the nature of a visit to Ballarat by Melbourne pressmen and the buildings in the background at the time. Also shows the dress of the visitors at the time. Various sources - ex photo held by the Ballarat Historical Society. Also shows the condition of the trams at the time.Black and white print of a photograph of two crowded horse trams in Lydiard St North. Ballarat, titled "Visit of Melbourne Pressmen 1900". Has Morris Manufacturing Company building in the background. Both horse trams, No.9 nearest to camera, have "Havelock" Tobacco roof advertisements. Behind the trams is Irwin's Provincial Hotel, when it was a timber structure. Print made from a copy negative held in the Ballarat Historical Society collection???? 2nd copy added 8/11/2005 from BTM collection of photos in mess room. 2785.1 - as above, but photographed from an album - shows the full length of horse tram No. 9 and has number TR4 in bottom right hand corner. 2785.2 - as above but cropped on sides - cropped out rear of horse tram 9. 2785.1 & .2 added 12/7/2009, ex William F Scott. See Email from Max Harris 12/8/042785.1 - top on rear in ink - "Ballarat Visit of Press men , 1900 Sydney Harvey photo". 2785.2 - in ink on rear "18a)", "Visit from Melbourne Press 1900, opposite Ballarat Railway Station". In bottom right hand corner "Sydney Harvey" and "William F Scott" address label.tramways, trams, horse trams, melbourne pressmen, ballarat, tram 9 -
 Ballarat Tramway Museum
Slide - 35mm slide/s, Bob Wilson, May. 1972
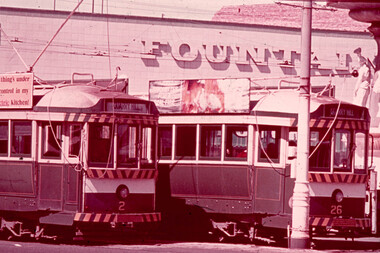
White cardboard mount, 35mm slide, from the Association of Railway Enthusiast's film strip titled "Provincial Tramway Film Strip" of Bendigo bogie tramcars Nos. 2 and 26 at Charing Cross, with the Fountain Plaza building in the background. Both trams have the destination of "Quarry Hill" No. 26 has the older type of destination roll and is fitted with a SEC Briquettes roof advertisement. The film strip notes (Reg. Item 2560), provided the following caption details: "The hub of the Bendigo system was at Charing Cross, where the "Quarry HILL" - "EAGLEHAWK "and "'GOLDEN SQUARE" - "NORTH BENDIGO" routes crossed at right angles. It was customary for trams for all four routes to meet at the CROSS. Here cars 2 & 26 (showing a wrong dest- -ination) meet by the fountain. -Mar '72 (Bob Wilson)" See image btm2580p.tif for high level scan of image. Stamped on base of slide "11789" and written in ink on top edge "No. 2 & 26 Charing Cross Bendigo"tramways, trams, are, film strip, charing cross, bendigo, tram 2, tram 26 -
 Ballarat Tramway Museum
Slide - 35mm slide/s, Ray Marsh, Sept. 1971
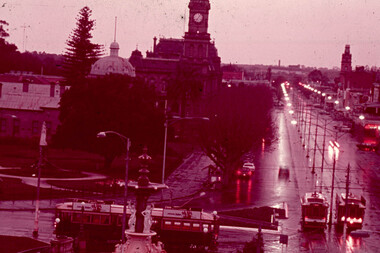
White cardboard mount, 35mm slide, from the Association of Railway Enthusiast's film strip titled "Provincial Tramway Film Strip" of the Charing Cross area on a rainy evening at sunset. Features three trams, Pall Mall and the Bendigo Post Office building. The film strip notes (Reg. Item 2560), provided the following caption details: "A rainy evening sees a pair of single truckers on "GOLDEN SQUARE" - "NORTH BENDIGO" line meeting an outbound "EAGLEHAWK" car at the Cross. Sept. '71 (Ray Marsh)" See image btm2581p.tif for high level scan of image. Stamped on base of slide "11790" and written in ink on top edge "Charing Cross Bendigo"tramways, trams, are, film strip, charing cross, bendigo, pall mall, night photo -
 Ballarat Tramway Museum
Photograph - Digital image Set of 20, 1971-72
Set of 20 digital images of Bendigo Tramways, 1972 at or before closure while on a tram tour by Stuart Lodington. .1 - No. 7 at Golden Square terminus .2 - ditto .3 - No. 26 in bound on the Eaglehawk line with a crossing loop behind. .4 - Birney crossing the bridge by the tram depot. .5 - No. 29 running a special on the Eaglehawk line with a HBA billboard in the background. .6 - No. 29 with a driver walking in front of the tram at the above location. .7 - No. 29 on the Eaglehawk line .8 - ditto waiting for a tram at Manchester Loop with poppet head in the background. .9 - No. 29 on the Eaglehawk line .10 - Eaglehawk Town Hall at night. .11 - No. 7 at the depot junction in McCrae St, with Golden Square destination. .12 - No. 29 with the Camp Hotel Eaglehawk in the background. Also a Newsagent with The Sun, The Bendigo Advertiser and The Age signs on the building, High St .13 - No. 29 Mt Korong Rd, with the railway overbridge in the background. .14 - interior photo of Birney tram roof .15 - interior view of controls of Birney at Eaglehawk .16 - No. 29 outbound at the Depot Junction McCrae St. .17 - No. 18 at the Eaglehawk terminus .18 - close up view of No. 29 front. .19 - No. 29 in Nolan St, crossing the bridge, outbound. .20 - No. 18 at the Eaglehawk terminus with the Eaglehawk Town Hall, Post Office in the background. Has a circus banner on the side.trams, tramways, bendigo, eaglehawk, quarry hill, golden square, depot, mccrae st, nolan st, tram 7, tram 26, tram 29, tram 18 -
 Ballarat Tramway Museum
Photograph - Digital image Set of 20, 16/04/1972 12:00:00 AM
Set of 20 digital images of Bendigo Tramways, of the last running day of the Eaglehawk to Quarry Hill line 16 April 1972, .1 - No. 24 outbound to Eaglehawk .2 - No. 3? at Manchester Loop .3 - No. 24 outbound to Eaglehawk .4 - bogie tram crossing the rail over bridge from Eaglehawk .5 - No. 18 in View St .6 - No. 24 outbound to Eaglehawk .7 - No 18 at Eaglehawk with destination roll being changed, and shopping centre in the background. .8 - No. 24 crossing the railway overbridge, going to Eaglehawk .9 - No. 3 outbound to Eaglehawk .10 - No. 24 crossing the railway overbridge, going to Eaglehawk .11 - No. 3 and 24 crossing at Long Gully .12 - No. 18 at Eaglehawk with Leo A Hughes photographer building in the background and a CFA truck passing the tram. Tram SEC roof advertisement and a banner for "German -?- Circus" at Eaglehawk and dates. .13 - No. 3 inbound on the Eaglehawk line. .14 - No. 18 outbound to Eaglehawk .15 - ditto .16 - No. 18 at Eaglehawk terminus with the Mechanics Institute in the background. .17 - No. 24 at the Eaglehawk terminus .18 - No 24 at the intersection with Taylor St .19 - No. 24 at the Eaglehawk terminus .20 - dittotrams, tramways, bendigo, eaglehawk, long gully, manchester loop, tram 24, tram 18, tram 3 -
 Ballarat Tramway Museum
Photograph - Digital image, c1971
... and John Macleod and Company buildings in the background. Railway... with Reid's Palace and John Macleod and Company buildings ...Yields information about Ballarat streetscape and its trams in the closing days of the SEC tramway system.Digital image from a black and white print of tram 40 southbound in Lydiard St North to Sebastopol with Reid's Palace and John Macleod and Company buildings in the background. Railway station signal gantry in the view. Photo by Marc Dahlstrom c1971.On rear is the Marc Dahlstrom stamp.trams, tramways, lydiard st nth, tram 40 -
 Ballarat Tramway Museum
Photograph - Digital image, c1971
... . Has the Reid's Palace building and the railway station... Palace building and the railway station and signal gantry ...Yields information about Ballarat streetscape and its trams in the closing days of the SEC tramway system.Digital image from a black and white print of tram 11 outbound in Lydiard St North, crossing the railway level crossing. Has the Reid's Palace building and the railway station and signal gantry in the background. The tram has a "Bliss Bombs" (Make Bliss not Love) roof advertisement and a Twin Lakes sign. Photo by Marc Dahlstrom c1971. On rear is the Marc Dahlstrom stamp.trams, tramways, lydiard st, railway station, level crossings, tram 11 -
 Ballarat Tramway Museum
Photograph - Black & White Photograph/s - set of 3, William. F. Scott, 1989
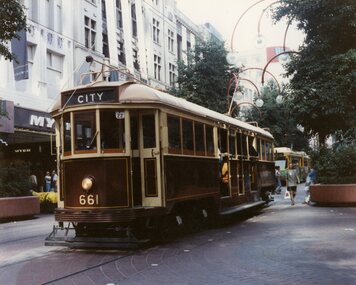
Yields information about the appearance of Geelong's trams and the railway station area and the conversion to a one-man tram.Set of three colour photographs of BTPS owned W3 661 operating in Bourke St Melbourne. Presumed taken at the same time as the front cover of the annual report, 1988-1989 - 29/4/1989. Has Myer building in the background. .2 - ditto - crossing an articulated tram. .3 - westbound in Bourke Street with the Priceline Centrepoint building in the background and Medicare office. Printed on Kodak paper.In pencil on the rear "William F Scott".trams, tramways, btps, bourke st, yapper tours, tram 661 -
 Ballarat Tramway Museum
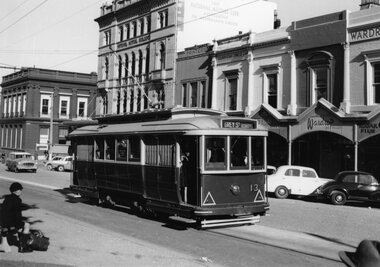
Photograph - Black & White Photograph/s, Doug Colquhoun, 24/03/1959 12:00:00 AM
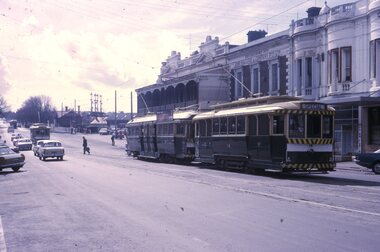
Yields information about Ballarat Trams and streetscapes late 1950's and the details of Sturt St shops.Black and white print of Ballarat 13, at the Sturt St stop, just west of Lydiard St. North, 24/3/1959. Photo by Doug Colquhoun. Has the Commonwealth Bank, National Mutual Building, Golden Star Chinese Cafe, V & L. Leslie Hairdresser and Wardrop Tailor shops in the background. Two copies. A school boy with cap is sitting on the bench opposite the tram. Tram has the destination of Grey St Sebastopol. Photo print courtesy of Port Dock Railway Museum, now the National Railway Museum. See worksheet 4311 for letter and details of prints sent to Bill Scott, 19/10/2001. Any photo credit to mention NRM Collection.On rear of copy 1"SEC Ballarat / 13 / Sturt St/ 24/3/59 / D. A. Colquhoun" Copy 2 "DAC" in ink, bottom right hand corner.trams, tramways, sturt st, schools, commonwealth bank, tram 13 -
 Ballarat Tramway Museum
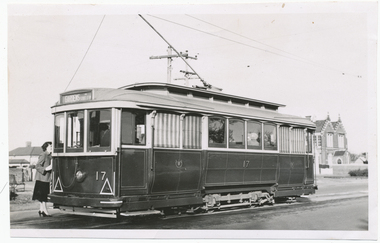
Photograph - Black & White Photograph/s, Digital Image, Wal Jack, 27/06/1957 12:00:00 AM
Yields information about Ballarat Trams and streetscapes early 1960's and the details of the Victoria St terminus, Yields information about Ballarat Trams and streetscapes early 1960's and the details of the Victoria St terminusBlack and white print of Ballarat 17, in Victoria Street, at Otway St photographed by Wal Jack, 27/6/1957. Two copies. A lady is standing at the back of the tram, possibly talking to the conductor. Tram has the destination of Gardens via Sturt St West. Has the Convent building in background. Photo print courtesy of Port Dock Railway Museum, now the National Railway Museum. See worksheet 4311 for letter and details of prints sent to Bill Scott, 19/10/2001. Any photo credit to mention NRM Collection. 4412.1 - Digital image from the Wal Jack Ballarat Album of the same photograph. See i3 for details of the rear of the photograph.On rear of copy 1 "SEC Ballarat / 17 / Victoria / 27/6/57 / Wal Jack" Copy 2 "DAC" in ink, bottom right hand corner. 4412.1 - on rear of photo in ink, "SEC Ballarat, No. 17 Victoria St at Otway St, Ballarat East 25 June '57" and "W. Jack photo Neg. to D. Colquhoun"trams, tramways, victoria st, tram 17 -
 Ballarat Tramway Museum
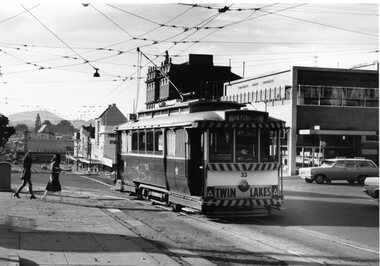
Photograph - Black & White Photograph/s, Doug Colquhoun, 15/05/1971 12:00:00 AM
Yields information about Ballarat's trams in the early 1970's and the Drummond St streetscape near the Mill St loop, Yields information about Ballarat's trams in the early 1970's and the Drummond St streetscape near the Mill St loopBlack and white print of Ballarat 33, in turning from Lydiard St Nth into Sturt St, with the Commonwealth Bank and buildings on the south side of Sturt St.. Two copies. Photo by Doug Colquhoun, 15/5/1971. Trams has the destination of Sebastopol and has a "Twin Lakes" sign on the dash panel. In the photograph is signage for Dickins, Neptune, Commonwealth Bank and Patersons. Has two young ladies walking across the street and the ESCo electrical cabinet. Photo print courtesy of Port Dock Railway Museum, now the National Railway Museum. See worksheet 4311 for letter and details of prints sent to Bill Scott, 19/10/2001. Any photo credit to mention NRM Collection.On rear of copy 1 "SEC Ballarat / 33 / 15/5/71 4164 / Lydiard St @ Sturt St / D.A. Colquhoun" . Copy 2 "DAC" in ink, bottom right hand corner.trams, tramways, sturt st, fashions, lydiard st nth, tram 33 -
 Ballarat Tramway Museum
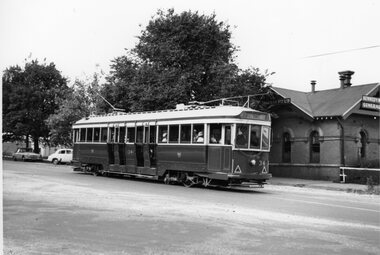
Photograph - Black & White Photograph/s, Doug Colquhoun, 23/05/1959 12:00:00 AM
Yields information about Ballarat's trams during the late 1950's and the Gardens area.Black and white print of Ballarat 34, inbound in Lydiard St Nth, just before the railway level crossing. Two copies. Photo by Doug Colquhoun, 23/3/1959. Tram has the destination of Sebastopol, and has the Kennedy Murray Pty Ltd General Carriers building in the background. Photo print courtesy of Port Dock Railway Museum, now the National Railway Museum. See worksheet 4311 for letter and details of prints sent to Bill Scott, 19/10/2001. Any photo credit to mention NRM Collection.On rear of copy 1 "SEC Ballarat / 34/ /Lydiard St North / 23/3/59 5535 / D.A. Colquhoun" . Copy 2 "DAC" in ink, bottom right hand corner.trams, tramways, lydiard st nth, tram 34 -
 Ballarat Tramway Museum
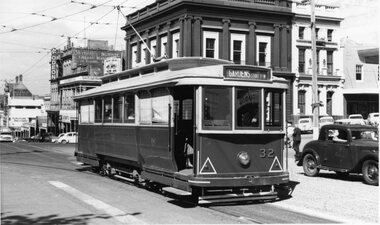
Photograph - Black & White Photograph/s, Doug Colquhoun, 24/03/1959 12:00:00 AM
Yields information about Ballarat's scrubber tram in early 1960's.Black and white print of Ballarat 32, crossing Lydiard St, in Sturt St with the destination of Gardens via Sturt St West. Has the Commonwealth Bank, Odeon theatre, Mechanics Institute, Ballarat Gas Co, Unicorn Hotel, and Colonial Mutual Life buildings in the background, along with a number of motor vehicles. Photo Doug Colquhoun 24/3/1959. Photo print courtesy of Port Dock Railway Museum, now the National Railway Museum. See worksheet 4311 for letter and details of prints sent to Bill Scott, 19/10/2001. Any photo credit to mention NRM Collection.On rear of copy "SEC Ballarat #32 / Sturt St @ Lydiard / 24/3/59 / Douglas A Colquhoun.trams, tramways, sturt st, lydiard st, tram 32 -
 Ballarat Tramway Museum
Photograph - Black & White Photograph/s, Doug Colquhoun, 23/03/1959 12:00:00 AM
Yields information about the Eaglehawk terminus, tram 18 and the tram liveries in 1963.Black and white print of Ballarat 12, crossing Lydiard St, in Sturt St with the destination of Gardens via View Point. Has the Commonwealth Bank, Odeon theatre, Mechanics Institute, Ballarat Gas Co, Unicorn Hotel, and Colonial Mutual Life buildings in the background. A group of children with bicycles are on the corner and the newspaper seller stand. Photo Doug Colquhoun 23/3/1959. Photo print courtesy of Port Dock Railway Museum, now the National Railway Museum. See worksheet 4311 for letter and details of prints sent to Bill Scott, 19/10/2001. Any photo credit to mention NRM Collection.On rear of copy In top left hand corner "72) No . 71 withdrawn" a yellow label with "24" crossed out over a sticker "Photo No. Reduced to 82% 145x80 see photocopy for masking" and "22" crossed out in the top right hand corner. In the lower left hand corner "SEC Ballarat #12 / Sturt St @ Lydiard / 23/3/59 / Douglas A Colquhoun"trams, tramways, sturt st, lydiard st, tram 12 -
 Ballarat Tramway Museum
Photograph - Black & White Photograph/s, c1895
Black and White copy print contained within the Wal Jack Bendigo and Geelong Album, see Reg Item 5003 for more details. Copy photograph of a photograph from a book (Plate 1) showing a view along High St Eaglehawk, looking west, c1895. Shows buildings on both sides of the street. Has name J. Nimmon? or Ninnis (see btm 4372) in the bottom right hand corner. See also Reg item 5729 for a similar photograph. .1 - On rear in ink "Steam track tracks, Eaglehawk. (So much for the AETA boys who believe steam service did not cross the railway on the level!). In bottom right hand corner is "P. W. Duckett" trams, tramways, bendigo, high st, eaglehawk, steam trams