Showing 2056 items matching "crossings"
-
 Ballarat Tramway Museum
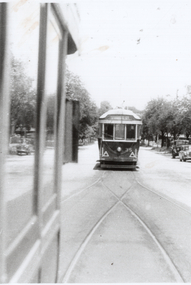
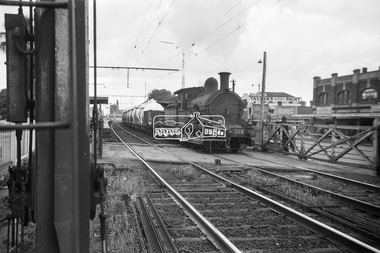
Photograph - Tram 35 Lydiard St Nth crossing, late 1950s
The photograph shows SEC Ballarat tram No. 35 northbound in Lydiard St loop, crossing another bogie tram, probably at the Seymour St Loop. The tram is fitted with tail lights and large reflective triangles, indicating a date between 1956 and 1960. Photographer unknown.Yields information about tram 35 crossing another bogie, probably at the Seymour St loop - late 1950s.Black and white print on plain papertramcars, tram 35, lydiard st nth -
 Melbourne Tram Museum
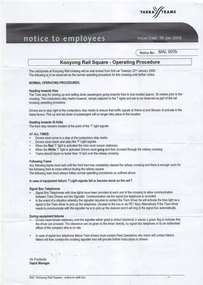
Document - Notice to Employees, Yarra Trams, "Kooyong Rail Square - Operating Procedure", Jan 2008
Document provides information on the operation of the rail square (also known as a tram square, railway Square) at the Kooyong Glenferrie Road level crossing. Provides a site plan, signal information and operational procedures including when items fail. Dated 16/1/2008.Demonstrates an instruction into the operation of the Kooyong rail squareSingle A4 sheet, printed double sided, with a coloured site plan.trams, tramway square, rail square, railway square, glenferrie road, kooyong level crossing, operations, instructions -
 Stawell Historical Society Inc
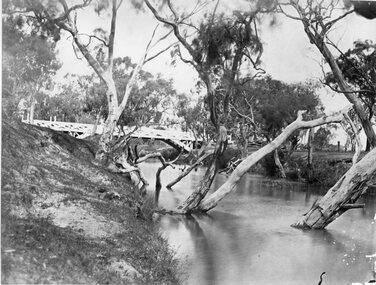
Photograph, Glenorchy Bridge on the Wimmera River 1866
Glenorchy Bridge Wimmera River. Part of a collection of Photographs by Mr. O.G. Armstrong as commissioned by the Shire of Stawell for the Inter-colonial and Paris Exhibition in Melbourne in 1866. Prior to the construction of this bridge in 1860, there existed two forwards across the Wimmer River at Glenorchy. One was 2 miles on the Stawell side of Glenorchy and 500 metres from the present railway bridge. It was well made, stone floor and can be seen today. The second was located 800 metres downstream of the town and was known as Stuart’s Crossing. These Fords were popular crossing spots for Bullock Drays which were delayed for days during floods before the bridge was built. The original Bridge was built near the site of the present ‘old’ bridge. stawell -
 Orbost & District Historical Society
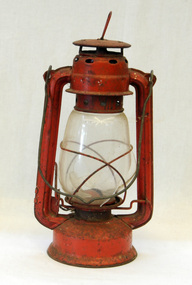
lantern, World Light MFY LTD, 1920's-1940's
This lantern could have been used for railway lighting. Railway lighting illuminated not only stations but also yards, engines, rolling stock, signals, signal-boxes and crossings. There were a number of different types of lamps used for a variety of railway purposes. This is a hand-held light.Railway lamps of this kind were significant railway items in their period of use as essential tools to the safe-working operations of the railway. Used domestically these lanterns were common in the period before the widespread connection of electricity. A painted red metal "hurricane" lamp which has a glass shade. This is a portable oil lantern which has an oil tank on the bottom that forms the base of the lamp. The tank has a door for filling and it also houses the wick and knob that increases or decreases the length of the wick.On base : No. 707 Globe Brand (globe of world) World Light MFY LTDlantern lighting hurricane-lamp -
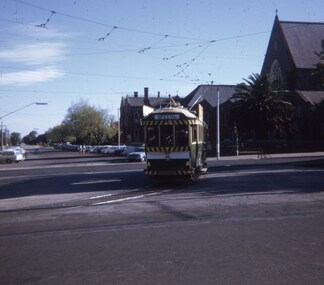
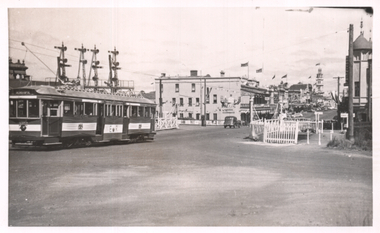 Ballarat Tramway Museum
Photograph - Tram 38 decorated for Royal Visit, Ken Magor, 1954
The photo, shows tram 38 decorated for the 1954 Royal Visit, crossing the railway tracks at Ballarat Station in Lydiard St North. The tram has the destination of Sebastopol. In the background is the railway signal gantry, Reids Coffee Palace and the Post Office. Many of the buildings are flying flags.Yields information about the 1954 Royal Tram.Photograph, black and white - plain black with Ken Magor stamp and negative number written on the rear.Ken Magor Negative Number - "3427" tramways, trams, royal visit, decorated trams, tram 38, lydiard st nth, level crossings -
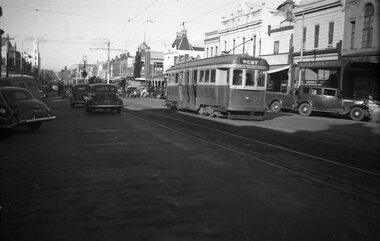
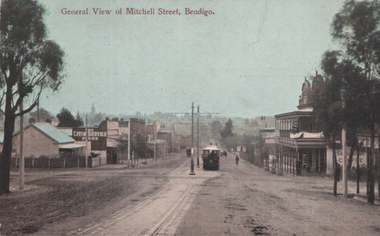
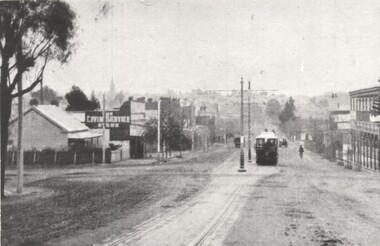 Ballarat Tramway Museum
Photograph - Black and White from a postcard of Bendigo - Mitchell St, 1910s
Photograph shows a Bendigo ESCo tram climbing the hill in Mitchell St to where the double track converged into single track before crossing over the railway line. Photo is looking west. Has a two storey hotel on the right. See item 9080 for a coloured version.Yields information about Mitchell St Bendigo and ESCo trams.Black and White photograph from a postcard of Bendigo - Mitchell Sttramways, trams, bendigo, esco, mitchell street -
 Melbourne Tram Museum
Photograph - Z28 Flinders St - Swanston St, late 1980s
Photo of Z28 (Spencer St, route 75) in Flinders St after crossing Swanston St. The tram has The Met logos, an advert for Westpac Bank. In the background is part of Young & Jackson Hotel and the Port Phillip Arcade. Photo taken from Princes Gate Plaza.Yields information about Melbourne trams late 1980s.Colour photograph with paper parts on rear.melbourne, tramways, tramcars, flinders st, z class, tram 28, route 75, trams -
 Port Melbourne Historical & Preservation Society
Photograph - Port Melbourne, Pat Grainger, 1996
Four panoramic black&white photos taken c1996 .01 View toward city of Nott Street and the school .02 View toward city of Nott Street, vertical .03 Pedestrian crossing in front of the 1910 post office .04 View north of Bay Street footpath, west sidebuilt environment, nott street, bay street -
 Ballarat Tramway Museum
Photograph - Digital image, Dave Macartney, c1969
Digital Image of MMTB tram W5 836 inbound in Mt Alexander road, just before the crossing of Moonee Ponds Creek. Tram is freshly painted, showing City Route 59. In the background is a Holden car dealer, the railway bridge over Flemington Road. Photo by Dave Macartney 1969?trams, tramways, w5 class, mt alexander road, tram 836 -
 Ballarat Tramway Museum
Photograph - Black & White Photograph/s - set of 2, Richard Gilbert, c August 1971
Yields information about tramway operations at Hospital corner. Series of 2 Black and white photographs of trams using the Hospital corner curves. .1 - tram 13 inbound to Victoria St, with the J A Malpass, Rimmington Bros and the Southern Cross Hotel in background. .2 - tram 14 showing Depot via Drummond North crossing the trackwork at Hospital corner.. trams, tramways, hospital corner, sturt st, drummond st nth, victoria st, tram 13, tram 14 -
 Ballarat Tramway Museum
Slide - 35mm slide/s, Peter Moses, Jan. 1969
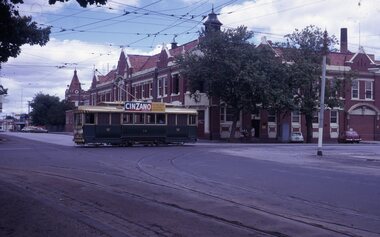
Photo of SEC Ballarat No. 14 crossing Sturt St, entering Drummond St. North with the Ballarat Base Hospital building in the background. Tram has a Cinzano roof advertisement and a Twin Lakes sign on the back of the tram. Kodak cardboard mount slide, taken by Peter Moses assumed Jan. 1969.On the rear of the slide "P. Moses" along bottom right hand corner in black ink.tramways, trams, hospital corner, sturt st, drummond st, tram 14 -
 Ballarat Tramway Museum
Slide - 35mm slide/s, Travis Jeffrey, c1962
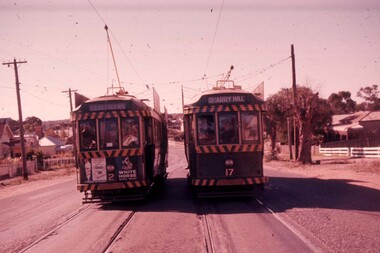
Agfa plastic mount (blue base, white cover) with a photo of Bendigo 2, with destination of Eaglehawk, crossing No. 17 at Jobs Gull loop on the Eaglehawk line. No. 17 has destination of Quarry Hill. Has a Streets Ice cream and Whitehorse Whisky advertisements on the rear panel. Photo taken c1962."BES 27" in penciltramways, trams, bendigo, eaglehawk, jobs gully, tram 2, tram 17 -
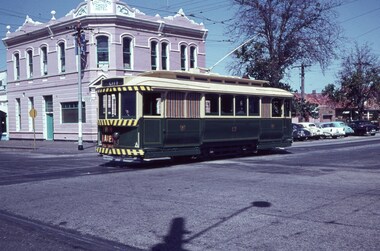
 Ballarat Tramway Museum
Postcard, SEC Ballarat trams 34
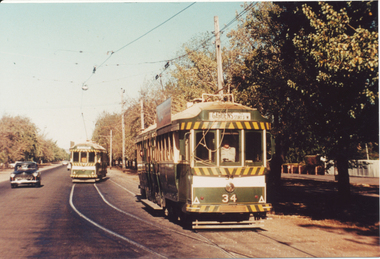
Yields information about the use of trams in Ballarat and tram operation in the Sturt St west as the loops, in particular the Parker St. Loop.Colour photograph, printed on a postcard back format of SEC Ballarat trams 34 and another bogie tram crossing at the Parker St loop in Sturt St West. Tram 34 has the destination of "Gardens via Sturt St West". Photo late 1960's or early 1970's.trams, tramways, sturt st west, parker st loop, tram 34 -
 Ballarat Tramway Museum
Photograph - Black & White Photograph/s, Bendigo 18 crossing Charing Cross, late 1950's
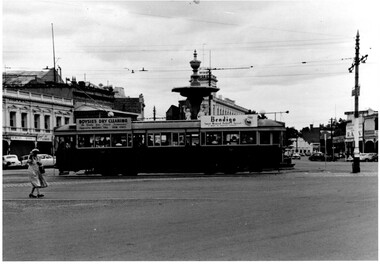
Black and White photograph, of Bendigo 18 crossing Charing Cross en route to Eaglehawk. Has roof ads for Boysies Dry Cleaning and Bendigo Sweet Mustard, Pickles spread. In the background is the fountain, Club Hotel, RACV and Neilors Wines Hotel? Printed on Fujicolour paper. Two copies held. "TMSV Sales" stamp on rear. On rear of in ink "PM & MM E45 = Bend 18" trams, tramways, bendigo, charing cross, tram 18 -
 Ballarat Tramway Museum
Slide - 27 mm sq slide/s, Andrew Howlett, Tram No. 37 (Special) crossing Sturt St at the Dawson St crossover, Feb or March 1969
Yields information about the Dawson St cross over in Sturt St and St Patricks church.Colour slide, Kodak white cardboard mount, developed Mar 1969 of No. 37 (Special) crossing Sturt St at the Dawson St cross over. St Patricks church in the background. St Patricks church in the background. See Reg Items 7675, 7678, 7681, 7684, 7686, 7705 and 7713. "Dawson St X over" in red inkballarat, tramways, trams, sturt st, tours, dawson st, tram 37 -
 Ballarat Tramway Museum
Negative, Wal Jack, c1950
Negative and Digital images of the Wal Jack Geelong Negative file of Geelong bogie 36 outbound to West after crossing Moolap St (the second set of bar lights). A four wheeler can be seen at the intersection. In the background is a Snooker / Billiard parlour and L. F. Weaver ? Agent. !950's. trams, tramways, geelong, ryrie st, tram 36 -
 Ballarat Tramway Museum
Negative, Wal Jack, late 1940s
Negative and Digital images of the Wal Jack Geelong Negative file of Geelong 18 and another car crossing at the Autumn St Loop\ in Pakington St West Geelong. Tram has the destination of West and the other car Station. In the background is Hambrook Milliner and a hotel. Photo possibly late 1940's. trams, tramways, geelong, pakington st, west, tram 18 -
 Ballarat Tramway Museum
Slide - 35mm slide/s, Wal Jack, 10/03/1964 12:00:00 AM
Photo of Ballarat No. 13 crossing Sturt St. from Sebastopol, with 'City' destination. Tram fitted with small white stripe under dash canopy lights. Twin Lakes ad on front of tram. 'The Southern Cross Hotel' building in pink paint in background. Photo taken on 10-3-1964.'Ballarat, #13 at corner Sturt and Drummond Sts, 10th March '64' in blue inktramways, trams, drummond st., sturt st., tram 13 -
 Ballarat Tramway Museum
Photograph - Black & White Photograph/s, Bob Lilburn, Aug. 1955
Yields information about the nature of tram operations for a tour (AETA) and the appearance of Grey St loop in 1955.Black and white photograph of trams (from the rear) 21, 38, 31 and 12 crossing at the Grey St Loop Sebastopol, while on an AETA tour?, 8/1955. Photo by R. Kelly. Printed on Ilford paper. Reg Item 4176, on an AETA tour 20/3/1955 at Sebastopol terminus.On rear in ink. "/8/55; 21, 38, 31,12; R. Kelly".tramways, trams, sebastopol, grey st loop, aeta tour, tram 12, tram 31, tram 38, tram 21 -
 Eltham District Historical Society Inc
Photograph, George Coop, Steam locomotive Y-103 at Newport Railway Station, c.1951
The Melbourne Road level crossing is now the location of the pedestrian underpass. Hall Street is seen to the right and the two-storey brick building remains to present day. One of several photos at Newport taken the same day in the early 1950s when George Coop was a secondary school student.Digital TIFF file Scan of Kopdak 620 black and white negative transparencygeorge coop collection, hall street, level crossing, melbourne road, newport railway station, y-103, y-class steam locomotive -
 Red Cliffs Military Museum
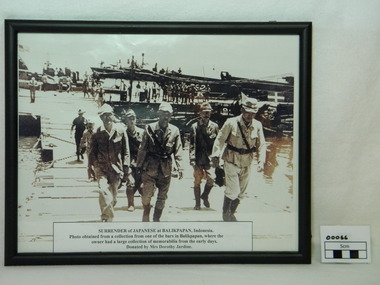
Framed Photograph, Surrender of Japanese at Balikpapan, 1945
Japanese Commanders crossing a pontoon bridge under guard by Australian soldier on the way to the official surrender of Japanese forces in Balikpapan in (Dutch East Indies) Indonesia 1945. This was a major event in the ending of World War 2. Following the japanese surrender the Local population began it push for independance. Framed photograph (copy) of Japanese Commanders surrendering at Balikpapan. Black frame and glass covered. The Japanese Command staff with a Japanese general and aid-d-camp (Captian)carring his breif case along with other staff members. In the background here are 2 American PT boats with American naval personal .Note American flag flying in the top left corner. There are several American landing craft next to a Japanese landing barge. The Japanese landing bardge has the required surrender markings which is a green square with a white cross on top right of photo. The Australian soldier following the Japanese soldiers is wearing slouch hat and gungle green uniform. Along the docks are native workers.Paper discription on lower photograph with details of item description, where photo obtained from and donated by.ww2, japanese, surrender, balikpapan, generals, americans, pt boats, japanese landing bardge, american landing craft, dutch east indies -
 Sunbury Family History and Heritage Society Inc.
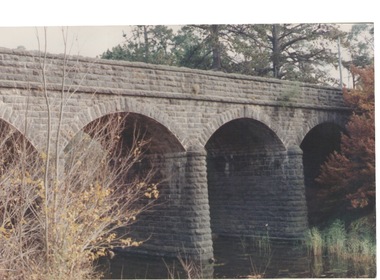
Photograph, Bulla Bridge, c 1980s
The bridge in the photograph is the bluestone bridge at Bulla which spans the Deep Creek, a tributary of the Maribyrnong River. It was built in 1869 and replaced a ford crossing which was built further downstream. Many of the buildings and structures in the area were built from bluestone which is in abundance throughout this volcanic area.This bridge is one of many similar structures built across Western Victoria where the bluestone volcanic rock was found in abundance.A coloured close - up photograph of a four-arched blue stone bridge spanning a waterway. Some greenery is visible on either side of the bridge and above it. bulla bridge, bluestone, bridges, deep creek. -
 Wodonga & District Historical Society Inc
Album - Ringer's River by Des Martin - Plate 27 - Erin swims the river with a warning
Erin swims the river when she finds herself too late to reach the drovers before their crossing; and amazes O'Day and Keiran when she arrives with the news that the police have them cut off. Behind her a major storm up river is causing the water to rise.The album and images are significant because they document literature written by a prominent member of the Wodonga community. The presentation of this precis was supported by several significant district families and individuals.Ringer's River Album Coloured photo Plate 27des martin, many a mile, ringer's river, northeast victoria stories -
 Ballarat Tramway Museum
Postcard, WTP, "General view of Mitchell Street Bendigo", 1910s
The photograph shows a Bendigo ESCo tram climbing the hill in Mitchell St to where the double track converged into a single track before crossing over the railway line. The photo is looking west. Has a two-storey hotel on the right. See item 8452 for a black-and-white version.Yields information about Mitchell St Bendigo and ESCo trams.Postcard - colour divided back, unused.tramways, trams, bendigo, mitchell st -
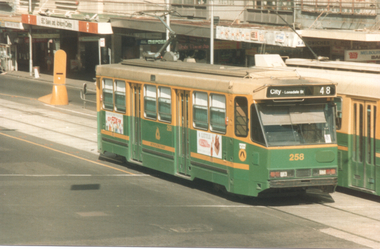 Melbourne Tram Museum
Photograph - A258 Flinders St - Swanston St, late 1980s
Photo of A class 258 (City Lonsdale St, route 48) in Flinders St just after crossing Swanston St. The tram has The Met logos, a Fox FM radio station. In the background is the Port Phillip Arcade buildings. Photo taken from Princes Gate Plaza.Yields information about Melbourne trams late 1980s.Colour photograph with paper parts on rear.melbourne, tramways, tramcars, flinders st, a class, tram 258, trams, route 48 -
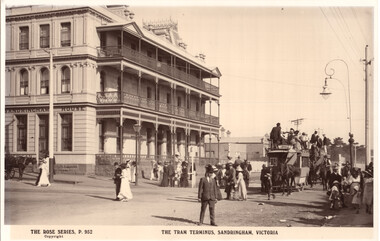 Melbourne Tram Museum
Postcard, Rose Stereograph Co, "The Tram terminus Sandringham Victoria", c1900
Postcard and large Photo of two double deck horse trams, shortly after arriving at the Sandringham - Beaumaris Tramway terminus c1900, including the Sandringham House Private Hotel on the corner on the corner of Beach Road and Melrose Street. Has many well dressed people crossing the roadway.Shows a double deck horse tram on the Sandringham to Beaumaris tramway.Original postcard and reproduction print of Rose Series postcard P952 on paper.trams, tramways, horse trams, sandringham, hotels, beaumaris -
 Ballarat Tramway Museum
Photograph - Black & White Photograph/s, late 1930's
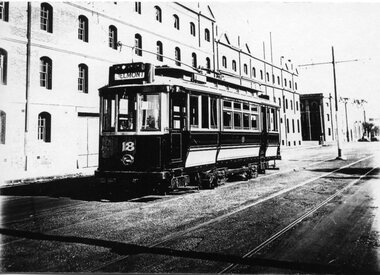
Yields information about the form and style of the early Geelong trams and assistance given to the Red Cross during the first world war.Black and white photograph, printed onto card (inkjet printer?) of Geelong Cross bench tram No. 18 in Corio Tce, now Brougham St outside the wood stores. Tram has the destination of Belmont. Taken after SEC take over with the sides of tram panelled in. Late 1930's. See Reg item 4317 for a different view. Two copies held. Dave O'Neil advised 20/7/2009 - following conversion for one man trams. Given the condition of the tram, assume just after conversion. Copy 1 - "Geelong Hist Soc / William Scott Collection." in ink. Copy 2 - " Corio Tce, now Brougham St / Moorabool Street crossing in background / Geelong Hist Soc / W F S Collection." in ink.trams, tramways, geelong, depot, brougham st, tram 18 -
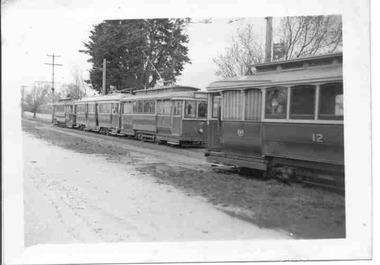
 Ballarat Tramway Museum
Slide - 35mm slide/s - set of 8, John Theodore, 1972 - 1974
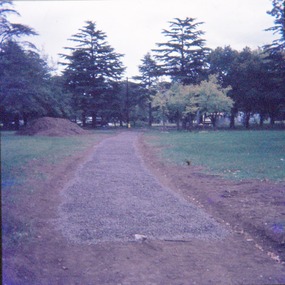
Yields information about depot activities of the BTPS in building the depot fan and access track.Set of 4 AGFA blue and white plastic mount and one Kodachrome 27mm sq slides of various works at the BTPS depot during 1972 / 1974. .1 - Access track with ballast layer looking back to the depot. .2 - workers on top of Mt Jessup - the stockpile. .3 - 26, 27 and 40 peering out of the depot .4 - 27 on depot fan and sleepers. 27 was the display the tram Noel Gipps, Gavin Young, Bob Prentice .5 - volunteer on roof of tram - can't recall his name. .6 - access track at the level crossing .7 - view from level crossing .8 - Stewart Loddington standing by 26 - 26 has a briquettes sign.Various notations by John as to the slide number and the trams in pencil and ink.tramways, trams, btps, depot, track construction, trams, tram 26, tram 27 -
 Ballarat Tramway Museum
Slide - 27 mm sq slide/s - set of 6, Andrew Howlett, Myer Christmas tram No. 18 - Wendouree Parade, Dec. 1969
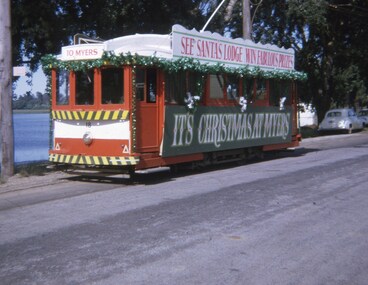
Yields information about the launch or a Santa event in 1969 for the Myer Santa Tram at Mt Pleasant.Set of 6 Colour slides, Kodak white cardboard mount, developed Nov 1969 of No.18 as the Myer Santa Christmas tram possibly at the time of its formal launch and one (Dec 1969) in City Loop. .1 - No. 18 leaving the depot in Wendouree Parade .2 - In Wendouree Parade .3 - No. 11 and 18 crossing - No. 17 has a Twin Lakes sign and Briquettes roof advert .4 - No. 30 and 18 crossing at the Grant St loop with a Mobil service station in the background. .5 - At the Mt Pleasant terminus with a number of people and a Father Christmas - Barkly St .6 - In the City Loop, Dec. 1969 along with another tram. Has the Big W and Dickens stores in the background."Duncan St Loop Drummond St" in red ink.ballarat, tramways, trams, santa tram, myer, christmas trams, decorated trams, wendouree parade, barkly st, grant st, mt pleasant, tram 18, tram 11, tram 30 -
 Melbourne Tram Museum
Postcard, Nu-color-Vue, looking south along Swanston St, mid 1970's
Colour postcard divided back, serrated edge, with a view from the Melbourne Town Hall portico, looking south along Swanston St towards the intersection of Bourke St. shows the city square, Wales Corner, trams and traffic in both streets. Has a W2 crossing Swanston St - W2 586? - the crossing is one of the type which composed of panels that allowed for maintenance. City Square completed to Flinders Lane early 1970, Bourke St Mall opened 1983 - photo mid 1970's Back has space for name and address, stamp and a message and title of postcard. Produced by Nu-Color-Vue. Card Number ML 209, NCV 2940.trams, tramways, postcards, swanston st, bourke st, tram 586?