Showing 1801 items matching "tramways sign"
-
 Ballarat Tramway Museum
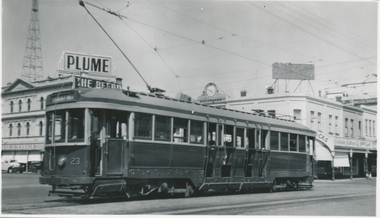
Photograph, Wal Jack, Bendigo No. 23 at Charing Cross, 3/01/1954
Photo of No. 23 at Charing Cross with the destination of Quarry Hill, photo by Wal Jack 3-1-1954. Has the Beehive in the background, a Plume petrol sign and the watchmaker's clock in the background. Printed on Ilford paper. Two prints held. See image i2 for rear of photograph. See image i3 for hi res scan of negative Yields information about Bendigo tram 23 in 1954 and Charing Cross.Black and White print contained within the Wal Jack Bendigo and Geelong Album, see Reg Item 5003 for more details. On the rear in blue ink "SEC Bendigo No 23 bogie to Quarry Hill at Fountain (Charing Cross) Bendigo 3-1-54" with Wal Jack copyright stamp in the top right hand corner and the number "T59PC" written in.trams, tramways, bendigo, charing cross, tram 23 -
 Ballarat Tramway Museum
Photograph - Black & White Photograph/s, 1930
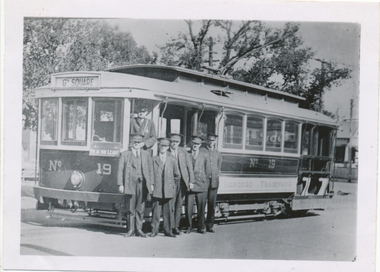
... Ballarat Tramway Museum South Gardens Reserve Wendouree ...Black and White print contained within the Wal Jack Bendigo and Geelong Album, see Reg Item 5003 for more details. Photo of Bendigo tram No. 19, 1st of the ex MMTB cars to Bendigo, prior to any conversion work. Tram has "Bendigo Tramways" painted on the side of the tram, a sign at the front of the tram saying "Pay as you Leave", the destination of Golden Square. Has one conductor and five drivers? (motormen) standing alongside the front of the tram. Wal Jack has written in on the album "No. 19, 1st of ex MMTB cars at depot 1930" Peter Duckett photo or collection. On the rear in blue ink "PWD"trams, tramways, bendigo, new trams, signs, crews, tram 19 -
 Ballarat Tramway Museum
Photograph - Black & White Photograph/s, Jun. 1949
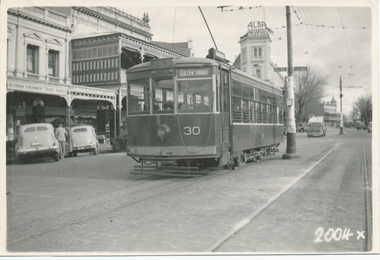
Black and White print contained within the Wal Jack Bendigo and Geelong Album, see Reg Item 5003 for more details. Photo of Bendigo Birney No. 30 in High St Bendigo at the end of the double track line en route to Golden Square. Wal's album notes date the photo as June 1949. In the background is the Victorian Government Tourist Bureau and an advertising sign for "Alba Motor Spirit" Has the number "2004X" written in white ink on the negative. Printed on Ilford paper. On rear in pencil "468"trams, tramways, bendigo, birney, high st, tram 30 -
 Ballarat Tramway Museum
Photograph - Black & White Photograph/s, 1940
Black and White print contained within the Wal Jack Bendigo and Geelong Album, see Reg Item 5003 for more details. Photo of Geelong No. 3 in Moorabool St. 1940. No details of photographer on rear. Tram has the destination of East. In the background is a sign for Berger Paints and F&M Ritchie? Wal's album notes provides the date of 1940. Printed on Kodak Velox Paper. On rear in ink "84 Geelong Tramways, State Electricity Commission, No. 3 One of their original trams I believe. They ride very steady and smooth. Duncan and Fraser body. The Brush Electrical Engineering Co. Ltd, Loughborough England, long wheel base truck."trams, tramways, geelong, moorabool st, tram 3 -
 Ballarat Tramway Museum
Photograph - Black & White Photograph/s, Wal Jack, 1940
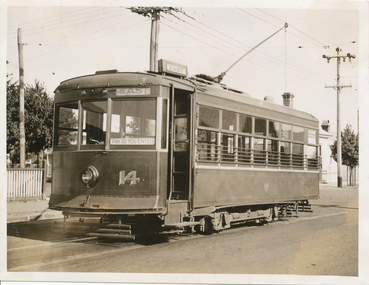
Black and White print contained within the Wal Jack Bendigo and Geelong Album, see Reg Item 5003 for more details. Photo of Geelong Birney 14 at the Chilwell terminus, 1940. Wal notes it is No. 11 on the Bendigo system. The tram has the destination of East and has a "Pay as you Enter" sign on the door. i1 - scan of print in the album i2 - rear of image i3 - scan of negative at 3200dpi added 18/6/2020.On the rear in ink "Geelong Tramways No. 14 Birney Car, bought new 1924"trams, tramways, geelong, chilwell, birney, tram 14 -
 Ballarat Tramway Museum
Photograph - Black & White Photograph/s, Leon Marshall Wood, 29/03/1948 12:00:00 AM
Black and White print contained within the Wal Jack Bendigo and Geelong Album, see Reg Item 5003 for more details. Photo of No. 24 in Aberdeen St, 29-3-1948. Wal's album notes that the tram is in the new colour (all green) scheme. Printed on Velox Paper. Tram has the destination of East. Note the "Pay as you enter" sign. Has on the rear in ink "Aberdeen St, Geelong 29-3-48" and the L. M. Wood copyright stamp.trams, tramways, geelong, aberdeen st, east, tram 24 -
 Ballarat Tramway Museum
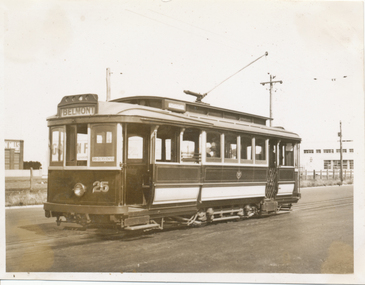
Photograph - Black & White Photograph/s - 25 at the North terminu, Wal Jack, Mar. 1940
Black and White print contained within the Wal Jack Bendigo and Geelong Album, see Reg Item 5003 for more details. Photo of 25 at the North terminus, March 1940. Note the "Pay as you enter" sign. Tram has the destination of Belmont. i1 - scan of print in the album i2 - rear of image i3 - scan of negative at 3200dpi added 18/6/2020.trams, tramways, geelong, north, tram 25 -
 Ballarat Tramway Museum
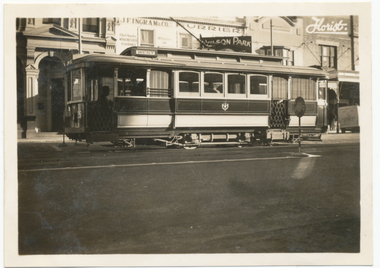
Photograph - Black & White Photograph/s, Wal Jack, Jun. 1939
Black and White print contained within the Wal Jack Bendigo and Geelong Album, see Reg Item 5003 for more details. Photo of 25 in Ryrie St Geelong , June 1939. Tram has the destination of West. Note the Safety Zone sign. Printed on Kodak Velox paper. In the background is J. F Ingram & Co, Furrier i1 - scan of print in the album i2 - rear of image i3 - scan of negative at 3200dpi added 6/6/2020. trams, tramways, geelong, ryrie st, tram 25 -
 Ballarat Tramway Museum
Photograph - Black & White Photograph/s, 11/07/1950 12:00:00 AM
... Parade Ballarat Ballarat goldfields Trams tramways Geelong Signs ...Black and White print contained within the Wal Jack Bendigo and Geelong Album, see Reg Item 5003 for more details. Photo of an illuminated street sign, lamp, near Geelong Railway Station, at Mercer St corner, 11-7-1950. Photographer not known. Photo is glued into album. Sign has the words "Geelong Electric Tramways / Board tram at Curve" with a hand and finger pointing the direction to walk in.trams, tramways, geelong, signs, railway station -
 Ballarat Tramway Museum
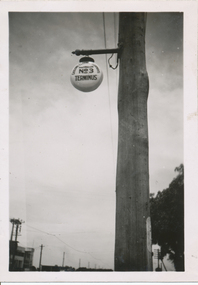
Photograph - Black & White Photograph/s, c1950
... Parade Ballarat Ballarat goldfields Trams tramways Geelong Signs ...Black and White print contained within the Wal Jack Bendigo and Geelong Album, see Reg Item 5003 for more details. Photo of an illuminated street sign, lamp, at the North Geelong terminus. Photographer not known, c 1950. Sign has the words "Geelong Electric Tramways / Destination? / No. 3 Terminus"On the rear in ink "Illuminated terminal sign"trams, tramways, geelong, signs, north -
 Ballarat Tramway Museum
Photograph - Black & White Photograph/s, Nov. 1956
Yields information about Ballarat's bogie trams, Pleasant St and Sturt St and possibly tram services during the Olympics.Black and white photograph of No. 34 outbound in Sturt St at Pleasant St, with the destination Sturt St West. Appears to be a very crowded tram with a man on the running board. Has St Peters Anglican Church in the background. On the tramway pole adjacent to the tram is a "One Way Traffic" and an "Olympics Rings" sign, indicating the photo could have been taken c1956, possibly during the Olympics themselves. Photographer unknown - could be Wal Jack. Based on Wal's notes for the events, could be 24/11/1956 - see Reg Item 5565. trams, tramways, pleasant st, olympics, sturt st, sturt st west, tram 34 -
 Ballarat Tramway Museum
Administrative record - SEC Ballarat Depot monthly report, State Electricity Commission of Victoria (SECV), 1971
Record of the monthly reports from April 1965 to July 1971, signed by the Depot Foreman S Lakey, D Irwin or acting F. Minns. Lists the number of brake blocks replaced and summarises the principal work done on the tramcars and special jobs eg replacing the destination rolls. image i2 - April 1965 to December 1966 image i3 - Jan. 1967 to December 1968 - including an entry dated 10-9-1968 with a list of depot staff, addresses and phone numbers, 17 in all. image i4 - Jan. 1969 to December 1970 image i5 - Jan 1971 to July 1971Yields information about the Ballarat Workshop activities, tramcars maintained and events on a monthly basis.Memo reporting book, with sheets headed "Departmental State Electricity Commission of Victoria" - ruled, carbon copy with heavy card covers with green tape binding. Form SF-466-12-0254. A sheet of carbon paper remains in the book as if for the next entry.ballarat, tramcars, workshop records, workshops, maintenance -
 Ballarat Tramway Museum
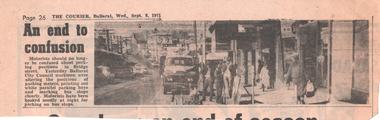
Newspaper, The Courier Ballarat, "An end to confusion", 8/9/1971
Newspaper item with photograph of Council workers changing car parking signs in Bridge St following the closure of the two tram routes using the streets. Notes the confusion over parking in bus stop zones.Yields information about the closure of the SEC operated tram system and changed car parking.Newspaper cutting from The Courier 8/9/1971.tramways, closure, ballarat, bridge st, car parking, bus stops -
 Ballarat Tramway Museum
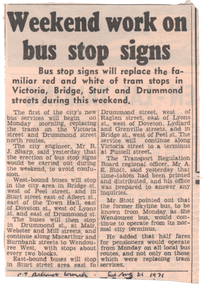
Newspaper, The Courier Ballarat, "Weekend work on bus stop signs", 14/8/1971
Newspaper item about the installation of new bus stops and signs following the closure of the Victoria St tram line that Sunday. Quotes Mr Sharp City Engineer and Mr A Stott of the TRB about the new services and notes that the Skyline Wendouree Bus city stop would be unchanged.Yields information about the closure of the SEC operated tram system and changed car parking.Newspaper cutting from The Courier 21/8/1971tramways, closure, ballarat, bridge st, car parking, bus stops, victoria st. -
 Ballarat Tramway Museum
Functional object - ESCO Tram Destination Symbol, Circa 1913
Tramcar Destination Sign used by the Electric Supply Company of Victoria on the Ballarat Electric Trams. The ESCo operated the Ballarat electric trams from 1905 to 1934. Tramcar destination symbols originated in a time when a large part of the population was illiterate. The symbols were displayed on the front of the tram enabling the public to easily identify a tram's destination. The destination signs had a painted circle in the middle, the colour indicated the tram's destination. This particular sign has a yellow circle indicating the destination was Lydiard Street North. See Reg No. 5488.Yields information about how the public related to the trams and their destinations.Square sheet of steel, painted dark green and with a painted yellow circle 125mm in diameter in the middle. Has two circular holes near one side with an extended slot for fastening over hooks or screw heads. Has at least two layers paint with slightly different shades; all layers of paint are flaking. One edge is partially rusted away.ballarat, tramways, tram, destination symbol, esco -
 Ballarat Tramway Museum
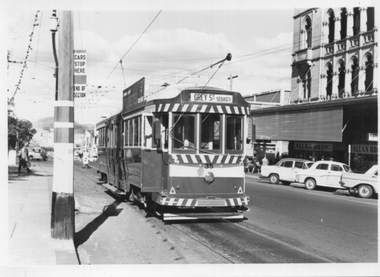
Photograph - Tram 28 Ripon & Sturt Sts, 15-2-1967
Black and white photograph of tram 18 in Ripon St after turning from Sturt St on its way to View Point. Has an Ampol Service station sign on the left-hand side. An adjacent pole has a compulsory tram stop marks. Photographer unknown.Yields information about the intersection of Ripon and Sturt Sts.Black and white photograph with photographer's notes on rear.In ink on rear - "Ripon & Sturt Sts 15-2-67 No 28"trams, tramways, tram 18, ripon st, view point, sturt st, ampol -
 Ballarat Tramway Museum
Photograph - Tram 35 - City Centre, c1970
Black and white photograph of tram 35 with the short working destination of Grey St Sebastopol at the tram stop known as the City Centre at Sturt and Lydiard Streets. The pole alongside the tram has the tram stop sign and an End of Section sign. In in the background is the National Mutual building and Allan Bros Jewellers store. Date and photographer unknown.Yields information about tram 35 at the City Centre stop late 1960s or early 1970s.Black and white photograph on plain paper.trams, tramways, tram 35, sturt st, lydiard st, national mutual, city centre -
 Ballarat Tramway Museum
Photograph - Ballarat No. 26 east bound in Sturt St at Drummond St, Wal Jack, 14-3-1953
Print of the Wal Jack Ballarat Negative file of Ballarat No. 26 east bound in Sturt St at Drummond St. Has a pole showing the tram stop and section signs. In the background is the Southern Cross Hotel. See item 7867 for the negative.Yields information about trams at Hospital corner.Photograph, black and white - plain black with Wal Jack's note on rearWal Jack number stamp and number T44PC.tramways, trams, sturt st, drummond st, hospital corner, tram 26 -
 Ballarat Tramway Museum
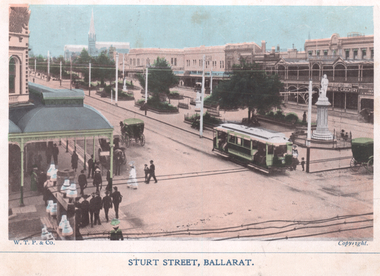
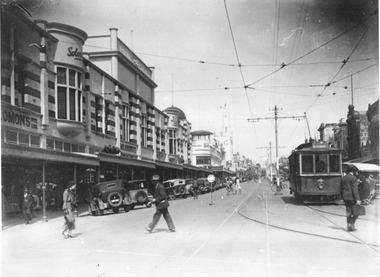
Photograph - Illustration, WTP, "Sturt Street, Ballarat", c1905
The photo shows an ESCo tram soon after commencement of trams in 1905, at the corner of Armstrong and Sturt Streets, Ballarat. The tram has a destination sign hung from the driver's dash canopy. On the left is the Snows Department store and a pole with telegraph/telephone wires and insulators. The Thomas Moore Statue is adjacent to the tramcar. The median plantation was known as Shoppees Square. See item 8419 for a postcard and 3795 for a copy photograph. Photo by WTP & Co.Yields information about Sturt St soon after the opening of the Ballarat Electric tramwayPrinted photograph on a sheet of plain paper.tramways, trams, sturt st, esco, armstrong st, wtp -
 Ballarat Tramway Museum
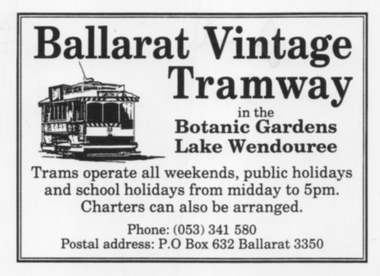
Sign - Advertisement, John Phillips, "Ballarat Vintage Tramway", late 1970s
... Tramway logos Sign or advertisement - Bromide sheet "Ballarat ...Sign or advertisement used by the Ballarat Tramway Preservation Society on a bromide sheet with the tram logo of 33 (see item 8257), giving details of the Tramway operation and contact details. Prepared late 1970s. Used on marketing and advertising materials.Yields information about the BTPS and its advertising base.Sign or advertisement - Bromide sheetbtps, marketing, ballarat vintage tramway, logos -
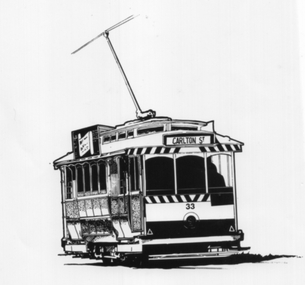 Ballarat Tramway Museum
Sign - Illustration, John Phillips, "Tram 33", late 1970s
... marketing Ballarat Vintage Tramway logos tram 33 Sign ...Sign or illustration used by the Ballarat Tramway Preservation Society and the Ballarat Tramway Museum on a bromide sheet with the tram logo of 33 with the destination of Carlton St. Prepared late 1970s. Used on marketing, posters, documents etc until the early 2000s.Yields information about the logos used by both the BTPS and the BTM.Sign or advertisement - Bromide sheetbtps, marketing, ballarat vintage tramway, logos, tram 33 -
 Ballarat Tramway Museum
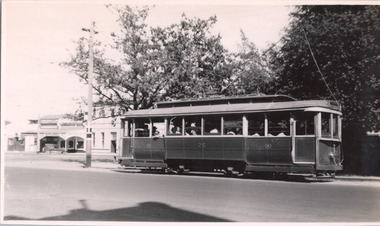
Photograph - Geelong 4 - Moorabool St, late 1930s
The photo taken at the corner of Moorabool and Malop Streets is looking south along Moorabool St. Shows Geelong tram 4 with the destination of North, about to turn into Malop St with several passengers boarding the tram. In the background is a safety zone sign, the Solomons store, the T&G building, and many angle-parked motor cars. The T&G building is finished. The bar traffic lights don’t appear to be at the Moorabool and Ryrie St corner yet so the photo was taken between 1934 and 1939Yields information about Geelong late 1930s and tramway operations.Black and white photograph - plain back.geelong, moorabool st, malop st, tramways, tram 4, safety zone -
 Ballarat Tramway Museum
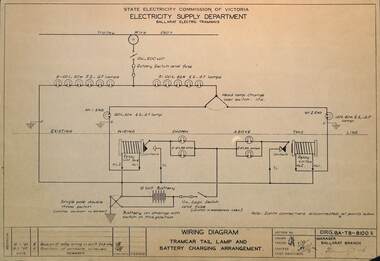
Drawing, State Electricity Commission of Victoria (SECV), "Tramcar tail lamp installation relay modification", 15/11/1949
Set of two drawings (BA-T8-8100/1 and BA-T8-8100B) showing the installation of tail lights on SEC tramcars and modifications to the battery/trolley pole relay and battery. Both are dated 15/11/1949 and signed by the Manager Ballarat Branch. The actual relay used later was a Post Office type relay contained within a wooden box.Yields information about the modifications proposed to the tramcars to provide a rear tail light and lights when at a terminus.Drawing - dyeline print on plain papertramcars, safety, tail lights, lights, ballarat -
 Ballarat Tramway Museum
Document - ESCo, Electric Supply Co. of Vic (ESCo), "Rules for Conductors"
The typed document, most likely from an original document, details the rules for Electric Supply Co of Victoria (ESCo) Conductors. ESCo was the operator of the Ballarat Tramways from 1905 to 1934. Notes issuing of tickets, operational issues, trailers, bell signs, cash handling, parcels, behavior, uniforms, and inspectors. Conductors were primarily youths, under 21 and could be sacked for errors and were generally not employed after they turned 21. Notes the Grenville St shelter/office of ESCo. Not known who retyped the document.Yields information about the rules that ESCo conductors operated under and the operation of trailers.Six page typed document on ruled foolscap paper with four punch holes on left side and stapled in top left hand corner.tramcars, tramways, conductors, tickets, esco, trailers -
 Ballarat Tramway Museum
Currency - Australian Two Dollar Note, Gordon Andrews, 1966-1988
Circulated between 1966 and 1988, the two dollar bank note was issued by the Reserve Bank of Australia following Australia's switch to decimal currency. It was later replaced by the two dollar coin. Legal tender throughout the Commonwealth of Australia and the Territories of the Commonwealth. Signed by J G Phillips, Governor of Reverse Bank of Australia, and R J Randall, Secretary to the Treasury. Each note is assigned a unique serial number, this notes serial number reads GJJ 982843.Demonstrates the two dollar note as it was circulated in Australia between 1966 and 1988. It represents currency used by Ballarat passengers to pay their tram fares and received by SEC Ballarat Tramway crews/staff in wage packets. Green and yellow minted note on treated white paper. Obverse depicts John Macarthur, a merino ram and a "2" denoting its value. The reverse depicts William James Farrer, alongside ears of wheat and the "2".btm, ballarat tramway museum, cash, bank notes, australian currency, money, two dollar bank note -
 Ballarat Tramway Museum
Negative, Wal Jack, late 1940's or early 1950's
Yields information about the Sturt and Lydiard St intersection and tram services.Negative and Digital image of the Wal Jack Ballarat Negative file of No. 21 turning from Sturt St south side into Lydiard St North. Has the Commonwealth Bank building, National Mutual, and Craig's Hotel. The small newsagent kiosk is in the photo. C. Marks Jewellers in the National Mutual building sign. trams, tramways, sturt st, lydiard st north, tram 23 -
 Ballarat Tramway Museum
Negative, Wal Jack, late 1940's or early 1950's
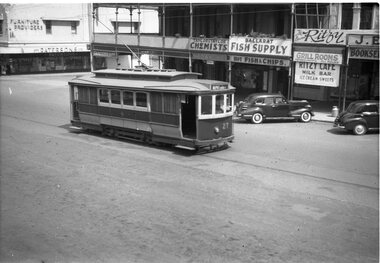
Yields information about the tram services and the lower section of Sturt St.Negative and Digital image of the Wal Jack Ballarat Negative file of No. 27 with the destination Depot via Ripon St. Note the white painted windows. Photo late 1940's or early 1950's. In the background are Paterson's Furniture Providers, Taylor and Taylor Chemists, Ballarat Fish Supply and The Ballarat Ritzy Cafe and Grill Rooms. The chemist shop has a sign for Kodak Film.trams, tramways, sturt st, tram 27 -
 Ballarat Tramway Museum
Negative, Wal Jack, late 1940's or early 1950's
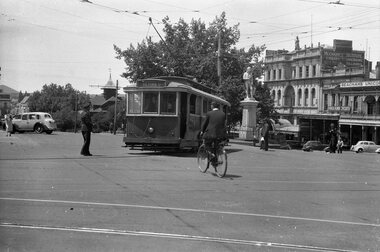
Yields information about the tram services and the Sturt St and Lydiard St intersection and the buildings behind.Negative and Digital image of the Wal Jack Ballarat Negative file of No. 31 turning from Lydiard St into Sturt St with the destination of Victoria St. In the background is the Robbie Burns statue, the inspector observing and holding a point bar. The Mechanics Institute, Beacham's Unicorn Hotel, and Ballarat Built Bicycles and a sign for Holland cycles.trams, tramways, sturt st, tram 31 -
 Ballarat Tramway Museum
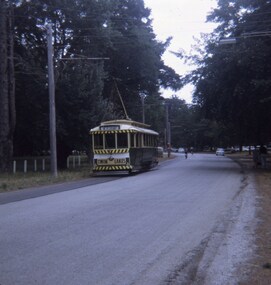
Slide - 27 mm sq slide/s, Andrew Howlett, Tram No. 11 northbound in Wendouree Parade in the North Gardens, Feb. 1969
Yields information about Wendouree Parade North Gardens area.Colour slide, Kodak white cardboard mount, developed Fb. 1969 of No. 11 northbound in Wendouree Parade in the North Gardens. Tram has the destination of Mt Pleasant and has a Twin Lake sign.ballarat, tramways, trams, wendouree parade, tram 11 -
 Ballarat Tramway Museum
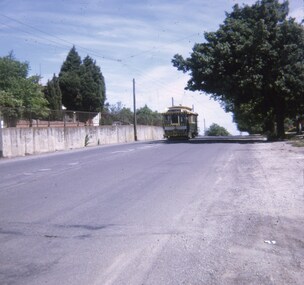
Slide - 27 mm sq slide/s, Andrew Howlett, Tram No. 11 northbound in Lydiard St North, with the cutting concrete wall before Gregory St, Feb. 1969
The concrete wall behind the tram was removed following closure of the SEC operated system and reconstruction of the street.Yields information about the Lydiard St line and in particular the concrete cutting wall before Gregory St.Colour slide, Kodak white cardboard mount, developed Feb. 1969 of No. 11 northbound in Lydiard St North, with the cutting concrete wall before Gregory St Tram has the destination of Lydiard St Nth and has a Twin Lake sign.ballarat, tramways, trams, lydiard st north, gregory st, tram 11