Showing 9191 items
matching more
-
 Ballarat Tramway Museum
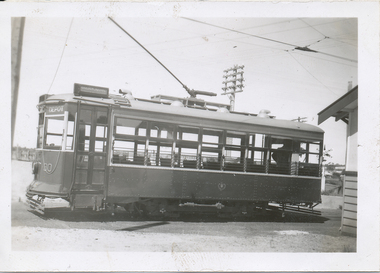
Photograph - Black & White Photograph/s, Leon Marshall Wood, 29/12/1947 12:00:00 AM
Black and White print contained within the Wal Jack Bendigo and Geelong Album, see Reg Item 5003 for more details. Photo of Bendigo Birney No.30 at North Bendigo, Photo Leon Marshall Wood, with the destination of Golden Square - 29-12-1947. Has the level crossing and rail line in the background and part of the tram stop shelter. On the rear in black ink "SEC of Victoria Bendigo, ex Geelong "Birney" car No. 30 Nth Bendigo terminus. In the bottom left hand corner "29.12.1947" The Leon Marshall Wood stamp in green ink and the number "SEC 15" written in.trams, tramways, bendigo, north bendigo, level crossings, birney, tram 30 -
 Ballarat Tramway Museum
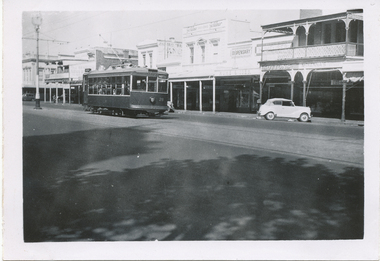
Photograph - Black & White Photograph/s, Wal Jack, 3/01/1954 12:00:00 AM
Black and White print contained within the Wal Jack Bendigo and Geelong Album, see Reg Item 5003 for more details. Photo of Bendigo Birney No. 28 in Pall Mall opposite near Post Office, Photo by Wal Jack, 3-1-54. In the background are shops for: Suttons Furniture, McKenna's, Hume & Iser Dispensary, and Gestetner Sales and Service. On the rear in blue ink "SEC Bendigo Birney No. 28 Birney ex North opposite Post Office 3-1-54" with Wal Jack copyright stamp in the top right hand corner and the number "T214" written in.trams, tramways, bendigo, pall mall, birney, tram 28 -
 Ballarat Tramway Museum
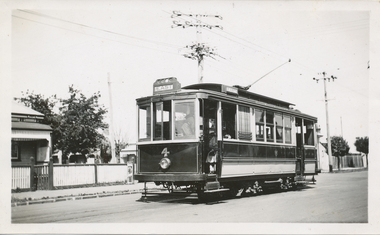
Photograph - Black & White Photograph/s, 1940
Black and White print contained within the Wal Jack Bendigo and Geelong Album, see Reg Item 5003 for more details. Photo of Geelong No. 4 at the Chilwell terminus, 1940, no details of photographer. Tram has the destination of East. A lady is seated in the front talking to the driver. Wal's album notes provides the date of 1940. Printed on "Selo" paper. On the rear in blue ink "Geelong No. 4" in ink.trams, tramways, geelong, chilwell, tram 4 -
 Ballarat Tramway Museum
Photograph - Black & White Photograph/s, late 1940s?
Black and White print contained within the Wal Jack Bendigo and Geelong Album, see Reg Item 5003 for more details. Photo of Geelong No. 5 in Moorabool St, late 1940's. No details of photographer. Has the T&G building, Savoia Cafe, The Commercial Bank of Australia in the background. Photo has been glued onto the album sheet.trams, tramways, geelong, moorabool st, tram 5 -
 Ballarat Tramway Museum
Photograph - Black & White Photograph/s, Wal Jack, 29/07/1943 12:00:00 AM
Black and White print contained within the Wal Jack Bendigo and Geelong Album, see Reg Item 5003 for more details. Photo of No. 18 at the Belmont terminus 29 July 1943. Tram has the destination of North. i1 - scan of print in the album i2 - rear of image i3 - scan of negative at 3200dpi added 18/6/2020. Has written in ink on the rear "SEC Geelong Tramways, No. 18. Belmont terminus 29-7-1943"trams, tramways, geelong, belmont, tram 18 -
 Ballarat Tramway Museum
Photograph - Black & White Photograph/s, 24/06/1949 12:00:00 AM
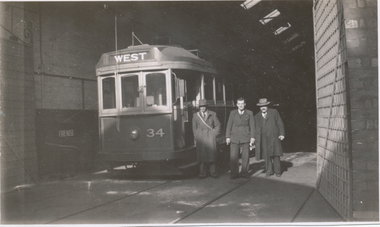
Black and White print contained within the Wal Jack Bendigo and Geelong Album, see Reg Item 5003 for more details. Photo of Geelong No. 34 in the No. 2 shed of Geelong with Wal Jack, S. Stephens and Ken Train alongside. Tram has the destination of West. See also Reg Item 7831 for the subsequent photo. No details on photographer. On rear in ink "SEC Geelong Tys, MT bogie tram No. 34 ex MMTB standing in paint shop 24/6/49. Alongside being Messrs W. Jack, S. Stephens and K. Train" Also photo information 5.4:122, 1/25 sec @50ft."trams, tramways, geelong, depot, tram 34 -
 Ballarat Tramway Museum
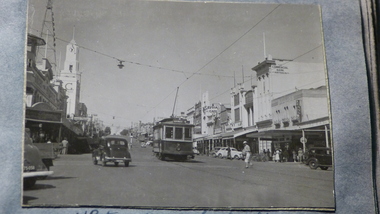
Photograph - Black & White Photograph/s, 8/01/1956 12:00:00 AM
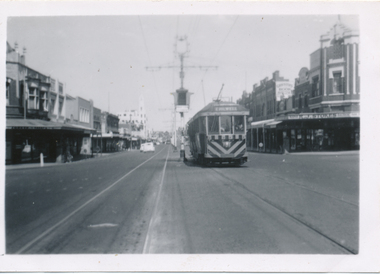
Black and White print contained within the Wal Jack Bendigo and Geelong Album, see Reg Item 5003 for more details. Photo of Geelong No 35 in Ryrie St, at Gheringhap St with destination of Chilwell, on the last day of service on this line. Has a bar traffic light in the photo and R. J. Stokes store. 8/1/1956. No details on photographer. On rear in ink "No.35 Chilwell bound in Ryrie St opposite Gheringhap St, Post Office Corner Geelong 8/1/56"trams, tramways, geelong, last day, ryrie st, traffic lights, tram 35 -
 Ballarat Tramway Museum
Negative, Wal Jack, Jul. 1944
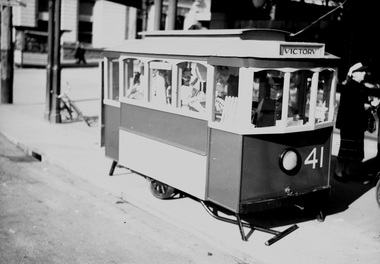
Yields information about Ballarat 's Treasure tram and fund raising during the second world war.Negative and Digital image of the Wal Jack Ballarat Negative file of the Treasure Tram built for fund raising by the depot staff to support the Most Popular Conductress Competition. See Reg Items 2129 and 5108 for more details. July 1944. Photographed at the corner of Sturt and Lydiard Streets. Image i1, original scan of the negative, image i2, and adjusted scan. trams, tramways, world war i, most popular conductress competition, conductresses, treasure tram, tram 41 -
 Whitehorse Historical Society Inc.
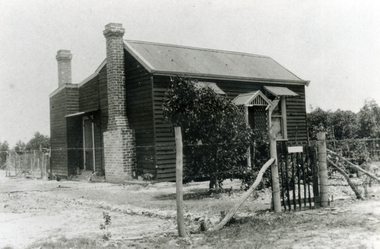
Photograph, Marie Arrowsmith's Home
Black and white photo of Home of Marie Arrowsmith, Grandmother of Ted, in Lucknow Street (formerly Scott Street), Mitcham. Marie lived there from 1915 to early 1920s. Originally 2 roomed Bungalow, 2 more rooms were added. Virgin bush at rear. House purchased from Mrs Scott of Scott's Estate. House since demolished.arrowsmith, marie, ted, scott, mrs, lucknow street, mitcham -
 Bendigo Military Museum
Letter - OFFICIAL LETTER & ENVELOPE, Australian Imperial Force Base Records Office, 2nd Oct 1922
The letter relates to the postage and receivable of a Victory Medal 194 - 1919 for Pte Walter Williams No 1442 2nd Bn AIF. Refer Cat No 4342P for his service details also Cat No 1859P for photo and medals..1) letter, yellow colour, official “Australian Imperial Force B.R.P.F.42”, all print in black, date stamp in blue, signature in purple, bottom section is a tear off return piece. .2) Envelope, blue colour “OHMS” with blue and orange stamp, stamped 3 more times, address in black pen, another entry in pencil..1) Letter addressed to, “Mr O.W.Williams, 323 Lyttleton Terrace Bendigo Vic”. .2) In black pencil, “Letter from the Army about Victory medal for Walter Williams dated Oct 1922”.letters, envelopes, medals -
 Ballarat Tramway Museum
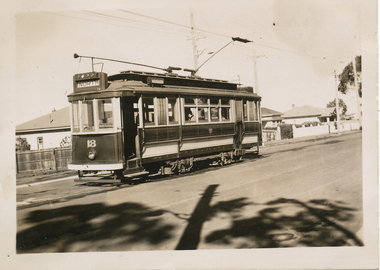
Photograph - Black & White Photograph/s, Wal Jack, 10/04/1950 12:00:00 AM
Black and White print contained within the Wal Jack Bendigo and Geelong Album, see Reg Item 5003 for more details. Photo of 13 outside the Bendigo tram depot. Photo by Wal Jack - 10-4-1950. i1 - scan of print in the album i2 - rear of image i3 - scan of negative at 3200dpi added 6/6/2020. On the rear in blue ink "SEC Bendigo No. 13 fitted with "Ballarat" type end doors. Bendigo Depot 10-4-50" "W. Jack copyright stamp in top right hand corner with the number "T212" written in.trams, tramways, bendigo, depot, tram 13 -
 Ballarat Tramway Museum
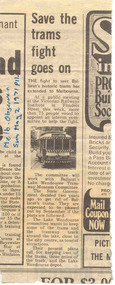
Newspaper, Melbourne Observer, "Save the trams fight goes on", 2/05/1971 12:00:00 AM
Demonstrates the type of publicity the moves to establish a heritage tramway in Ballarat was obtaining in Melbourne at the time.Newspaper clipping from Melbourne Observer, Sunday, 2 May 1971, page 11, titled "Save the trams fight goes on". Item written following the public meeting at the VRI on 29 April (See Reg Item 3932.1 and other papers). Reported that more than 75 people attended, that the committee will work with the Lake Wendouree Tramway Museum Committee.On the side of the cutting in blue ink "Melb Observer / Sun May 2 1971 p11."ballarat, btps, preservation -
 Ballarat Tramway Museum
Photograph - Colour Photograph/s, Carolyn Dean, 29/10/1994 12:00:00 AM
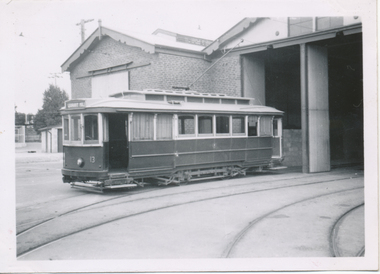
Photograph of BTPS workers dismantling the house that ESCo No. 21 was built into. Taken on 29/10/1994. In photo are (L to R), Paul Mong, Darren Hutcheson, Albert Mong, Jim Parker, & John Phillips. See Nov 95 and Jan. 96 issue of Fares Please! for more details. Photo appeared in Feb. 1995 issue of Trolley Wire, p38.On rear, '29-10-94, C.Dean', 'Photo page 38 bottom same size' and cropping marksballarat, tram recovery, btm, esco, tram 21 -
 Ballarat Tramway Museum
Photograph - Colour Photograph/s, Carolyn Dean, 7/11/1992 12:00:00 AM
Colour photograph of the first passenger carrying trip of Horse Tram No. 1 on 7 November 1992, leaving depot junction. See November 1992 Fares Please! for more details, re crew and operations. On Fujicolour paper. Len Millar conductor, leaning out, Richard Gilbert and Warren Doubleday on top deck at rear. November 1992 Fares Please!horse tram no. 1, tramcars, reconstruction, btps, tram 1 -
 Wodonga & District Historical Society Inc
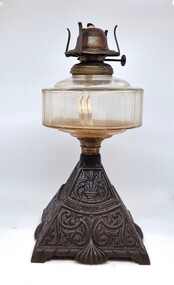
Domestic object - Kerosene Lamp, early 20th Century
Kerosene lamps were used as a main source of lighting throughout Australia prior to the supply of domestic electrical services. This was obviously later in many rural areas. This lamp was used in the home of Mrs. Laura Flower nee Sommer wife of Mr. Stanley Flower of Wodonga.This lamp is representative of the lamps used throughout Australia prior to the introduction of domestic electricity supplies. It was used in the home of a Wodonga resident.This item has a cast iron base in a pyramidal shape with the four sides having an identical leaf and flower design. A piece of brass attaches the base to a clear glass bowl. The bowl contains a white wick. The brass wick holder has an external knob for regulating the light intensity. There is more brass between the bowl and the mantle which is made of plain glass.Inside the base of the lamp: an Rd No which is uncleardomestic appliances, kerosene lamp -
 Melbourne Tram Museum
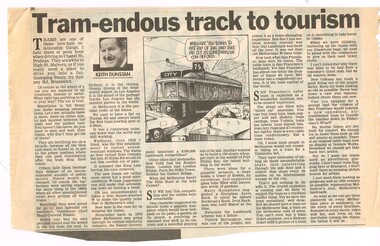
Newspaper, Keith Dunstan Herald Sun, "Tram-endous track to tourism", 31/03/1993 12:00:00 AM
Newspaper cutting - Herald-Sun - 31/3/1993, titled "Tram-endous track to tourism", written by Keith Dunstan, looking at the tram in Melbourne - equating it to a landmark in itself, the 1978 Landmark competition and why Melbourne should be using the tram more as an icon. See also Reg Item 1876 for another story by Keith, along the same lines.trams, tramways, melbourne, tourism, w class -
 Melbourne Tram Museum
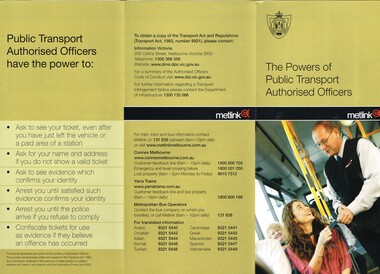
Pamphlet, Metlink, "The Powers of Public Transport Authorised Officers", c2005
Pamphlet - DL three fold, full colour on gloss paper, titled "The Powers of Public Transport Authorised Officers", explaining what Authorised Officers can do, facts, customer feedback, more than checking tickets. The Transport Act gave the power to arrest people. Gives contact details for the Connex, Yarra Trams, Metlink. Published by Metlink.trams, tramways, metlink, tickets, ticket inspectors, transport regulations -
 Melbourne Tram Museum
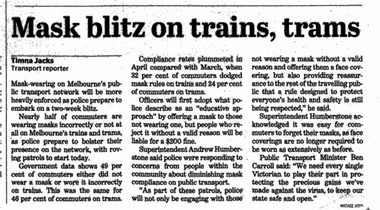
Newspaper, The Age, "Mask blitz on trains, trams”, 24/05/2021 12:00:00 AM
Newspaper clippings titled: "Mask blitz on trains, trams” by Timna Jacks Newspaper clipping from the Age 24/05/2021 Mask wearing on public transport to be more heavily enforced as police take on two week blitz. Latest Government data shows 46% of tram passengers did not wear a properly fitted mask, compared to 24% in March.trams, tramways, yarra trams, safety, covid-19 -
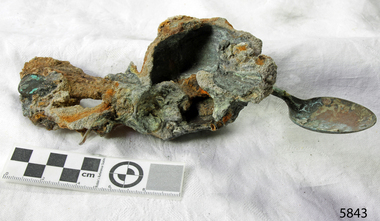 Flagstaff Hill Maritime Museum and Village
Domestic object - Spoon, c. 1878
This tea spoon is from the wreck of the LOCH ARD, a Loch Line ship of 1,693 tons which sailed from Gravesend, London, on 2 March 1878 with 17 passengers and a crew of 36 under Captain George Gibbs. “The intention was to discharge cargo in Melbourne, before returning to London via the Horn with wool and wheat”. Instead, on 1 June 1878, after 90 days at sea, she struck the sandstone cliffs of Mutton Bird Island on the south west coast of Victoria, and sank with the loss of 52 lives and all her cargo. The manifest of the LOCH ARD listed an array of manufactured goods and bulk metals being exported to the Colony of Victoria, with a declared value of £53,700. (202 bills of lading show an actual invoice value of £68, 456, with insurance underwriting to £30,000 of all cargo). Included in the manifest is the item of “Tin hardware & cutlery £7,530”. This teaspoon is one of 482 similar items of electro-plated cutlery from the LOCH ARD site, comprising spoons and forks of various sizes but all sharing the same general shape or design and metallic composition. 49 of these pieces display a legible makers’ mark — the initials “W” and “P” placed within a raised diamond outline, which is in turn contained within a sunken crown shape — identifying the manufacturer as William Page & Co of Birmingham. An electroplater’s makers’ marks, unlike sterling silver hallmarks, are not consistent identifiers of quality or date and place of manufacture. A similar line of five impressions was usually made to impress the consumer with an implication of industry standards, but what each one actually signified was not regulated and so they varied according to the whim of the individual foundry. In this case, the maker’s marks are often obscured by sedimentary accretion or removed by corrosion after a century of submersion in the ocean. However sufficient detail has survived to indicate that these samples of electro-plated cutlery probably originated from the same consignment in the LOCH ARD’s cargo. The following descriptions of maker’s marks are drawn from 255 tea spoons, 125 dessert spoons, and 99 table forks. These marks are clearly visible in 66 instances, while the same sequence of general outlines, or depression shapes, is discernible in another 166 examples. 1. A recessed Crown containing a raised Diamond outline and the initials “W” and “P” (the recognised trademark of William Page & Co) 2. An impressed Ellipse containing a raised, pivoted, Triangle in its lower part and bearing a Resurrection Cross on its upper section (a possible dissenting church symbol reflecting religious affiliation); OR a rounded Square impression containing a raised, ‘lazy’, letter “B” (possibly mimicking sterling silver hallmark signifying city of manufacture i.e. Birmingham) 3. An impressed rounded Square filled with a raised Maltese Cross (the base metal composite of nickel silver was also known as ‘German silver’ after its Berlin inventors in 1823) 4. A recessed Circle containing a Crab or Scarab Beetle image; OR a recessed Circle containing a rotated ‘fleur de lys’ or ‘fasces’ design 5. A depressed Diamond shape enclosing a large raised letter “R” and a small raised letter “D” (mimicking the U.K. Patent Office stamp which abbreviated the term ‘registered’ to “RD”, but also included date and class of patent) Suggested trade names for William Page & Co’s particular blend of brass plating are ‘roman silver’ or ‘silverite’. This copper alloy polishes to a lustrous gold when new, discolouring to a murky grey with greenish hue when neglected. HISTORY OF THE LOCH ARD The LOCH ARD belonged to the famous Loch Line which sailed many ships from England to Australia. Built in Glasgow by Barclay, Curdle and Co. in 1873, the LOCH ARD was a three-masted square rigged iron sailing ship. The ship measured 262ft 7" (79.87m) in length, 38ft (11.58m) in width, 23ft (7m) in depth and had a gross tonnage of 1693 tons. The LOCH ARD's main mast measured a massive 150ft (45.7m) in height. LOCH ARD made three trips to Australia and one trip to Calcutta before its final voyage. LOCH ARD left England on March 2, 1878, under the command of Captain Gibbs, a newly married, 29 year old. She was bound for Melbourne with a crew of 37, plus 17 passengers and a load of cargo. The general cargo reflected the affluence of Melbourne at the time. On board were straw hats, umbrella, perfumes, clay pipes, pianos, clocks, confectionary, linen and candles, as well as a heavier load of railway irons, cement, lead and copper. There were items included that intended for display in the Melbourne International Exhibition in 1880. The voyage to Port Phillip was long but uneventful. At 3am on June 1, 1878, Captain Gibbs was expecting to see land and the passengers were becoming excited as they prepared to view their new homeland in the early morning. But LOCH ARD was running into a fog which greatly reduced visibility. Captain Gibbs was becoming anxious as there was no sign of land or the Cape Otway lighthouse. At 4am the fog lifted. A man aloft announced that he could see breakers. The sheer cliffs of Victoria's west coast came into view, and Captain Gibbs realised that the ship was much closer to them than expected. He ordered as much sail to be set as time would permit and then attempted to steer the vessel out to sea. On coming head on into the wind, the ship lost momentum, the sails fell limp and LOCH ARD's bow swung back. Gibbs then ordered the anchors to be released in an attempt to hold its position. The anchors sank some 50 fathoms - but did not hold. By this time LOCH ARD was among the breakers and the tall cliffs of Mutton Bird Island rose behind the ship. Just half a mile from the coast, the ship's bow was suddenly pulled around by the anchor. The captain tried to tack out to sea, but the ship struck a reef at the base of Mutton Bird Island, near Port Campbell. Waves broke over the ship and the top deck was loosened from the hull. The masts and rigging came crashing down knocking passengers and crew overboard. When a lifeboat was finally launched, it crashed into the side of LOCH ARD and capsized. Tom Pearce, who had launched the boat, managed to cling to its overturned hull and shelter beneath it. He drifted out to sea and then on the flood tide came into what is now known as LOCH ARD Gorge. He swam to shore, bruised and dazed, and found a cave in which to shelter. Some of the crew stayed below deck to shelter from the falling rigging but drowned when the ship slipped off the reef into deeper water. Eva Carmichael had raced onto deck to find out what was happening only to be confronted by towering cliffs looming above the stricken ship. In all the chaos, Captain Gibbs grabbed Eva and said, "If you are saved Eva, let my dear wife know that I died like a sailor". That was the last Eva Carmichael saw of the captain. She was swept off the ship by a huge wave. Eva saw Tom Pearce on a small rocky beach and yelled to attract his attention. He dived in and swam to the exhausted woman and dragged her to shore. He took her to the cave and broke open case of brandy which had washed up on the beach. He opened a bottle to revive the unconscious woman. A few hours later Tom scaled a cliff in search of help. He followed hoof prints and came by chance upon two men from nearby Glenample Station three and a half miles away. In a state of exhaustion, he told the men of the tragedy. Tom returned to the gorge while the two men rode back to the station to get help. By the time they reached LOCH ARD Gorge, it was cold and dark. The two shipwreck survivors were taken to Glenample Station to recover. Eva stayed at the station for six weeks before returning to Ireland, this time by steamship. In Melbourne, Tom Pearce received a hero's welcome. He was presented with the first gold medal of the Royal Humane Society of Victoria and a £1000 cheque from the Victorian Government. Concerts were performed to honour the young man's bravery and to raise money for those who lost family in the LOCH ARD disaster. Of the 54 crew members and passengers on board, only two survived: the apprentice, Tom Pearce and the young woman passenger, Eva Carmichael, who lost all of her family in the tragedy. Ten days after the LOCH ARD tragedy, salvage rights to the wreck were sold at auction for £2,120. Cargo valued at £3,000 was salvaged and placed on the beach, but most washed back into the sea when another storm developed. The wreck of LOCH ARD still lies at the base of Mutton Bird Island. Much of the cargo has now been salvaged and some was washed up into what is now known as LOCH ARD Gorge. Cargo and artefacts have also been illegally salvaged over many years before protective legislation was introduced. One of the most unlikely pieces of cargo to have survived the shipwreck was a Minton porcelain peacock - one of only seven in the world. The peacock was destined for the Melbourne International Exhibition in 1880. It had been well packed, which gave it adequate protection during the violent storm. Today, the Minton peacock can be seen at the Flagstaff Hill Maritime Museum in Warrnambool. From Australia's most dramatic shipwreck it has now become Australia's shipwreck artefact and is one of very few 'objects' on the Victorian State Heritage Register most valuable. The LOCH ARD shipwreck is of State significance – Victorian Heritage Register S 417. Flagstaff Hill’s collection of artefacts from LOCH ARD is significant for being one of the largest collections of artefacts from this shipwreck in Victoria. It is significant for its association with the shipwreck, which is on the Victorian Heritage Register (VHR S417). The collection is significant because of the relationship between the objects, as together they have a high potential to interpret the story of the LOCH ARD. The LOCH ARD collection is archaeologically significant as the remains of a large international passenger and cargo ship. The LOCH ARD collection is historically significant for representing aspects of Victoria’s shipping history and its potential to interpret sub-theme 1.5 of Victoria’s Framework of Historical Themes (living with natural processes). The collection is also historically significant for its association with the LOCH ARD, which was one of the worst and best known shipwrecks in Victoria’s history. Remains of a number of teaspoons in a clump of concretion raised from the wreck of the Loch Ard. There are parts of at least 4 spoons visible with one spoon more complete and exposed than the others. Pieces of glass are embedded in the sediment. Original teaspoons made of thin layer of copper alloy (brass) electroplated onto nickel-silver base metal. No makers marks visible.flagstaff hill maritime museum, shipwreck coast, great ocean road, loch line, loch ard, mutton bird island, loch ard gorge, electroplated cutlery, loch ard shipwreck, nickel silver, william page & co, birmingham brass plating, makers marks, teaspoons, william page & co, william page & co -
 Bendigo Military Museum
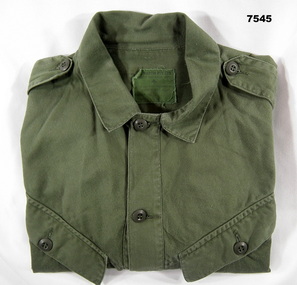
Uniform - SHIRT, ARMY, Australian Defence Industries, 1972
Shirt - green colour cotton fabric with long sleeves, shoulder epaulettes, two front pockets with button down flap, two sleeve pockets with button down flap, plastic buttons, cotton manufacturers label, below collar with black print information. Army workdress shirt commonly called "Greens". This shirt has more of an American style.Cotton label information - black ink print. 'C.J. MARTIN PTY LTD/ SOUTH AUSTRALIA 1972/ ^/ DSN 8405 66 034 5991/ chest 7 size 41/43l/ Army no./ name/"uniform, army, work wear -
 Bendigo Military Museum
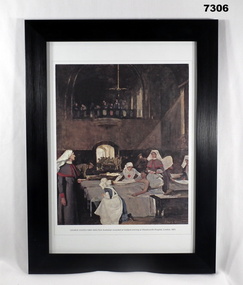
Print - PRINT, FRAMED WW1, Reader's Digest (Australia) Pty Limited, 2015
From information book - "Reader's Gigest/ Gallipoli/ 25th Aril 1915 - 9th January 1916/ Centenary Commemorative Prints". Collection of 20 prints Refer Cat No. 7300.Framed print. Print - colour print on paper. Copy of an oil on canvas painting. Depicts a "Hospital ward where several nurses attend a patient in bed", against a background of "beds being made ready in the ward" and "Stretcher bearers carrying in more wounded". Frame - black plastic framing with glass front and MDF board backing with adhered black paper.Details below print - in black ink. "GEORGE COATES (1869 - 1930). First Australian wounded at Gallipoli arriving at Wandsworth Hospital, London". 1921. "Served with the Royal Army Medical Corps at 3rd London General Hospital at Wandsworth". 1919 Commissioned to do portrait work for the Australian War Records section. framed accessories, pprints, ww1, gallipoli, centenary -
 Lakes Entrance Regional Historical Society (operating as Lakes Entrance History Centre & Museum)
Photograph, 1915c
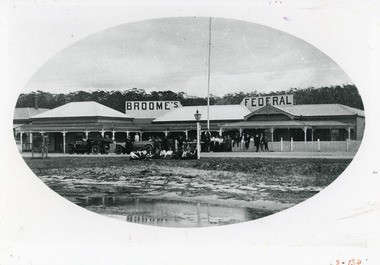
Also copy as postcard 10 x 14, also copy in cameo 18.5 x 25|This is the before paired photograph used in the 150 year, Lakes Entrance 1858-2008 display.|The after paired photograph number is 01190.1|Also one 12 x 16 framed photograph used in room displayBlack and white photograph - in cameo - of Broomes Federal Hotel. Photo features gas light, vintage cars, dead weeds on sandy beach at lake edge. Building appears to consist of three neighbouring houses connected to make a large rambling guesthouse. Guests sitting or leaning on fence, and dozen more seated on grass by the gas light. Lakes Entrance Victoriaguesthouses, architecture, waterfront, transport, room display -
 Bendigo Historical Society Inc.
Document - BILL ASHMAN COLLECTION: CORRESPONDENCE
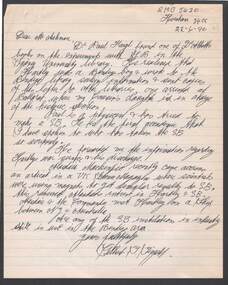
Handwritten letter dated 22-6-96 to Mr Ashman from Gilbert Tippett. Dr. Paul Haigh found one of Dr. Abbott's books on Scalebuoys in the Sydney University and wanted more information so he sent letters to the libraries. Scalebuoys are mentioned. The writer wanted to know if Scalebuoy installations were still in use in the Bendigo area.sciences, instruments - general, scalebuoy, bill ashman collection - correspondence, mr ashman, dr paul haigh?, dr abbott, sydney university, bendigo library, ballarat library, a-? mackenzie, gilbert tippett -
 Bendigo Historical Society Inc.
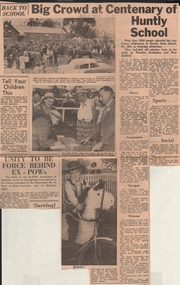
Newspaper - LYDIA CHANCELLOR COLLECTION: CENTENARY OF HUNTLY PRIMARY SCHOOL
Newspaper article, June 13, 1960 Bendigo Advertiser, describing the activities held at the Hunty Primary School Centenary celebrations. 'More than 1000 people attended the centenary celebration of Huntly State School 306' Images: attendees in front of school building,; an old pupil Mrs. A. Fleming signing the school roll and Trevor Willman, with his decorated bicycle.education, primary, huntly primary school -
 Bendigo Historical Society Inc.
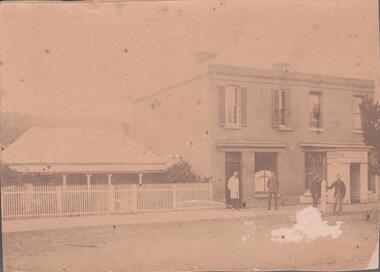
Photograph - ROBINSON COLLECTION: DR. ROBINSON SURGERY
Black and white photograph. There is a weatherboard house with a high white picket fence on the left of a two storey brick building, a man in a white tunic is standing at the front door, on the window the sign Dr. Robinson. A man is standing near the window. Next to Dr. Robinson studio there is a bank, two more men standing,, On the back in red pen Dr. Robinson Surgery.buildings, commercial, dr. robinson surgery -
 Bendigo Historical Society Inc.
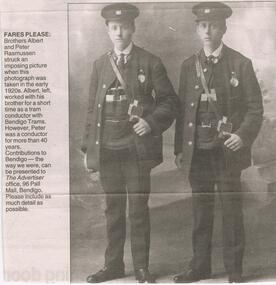
Newspaper - JENNY FOLEY COLLECTION: FARES PLEASE
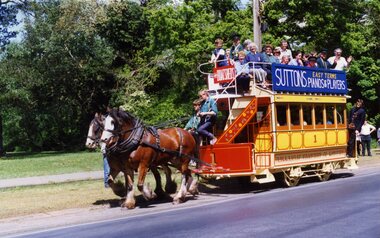
Bendigo Advertiser "The way we were" from Friday, October 15, 2004. Fares please: brothers Albert and Peter Rasmussen struck an imposing picture when this photograph was taken in the early 1920s. Albert,left, worked with his brother for a short time as a tram conductor with Bendigo trams. However Peter was a conductor for more than 40 years.newspaper, bendigo advertiser, the way we were -
 Bendigo Historical Society Inc.
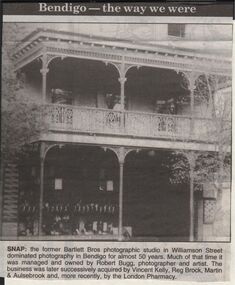
Newspaper - JENNY FOLEY COLLECTION: SNAP
Bendigo Advertiser "The way we were" from 1999. Snap: the former Bartlett Bros photographic studio in Williamson Street dominated photography in Bendigo for almost 50 years. Much of that time it was managed and owned by Robert Bugg, photographer and artist. The business was later acquired by Vincent Kelly, Reg Brock, Martin&Aulsebrook and more recently by the London Pharmacy.newspaper, bendigo advertiser, the way we were -
 Bendigo Historical Society Inc.
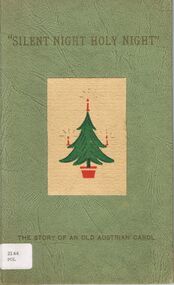
Book - ALEC H CHISHOLM COLLECTION: BOOK ''SILENT NIGHT HOLY NIGHT'' BY L.L.POLITZER
Book. ALEC H CHISHOLM COLLECTION. 16 page hardcover booklet. The story of the origin of ''Silent Night Holy Night'' an old Austrian carol. Published and printed c1952 by Pan Press, Melbourne. Handwritten in biro opposite title page ''To Alec H Chisholm from Louis Politzer wishing you many more Happy Birthdays. 1952.''L.L.Politzerbooks, collections, songs, alec h chisholm collection, l.l.politzer, carol, austria -
 Bendigo Historical Society Inc.
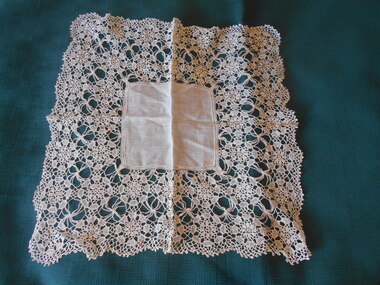
Clothing - MAGGIE BARBER COLLECTION: LINEN HANDKERCHIEF WITH CROCHET EDGE, 1800's
Clothing. A square of very fine linen, 12 cms diameter, surrounded by a one cm edging of drawn threadwork, and 9.5 cm of fine crochet. Crochet has circular shaped motifs, some very lacy and open, with a band of more closely worked pattern on either side of the open motifs. A looped pattern with picot finish edges the handkerchief.costume accessories, female, linen handkerchief with crochet edge. -
 Bendigo Historical Society Inc.
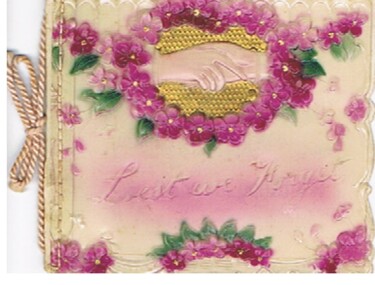
Document - MALONE COLLECTION: GREETING CARDS
Small cream card with clear celluloid front which is sewn to the back. Card has shaped edges. At the top is a circular area edged with pink flowers. Inside two pink hands on a gold background. Underneath is embossed 'Lest we Forget'. Slong the bottom edge are some more pink flowers. Card & insert held together with pink cord.Misch & C0, Ltd. London. E. C.person, greeting cards, malone collection, malone collection, greeting cards