Showing 1324 items matching "tram terminus"
-
 Ballarat Tramway Museum
Photograph - Digital image, Peter Bruce, "No. 41 Loading for Sebas", 1970s
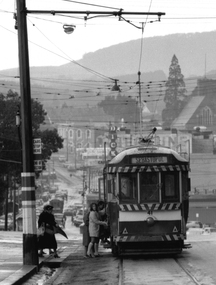
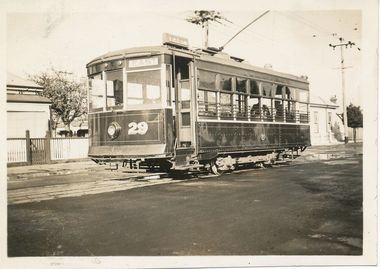
Yields information about the stop in the City on the south side of Sturt St and loading passengers.Digital image, black and white, of No. 41 loading passengers for Sebastopol at the city terminus. A number of passengers, including one carrying an umbrella are boarding. Shows the signage at the city stop. In the background is Bridge St, looking along to Victoria St and Mt Warrenheip. Another tram is in Bridge St. Photo taken by Peter Bruce 1970's and 1971, prior to the closure of the Ballarat tramway system. Peter's Title of image: "No. 41 Loading for Sebas"trams, tramways, city, sturt st, bridge st, sebastopol, tram 41 -
 Ballarat Tramway Museum
Photograph - Digital image, 1970s
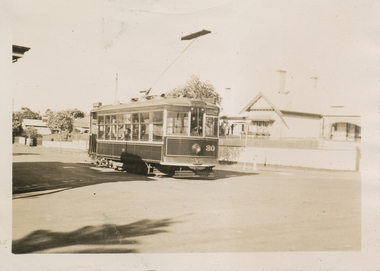
... swinging the pole at the Victoria St terminus. Trams tramways ...Yields information about swinging the pole at the Victoria St terminus.Digital image, black and white, of the pole being swung by the conductor on No. 26 at the Victoria St terminus. shows the terminus arrangements and the location. Tram has the destination of Victoria St. Photo taken by Peter Bruce 1970's and 1971, prior to the closure of the Ballarat tramway system. Peter's Title of image: "Swinging the Poles"trams, tramways, victoria st, crews, trolley poles, tram 26 -
 Ballarat Tramway Museum
Photograph - Colour Photograph/s - set of 2, 5/03/1971 12:00:00 AM
Yields information the Victoria St terminus and the appearance of the Gardens in March 1971.Set of two colour prints: .1 - No. 33 at Victoria St terminus, 5/3/1971 .2 - view of the Botanic gardens with the statute of Wallace and the old hot house in the background. Date 5/3/71. Many colour garden beds in the photograph. Printed on Kodak paper.On the rear of the photograph is a stamp with date, place and subject details.trams, tramways, victoria st, gardens, botanical gardens, tram 33 -
 Ballarat Tramway Museum
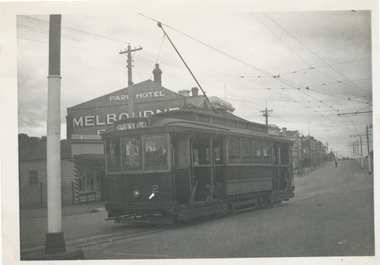
Photograph - Black & White Photograph/s, Wal Jack, 7/10/1939 12:00:00 AM
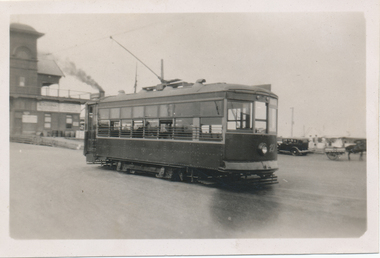
Black and White print contained within the Wal Jack Bendigo and Geelong Album, see Reg Item 5003 for more details. Photo of No. 2 at the Eaglehawk terminus, 7-10-1939, High St, with the Park Hotel in the background. Photo by Wal Jack. Tram has the destination of Quarry Hill. Printed on Ilford paper. i1 - scan of print in the album i2 - rear of image i3 - scan of negative at 3200dpi added 7/6/2020. On the rear in blue ink "SEC Bendigo No 2 (ex MMTB 115 M class) in High St Eaglehawk (terminus) 7th Oct. 1939." with Wal Jack copyright stamp in the top right hand corner and the number "T194" written in.trams, tramways, bendigo, high st, eaglehawk, tram 2 -
 Ballarat Tramway Museum
Photograph - Black & White Photograph/s, Keith Kings, 29/12/1947 12:00:00 AM
Black and White print contained within the Wal Jack Bendigo and Geelong Album, see Reg Item 5003 for more details. Photograph of No. 26 in Mitchell St Bendigo, outbound to Quarry Hill with the Terminus Hotel in the background. Wal's album notes date the photo as 29-12-1947. Photo by Leon Marshall Wood. In ink on rear "SEC of Victoria, Bendigo, Bogie drop centre car No.26 acquired from M&MTB 1947, ex MMTB "C" class, owned originally by Hawthorn Tramways Trust". In pencil, different hand writing "ex 135" and in bottom left hand corner, Leon Marshall Wood photo number "SEC 22" written in.trams, tramways, bendigo, bogie trams, quarry hill, mitchell st, tram 26 -
 Ballarat Tramway Museum
Photograph - Black & White Photograph/s, Wal Jack, 3/01/1954 12:00:00 AM
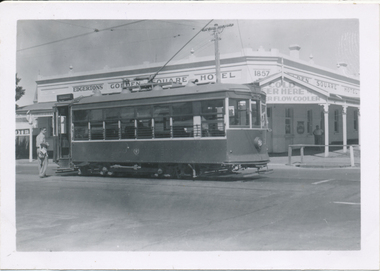
Black and White print contained within the Wal Jack Bendigo and Geelong Album, see Reg Item 5003 for more details. Photo of Bendigo Birney No. 30 at Golden Square Terminus, 3/1/1954. Has Edgerton's Golden Square Hotel in the background with date of 1857 on building corner and "Cold Beer Here and "?..er flow cooler" on the front verandah of the hotel. Note the railing around the drainage channel. i1 - scan of print in the album i2 - rear of image i3 - scan of negative at 3200dpi added 6/6/2020. On the rear in blue ink "SEC Bendigo Birney No. 30 at Golden Square terminus 3rd Jan '54" with Wal Jack copyright stamp in the top right hand corner and the number "T215" written in.trams, tramways, bendigo, golden square, birney, tram 30 -
 Ballarat Tramway Museum
Photograph - Black & White Photograph/s, Leon Marshall Wood, 29/12/1947 12:00:00 AM
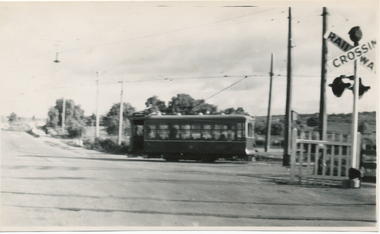
Black and White print contained within the Wal Jack Bendigo and Geelong Album, see Reg Item 5003 for more details. Photo of Bendigo Birney No.30 at North Bendigo, Photo Leon Marshall Wood, with the destination of Golden Square - 29-12-1947. Has the level crossing and rail line in the background and part of the tram stop shelter. On the rear in black ink "SEC of Victoria Bendigo, ex Geelong "Birney" car No. 30 Nth Bendigo terminus. In the bottom left hand corner "29.12.1947" The Leon Marshall Wood stamp in green ink and the number "SEC 15" written in.trams, tramways, bendigo, north bendigo, level crossings, birney, tram 30 -
 Ballarat Tramway Museum
Photograph - Black & White Photograph/s, c1950
Black and White print contained within the Wal Jack Bendigo and Geelong Album, see Reg Item 5003 for more details. Photo of Bendigo Birney No. 30 leaving North Bendigo terminus, crossing Thunder St with the level crossing in the foreground. Photo c1950. On rear in ink "SEC B"trams, tramways, bendigo, birney, north bendigo, level crossings, tram 30 -
 Ballarat Tramway Museum
Photograph - Black & White Photograph/s - set of 7, Keith Kings, 20/10/1962 12:00:00 AM
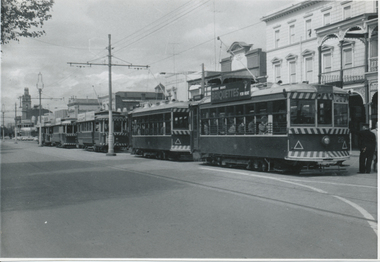
Black and White print contained within the Wal Jack Bendigo and Geelong Album, see Reg Item 5003 for more details. Set of seven images of the ARHS Special tour of Bendigo on 20-10-1962. .1 - Trams 28, 30, 21, 7 and 19 in Pall Mall .2 - 18, 26, 29, 11 and 5 at the Bridge St loop on the North Bendigo line. .3 - 28, 30, 21, 7, 19 on "down" line and 18, 26, 29, 11, 5 and service car 3 on "up" line, View St Opposite Oval .4 - 28, 30, 21, 7, and 19 at Eaglehawk .5 - 28, 30, 21 in North Bendigo siding and 7 and 9 in Thunder St - photo taken in Thunder St. .6 - ditto photo taking from vacant land on the south side of the terminus, along with No. 6 the service tram. .7 - 28, 30, 21, 7, 19 in View St with Goodyear and Caltex signs in the photo and the Commercial Banking Company of Australia building in the background. Most printed on Ilford paper.On rear in ink. .1 - "28, 30, 21, 7, 19 Pall Mall 20-10-62" .2 - "Bendigo ARHS Convoy "A" on Bridge St loop, Nos. 18, 26, 29, 11, 5 20/10/62" with Keith Kings copy right stamp printed in top right hand corner and number "N(y)(12)" written in. .3 - "18, 26, 29, 11, 5 and service car 3 on "up" line, 28, 30, 21, 7, 19 on "down" View St 20-8-62" .4 - "28, 30, 21, 7, and 19 Eaglehawk 20-10-62" .5 - "19, 7 in, 28, 30, 21 in spur siding Nth Bendigo 20/10/62" .6 - "28, 30, 21, 7, 19 plus No. 6 service car Nth B/go 20/10/62" .7 - "Bendigo ARHS Convoy "B" - 28, 30, 21, 7, 19 Charing Cross, 20/10/62" with Keith Kings copy right stamp printed in top right hand corner and number "N(y)(14)" written in.trams, tramways, bendigo, arhs, tours, eaglehawk, north bendigo, view st, tram 28, tram 30, tram 21, tram 7, tram 19, tram 6, tram 18, tram 26, tram 29, tram 11, tram 3 -
 Ballarat Tramway Museum
Photograph - Black & White Photograph/s, 1940
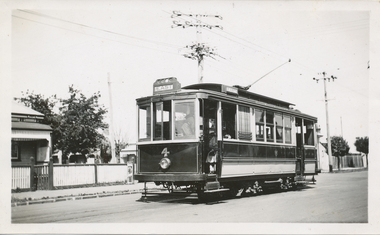
Black and White print contained within the Wal Jack Bendigo and Geelong Album, see Reg Item 5003 for more details. Photo of Geelong No. 4 at the Chilwell terminus, 1940, no details of photographer. Tram has the destination of East. A lady is seated in the front talking to the driver. Wal's album notes provides the date of 1940. Printed on "Selo" paper. On the rear in blue ink "Geelong No. 4" in ink.trams, tramways, geelong, chilwell, tram 4 -
 Ballarat Tramway Museum
Photograph - Black & White Photograph/s, Wal Jack, Mar. 1939
Black and White print contained within the Wal Jack Bendigo and Geelong Album, see Reg Item 5003 for more details. Photo of Geelong No. 5 at the Wharf terminus, March 1939. Wal's album notes provides the date. Printed on Kodak Velox Paper. See Reg Item 7813 for the negative. On rear in ink " Geelong Tramways, No. 5 near wharf. One of the original trams built in 1912 by Duncan and Fraser."trams, tramways, geelong, moorabool st, tram 5 -
 Ballarat Tramway Museum
Photograph - Black & White Photograph/s, Ken Magor, Geelong 10 at Beach terminus, 26/2/1948
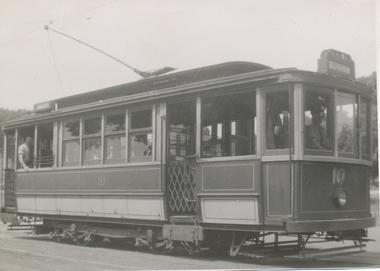
Yields information about Geelong tram No. 10 in 1948.Black and White print contained within the Wal Jack Bendigo and Geelong Album, see Reg Item 5003 for more details. Photo of Geelong No. 10 at the Beach terminus, 1940's. Photos by Ken Magor, Negative No. 3103. Taken on a summers day as the crew are in rolled up shirt sleeves. Two copies held - second is dated 26/2/1948.On rear in ink "SEC Geelong, No. 10 at Beach terminus" Has in bottom right hand corner Ken Magor stamp with negative number "3103" written in. In the bottom left hand corners has details of the photograph itself.trams, tramways, geelong, beach, tram 10 -
 Ballarat Tramway Museum
Photograph - Black & White Photograph/s, Wal Jack, 1940
Black and White print contained within the Wal Jack Bendigo and Geelong Album, see Reg Item 5003 for more details. Photo of Geelong Birney 14 at the Chilwell terminus, 1940. Wal notes it is No. 11 on the Bendigo system. The tram has the destination of East and has a "Pay as you Enter" sign on the door. i1 - scan of print in the album i2 - rear of image i3 - scan of negative at 3200dpi added 18/6/2020.On the rear in ink "Geelong Tramways No. 14 Birney Car, bought new 1924"trams, tramways, geelong, chilwell, birney, tram 14 -
 Ballarat Tramway Museum
Photograph - Black & White Photograph/s, Wal Jack, 26/03/1939 12:00:00 AM
Black and White print contained within the Wal Jack Bendigo and Geelong Album, see Reg Item 5003 for more details. Photo of Geelong No. 15 at the Wharf terminus, Moorabool St, 26-3-1939. Photo by Wal Jack. Tram has the destination of Newtown. In the background are the Australian Steamships Pty Ltd Office and Sailor's Rest building. Printed on Ilford paper. i1 - scan of print in the album i2 - rear of image i3 - scan of negative at 3200dpi added 6/6/2020. On rear in ink "SEC Geelong No. 15 Birney at Moorabool St Wharf terminus. 26-3-1939." Has the Wal Jack copyright stamp in the top right hand corner with the number "T264" written in.trams, tramways, geelong, moorabool st, wharf, tram 15 -
 Ballarat Tramway Museum
Photograph - Black & White Photograph/s, Wal Jack, c1940
Black and White print contained within the Wal Jack Bendigo and Geelong Album, see Reg Item 5003 for more details. Photo of No. 27 at the Wharf terminus, with the wharf building in the background and the funnel of a steam vessel. Printed on Kodak Velox paper. i1 - scan of print in the album i2 - rear of image i3 - scan of negative at 3200dpi added 18/6/2020. On rear in ink "Geelong No. 27 Birney at wharf"trams, tramways, geelong, wharf, tram 27 -
 Ballarat Tramway Museum
Photograph - Black & White Photograph/s, Wal Jack, Jun. 1939
Black and White print contained within the Wal Jack Bendigo and Geelong Album, see Reg Item 5003 for more details. Photo of No.29 at the Chilwell terminus with houses behind. The tram has the destination of East. Photographer unknown, but similar handwriting on the back of the other prints such as Reg Item 5850. Printed on Kodak Velox paper. i1 - scan of print in the album i2 - rear of image i3 - scan of negative at 3200dpi added 6/6/2020. On rear in ink "Geelong Tramways No. 29 Chilwell terminus June 1939 ex Adelaide 302."trams, tramways, geelong, chilwell, tram 29 -
 Ballarat Tramway Museum
Photograph - Black & White Photograph/s, Wal Jack, Jul. 1943
Black and White print contained within the Wal Jack Bendigo and Geelong Album, see Reg Item 5003 for more details. Photo of No. 30 at the Newtown Terminus, July 1943. Photo Wal Jack i1 - scan of print in the album i2 - rear of image i3 - scan of negative at 3200dpi added 18/6/2020. Has the Wal Jack stamp on rear, but no details written in.trams, tramways, geelong, newtown, tram 30 -
 Ballarat Tramway Museum
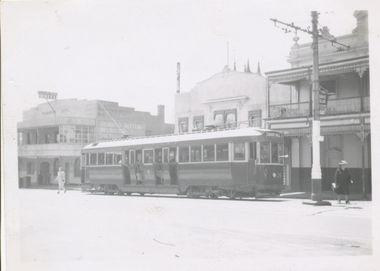
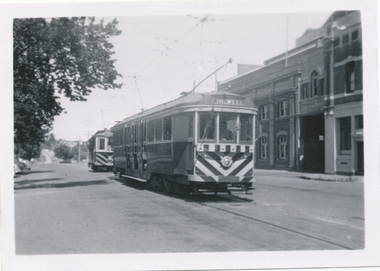
Photograph - Black & White Photograph/s Geelong 18 at West terminus, 8/01/1956
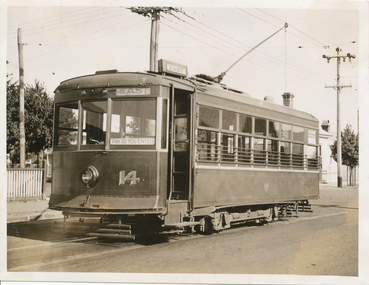
Photo of No. 18 at West, 2.30pm, last day of operations 8-1-1956. Photographer unknown - same as 5854. Tram has the destination of East. Black and White print contained within the Wal Jack Bendigo and Geelong Album, see Reg Item 5003 for more details. Two copies held. Has written in ink on the rear "No 18 at top of Packingham St (terminus) 2.30pm 8/1/56, Geelong"trams, tramways, geelong, pakington st, west, tram 18 -
 Ballarat Tramway Museum
Photograph - Black & White Photograph/s, Wal Jack, 29/07/1943 12:00:00 AM
... of No. 18 at the Belmont terminus 29 July 1943. Tram has... terminus 29 July 1943. Tram has the destination of North. i1 ...Black and White print contained within the Wal Jack Bendigo and Geelong Album, see Reg Item 5003 for more details. Photo of No. 18 at the Belmont terminus 29 July 1943. Tram has the destination of North. i1 - scan of print in the album i2 - rear of image i3 - scan of negative at 3200dpi added 18/6/2020. Has written in ink on the rear "SEC Geelong Tramways, No. 18. Belmont terminus 29-7-1943"trams, tramways, geelong, belmont, tram 18 -
 Ballarat Tramway Museum
Photograph - Black & White Photograph/s, Geelong No. 23 decorated for the Centenary, 1938
Black and White print contained within the Wal Jack Bendigo and Geelong Album, see Reg Item 5003 for more details. Photo of No. Geelong No. 23 was decorated for the Centenary in 1939, photographed at the old Wharf Terminus, decorated with festooned lighting and other "baubles" and items. On the sides, the letters "1838.1938" In the background are various wharf buildings. The tram has the destination of Newtown. Handwriting is the same as other photos such as Reg item 5850. Printed on Velox paper. See also Reg item 5865 for another photograph of the same decorated tramcar and 8886 for a mounted photograph.Has the rear in ink "Geelong Centenary 1938".trams, tramways, geelong, wharf, decorated trams, tram 23 -
 Ballarat Tramway Museum
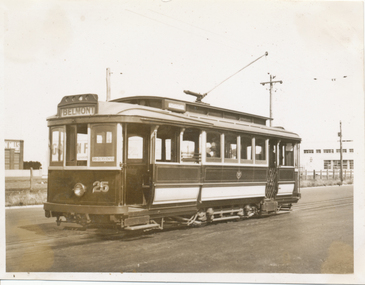
Photograph - Black & White Photograph/s - 25 at the North terminu, Wal Jack, Mar. 1940
Black and White print contained within the Wal Jack Bendigo and Geelong Album, see Reg Item 5003 for more details. Photo of 25 at the North terminus, March 1940. Note the "Pay as you enter" sign. Tram has the destination of Belmont. i1 - scan of print in the album i2 - rear of image i3 - scan of negative at 3200dpi added 18/6/2020.trams, tramways, geelong, north, tram 25 -
 Ballarat Tramway Museum
Photograph - Black & White Photograph/s, 8/01/1956 12:00:00 AM
Black and White print contained within the Wal Jack Bendigo and Geelong Album, see Reg Item 5003 for more details. Photo of Geelong 35 in front of No. 5, from the Beach terminus, in Corio Terrace, last day of Service 8-1-1956 outside the depot. No. 35 has the destination of Chilwell No details on photographer. On rear in ink "No. 35 in front of No. 5 at depot enroute from Eastn Beach terminus 8/1/56"trams, tramways, geelong, depot, corio terrace, tram 35, tram 5 -
 Ballarat Tramway Museum
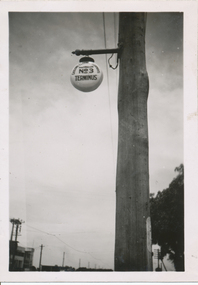
Photograph - Black & White Photograph/s, c1950
Black and White print contained within the Wal Jack Bendigo and Geelong Album, see Reg Item 5003 for more details. Photo of an illuminated street sign, lamp, at the North Geelong terminus. Photographer not known, c 1950. Sign has the words "Geelong Electric Tramways / Destination? / No. 3 Terminus"On the rear in ink "Illuminated terminal sign"trams, tramways, geelong, signs, north -
 Ballarat Tramway Museum
Photograph - Black & White Photograph/s, Wal Jack, 1/01/1956 12:00:00 AM
Black and White print contained within the Wal Jack Bendigo and Geelong Album, see Reg Item 5003 for more details. Photograph of Geelong tram No. 39 at the East Terminus, 1/1/1956. Photo by Wal Jack. Tram has the destination of East, with few houses directly behind the tram. Their is a lady walking towards the tram. i1 - scan of print in the album i2 - rear of image i3 - scan of negative at 3200dpi added 27/6/2020. On rear in ink SEC Geelong / No. 39 (now Ballarat No. 43) at East Geelong / Sunday 1-1-1956". Has the Wal Jack copyright stamp in the top right hand corner with the number T1301 written in.trams, tramways, geelong, east, tram 39 -
 Ballarat Tramway Museum
Photograph - Digital image, c1912
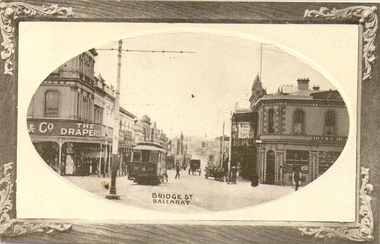
Yields information about the streetscape of Bridge St at Grenville St c1912.Digital image of a Postcard held by David Critchley of Ballarat ESCo No. 17 at the Grenville St terminus, west end of Bridge St. The tram has not been fitted with windscreens. Trolley pole is set up for the tram to come into Sturt St. In the background are the Bucks Head Hotel and Cowdell Tonner and Ellis drapers/ Provided by David Critchley - not to be reproduced without discussions with David. trams, tramways, esco, sturt st, bridge st, grenville st, tram 17 -
 Ballarat Tramway Museum
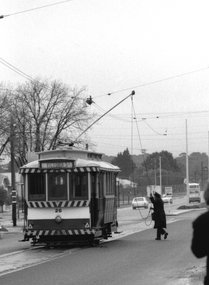
Photograph - Tram 30 at Victoria St, 1/1966
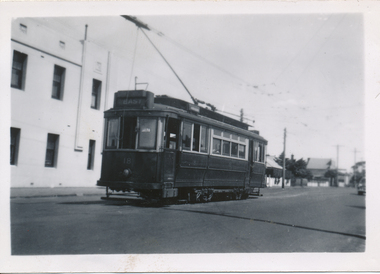
... at the Victoria St terminus during Jan. 1966. Tram has a Trotting... of Ballarat tram No 30 at the Victoria St terminus during Jan. 1966 ...Photograph - Black and white of Ballarat tram No 30 at the Victoria St terminus during Jan. 1966. Tram has a Trotting at the Showgrounds Friday night auxiliary board, an SEC cooking advert, and the return destination of Gardens. Not known who took the photo.Yields information about the appearance of tram No. 30 during Jan 1966 and the Victoria St terminus.Black and white photograph on Ilford paper.In ink on rear "Victoria St Jan 66"tramways, tramcars, victoria st, tram 30 -
 Ballarat Tramway Museum
Photograph - AETA Ballarat tour, 21/4/1962
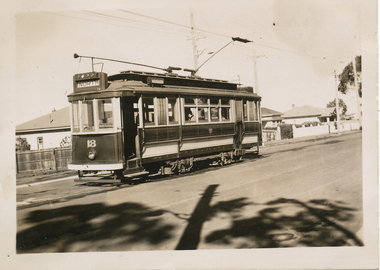
Photograph taken during Easter 1962 AETA tour of Ballarat with trams 37 and 18 at the Victoria St terminus. Yields information about the trams used for an AETA visit in 1962Black and white photograph printed on Ilford paper.trams, tramways, aeta, tours, special trams, tram 18, tram 37, victoria st. -
 Ballarat Tramway Museum
Photograph - AETA Ballarat tour, 21/4/1962
Photograph taken during Easter 1962 AETA tour of Ballarat with trams 37 and 18 at the Lydiard St North terminus. Yields information about the trams used for an AETA visit in 1962Black and white photograph printed on Ilford paper. has "tram" and "trams at" in red ink on the side of the print.trams, tramways, aeta, tours, special trams, tram 18, tram 37, lydiard st -
 Ballarat Tramway Museum
Photograph - ESCo trams - Grenville St, early 1920s
... information about Grenville St tram stop and terminus. trams tramways ...Black and white photograph of two ESCo trams at Grenville and Sturt Streets. A Sebastopol-type car on the left and an original ESCo on the right, along with horse-drawn cars and pedestrians. The large tramway office/shelter is in the centre of the photograph. Photo possibly early 1920s, given the shelter was removed during 1923.Yields information about Grenville St tram stop and terminus.Black and white photograph on plain paper.trams, tramways, shelters, grenville st, sturt st, esco -
 Ballarat Tramway Museum
Photograph - Black & White Photograph/s, Ken Magor, 1940's
Black and White print contained within the Wal Jack Bendigo and Geelong Album, see Reg Item 5003 for more details. Photo of Geelong No. 10 at the Beach terminus, 1940's. Photos by Ken Magor, Negative No. 3103. Taken on a summers day as the crew are in rolled up shirt sleeves. On rear in ink "SEC Geelong, No. 10 at Beach terminus" Has in bottom right hand corner Ken Magor stamp with negative number "3103" written in. in the bottom left hand corners has details of the photograph itself.trams, tramways, geelong, beach, tram 10