Showing 25208 items
matching north
-
 Ballarat Tramway Museum
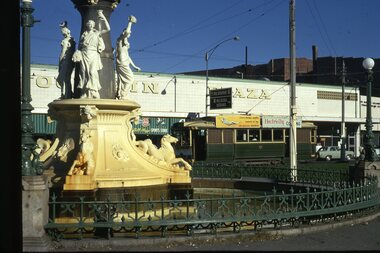
Slide - 35mm slide/s - set of 2, Noel Simons, 20/05/1971 12:00:00 AM
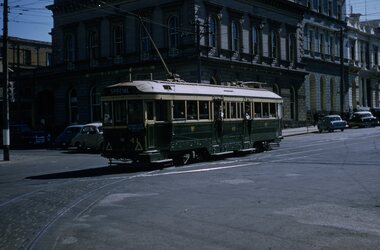
Set of 2 slides mounted in Kodak Ready Mounts. Slides dated 20 May 1971. 1196.1 - Bendigo No. 21 arriving at Charing Cross from Golden Square with the Alexandria Fountain in the foreground. In the background is the Fountain Plaza building. Tram has 2 SEC roof ads. 1196.2 - No. 30 at Charing Cross from North Bendigo. On a pole in front of the tram are two signs "All cars stop here" in white printing on a red background and "Cars Stop by Request" in white lettering on a black background.1196.1 - "No. 21 passing Alexandra Fountain on arrival at Charing Cross from Golden Square" 1196.2 - "No. 30 at Charing Cross"tramways, trams, charing cross, bendigo, alexandra fountain, tram stops, tram 21, tram 30 -
 Ballarat Tramway Museum
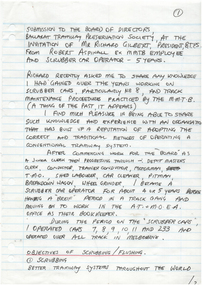
Document - Letter/s, Robert Aspinall, 20/02/2001 12:00:00 AM
Letter from Robert Aspinall, dated 20/2/2001 of North Fitzroy. outlining his tramway experience and as operator of MMTB Scrubber tram No. 8 (8W). Gives brief history of employment with MMTB, ATMOEA. Notes objectives of scrubbing and flushing rails, leaf season, logistics, and other thoughts. Letter on line foolscap paper with punch holes in the left hand margin. Letter handwritten in black ink - five pages. Photocopy of letter held on file. Information used in the preparation of the notes on the operation of No. 8 - 4/2001.trams, tramways, flushing, scrubber tram, employees -
 Ballarat Tramway Museum
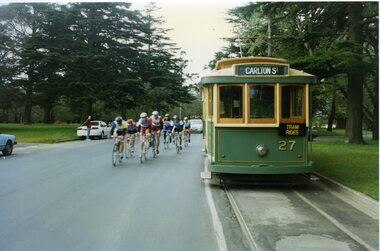
Photograph - Colour Photograph/s set of 6, Earl Ewers, 12/10/1996 12:00:00 AM
Group of six colour photographs by Earl Ewers on 12/10/1996 of the completion of one of the stages of the Herald Sun Bike Race in Wendouree Parade, showing some of the arrangements and tram 27. On Kodak paper. 845.1 - Carlton St. terminus - 27 and cyclists 845.2 - Gardens, near floral clock - 27 and cyclists 845.3 - Gardens, near floral clock - 27 and cyclists 845.4 - Gardens, near floral clock - 27 and cyclists 845.5 - Loop, north end with witches hats 845.6 - Loop, south end with barriers. On rear in blue ink "E.Ewers 12/10/96"herald sun - bike race, wendouree parade, tram 27 -
 Ballarat Tramway Museum
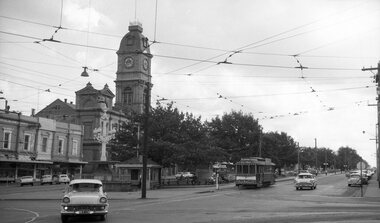
Photograph - B&W print of donated negative, Ron E. Fluck, 1968
Black and white print of a donated negative. Print made 8/1998. Photo of SEC single trucker tram No. 21 at the intersection of Sturt and Lydiard Streets. Tram has destination of "Lydiard St. Nth". Good photograph of intersection with Town Hall in background, a few cars and tram stop arrangement. Also shows festoon lighting along the north side of the centre median in Sturt. St. Photo taken from the Post Office corner, during 1968. Negative rescanned 9-5-2020 and image updated.tramways, trams, town hall, 21, ballarat, sturt st., tram 21 -
 Ballarat Tramway Museum
Ephemera - Ticket/s, State Electricity Commission of Victoria (SECV), Two SEC 4c tickets, late 1960's
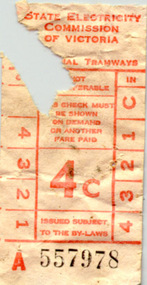
Two SEC 4c tickets, light red printing on off white paper, Nos. A557978 and A557979 with portion of tickets missing. See image for one of these tickets. On rear of tickets is a printed diagonal pattern. Handwritten note to Warren Doubleday from Dave Macartney on a piece of ARHS Vic. Div. news sheet explains the origin of these tickets - found blocking the north east sander on tram 18 on 25 April 2000. Possibly these tickets have been in the sand box for over 30 years.trams, tramways, tickets, accidents, maintenance -
 Ballarat Tramway Museum
Slide - 35mm slide/s, Peter Moses, Dec. 1963
Photo of Ballarat trams 11 and 18 crossing at Carlton St. Loop. Tram 18 showing destination of Victoria St. and Tram 11, southbound in Wendouree Parade, showing Lydiard St North on rear of tram. Both trams have advertisements for 50/50 dancing at the Civic Hall are on the front panel of the tram and No. 11 a roof advertisement for SEC Briquettes. Both trams have tiger stripes but not the white dash under the lights. Kodak cardboard mount slide, taken by Peter Moses December 1963.On back of slide in blue ink "1963 Dec. Trams Lake Wendouree, Ballarat Vic." and bottom right hand corner "P. Moses"tramways, trams, wendouree parade, carlton st, tram 11, tram 18 -
 Ballarat Tramway Museum
Slide - 35mm slide/s, Peter Moses, 21/08/1971 12:00:00 AM
Photo of SEC Ballarat trams waiting in Lydiard St. North for the passengers to travel on the ARHS/ TMSV specials on Saturday 21/8/1971 to undertake the last tour of Ballarat Tramways, prior to the closure of the system. The first line closure (Victoria St.) took place the following day. The organising group is discussing the arrangements with the SEC tramway inspector. Bob Whitehead, Len Millar, Keith Kings, Eildon Hogan, Jim Dowell and the Inspector? Kodak cardboard mount slide, taken by Peter Moses 21 August 1971.On the rear of the slide in black ink "Ballarat Lydiard St. / ARHS Specials" and "P. Moses" in the bottom right hand corner.tramways, trams, arhs, lydiard st north -
 Ballarat Tramway Museum
Slide - 35mm slide/s, Peter Moses, 21/08/1971 12:00:00 AM
Photo of SEC Ballarat No. 31 west bound in Victoria St. Ballarat, just past King St. North, entering the King St. loop. Tram fitted with a Twin Lakes sign, two Johnnie Walker whiskey roof advertisements and has destination of "Gardens via Sturt St. W". Note the new bus stop sign in position. This photo was taken on the 2nd last day of operation. Has St. Alipius church in the background. Kodak cardboard mount slide, taken by Peter Moses 21 August 1971.On the rear of the slides in blue ink "Ballarat / Victoria St." and "P. Moses" in the bottom left hand corner in black ink.tramways, trams, victoria st, king st, bus stops, tram stops, tram 21 -
 Ballarat Tramway Museum
Document - Table Cards (Sheets), State Electricity Commission of Victoria (SECV), table for Saturday or Sunday, Aug. 1971
Summary sheets of the hours worked for each run or table for Saturday or Sunday following the closure of the Victoria St. - Gardens via Drummond St North routes in August 1971. Gives ON - OFF times for meal breaks. Each sheet has "LJD/71" in the top left hand corner. 2986.1 - Saturday sheet - lists 24 runs. 2986.2 - Sunday sheet - lists 8 runs - see Reg. Item 2985. Stored separately with these sheets are a photocopies of each sheet reduced to A4 size.trams, tramways, timetables, sec, ballarat, crews -
 Ballarat Tramway Museum
Slide - 35mm slide/s, Eldon Hogan, early 1960's
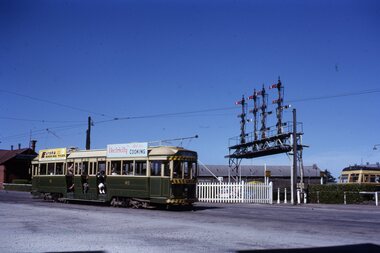
35mm Kodachrome cardboard mount slide of Ballarat No. 40 southbound in Lydiard St North, crossing the railway level crossing. In the background is Kennedy Murray General Carters building, the main signal gantry and a Walker Rail car - 280HP?. No. 40 has roof advertisements for Eureka Roofing Tiles and "Electricity Best for Cooking". Photo taken early 1960's. Photo from the Eldon Hogan collection. See email with worksheet from R.Gilbert date 29/12/2000 and Fares Please!, May 1995. In ink on the top of the slide "Bogie car at Ballarat Station"tramways, trams, railway station, lydiard st north, signals, tram 40 -
 Ballarat Tramway Museum
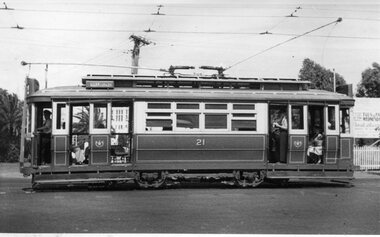
Photograph - Black & White Photograph/s, 1954
Yields information about the appearance of Geelong 21 and the crews operating it on a hot summers day.Black and white photograph of Geelong No. 21, side on view, inbound to the city area with the destination of Belmont. Shows the crews in shirt sleeves, the blinds drawn and the length of the tram with its two trolley poles. Photo by an unknown photographer, 1954. Dave O'Neil confirmed June 30/2009, the tram is travelling from North to Belmont, lost likely at Mercer and Railway Terrace. Entrance to the goods yard is at the rear of the tram, and Gordon institute can been seen through the front entrance. See Related documents.In pencil on the rear 1954.tramways, trams, geelong, crews, railway station, tram 21 -
 Ballarat Tramway Museum
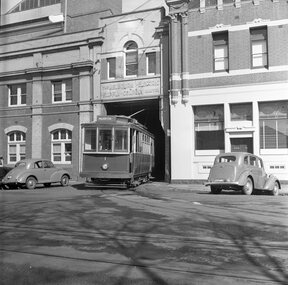
Photograph - B&W print of donated negative, John Webster, mid 1950's
Yields information about Geelong Depot and tramcar No. 1, Yields information about Geelong Depot and tramcar No. 1Black and white digital print from scan of a donated negative showing Geelong No. 1 leaving the Geelong depot entrance with a number of motors cars on either side with the Melbourne Electric Supply Company logo above the doorway. The tram has the destination of North. Photographed by John Webster given the markings on the side of the negative, early 1950's. Black and White print made from scan of negative. Original Negative stored with Negatives. Negative scanned at hi res 2/6/2020 and image updated.On left hand side of the negative in ink is "EH35".tramways, trams, geelong, depot, tram 1 -
 Ballarat Tramway Museum
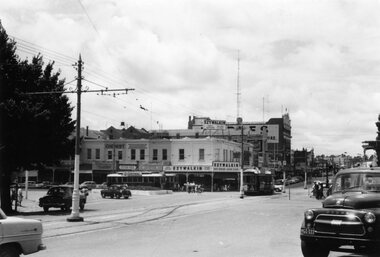
Photograph - Black & White Photograph/s, Ron Hann, Jan. 1963
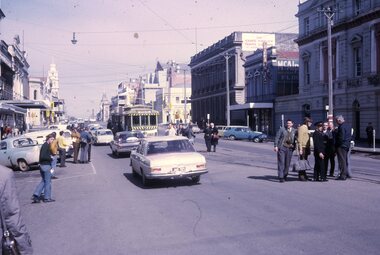
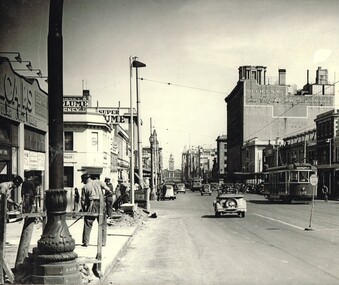
Yields information about the Charing Cross Bendigo tram terminal, and nature of the traffic arrangements.Black and white print on heavy matt photographic paper of a view of Bendigo Charing Cross tram terminal area from western side. Has two single truckers in Pall Mall and a bogie tram. Shows the tram crossover in High St and a number of motor vehicles. Has the Ezywalkin building on the north east corner. 2nd copy - laser print - with date etc on rear - added 22/2/2010, copy from Ron Hann. Printed on Fujifilm, Fujicolour Crystal Archive for Frontier"On rear in pencil "Charing Cross 1963" 2nd copy has label "Reference 6/214/25" Photo by Ron Hann" and another label "Charing Cross Bendigo 01.63"tramways, trams, bendigo, charing cross -
 Ballarat Tramway Museum
Slide - 35mm slide/s, Ben Parle, 5/04/1958 12:00:00 AM
Kodachrome Transparency - 35mm slide - cardboard mount, with one side with red border and words "Kodachrome Transparency / Processed by Kodak" top and bottom. Photo taken by Ben Parle 5/4/1958. Has slide No. "19" stamped in red in top corner. Photo of Ballarat No. 41, turning from the south side of Sturt St into Lydiard St. North Tram has the destination of Special and has the AETA special tram sign. Has the ANZ Bank in the background. For high resolution scan see btm2852h.tif"Lydiard St / Sturt St" "5-4-58"tramways, trams, lydiard st, sturt st, anz, aeta, tram 41 -
 Ballarat Tramway Museum
Slide - 35mm slide/s, Ben Parle, 5/04/1958 12:00:00 AM
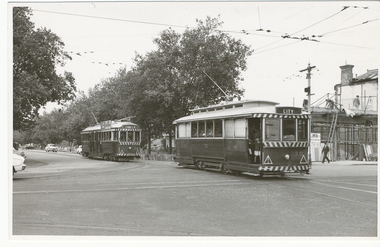
Kodachrome Transparency - 35mm slide - cardboard mount, with one side with red border and words "Kodachrome Transparency / Processed by Kodak" top and bottom. Photo taken by Ben Parle 5/4/1958. Has slide No. "20" stamped in red in top corner. Photo of Ballarat No. 41, 21 in the Seymour St loop, Lydiard St North, with No. 31 leaving the loop, inbound to the City. No. 41 and 21 have the destination of Special and has the AETA special tram sign. For high resolution scan see btm2853h.tif"Lydiard St Nth line" "5-4-58"tramways, trams, lydiard st, seymour st loop, aeta, tram 41, tram 21, tram 31 -
 Ballarat Tramway Museum
Slide - 35mm slide/s, Ben Parle, 8/04/1958 12:00:00 AM
Kodachrome Transparency - 35mm slide - cardboard mount, with one side with red border and words "Kodachrome Transparency / Processed by Kodak" top and bottom. Photo taken by Ben Parle 8/4/1958. Has slide No. "3" stamped in black in top corner. Photo of Ballarat No. 14 inbound in Drummond St. North, approaching Sturt St, at Hospital Corner, Drummond St. Tram has the destination of Victoria St. Photo taken after tram has passed photographer. For high resolution scan see btm2862.tif "Drummond St N Ballarat" / "8-4-58"tramways, trams, drummond st nth, tram 14 -
 Ballarat Tramway Museum
Photograph - Black & White Photograph/s, Doug Colquhoun, 15/05/1971 12:00:00 AM
Yields information about Ballarat's trams in the early 1970's and the Sebastopol terminus.Black and white print of Ballarat 37, north bound in Drummond St South at near South St and a Holden motor car alongside. Two copies. Photo by Doug Colquhoun, 17/5/1971. Trams has the destination of Lydiard St Nth. Photo print courtesy of Port Dock Railway Museum, now the National Railway Museum. See worksheet 4311 for letter and details of prints sent to Bill Scott, 19/10/2001. Any photo credit to mention NRM Collection.On rear of copy 1 "SEC Ballarat / 37 / Sebastopol / 17/5/71 4176 / D.A. Colquhoun" . Copy 2 "DAC" in ink, bottom right hand corner.trams, tramways, drummond st sth, tram 37 -
 Ballarat Tramway Museum
Photograph - Black & White, Bendigo 3 climbing Mitchell St, late 1950's
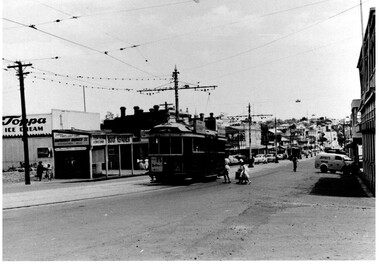
Black and White photograph, of Bendigo 3 climbing Mitchell St, near the Railway Station with the Destination of Quarry Hill. Has a Hutton's Ham ad on the front drivers panel and two rood ads. In the background are Sandhurst Dairies shop advertising Toppa Ice Cream, a boot repairer and a van marked Jeffreys Bread parked on the north side of Mitchell St. Nearing the point where the double track became single - see the signal wire insulators in the overhead. Printed on Fujichrome paper. Two copies held."TMSV Sales" stamp on rear. On rear of in ink 'HTT16 = MM N 102 = Geel 32 = BED 3"trams, tramways, bendigo, mitchell st, quarry hill, overhead, tram 3 -
 Ballarat Tramway Museum
Domestic Object - Fridge Magnet, Ballarat Tramway Museum (BTM), 2015
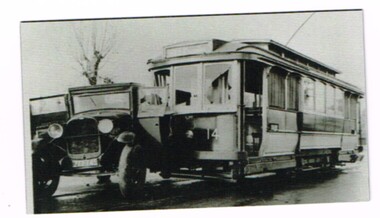
Fridge magnet with a photograph of a collision, accident, between SEC Ballarat No. 14 and a motor truck at the intersection of Drummond St. North and Webster St. May or June 1939. Official SEC photo, there are other photos of this collision in the collection. See Reg Items 580, 1019, 1365 and 1366 and 3904 for larger prints of these photographs of these photographs and further details. See also Reg Item 6211 for a fridge magnet version. The tramcar body card shows it was repaired following an accident June 1939. (Note added 2-2-19). trams, tramways, ballarat, drummond st nth, accidents, fridge magnet -
 Ballarat Tramway Museum
Photograph - Black & White Photograph/s, Lloyd Rogers, 21/03/1962 12:00:00 AM
Yields information about the appearance of Hospital Corner in the early 1960's and trams that used the area.Black and white photograph of Ballarat tram No. 30 followed by No. 34 leaving Drummond St south and crossing Sturt St, Hospital corner. No. 30 has the destination of City and No. 34, Lydiard St North. In the background is the construction of the liquor store on the south west corner by J Wier. Dated 21/3/1962. Printed on Agfa Gevaert paper in a postcard format. In the front of No. 30 can be seen a child hanging onto the door and pillar. No. 34 has SEC Electricity cooking advertisement. Photo by Lloyd Rogers.In ink "Ballarat Cars 30 and 34 entering Sturt St from Sebastopol route. 21/3/1962. and the number "4/43". In the top left hand corner "30 ex M?"trams, tramways, sturt st, drummond st sth, hospital corner, passengers, tram 30, tram 34 -
 Ballarat Tramway Museum
Photograph - Digital image, Wal Jack, 25/04/1959 12:00:00 AM
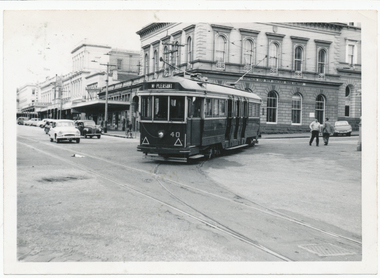
Yields information about No. 40, tramway centre and special arrangements for events.Digital image from the Wal Jack Ballarat Album of a photograph of No.40 turning from Lydiard St North into Sturt St to run to Mount Pleasant on 25-4-1959, rearranged working due to the Anzac day March. Has the ANZ bank in the background. Wal's album notes say the tram used the Lydiard St crossover. See image i2 for rear of photograph. See image i3 for hi res scan of print. See image i4 for hi res scan of negativeOn rear of photograph in ink "SEC Ballarat No. 40 turning out of Lydiard St Nth into Sturt St, during Anzac Day march 25-4-59" with W. Jack stamp in the top right hand corner and number "T249". trams, tramways, anzac day, lydiard st, sturt st, special workings, tram 40 -
 Ballarat Tramway Museum
Photograph - Black & White Photograph/s, c1927
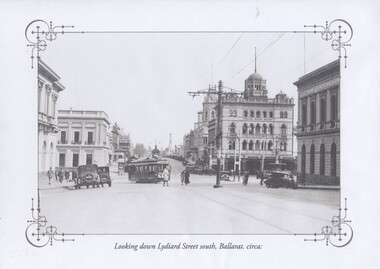
Yields information about Sturt and the streetscape with a horse tram outside St Andrews Kirk with two small boys playing.Black and white historic photograph downloaded from a picture resource website within a decorative frame. Printed with an inkjet printer. Titled "Looking down Lydiard Street south, Ballarat. circa:" shows an ESCo tram turning from Lydiard St north into Sturt St with many parked motor vehicles and pedestrians. Has the Post Office, Craigs Hotel, Commonwealth Bank, National Mutual Building and the Bank of Australasia in the photograph. One centre pole in the photograph. Photo c1927 Original photo from a postcard?trams, tramways, lydiard st north, poles, post office, esco, tram 20 -
 Bendigo Historical Society Inc.
Map - VICTORIA HILL AREA
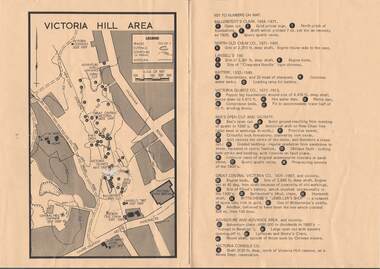
Map of Victoria Hill Area printed on yellow paper. Details of tracks, cuttings, contours (in Metres) and Anticline. Location of mines, open cuts and buildings are shown. Numbers on map are: Ballerstedt's Claim 1 - 5; North Old Chum Co. 6; Lansell's 180, 7,8,11; Battery 9.10.12; Victoria Quartz Co. 13 - 17; Rae's Open Cut and Vicinity 18 - 28, Great Central Victoria Co 29 - 36, Adventure and Advance Area and vicinity 37 - 40 and Victoria Consols Co 41.map, bendigo, victoria hill, victoria hill area, victoria consols, new chum anticline, great central victoria, rae's open cut, w rae's home, victoria quartz, ballerstedt's open cut, lansell's 180, north old chum, central nell gwynne, john brown factory, gold mines hotel, cleopatra needle type chimney, floyd's battery, ballerstedt's 24yd claim, humboldt shaft, wittscheibe's jeweller's shop, luffsman and sterry's claim, victoria hill reserve, mines dept reervation -
 Ballarat Tramway Museum
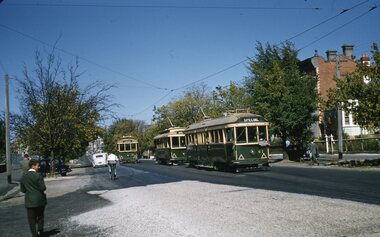
Slide - 35mm slide/s, Wal Jack, 20/10/1962 12:00:00 AM
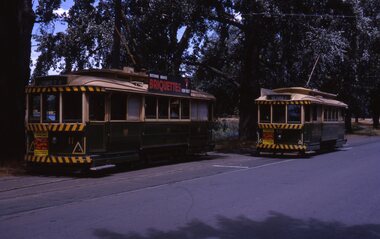
Bendigo, North Bendigo terminus, trams (from rear), 28, 30, 21, 7 and 19 at time of ARHS 100th Anniversary tour, on 20-10-1962. Three trams at terminus, and 7 and 9 standing in street. Tram 19 has briquette ad on front panel, Electric cooking roof ad and is carrying the white 'tram following' disk. No. 7 has a Castrol roof ad, and No. 21 Sandhurst Milk Ad. Level crossing with flashing lights in background, old style level crossing sign in foreground.'White Hills, ARHS 100 Rly Anniversary, 20-10-62, 28, 30, 21, 7, 19' in blue inktramways, trams, bendigo, north bendigo, arhs, tram 28, tram 30, tram 21, tram 7, tram 19 -
 Tennis Australia
Racquet, Circa 1931
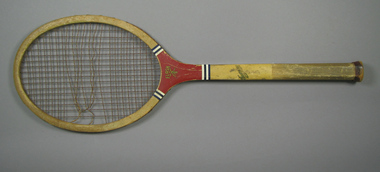
A wooden racquet with a red-painted concave throat, and grooved handle. Inscription across the throat on obverse, accompanied by an emblem of a hand grasping three thunder bolts: FLASH. Below on stem: MAGNAN. Manufacturer's emblem, featured on throat on reverse, comprises of the letter 'M' at the centre of a gold ribboned black badge. Inscription: N.J. MAGNAN CORP./NORTH ATTLEBORO,MASS, U.S.A. Illegible hand-written name and intials on head and stem also feature. Materials: Wood, Gut, Plastic, Leather, Cloth, Metal, Glue, Lacquer, Inktennis -
Kew Historical Society Inc
Plan - Tramway Estate, Camberwell North, 1937
Subdivision plans and real estate flyers/brochures reveal a number of aspects of urban development and history. The Kew Historical Society's collection of these plans, as well as advertisements extracted from magazines, cover key aspects of community development and architectural history of Kew and Kew Eat as well as surrounding suburbs. While most of the plans in the collection were gifted to the Society by the former City of Kew, a number of other plans and advertisements have been donated by individuals, of which this is an example.Single page subdivision plan listing properties for sale in the Tramways Estate, Camberwell North. The large estate was bounded by Doncaster Road, Burke Road, Marwan Avenue, Maud Street, Severn Street, and extended over Glass's Creek at Mayland's Avenue. Within the plan, lots 3 to 342 are listed as lots. The plan includes annotations in ink indicating the prices realised by a number of lots. A key explains that lots with an 'H' represent a house, whereas the 37 shaded lots represent those being offered by this agent. subdivision plans -- camberwell (vic.), tramways estate -
 Kew Historical Society Inc
Plan - Subdivision Plan, St Helliers Estate, Kew, circa 1910, c.1910
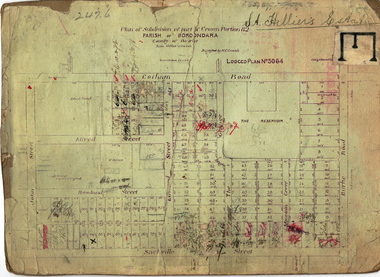
Pru Sanderson, in her groundbreaking ‘City of Kew Urban Conservation Study : Volume 2 - Development History’ (1988), summarised the periods of urban development and subdivisions of land in Kew. The periods that she identified included 1845-1880, 1880-1893, 1893-1921, 1921-1933, 1933-1943, and Post-War Development. These periods were selected as they represented periods of rapid growth or decline in urban development. An obvious starting point for Sanderson’s groupings involved population growth and the associated economic cycles. These cycles also highlighted urban expansion onto land that was predominantly rural, although in other cases it represented the decline and breakup of large estates. A number of the plans in the Kew Historical Society’s collection can also be found in other collections, such as those of the State Library of Victoria and the Boroondara Library Service. A number are however unique to the collection.Subdivision plans are historically important documents used as evidence of the growth of suburbs in Australia. They frequently provide information about when the land was sold on which a built structure was subsequently constructed as well as evidence relating to surveyors and real estate and financial agents. The numerous subdivision plans in the Kew Historical Society's collection represent working documents, ranging from the initial sketches made in planning a subdivision to printed plans on which auctioneers or agents listed the prices for which individual lots were sold. In a number of cases, the reverse of a subdivision plan in the collection includes a photograph of a house that was also for sale by the agent. These photographs provide significant heritage information relating house design and decoration, fencing and household gardens.In the subdivision of part of Crown Portion 82, bordered by John and Sackville Streets and Cotham and Burke Roads, over 100 lots were offered for sale. In addition to the designated lots, a number of key locations are also identified. These include the Genazzano Convent to the north of Cotham Road, the Reservoir, St Hilary’s and the land holding of Colonel Parnell on the corner of John Street and Cotham Road. On the Plan, No. 5064, is the handwritten name ‘St. Hellier’s Estate’. St. Helliers, the home of the Dumaresq family is shown beside St. Hilary’s.subdivision plans - kew, st helliers estate -
 Wodonga & District Historical Society Inc
Photograph - Fred Rochow Railways Collection - Jack Dwyer and Harry Binder, C. 1961
The Fred Rochow Railways Collection incorporates photos related to the operation of the Wodonga Railway Station including different types of trains and railways staff C. 1930 – 1990. It was donated to the Wodonga Historical Society by Fred Rochow, a railwayman who spent many years based in Wodonga. He joined the Victorian Railways on 17th June l947 and retired in 1988. For some time, he was a member of the Australian Federated Union of Locomotive Enginemen and served a term as a member of the Trades Hall Council. He had an extensive knowledge of the struggles that took place to achieve better conditions for railway workers. Fred worked for many years as a fireman and then worked his way up the ranks to driver, experiencing many changes from the days of steam locomotives through to diesel trains, locomotives and even the modern XPT train. He worked throughout Victoria at different stages of his career, with his final working years focused on the northeast of Victoria and the Albury to Melbourne line. After his retirement, Fred continued to share his love of steam miniature trains with the community.This collection has local and statewide significance as it captures images of trains, locomotives and personnel who operated the railway services in Wodonga and throughout Northeast Victoria. The railways played a critical role in opening up Victoria and connecting Australia for trade, business, social communication and transport.Jack Dwyer was born on 25 September 1896. He started his railway career at North Melbourne on 8 February 1917. Jack passed his driving qualification on 25 June 1936 and retired at Wodonga on 25 September 1961. Harry Binder was born on 30 July 1898. He started his railway career at Ballarat on 7 January 1918. Harry passed his driving qualification at Wodonga on 23 February 1921 from where he retired on 30 July 1963.railways wodonga, fred rochow, wodonga railway men, harry binder, jack dwyer -
 Melbourne Tram Museum
Photograph - Block Mounted Photograph, Ron Scholten, c1970
Chipboard base for a block mounted black and white photograph of Elizabeth St Melbourne at Franklin St. Has a stapled nylon cord on rear to provide a hanging method. Has tram W5 728 north bound to Brunswick on a route 18. In the background is the Argus building, printers of The Argus and The Australasian. Note the safety zone. Photo and story along with a photograph by Warren Doubleday of the same location September 2014 used in the October 2014 issue of Bellcord - see image i3. First two pages extracted only.On rear in ink at the top - "Donated to Hawthorn Tram Museum Feb. 19th 2012 Ron Scholten"trams, tramways, elizabeth st, brunswick, route 18, the argus, franklin st, tram 728 -
 Bendigo Historical Society Inc.
Document - MISS G ALICE JONES COLLECTION: ACCOUNT
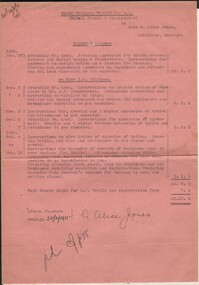
North Hustlers Mining Co. N. L. (McColl Rankin & Stanistreet) to Miss G. Alice Jones. Pink paper dated Aug 28 to Dec 7, 1934, Feb 4 to Feb 18, 1935, and 28/3/1935. Option - Selewar. Costs involved in agreement for option. Re Miss I. N. Williams. Costs for options of purchase and preparations for transfer of portion of residence area and related expenses. Total cost £6.13.0. "Del'd 29/3/35" written in the top left corner.miss g alice jones - solicitor - account, north hustlers mining co n l, mccoll rankin & stanistreet, selewar, mr leed, miss i n williams, mr j j stanistreet, mr e. r. grelis, building society