Showing 1733 items
matching bendigo gardens
-
 Ballarat Tramway Museum
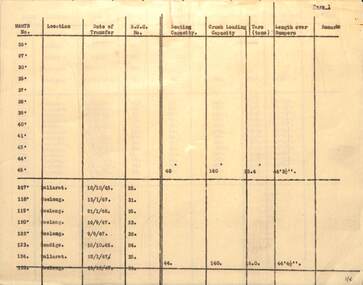
Document - Research note - list of MMTB bogie tramcars sold to the SEC, 1948c
Lists maximum traction or bogie trams sold up to Jan. 1948. Further tramcars were sold to the SEC for use in Ballarat during 1951.Yields information about the sale of former MMTB bogie trams to the SEC from 1945 to 1948.Typed 3 quarto sheets, carbon copy of a list of MMTB bogie tramcars sold to the SEC. Lists MMTB Number, location, date of transfer, SEC No, Seating capacity, Crush loading, Tare, Length over bumpers and remarks. Two copies held.trams, tramways, sec, tramcars, ballarat, bendigo, geelong, bogie tramcars, sale of tramcars, mmtb, maximum traction -
 Ballarat Tramway Museum
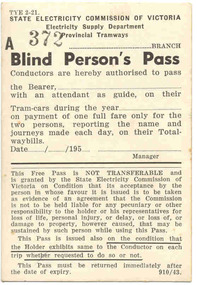
Ephemera - Blind Person's Pass, State Electricity Commission of Victoria (SECV), 1950s
Issued to Blind People as a travel concession for tramways in the Provincial cities of Geelong, Ballarat and Bendigo.Demonstrates the method that the SECV used to enable free or low cost travel for Blind people with an attendant.Yellow cloth backed paper ticket with white front, printed in black ink - titled "Blind Person's Pass". Has number "372" stamped on. Form number "TYE 2-221" in top left hand corner. Has space for the name of the Bearer, Branch to be written, conditions of use, and space for manager to sign with date .../.../195...." At base of ticket has "910/43". .2 - No. 375 .3 - No. 382sec tramways, ballarat, blind persons, tickets, provincial cities -
 Ballarat Tramway Museum
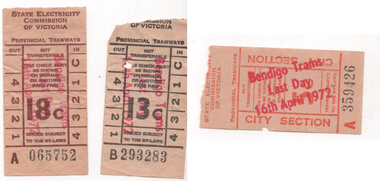
Ephemera - Tickets - over stamped "Bendigo Trams 16th April 1972", State Electricity Commission of Victoria (SECV)
Issued by conductors on the last day of SECV tram services in Bendigo to mark the occasion. Demonstrates the work the local office of the SECV did to mark the occasion. Three SECV paper tickets - 13c (black) No. B293283, 18c (brown) No. A065752 and 5c City Section A359426 over stamped in red "Bendigo Trams 16h April 1972". Has the SEC logo of the time of a child wrapped in a blanket on the rear.bendigo, tramways, secv tramways, last day, closure, tickets, overstamped, secv -
 Ballarat Tramway Museum
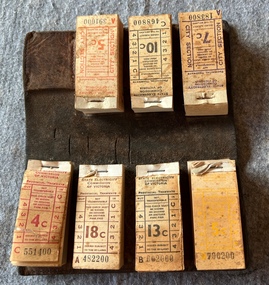
Functional object - Ticket Wallet with 7 blocks of tickets, State Electricity Commission of Victoria (SECV)
Used by conductors or conductors to retain and sell tickets from. Demonstrates the method of dispensing tickets by conductors, how the tickets could be arranged. Yields information about the style and printing of tickets used in Ballarat and Bendigo tramways and how they were presented.Sheet of leather, approx 2mm thick, stained brown with four pockets formed on each side with another sheet of leather, stitched on all sides to form pockets to hold eight blocks of tickets. Stitching is a dark brown colour cotton. Has seven blocks of tickets, possibly of Bendigo origin, each with 200 tickets. 4c - red - C551400 5c - orange - City Section - A391000 5c - yellow - B796200 7c - City Section - purple - A183800 10c - black - C468800 13c - black - B602000 18c - brown - A482200 tramways, trams, tickets, conductors, sec, ticket wallet -
 Ballarat Tramway Museum
photograph - Narrow gauge demonstration railway - Bendigo, 1901
Photo of the 1901 demonstration electric railway at the Bendigo Gold Jubilee Exhibition. Page 80 of Keith Kings book "The Bendigo Tramways" describes the photo and its purpose; a mine locomotive. Notes that it is from the P W Duckett collection.Yields information about a demonstration electric railway in Bendigo in 1901.Black and white photograph of Narrow gauge demonstration electric railway Bendigo 1901Has description and source information on the rear.bendigo, railway, demonstration, gold jubilee, electric railway, mining -
 Ballarat Tramway Museum
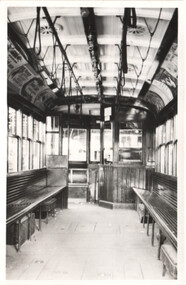
photograph - Black & White - set of 2 - Interior of Birney type trams Bendigo 15 and 29, Keith Kings, 4/1950
Set of two photos of the interiors of two different types of Birney trams in Bendigo. 1 - Bendigo 15, longitudinal seating and the drivers cabin. Also shows the tramway control equipment that was located under the seats. Photo - Keith Kings No. D(i)(4), dated 10/4/1950 2 - Bendigo 29 with tip over seating, the open driver's position and night curtain. Photo - Keith Kings No. D(i)(3), dated 10/4/1950.Yields information about the interior seating arrangments of Birney type tramcars.Set of two black and white photographs of the interior of Bendigo Birney trams.Details the image on the rear of the print in ink.birney tramcars, bendigo, tramcars, interiors, tram 15, tram 29 -
 Ballarat Tramway Museum
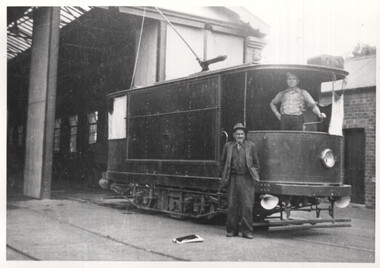
photograph - Black & White - Bendigo water car - track cleaner, Peter Duckett, c1947
Photograph of the Electric Supply Co. (ESCo) Bendigo water tram in front of the depot with two workmen. The tram has been modified with rail scrubbing blocks to clean the head of the rails. Photo by Peter Duckett about 1947.Yields information about the first Bendigo track cleanerPhotograph - Black & White - Bendigo water car - track cleaner - about 1947Details the image on the rear of the print in ink.bendigo, tramcars, esco, water tram, scrubber tram, bendigo tramways, depot -
 Ballarat Tramway Museum
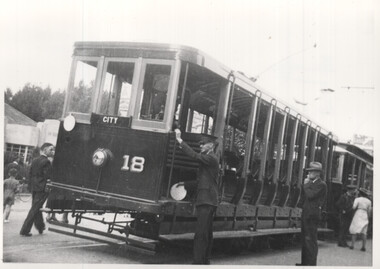
photograph - Set of 3 Black & White - ESCo trams Bendigo - Easter, Peter Duckett, c1947
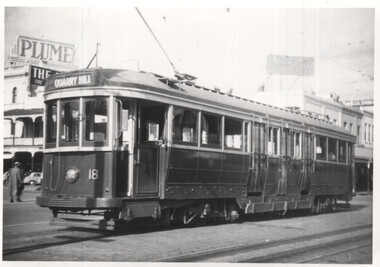
Set of three photographs of early Bendigo trams photographed by Peter Duckett, Easter Monday 1946 or 1947 1 - Bendigo 18 - note the white disc held by a crew member. View St at Charing Cross. Tram has the destination of City. 2 - Original car No. 9 (in final form) and open bench car, either 17 or 18, probably at Ironbark Gully loop. Tram has destination of Quarry Hill. 3 - Original ESCo cars - Charing Cross.Yields information about Bendigo trams during Easter 1946 or 1947Set of three black and white photographs by Peter Duckett.Details the image on the rear of the print in ink.bendigo, tramcars, esco, bendigo tramways, tram 18, tram 9, charing cross, easter -
 Ballarat Tramway Museum
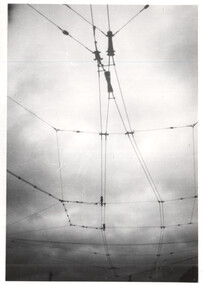
photograph - Set of 4 Black & White - Bendigo tramways, Peter Duckett, late 1940s
Set of four photographs of Bendigo trams and infrastructure photographed by Peter Duckett, late 1940s 1 - double trolley wire at a "Y" terminus showing the details of dual trolley wire - Could be either Quarry Hill or Golden Square. 2 - Bendigo trams 24 and 22 at Quarry Hill terminus - note the cream rocker panels. 3 - Bendigo 6 at Charing Cross. 4 - Bendigo 16 - after conversion to one man tram.Yields information about Bendigo trams late 1940sSet of four black and white photographs by Peter Duckett.Details the image on the rear of the print in ink.bendigo, tramcars, bendigo tramways, overhead, double trolley wire, terminals, tram 24, tram 22, tram 6, tram 16, quarry hill, charing cross -
 Ballarat Tramway Museum
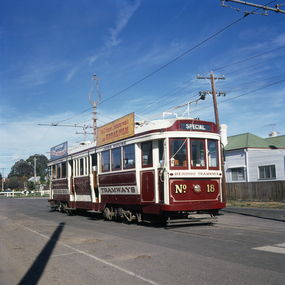
photograph - Bendigo 18 prior to conversion to a one-man tram, Peter Duckett, 1951
Photograph of Bendigo bogie tram 18 at Charing Cross prior to its conversion by the SEC to a one-man tram in 1952. Tram has the destination of Quarry Hill. In the background is an advert for Plume petrol. Photo taken in 1951.Yields information about Bendigo tram 18 prior to conversion to a one-man tram.Black and white photograph by Peter Duckett.Details the image on the rear of the print in ink.bendigo, tramcars, bendigo tramways, quarry hill, charing cross, tram 18 -
 Ballarat Tramway Museum
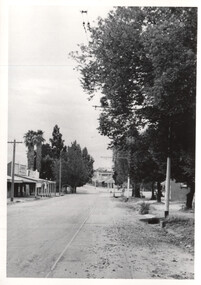
photograph - Darling Street Eaglehawk Bendigo - unused track, Peter Duckett, About 1950
Set of two photographs showing the Darling Street extension of the Eaglehawk line. This section of the route fell out of use when mining decreased (See Keith Kings, Bendigo Tramways). Both photos by Peter Duckett about 1950.Yields information about the Darling St extension of the Eaglehawk line.Set of two Black and white photographs by Peter Duckett.Details the image on the rear of the print in ink.bendigo, tramcars, bendigo tramways, eaglehawk, darling st -
 Ballarat Tramway Museum
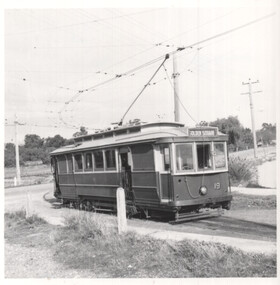
photograph - Set of 4 Black & White - Bendigo tramways, Peter Duckett, late 1940s
Set of four photographs of Bendigo trams and infrastructure photographed by Peter Duckett, early 1950 1 - Bendigo 19 at North Bendigo terminus - tram has destination of Golden Square 2 - Birney No. 30 leaving the depot for North Bendigo 3 - Depot entrance from Arnold St (now Tramway Ave) across Hargraves St 4- North Bendigo terminus overhead wiringYields information about Bendigo trams early 1950sSet of four black and white photographs by Peter Duckett.Details the image on the rear of the print in ink.bendigo, tramcars, bendigo tramways, overhead, double trolley wire, terminals, quarry hill, charing cross, tram 19, tram 30 -
 Ballarat Tramway Museum
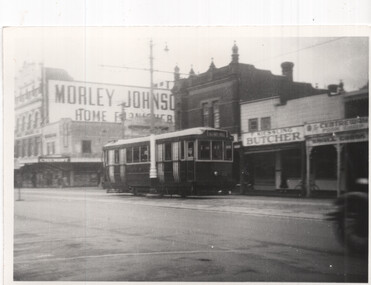
photograph - Set of 5 Black & White - Bendigo tramways, Peter Duckett, early 1950s
Set of five photographs of Bendigo trams photographed by Peter Duckett, early 1950s 1 - Bendigo 22 in Mitchell Street. Tram has the destination of Quarry Hill. In the background is the Morley Johnson Home furnisher and F. Kessling Butcher 2 - Tram No. 3 at the depot. 3 - Tram 7 on a Quarry Hill service. 4 - Bogie tram 24 at the depot 5 - Track cleaner - scrubber and another ex Melbourne single trucker at the depot.Yields information about Bendigo trams early 1950sSet of five black and white photographs by Peter Duckett.Details the image on the rear of the print in ink.bendigo, tramcars, bendigo tramways, quarry hill, charing cross, mitchell st, tram 22, tram 3, tram 7, tram 24, scrubber tram -
 Melbourne Tram Museum
Album - Charles Craig - part 1 of 2, 1950s to 1970s
Photo - see pdf file for further information. Number Brief Description CC1 S178 at Elsternwick level crossing track works CC2 Building East Preston Depot 1955 CC3 Camberwell depot – post WW2 – lots of trams and a black cat CC4 W2 584 and SW6 958 northbound – Chapel St and Brighton Road CC5 W2 357 – southbound, Chapel St Brighton Road CC6 Pascoe Vale Road, Raceday working – note the signal CC7 The Preston Workshops - The Argus, post WW2, 223, 647 et al CC8 923 or is it 922 being built at Preston – The Argus photo - CC8A 832 being positioned onto trucks at Preston after an overhaul – Argus Photo – see also CC306 CC9 Footscray depot` CC10 W5 797 in St Kilda Road during track works – 1950s CC11 W2 457 at Kew Post Office CC12 Wellington Parade – W2 432, 492 and 337 – special event CC13 Swan St line up of trams – football? Or other special event – Sinclair’s bus on the right side. CC14 W2 630 being washed at a depot – The Argus photo CC15 Royal Park line at Flemington Road – W2 355 and W5 786 CC16 Nicholson St track construction from a tram cab CC17 T181 on tour at Gordon St CC18 T181 on Maribyrnong Bridge CC19 Ditto at River St just off bridge CC20 As for CC18 CC21 At Raleigh Rd CC22 T181 at Footscray depot CC23 Track construction, Nicholson, just north of Gertrude CC24 Commissioning overhead Bourke St tram 988 CC25 Queens Parade – 997 and 994 CC26 Swapping trolley wheel to skid – commissioning CC27 Track construction in Gertrude St CC28 985 in Queens Parade running special CC29 997 in Queens Parade CC30 1033 at North Fitzroy – AETA Special CC31 Bourke St at Elizabeth St – has passengers on board CC32 W6 985, 996 Queens Parade, Mk 3 bus 333 CC33 As above CC34 Showing construction at Nicholson & Gertrude – Bourke St CC35 W2 223 on Burnley temporary bridge – VR track expansion CC36 W5 823 – ditto CC37 Tram on old bridge prior to removal CC38 W2 433 on temporary bridge with new bridge beams and old track CC39 Looking down showing temporary single track – Swan St CC40 Tait train passing under tram bridge CC41 SW6 on single line – off loading CC42 W2 547 at City Road Junction CC43 City Road Jtn – 1969 – 596 and 771 CC44 City Road Jtn – 1969 – 596 and 771 (same as CC45 438 in Flinders St CC46 355 somewhere CC47 552 somewhere CC47A 364 at Preston Workshops? CC48 W2 334 on Traverser – Preston Workshops CC49 Wellington pade – large line up of trams, c1950 925, and 611 CC50 W2 493 Franklin st – advertising for Savings Certificates CC51 Possibly 551 with advertising for fund raising for Blind institute CC52 249 at Hawthorn – Riversdale Junction – with a Tally Ho and Village Fair Aux. board CC53 MMTB Postcard of 511 CC54 Wattle Park terminus with Single line warning sign CC55 Wattle Park Duplication CC56 36 at Domain Junction – 833 CC57 36 at Domain Junction CC58 36 at Domain Junction with 810 and 833 CC59 36 in Swanston by Flinders St Station CC60 36 in Spencer St at A’Beckett CC61 36 crossing Collins St CC62 36 crossing Collins St CC63 36 northbound in St Kilda Road with Shrine in background CC64 36 northbound in Swanston St at Flinders St CC65 Postcard – Ballarat 36 in Domain Road CC66 Postcard - Stampshow – Hawthorn Horse tram CC67 Postcard - Stampshow – Peace cable tram CC68 Postcard - 1041 and cable car set 1 at Preston CC69 Postcard - Colins & Elizabeth – greetings from old Melbourne CC70 Postcard - Cable car set at Preston CC71 Postcard - Twentyman’s cable cars CC72 Postcard - Nu-color-vue – horse tram 256 CC73 Cable car set – Market & Flinders CC74 Cable trams at Twentymans’ in their shed CC75 Cable tram track at Bourke & Spencer prior to removal CC76 Cable tram bogie at Preston Workshops – used as a dolly CC77 Cable trams at Twentymans’ CC78 Postcard - Valentines – Bourke looking west from Swanston CC79 Postcard - Rose 3938 – Bourke at Swanston – the Leviathan building CC80 Postcard - Valentines – Elizabeth St looking south from Collins – No. 19 CC81 Postcard - Rose P4765 – Bourke St Melbourne CC82 Postcard - Rose 4090 – cable tram passing Parliament house CC83 Postcard - Valentines – GPO Elizabeth St CC84 Interior of cable trailer with clothing on a set CC85 Elizabeth St looking north CC86 Cigarette card - Collins St No. 41- WD HO Wills CC87 Postcard - Rialto building with cable set CC88 Postcard - Valentines - Swanston at Flinders looking north CC89 CC90 Q 150 Hanna St – dated on rear CC91 176 turning – photo ex Alan Jungworth CC92 161 on Princes Bridge – minimum fare 4d sign and Inspector CC93 459 at Point Ormond CC94 158 at Gordon St – side on view CC95 X 217 in Swanston St CC96 X 217 in Swanston St with an East Brighton destination CC97 T177 CC98 T177 Peel St – no destination roll – being transferred? CC99 X1 462 in Glenhuntly Road to Point Ormond CC100 X1 462 in Glenhuntly Road to Elsternwick Rly Station CC101 X1 462 in Glenhuntly Road to Point Ormond CC102 Q 150 Hanna St CC103 190 at Camberwell Depot CC104 T182 at Footscray CC105 X1 466 and W2 at Footscray CC106 190 at Camberwell Depot CC107 X1 467 Barkly St Footscray CC108 X2 679 turning into William St from La Trobe St CC109 X2 677 Glenhuntly Road with Point Ormond Destination CC110 Postcard T180 CC111 Postcard format – X1 467 on a truck – see also CC178 CC112 Postcard format – X1 467 at Wantirna South CC113 Q200 and SW6 896 at Thornbury – has labels on rear CC114 T177, Ballarat Road – has labels on rear CC115 T178 at Point Ormond CC116 Postcard X1 465 and 466 CC117 Postcard – X2 676 CC118 Postcard – TMSV X2 217 CC119 810 on temporary bridging – 24-12-67 CC120 W2 575 – Queens Parade junction in, still temporary bridging, substation under construction CC121 Forming Queens Parade Junction base slab CC122 W2 596 prior to tramway works – all tracks still in position CC123 It’s a mass of reinforcing – bridging being formed CC124 Looking north with substation being built CC125 Looking east with some rather tight curves, Wellington St still in use CC126 SW6 958 ex Wellington St with all tracks and signal box and buildings. CC127 Victoria Pde at Gisborne looking east – at least 4 cars CC128 SW6 893? With dash canopy lights and SW6 862 and a man with a newspaper CC129 SW6 894 on the S curves, with tram in Wellington St CC130 Similar photo CC131 W2 564 turning into Wellington St – the concrete tracks are not that old CC132 W2 552 running out of Wellington St CC133 W5 732 from Fitzroy St into St Kilda Road with next iteration in position – very wonky CC134 W5 764 turning into Fitzroy St CC135 SW6 947 turning from Wellington St CC136 W2 586 running out of High St CC137 W2 500 turning into Wellington St CC138 W2 543 in Wellington St inbound CC139 L103 with St Kilda Junction destination, and a tower truck on right CC140 Workmen – new track in Queensway in use CC141 Ditto CC142 L103 in Queensway, and another car in bound CC143 Looking east along Wellington St which has been taken out of use. Also a MMTB Roller CC144 W5 824 and a W2 and all types of wobbly temporary track CC145 W2 354 to High St CC146 Sw6 947 on the S bends CC147 W2 500 looking north – tram on the S bends CC148 SW6 896 leaving the S bend CC149 W2 357 and a MMTB City bus with trees/gardens on the side CC150 W5 817 Elliot Ave – see also CC302 CC151 W2 552 – note the large trolley bridge CC152 W2 550 at depot or workshops CC153 1B truck CC154 SW2 432 CC155 W2 155 at Glenhuntly CC156 SW6 937 on AETA tour? CC157 X2 677 on Footscray service – Ballarat Rd? CC158 W2 641 – High St Kew? CC159 SW6 847 – Power St Hawthorn CC160 Simpson St – big line up CC161 W2 546 truck No. 1? CC162 W2s at Glenhuntly depot CC163 No. 15 truck under 899 CC164 206 and other junk at Preston Workshops CC165 W in Swanston St Melbourne – Rose series card CC166 Y1 613 Batman Ave?? or William St at Collins CC167 Tram plans CC168 X 217 Swanston St – see also 95 and 96 CC169 217 in Swanston St – same as 95 CC169A 192 in St Kilda Road at Princes bridge CC170 192 in St Kilda Road at Princes bridge CC171 Bendigo 3 arriving Malvern depot – being unloaded CC172 Ditto CC173 T180 at a depot CC174 X1 463 wheel set CC175 C30 – dog car side view – close up CC176 C30 dog car CC177 206 and 30 at Preston Workshops CC178 X1 467 on a truck – see CC111 also CC179 42 CC180 42 at a depot, no destination box CC181 W2 556 1A type truck CC182 Flinders St Station – Rose Series CC183 W7 1035 Spring – Nicholson St CC184 W7 1022 MMTB Post Card CC185 Adelaide 178 – has on rear – R. Lilburn 4/82 CC186 Adelaide 175 – has on rear – R. Lilburn 4/82 CC187 Y1 610 on AETA tour CC188 Y1 610 on AETA tour with large group – Point Ormond CC189 AETA display – has GH55-32 in pencil on rear CC190 AETA display – has GH55-29 in pencil on rear CC191 Y1 610 on AETA tour with large group – Point Ormond CC192 VR 53 at Footscray CC193 VR cars 40 and 34 at Elwood wash dock CC194 W7 1024 as the 1970 Christmas tram CC195 Geelong – loading a set of 22E trucks CC196 Geelong 10 and 23 running an AETA special CC197 Geelong – AETA special CC198 Geelong 7 at Junction CC199 Geelong 10, in the city CC200 Geelong 33 with Belmont destination CC201 Geelong 15 Eastern Park destination 29-3-1948 CC202 Geelong 23 at Railway Station – 29-3-1948 CC203 Geelong 23 at Railway Station – 29-3-1948 CC204 Geelong – loading a bogie tram CC205 Geelong – loading a bogie tram CC206 Geelong 40 – loaded on truck CC207 Geelong 40 – on jacks CC208 Geelong 40 on jacks – 19 behind CC209 Geelong 38 with two workers on either side CC210 – 214 Australian Historic Tramways stamp folder and set CC215 Bendigo 17 at depot – has dup JBS on rear CC216 Bendigo 20, 29 bogie and straight sill car at Charing Cross CC217 Bendigo one man bogie Pall Mall CC218 Bendigo – Bogie 23, other cars and welding truck at depot CC219 Bendigo 7 with Quarry Hill destination CC220 Bendigo 21 with Lake Weerona destination CC221 ESCo 18 Ballarat CC222 Ballarat bogie 22 on AETA special CC223 Ditto CC224 Ballarat 34 at Stones Corner – R Lilburn CC225 Ballarat 15 in Bridge St – R Lilburn CC226 Ballarat 40 at Gardens – R Lilburn CC227 Ballarat 37 running out of depot – R Lilburn CC228 Postcard – Valentines – Sturt St with loaded horse tram trailer CC229 AETA Geelong tram tour ticket – 29-3-1948 CC230 Postcard – Geelong – Valentine 2114 – T&G building CC231 Postcard – PMTT ! – High St Malvern CC232 Postcard – Empire – Glenferrie Road, Malvern at Wattletree Rd CC233 Postcard Y469, MMTB CC234 Postcard Z2 Spring St CC235 Postcard – Z1 MMTB CC236 Postcard – Stamp Show W1 431 CC237 Postcard – Stamp show B2005 CC238 Postcard – Stamp show W6 982 CC239 Postcard – Valentines 1264 – Johnstone Park with tram in distance CC240 Postcard – Rose 10711 – Swanston and Lonsdale – Hospital and W232 CC241 Postcard – Rose 4827 – Fitzroy St St Kilda W2 362 and 548 CC242 Postcard – Valentines – 939 – St Kilda War Memorial, W and a R? CC243 Postcard – Valentines – 572 – St Kilda War Memorial, W 413 and 140? CC244 Postcard – Valentines – 938 – Uper and Lower Esplanade – L 104 CC245 Postcard – St Kilda Rd at Princes Bridge Y1 and W CC246 Postcard – Biscay BG82 – W5 814 - CC247 Postcard – Biscay 796112 – Bourke St looking west CC248 Postcard – Biscay 796109 – Bourke St looking east CC249 Postcard – Biscay 2AUS58 – Z5 Bourke St CC250 Postcard – Biscay BG 249 – Swanston St CC251 Postcard – National View – St Kilda Rd – shrine and Prince Henrys W2 405 CC252 Postcard – Nu color vue – 11 ML 156 – St Kilda Rd CC253 Postcard – Nu color vue – 11 ML 153 – Swanston St CC254 Postcard – Nu Color vue – Collins St 442 CC255 Postcard – Pitt card – Adelaide – H 364 at Victoria St CC256 Postcard – SPER L/P 154 CC257 Postcard – BTMS – 550 CC258 Postcard – SPER – Brisbane 295 CC259 Adelaide 131 at Burnside – has R Lilburn on card, c1911 CC260 Adelaide 194 CC261 Adelaide 235, with two crew, The News photo CC262 Rockhampton, outside post office – has source of photo details CC263 Sydney – 2086 and 2062 arriving Circular Quay CC264 Sydney – P class – Pitt St? CC265 Sydney – 1610 at Circular Quay CC266 Brisbane 99 and 468 CC267 Sydney with bridge behind CC268 Steam tram Paramatta Park – 103 CC269 Sydney – Museum Station =- Elizabeth St CC270 Sydney – weed burner 137S at a loop Demonstrates the work of Charles Craig in photography and collection of prints.Assembled album in a black presentation folder of 270 photographs from the Charles Craig Collection - 86 sleeves - part 1 of 2. All photographs have been scanned and placed on the Museum's G drive. A list of all photographs with details where possible has been compiled. Victorian Provincial, Launceston, Hobart and Sydney tram photos have been transferred to other Museums, image files retained.melbourne, tramways, tramcars, trams, charles craig, st kilda junction, trackworks -
 Ballarat Tramway Museum
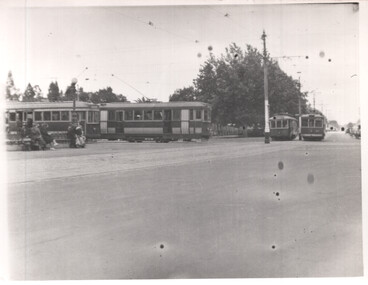
Photograph - Bendigo Charing Cross
Photo shows Bendigo Charing Cross and four trams - bogie tram, tram 22 (ex Melbourne R 153, scrapped 1956), tram 20 and Birney 29 - photo late 1940s or early 1950s.Yields information about Bendigo tramways operationsBlack and White photograph of Bendigo Charing Cross and four trams. Two prints held.tramways, trams, charing cross, tram 22, tram 20, tram 29, sec tramways -
 Ballarat Tramway Museum
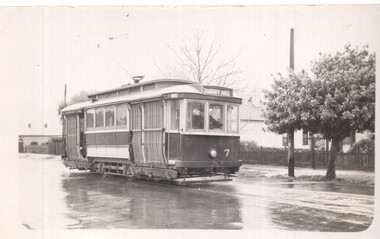
Photograph - Bendigo - Tram 7 - (2nd)
Photo shows the second Bendigo tram to carry the number 7. It has the destination of Quarry Hill. Most of the weather blinds are drawn. The tram was former MMTB No. 90, purchased in 1931, scrapped in 1951. The tram was not converted for one-man operation. Reference Destination Eaglehawk. Photo c1940.Yields information about Bendigo tramways operations and tram 7.Black and white photograph of the 2nd Bendigo No. 7tramways, trams, sec tramways, tram 7, quarry hill -
 Ballarat Tramway Museum
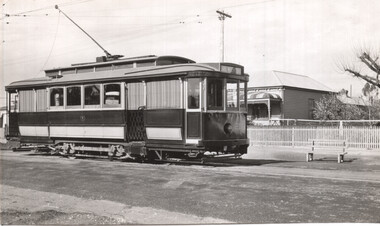
Photograph - Bendigo - tram 21 - one man
Photo shows SEC Bendigo No. 21, after its conversion during the 1930's to a one-man tram with metal folding gates, weather blinds and a cream rocker panel. Tram has the destination of Lake Weeroona. Note the driver's footstep. Originally built for the Hawthorn Tramways Trust, sold to the Footscray Tramways Trust and became MMTB No. 188.Yields information about Bendigo tram 21 after conversion to a one-man tram.Black and white photograph of Bendigo - tram 21 - one man conversion.tramways, trams, sec tramways, tram 21, lake weerona, bendigo -
 Ballarat Tramway Museum
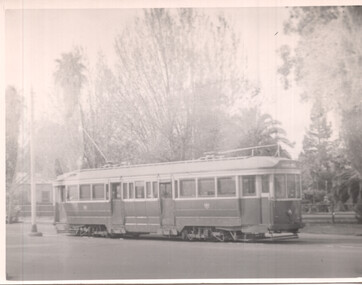
Photograph - Bendigo - tram 18 - one man bogie tram
Photo shows SEC Bendigo No. 18, after its conversion in 1952 to a one-man bogie tram. It did not operate as such due to Union opposition. Originally built for the Prahran and Malvern Tramways Trust as their No. 45 and became MMTB 45 as well.Yields information about Bendigo tram 18 after conversion to a one-man tram.Black and white photograph of Bendigo - tram 18 - one man bogie tramtramways, trams, sec tramways, bendigo, tram 18, one-man trams -
 Ballarat Tramway Museum
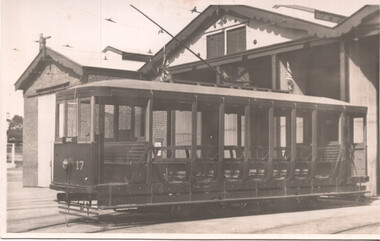
Photograph - Bendigo - tram 17 at depot
Photo shows Electric supply Co. toast rack or cross bench type No. 17 outside the depot prior to its coversion to the track cleaner in 1953. The Bendigo trust returned the tram to its toast rack or cross bench type.Yields information about Bendigo tram 17 prior to its conversion in 1953 to the track cleaner.Black and white photograph of Bendigo - tram 17 at depotOn rear in red pencil is "Dup JBS"tramways, trams, sec tramways, bendigo, tram 17, bendigo depot -
 Ballarat Tramway Museum
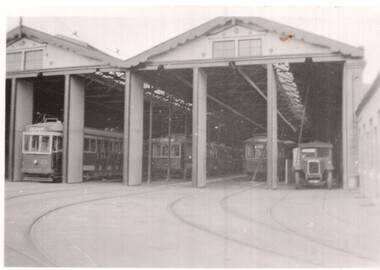
Photograph - Bendigo - tram depot c1945
Photo shows the Bendigo tram depot, c1945 after the arrival of the first bogie trams. Tram 23 with cream rocker panels, possibly No. 20, another tram and the welding truck. Appears that there is some welding going on with the ladder positioned just inside the depot and a pole connected to the overhead alongside the truckYields information about Bendigo tram depot after the arrival of the first bogie tramsBlack and white photograph of the Bendigo tram depot c1945tramways, trams, sec tramways, bendigo, bendigo depot, tram 23, welding truck -
 Ballarat Tramway Museum
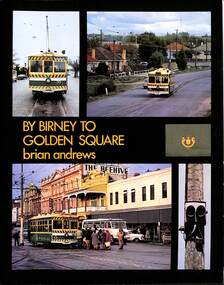
Book, Brian Andrews, "By Birney to Golden Square", 1973
Features both black and white and colour photographs, including tickets, photos along each route, Charing Cross, depot, notes on the rolling stock with an aerial photograph of Bendigo with the tram routes marked in and a fold out detailed map of Bendigo and its track layout.Yields information about the Bendigo tramways operated by the SEC in a photographic and text format.Book, 78 pages including card cover, printed on gloss paper, titled "By Birney to Golden Square", written by Brian Andrews, published by Southern Cross Traction, Kensington Park SA. Sub-titled "The last last years of Bendigo's tramways", 1973. trams, tramways, bendigo, sec tramways, maps -
 Ballarat Tramway Museum
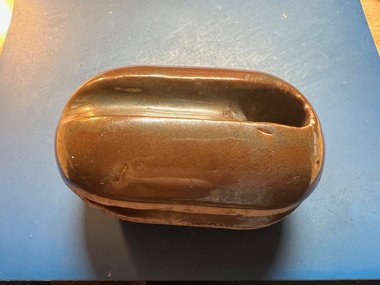
Functional object - tramway overhead ceramic insulator
Sold by the Bendigo Tramways following its replacement. Larger size for use with a heavier size span or support wire than normally used in tramway overhead. Designed on the basis that in the event the insulator failed or broken, the overhead would still be supported but there would be a loss of insulation.Demonstrates a larger size insulator used on tramway overhead.Insulator - known as an egg type - ceramic - fired clay (porcelain) finished with a brown colour with two holes for span wire with the holes offset to each other.tramways, overhead, trolley wire, span wires, insulators -
 Ballarat Tramway Museum
Photograph - Colour print - Bendigo 18, Barry Pemberton
Photo shows Bendigo 18, painted in the Bendigo Trust colour scheme at the Mine terminus, late 1980's or early 1990s. It was originally converted by the SEC to a one-man tram but not used as such. Converted by the Bendigo Trust to a enclosed car with entries at either ends. Operated by the Ballarat Tramway Museum during 2001 to 2005 to celebrate 150 years of Gold, where it carried its Melbourne number of 45. Currently operated by the Bendigo Tramways as No. 45.Yields information about Bendigo Tramways tramcar 18 /45.Colour print - digital printed made 12/22Has notes on the rear of the print about the photographer, address and dates.tramways, tramcars, tram 18, bendigo, bendigo tramways, tram 45 -
 Ballarat Tramway Museum
Photograph - Bendigo Charing Cross, Keith Kings, 15-2-1972
Photograph of Bendigo trams 18 and 5 at Charing Cross from roof of Fountain Plaza. Second last day of normal tram service, that is all lines, Saturday 15/2/1972. Photo by Keith Kings.Yields information about Bendigo tramways prior to closure in 1972.Black and white photograph of Charing Cross Bendigo.Has full details of the photograph on the rear in ink.bendigo, trams, tramways, charing cross, tram 18, tram 5 -
 Ballarat Tramway Museum
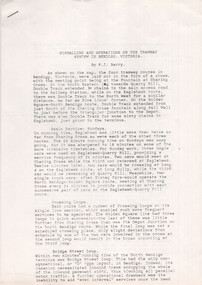
Document - Manuscript, Peter J Barry, "Signalling and Operations on the Tramway System in Bendigo", April 1990
Draft of an article with notes/additions by Keith Kiings on the signalling system and tramcar operations in Bendigo. Looks at the basic services, crossing loops, signalling, following movements (Bendigo used a white disc on the tram to indicate a following tram, Ballarat did not use this system), short workings, reversals, observations of actual workings. Includes a map drawn by Keith Kings in 1972. Published in the September 1990 issue of Somersault, by the Signalling Record Society of Victoria.Yields information about the operation of the Bendigo tramway system using the Forest City Signalling system.Six A4 pages of a draft of an article by Peter Barry and correspondence to Keith Kings re "Signalling and Operations on the Tramway System in Bendigo, April 1990.tramways, trams, bendigo, signalling, forest city, operations, crossing loops, srsv -
 Ballarat Tramway Museum
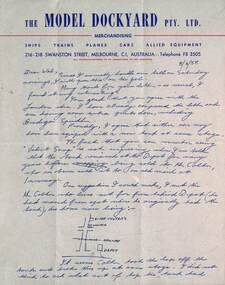
Letter - from Peter Duckett to Wal Jack re Ballarat Sprinkler car tank, Peter Duckett, 8/3/1958
Wal Jack had an extensive range of correspondents throughout Australia and the world who often prepared extensive notes and records for him. This letter from Peter Duckett, the owner and proprietor of the Model Dockyard, dated 8/3/1955 discusses the water tank on the Ballarat ESCo sprinkler tram and its disposal history, First sold to a Mr Colters of Forest St and then sold to a lady in Invermay. Also compares the Ballarat tank to that of Bendigo. Finishes off with a discussion about his visit to Ballarat the previous weekend and the traffic on the road.Demonstrates some of the correspondence that Wal Jack received from around the world and that of Peter DuckettLetter on The Model Dockyard letterhead, printed quarto sheet, hand written by Peter Duckett dated 8/3/1955 - two sheets.letters, wal jack, peter duckett, sprinkler tram, water tanks, ballarat, bendigo, model dockyard -
 Ballarat Tramway Museum
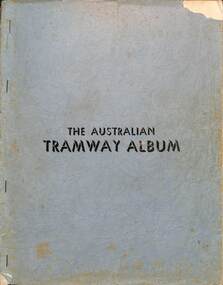
Book, Jack Richardson, The Australian Tramway Album, 1946/47
One of the first books published about Australian Tramway systems. Compiled by Jack Richardson as Editor who went on to publish the Destination series of tramway books. Provides information about the tramcars of each Australian tramway system and some photos and information on USA systems.Demonstrates publishing of magazines and books after the second world war and the work of Jack Richardson.Book - 56 pages, multiple sections with grey covers, stapled and re-stapled, black and white photos.Many corrections, notes marked in blue ink on various pages.books, destinations, jack richardson, traction publications, australia, tramways, ballarat, bendigo, geelong -
 Ballarat Tramway Museum
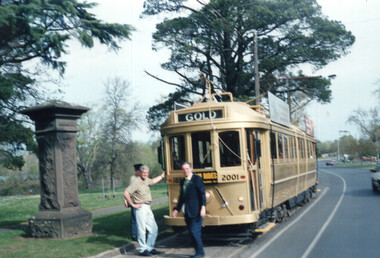
Photograph - Gold tram No. 45 (Bendigo 18) at Carlton St, David Frost, 2001
Colour print of Gold Tram, Ballarat 45 (Bendigo 18), at Carlton St with Peter Winspur and David Frost standing in front of the tram. Photo probably soon after its launch in June 2001.Demonstrates the work of BTMColour photograph print, printed on Kodak paper.btm, carlton st, tramways, gold tram, tram 45 -
 Ballarat Tramway Museum
Album, Gus Weir, "Tramway Museums Australia"
Compiled by Gus Weir of the Wellington Tramway Museum, former Wellington tram driver. See Gus Weir Obituary - Wellington Tramway Museum 2019 file. Comprises photos taken during COTMA conferences and tours in Australia. Ballarat photos have details on the rear as do many others. Museums include Sydney, Victor Harbor, Bylands, Haddon, Bendigo, Ballarat, Rockhampton, Portland, Launceston, Perth, Portland and Hawthorn Melbourne. Ballarat photos are dated 11/2000.Yields photographic records of most Australian tramway museums. Album, black leather covered heavy card cover, with 46 double side paper sheets bound into album with two plastic sleeves per side to hold photographs. Some sheets at the front have been removed. Also has a paper envelope to hold negatives at the rear. Titled "Tramway Museums Australia" on the front spine.cotma, tram museums, btm, ballarat, gus weir, stm, tmsv, bendigo, portland, launceston, perth, mtpa, mtm, victor harbor -
 Ballarat Tramway Museum
Photograph - Bendigo Birneys 28 & 30 Charing Cross, Robert Wallace Studios
Photograph shows Bendigo SEC Birney trams 28 and 30 at Charing Cross in Pall Mall, prior to the closure of the SEC operated system in April 1972. Photograph by Robert Wallace Studios. Has The Behive buildiing in the background. No. 28 has a SEC Briquettes roof advertisement.Yields information about the operation of SEC Birney's in Bendigo prior to closure.Photograph - Black and White mounted onto heavy card.Photographer's studio stamp on rear - Robert Wallace Studiosbendigo, tramways, trams, birney tramcars, tram 28, tram 30, charing cross, pall mall