Showing 894 items matching " route 2"
-
 Melbourne Tram Museum
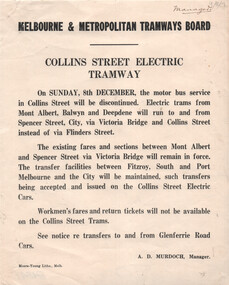
Document, Melbourne & Metropolitan Tramways Board (MMTB), "Collins Street Electric Tramway", Dec. 1929
Set of two Notices to Passengers regarding changes resulting from the opening of the Collins St electric lines to Victoria Bridge as of 8/12/1929. Signed by A D Murdoch, Manager. 1 - Collins St Electric Tramway - noting that the bus service will be discontinued, and electric trams to Victoria Bridge. Existing fares remain applicable but no workmen's fares. 2 - St Kilda Beach - Kew Route - trams will terminate at Glenferrie and Cotham Roads, rather than running to Victoria Bridge. Details fares for the route.Yields information about the opening of the Collins St electric tram service in 1929 and other changes.Set of two Notices printed on quarto paper.Both have "Manager" in top right hand corner.tramways, buses, new tramway, collins st, tram routes, kew -
 Geoffrey Kaye Museum of Anaesthetic History
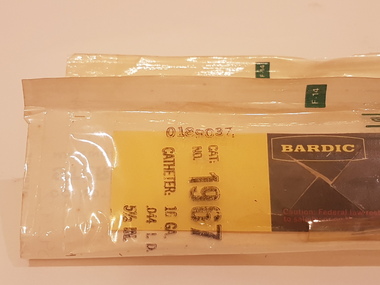
Equipment - Cannula placement set, Bardic, c. 1980
Cholera swept a deadly path through Europe in 1832. Irish physician, William O’Shaughnessy, proposed treating patients with saline infusions and Dr Thomas Latta of Leith, successfully applied the treatment. The intravenous route is the fastest way to deliver fluids and medications through the body. Today, fluid therapy is one of the most widespread interventions in acute medicine. Clear plastic strip adhered to white paper backing, forming a sealed packet containing a cardboard backing board, with a cannula attached.Stamped in black ink on 3929.1: CAT: / NO. 1966 / CATHETER: 14 GA. / .058 I.D. / 5 1/2 IN. / 0182037 Stamped in black ink on 3929.2: CAT: / NO. 1967 / CATHETER: 16 GA. .044 I.D. / 5 1/2 IN. / 0189037intravenous, cannula, fluid therapy, william o'shaughnessy, thomas latta -
 Ballarat Tramway Museum
Administrative record - Ballarat, State Electricity Commission of Victoria (SECV), "Traffic Statistics for four months period", 2/1952
Set of four typed documents dated 23/2/1952: Appendix A - All routes and Sections - Adults Appendix B - City to Sebastopol and other routes Appendix C - One section on all routes and city sections Appendix D - Summary of comparisons with average for previous two years. Sets out tables for 1947/48, 1949/50 and 1951/52. Gives information on tickets and transfers issued, weekly tickets, tourist tickets issue, scholar's tickets issued, passengers, tram mileages, revenue, revenue per car miles, average fare per passengers, passengers per car miles, and misc. revenues - papers, parcel tickets and special chartered trams.Yields information about the type of traffic reports prepared by the SECV Ballarat to provide detail of passengers carried, tramcar mileages, and statistics.Set of four large format sheets, heavily creased, typed originals.tramways, ballarat, reports, traffic, weekly tickets, transfer tickets, secv, revenue, statistics -
 Ballarat Tramway Museum
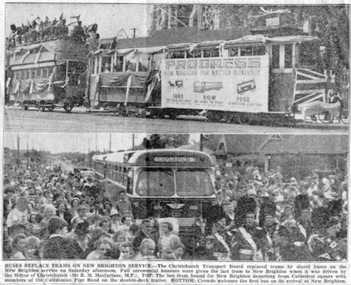
Newspaper, The Press, "Buses replace trams on New Brighton Service", Oct. 1952
Newspaper cutting with 2 photos and caption of closure of Christchurch NZ's New Brighton tram route, titled "Buses replace trams on New Brighton Service" and replacement with buses - 20/10/1952. Page 8 of the "The Press", Mon. Oct 20, 1952. Record revised 20/9/2013.trams, tramways, christchurch, brighton trams closure, closure -
 Ballarat Tramway Museum
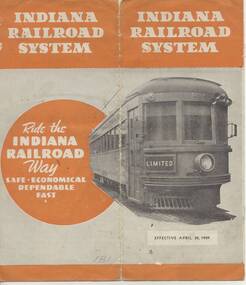
Ephemera - Timetable, Indiana Railroad, "Indiana Railroad system, Timetable, April 30, 1939" - Wal Jack Collection, Apr. 1932
Eight page (folded) timetable for the Indiana Railroad (Interurban Traction Co.) in receivership at time (see page 2), map of page 1, showing routes and connecting lines, bus services, services, days run etc. Record images added 20/8/2013.On each timetable in pencil, whether traction operated or bus (coach), where coach, crossed out in pencil.indiana railroad (electric cars), indianapolis, terre haute, timetables -
 Melbourne Tram Museum
Photograph - Tram Z1 - set of two colour prints, Norm Cross, c1975
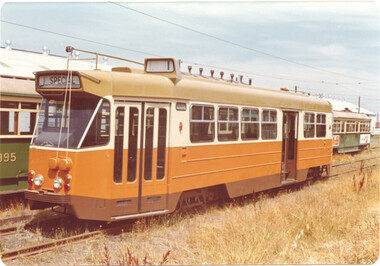
Set of 2 colour photographs by Norm Cross, of Z1 at Preston Workshops prior to being formally numbered. The number 1 is shown in the route number box. The tram was delivered to Preston Workshops in Dec. 1974 and entered service in May 1975. Photos not dated. In the background are trams 995 or 895 and W2 560.Demonstrates the work of Norm Cross in photographing trams and his collection.Set of 2 colour prints.trams, tramways, z class, tram 1, preston workshops -
 Ringwood and District Historical Society
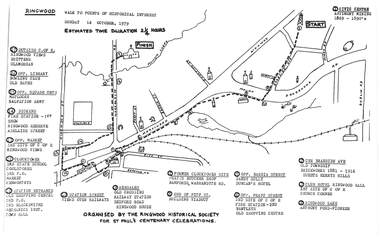
Pamphlet, Ringwood Walk - Points of Historical Interest, 1979
Sketch of walking route for 17 historical points of interest organised by the Ringwood Historical Society for St. Paul's Church Centenary Celebrations - 14 October 1979, estimated duration 2-1/4hours.1 - Start 2 - Cnr Braeside Avenue, old township, brickworks 1881-1916, Guests, Herrys, Hills 3 - Club Hotel, Ringwood Hall, 1st site of C of E church corner 4 - Ringwood Lake, Anthony Ford - pioneer 5 - Opposite Bardia Street, Sandy Gully, Duncan's Hotel 6 - Opposite Pratt Street, 2nd site of C of E, 2nd fire station, Bentleys, old shopping centre 7 - Warrandyte Road, Former Clocktower site, Pratts butcher shop, Bamfords 8 - End of Pitt Street, building viaduct 9 - Bedford Road, Webdales, old crossing, railway station 10 - Station Street, views over railways 11 - Station entrance, old shopping centre, 2nd Postoffice, 2nd blacksmiths, Mechanics Institute, Town Hall 12 - Clocktower, 3rd State School, coolstores, 3rd Postoffice, market, Kenworthys 13 - Opposite market, 3rd site of C of E, Ringwood views 14 - Adelaide Street, Dickens, 1st fire station, Ringwood Reserve 15 - Opposite squash courts, Matlocks, Salvation Army 16 - Opposite library, bowling club, old baths 17 - Outside C of E, Ringwood views, Brittens, Glamorgan -
 Eltham District Historical Society Inc
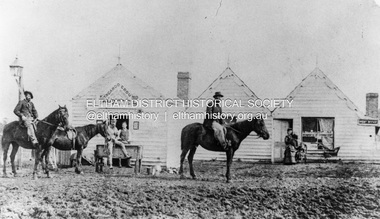
Photograph, William McLaughlin's Kangaroo Ground Hotel, General Store and Post Office, Eltham-Yarra Glen Road, Kangaroo Ground, c.1875
Initially known as the ‘Kangaroo Hotel,’ this photo shows the sign ‘Kangaroo Ground Hotel’ and William McLaughlin as the proprietor, which dates it between 1871 and 1882. The first hotel known as the Kangaroo Hotel was built at the top of the hill by Andrew Ross in 1864 commencing April; a license was obtained, and the bar opened by Edmund Pickett, the tenant, on 11th of July. The hotel was ready for public accommodation by September, 1864. On June 27, 1864, Edmund Pickett, residing at Kangaroo Ground, gave notice to the Bench of Magistrates at Eltham that it was his intention to apply on July 6th for a certificate authorising the issue of a Publican’s Licence for a house rented and occupied by himself, situated at Kangaroo Ground, containing two sitting rooms and five bedrooms exclusive of those required for the use of his family. On February 7, 1866, Edmund Pickett, publican, residing at Kangaroo Ground, applied at the Court of Petty Sessions held at Eltham for a Publican’s License for a house situated at the Kangaroo Ground, containing six bedrooms and two sitting rooms, rented and occupied by himself and licensed under the sign of the 'Kangaroo Hotel.' In 1866, with few boarders at the school and needing to reduce expenses, Ross had the bedroom house removed from the school and placed in contiguity to the hotel, the occupier to have the post office. The house was re-erected with a kitchen addition and was opened as the Post Office & General Store on April 1st. Throughout 1870 Andrew Ross found himself at odds with Pickett - he "felt much dissatisfaction at my having a hotel especially kept by a man of loose principals and low habits" and so served him notice to vacate by December 31st, occupying it himself on January 1, 1871, calling it Rossville House. William McLaughlin and his wife kept the store and post office. As a hotel was now wanted and McLaughlin was desirous to obtain a license, Ross set about making the Store building suitable which was achieved towards the end of 1871. Ross notes in his diary that the Store hotel was finished January 1, 1872. At the Court of Petty Sessions held at Eltham on 5 December 1871, William McLaughlin applied for a license for the Kangaroo Hotel, Kangaroo Ground. He had previously obtained a wine license, March 28. In June 1882, William McLaughlin of Madeline Street, Carlton, (late of Kangaroo Ground, hotelkeeper) was found insolvent due to losses in connection with the Kangaroo Ground Hotel. The license for the hotel was later transferred from Mr John Donaldson to Mrs Sophia Greenaway. It appears during McLaughlin’s tenure the hotel became known as the Kangaroo Ground Hotel. The hotel was replaced with a new wooden building in 1892, constructed by W.Holland and described as being "of a neat appearance, roomy, and fittled up with all modern requirements necessary in a business of this kind." This building was destroyed by fire in 1930. References: Ross, Andrew, 1814-1895 & Woiwod, Mick & Andrew Ross Museum. (2011). The diary of Andrew Ross 1828-1895 & the reminiscences of Andrew Ross 1851-1864 / edited, annotated and introduced by Mick Woiwod for the Andrew Ross Museum, Kangaroo Ground. Kangaroo Ground, [Vic.] : Tarcoola Press in association with the Andrew Ross Museum The Evelyn Observer, (1892, June 24). Evelyn Observer, and South and East Bourke Record (Vic. : 1882 - 1902), p. 2 (MORNING.). Retrieved May 13, 2025, from http://nla.gov.au/nla.news-article60667494 REMINISCENCES. (1893, April 21). Evelyn Observer, and South and East Bourke Record (Vic. : 1882 - 1902), p. 2 (MORNING.). Retrieved May 10, 2025, from http://nla.gov.au/nla.news-article60669116 REMINISCENCES COUNTY EVELYN. BY Andrew Ross. (No. 41) The summer of 1863-4 may be re membered by many colonists as one of the most enjoyable as regards wet weather, and it was one made remarkable by the enterprise and activity apparent throughout Evelyn County. This spirit was fostered and encouraged by the prospect presented from the opening up of the new route to the Jordan and Wood's Point, and the consequent occupation of lands and special localities along the main track. Accommodation for travellers were established at Yarra Flats, the future Healesville, Fernshaw, Marysville, while the beauties and difficulties of the Black Spur, together with the romantic region of the Stephenson Waterfalls mid the mountain forests attracted visitors other than the gold diggers. Before the end of this year 1863, the new route to Wood's Point by the Dividing Range had been so far improved that a track was laid off by the New Chum Creak, Paradise Plains, and the Springs to Emerald Hill, about half way between Jordan and Wood's Point, and the clearing of this track was looked forward to as enabling drays to be employed. The Government had so far yielded to the demands made upon it, that the work was proceeded with early in 1864. In March of that year the writer was favoured by a visit from Mr. Ligne, Surveyor-General, who was enroute to inspect the progress of the undertaking. He was accompanied by Mr. Collins Levey, his son-in-law, who had been a frequent visitor with his friend Mr. Franklin, of the Melbourne Herald newspaper, These parties, and not a few others, were glad to partake of the hospitality of residents on the Ground or, at Yarra Flats when as yet no public accommodation existed. Horsemen and pedestrians became numerous ere winter set in, and there was obviously the want of the hotel which was planned and commenced late in the autumn. The absence of any endeavour on that score by local proprietors induced the writer to undertake the erection of the Kangaroo Ground Hotel, which he did on his own responsibility. The spot best suited for the hotel being held by him on lease, he was permitted by the landlord to devote the required portion of land for the premises to be erected and occupied. Before this was accomplished the imported houses placed near the schoolhouse which had served for bedroom to boarded pupils were rebuilt near the hotel and served for a general store and post office also. Delay was experienced in procuring all the materials for the new building. After the break in the weather the roads on the Ground became very heavy and as timber had to come from town, it was under difficulties that the supply was procured. Bricks for chimneys were made in a small kiln, and hardwood for joists, &c., provided by sawyers employed for the purpose in the bush. The hotel, in consequence, was not ready for public accommodation until the spring, although a license was obtained, and the bar opened by Mr. Pickett, the tenant, on 11th of July. It may be remarked that the house was rather late in being established; a year earlier it would have secured the benefit of the rush to the new diggings, but in another sense it was rather premature for as yet no steps had been taken by the authorities to stop or even discourage the sale of liquor by unlicensed parties, and the holder of a license had to compete with the class in question. As the season (1864) advanced there were parties anxious to be the pioneers in traversing the whole of the route to Wood’s Point, but it was nigh to summer again before the track was available to vehicular traffic. I believe one of the first to effect the whole passage in this way was Mr. Gillies, some time settled at Mortlake. He drove a buggy and called at the Ground on 9th September, stating his intention to drive through to the Point, and we were subsequently informed that he had accomplished the task. (End of Reminiscences No 41)This photo forms part of a collection of photographs gathered by the Shire of Eltham for their centenary project book,"Pioneers and Painters: 100 years of the Shire of Eltham" by Alan Marshall (1971). The collection of over 500 images is held in partnership between Eltham District Historical Society and Yarra Plenty Regional Library (Eltham Library) and is now formally known as the 'The Shire of Eltham Pioneers Photograph Collection.' It is significant in being the first community sourced collection representing the places and people of the Shire's first one hundred years.Digital image (neg copy missing) Print 21 x 26.5 cmeltham-yarra glen road, kangaroo ground, kangaroo ground hotel, post office, shire of eltham pioneers photograph collection, gas lamp, hotels, kangaroo hotel, william mclaughlin, andrew ross, edmund pickett -
 Ballarat Tramway Museum
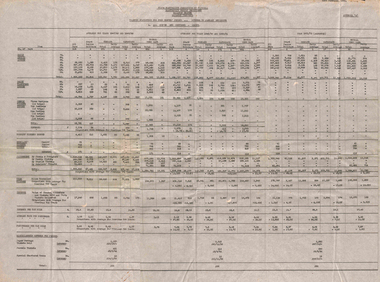
Administrative record - Set of 18 Ballarat - Passenger graphs, State Electricity Commission of Victoria (SECV), 1956 - 1957
Set of 18 graphs showing route, date, passenger numbers by time: 1 - Gardens via Sturt St West - Sunday 5-2-1956 2 - Gardens via Drummond St North - Sunday 5-2-1956 3 - Victoria St - Sunday 5-2-1956 4 - Mt Pleasant - Sunday 5-2-1956 5 - Gardens via Sturt St West - Sunday 26-8-1956 6 - Gardens via Drummond St North - Sunday 26-8-1956 7 - Victoria St - Sunday 26-8-1956 8 - Mt Pleasant - Sunday 26-8-1956 9 - Lydiard St Nth - Sebastopol - Sunday - August 1956 10 - ditto - Feb. 1956 11 - Sunday Operation - average no. of passengers carried all routes, Sundays Nov. 1955 to Oct. 1956 12 - Sebastopol route - Sunday 6-1-1957 13 - Lydiard St Nth route - Sunday 6-1-1957 14 - Gardens via Sturt St West - Sunday 6-1-1957 15 - Gardens via Drummond St Nth - Sunday 6-1-57 16 - Victoria St - Sunday 6-1-1957 17 - Mt Pleasant - Sunday 6-1-1957 18 - Average Number of passengers per trip - Sunday 6-1-1957 Demonstrates the SECV Ballarat office work to understand Sunday passenger numbers. May have been part of a move to consider ceasing operations on Sundays.Printed graphs on foolscap paper set of 18.All have the SEC Drawing Office stamp and dated on the rear.tramways, statistics, passenger services, reports, ballarat, sunday services -
 Ballarat Tramway Museum
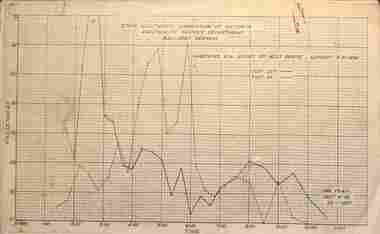
Document, State Electricity Commission of Victoria (SECV), "Evidence to be given at the inquiry into Public Transport Facilities at Ballarat", 4/1968
Details the history of the Ballarat system, take over by the SEC and the conditions of that take over by the SEC, reconstruction, financial losses incurred by the SEC, decline in passengers, its suitability, condition of the infrastructure and rolling stock. Its unsuitability to extend, effectiveness of the Geelong conversion, ability of private bus operators, tramway employees, methods of abandonment, tram tracks, overhead and impact on the electricity supply system. Dated 2/4/1968. Has a table showing the income and losses and population from 1935 to 1967, a coloured graphical presentation of tramway statistics, sheet of Fares and Charges for Ballarat. Attached to the rear of the document was an advertisement for Ballarat Tramways fare sections (See Reg Item 8039) and a map showing tram and bus services - drawing No. VX4/1/1. Attached to the second copy is drawing VD6/144, showing Geelong bus routes and former tram routes. See item 8038 for the Bendigo document dated May 1968. Yield information and demonstrates the SEC's attitude to trams in Ballarat and their finances. Report, 13 foolscap pages + three attachments stapled on left hand side, titled "Evidence to be given at the inquiry into Public Transport Facilities at Ballarat" Two copies held.secv, ballarat, trams, tramways, sec, reports, closure, history, buses, submissions -
 Ballarat Tramway Museum
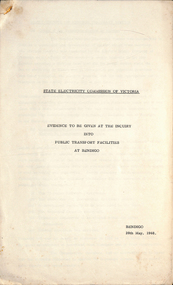
Document - Report, State Electricity Commission of Victoria (SECV), "Evidence to be given at the inquiry into Public Transport Facilities at Bendigo", May. 1968
Details the history of the Bendigo system, take over by the SEC and the conditions of that take over by the SEC, reconstruction, financial losses incurred by the SEC, decline in passengers, its suitability, condition of the infrastructure and rolling stock. Its unsuitability to extend, effectiveness of the Geelong conversion, ability of private bus operators, tramway employees, methods of abandonment, tram tracks, overhead and impact on the electricity supply system. Has a table showing the income and losses and population from 1935 to 1967, a coloured graphical presentation of tramway statistics, sheet of Fares and Charges for Ballarat. Attached to the rear of the document was an advertisement for Ballarat Tramways fare sections (See Reg Item 8039) See item 9835 for the Ballarat report dated April 1968. At the rear of the second copy is drawing VX4/2/1 showing bus and tram routes in Bendigo and VD6/144A for Geelong. See Reg Item 8046 for a separate map which may have been part of this report.Yield information and demonstrates the SEC's attitude to trams in Bendigo and their finances.Report 15 Foolscap sheets, duplicated and three attachments, was stapled in the top left hand corner, titled "Evidence to be given at the inquiry into Public Transport Facilities at Bendigo" Presented 28/5/1968. Two copies held.trams, tramways, reports, closure, bendigo, history, buses, submissions -
 Flagstaff Hill Maritime Museum and Village
Letter - William Ferrier, 14th November 1905
The letter to William Ferrier of South Warrnambool from the Prime Minister and the Parliament of the Commonwealth recognised the significance of William’s brave and courageous lifesaving act to the people of Australia; “They all feel that your conduct was worthy of the best deeds done by British sailors in the past and they are proud to know that Australia can produce such as you.” The story of that brave rescue follows on below … The ship from which the sailors were rescued was the three-masted, iron and steel barquentine the La Bella, built in Norway in 1893. She was one of two iron and steel ships by Johan Smith, The company was one of the leading shipping families in Tvedestrand, Norway. She was significant to Norwegian shipping, being one of only 27 iron and steel ships ever built in Norway. She was registered in New Zealand and engaged from 1902 in inter-colonial trading of timber in the Pacific, between New Zealand and Australia and was often in Port Phillip Bay, Victoria. On 5th October 1905, the twelve-year-old La Bella left Lyttleton, New Zealand carrying a cargo of timber bound for Warrnambool, Australia. She was manned by a crew of twelve: the Master, (Captain Mylius, previously 1st Mate of La Bella, appointed Captain to La Bella on 6th February 1903) 2 Mates, Cook, six able seamen, one ordinary seaman and a boy. Bad weather en route caused her to shelter at Burnie on Tasmania's North West coast. On November 10th, the 37th day of her journey, La Bella approached Warrnambool. Captain Mylius steered her towards Lady Bay Channel in heavy south-west seas and evening mist. He ordered the helmsman to steer for the light. As the ship came round, a tremendous sea struck her on the port quarter, causing her to breach broadside in a north-westerly direction into breakers. The helm was brought round twice more, but each time heavy seas broke over her, the third time throwing the La Bella on to a submerged reef in Lady Bay now known as La Bella Reef (about 100 yards from the Warrnambool breakwater). The sea was so rough that it even wrenched a one-and-a-half ton anchor from its fastenings and into the sea. As Captain Mylius headed to the steel wheelhouse, intending to send up a rocket flare, a huge sea slammed the steel door into him (resulting in massive bruising front and back) Despite his injuries he still managed to set off a blue light, which he held up in his hands. La Bella’s lifeboats were filled with seawater and broke up on their chocks. The blue light was the first indication to people on the shore that there was a ship in distress. The Harbour Master, Captain Roe (who lived in the Harbour Master’s House opposite Flagstaff Hill), organised a group of volunteers to crew the lifeboat because the trained crew was unavailable; the crewmen were working on a steamer in Port Fairy at the time. He then poured oil onto the water to try and smooth the sea. At around 11 pm three of the crew took shelter in the steel forecastle but the sea crashed into it and broke it up. While the rest of the crew and onlookers watched helplessly in the moonlight the bodies were washed away into the sea, never to be seen again. Some of the crew lashed themselves to the weather rail to keep from being washed away. Watson, the ordinary seaman, became tangled in the rigging lines and was too weak to move, so the 2nd Mate, Robertson, put a line onto him so that he wouldn’t wash off. Around 11 pm three of the crew were unconscious from exhaustion. The situation on La Bella was becoming dangerous. The 2nd Mate moved to the ‘house’ and soon afterwards the ship slipped in the heavy sea. The lashings of the 1st Mate and the ‘boy’ Denham had kept them safe until about 2 am when they were washed overboard; no one was able to help. One by one, the exhausted crew were being washed overboard, too weak to hold on any longer. During the night the La Bella had broken into two and the deckhouse ran out towards the sea. Two more men drowned when trying to reach the lifeboat. By sunrise, the only survivors of the twelve were the Master, 2nd Mate and three seamen. Early in the morning, Captain Roe used the rocket apparatus on shore to try and shoot a line to the ship for a safer rescue but each attempt fell short of the target. Several attempts were made by the lifeboat to rescue the stricken sailors, but the rough conditions made this difficult for the boat to get close enough to the ship and the lifeboat had to return to shore. During a final attempt to reach the ship Captain Mylius ordered his men to jump into the sea. Leonard Robertson, 2nd mate, jumped and swam towards the lifeboat, taking hold of the boat hook offered to him. Oscar Rosenholme managed to reach the boat floating on a piece of timber from the ship’s load and a third survivor, Noake, also made the boat. Along with the lifeboat rescue crew, 25-year-old William Ferrier rowed his small dingy through the heavy seas and managed to rescue the Captain, whom he landed on the breakwater. Ferrier then returned to the ship to attempt a final rescue, losing his oars and rowlocks into the high sea. Using just a spare paddle he skulled towards the La Bella, reaching her stern in time to cut loose the lone surviving sailor, Payne, from the lashing that held him to the ship; the terrified sailor dropped from the ship and into the dingy. Shortly after the last man was rescued, the La Bella was lifted by a huge wave and crashed back down on the reef; she broke up and sank. The ordeal had lasted ten hours. The survivors were taken to the nearby Bay View Hotel and gratefully received warm food and clothing, medical attention and a place to sleep. In the following days, an unidentified body of a young person has washed ashore; it was either Watson or Denham. The body was buried in the Warrnambool cemetery with an appropriate gravestone and inscription. William Ferrier became a national hero as news of the daring rescue spread. In recognition of his bravery in the two daring rescues, he was awarded the Silver Medal for Bravery by the Royal Humane Society and was honoured in the letter from the Prime Minister and the Parliament of the Commonwealth, telegrams and a cheque for £20 from the Governor-General, over £150 subscribed by the public, including Warrnambool and district and readers of The Argus, and a gold medal from the Glenelg Dinghy Club of South Australia. Ferrier’s rescue efforts are one of the most heroic in Victoria’s shipwreck history. (William Ferrier’s son, Frank, received a similar award almost fifty years later when he helped rescue four members of the crew on the yacht Merlan after it ran on to a reef near the Point Lonsdale Lighthouse. ) The wreck of La Bella now lies on her port side in 13 metres of sheltered water inside the reef she struck. The bow section is relatively intact and part of the stern has drifted north-easterly towards the mouth of the Hopkins River. The reef the La Bella struck now bears its name. Those five rescued from the La Bella were Captain George Mylius, Leonard Robertson (2nd Mate, 21 years old), R. Payne, Oscar Rosenholme and Jack Noake. Those seven who lost their lives were Mr Coulson (1st mate), Charles Jackman (cook) Gustave Johnson, Pierre Johann and Robert Gent (all able seamen), Harry Watson (ordinary seaman) and Jack Denham (ship’s boy), Captain Mylius was found guilty of careless navigation; he had sailed into the bay without the services of a pilot. His Master Certificate was suspended for twelve months. Later he was also charged with the manslaughter of one of the crew who had died when the La Bella was wrecked but found not guilty. The event’s adverse publicity and damage to his career took a toll on his health and he died of a heart attack six months after the wreck; he was only thirty-seven. His body was buried in the Melbourne General Cemetery. The La Bella was “the best documented of all sailing ships owned in New Zealand”. Her record books, ship logs, correspondence and supporting papers are still available. At the time of the tragedy, she was owned by Messers David C.Turnbull and Co. of Timaru, New Zealand timber merchants and shipping agents, who had purchased her on 13th December 1901. A detailed account of the last journey of La Bella can be read in “Leonard Robertson, the Whangaroa & La Bella” written by Jack Churchouse, published in 1982 by Millwood Press Ltd, Wellington, NZ. As well as this letter, Flagstaff Hill’s La Bella Collection includes a photograph of the wrecked La Bella, a brass rail holder and a postcard of William Ferrier with four of the survivors. Some 15 – 17 ships are believed to have sunk in Lady Bay, but only two have been discovered on the seafloor; the “La Bella” and the “Edinburgh Castle”. Both wrecks are popular diving sites and are preserved as significant historical marine and marine archaeological sites. This original congratulatory letter sent to William Ferrier by the Prime Minister and Government of Australia demonstrates the importance attached to his efforts for Victoria and to Australia. The letter is part of the La Bella Collection and is significant at both a local and state level. Its connection to the La Bella shipwreck and the rescue of five survivors highlights the dangers of Victoria’s Shipwreck Coast. The letter to William Ferrier from the Australian Government acknowledges the bravery of ordinary Australians who risked their lives to save victims of shipwrecks along the coast. The letter is significant to the history of Warrnambool as it honours William Ferrier, a local fisherman whose descendants continue to live in the area. It highlights the way of life of people who lived in coastal towns in 19th century Victoria and the effects of shipwrecks upon them. The letter connects to the postcard of William Ferrier with four of the five rescued crew, the photograph of the wreck of the La Bella and the artefact from the wreck, the rail holder. This letter is significant because of its association with the sailing ship “La Bella”. The “La Bella” is of local and state and national significance. It is one of the only two shipwrecks discovered in Lady Bay, Warrnambool, out of the 15-17 shipwrecks in the bay. Letter to William Ferrier of South Warrnambool from the Prime Minister and Members of Parliament commending him on his bravery. The printed letterhead includes a coat of arms in the top centre and the official address. The letter is very neatly hand written in black pen and includes 4 signatures of Members of Parliament. The rectangular paper is cream coloured with some yellow/brown discolouring. It has the letterhead on the right hand side of it and the written letter begins below the letterhead. The paper has been folded so that the right side becomes the cover page of the letter. The writing is continued onto the inside right hand page of the folded paper and the writing ends here. There is more recent writing on the bottom right hand corner of the back page. The paper has been officially folded in half a total 3 times and there is heavy discolouration on the sections that form the front and back of the folded letter. There is a 4th fold line that is less pronounced that the other folds and would make the paper the size to fit into a pocket. At several fold creases the paper has worn through. The edges of the paper have minor tears. The printed coat of arms is that of the House of Representatives. Underneath is printed “The Parliament of the Commonwealth, / Parliament House / Melbourne”. The hand written, letter is dated “14th November, 1905” and addressed to “Mr. William Ferrier / South Warrnambool” The letter begins “The Speaker, the Prime Minister and Members of the Ministry and its supporters, the Leader and Members of the Opposition, the Leader and Members of the Labour Party, being all the Members of the House of Representatives of the Federal Parliament of Australia” … It continues “desire to express to you their appreciation of your bravery in skulling out to the wreck of the “La Bella” at Warrnambool on Saturday, 11th November, 1905, and recovering therefrom two of the crew who were in imminent danger of their lives. They all feel that your conduct was worthy of the best deeds done by British sailors in the past and they are proud to know that Australia can produce such as you.” The letter is “Signed on behalf of the Members – Speaker (Frederick Holder ), Deputy Leader of the Opposition (Joseph Cook ), Prime Minister (Alfred Deakin), Leader of the Labour Party ( J.C. Watson)” On the back of the letter is blue ink handwriting “OWNER / G. FERRIER / TO. BE. PHOTOGRAPHED / 27-4-76”la bella, william ferrier, bill ferrier, lady bay, 1905, 10th november 1905, 11th november 1905, parliament of the commonwealth, prime minister, australian government, new zealand, flagstaff hill, warrnambool, shipwrecked coast, flagstaff hill maritime museum, maritime museum, shipwreck coast, flagstaff hill maritime village -
 Ballarat Tramway Museum
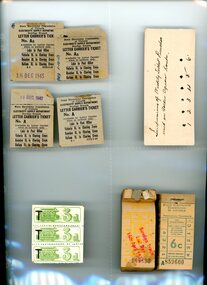
Ephemera - Ticket, Electric Supply Co. of Vic (ESCo), Tramways tickets - Bendigo assorted, c19??
Bendigo tram tickets - variousDemonstrates a variety of tickets used by Bendigo Tramways in Victoria, and the variety of punch marks used to differentiate conductors, days Mon - Fri, etc.A collection of Bendigo Tramways ticket memorabilia. Pocket 1 - Letter Carrier's tickets. The tickets are printed in black ink on a cream paper. All cover the same destinations and are issued by the Electricity Supply Department for the State Electricity Commission of Victoria - Bendigo Branch. Pocket 2 - Nipping impressions of Weekly Ticket Punches used on the golden Square route. Pocket 3 - Bendigo Tramways Co. Ltd - 3d ticket. The three tickets have a value of 3d each. They feature an illustration of the Bendigo Tram, with the 3d price, printed in green ink on cream paper. There is a large Capital T printed in black ink. Pocket 4 - SECV Provisional Tramways books of tickets - Book 1 is incomplete and has every ticket stamped "Bendigo Trams Last Day 16th April 1972 in red ink on the ticket face. The tickets, printed in yellow ink on a cream background, have a value of 16c each. Book 2 is complete, with tickets having a value of 6c. The printing ink is aqua on a cream paper background. Pocket 1 - Letter Carrier's tickets Nos. 1 and 3 feature a stamped date in ink. Ticket No. 2 has the date 1-10-51 hand-written on the LH side edge. Pocket 2 - Nipping impressions - the card, showing different nippings, labelled 1 - 6, has the words "Impressions of Weekly Ticket Punches used on Golden Square Route". Pocket 3 - B. T. Co Ld Tram tickets Pocket 4 - Block 1 tickets have the wording "Bendigo Trams Last Day 16th April 1972" stamped in red ink on the face.tickets, tramways, esco -
 Melbourne Tram Museum
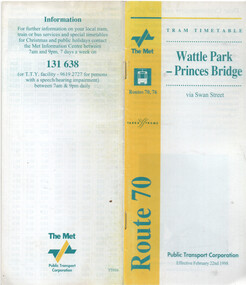
Ephemera - Timetable - route 70 - Wattle Park - Princes Bridge, The Met, 2/1998
Timetable - route 70 - Wattle Park - Princes Bridge, dated 22/2/1998, published by The Met, with Yarra Trams logo as well, and PTC name on the rear cover. Has a map of the route, forward by Geoff Lockwood Operations Supt of Camberwell depot, the Met Fare system, an advert for tram hire, timing points, and contact information.Demonstrates a timetable at the time of the formation of Yarra Trams when it was operated by The Met and the PTC.Timetable - printed, centre stapled, 24 pages.tramways, timetables, route 70, wattle park, the met, yarra trams -
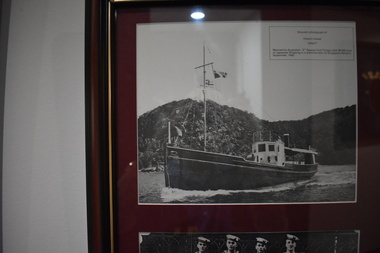 Dandenong/Cranbourne RSL Sub Branch
Photograph - Large frame containing 4 photographs, Circa 1940s
Large wooden frame with 4 black and white photographs of M V Krait and crew.Photograph # 1 depicts M V Krait manned by "z" Special Unit Troops. Photo # 2 shows M V Krait who sank 38,000 tons of Japanese shipping in raids they carried out. Anchored in Hawksbury River N.S.W. Photo # 3 shows the crew of M.V. Krait blacking their skins wearing sarongs to resemble fishermen. (Note Japanese flag on rear of ship.) Photo # 4 the M V Krait en route to Singapore. -
 Melbourne Tram Museum
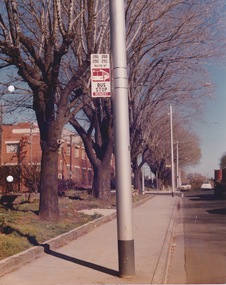
Photograph - Bus stop sign and post, 1970s
Photograph shows red and white bus stop sign on silver painted metal tramways pole with footpath a red brick building in the mid ground. The sign lists routes 286, 288, 290, 295, carries a stylised drawing of a bus and the words 'Bus Stop Request'. The two holes on one side allowed the photograph to be inserted in to a ring binder.Yields information about Melbourne bus stops and routesColour print with note on the rear and 2 small holes on sideIn ink on rear "1978 Annual Report"bus stop, bus stop request, 286, 288, 290, 295 -
 Melbourne Tram Museum
Photograph - W class 307 and crew, 1924-1928
Photograph shows W class 307 standing on slightly curved track displaying destination "Victoria Bridge" and no route number box attached. The uniformed motorman and conductor stand on the roadway next to the front driver's cab where the trolley pole has been tied down. The conductor wears his coin bag and the driver is holding the tram's key and air brake handle. An elderly male passenger with coat stands at the drop-centre doorway and other passengers are inside. The car body of W 307 was built by Holden Motor Body Builders in South Australia in 1924 as part of a large contract to build W class trams. Victoria Bridge was the termini of both the Collins Street and Victoria Parade cable tram that closed in 1929 and the Mont Albert electric tram from Union Road, via Whitehorse Road and Kew Junction. Perhaps this photograph is of the Mont Albert terminus although the curved track suggests otherwise.Yields information about early W class tramcars . Black and white photograph with penciled dates on rearPencil writing reads "Between 2/9/24 & 19/3/28" trolley pole, drop-centre, w class, tram 307, victoria bridge, route number box, key, air brake handle, car body, holden motor body builders, mont albert, termini -
 Melbourne Tram Museum
Photograph - Set of 10 - various trams Preston Workshops, Norm Cross, mid 1970s
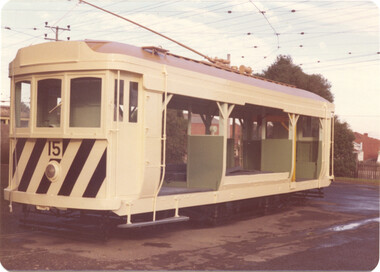
Set of 10 colour prints by Norm Cross of trams at Preston Workshops or St George's Road. 1 - Sleeper transport 15W 2 - ditto 3 - W2 class 243 on No. 17 road, pending an 02 overhaul. 4 - W2 327 on dolly trucks at Preston Workshops 5 - W2 class tram 337 Preston Workshops 6 - W2 355 Preston Workshops 7 - W2 380 in the Yard at Hawthorn Depot 8 - W2 567 on a traverser at Preston Workshops. 9 - W2 248 Preston Workshops after a 03 overhaul or repainting 10 - W2 333 St George's Road - route 10Yields information about various W2 class cars at Preston Workshops, mid 1970sSet of 10 colour prints with rounded corners.trams, tramways, tram 15w, tram 243, tram 327, preston workshops, w2 class, tram 337, tram 355, tram 380, tram 567, tram 248, tram 333 -
 Melbourne Tram Museum
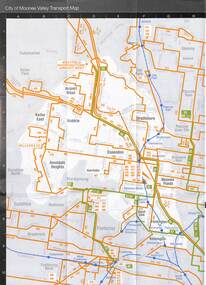
Map - Set of 3, Metlink, "Your Guide to Melbourne's Public Transport System - City of Manningham", c2005
Folded map titled "Your Guide to Melbourne's Public Transport System - City of Manningham", published by Metlink c2005. Has a map of transport routes in the City of Manningham, details of Metcards, bus routes, maps of the tram and train network and Metcard agents. 2 - as for .1, but for the City of Moonee Valley 3 - ditto for City of BoroondaraDemonstrates a map produced by Metlink for each municipality.Map - 18 fold - 6x3 - pocket size, printed in full colour.trams, tramways, maps, city of manningham, city of moonee valley, city of boroondara, metlink -
 Melbourne Tram Museum
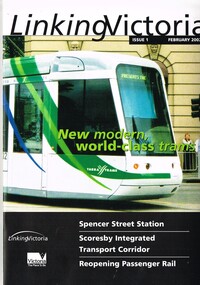
Book, Department of Infrastructure (DOI), "Linking Victoria - issue 1", Feb. 2002
Book published by the Victorian Department of Infrastructure. Includes a message from Steve Bracks Premier and Peter Batchelor Minister for Transport. Looks at Transport Planning, Spencer St Station redevelopment, Fast rail regional links, passenger services, new low floor trams, notes Yarra and M>Tram rollingstock, route 109 to Box Hill, buses and other transport projects underway or planned. See item 8697 for issue 2.Yields information about DOI projects that were being undertaken during 2002.Book - 20 A4 pages, centre stapled printed on gloss paper titled "Linking Victoria - issue 1 February 2002"trams, tramways, planning, doi, m>tram, spencer st, public transport, railways -
 Melbourne Tram Museum
Photograph - Set of 11 - Melbourne trams c1970, Norm Cross, 1970s
Set of 11 colour photographs of Melbourne trams by Norm Cross. 1 - Tram W2 550 - Truganini Road with adverts for HMV, Channel 9 and CU. 2 - Tram W2 268 - Brunswick St - with a board on the front bumper celebrating 50 years of the tram 3 - Tram W2 411 Victoria Parade and St Vincent's Hospital with adverts for National TV, and AAMI 4 - Tram SW6 902 St Kilda Road and High St. with an advert for Jigglers tea bags and Courage draught beer, 5 - Tram W2 432 Turganini Road - AVCO Finance Co and Heinz baked beans. 6 - Tram W2 241, Swanston St (East Malvern Darling Road, route 3) with Heinz baked beans side advert. 7 - tram W5 781, St Georges Road (route 9) with a Shell motor oil advert in the background. 8 - tram W5 825, St Georges Road with a Shumberland advert 9 - tram W2 631, Victoria Parade, route 10 with St Vincents in the background. 10 - tram W3 class 657, Brunswick Depot with route 2A, St Kilda Beach showing and a Princes Curtain/drape cleaning service. 11 - tram L class 103, running out at Essendon Depot,Yields information about various Melbourne trams in the 1970s.Colour print with plain back, rounded corners - set of fourtrams, tramways, w2 class, st kilda road, sw6 class, tram 550, tram 268, tram 411, tram 902, truganini rd, brunswick st, victoria parade, carnegie, swanston st, tram 431, tram 241, w5 class, tram 781, tram 825, w3 class, l class, tram 103, tram 657, tram 631 -
 Melbourne Tram Museum
Photograph - SW6 tram 967 departing Essendon Airport, Clive Mottram, February 14 1976
967 waits at traffic lights at the junction of Vaughan St and Lancefield Rd (a non-freeway section of the Tullamarine Freeway) to cross to the tramway ROW parallel to Matthews Ave. The driver in shirt sleeves is about to lean out of his left doorway to press the traffic light activation button. The tram displays 'City 59' with run number 'E22'. All right-side windows are closed yet the sliding doors are open which is unusual for a revenue service car. It was, however, normal practice to not shut the left side doors in warmer weather.Yields information about last weeks of Essendon Airport terminusBlack and white print with note on rear.In ink on rear: "Photo by Clive Mottram. Photo taken Feb 14th '76 on Airport section soon to go. 967 is one of the Preston Trams put out to other depots now that Z class tram[sic] are operating at Preston. Other trams including W7 are at Glen Huntly and Malvern Depots. 351 Enlarge to 5 1/2" wide."sw6, tram 967, essendon, airport, vaughan st, lancefield rd, matthews ave, city, route 59, run number e22, tramway row, traffic light activation button, open sliding doors, revenue service -
 Melbourne Tram Museum
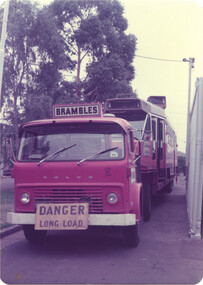
Photograph - Z class trams - new & in service - set of 7, Norm Cross, c1975
Set of 7 colour prints showing Z or Z1 class trams being delivered to Preston and in use. All photos by Norm Cross mid to late 1970s. 1 - Z1, unnumbered, being delivered to Preston on a Brambles truck from Comeng Dandenong. 2 - ditto - rear view 3 - Z 6 at Preston Workshops, possibly soon after completion. The tram entered service on 28/6/1975 4 - Z1 51, running on route 51 to the City. 5 - Z1 100 and 10 at Preston Workshops, both without destination and route numbers. 6 - Z2 101 and Z1 98 at Preston Workshops. 101 is without destination and route numbers. 7 - Z1 60 and Y469 Bourke St. 20/2/1977 - both showing Special with the Southern Cross Hotel and Malcolm Reid store in the background. Yields information about the operation and delivery of Z1 class trams during the mid to late 1970s.Set of 7 colour photos with rounded corners.trams, tramways, z class, tram 6, preston workshops, tram 51, brambles, delivery of tramcars, tram 60, tram 469, tram 101, tram 98, tram 10 -
Bendigo Military Museum
Album - NATIONAL SERVICE MALAYA, C.1967 - 68
A small selection of the photo album pertaining to service in Malaya covering parade ground drill, route marching, group photos, relaxation and aerial photos of Terendak Garrison. The album is part of the collection of Graeme Jones 3790932, refer Cat No 10053.2P for his service details..1) Photograph Album, colour cardboard cover, spirax bound, 16 pages, B & W and a small few Colour photographs. The pages are sticky backed with plastic cover sheets. Inside the front cover attached via the spirax is a poem pasted to cardboard titled "The Soldier". .2) Plain brown carboard cover for the albumalbum, national service, 8 rar, malaya