Showing 3506 items
matching trade
-
 National Wool Museum
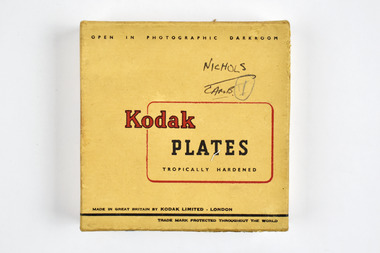
Container - Glass Plate Box, Kodak Limited, 1900 - 1940
This item is part of a collection of four black and white glass lantern slides previously housed in this box. The slides and this box are part of a greater collection of around forty three black and white glass lantern slides, along with other photographs and photo albums related to this collection. This item is associated with the New South Wales Graziers Association world tour of merino sheep 1928/9. The slides were possibly used as supporting material in presentations made by J W Allen when on tour.Brown paper box with printed black and red text on top, and handwritten text on top. Labels with printed text are also on the sides and bottom on the box.Top: [handwritten] NICHOLS / LAMB [printed] OPEN IN PHOTOGRAPHIC DARKROOM / Kodak / PLATES / TROPICALLY HARDENED / MADE IN GREAT BRITAIN BY KODAK LIMITED LONDON / TRADE MARK PROTECTED THROUGHOUT THE WORLDnew south wales graziers association, travel, agriculture, j w allen, photography, glass lantern slide, sheep, breeding -
 Flagstaff Hill Maritime Museum and Village
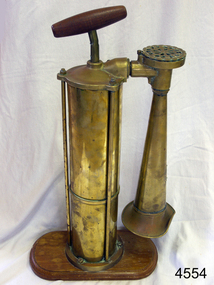
Equipment - Foghorn, 20th century
A marine foghorn gives an audible navigational signal to warn vessels of dangers, hazards and the presence of other vessels in fog conditions. The foghorn signal is a series of long and short sounds with short or long pauses between them. These common signals conform to a code called the International Regulations for Preventing Collisions at Sea and provide such information as whether the vessel is under sail or motor, large or small, aground or at anchor. The designs of foghorns vary but they all use a column of air to make a loud sound. Some use vibrating plates or metal reeds, others force air through holes in a revolving cylinder or disc, sounding like a siren, and some use a clockwork mechanism to open the valves that let the air into the horn. They are usually built to meet particular specifications e.g. U.S.C.G. (US Coast Guard). This Tyfon plunger foghorn has a horizontal handle attached to a vertical rod that moves up and down inside a cylinder. When the handle is plunged down, in a similar way to a bicycle pump, the air is forced out of the bottom of the cylinder into a pipe with a bell-shaped horn on the end, making a loud, low sound. The wider base of the cylinder helps to keep it stable. The original type Tyfon foghorns were manufactured in about 1910 by Kochums Mechanical Workshop (Kockums Mechanical Werkstad, Ltd.), Malmo, Sweden. The company was established in 1840, became a Limited company in 1866, and established a shipyard at the Port of Malmo, Sweden, in 1870. The civilian ship production in Malmo ceased in 1987. As well as building ships the company built large industrial and agricultural machinery and maritime goods.this replica foghorn represents the design of a Swedish, Tyfon model 1910. It is an example of the type of safety equipment used on marine vessels to signal other vessels and signal to land. Replica foghorn; portable marine, plunger operation. It has a brass cylinder and adjustable brass horn. The plunger handle and base are wooden. Inscriptions are on the plaque on the horn and moulded into the air intake. Facsimile of a Kockums of Malmo, Sweden, Tyfon model 1910 Fog Horn.Impressed into the attached plaque "KOCKUMS MLK. VERKSTAD / MALMO SWEDEN" and "TRADE TYFON MARK" Also added to the plaque individually "288938" Molded around the circumference of the air intake "TYFON PATENT"flagstaff hill, warrnambool, shipwrecked coast, flagstaff hill maritime museum, maritime museum, shipwreck coast, flagstaff hill maritime village, great ocean road, foghorn, fog horn, tyfon foghorn, kockums mlk verkstad, malmo sweden, replica, warning signal, safety equipment, ship's equipment -
 University of Melbourne, Burnley Campus Archives
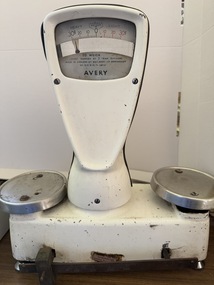
Machine - Scales, W & T Avery Ltd, Set of manual scales with weights, Mid 20th Century
Avery metal manual scales with measurement in grams - with adjustable chrome feet. Accompanied by an array of weights of varying brands (Mercury, MSC, unmarked) 2 x 7LB, 3 x 4LB, 1 x 3LB, 1 x 2LB, 3 x 1LB, 8OZ and 4OZ.AVERY FOR TRADE VICTORIAN PATTERN APPROVAL No. V8 To Weigh Chart MARKED BY 2 GRAM DIVISIONS MADE IN ENGLAND BY W&T AVERY LTD BIRMINGHAM No 1215 BFH/S - 680767scales, measurement, weighing, weights -
 Lara RSL Sub Branch
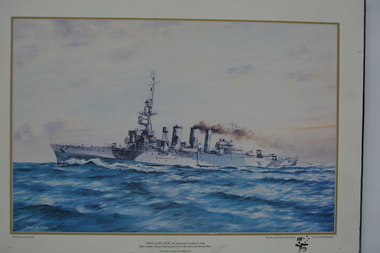
Photograph, H.M.A.S.ADELAIDE
On 1 September 1939 Adelaide (I) commissioned for war service under the command of Captain HA Showers RAN, and operated on the Australian coast for defence of trade.This is a limited print of HMAS Adelaide. No 6 in a series of 25. Royal Australian Navy 75th Anniversary.White bordered coloured print mounted on M.D.F.board.H.M.A.S.ADELAIDE,an improved Chatham class light crusier,shown during service in the Second World War. No 6 in a series of 25 ROYAL AUSTRALIAN NAVY 75 TH ANNIVERSARYh.m.a.s., navy, royal australian navy, ship, cruiser, ww2, world war two, lara r.s.l. -
 National Wool Museum
Book, Only wool can do it
"Only wool can do it" - Australian Wool Corporation, c.1985. Describes how to care for wool, the various wool trade marks and the advantages of wool.wool - characteristics wool marketing, australian wool corporation, laundering, wool - characteristics, wool marketing -
Unions Ballarat
Book - Contemporary Australian Industrial Relations (D.J. Spiers Collection)
Collected essays by various authors - industrial relations. Particular focus upon: employers and management; trade unions; methods of regulation; industrial conflict; theoretical approaches.Unionism, industrial relations and employment relationships.Paper; book. Front cover: green background; black and white picture of people sitting around a meeting table.Title page: D.J. Spiers, Ballaarat University College, May 1992 In black ink. Front cover: editors' names and title.ballarat trades and labour council, btlc, industrial relations, trade unions, industrial action, employment, enterprise bargaining -
 Carlton Football Club
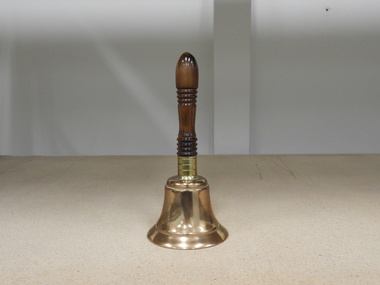
Hand Held Bell, Hand Held Bell with a small inscription on the inside
The bell was used for Trade Week to signify "time's up" at Optus Oval. Prior to this it was used to let Alan Espie's children on their Wandin property to come home.Why Al chimes in for Carlton Tony De Bolfo, Carlton Media Feb 20, 2014 11:05AM Alan Espie with the famous bell. (Photo: Carlton Football Club) Alan Espie with the famous bell. (Photo: Carlton Football Club) Related Etched into the rim of the bell Alan Espie has rung at every trade week gathering since 1994 is a touching quote attributed to his grandson. Dear Pa, May you always ring true blue, Love Harry Just thinking about that inscription often brings big Al to tears. The story of the Espie bell has its origins at the old family property at Wandin in the picturesque Yarra Valley, in the days when the Espies’ kids were at the neighboring creek fossicking for local platypus. “If they got too far away we’d ring an old cowbell,” Espie recalled, “and years later, my daughter Jo brought me this replacement bell from some second-hand naval place”. “Not long after Shane (O’Sullivan) asked me to officiate at trade week and that’s when the bell came into vogue.” A permanent fixture at trade week, Espie would ring the bell to signal the opening of trading when club recruiters gathered – initially within the confines of the Carlton Heroes Stand at Visy Park, more recently at Etihad Stadium. In those early days at Carlton he caused a stir as bell ringer, drawing curious responses from officiating journalists, recruiters and coaches alike. “I even remember (Kevin) Sheedy asking me if I was selling muffins,” he recalled. Then, when trade day was relocated to Etihad, Espie’s daughter thought it appropriate to get the bell inscribed. “Because the bell was leaving Carlton, Jo got it inscribed on my grandson’s behalf, because he was only four or five then. When I saw what was inscribed I was tearful,” Espie said. “The bell is very important to me, particularly at this time, because Jo is battling health problems at the moment, my grandson is autistic and she’s fought like hell to get him through.” Espie joined Carlton’s Under 19 committee on the eve of the senior Premiership season of 1979 and managed the club’s junior squads, the Bert Deacon Squad included. “I worked very closely with Geoff Southby, ‘Swan’ McKay and Trevor Keogh when they were coaching the Under 19s and I was recruiting as well,” he said. “In 1981 and ’82 I forward scouted for ‘Parko’ (David Parkin) and later on I did the same for ‘Wallsy’ (Robert Walls). After that I coordinated recruiting in central Victoria and it was nothing for me to do 25,000ks a year in my own car – and I loved every minute of it.” Espie’s passion for Carlton and empathy for its wartime players Bert Deacon, Ollie Grieve and Jack “Chooka” Howell can be sourced to his childhood years. His grandparents lived not far from the old ground on Wilson Street “and that’s how I got in for the ’45 Grand Final”. “My uncle, who had just got back from the war, grabbed a ladder from Wilson Street and set it up against the barbed wire fence at the ground. I climbed the ladder and caught my arm on the barbed wire, but I got over the top and saw the game while I straddled the fence,” Espie said. “What I saw was what you would today call ‘spotfires’ and I reckon it took football 20 years to get rid of it.” Today, Espie continues to ring in the yearly trade talk days at AFL headquarters (with the notable exception of 2012 when he was hospitalized), but he’s in no doubt as to where the bell belongs. “This bell has had nothing to do with Wandin but everything to do with Carlton - and with the 150th year of the club I think the bell stays here (at Visy Park). I still hope to ring the bell for the AFL this year, but at least I’ll know where it is,” Espie said. “I’ve told Jo about this and she tells me Harry’s rapt, because he’s a big Carlton supporter and he’s so happy his name is on the bell.”Wooden handle attached to a brass bell."Dear Pa, may you always ring true blue, Love Harry" -
 Flagstaff Hill Maritime Museum and Village
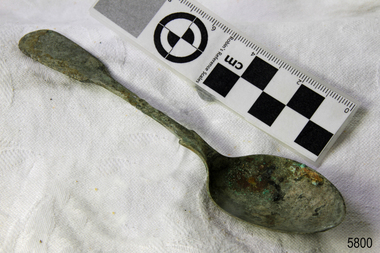
Spoon, circa 1878
This tea spoon is from the wreck of the LOCH ARD, a Loch Line ship of 1,693 tons which sailed from Gravesend, London, on 2 March 1878 with 17 passengers and a crew of 36 under Captain George Gibbs. “The intention was to discharge cargo in Melbourne, before returning to London via the Horn with wool and wheat”. Instead, on 1 June 1878, after 90 days at sea, she struck the sandstone cliffs of Mutton Bird Island on the south west coast of Victoria, and sank with the loss of 52 lives and all her cargo. The manifest of the LOCH ARD listed an array of manufactured goods and bulk metals being exported to the Colony of Victoria, with a declared value of £53,700. (202 bills of lading show an actual invoice value of £68, 456, with insurance underwriting to £30,000 of all cargo). Included in the manifest is the item of “Tin hardware & cutlery £7,530”. This teaspoon is one of 482 similar items of electro-plated cutlery from the LOCH ARD site, comprising spoons and forks of various sizes but all sharing the same general shape or design and metallic composition. 49 of these pieces display a legible makers’ mark — the initials “W” and “P” placed within a raised diamond outline, which is in turn contained within a sunken crown shape — identifying the manufacturer as William Page & Co of Birmingham. An electroplater’s makers’ marks, unlike sterling silver hallmarks, are not consistent identifiers of quality or date and place of manufacture. A similar line of five impressions was usually made to impress the consumer with an implication of industry standards, but what each one actually signified was not regulated and so they varied according to the whim of the individual foundry. In this case, the maker’s marks are often obscured by sedimentary accretion or removed by corrosion after a century of submersion in the ocean. However sufficient detail has survived to indicate that these samples of electro-plated cutlery probably originated from the same consignment in the LOCH ARD’s cargo. The following descriptions of maker’s marks are drawn from 255 tea spoons, 125 dessert spoons, and 99 table forks. These marks are clearly visible in 66 instances, while the same sequence of general outlines, or depression shapes, is discernible in another 166 examples. 1. A recessed Crown containing a raised Diamond outline and the initials “W” and “P” (the recognised trademark of William Page & Co) 2. An impressed Ellipse containing a raised, pivoted, Triangle in its lower part and bearing a Resurrection Cross on its upper section (a possible dissenting church symbol reflecting religious affiliation); OR a rounded Square impression containing a raised, ‘lazy’, letter “B” (possibly mimicking sterling silver hallmark signifying city of manufacture i.e. Birmingham) 3. An impressed rounded Square filled with a raised Maltese Cross (the base metal composite of nickel silver was also known as ‘German silver’ after its Berlin inventors in 1823) 4. A recessed Circle containing a Crab or Scarab Beetle image; OR a recessed Circle containing a rotated ‘fleur de lys’ or ‘fasces’ design 5. A depressed Diamond shape enclosing a large raised letter “R” and a small raised letter “D” (mimicking the U.K. Patent Office stamp which abbreviated the term ‘registered’ to “RD”, but also included date and class of patent) Suggested trade names for William Page & Co’s particular blend of brass plating are ‘roman silver’ or ‘silverite’. This copper alloy polishes to a lustrous gold when new, discolouring to a murky grey with greenish hue when neglected. HISTORY OF THE LOCH ARD The LOCH ARD belonged to the famous Loch Line which sailed many ships from England to Australia. Built in Glasgow by Barclay, Curdle and Co. in 1873, the LOCH ARD was a three-masted square rigged iron sailing ship. The ship measured 262ft 7" (79.87m) in length, 38ft (11.58m) in width, 23ft (7m) in depth and had a gross tonnage of 1693 tons. The LOCH ARD's main mast measured a massive 150ft (45.7m) in height. LOCH ARD made three trips to Australia and one trip to Calcutta before its final voyage. LOCH ARD left England on March 2, 1878, under the command of Captain Gibbs, a newly married, 29 year old. She was bound for Melbourne with a crew of 37, plus 17 passengers and a load of cargo. The general cargo reflected the affluence of Melbourne at the time. On board were straw hats, umbrella, perfumes, clay pipes, pianos, clocks, confectionary, linen and candles, as well as a heavier load of railway irons, cement, lead and copper. There were items included that intended for display in the Melbourne International Exhibition in 1880. The voyage to Port Phillip was long but uneventful. At 3am on June 1, 1878, Captain Gibbs was expecting to see land and the passengers were becoming excited as they prepared to view their new homeland in the early morning. But LOCH ARD was running into a fog which greatly reduced visibility. Captain Gibbs was becoming anxious as there was no sign of land or the Cape Otway lighthouse. At 4am the fog lifted. A man aloft announced that he could see breakers. The sheer cliffs of Victoria's west coast came into view, and Captain Gibbs realised that the ship was much closer to them than expected. He ordered as much sail to be set as time would permit and then attempted to steer the vessel out to sea. On coming head on into the wind, the ship lost momentum, the sails fell limp and LOCH ARD's bow swung back. Gibbs then ordered the anchors to be released in an attempt to hold its position. The anchors sank some 50 fathoms - but did not hold. By this time LOCH ARD was among the breakers and the tall cliffs of Mutton Bird Island rose behind the ship. Just half a mile from the coast, the ship's bow was suddenly pulled around by the anchor. The captain tried to tack out to sea, but the ship struck a reef at the base of Mutton Bird Island, near Port Campbell. Waves broke over the ship and the top deck was loosened from the hull. The masts and rigging came crashing down knocking passengers and crew overboard. When a lifeboat was finally launched, it crashed into the side of LOCH ARD and capsized. Tom Pearce, who had launched the boat, managed to cling to its overturned hull and shelter beneath it. He drifted out to sea and then on the flood tide came into what is now known as LOCH ARD Gorge. He swam to shore, bruised and dazed, and found a cave in which to shelter. Some of the crew stayed below deck to shelter from the falling rigging but drowned when the ship slipped off the reef into deeper water. Eva Carmichael had raced onto deck to find out what was happening only to be confronted by towering cliffs looming above the stricken ship. In all the chaos, Captain Gibbs grabbed Eva and said, "If you are saved Eva, let my dear wife know that I died like a sailor". That was the last Eva Carmichael saw of the captain. She was swept off the ship by a huge wave. Eva saw Tom Pearce on a small rocky beach and yelled to attract his attention. He dived in and swam to the exhausted woman and dragged her to shore. He took her to the cave and broke open case of brandy which had washed up on the beach. He opened a bottle to revive the unconscious woman. A few hours later Tom scaled a cliff in search of help. He followed hoof prints and came by chance upon two men from nearby Glenample Station three and a half miles away. In a state of exhaustion, he told the men of the tragedy. Tom returned to the gorge while the two men rode back to the station to get help. By the time they reached LOCH ARD Gorge, it was cold and dark. The two shipwreck survivors were taken to Glenample Station to recover. Eva stayed at the station for six weeks before returning to Ireland, this time by steamship. In Melbourne, Tom Pearce received a hero's welcome. He was presented with the first gold medal of the Royal Humane Society of Victoria and a £1000 cheque from the Victorian Government. Concerts were performed to honour the young man's bravery and to raise money for those who lost family in the LOCH ARD disaster. Of the 54 crew members and passengers on board, only two survived: the apprentice, Tom Pearce and the young woman passenger, Eva Carmichael, who lost all of her family in the tragedy. Ten days after the LOCH ARD tragedy, salvage rights to the wreck were sold at auction for £2,120. Cargo valued at £3,000 was salvaged and placed on the beach, but most washed back into the sea when another storm developed. The wreck of LOCH ARD still lies at the base of Mutton Bird Island. Much of the cargo has now been salvaged and some was washed up into what is now known as LOCH ARD Gorge. Cargo and artefacts have also been illegally salvaged over many years before protective legislation was introduced. One of the most unlikely pieces of cargo to have survived the shipwreck was a Minton porcelain peacock - one of only seven in the world. The peacock was destined for the Melbourne International Exhibition in 1880. It had been well packed, which gave it adequate protection during the violent storm. Today, the Minton peacock can be seen at the Flagstaff Hill Maritime Museum in Warrnambool. From Australia's most dramatic shipwreck it has now become Australia's most valuable shipwreck The LOCH ARD shipwreck is of State significance – Victorian Heritage Register S 417. Flagstaff Hill’s collection of artefacts from LOCH ARD is significant for being one of the largest collections of artefacts from this shipwreck in Victoria. It is significant for its association with the shipwreck, which is on the Victorian Heritage Register (VHR S417). The collection is significant because of the relationship between the objects, as together they have a high potential to interpret the story of the LOCH ARD. The LOCH ARD collection is archaeologically significant as the remains of a large international passenger and cargo ship. The LOCH ARD collection is historically significant for representing aspects of Victoria’s shipping history and its potential to interpret sub-theme 1.5 of Victoria’s Framework of Historical Themes (living with natural processes). The collection is also historically significant for its association with the LOCH ARD, which was one of the worst and best known shipwrecks in Victoria’s history. Unrestored tea spoon from the wreck of the LOCH ARD. The spoon design has a flattened fiddle-back handle, with a thin stem or shank, flared collar, and elongated bowl. The spoons metallic composition is a thin layer of brass alloy which has partially corroded back to a nickel-silver base metal. Approximately 35% of original electroplating survives with traces of verdigris. Outlines of five makers marks are visible and the details of one are legible: (1) Trade Mark.flagstaff hill, warrnambool, shipwrecked coast, flagstaff hill maritime museum, maritime museum, shipwreck coast, flagstaff hill maritime village, great ocean road, loch line, loch ard, captain gibbs, eva carmichael, tom pearce, glenample station, mutton bird island, loch ard gorge, electroplated cutlery, loch ard shipwreck, nickel silver, william page & co, birmingham, brass plating, makers marks -
 Flagstaff Hill Maritime Museum and Village
Domestic object - Spoon, c.1878
This tea spoon is from the wreck of the LOCH ARD, a Loch Line ship of 1,693 tons which sailed from Gravesend, London, on 2 March 1878 with 17 passengers and a crew of 36 under Captain George Gibbs. “The intention was to discharge cargo in Melbourne, before returning to London via the Horn with wool and wheat”. Instead, on 1 June 1878, after 90 days at sea, she struck the sandstone cliffs of Mutton Bird Island on the south west coast of Victoria, and sank with the loss of 52 lives and all her cargo. The manifest of the LOCH ARD listed an array of manufactured goods and bulk metals being exported to the Colony of Victoria, with a declared value of £53,700. (202 bills of lading show an actual invoice value of £68, 456, with insurance underwriting to £30,000 of all cargo). Included in the manifest is the item of “Tin hardware & cutlery £7,530”. This teaspoon is one of 482 similar items of electro-plated cutlery from the LOCH ARD site, comprising spoons and forks of various sizes but all sharing the same general shape or design and metallic composition. 49 of these pieces display a legible makers’ mark — the initials “W” and “P” placed within a raised diamond outline, which is in turn contained within a sunken crown shape — identifying the manufacturer as William Page & Co of Birmingham. An electroplater’s makers’ marks, unlike sterling silver hallmarks, are not consistent identifiers of quality or date and place of manufacture. A similar line of five impressions was usually made to impress the consumer with an implication of industry standards, but what each one actually signified was not regulated and so they varied according to the whim of the individual foundry. In this case, the maker’s marks are often obscured by sedimentary accretion or removed by corrosion after a century of submersion in the ocean. However sufficient detail has survived to indicate that these samples of electro-plated cutlery probably originated from the same consignment in the LOCH ARD’s cargo. The following descriptions of maker’s marks are drawn from 255 tea spoons, 125 dessert spoons, and 99 table forks. These marks are clearly visible in 66 instances, while the same sequence of general outlines, or depression shapes, is discernible in another 166 examples. 1. A recessed Crown containing a raised Diamond outline and the initials “W” and “P” (the recognised trademark of William Page & Co) 2. An impressed Ellipse containing a raised, pivoted, Triangle in its lower part and bearing a Resurrection Cross on its upper section (a possible dissenting church symbol reflecting religious affiliation); OR a rounded Square impression containing a raised, ‘lazy’, letter “B” (possibly mimicking sterling silver hallmark signifying city of manufacture i.e. Birmingham) 3. An impressed rounded Square filled with a raised Maltese Cross (the base metal composite of nickel silver was also known as ‘German silver’ after its Berlin inventors in 1823) 4. A recessed Circle containing a Crab or Scarab Beetle image; OR a recessed Circle containing a rotated ‘fleur de lys’ or ‘fasces’ design 5. A depressed Diamond shape enclosing a large raised letter “R” and a small raised letter “D” (mimicking the U.K. Patent Office stamp which abbreviated the term ‘registered’ to “RD”, but also included date and class of patent) Suggested trade names for William Page & Co’s particular blend of brass plating are ‘roman silver’ or ‘silverite’. This copper alloy polishes to a lustrous gold when new, discolouring to a murky grey with greenish hue when neglected. HISTORY OF THE LOCH ARD The LOCH ARD belonged to the famous Loch Line which sailed many ships from England to Australia. Built in Glasgow by Barclay, Curdle and Co. in 1873, the LOCH ARD was a three-masted square rigged iron sailing ship. The ship measured 262ft 7" (79.87m) in length, 38ft (11.58m) in width, 23ft (7m) in depth and had a gross tonnage of 1693 tons. The LOCH ARD's main mast measured a massive 150ft (45.7m) in height. LOCH ARD made three trips to Australia and one trip to Calcutta before its final voyage. LOCH ARD left England on March 2, 1878, under the command of Captain Gibbs, a newly married, 29 year old. She was bound for Melbourne with a crew of 37, plus 17 passengers and a load of cargo. The general cargo reflected the affluence of Melbourne at the time. On board were straw hats, umbrella, perfumes, clay pipes, pianos, clocks, confectionary, linen and candles, as well as a heavier load of railway irons, cement, lead and copper. There were items included that intended for display in the Melbourne International Exhibition in 1880. The voyage to Port Phillip was long but uneventful. At 3am on June 1, 1878, Captain Gibbs was expecting to see land and the passengers were becoming excited as they prepared to view their new homeland in the early morning. But LOCH ARD was running into a fog which greatly reduced visibility. Captain Gibbs was becoming anxious as there was no sign of land or the Cape Otway lighthouse. At 4am the fog lifted. A man aloft announced that he could see breakers. The sheer cliffs of Victoria's west coast came into view, and Captain Gibbs realised that the ship was much closer to them than expected. He ordered as much sail to be set as time would permit and then attempted to steer the vessel out to sea. On coming head on into the wind, the ship lost momentum, the sails fell limp and LOCH ARD's bow swung back. Gibbs then ordered the anchors to be released in an attempt to hold its position. The anchors sank some 50 fathoms - but did not hold. By this time LOCH ARD was among the breakers and the tall cliffs of Mutton Bird Island rose behind the ship. Just half a mile from the coast, the ship's bow was suddenly pulled around by the anchor. The captain tried to tack out to sea, but the ship struck a reef at the base of Mutton Bird Island, near Port Campbell. Waves broke over the ship and the top deck was loosened from the hull. The masts and rigging came crashing down knocking passengers and crew overboard. When a lifeboat was finally launched, it crashed into the side of LOCH ARD and capsized. Tom Pearce, who had launched the boat, managed to cling to its overturned hull and shelter beneath it. He drifted out to sea and then on the flood tide came into what is now known as LOCH ARD Gorge. He swam to shore, bruised and dazed, and found a cave in which to shelter. Some of the crew stayed below deck to shelter from the falling rigging but drowned when the ship slipped off the reef into deeper water. Eva Carmichael had raced onto deck to find out what was happening only to be confronted by towering cliffs looming above the stricken ship. In all the chaos, Captain Gibbs grabbed Eva and said, "If you are saved Eva, let my dear wife know that I died like a sailor". That was the last Eva Carmichael saw of the captain. She was swept off the ship by a huge wave. Eva saw Tom Pearce on a small rocky beach and yelled to attract his attention. He dived in and swam to the exhausted woman and dragged her to shore. He took her to the cave and broke open case of brandy which had washed up on the beach. He opened a bottle to revive the unconscious woman. A few hours later Tom scaled a cliff in search of help. He followed hoof prints and came by chance upon two men from nearby Glenample Station three and a half miles away. In a state of exhaustion, he told the men of the tragedy. Tom returned to the gorge while the two men rode back to the station to get help. By the time they reached LOCH ARD Gorge, it was cold and dark. The two shipwreck survivors were taken to Glenample Station to recover. Eva stayed at the station for six weeks before returning to Ireland, this time by steamship. In Melbourne, Tom Pearce received a hero's welcome. He was presented with the first gold medal of the Royal Humane Society of Victoria and a £1000 cheque from the Victorian Government. Concerts were performed to honour the young man's bravery and to raise money for those who lost family in the LOCH ARD disaster. Of the 54 crew members and passengers on board, only two survived: the apprentice, Tom Pearce and the young woman passenger, Eva Carmichael, who lost all of her family in the tragedy. Ten days after the LOCH ARD tragedy, salvage rights to the wreck were sold at auction for £2,120. Cargo valued at £3,000 was salvaged and placed on the beach, but most washed back into the sea when another storm developed. The wreck of LOCH ARD still lies at the base of Mutton Bird Island. Much of the cargo has now been salvaged and some was washed up into what is now known as LOCH ARD Gorge. Cargo and artefacts have also been illegally salvaged over many years before protective legislation was introduced. One of the most unlikely pieces of cargo to have survived the shipwreck was a Minton porcelain peacock - one of only seven in the world. The peacock was destined for the Melbourne International Exhibition in 1880. It had been well packed, which gave it adequate protection during the violent storm. Today, the Minton peacock can be seen at the Flagstaff Hill Maritime Museum in Warrnambool. From Australia's most dramatic shipwreck it has now become Australia's most valuable shipwreck artefact and is one of very few 'objects' on the Victorian State Heritage Register. The LOCH ARD shipwreck is of State significance – Victorian Heritage Register S 417. Flagstaff Hill’s collection of artefacts from LOCH ARD is significant for being one of the largest collections of artefacts from this shipwreck in Victoria. It is significant for its association with the shipwreck, which is on the Victorian Heritage Register (VHR S417). The collection is significant because of the relationship between the objects, as together they have a high potential to interpret the story of the LOCH ARD. The LOCH ARD collection is archaeologically significant as the remains of a large international passenger and cargo ship. The LOCH ARD collection is historically significant for representing aspects of Victoria’s shipping history and its potential to interpret sub-theme 1.5 of Victoria’s Framework of Historical Themes (living with natural processes). The collection is also historically significant for its association with the LOCH ARD, which was one of the worst and best known shipwrecks in Victoria’s history. Unrestored tea spoon from the wreck of the LOCH ARD. The spoon design has a flattened fiddle-back handle, with a thin stem or shank, flared collar, and elongated bowl. The spoons metallic composition is a thin layer of brass alloy which has partially corroded back to a nickel-silver base metal. Four of five makers marks are legible: (1) Trade Mark (2) Lazy "B" (3) Maltese Cross (5) Register Stamp.flagstaff hill maritime museum, shipwreck coast, great ocean road, loch line, loch ard, electroplated cutlery, loch ard, william page and company, birmingham brass plating, makers marks, nickel silver -
 Pyrenees Shire Council
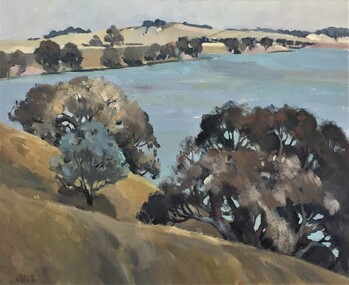
painting, Sue Jarvis, Lake Burrumbeet by Sue Jarvis
Donors Mr. A.F. Russell Mrs. Bettine James Mr. O.P. Gutauskas Hains & Sutton &co. Mr. F.W. Glare Mr. & Mrs. R.I. Read Fiery Creek Stage & Trading Co. Mr. P.B.A Cowden Mr. A.W.N Lyons Mr. J.McG. Troup Mrs. W.R.R Beggs Mr. W.J. Smith Mr. R. Read Mr. & Mrs. N..S.Reid Mr. K.W. McKenzie Mrs. Pam. Wotherspoon Mr. L.J.Harris Mr. R.A. Fraser Mr. W. Morcombe Mr. R.F. Gardiner Mr. S.R. Greenbank Mr. C. J. Hedges Mr. F.J. O'Briensignificant as a work of art by local Pyrenees artist, locally significant to the Central Highlands Region of Victoria as a representation of local landscape and/or culture oil painting of Lake Burrumbeet with trees in the foreground"Signed: Jarvis (lower left) Verso: (handwritten and typed list) Painting of Lake Burrumbeet By Sue Jarvis Obtained by Cr. C.J. Hedges Cost $120 Donors Mr. A.F. Russell Mrs. Bettine James Mr. O.P. Gutauskas Hains & Sutton &co. Mr. F.W. Glare Mr. & Mrs. R.I. Read Fiery Creek Stage & Trading Co. Mr. P.B.A Cowden Mr. A.W.N Lyons Mr. J.McG. Troup Mrs. W.R.R Beggs Mr. W.J. Smith Mr. R. Read Mr. & Mrs. N..S.Reid Mr. K.W. McKenzie Mrs. Pam. Wotherspoon Mr. L.J.Harris Mr. R.A. Fraser Mr. W. Morcombe Mr. R.F. Gardiner Mr. S.R. Greenbank Mr. C. J. Hedges Mr. F.J. O'Brien" -
Federation University Historical Collection
Plan - Plan (copy), Melbourne Road Ballaarat, 1857
This map shows the vicinity of the site of the Eureka Stockade. A3 black and whole photocopy of a plan of Ballarat's Melbourne Road. The plan shows Melbourne Road, Proposed Melbourne Road (later Eureka Street), Chamberlain Street, Queen Street, Allotments between Rodier Street and Stawell Street (William Collard Smith, J & T Oddie, F.A. Edward A. Wynne, David Fitzpatrick, Robert Walsh, Charles Spencer, Alfred Lester, Free Trade Hotel)william collard smith, oddie, wynne, fitzpatrick, walsh, spencer, lester, free trade hotel -
Federation University Historical Collection
Book, Ballarat Technical Art School Register, 1955-1971, 1955-1971
The Ballarat Technical Art School (No. 10) was a division of the Ballarat School of Mines. Green ledger with black spine. Lists Student Number, Name, Trade or Occupation, Age at Last Birthday, Address, Date of Joining the School, Course Work. Courses listed include dressmaking, Elementary Art, Ticket Writing, Shorthand, Drawing, Pottery and Drawing. Pottery, Millinery. Junior Art, Building Construction, Matriculation Art, Needlework, Painting, Life Class, Decorative Needlework, General Art Course, Sculptureballarat technical art school, art general register, student enrolments, alumni, art studies, ballarat school of mines -
 Bendigo Historical Society Inc.
Tool - TYZACK SCYTHE BLADE
Scythe Blade. Remains of two yellow paper labels. One label contains 'Trade Mark W.A. TYZACK & CO LTD. SHEFFIELD' The other contains 'PATENT UNBREAKABLE POINTED SCYTHE' This scythe has an advantage over any other scythe, as The Point cannot be broken in stony or rough ground' An embossed stamp on The scythe has the words 'W. A. TYZACK & Co. Ltd. Stella Works, Sheffield. -
Port Melbourne Historical & Preservation Society
Container - Bags, Robert Harper & Co, 1900 - 1925
Three calico bags with colourful trade information printing; flour and rolled oats, two bags clearly Robert Harper and Company Limited, early 20th Century. .01 "Three Bears Porridge Rolled Oats" 7 lbs .02 "Harpers Star Avena Brand Rolled Oats"- on the back "The SilverStar Rice Starch" 7 lbs .03 "Empire Self Raising Flour" 25 lbsbusiness and traders - bakers, industry - food, robert harper & co ltd -
 Tennis Australia
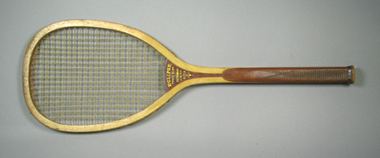
Racquet, Circa 1890
A transitional flat top tennis racquet with a convex throat. Inscription across throat on obverse: ECLIPSE/TRADE MARK/HORSMAN/N.Y. Across the top of the head is a partly illegible inscription, which may spell 'SPECIAL'. Across the length of the side of the stem is the inscription: ORIENTAL/GUT. Ornamentally latticed cuts into the handle around all sides act as the grip. Materials: Wood, Gut, Metal, Lacquer, Leather, Stringtennis -
 Ballarat Tramway Museum
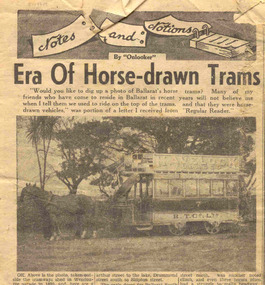
Newspaper, The Courier Ballarat, "Era of Horse-drawn Trams", 29/07/1950 12:00:00 AM
Newspaper clipping from The Courier, Ballarat, Sat. 29/7/1950, titled "Era of Horse-drawn Trams", in the "note and Notions" column prepared by "Onlooker". Has a photo of No. 7 in Wendouree Parade, outside the depot. Gives an history of the horse trams, routes, operations, tickets, housing, "Tramway Row", wages and closing. Has advertisements for Woodmason Trading Co (Paint sale) and Commonwealth bank on the same sheet.horse trams, wages, housing, operations -
 Tennis Australia
Racquet, Circa 1925
A wooden racquet with red and white plastic shoulder bands, red gut, and a grooved handle. Inscription across throat of obverse: ACE. Decal trademark featured across throat on reverse, comprising of an encircled racquet presented behind two ribbon devices. Inscription: C.L.GODFREY/THE PEAK/OF QUALITY/TRADE MARK/PAWTUCKET,/R.I. Materials: Wood, Gut, Plastic, Ink, Leather, Cloth, Metal, Glue, Lacquertennis -
 Melbourne Tram Museum
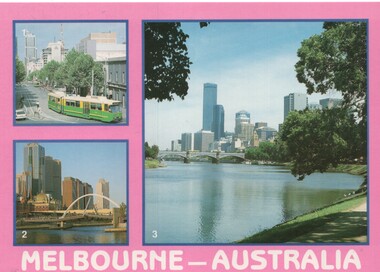
Postcard, Wayne Zerbe / North Australian Trading Co. for Kangaroo Gifts, Melbourne views including trams, early 1990's
Colour postcard, three panels: 1 - B class turning from Bourke into Spring St 2 - Walkway bridge (Evan Walker Bridge) over the Yarra 3 - City Skyline Back has space for name and address, stamp and a message and details of the postcard. Produced by Wayne Zerbe / North Australian Trading Co. for Kangaroo Gifts. Card No. KGL8 Has "Melbourne Australia" along the bottom edge.trams, tramways, bourke st, b class, melbourne -
 Warrnambool and District Historical Society Inc.
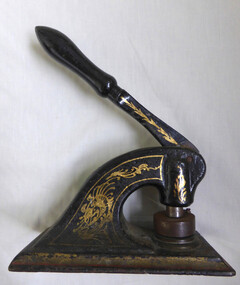
Functional object - Newcombe timber company Seal, Mid to Late 19th century
Newcombe and Co traded as timber merchants And iron mongers in Koroit Street in the later part of the 19th century and early 20th century. It was destroyed by fire in March 1918.A commonly used office item which is well linked to a long established business in Warrnambool.Cast iron rectangular base with arch form leading to handle. Painted black and decorated with gold scroll work. Orange line around rectangular base. The seal is operated by pushing down the handle which stamps on paper which would be placed between the circular stamp and the base plate.warrnambool, company seal, embossing seal, newcombe timber company, koroit street -
Federation University Historical Collection
Menu, Complimentary Dinner for The Hon, A.A. Dunstan, M.L.A., 1935, 09/05/1935
A. A. Dunstan was the Premier and Treasurer of Victoria in 1935. This material was removed from the book "British Trade and Industry: Past and Present." Federation University Creedy Collection 382.0941 C6746B.1) Folded card menu with an image of A.A. Dunston on the cover. .2) Notes, possibly written by the last speaker ( Cr A.E. Staples or Cr R.R. Skeates)Signed on front A.E. Hocking E.F. Coyle J.W. W[illegible] Eugene Gorman J. [illegible] J.H. Lienhopa. a. dunstan, premier, menu, j.m. lienhop, a.e. staples, hubert woolcock, j.h. meggs, a.e. hocking, eugune gorman, h.f. allen, m.w.j. bourchier, e.j. hogan, j.r. harris, r.r. skeat, a.e. cook, e.f. coyle -
Unions Ballarat
Employer power and weakness : how local and global factors have shaped Australia's meat industry and its industrial relations, O'Leary, Patrick et al, 2012
This book explores the choices employers have made and the reasons behind those choices in the context of the national economy, global meat trade and period of severe booms and busts.Relevant to industrial relations and the Australian and global meat trade.Paper; book. Front cover: Purple and white background; colour picture of meat worker at work.Front cover: author name and title.btlc, ballarat trades hall, ballarat trades and labour council, meat industry, employers, globalisation, economy, australasian meat industry employees' union, meat industry and trade -- australia, employee relations, exports -
 Otway Districts Historical Society
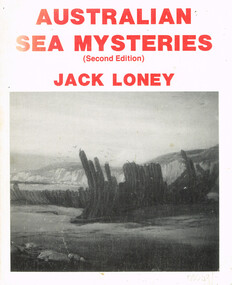
Book, Australian sea mysteries, 1988
Recalling ships that have explored, traded and plied the waters around the Australian coastline it tells of their changing fortunes, their shipwrecks and their incidents which have added to their sea mysteries.Australian sea mysteries. J.K. Loney. 2nd ed. nl; Marine History Publications; 1988. 116 p.; illus, maps, bibliography. Hard cover. ISBN 0 909191 28 Xaustralia; sea; j.k. loney; shipwrecks; oceans; -
 Flagstaff Hill Maritime Museum and Village
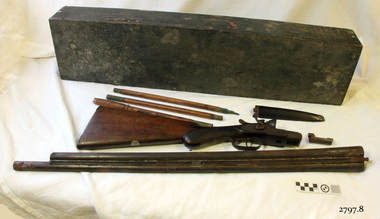
Shotgun Double Barrel, 1904
Hollis Brothers were first recorded trading from 11 Weaman Row in 1840 but appear to have started trading a little earlier. The firm later became Isaac Hollis & Sons and claimed establishment from 1814. Richard & William Hollis were recorded trading in Bath Street Birmingham from 1814 to 1818 so it may be that the Hollis brothers were descended from them. The brothers were Isaac Hollis (1815) and Frederick Hollis (birth date unknown), but Frederick died 20 December 1839. Isaac was recorded in the 1841 census living in Weaman Row. He was a 25-year-old gun and pistol maker, married to Emma 1821. They had two children, Isaac (1837), and Henry (1839). After Frederick died, Isaac carried on trading under the name of Hollis Brothers until 1845 when he re-named the business Hollis Brothers & Co who traded up to 1848. In 1844 Isaac entered into a short term partnership with William Tranter at 10 & 11 Weaman Row, presumably to complete a particular contract or supply certain parts, this partnership lasted until 1849. In 1848 Isaac took in Isaac Brentnall Sheath as a partner, and the firm of Hollis & Sheath was established, expanding into 10 Weaman Row. Hollis & Sheath were licensed makers of percussion breech-loading guns. in 1861 the firm changed its name to Isaac Hollis & Sons on the departure of Isaac Brentnall Sheath. Isaac Sheath died in July 1875 By about 1870 Isaac Hollis and Henry Hollis had taken over the day to day running of the business. Isaac Hollis was responsible for the overall management and the marketing of the firm's products. Henry was responsible for manufacturing. The firm became volume producers of inexpensive trade guns and sporting guns for the South African and the British colonies. In 1870 the firm opened a shop at 44a Cannon Street in London; in 1871 this moved to 83 Cheapside. Isaac Hollis Jnr died October 1875 in Birmingham aged 37. He was never married and in 1876/1877 Henry registered a limited liability company, Isaac Hollis & Sons Ltd, but by 1879 they were again trading as Isaac Hollis & Sons. From 1879 the London shop was at 6 Great Winchester Street. From 1932 to 1933 the London business traded as Hollis, Bentley & Playfair Hollis, Bentley & Playfair finally closed in Birmingham in 1953.The shotgun is not in pristine condition and is not very significant historically or valuable, although made by a well known and respected manufacturer of firearms there are many better examples of Issac Hollis and Sons shotguns in collections and for sale. This particular example is of a standard pattern for utilitarian use of which many were made.Shotgun, double barrel, 12 gauge, with cleaning rod. Right barrel has been cut shorter and has sharp edges on the muzzle. Metal stock extension, cleaning rod comprising 3 pieces that screw together. Gun is stored in a black painted, wooden case with hinged lid. Inscribed "I. HOLLIS & SONS", SN 84245. "I. HOLLIS & SONS". SN on stock “84245”. Badge on both sides “Crown [symbol] / BV”. “Crown [symbol] / NP”, “12G inside Diamond [symbol]”, “NITRO PROOF”, “STEEL 84245” Paper note included with gun, written in felt tip pen “ENTERPRISE”. flagstaff hill, warrnambool, shipwrecked-coast, flagstaff-hill, flagstaff-hill-maritime-museum, maritime-museum, shipwreck-coast, flagstaff-hill-maritime-village, shotgun, double barrel shotgun, isaac hollis and son, birmingham, i hollis and sons, gun makers, sporting firearm, south african firearm market, rifles for british government, hollis, bentlely and playfair -
 Flagstaff Hill Maritime Museum and Village
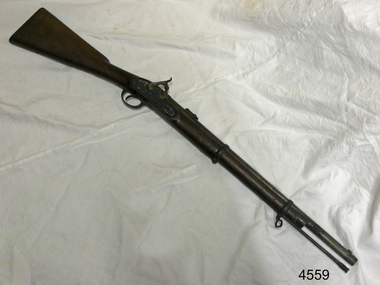
Gun, Mid 19th Century
Hollis Brothers were first recorded trading from 11 Weaman Row in 1840 but appear to have started trading a little earlier. The firm later became Isaac Hollis & Sons and claimed establishment from 1814. Richard & William Hollis were recorded trading in Bath Street Birmingham from 1814 to 1818 so it may be that the Hollis brothers were descended from them. The brothers were Isaac Hollis (b.1815) and Frederick Hollis (birth date unknown), but Frederick died 20 December 1839. Isaac was recorded in the 1841 census living in Weaman Row. He was a 25-year-old gun and pistol maker, married to Emma 1821. They had two children, Isaac (1837), and Henry (1839). After Frederick died, Isaac carried on trading under the name of Hollis Brothers until 1845 when he re-named the business Hollis Brothers & Co who traded up to 1848. In 1844 Isaac entered into a short term partnership with William Tranter at 10 & 11 Weaman Row, presumably to complete a particular contract or supply certain parts. This partnership lasted until 1849. In 1848 Isaac took in Isaac Brentnall Sheath as a partner, and the firm of Hollis & Sheath was established, expanding into 10 Weaman Row. Hollis & Sheath were licenced makers of percussion breech-loading guns. In 1861 the firm changed its name to Isaac Hollis & Sons on the departure of Isaac Brentnall Sheath. Isaac Sheath died in July 1875. By about 1870 Isaac Hollis and Henry Hollis had taken over the day to day running of the business. Isaac Hollis was responsible for the overall management and the marketing of the firm's products. Henry was responsible for manufacturing. The firm became volume producers of inexpensive trade guns and sporting guns for the South African and the British colonies. In 1870 the firm opened a shop at 44a Cannon Street in London; in 1871 this moved to 83 Cheapside. Isaac Hollis Jnr died October 1875 in Birmingham aged 37. He was never married and in 1876/1877 Henry registered a limited liability company, Isaac Hollis & Sons Ltd, but by 1879 they were again trading as Isaac Hollis & Sons. From 1879 the London shop was at 6 Great Winchester Street. From 1932 to 1933 the London business traded as Hollis, Bentley & Playfair Hollis, Bentley & Playfair finally closed in Birmingham in 1953. This gun is a typical example of the type of firearm issued to the colony's military in 1861. Specifically made by Isaac Hollis and Sons for the military market of the time and sold through contractors Hebbert & Sons, military suppliers, in London. The gun was probably issued from the Hythe Armory to British troops (a training facility) or police prior to coming to Tasmania Australia around 1861.Gun; Percussion Carbine, .577 Cal. Colonial Tasmanian issue Artillery carbine, Pattern 1861. Muzzle loading "Cap and Ball" musket. Wood stock and ram rod. Inscriptions are on the stock and breech. Gun was made for Herbert & Co. London by Isaac Hollis & Sons, Birmingham.Stamped on stock "SOLD 95", " ISAAC HOLLIS & SONS" "GUN & PISTOL MANUFACTURES" "BIRMINGHAM" "LASTON ARMOURER HYTHE" "MANUFACTURED EXPRESSLY FOR HEBBERT & CO LONDON". Stamped on breech "25", and "25C ---05"flagstaff hill, warrnambool, shipwrecked-coast, flagstaff-hill, flagstaff-hill-maritime-museum, maritime-museum, shipwreck-coast, flagstaff-hill-maritime-village, firearms, gun, muzzle loading musket, isaac hollis and son, hebbert & sons, military supplies, lee enfield -
 Bendigo Historical Society Inc.
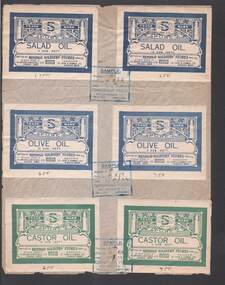
Document - CAMBRIDGE PRESS COLLECTION: LABEL - BENDIGO SOLDIERS' STORE
Sheet of paper with six labels gummed to it. There are two of each, Salad Oil, Olive Oil and Castor Oil. The labels are blue on white paper for the Salad Oil and Olive Oil. The Castor Oil is green on white background. The top of the label has the trade mark which has a blue/green B and two white S's in front of it and Prop Ltd. Underneath.It has trade on one side and mark on the other. It has some floral work and a bullet on the left and right. Under this is the name of the contents. Under the contents is Bottled by Bendigo Soldiers' Stores Prop. Ltd. Head Store - corner Myers & Mitchell Streets, Phone 950 and Branch - corner. View & Rowan Streets Phone 830. Stamped Sample by Cambridge Press, Hargreaves St. Phone 130 Bendigo. Date 7/5/24. The labels are for 5 ozs Net and 10 ozs Net for each oil. Written at the bottom of each label is the quantity required.business, printers, cambridge press, cambridge press collection, bendigo soldiers' stores, oil labels -
 Bendigo Historical Society Inc.
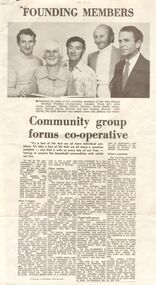
Document - BENDIGO ADVERTISER ARTICLE BENDIGO TRADING COOPERATIVE LIMITED CREATION 24 MAY 1977, 1977
Bendigo Advertiser Article 24th May 1977 re: Bendigo Trading Cooperative Limited Foundation. Founding Members Photograph: from left John Carty, Manager; Shirley Helfert, Director; Kevin Smith, Chairman; Gerard Clarke, Director and Bert Caldow, Director. John Clarke, the Fifth Director was absent when this picture was taken. Aims of the Cooperative: - members own and ran business themselves as a non profit organisation to contain the high costs of fruit and vegetables for Bendigo citizens by bringing the producer and consumer together. ? Could this be the precursor idea for future farmers markets which continue to run to this day. Mr Bryan McMahon the Bendigo Credit Union Manager provided advise on the process of forming a cooperative. The formation meeting was held on February 3, 1977 at the Kell Pell Pavilion in Barnard Street Bendigo where an application to the Registrar for registration under the the Cooperation Act 1958 was made. (See 10443b) Trading commenced on April 14, 1977.Bendigo Advertiser.bendigo, clubs, bendigo trading coopertive produce -
 National Wool Museum
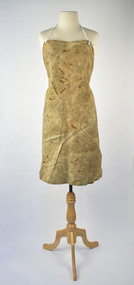
Textile - Dyers Apron
Over time, apron design and function diversified, and many trades and professions developed their own versions. Aprons were practical for protecting the wearer’s clothing as well as signifying their trade or craft. Wool dyeing was an industrialised profession to aid in the mass production of synthetic dyed clothing. This dyer’s apron would have protected the wearer from the chemicals of the dyer’s trade. There are several ways that fabrics would have been dyed including direct application, exhaust methods, continuous methods and waterless dyeing methods. As seen folded in archive box.dying, wool, apron, wool dying -
 City of Kingston
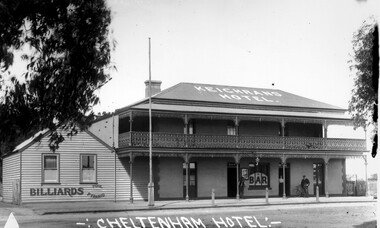
Photograph - Black and white, Percy Fairlam, Cheltenham Hotel - Keighrans, c. 1918
This image shows the importance of a reasonably large pub offering accommodation and a meeting place for a relatively small community in a regional area during the World War I (WWI) periodBlack and white image of Keighrans Hotel which is a two Storey building with a wrought iron balcony with a man standing at ground level with his bicycle and a big sign billiardsRound red sticker:X3 Handwritten in blue ink: A16 Handwritten in red ink 72% Handwritten in black ink: CHAP 4? / CHELTENHAM HOTEL / EXCHANGE HOTEL [crossed out] / Cheltenham / Pre WW [crossed out] about / WWI / BUILT ON THE SITE / of the ORIGINAL / CHELTENHAM INNcommerce, trade, hotel, pub, public house, cheltenham, world war i, first world war, wwi -
Port Melbourne Historical & Preservation Society
Document - William Robert COOPER Retirement Tribute, Weekly Times, 26 August 1911
John William COOPER landed at Liardet's Beach in late 1852. A builder by trade, he settled in Sandridge and was active in creating Sandridge as an independent municipality. His was Elizabeth HARRIS. Two stapled A4 sheets with photocopy of tribute on retirement of William Robert COOPERjohn willian cooper, local government - borough of sandridge, elizabeth harris -
National Wool Museum
Report, Wool Industry Review: Progress Report Nov 1965
"Wool Industry Review: Progress Report Nov 1965" includes review of P A Management Report, (w7071), proposals by Sir Alan Westerman and Mr McKinnon of the Dept of Trade.wool marketing textile industry - history, wool textile manufacturers association alexander lau pty ltd, alexander lau pty ltd, wool marketing, textile industry - history