Showing 2188 items
matching tram 6
-
 Ballarat Tramway Museum
Negative, Travis Jeffrey, 17/06/1962 12:00:00 AM
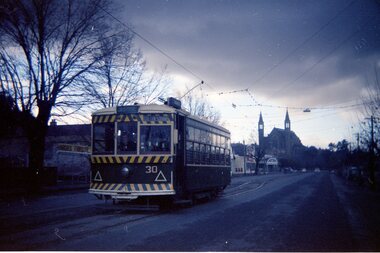
Colour Negative No. N401, of Bendigo Birney No. 30 at Myrtle St loop on the Golden Square line. Tram has the destination of Golden Square. Photo possibly 17/6/1962. Colour laser printed copy of image stored in box 73. Image scanned at hi res 27/5/2020 and image updated.In red pen on folder that contained negative, "NR71B" and "17 Jun 62". trams, tramways, bendigo, golden square, myrtle st, tram 30 -
 Ballarat Tramway Museum
Negative, Travis Jeffrey, 5/08/1962 12:00:00 AM
Colour Negative No. N402, of the interior of Birney tram with two crew members, driver and conductor sitting at one end of the tramcar. Probably No. 11 - see Reg. Item 2753 for the same Conductor, probably at Golden Square terminus. Photo possibly 17/6/1962. Colour laser printed copy of image stored in box 73. Image scanned at hi res 27/5/2020 and image updated.In red pen on folder that contained negative, "NR92B" and "5 Aug 62". trams, tramways, bendigo, crews, birney -
 Ballarat Tramway Museum
Negative, Travis Jeffrey, 5/08/1962 12:00:00 AM
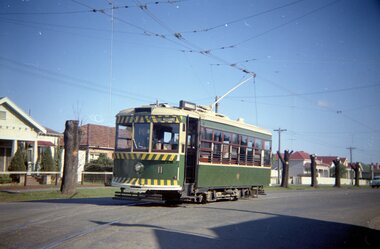
Colour Negative No. N403, of Bendigo Birney No. 11, outbound to Golden Square at Honeysuckle St. Loop?, has a mile post oppose the front of the tram. Tram has the destination of Golden Square. Photo possibly 17/6/1962. Colour laser printed copy of image stored in box 73. Original negative hires scan and image updated 28/5/2020.In red pen on folder that contained negative, "NR91B" and "5 Aug 62". trams, tramways, bendigo, golden square, honeysuckle st., tram 11 -
 Ballarat Tramway Museum
Negative, Travis Jeffrey, 5/08/1962 12:00:00 AM
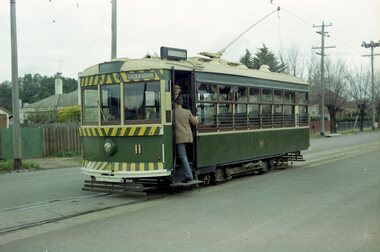
Colour Negative No. N404, of Bendigo Birney No. 11, bound to Golden Square. Actual location not known. Tram has the destination of Golden Square. Has passenger boarding tram and the conductor (same as Reg. Item 2751) looking at the photographer. Photo possibly 17/6/1962. Colour laser printed copy of image stored in box 73. Original negative hires scan and image updated 28/5/2020.In red pen on folder that contained negative, "NR89B" and "5 Aug 62". trams, tramways, bendigo, golden square, tram 11 -
 Ballarat Tramway Museum
Negative, Travis Jeffrey, 5/08/1962 12:00:00 AM
Colour Negative No. N410, of the Bendigo No 11 turning from McCrae St into Nolan St, with in the background. Tram has the destination of Lake Weeroona. Photo taken possibly on Sept or Oct 1962, given the tree pruning in the background - pruned back stumps. Colour laser printed copy of image stored in box 73. Original negative hires scan and image updated 28/5/2020.In red pen on folder that contained negative, "NR65A" and "23 Feb 1962" and inside "26 Sep 1962" and "6 Oct 1962". and "55A" in pencil. trams, tramways, bendigo, nolan st, lake weeroona, tram 11 -
 Ballarat Tramway Museum
Photograph - Black & White Photograph/s - set of 22, Eldon Hogan, 8/12/1974 12:00:00 AM
Set of 22 black and white photographs of the first trams along Wendouree Parade, 8 Dec. 1974 (See 1974-75 Annual Report) .1 - Rolf Jinks at depot Junction .2 - 27 entering Wendouree Parade - Clyde Croft .3 -ditto with Richard Gilbert with the flag .4 - 27 crossing the parade .5 - In Wendouree Parade .6 - ditto .7 -At St Aidans Drive .8 - ditto .9 - 27 returning to the depot .10 - ditto .11 - 40 returning to the depot .12 - 40 at the loop - Richard Gilbert and Clyde Croft .13 - ditto .14 -ditto .15 - 40 at St Aidans Drive .16 - ditto .17 - ditto .18 - the dust is flying. .19 - 40 at Gardens Loop .20 - ditto .21 - Wendouree Parade .22 - 40 entering the Parade. Photographer Eldon Hogan. Roll of negatives held - stored with negatives file.trams, tramways, btps, wendouree parade, first tram, testing, tram 27, tram 40 -
 Ballarat Tramway Museum
Manual - Procedure, State Electricity Commission of Victoria (SECV), "Extract from the 'Proceedings of the Electrical Association of New South Wales' session 1910 - 11", mid 1930's
Two copies of a Carbon typed copy of a technical procedure - 6 pages - "Extract from the 'Proceedings of the Electrical Association of New South Wales' session 1910 - 11" - giving advice on the location of Trolley Wire" giving the guide on how to locate trolley wire on curves and junctions, gives formulas, positioning at frogs, notes regarding various cars and trolley wire height includes notes on cross falls of track, a table of aluminium copper alloys - bending strength and failure modes. Consists of five pages with two blue print drawing. Each page has been scanned the blue print drawings reversed imaged as well. 4768.2 - blue print drawing showing references in the various formulas etc used. 4768.3 - ditto showing tracking for four wheeled and bogie cars and other diagrams for turnouts, frog locations and frog angles. BTPS Number "219". "226" in ink on left hand bottom of first pagetrams, tramways, overhead, trolley wire, points -
 Ballarat Tramway Museum
Photograph - Digital image, WTP, Sturt and Lydiard St from a postcard, c1907
Taken from the Post office building looking towards the National Mutual Life building, and the Town Hall. Has numerous horse-drawn vehicles in the image along with an ESCo tram. Received from David Critchley of Sydney Tramway Museum in an email dated 6/5/2010. See the folder for a print of the email and a copy of the image. Notes that it is from a WTP Postcard, hand-dated 14/3/1908 along the bottom edge. See the Email dated 15/3/2010 regarding the use of this image. See 8988 for the postcard.Yields information about the corner of Sturt and Lydiard St in 1907c, from a digital image copy of a post card.Digital image of the corner of Sturt and Lydiard St from a postcard, 1908. trams, tramways, sturt st, lydiard st, esco -
 Ballarat Tramway Museum
Document - Letter/s, Forest City Electric Company and Victorian Agent General London, "State Electricity Commission of Victoria Type B Non-car counting signals", Jun. 1936
Yields information about how letters were exchanged between the Forest City Electric Co and the SEC using the Victorian Agent General in London. Yields information about the various parties processes and letterheads.4913.1 - Duplicate copy of letters from the Forest City Electric Company, titled "State Electricity Commission of Victoria Type B Non-car counting signals" forwarding blueprints of drawing ST 51912 to the Agent General for Victoria London for the SEC, dated 18/6/1936, on watermarked paper. 4913.2 - Original of letter dated 22/6/1937 to the SEC Melbourne, received 27/7/1937 in Melbourne and forwarded to Ballarat by 29/7/1937 from the Agent General for Victoria London forwarding the Forest City letter. Has various date stamps and hand written notes.trams, tramways, overhead, signals, forest city signals, trolley wire -
 Ballarat Tramway Museum
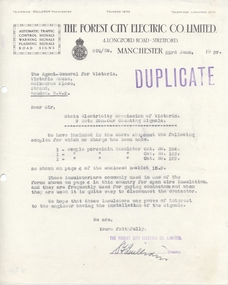
Pamphlet, State Electricity Commission of Victoria (SECV), "Overhead Line Material", Jun. 1937
Yields information about equipment made for Overhead tramway range and materials used and how correspondence was exchanged with the SEC via the Agent General.4914.1 - Letter from The Forest City Electric Co. Limited of Manchester 23/6/1937, to the Agent General for Victoria and the SEC, notifying that they have included within the shipment free of charge, three sample insulators and booklet 15.2. 4914.2 - Booklet or Sheet 15.2, titled "Overhead Line Material" comprising 12 pages showing details of porcelain insulators available from The Forest City Electric Co., and other associated equipment, including cap and cone suspensions, wood strain insulators, Giant Strain Insulators, overhead frogs, crossings, bonding compressors and contactors. Each sheet had three staples on left hand side and two punch holes. There were removed for scanning and have not been replaced.trams, tramways, overhead, forest city signals, insulation, trackwork, trolley wire -
 Ballarat Tramway Museum
Document - Report, Municipal Tramways Association, "Report of the Sub-Committee on Standardization of Overhead Line Material", Jun. 2020
Yields information about the materials used in tramway overhead and could have been used as a specification by ESCo Engineers and standardization of materials in order to reduce costs.Sixteen page booklet, titled "Report of the Sub-Committee on Standardization of Overhead Line Material", published by Municipal Tramways Association, 2nd Edition, issued in May 1921, Submitted to the Annual Meeting of the Manager's Section of the Association at Birmingham, 16/6/1920 under the signature of J. Beckett, General Secretary. Gives an Appendix - List of Drawings, Suggested specification for Standard Copper Trolley Wire, steel span and guard wires, and Overhead wire fittings trams, tramways, overhead, trolley wire -
 Ballarat Tramway Museum
Document - Letter/s, State Electricity Commission of Victoria (SECV), "Tramways By-Law No. 1", Jun. 1937
Yields information about the distribution of the SEC tramway by-laws to workers and the relevant councils.Set of four letters or copies that involved the publication of the SEC's "Tramways by-Law No. 1" in 1937. .1 - From Engineer & Manager - to the Manager Ballarat - 4/6/1937 - quarto paper, typed and handwritten notes regarding the availability of the amended by-law and please order sufficient copies. .2 - Copy of the Letter to The Town Clerk, Sebastopol advising them of the new by-law, quarto green paper, carbon copy, dated 17/6/1937 .3 - ditto to the City of Ballarat .4 - Letter - quarto, typed, dated 22/6/1937 from the City of Ballaarat acknowledging receipt of the letter to the SEC.trams, tramways, by laws, city of ballaarat, borough of sebastopol, sec -
 Ballarat Tramway Museum
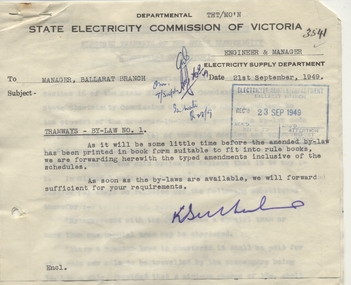
Document - Letter/s, State Electricity Commission of Victoria (SECV), "Tramways By-Law No. 1 ", Sep. 1949
Yields information about the distribution of the SEC tramway by-laws to workers and alterations to them in 1949 in a temporary format.Correspondence concerning the alterations to By-Law No. 1, in Sept. 1949. .1 - covering letter forwarding the typed amendments to the Manager Ballarat, dated 21/9/1949. Has a date stamp of 23/9/1949.. type on Quarto paper with SEC letter head. .2 - 6 pages - foolscap - carbon copy of the alterations to the By Law, re special trams, fares in Ballarat, Bendigo and Geelong and transfer checks. Dated under seal of the SEC 18/8/1949. trams, tramways, by laws, sec -
 Ballarat Tramway Museum
Photograph - Digital image Set of 10, 19/02/2011 12:00:00 AM
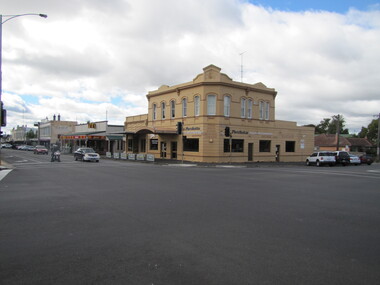
Yields information about the 2011 appearance of Hospital Corner.Set of 10 digital images of Hospital Corner, taken by Warren Doubleday on 19-2-2011 for use in BTM web presentation - Hospital Corner. .1 - SE Corner - La Porchetta's .2 - NE Corner - Shell service station .3 - Looking across to SE corner .4 - Looking across to SW corner - Celebrations store .5 - looking across to NW corner and Hospital .6 - ditto .7 - ditto .8 - Drummond St signage on western side .9 - Celebrations store on SW corner .10 - Davis bus turning from Drummond into Lydiard Sts.trams, tramways, hospital corner, drummond st, sturt st, davis buses -
 Ballarat Tramway Museum
Photograph - Black & White Photograph/s, 24/05/1974 12:00:00 AM
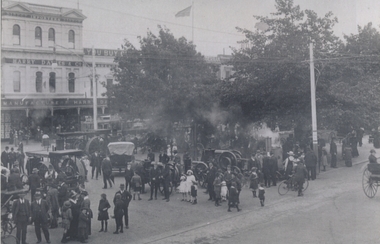
Black and white (6 prints), digital prints, of Jelbart Engine Display, Sturt and Doveton Streets, 24/5/1924 with Harry Davies building in background, along with an ESCo tram and other street furniture. Many people in the photograph. Donated by Colin Homes 27/3/2011. Colin notes no King George V statue (1936) See the June 2010 issue of Fares Please! for an article written by Colin Holmes on Jelbart and the Ballarat roller.trams, tramways, jelbart, sturt st, exhibitions, esco -
 Ballarat Tramway Museum
Photograph - Digital image Set of 11, Stuart Loddington, 10 images of Ballarat trams prior to closure, 1971
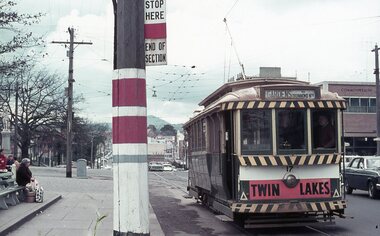
Yields information about Ballarat Tramways and trams prior to the closure of the tramway system.Set of 11 digital images, comprising 1 donation text image and 10 images of Ballarat trams prior to closure, scanned from original slides by Stuart Lodington, 1971 prior to closure of the system. .1 - Donation text slide. .2 - No. 26 southbound in Lydiard St North, with the Ballarat Railway Station level crossing gates in the background. .3 - No. 27 and 30 crossing at Bell St Loop, Skipton St. (see also btm4976i4) .4 - No. 17 Wendouree Parade, near Gardens Loop .5 - Single truck tram at Victoria St terminus, taken from the west side of the Buninyong Rail line bridge, with CRB Roadwork sign, Eureka Caravan Park and Meagher Hotel in the background, possibly No. 11, see entry for .10 .6 - No. 12 and 30 crossing at the Urquhart St Loop, Drummond St South. .7 - No. 12 westbound in Sturt St, with Grenville St in the background. .8 - No. 17 at Gardens Loop with the Trolley pole being reversed. .9 - No. 30, Lydiard St North with Reid's Palace building in the background. .10 - No. 11 passing over the Buninyong rail line bridge, with Gardens via Sturt St West and a Twin Lakes sign. Has a number of children alongside the driver. .11 - No. 21 heading northbound in Wendouree Parade, Gardens, just to the north of the now BTM depot junction.trams, tramways, ballarat, level crossings, buninyong railway, lydiard st north, bell st, victoria st, wendouree parade, gardens, drummond st, sturt st, tram 26, tram 27, tram 30, tram 17, tram 12, tram 21, tram 11 -
 Ballarat Tramway Museum
Photograph - Digital image Set of 10, 1971
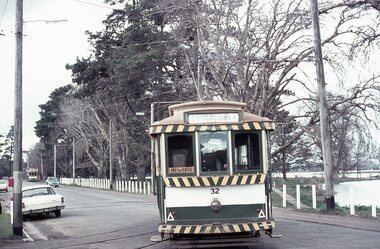
Yields information about Ballarat Tramways and trams prior to the closure of the tramway system.Set of 10 digital images of Ballarat trams prior to closure, scanned from original slides by Stuart Lodington, 1971 prior to closure of the system. .1 - No. 17 at the City Centre, Sturt St, south side, with Gardens via Sturt St on destination roll. Can see the ESCo switch box in the back and the stop and section sign on the adjacent pole. .2 - No. 26 at Sebastopol terminus alongside the Royal Mail Hotel. The tram has yet to turn the pole or the destination roll. Note the Bus Stop sign on the pole, just prior to closure. .3 - ditto .4 - No. 27 and 30 crossing in Skipton St at the Bell St loop (see also btm4975i3) .5 - No. 32, Gardens, about to enter the Carlton St loop, with Lake Wendouree in background, Wendouree Parade. .6 - No. 32 at Depot junction, good photo of depot trackwork entry area. .7 - No. 21, Wendouree Parade, Gardens area, north bound, showing Gardens via Sturt. .8 - No. 12, inbound on Sturt St west at a tram stop. Has destination of Mt. Pleasant. .9 - No. 27 at Lydiard St north terminus with the shelter in the background. .10 - No. 21 at Gardens Loop, tram has destination of Mt. Pleasant. Crews sitting in the saloon.trams, tramways, ballarat, sturt st, sebastopol, drummond st sth, wendouree parade, carlton st, depot, depot junction, trackwork, gardens, sturt st west, crews, tram 17, tram 26, tram 27, tram 32, tram 21, tram 12 -
 Ballarat Tramway Museum
Photograph - Digital image Set of 10, Stuart Lodington, 1971
Set of 10 digital images of Ballarat trams prior to closure, scanned from original slides by Stuart Lodington, 1971 prior to closure of the system. .1 - No. 32 entering the depot from Wendouree Parade, with the Lake in the background. Shows the depot fire alarm on an adjacent pole. .2 - No. 26 at Sebastopol, before turning the pole. Has a bus stop sign on a pole already. .3 - No. 27 and 26? crossing at the Bell St loop in Skipton St. No. 27 has a Twin Lakes sign. .4 - No. 32 outbound to the Gardens in Hamilton Ave about to enter Wendouree Parade with Loreto convent and Olympic monument the background. .5 - No. 26, Albert St Sebastopol, approaching the Sebastopol terminus, with Sebastopol Food Stores building on the left of the photo. .6 - No. 12 leaving the Parker St. Loop, Sturt St West after crossing a tram. No. 12 has destination of Victoria St. .7 - No. 12 inward bound in Lydiard St North with Fine Art Gallery in the background, 3BA. No. 12 has destination of Sebastopol and has a Twin Lakes sign. .8 - No. 12 inward bound, Sturt St West, No. 12 has destination of Victoria St and has a Twin Lakes sign. .9 - No. 26 at Sebastopol terminus, outside the Royal Mail Hotel, has a bus stop sign on a pole. Tram pole yet to be turned, but destination adjusted to Lydiard St. North. .10 - No. 12 at Sebastopol terminus, outside the Royal Mail Hotel. No. 12 has destination of Lydiard St Nth and has a Twin Lakes sign.trams, tramways, ballarat, sturt st west, sebastopol, skipton st, wendouree parade, hamilton ave, depot, depot junction, parker st loop, bell st, lydiard st nth, tram 32, tram 26, tram 27, tram 12 -
 Ballarat Tramway Museum
Photograph - Digital image Set of 10, 1971
Yields information about Ballarat Tramways and trams prior to the closure of the tramway system.Set of 10 digital images of Ballarat trams prior to closure, scanned from original slides by Stuart Lodington, 1971 prior to closure of the system. .1 - No. 27 at Lydiard St North terminus with passengers alighting/boarding and an enthusiast about to turn the pole. .2 - No. 27 and No. 30 Skipton St at the Bell St Loop. .3 - No. 13 at the Mt Pleasant terminus, showing destination of Gardens via Drummond St North. .4 - Crews of No. 31 (Conductor and Driver) reversing pole of No. 31 at the depot. .5 - No. 11 inbound on Victoria St. .6 - Night view of a tram at a terminus. .7 - Scrubber on 0 road at the depot .8 - No. 14 at Gardens Loop with another tram behind and the driver standing in the front of the tram. .9 - No. 13 (Mt Pleasant) inbound in Sturt St with 14 behind. .10 - No. 26 northbound to Lydiard St north, about to cross Albert St Sebastopol with the SSW shop in the background. trams, tramways, sebastopol, lydiard st nth, skipton st, bell st, mt pleasant, victoria st, depot, albert st, tram 27, tram 30, tram 13, tram 11, scrubber, tram 14, tram 26 -
 Ballarat Tramway Museum
Photograph - Digital image Set of 10, 1971
Yields information about Ballarat Tramways and trams prior to the closure of the tramway system.Set of 10 digital images of Ballarat trams prior to closure, scanned from original slides by Stuart Lodington, 1971 prior to closure of the system. .1 - No. 43 westbound in Sturt St. .2 - No. 43 at Gardens Loop showing Mt Pleasant on the destination roll. .3 - Scrubber on 0 road at the depot. .4 - night photo of a bogie tramcar. .5 - No. 43 at the Gardens Loop, Wendouree Parade .6 - night photo of a bogie tramcar .7 - Sturt St West, with tram following? and Parker St Loop? .8 - Night photo of a single truck tramcar at the Sebastopol terminus .9 - Night photo of a bogie tram at Gardens Loop .10 - Night photo of No. 30 at Sebastopoltrams, tramways, sebastopol, sturt st, depot, wendouree parade, gardens loop, sturt st west, night lighting, tram 26, tram 27, tram 14, tram 39, tram 13, tram 43 -
 Ballarat Tramway Museum
Photograph - Digital image Set of 7, 1971
Yields information about Ballarat Tramways and trams prior to the closure of the tramway system.Set of 7 digital images of Ballarat trams prior to closure, scanned from original slides by Stuart Lodington, 1971 prior to closure of the system. .1 - No. 26 and 27 inbound Sturt St West at Parker St loop, both trams showing CITY. .2 - No. 43 and 14 crossing at Parker St Loop. .3 - No. 39 turning in bound from Hamilton Ave into Sturt St West. Tram showing destination of Mt Pleasant. .4 - No. 39 inbound in Hamilton Ave. .5 - No. 14 (Gardens via Sturt St W), and No. 13 (Special) at Gardens Loop .6 - No. 26, crossing Albert St Sebastopol, northbound, going to Lydiard St North .7 - Crew of No. 43 standing in front of the tram at Gardens Looptrams, tramways, sturt st west, parker st loop, hamilton ave, albert st, crews -
 Ballarat Tramway Museum
Photograph - Digital image Set of 13, Stuart Lodington, early BTPS operations and depot construction, 1975 - 1978c
Yields information about Ballarat Tramways and trams prior to the closure of the tramway system.Set of 13 digital images of early BTPS operations and depot construction, scanned from original slides by Stuart Lodington, 1974 to 1978c. .1 - Richard Gilbert and Gavin Young in No. 27 .2 - Richard Gilbert, Peter Bruce, Campbell Duncan, and others at the rear of the depot enjoying a drink. .3 - Richard Gilbert, Stuart Lodington, Gavin Young and Peter Rees in No. 27 .4 - as for No. 2 .5 - Richard Gilbert and Gavin Young on depot fan. .6 - Depot extensions, showing 4 and 5 roads, prior to any track laying of the pit track being built. .7 - Graeme Jordan lifting No. 38 on jacks .8 - front of new depot shed prior to any track construction .9 - King points laid into positron and queen points positioned .10 - Looking north inside shed across 4 road prior to any track laying .11 - spare motor and pinions at rear of shed. .12 - No. 26 at the Carlton St terminus, showing Sturt St West. .13 - ditto, looking north west.trams, tramways, btps, depot, carlton st, wendouree parade, tram 27, tram 38, tram 26 -
 Ballarat Tramway Museum
Photograph - Digital image Set of 20
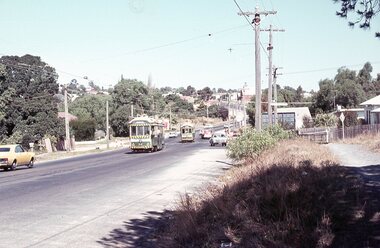
Set of 20 digital images of Bendigo Tramways, 1972 at or before closure while on a tram tour by Stuart Lodington. .1 - No. 28 and 5 at Eaglehawk terminus .2 - No. 28 leaving Charing Cross and travelling into View St with Armstrong Type Service building in background and Firestone Advertisements. .3 - No. 29 with Eaglehawk Town Hall and Post Office in background. .4 - No. 26 and 29 at start of double track, High St Eaglehawk .5 - No. 29 leaving Eaglehawk with shops in the background, Foodland, J. Bests .6 - No. 29 and 23 crossing Manchester Loop with Manchester Arms Hotel in the background and an old poppet head. .7 - No. 29 at ditto with poppet head in the background. .8 - No. 28 and two other trams at the Quarry Hill terminus. .9 - No. 29 in High St Bendigo with the Cathedral and Golden Gate Hotel in the background. .10 - No. 3 with destination Eaglehawk, in bound Carpenter St? .11 - No. 29 following a single trucker through a loop or the end of the double track near the depot. .12 - No. 23?, at Eaglehawk terminus, with Eaglehawk Town Hall in the background. .13 - Birney tram crossing the bridge at the Depot entrance - No. 29 .14 - No. 29 on the Eaglehawk line? .15 - as for .13 .16 - No. 29 entering the depot. .17 - No. 23, inbound from Eaglehawk, at Jobs Gully Loop with the railway overbridge in the background. .18 - No. 28 and two other trams (see also Reg Item 4982) for the same tram tour at Myrtle St. Loop. .19 - No. 21 with North Bendigo on the destination approaching the Golden Square terminus. .20 - No. 7 at Golden Square terminustrams, tramways, bendigo, eaglehawk, quarry hill, golden square, depot, tram 5, tram 29, tram 28, tram 26, tram 23, tram 7, tram 21 -
 Ballarat Tramway Museum
Photograph - Digital image Set of 20, 1971-72
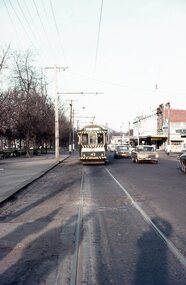
Set of 20 digital images of Bendigo Tramways, 1972 at or before closure while on a tram tour by Stuart Lodington. .1 - No. 7 at Golden Square terminus .2 - ditto .3 - No. 26 in bound on the Eaglehawk line with a crossing loop behind. .4 - Birney crossing the bridge by the tram depot. .5 - No. 29 running a special on the Eaglehawk line with a HBA billboard in the background. .6 - No. 29 with a driver walking in front of the tram at the above location. .7 - No. 29 on the Eaglehawk line .8 - ditto waiting for a tram at Manchester Loop with poppet head in the background. .9 - No. 29 on the Eaglehawk line .10 - Eaglehawk Town Hall at night. .11 - No. 7 at the depot junction in McCrae St, with Golden Square destination. .12 - No. 29 with the Camp Hotel Eaglehawk in the background. Also a Newsagent with The Sun, The Bendigo Advertiser and The Age signs on the building, High St .13 - No. 29 Mt Korong Rd, with the railway overbridge in the background. .14 - interior photo of Birney tram roof .15 - interior view of controls of Birney at Eaglehawk .16 - No. 29 outbound at the Depot Junction McCrae St. .17 - No. 18 at the Eaglehawk terminus .18 - close up view of No. 29 front. .19 - No. 29 in Nolan St, crossing the bridge, outbound. .20 - No. 18 at the Eaglehawk terminus with the Eaglehawk Town Hall, Post Office in the background. Has a circus banner on the side.trams, tramways, bendigo, eaglehawk, quarry hill, golden square, depot, mccrae st, nolan st, tram 7, tram 26, tram 29, tram 18 -
 Ballarat Tramway Museum
Photograph - Digital image Set of 20, 9/12/1972 12:00:00 AM
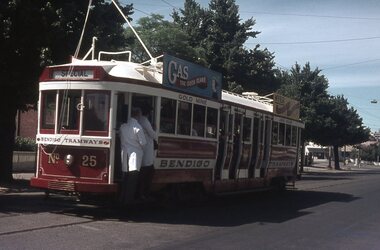
Set of 21 digital images of Bendigo Tramways, at the re-opening of the Bendigo tramways by the Bendigo Trust on 9/12/1972by Stuart Lodington. All trams in the first Bendigo Trust colours. .1 - No. 25 with Gas and Myer roof advertisements .2 - No. 30 with 3BO roof advert and a BP service station in the background. .3 - SEC single trucker at the Mine with a large "Tram Tours" sign on the front of the tram .4 - ditto .5 - No. 19 with a large group of passengers, Bendigo Motor Co and Sandhurst roof advertisements .6 - No. 30 in McCrae St .7 - view of opening march with band .8 - No. 19 in opening parade .9 - Opening Parade in High St with cathedral in the background .10 - No. 30 in Nolan St crossing bridge .11 - ditto .12 - No. 25 at the mine .13 - No. 30 leaving the mine .14 - No. 30 ditto with BCTV roof advert. .15 - Charing Cross with cenotaph, The Beehive building and Ezywalkin shoes and Coca Cola adverts .16 - No. 19 southbound in High St with City Centre Motel building in the background. .17 - No. 30 returning from North Bendigo .18 - No 25 in High St after leaving Gold Mine .19 - No. 30 at the Mine .20 - No. 30 in Nolan St .21 - No. 30 with 3BO roof advert and a BP service station in the background.trams, tramways, bendigo, north bendigo, charing cross, bendigo trust, central deborah, tram 25, tram 30, tram 19 -
 Ballarat Tramway Museum
Photograph - Digital image Set of 20, 16/04/1972 12:00:00 AM
Set of 20 digital images of Bendigo Tramways, of the last running day of the Eaglehawk to Quarry Hill line 16 April 1972, .1 - No. 24 outbound to Eaglehawk .2 - No. 3? at Manchester Loop .3 - No. 24 outbound to Eaglehawk .4 - bogie tram crossing the rail over bridge from Eaglehawk .5 - No. 18 in View St .6 - No. 24 outbound to Eaglehawk .7 - No 18 at Eaglehawk with destination roll being changed, and shopping centre in the background. .8 - No. 24 crossing the railway overbridge, going to Eaglehawk .9 - No. 3 outbound to Eaglehawk .10 - No. 24 crossing the railway overbridge, going to Eaglehawk .11 - No. 3 and 24 crossing at Long Gully .12 - No. 18 at Eaglehawk with Leo A Hughes photographer building in the background and a CFA truck passing the tram. Tram SEC roof advertisement and a banner for "German -?- Circus" at Eaglehawk and dates. .13 - No. 3 inbound on the Eaglehawk line. .14 - No. 18 outbound to Eaglehawk .15 - ditto .16 - No. 18 at Eaglehawk terminus with the Mechanics Institute in the background. .17 - No. 24 at the Eaglehawk terminus .18 - No 24 at the intersection with Taylor St .19 - No. 24 at the Eaglehawk terminus .20 - dittotrams, tramways, bendigo, eaglehawk, long gully, manchester loop, tram 24, tram 18, tram 3 -
 Ballarat Tramway Museum
Photograph - Digital image Set of 20, 16/04/1972 12:00:00 AM
Set of 22 digital images of Bendigo Tramways, of the last running day of the Eaglehawk to Quarry Hill line 16 April 1972, .1 - No. 3 and 24 crossing at Long Gully .2 - No. 3 turning at the Cricket ground, Barnard and View Sts, inbound to the City and Quarry Hill .3 - No. 3 in bound to the City and Quarry Hill, Long Gully area .4 - No. 18 inbound to the City and Quarry Hill crossing the railway bridge from Eaglehawk. .5 - Manchester Loop .6 - No. 18 inbound to the City and Quarry Hill crossing the railway bridge from Eaglehawk. .7 - No. 18 about to enter Jobs Gully Loop .8 - No. 3 about to turn at the Cricket ground, Barnard and View Sts inbound to the City and Quarry Hill .9 - No. 3 turning at the Cricket ground, Barnard and View Sts, inbound to the City and Quarry Hill .10 - No. 18 at Eaglehawk terminus with the Mechanics Institute in the background. .11 - No. 3 in bound, Ironbark area. .12 - No. 3 at Long Gully Loop .13 - No. 3 outbound to Eaglehawk. .14 - No. 18 at Eaglehawk with German circus banner on tram .15 - No. 18 on the Eaglehawk line at Jobs Gully Loop .16 - No. 24 outbound to Eaglehawk at Taylor St .17 - No. 18 inbound to the City and Quarry Hill crossing the railway bridge from Eaglehawk. .18 - No. 3 at Manchester Loop .19 - No. 18 at Eaglehawk terminus .20 - No. 18 at Eaglehawk with German circus banner on tram .21 - bogie tram at Long Gully Loop. .22 - No. 24 outbound to Eaglehawk at Taylor Sttrams, tramways, bendigo, eaglehawk, long gully, jobs gully, manchester loop, tram 24, tram 18, tram 3 -
 Ballarat Tramway Museum
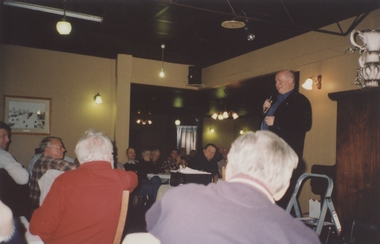
Photograph - Colour Print/s - set of 7, Earl Ewers, 28/05/2011 12:00:00 AM
Yields information about the BTM's 40th anniversary celebrations, and some of the people involved.Set of seven colour prints of speakers during the 40th anniversary celebrations dinner at the Brewery Tap Hotel, Warrenheip. Taken by Earl Ewers, printed on Fujichrome paper. Taken 28/5/2011. .1 - Richard Gilbert speaking .2 - Paul Nicholson .3 - Neil Lardner, Richard Gilbert and Greg Rogers .4 - Neil Lardner, Richard Gilbert, Stephen Butler and Greg Rogers .5 - Alan Bradley .6 - Bill Kingsley .7 - Ballarat Bertie beer advert at hotel.On rear in blue pen .1 - Richard Gilbert speaking at 40th Anniversary Dinner, Warrenheip Hotel 28 May 2011. .2 - Paul Nicholson speaking at 40th Anniversary Dinner, Warrenheip Hotel 28 May 2011. .3 - Neil Lardner, Richard Gilbert, Greg Rodgers 40th Anniversary Dinner, Warrenheip Hotel 28 May 2011. .4 -L. to R. Neil Lardner, Richard Gilbert, Stephen Butler Greg Rodgers 40th Anniversary Dinner, Warrenheip Hotel 28 May 2011. .5 - Alan Bradley speaking at 40th Anniversary Dinner, Warrenheip Hotel 28 May 2011. .6 - Bill Kingsley speaking at 40th Anniversary Dinner, Warrenheip Hotel 28 May 2011. .7 -"Ballarat Bertie" adverts, Warrenheip Hotel 28 May 2011.trams, tramways, 40th anniversary, btm -
 Ballarat Tramway Museum
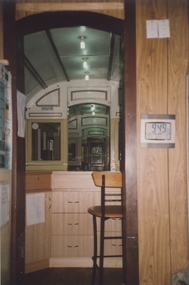
Photograph - Colour Print/s - set of 8, Earl Ewers, 29/05/2011 12:00:00 AM
Yields information about the BTM's 40th anniversary celebrations, and some of the people involved.Set of eight colour prints of the display area and new panels on show for the first time. Taken by Earl Ewers, printed on Fujichrome paper. Taken 29/5/2011. .1 - Display area from the office .2 - Boards and panels on display alongside 3 road .3 - No. 39 and shed. .4 - New panels alongside wall./ .5 - Gavin Young at sales desk .6 - Panel - 1950's to 1960's .7 - Yanks Conductresses and pranksters .8 - End of the Line On rear in blue pen .1 - Interior Museum Section BTM 29 May 2011 .2 - Interior Ballarat Tram Museum 29 May 2011 .3 - Interior Ballarat Tram Museum 29 May 2011 .4 - Wall mountings ready to be put on museum wall 29 May 2011 .5 - "Counting the badges" Gavin Young hard at it 29 May 2011 Ballarat Tram Depottrams, tramways, 40th anniversary, btm, displays, depot, tram 39, tram 1, tram 40 -
 Ballarat Tramway Museum
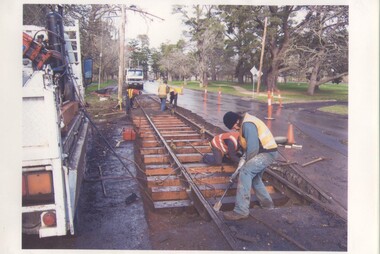
Photograph - Colour Print/s, Richard Gilbert, 18/06/2007 12:00:00 AM
Yields information about track work in Wendouree Parade at Depot Junction August 2007.Laminated A4 colour print containing three photographs of the Puffing Billy Track gang replacing sleepers in Wendouree Parade at Depot Junction, 18/6/2007 - See August 2007 Fares Pease for further depot. Photo by Richard Gilbert, digital photograph print laminated for display purposes.trams, tramways, puffing billy, depot junction, trackwork