Showing 151 items
matching black hill reserve
-
 Ballarat Tramway Museum
Photograph - Digital Image, Black & White Photograph/s, Marc Dahlstrom, c1971
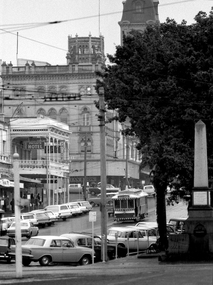
Digital image from a black and white print of tram 42 running a "Special" climbing the Sturt St hill up to Lydiard St, shows the steep hill. In the background is Cooks Private Hotel, Ballarat Travel Centre, Commonwealth Bank, National Mutual Building and Alan Bros. Photo by Marc Dahlstrom c1971. 5056.1 - physical print of the same image, with the Marc Dahlstrom stamp on the rear - added 8-5-2016.On rear is the Marc Dahlstrom stamp.trams, tramways, sturt st, lydiard st, tram 42 -
 Ballarat Tramway Museum
Photograph - Digital image, c1971
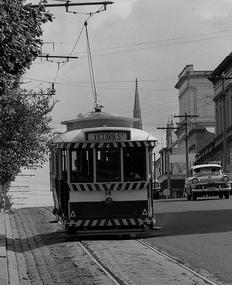
Yields information about Ballarat streetscape and its trams in the closing days of the SEC tramway system.Digital image from a black and white print of tram 31 climbing the hill in Sturt St up to Lydiard St, shows the steepness of the hill. Tram has two Johnnie Walker whisky roof advertisements, a Twin Lakes sign and is showing Special. In the background are a Discount store, a Thrifty furniture van, Cooks Private Hotel, the Commonwealth Bank and the National Mutual Building. Photo by Marc Dahlstrom c1971.On rear is the Marc Dahlstrom stamp.trams, tramways, sturt st, lydiard st, tram 31 -
 Ballarat Tramway Museum
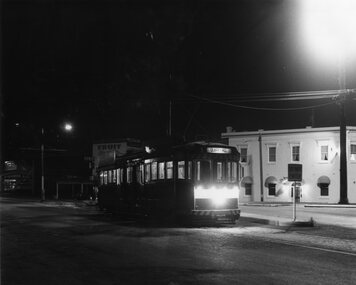
Photograph - Black & White Photograph/s, Chris Wurr, Jan. 1971
Black and White Photograph of Bendigo No. 2 at the Eagle Hawk terminus, Jan. 1971, night photograph. Tram has the destination of Quarry Hill. In the background is the Foodland Store, a Milk bar. The tram has arrived at the terminus, the trolley pole has been turned, but the headlights and dash canopy lights have yet to be turned. Tram has the destination of Quarry Hill. Photo Chris Wurr, early 1970's. "Photo by Chris Wurr" stamped on the rear. In top left hand corner, in ink "71)" and "Bendigo (SEC) Tramways / 1.1971 / Eaglehawk Terminus"trams, tramways, bendigo, eaglehawk, night photo, tram 2 -
 Ballarat Tramway Museum
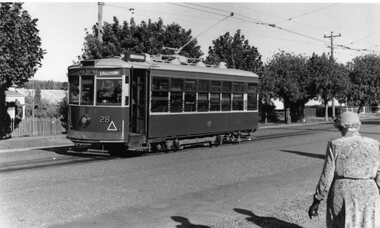
Photograph - Black & White Photograph/s, Wal Jack, 12/04/1959 12:00:00 AM
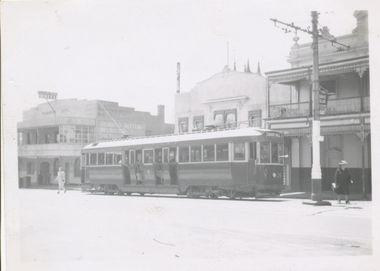
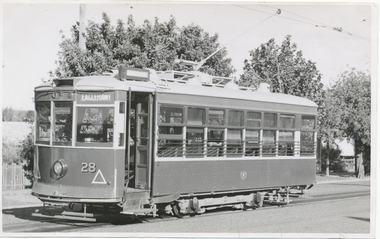
Yields information about Ballarat's trams, and the City centre area and motor vehicles late 1950's.Black and white print of Bendigo 28 at the Quarry Hill terminus, 12/4/1959, photo by Wal Jack. Has a lady walking across to the tram - dressed in gloves and hat. Tram has the destination of Eaglehawk. Photo print courtesy of Port Dock Railway Museum, now the National Railway Museum. See worksheet 4311 for letter and details of prints sent to Bill Scott, 19/10/2001. Any photo credit to mention NRM Collection.On rear of copy "SEC Bendigo #28 / Quarry Hill terminus / 12/4/59 / Wal Jack photo / National Railway Museum.trams, tramways, bendigo, quarry hill, tram 28 -
 Ballarat Tramway Museum
Slide - 35mm slide/s - set of 4, Campbell Duncan, 1971 or 1972
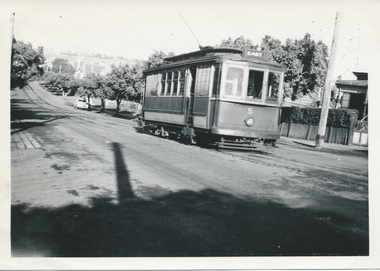
Set of four colour slide on Agfacolour - black and white plastic mounts. .1 - Bendigo No. 3 on a Quarry Hill service .2 - Bendigo No. 5, in High St Eaglehawk, inbound to Quarry Hill. Has a former Masonic Hall? in the background - now part of the Eaglehawk Primary School. .3. - Bendigo 26, en route to Quarry Hill, on Quarry hill line? with a BP service station in the background. .4 - Bendigo 5, descending View St to Charing Cross.tramways, trams, bendigo, quarry hill, eaglehawk, view st, tram 3, tram 5, tram 26 -
 Ballarat Tramway Museum
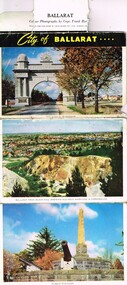
Postcard - Folder set, John Sands and Co, "City of Ballarat", c1950
Yields information about the city of Ballarat late 1940's or early 1950's through a set of photographs and has a strong association with well known photographer - Frank Hurley.Folder of postcards or photographs of the City of Ballarat, photographs by Capt. Frank Hurley, late 1940's or very early 1950's. Series of 7 colour photographs on one side and five black and whites on the other. Colour - Arch of The Avenue of Honor, Ballarat from Black Hill showing gold workings, Eureka Stockade, The Begonia Conservatory Botanic Gardens, Sturt St between Grenville St and Lydiard St, the floral clock with the Town Hall in the background, The Ballarat Hospital and Autumn in the Botanic Gardens. Has a title "City of Ballarat", with a folder tab at the top. Black and white photographs "Ballarat Monument to the Golden Age (The gold monument), Sturt St looking west from the town hall, The City Hall, Ballarat Looking NE from the City Hall with the post office in the foreground and the "The flight from Pompeii - Botanical Gardens" Printed by John Sands and Co.trams, tramways, ballarat, postcards, sturt st, town hall, floral clock, eureka, botanical gardens, hospital, post office, black hill, floral clock -
 Ballarat Tramway Museum
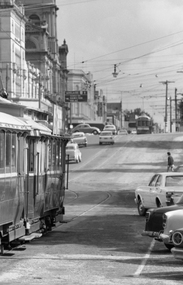
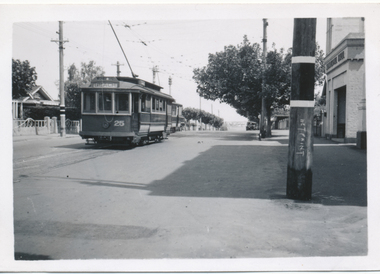
Photograph - Black & White Photograph/s, mid to late 1950's
Black and white photograph of Bendigo 25, late 1950's crossing the highway at Charing Cross and about to enter Mitchell St. Tram has the destination of Quarry Hill. In the background is City Club Hotel. On the right hand side of the photograph is a direction sign and tram stop sign. Photographer unknown - see history of object.In the rear in ink "Bendigo"trams, tramways, bendigo, charing cross, mitchell st, quarry hill, tram 25 -
 Ballarat Tramway Museum
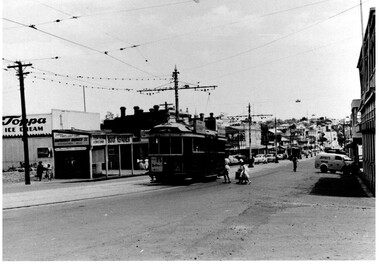
Photograph - Black & White, Bendigo 3 climbing Mitchell St, late 1950's
Black and White photograph, of Bendigo 3 climbing Mitchell St, near the Railway Station with the Destination of Quarry Hill. Has a Hutton's Ham ad on the front drivers panel and two rood ads. In the background are Sandhurst Dairies shop advertising Toppa Ice Cream, a boot repairer and a van marked Jeffreys Bread parked on the north side of Mitchell St. Nearing the point where the double track became single - see the signal wire insulators in the overhead. Printed on Fujichrome paper. Two copies held."TMSV Sales" stamp on rear. On rear of in ink 'HTT16 = MM N 102 = Geel 32 = BED 3"trams, tramways, bendigo, mitchell st, quarry hill, overhead, tram 3 -
 Ballarat Tramway Museum
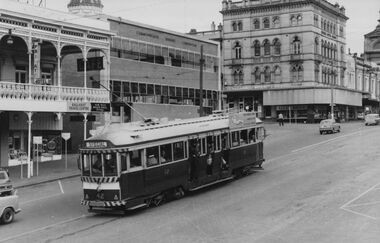
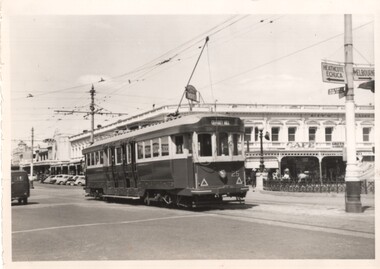
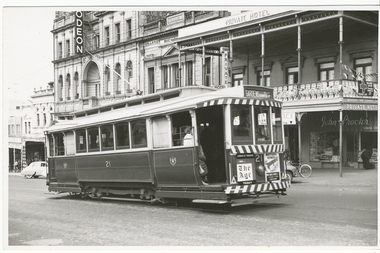
Photograph - Black & White Photograph/s, Lloyd Rogers, 21/03/1962 12:00:00 AM
Yields information about the appearance of tram No. 21 and the Mechanics Institute in the early 1960's.Black and white photograph of Ballarat tram No. 21 climbing the Sturt St hill. Has the destination of Gardens via Drummond Nth. Dated 21/3/1962. Printed on Agfa Gevaert paper in a postcard format. The tram has an Mutual Home and The Age advertisements on the front dash panel. In the background is the Ballarat Mechanics Institute building with The Odeon sign on the front of the building and Cooks Private Hotel. Photo by Lloyd Rogers.In ink "Car 21, Sturt St, Ballarat 21/3/1962. and the number "3/25". In the top left hand corner "ex A'alide 10?"trams, tramways, sturt st, tram 21 -
 Ballarat Tramway Museum
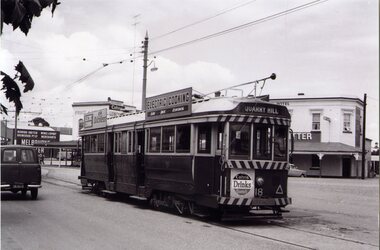
Photograph - Black & White Photograph/s, Ron Hann, Jan. 1963
Yields information about the interior of Bendigo tram depot, is storage area and two Birney trams.Black and white print on laser print paper - of Bendigo 18 at the Eaglehawk terminus 1/1963. Photo by Ron Hann. Tram has a Cohn's Drink advertisement on the front dash panel, two SEC roof advertisements and the destination of Quarry Hill. In the background are a hotel and a liquor store, both advertising Melbourne Bitter. Printed on Fujifilm, Fujicolor Crystal Archive for Frontier"Has label "Reference 6/214/26 Photo by Ron Hann" and another label "Eaglehawk Bendigo 01.63"trams, tramways, eaglehawk, hotels, tram 18 -
 Ballarat Tramway Museum
Photograph - Digital image, 1970s
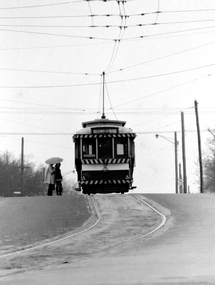
Yields information about the Victoria St route and Bakery Hill.Digital image, black and white, of No. 13 climbing Bakery Hill towards Princess St on the Victoria St route, in Victoria St, with two people waiting for the tram to pass. Photo taken by Peter Bruce 1970's and 1971, prior to the closure of the Ballarat tramway system. Peter's Title of image: "No. 13 Victoria St"trams, tramways, victoria st, bakery hill, tram 13 -
 Ballarat Tramway Museum
Photograph - Digital image, Peter Bruce, "No. 14 Sturt", 1970s
Yields information about Sturt St between Lydiard St and Grenville St, part of the Victoria St route..Digital image, black and white, of No 14 descending the Sturt St hill to Grenville St, enroute to Victoria St. Photo taken by Peter Bruce 1970's and 1971, prior to the closure of the Ballarat tramway system. Peter's Title of image: "No. 14 Sturt"trams, tramways, sturt st, victoria st, tram 14 -
 Ballarat Tramway Museum
Photograph - Digital image, 1970s
Yields information about Sturt St between Grenville St and Lydiard St and the south side of the street.Digital image, black and white, of No. 13 climbing the hill between Grenville St and Lydiard St, past the City Loop with Cooks Private Hotel in the background. Photo taken by Peter Bruce 1970's and 1971, prior to the closure of the Ballarat tramway system. Peter's Title of image: "No. 13 up the hill"trams, tramways, sturt st, grenville st, city loop, tram 14 -
 Ballarat Tramway Museum
Photograph - Digital image Set of 2, 1970s
Yields information about Sturt St and the intersection with Grenville St.Digital image, black and white, two images of No. 21 at the base of the Sturt St hill before crossing Grenville St, going to Victoria St. Roof advert appears in other photos, but very hard to work out. Photo taken by Peter Bruce 1970's and 1971, prior to the closure of the Ballarat tramway system. Peter's Title of image: "No. 21 bottom Sturt St" and "No. 21 Sturt and Grenville".trams, tramways, sturt st, grenville st, tram 21 -
 Ballarat Tramway Museum
Photograph - Digital image, 1970s
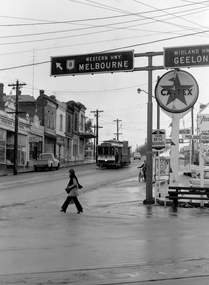
Yields information about the Bakery Hill Victoria St and the Caltex Service Station.Digital image, black and white, of No. 26 descending Bakery Hill to Stone's Corner, Victoria and Main St with the Caltex service station in the foreground. Has a lady with slacks walking across the road and a boy wheeling a bike down the footpath. Note the Highway direction signs and service station signage. O'Brien Motors and a book and record shop on the north side Bakery Hill Victoria St. shops. See Reg 4603 for the subsequent photo at this location. Photo taken by Peter Bruce 1970's and 1971, prior to the closure of the Ballarat tramway system. Peter's Title of image: "No. 26 Bridge and Vic1"trams, tramways, victoria st, main st, stones corner, bakery hill, tram 26 -
 Ballarat Tramway Museum
Photograph - Digital image, Peter Bruce, "No. 26 Sturt and Grenville", 1970s
Yields information about the bottom end of Sturt St and the Victoria St route.Digital image, black and white, of No. 26, at the bottom of the Sturt St hill prior to crossing Grenville St, enroute to Victoria St. Note the conductor talking to the driver. Owen Williams, ANZ and Crockers in the view. Photo taken by Peter Bruce 1970's and 1971, prior to the closure of the Ballarat tramway system. Peter's Title of image: "No. 26 Sturt and Grenville"trams, tramways, sturt st, grenville st, victoria st, tram 26 -
 Ballarat Tramway Museum
Photograph - Digital image, 1970s
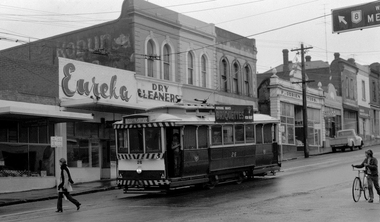
Yields information about the Bakery St Hill on the Victoria St route.Digital image, black and white, of No. 26 at Stones Corner, junction of Bridge, Victoria and Main St, Bakery Hill. No the young girl in slacks walking in front of the tram, the boy wheeling the bike down the street and the young boy standing in the front door of the tram. In the background is Eureka Dry Cleaners, an old Robur tea ad on a building, F. O'Brien Motors. The tram has the destination of Gardens via Sturt St West and a SEC Briquettes Roof advert. Photo taken by Peter Bruce 1970's and 1971, prior to the closure of the Ballarat tramway system. Peter's Title of image: "No. 26 Victoria and Bridge"trams, tramways, stones corner, bakery hill, victoria st, bridge st, tram 26 -
 Ballarat Tramway Museum
Photograph - Digital image, 1970s
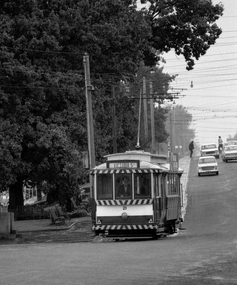
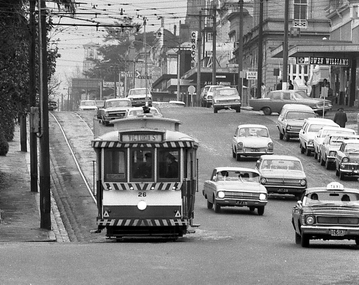
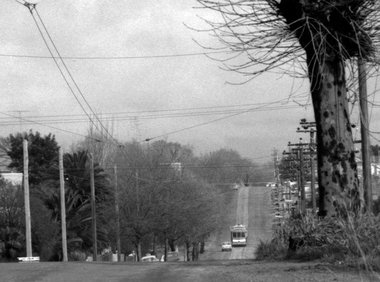
Yields information about the Mt Pleasant route and Barkly St.Digital image, black and white, of No. 31 in Barkly St, Mt Pleasant. Photo taken by Peter Bruce 1970's and 1971, prior to the closure of the Ballarat tramway system. Peter's Title of image: "No. 31 over the hill"trams, tramways, mt pleasant, barkly st, tram 31 -
 Ballarat Tramway Museum
Photograph - Digital image Set of 2, Peter Bruce, "Up the Street", 1970s
Yields information about Sturt St and the City loop.Digital image, black and white, two images, of two single truck trams parked in the City Loop Sturt St, looking up the hill towards the Town Hall. Photo taken by Peter Bruce 1970's and 1971, prior to the closure of the Ballarat tramway system. Peter's Title of image: "Up the Street"trams, tramways, city loop, sturt st -
 Ballarat Tramway Museum
Photograph - Black & White Photograph/s, John Phillips, May. 1985
Yields information about the central Ballarat streets, buildings late 1960's prior to the closure of the tramway and commencement of the construction of Sovereign Hill.Black and White photograph of Ballarat No. 27, photographed by John Phillips, after its repainting to the 1930's colour scheme, but before the white tyres were painted, May 1985. Large image held. Small print of this image added 10/10/2019 and print referenced. trams, tramways, btps, tramcars, restoration, repainting, tram 27 -
 Ballarat Tramway Museum
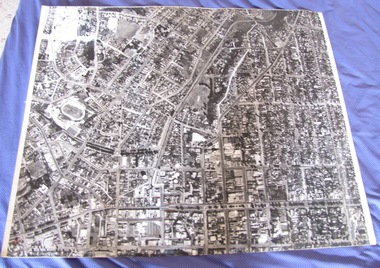
Photograph - Black & White Photograph/s, late 1960's
Black and white aerial photograph of the central area of Ballarat ranging from Mair St to Mt Pleasant, Drummond St and Victoria St. Taken late 1960's as it would appear that the construction of Sovereign Hill has commenced. Shows the tram tracks and possibly parking areas being marked out. On rear in pencil "2384/90"trams, tramways, ballarat, aerial views, sovereign hill -
 Ballarat Tramway Museum
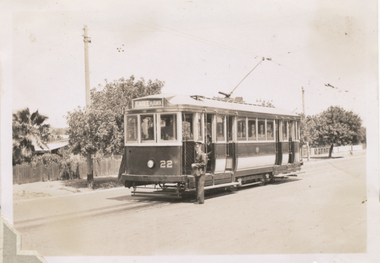
Photograph - Black & White Photograph/s, Wal Jack, 1/01/1941 12:00:00 AM
Black and White print contained within the Wal Jack Bendigo and Geelong Album, see Reg Item 5003 for more details. Photo of No. 22 at Quarry Hill 1-1-1941, has the conductor standing alongside the front of the tram. The tram has the destination of Eaglehawk. Photo by Wal Jack. Printed on Kodak Velox paper. i1 - scan of print in the album i2 - rear of image i3 - scan of negative at 3200dpi added 6/6/2020. On the rear in blue ink "T160, Bendigo Tramways, No. 22 at Quarry Hill 1-1-41" "W. Jack photo" in bottom right hand corner.trams, tramways, bendigo, quarry hill, conductors, tram 22 -
 Ballarat Tramway Museum
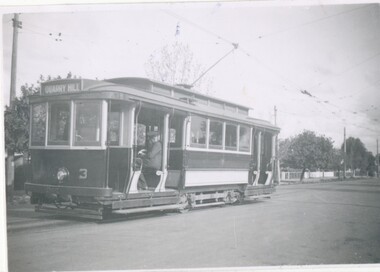
Photograph - Black & White Photograph/s, Wal Jack, 7/10/1939 12:00:00 AM
Black and White print contained within the Wal Jack Bendigo and Geelong Album, see Reg Item 5003 for more details. Photo of No. 3 at Quarry Hill 7-10-1939, has the driver sitting in the front of the tram. The tram has the destination of Quarry Hill. Photo by Wal Jack/ i1 - scan of print in the album i2 - rear of image i3 - scan of negative at 3200dpi added 6/6/2020. On the rear in blue ink "SEC Bendigo No 3 at Quarry Hill, Rly Picnic Day 7/10/39" with Wal Jack copyright stamp in the top right hand corner and the number "T193" written in.trams, tramways, bendigo, quarry hill, crews, tram 3 -
 Ballarat Tramway Museum
Photograph - Black & White Photograph/s, Keith Kings, 29/12/1947 12:00:00 AM
Black and White print contained within the Wal Jack Bendigo and Geelong Album, see Reg Item 5003 for more details. Photograph of No. 26 in Mitchell St Bendigo, outbound to Quarry Hill with the Terminus Hotel in the background. Wal's album notes date the photo as 29-12-1947. Photo by Leon Marshall Wood. In ink on rear "SEC of Victoria, Bendigo, Bogie drop centre car No.26 acquired from M&MTB 1947, ex MMTB "C" class, owned originally by Hawthorn Tramways Trust". In pencil, different hand writing "ex 135" and in bottom left hand corner, Leon Marshall Wood photo number "SEC 22" written in.trams, tramways, bendigo, bogie trams, quarry hill, mitchell st, tram 26 -
 Ballarat Tramway Museum
Photograph - Black & White Photograph/s, Wal Jack, 12/04/1959 12:00:00 AM
Black and White print contained within the Wal Jack Bendigo and Geelong Album, see Reg Item 5003 for more details. Photo of Bendigo Birney No.28 at Quarry Hill, Photo Wal Jack, with the destination of Eaglehawk - 12/4/1959. i1 - scan of print in the album i2 - rear of image i3 - scan of negative at 3200dpi added 6/6/2020. On the rear in black ink "SEC Bendigo #28 at Quarry Hill, about to leave for Eaglehawk, 4.00pm, Sun 12th April 1959", in bottom left hand corner "Wal Jack Photo"trams, tramways, bendigo, quarry hill, birney, tram 28 -
 Ballarat Tramway Museum
Photograph - Black & White Photograph/s, 12/01/1960 12:00:00 AM
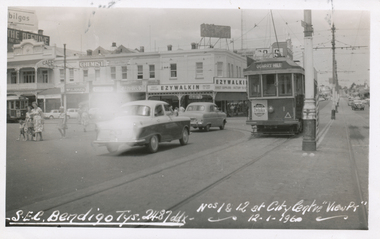
Black and White print contained within the Wal Jack Bendigo and Geelong Album, see Reg Item 5003 for more details. Photo, commercially produced?, of Bogie tram No. 1 and single trucker No. 12 at Charing Cross 12-1-1960, with the details of the photo written onto the negative and printed. Tram 1 has the destination of Quarry Hill and has a Cohn's drink advertisement on the rear panel. In the background are: The Beehive, Ezywalkin, Wm Jones Chemist, A. G. Relearn Optician, .Mobilgas. Note the advertisement Plume? over the Ezywalkin store has been blanked out. trams, tramways, bendigo, charing cross, secv, pall mall, tram 1, tram 12 -
 Ballarat Tramway Museum
Photograph - Black & White Photograph/s, Wal Jack, 23/06/1949 12:00:00 AM
Black and White print contained within the Wal Jack Bendigo and Geelong Album, see Reg Item 5003 for more details. Photo of Geelong No. 5 from Chilwell climbing up Pakington St Hill, from Mercer St. Chilwell. Has the destination of East. Photo by Wal Jack 23-6-1949. Printed on Ilford paper. See also Reg Item 7824 for another similar photograph. i1 - scan of print in the album i2 - rear of image i3 - scan of negative at 3200dpi added 17/6/2020. On rear in ink "SEC Geelong No."5 from Chilwell climbing up Pakington St Hill, from Mercer St. Chilwell. 23-6-49" Has the Wal Jack copyright stamp in the top right hand corner with the number "T281" written in..trams, tramways, geelong, chilwell, pakington st, tram 5 -
 Ballarat Tramway Museum
Photograph - Black & White Photograph/s, Wal Jack, 3/01/1945 12:00:00 AM
Black and White print contained within the Wal Jack Bendigo and Geelong Album, see Reg Item 5003 for more details. Photo of No. 25 and 1 at the junction between the Newtown and East lines, in Pakington St. Photo by Wal Jack 3/1/1945. City of Newtown and Chilwell offices on the right hand side. i1 - scan of print in the album i2 - rear of image i3 - scan of negative at 3200dpi added 29/6/2020. Has the rear in ink "SEC Geelong No. 25 from Beach to Newtown, No. 1 from East to Chilwell (straight down hill) Newtown Junc. Pakington St 3-1-45". Has the Wal Jack copyright stamp on the rear with the number T326 written in.trams, tramways, geelong, pakington st, newtown, east, tram 25, tram 1 -
 Bendigo Historical Society Inc.
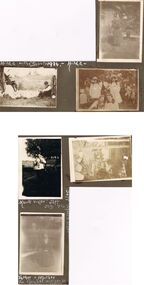
Photograph - HILDA HILL COLLECTION: BLACK AND WHITE PHOTOS, 1917-1924
Series of Black & White Photos Total 6 Hill Family & Friends During the First World War and after. Rita, wearing a dark dress with white collar and holding a dark coloured hat, background is large brick structure with windows to right and small section of veranda, pal tree, Railway Reserve Kyneton 1918. Man and two women wearing white dresses and dark hats, man wears dark suit white shirt and dark tie with his back against a large wheel, white sheet on ground between them and indistinguishable articles on sheet, Hibernian Picnic Axedale November 13th 1918. Group of young girls and boys all dressed in light coloured clothing gathering Botanical gardens January 1917, Miss N. Linnane reclining on cane lounge chair on verandah, weatherboard wall of house, verandah post, rock garden edging in foreground, May 1918. Monte Video Property Queensland Jeff, dressed in dark trousers and white shirt, holding a skinned rabbit, water tank in background, wire fence, July 1924. Father & Mother, Father wears a grey suit with white shirt and dark tie, Mother seated is wearing a dark dress with striped collar and white blouse, 'The Ranche' Mollison Street Eppalock.Hilda Hill Personal Collectionaustralia, history, post war life -
 Bendigo Historical Society Inc.
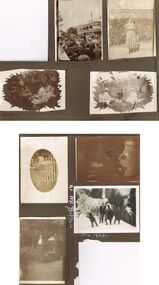
Photograph - HILDA HILL COLLECTION: BLACK AND WHITE PHOTOS, 1918-1923
Series of Black & White Photos of Hill Family and Friends during the war and post war life. Total 8 Photos. Welcome Parade General Pa n Bendigo October 21, 1918, tram wiring post in street, large two storey building in the background named Stanley's Coffee palace at corner of Mitchell and Mollison streets, Large crowd on roadway, Covered wagon among crowd with Good Shepherd laundry written on the side, foreground shows General Pau being driven through the crowd, General Pan is wearing a Napoleon style hat. Doreen dressed in a light coloured dress with white collar standing before a hedge, at rear is part of a corrugated iron roof gable, S.H.L.C. 27 September 1918. Group of four ladies three dressed in white and other a darker colour all seated on the ground, distant background a row of trees along a fence line, tea time Hibernian picnic Axedale 13 November 1918. Three women and young boy all seated on the ground, the ladies are all in white and two wearing white hats, young boy is dressed in suit with white shirt and dark tie and his right hand is pointing to his open mouth, to their right is a wooden structure and distant background more people can be seen, dinner time Hibernian picnic Axedale 13 November 1918. Overdeveloped photo of two young men standing between two shrubs and in front of a full length external window blind, 'The Ranche' February 1918. Group of four males dressed in dark coats and grey trouser at the snow Mt. Buffalo July 1923. Baby Irene clothed in white with bonnet seated in an English style pram with large wheels, picket fence and shrubbery in background, may 1918. Gert dressed in white shirt dark cardigan and dark skirt standing in front of hedged garden and trees, a small part of a roof can be seen between the trees, Railway Reserve 1918.Hilda Hill Personal Collectionaustralia, history, post war life