Showing 203 items
matching bus line
-
 Kew Historical Society Inc
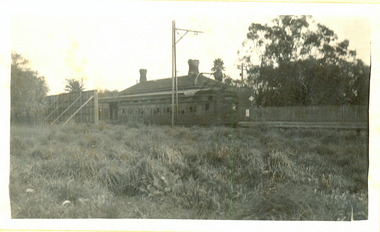
Photograph - Barker Station, August 1952
The Kew railway was opened in 1887, and diverged from the main (Box Hill–Lilydale) line about half-way between Hawthorn and Glenferrie. From the point of divergence the line was slightly less than one mile long, and it had only one intermediate station — Barker. There were four road over-bridges and two level crossings, including one over the busy Barkers Road. The line supported a passenger and goods service, and was electrified in December 1922, at the same time as the main line to Box Hill. There were a number of peak hour services which ran from Flinders Street station (Melbourne) to Kew, but in 1938 all but one of these were diverted to the Ashburton line, where traffic was growing. This had an adverse effect on Kew traffic, as passengers from Kew needed to cross over a footbridge at Hawthorn to change trains, and the main line trains were usually already crowded by the time they reached Hawthorn. At about the same time the off-peak trains were replaced by road buses. In 1952 all passenger trains were withdrawn, but the road bus service continued for many years. Goods trains were finally withdrawn in 1957, and the railway was dismantled in 1958-59. (Source: Frank Stamford, 'The Hawthorn - Kew Railway')Small black and white snapshot of the last passenger train at Barker Railway Station in 1952. The photograph, one of 12, is part of a larger album of newspaper clippings, timetables, tickets and photos relating to the Kew Railway Line, taken and compiled by Lachlan Richardson, while a resident of Kew. The album dates from the 1950s. The album is part of a larger subject file on the Kew Line, compiled over time by members of the Kew Historical Society."Barker Station / August 1952"kew railway line, transport -- railways -- kew (vic.), barker railway station, kew branch line -
 Kew Historical Society Inc
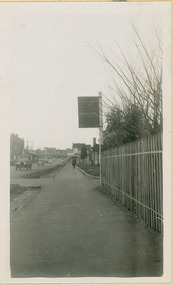
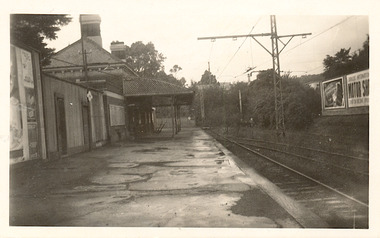
Photograph - Kew Railway Station: Denmark Street entrance, 1952
The Kew railway was opened in 1887, and diverged from the main (Box Hill–Lilydale) line about half-way between Hawthorn and Glenferrie. From the point of divergence the line was slightly less than one mile long, and it had only one intermediate station — Barker. There were four road over-bridges and two level crossings, including one over the busy Barkers Road. The line supported a passenger and goods service, and was electrified in December 1922, at the same time as the main line to Box Hill. There were a number of peak hour services which ran from Flinders Street station (Melbourne) to Kew, but in 1938 all but one of these were diverted to the Ashburton line, where traffic was growing. This had an adverse effect on Kew traffic, as passengers from Kew needed to cross over a footbridge at Hawthorn to change trains, and the main line trains were usually already crowded by the time they reached Hawthorn. At about the same time the off-peak trains were replaced by road buses. In 1952 all passenger trains were withdrawn, but the road bus service continued for many years. Goods trains were finally withdrawn in 1957, and the railway was dismantled in 1958-59. (Source: Frank Stamford, 'The Hawthorn - Kew Railway')Small black and white snapshot of the entrance to Kew Station from Denmark Street in 1952. The photograph, one of 12, is part of a larger album of newspaper clippings, timetables, tickets and photos relating to the Kew Railway Line, taken and compiled by Lachlan Richardson, while a resident of Kew. The album dates from the 1950s. The album is part of a larger subject file on the Kew Line, compiled over time by members of the Kew Historical Society.kew railway line, transport -- railways -- kew (vic.), kew branch line, kew railway station -
 Kew Historical Society Inc
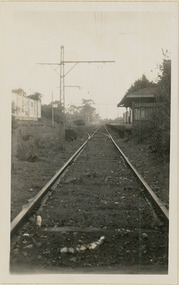
Photograph - Kew Station 22/4/51, F3
The Kew railway was opened in 1887, and diverged from the main (Box Hill–Lilydale) line about half-way between Hawthorn and Glenferrie. From the point of divergence the line was slightly less than one mile long, and it had only one intermediate station — Barker. There were four road over-bridges and two level crossings, including one over the busy Barkers Road. The line supported a passenger and goods service, and was electrified in December 1922, at the same time as the main line to Box Hill. There were a number of peak hour services which ran from Flinders Street station (Melbourne) to Kew, but in 1938 all but one of these were diverted to the Ashburton line, where traffic was growing. This had an adverse effect on Kew traffic, as passengers from Kew needed to cross over a footbridge at Hawthorn to change trains, and the main line trains were usually already crowded by the time they reached Hawthorn. At about the same time the off-peak trains were replaced by road buses. In 1952 all passenger trains were withdrawn, but the road bus service continued for many years. Goods trains were finally withdrawn in 1957, and the railway was dismantled in 1958-59. (Source: Frank Stamford, 'The Hawthorn - Kew Railway')Small black and white snapshot of Kew Railway Station, looking south to Barker Station. The photograph, one of 12, is part of a larger album of newspaper clippings, timetables, tickets and photos relating to the Kew Railway Line, taken and compiled by Lachlan Richardson, while a resident of Kew. The album dates from the 1950s. The album is part of a larger subject file on the Kew Line, compiled over time by members of the Kew Historical Society.kew railway line, transport -- railways -- kew (vic.), kew branch line, kew railway station -
 Kew Historical Society Inc
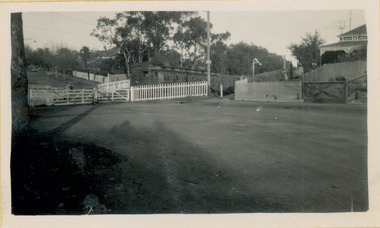
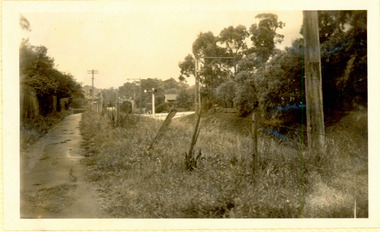
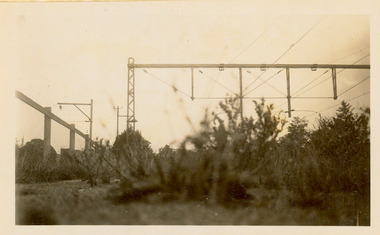
Photograph - Kew Branch Line : The Hawthorn Grove crossing, August 1952
The Kew railway was opened in 1887, and diverged from the main (Box Hill–Lilydale) line about half-way between Hawthorn and Glenferrie. From the point of divergence the line was slightly less than one mile long, and it had only one intermediate station — Barker. There were four road over-bridges and two level crossings, including one over the busy Barkers Road. The line supported a passenger and goods service, and was electrified in December 1922, at the same time as the main line to Box Hill. There were a number of peak hour services which ran from Flinders Street station (Melbourne) to Kew, but in 1938 all but one of these were diverted to the Ashburton line, where traffic was growing. This had an adverse effect on Kew traffic, as passengers from Kew needed to cross over a footbridge at Hawthorn to change trains, and the main line trains were usually already crowded by the time they reached Hawthorn. At about the same time the off-peak trains were replaced by road buses. In 1952 all passenger trains were withdrawn, but the road bus service continued for many years. Goods trains were finally withdrawn in 1957, and the railway was dismantled in 1958-59. (Source: Frank Stamford, 'The Hawthorn - Kew Railway')Small black and white snapshot of the Hawthorn Grove crossing, August 1952. The photograph, one of 12, is part of a larger album of newspaper clippings, timetables, tickets and photos relating to the Kew Railway Line, taken and compiled by Lachlan Richardson, while a resident of Kew. The album dates from the 1950s. The album is part of a larger subject file on the Kew Line, compiled over time by members of the Kew Historical Society.kew railway line, transport -- railways -- kew (vic.), kew branch line, hawthorn grove -- hawthorn (vic.), railway crossings -
 Kew Historical Society Inc
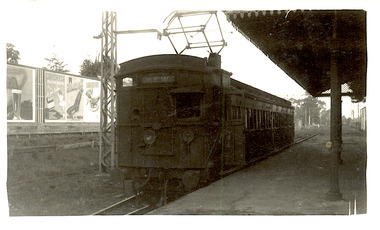
Photograph - Seven Carriage Train at Barker Station
The Kew railway was opened in 1887, and diverged from the main (Box Hill–Lilydale) line about half-way between Hawthorn and Glenferrie. From the point of divergence the line was slightly less than one mile long, and it had only one intermediate station — Barker. There were four road over-bridges and two level crossings, including one over the busy Barkers Road. The line supported a passenger and goods service, and was electrified in December 1922, at the same time as the main line to Box Hill. There were a number of peak hour services which ran from Flinders Street station (Melbourne) to Kew, but in 1938 all but one of these were diverted to the Ashburton line, where traffic was growing. This had an adverse effect on Kew traffic, as passengers from Kew needed to cross over a footbridge at Hawthorn to change trains, and the main line trains were usually already crowded by the time they reached Hawthorn. At about the same time the off-peak trains were replaced by road buses. In 1952 all passenger trains were withdrawn, but the road bus service continued for many years. Goods trains were finally withdrawn in 1957, and the railway was dismantled in 1958-59. (Source: Frank Stamford, 'The Hawthorn - Kew Railway')Small black and white snapshot of a seven carriage train approaching Barker Railway Station. The photograph, one of 12, is part of a larger album of newspaper clippings, timetables, tickets and photos relating to the Kew Railway Line, taken and compiled by Lachlan Richardson, while a resident of Kew. The album dates from the 1950s. The album is part of a larger subject file on the Kew Line, compiled over time by members of the Kew Historical Society."Seven Carriage Train at Barker Station"kew railway line, transport -- railways -- kew (vic.), barker railway station, kew branch line -
 Kew Historical Society Inc
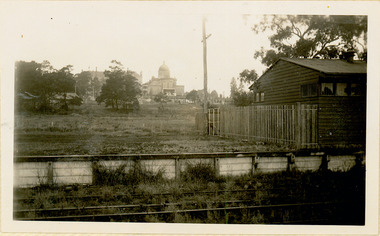
Photograph - Farewell to 'Our Lady of Fatima'. Xavier College 22/4/51
The Kew railway was opened in 1887, and diverged from the main (Box Hill–Lilydale) line about half-way between Hawthorn and Glenferrie. From the point of divergence the line was slightly less than one mile long, and it had only one intermediate station — Barker. There were four road over-bridges and two level crossings, including one over the busy Barkers Road. The line supported a passenger and goods service, and was electrified in December 1922, at the same time as the main line to Box Hill. There were a number of peak hour services which ran from Flinders Street station (Melbourne) to Kew, but in 1938 all but one of these were diverted to the Ashburton line, where traffic was growing. This had an adverse effect on Kew traffic, as passengers from Kew needed to cross over a footbridge at Hawthorn to change trains, and the main line trains were usually already crowded by the time they reached Hawthorn. At about the same time the off-peak trains were replaced by road buses. In 1952 all passenger trains were withdrawn, but the road bus service continued for many years. Goods trains were finally withdrawn in 1957, and the railway was dismantled in 1958-59. (Source: Frank Stamford, 'The Hawthorn - Kew Railway')Small black and white snapshot of a train leaving Kew Station with the Xavier Chapel on the hill in the background, hence the ironic title provided by the photographer. The photograph, one of 12, is part of a larger album of newspaper clippings, timetables, tickets and photos relating to the Kew Railway Line, taken and compiled by Lachlan Richardson, while a resident of Kew. The album dates from the 1950s. The album is part of a larger subject file on the Kew Line, compiled over time by members of the Kew Historical Society."Farewell to 'Our Lady of Fatima'. Xavier College 22/4/51"kew railway line, transport -- railways -- kew (vic.), kew branch line, xavier college, kew railway station -
 Kew Historical Society Inc
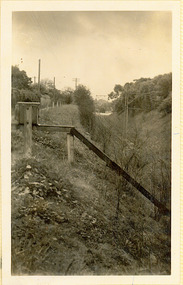
Photograph - Kew Branch Line: Looking along cutting towards Barker Station 22/4/51
The Kew railway was opened in 1887, and diverged from the main (Box Hill–Lilydale) line about half-way between Hawthorn and Glenferrie. From the point of divergence the line was slightly less than one mile long, and it had only one intermediate station — Barker. There were four road over-bridges and two level crossings, including one over the busy Barkers Road. The line supported a passenger and goods service, and was electrified in December 1922, at the same time as the main line to Box Hill. There were a number of peak hour services which ran from Flinders Street station (Melbourne) to Kew, but in 1938 all but one of these were diverted to the Ashburton line, where traffic was growing. This had an adverse effect on Kew traffic, as passengers from Kew needed to cross over a footbridge at Hawthorn to change trains, and the main line trains were usually already crowded by the time they reached Hawthorn. At about the same time the off-peak trains were replaced by road buses. In 1952 all passenger trains were withdrawn, but the road bus service continued for many years. Goods trains were finally withdrawn in 1957, and the railway was dismantled in 1958-59. (Source: Frank Stamford, 'The Hawthorn - Kew Railway')Small black and white snapshot looking along cutting towards Barker Station 22/4/51. The photograph, one of 12, is part of a larger album of newspaper clippings, timetables, tickets and photos relating to the Kew Railway Line, taken and compiled by Lachlan Richardson, while a resident of Kew. The album dates from the 1950s. The album is part of a larger subject file on the Kew Line, compiled over time by members of the Kew Historical Society."Looking along cutting towards Barker Station 22/4/51"kew railway line, transport -- railways -- kew (vic.), barker railway station, kew branch line -
 Kew Historical Society Inc
Photograph - The last train at Kew Station, August 1952
The Kew railway was opened in 1887, and diverged from the main (Box Hill–Lilydale) line about half-way between Hawthorn and Glenferrie. From the point of divergence the line was slightly less than one mile long, and it had only one intermediate station — Barker. There were four road over-bridges and two level crossings, including one over the busy Barkers Road. The line supported a passenger and goods service, and was electrified in December 1922, at the same time as the main line to Box Hill. There were a number of peak hour services which ran from Flinders Street station (Melbourne) to Kew, but in 1938 all but one of these were diverted to the Ashburton line, where traffic was growing. This had an adverse effect on Kew traffic, as passengers from Kew needed to cross over a footbridge at Hawthorn to change trains, and the main line trains were usually already crowded by the time they reached Hawthorn. At about the same time the off-peak trains were replaced by road buses. In 1952 all passenger trains were withdrawn, but the road bus service continued for many years. Goods trains were finally withdrawn in 1957, and the railway was dismantled in 1958-59. (Source: Frank Stamford, 'The Hawthorn - Kew Railway')Small black and white snapshot of the last passenger train at Kew Railway Station in 1952. The photograph, one of 12, is part of a larger album of newspaper clippings, timetables, tickets and photos relating to the Kew Railway Line, taken and compiled by Lachlan Richardson, while a resident of Kew. The album dates from the 1950s. The album is part of a larger subject file on the Kew Line, compiled over time by members of the Kew Historical Society."The last train at Kew Station, August 1952"kew railway line, transport -- railways -- kew (vic.), kew branch line, kew railway station -
 Kew Historical Society Inc
Photograph - Kew Branch Line: Weeds at Kew Station 14/51
The Kew railway was opened in 1887, and diverged from the main (Box Hill–Lilydale) line about half-way between Hawthorn and Glenferrie. From the point of divergence the line was slightly less than one mile long, and it had only one intermediate station — Barker. There were four road over-bridges and two level crossings, including one over the busy Barkers Road. The line supported a passenger and goods service, and was electrified in December 1922, at the same time as the main line to Box Hill. There were a number of peak hour services which ran from Flinders Street station (Melbourne) to Kew, but in 1938 all but one of these were diverted to the Ashburton line, where traffic was growing. This had an adverse effect on Kew traffic, as passengers from Kew needed to cross over a footbridge at Hawthorn to change trains, and the main line trains were usually already crowded by the time they reached Hawthorn. At about the same time the off-peak trains were replaced by road buses. In 1952 all passenger trains were withdrawn, but the road bus service continued for many years. Goods trains were finally withdrawn in 1957, and the railway was dismantled in 1958-59. (Source: Frank Stamford, 'The Hawthorn - Kew Railway')Small black and white snapshot of how the Kew Branch Line was allowed to run down. The photograph, one of 12, is part of a larger album of newspaper clippings, timetables, tickets and photos relating to the Kew Railway Line, taken and compiled by Lachlan Richardson, while a resident of Kew. The album dates from the 1950s. The album is part of a larger subject file on the Kew Line, compiled over time by members of the Kew Historical Society.kew railway line, transport -- railways -- kew (vic.), barker railway station, kew branch line -
 Kew Historical Society Inc
Photograph - Kew Railway Station, May 1950
The Kew railway was opened in 1887, and diverged from the main (Box Hill–Lilydale) line about half-way between Hawthorn and Glenferrie. From the point of divergence the line was slightly less than one mile long, and it had only one intermediate station — Barker. There were four road over-bridges and two level crossings, including one over the busy Barkers Road. The line supported a passenger and goods service, and was electrified in December 1922, at the same time as the main line to Box Hill. There were a number of peak hour services which ran from Flinders Street station (Melbourne) to Kew, but in 1938 all but one of these were diverted to the Ashburton line, where traffic was growing. This had an adverse effect on Kew traffic, as passengers from Kew needed to cross over a footbridge at Hawthorn to change trains, and the main line trains were usually already crowded by the time they reached Hawthorn. At about the same time the off-peak trains were replaced by road buses. In 1952 all passenger trains were withdrawn, but the road bus service continued for many years. Goods trains were finally withdrawn in 1957, and the railway was dismantled in 1958-59. (Source: Frank Stamford, 'The Hawthorn - Kew Railway')Small black and white snapshot of Kew Railway Station inMay 1950. The photograph, one of 12, is part of a larger album of newspaper clippings, timetables, tickets and photos relating to the Kew Railway Line, taken and compiled by Lachlan Richardson, while a resident of Kew. The album dates from the 1950s. The album is part of a larger subject file on the Kew Line, compiled over time by members of the Kew Historical Society."Kew Railway Station, May 1950"kew railway line, transport -- railways -- kew (vic.), kew branch line, kew railway station -
 Kew Historical Society Inc
Photograph - Kew Railway Station, 1951
The Kew railway was opened in 1887, and diverged from the main (Box Hill–Lilydale) line about half-way between Hawthorn and Glenferrie. From the point of divergence the line was slightly less than one mile long, and it had only one intermediate station — Barker. There were four road over-bridges and two level crossings, including one over the busy Barkers Road. The line supported a passenger and goods service, and was electrified in December 1922, at the same time as the main line to Box Hill. There were a number of peak hour services which ran from Flinders Street station (Melbourne) to Kew, but in 1938 all but one of these were diverted to the Ashburton line, where traffic was growing. This had an adverse effect on Kew traffic, as passengers from Kew needed to cross over a footbridge at Hawthorn to change trains, and the main line trains were usually already crowded by the time they reached Hawthorn. At about the same time the off-peak trains were replaced by road buses. In 1952 all passenger trains were withdrawn, but the road bus service continued for many years. Goods trains were finally withdrawn in 1957, and the railway was dismantled in 1958-59. (Source: Frank Stamford, 'The Hawthorn - Kew Railway')Small black and white snapshot of Kew Railway Station in 1950. The photograph, one of 12, is part of a larger album of newspaper clippings, timetables, tickets and photos relating to the Kew Railway Line, taken and compiled by Lachlan Richardson, while a resident of Kew. The album dates from the 1950s. The album is part of a larger subject file on the Kew Line, compiled over time by members of the Kew Historical Society."Kew Station / 14/51 / 22/4/51 F5"kew railway line, transport -- railways -- kew (vic.), kew branch line, kew railway station -
 Sunbury Family History and Heritage Society Inc.
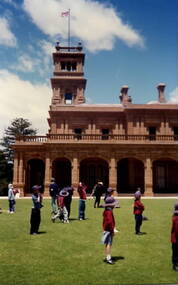
Photograph, Werribee Park Mansion, 1900s
The children from Bulla Primary School were taken on an excursion to Werribee Park Mansion. After being taken over the mansion they then played a variety of games on the lawns outside before boarding the bus back to school.A non-digital coloured photograph of children lined up on an expanse of lawn outside a grand Italianite mansion. They are getting ready to play some games. A flag is flying on the mansion's flagpoleschool excursions, bulla primary schooil, werribee park mansion -
 Vision Australia
Photograph - Image, Boarding a bus, 1967
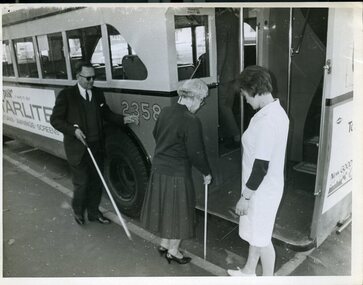
Two people wait in a line to board to double-decker bus in Sydney, holding their white cane and feeling the side of the bus. A female in a white coat looks on from the side of the bus near the person about to board. A man (possibly Wally Urgacz) and a woman use their canes to alight from the bus, with the guidance of a woman in a white coat. 4 B/W photographs of two people boarding a bus1967 - Mobility - historical - Bus orientation Bus orientation, locating doorways, safe ways of mounting steps, RBS V NB: Inefficiency of short collapsible cane in descending bus steps. Women aged 67 with some peripheral vision. RBS IV Learning bus orientation with long cane. Man aged 65 (light perception only) RBS VI Mobility training for doorways and seating arrangement in bus. Annual report 1968 Royal Blind Society of New South Wales royal blind society of nsw, white cane day, orientation and mobility, wally urgacz -
 Melton City Libraries
Photograph, Wendy Barrie, Unknown
Eldest daughter of Edna and Bon Barrie, born on 03 November 1943 in Melbourne, Victoria, Memoirs of Wendy Barrie, recalling the early formative years of life in Melton: In 1949 I started school at Melton State School no 430 and was driven the 2½ miles to there by my parents at first. Later we walked home in the afternoons or were picked up by car as we made our way home along the Western Highway. In 1956 I went to Bacchus Marsh High School. There were 4 students in grade 6 and 3 of us went to the High School. The students from Melton, Melton South and Toolern Vale State Schools went by bus to Bacchus Marsh High School as far a fifth form. My parents drove me to the pick up point and during the five years of travel to High School. The bus travelled via Toolern Vale and later went through Exford and through Parwan. On the return journey in the afternoon the bus went in the reverse direction. The bridge at Exford was an old narrow wooden one, and the students had to get off the bus and walk across, with the driver crossing in the empty bus for safety reasons. There was a travelling allowance paid to parents and it was estimated from the distance the crow flies, a straight line. We lived a Ferris Lane, just where the Harness Racing entrance is now situated about 2 ½ miles by road to school too close to qualify for the subsidy. While at State School Melton we would walk home in a group with the Nixon and Gillespie children, along the main road over the bridge near the Shire Offices and down a hill. I was being dinked on Joyce Gillespie’s bike while holding onto the seat, toppled off the bike striking my chin and teeth on the bitumen and cracking my jaw. I was about 9 years old and stayed a couple of days in the Quamby Hospital in Bacchus Marsh, it seemed like and eternity at the time and quite traumatic being separated from my family. I can remember contemplating how I could get out of the window and run away but realised it was too far to walk home. Often we would cut across the Common on our way home from school picking up stray golf balls and collecting them from the creek when it dried out. We were warned about not accepting lifts from strangers passing along the Melbourne/ Ballarat Road. The only danger we faced was being swooped by the magpies particularly on the open ground on the Common. We were also fairly cautious when the Gypsies camped on the Common in the area just about opposite the small reservoir. “Mum” grandma Myers loved to have us call in on our way home, and usually would cut a slice of Jongebloed’s bread and spread it with home made butter. Sometimes we waited there until we were collected by car, usually driven by our mother. Margaret Nixon and Joyce Gillespie were a few grades ahead of me and Barbara Nixon was born just two months earlier than me. Our mothers were great friends for over 6o years, born in the same month three years apart. They lived within a few days of the same age as each other at the time their deaths. Dad and George Nixon attended Melton school at the same time. Sarah nee Hornbuckle Nixon and my grandfather Frederick Myers Snr were at school together at the same in the 1880s. The Nixon family lived in Keilor Road just past the Toolern Creek near the turnoff. Tom and Ann Collins lived on the southern side of the Western highway and Keilor road intersection. Jim and Ruby Gillespie’s house was further long Keilor road on the right. They backed onto the Myers who lived on the north side of Western Highway east of Myers Gully (Ryans Creek). The Bridge over the Toolern Creek as very narrow and as truck traffic increased there were accidents. One truck took out the side railing and plunged upside down into the bank and into the shallow water. Another fatal accident happened between a car and a truck right in front of the Myers house. Grandfather Fred had been a bike rider all his life, as far as the Riverina in his younger years, wryly made the comment about the drivers the speeding along the Ballarat Road were setting out to kill themselves. The road was busy particularly after the Races at Ballarat when the crowds were hurrying home to Melbourne. Train travel had changed very little from the time my mothers generation to mine. The timetable meant the usual rush to Melton South by bike in her case and if she was running late the train pulled up on the crossing. I was driven to the Station from home past Keith and Mary Gillespie’s house near the Ferris Road rail crossing to Bridge road to Melton South for the 7.32 train. While attending Sunshine High School in 1961 I would meet up with three other students, two of whom I knew from Bacchus Marsh High School days. We usually got into the same compartment on the train, it was a typical country train with a corridor along the side and compartments with a door, roof racks and sometimes heated metal containers for the feet in the winter. Some of the trains came through from Horsham and Ballarat, and the Overland from Adelaide passed through in the evening, we could hear it in the distance from the Ferris Lane home. The carriages had 1st and economy class compartments showing photographs of county scenes and holiday destinations. The engine was the large A class diesel. They are still running to Bacchus Marsh 50 years later, due to the need for the greatly increased number of commuters travelling to work in the city. Sometimes the carriages were pull by a Steam engine, these were a problem in the summer time because the sparks caused fires along the train lines and then quickly spread into the dry grass, crops and stubble. The Motor Train left Spencer Street at 4.23 pm and was the best train for me to catch. Ferris Road was a designated stop and train pulled up on the road crossing. It had steps at the door and rungs to hold while alighting to the ground. The ballast along the tracks was rough and uneven and awkward to land on. The train was painted blue and yellow with the letters VR pained on the front. This saved may parents the afternoon trip to collect me from the Station. On the walk home on the gravel road I would pass Uncle Tom and Aunty May’s house before reaching home. Melva Gillespie was studying at Sunshine Technical School and we sometimes both got off the train at the same time. On other occasions the Motor Train was replaced with a diesel engine with carriages, it was also required to stop and the driver had to be notified in advance. This meant getting into the guards van a Rockbank. It was more difficult alighting from the carriage as the gap was greater and more precarious to swing out and land on the ground. A few times in my last year of study at Melbourne Teachers College in Grattan Street Carlton. I managed to catch the 2.30 pm train to Serviceton, it was express to Melton and was very quick trip. The last train, was the 5.25 pm diesel to Ballarat and I usually caught this train to Melton South Station. On one occasion after being held up on the tram in Bourke street I had to make a mad dash to the platform chasing the train as it was just moving off and yelling to the guard, fortunately I was noticed and the train ground to halt. I scrambled into the end door and took most of the journey home to recover. After the last year at High School I continued to travel on the train, 2 years to Prahran Technical School changing at North Melbourne. There were a lot school children travelling to private schools and some at the primary level and mainly from Bacchus Marsh. Rockbank children also travelled by train from the beginning of their high school years, quite a few went to Sunshine High School. During my third year of teacher training I travelled to Flinders Street to RMIT for ceramics classes and Grattan St Teachers College located in the grounds of Melbourne University. There were many teachers being trained at the Secondary Teachers College due to the baby bulge creating a great shortage of teachers. Sunshine High School was very well represented amongst the different courses in Primary, Secondary and Art and Crafts. I attended Melbourne University lectures, studying a Fine Art subject. Bernard Smith was the most notable of the lecturers. he replaced Professor Joseph Bourke who had taken leave for the years. In 1962 he published the art book “Australian Painting”. The secondary art and craft student teachers from the College were in the majority, taking this subject and were well regarded due to their practical art and craft methods and their teaching round experience. In December 1964 I graduated as a Trained Secondary Teacher – Art and Crafts. The graduating ceremony was held at Wilson Hall. I received my appointment to work at Maryborough High School. Uncle Max and Aunty Rosemary Myers arranged my accommodation. Uncle Max was a teacher at the Maryborough Technical School fat the time. The appointment was suddenly changed when just before the school year was about to start when I received notification that I was now required to move to Warracknabeal High School. I was subject to a bond for the three years of training and three years of teaching and was under an obligation to comply with the directive of the Education Department. My father stood as guarantor when I was accepted as student at the Melbourne Teachers’ College, thus enabling me to receive my teacher training, and a 5 pounds a week allowance for expenses. After teaching for two years at Warracknabeal High School I was fortunate enough the gain a transfer to Sunshine West High School, returning to live at home in Melton and travelling by car to work with a fellow colleague, Jock Smith who lived at Station road Melton. I completed bond obligation and resigned at the end of the year. The employment regulations at that time did not allow the option of leave of absence for, indefinite overseas travel. I returned to Australia in October 1969. Visiting Arthur Hart the Principal of Sunshine High School he arranged with the Education Department for my re-employment at Sunshine High School until the end of the year. In 1970 I was transferred, and returned to Sunshine West High School where I worked for the next three years. In January 1968 I sailed on the “Oriana” to South Hampton with two teaching friends from Warracknabeal High School on a travelling and working holiday. Doreen Kiely, a former Bacchus Marsh High student and fellow train traveller from Bacchus Marsh, was already working in London, had arranged our accommodation at the London Travellers Club Hotel, Braham Gardens, Earls Court SW5. We based our stay at this address in London and travelled around Scotland, Ireland and England. In the summer we took a four month trip around the Continent and the Mediterranean. I registered with The Royal Borough Of Kingston Upon Thames as a Supply teacher, and worked at Chessington School form autumn to spring the following year and living with Mrs Rose Gillies at Kinross Avenue, Worcester Park, Surrey. In the spring of 1969 visiting Norway, Sweden and Finland joining an organised camping group to the Artic Circle, entered Russia at Leningrad (St Petersburg) Moscow, Minsk, to Poland and Czechoslovakia. In August returning to Worcester Park for the flight to Montreal to stay with cousin Lynette and husband Jurgen. A side trip was taken to Toronto, Niagara Falls and New York. The flight home from Montreal to Melbourne took 52 hours. A ½ day break in Vancouver before boarding the Qantas boeing 707 via San Francisco, Honolulu, Fiji, Sydney to Melbourne. Around the world in 21 months. Photographs of Wendy local identities -
 Federation University Historical Collection
Book, Public Transport Users Association Notes and Press Clippings, 1991-2010, 1991-2010
Used by the local branch of the Public Transport Users Association.Seven plastic covered display books with press clippings, media releases and notes concerning the Public Transport users Association in the Ballarat Region. .1) Public Transport Ballarat & Region Vol 1 - National Express Review, 1999-2001 .2) Public Transport Ballarat & Region Vol 2 - Press Cuttings, 2001 - 2002 .3) Public Transport Ballarat & Region Vol 3 - Press Cuttings, 2002-2003 .4) Public Transport Ballarat & Region Vol 4 - Press Cuttings, 2004-2005 .5) Public Transport Ballarat & Region Vol 5 - Press Cuttings,2006-2012 .6) Public Transport Ballarat & Region Vol 6 - Other Ballarat Transport Issues, 2001-2008 .7) Public Transport Ballarat & Region Vol 7 - Creswick, 2000-2010 11729.8 Documents Transport Public Transport Ballarat & Region Vol 8 -Other Regional Areas Baker, Jean 2000-2010 11729.9 Documents Transport Public Transport Ballarat & Region Vol 9 - Closure of North Melbounre Station and the impact on Ballarat Commuters Baker, Jean 2014 Book Transport Driving the Fast Train Further: Integreated Public Tranpost Across All Victoria Everingham, Wendy and McPherson 1999-2001 Documents Transport Public Transport Ballarat & Region Vol 3 - Press Cuttings Baker, Jean 1999-2001 transport, linking victoria, railway, fast rail, ballarat corridor, bendigo corridor, traralgon corridor, geelong corridor, warrnambool corridor, level crossings, country rail lines, ararat rail line, trains, jean baker, hedley thomson, coach, national express review, mildura review, public transport corporation, maryborough to ballarat passenger rail service, mildura country rail, john parkin, john mclean, steve bracks, airport rail, john barnes, buses, alstrom, rail crossings, dove downey, curtis street bus terminal, bus interchange, ballarat railway stations, trams, creswick, creswick railway station, ararat, wimmera, mallee, maryborough, clunes, talbot -
 Ballarat Tramway Museum
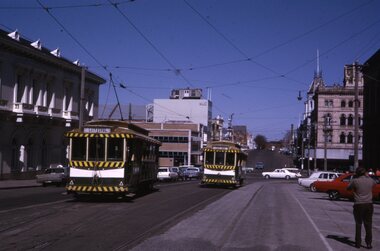
Slide - Set of 7, Warren Doubleday, Ballarat - last day of the Mt Pleasant line, 5/9/1971
Photos taken on the last day of the Mt Pleasant tram line 5/9/1971 1 - Trams 26 and 27 shunting in Lydiard St North Xover - has the Post Office, Commonwealth Bank, MLC and National Mutual buildings in the background. 2 - as above 3 - Trams 26 and 27 at the Mt Pleasant terminus in Barkly St - note the bus stop sign. 4 - Trams 26, 27 and 43 at the Grant St loop. 5 - Trams 14 and 43 at the Grant St Loop 6 - Tram 13 arriving at the City stop with the National Mutual Building in the background. 7 - Tram 43 passing 26 and 27 in the Sturt St City Loop with the Dickins Food Store, Patersons, Union Hotel, Brashes, Ballarat Gas Co. Gear Chemist in the background.Yields information about the last day of the Mt Pleasant tram line in Ballarat.Set of 7 Kodachrome colour slides - cardboard mountsHave the photographer's slide numbers written on them.trams, tramways, closure, tram 26, barkly st, level crossing, lydiard st nth, sturt st, tram 27, tram 14, tram 13, tram 43, mt pleasant, grant st. -
 Sunbury Family History and Heritage Society Inc.
Photograph, Bridge repairs
Work was being done repairing a bridge on the Sunbury - Bendigo line at the former Rupertswood siding, which in the past was used initially by guests who would arrive at the Rupertswood mansion and of later years by students from Salesian College. The siding has been dismantled. Students now use buses to travel to and from the school.A scanned non-digital black and white photograph of work being done along a rail line. There is a large crane beside the rail track and a rail car is also on the line.railways, salesian college, rupertswood siding., rupertswood estate. -
 Melbourne Tram Museum
Document - report, Alf Twentyman, "The Horse Omnibuses"
A report was written by Alf Twentyman titled "The Horse Omnibuses" about the operation firstly by the Melbourne Omnibus Co from 23/3/1869 and then from 1877 the Melbourne Tramway and Omnibus Co. Looks at the routes, buses, staff, and stables operated. Includes notes on Race days, St Patrick's Day and other special traffic days, passenger loadings, operations and why the Johnston St cable line was known as the Carlton line.Yields information about Melbourne's horse omnibuses operated by the Melbourne Omnibus Co.Three foolscap sheets - photocopied - stapled in top left hand corner.tramways, tramcars, horse buses, omnibues, melbourne omnibus co., mtoco, races, st patricks day -
 Melbourne Tram Museum
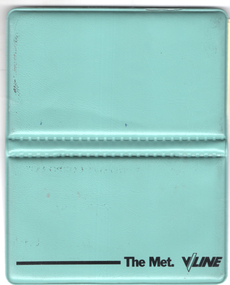
Functional object - Pad of driver reminder forms for disabled passengers, Public Transport Corporation (PTC), c1990
Issued to drivers to remind them when they had to assist disabled passengers from a train, bus or tram. Issued by the PTC disability services. Has The Met and V/line logos. c1990.Yields information about a stop reminder system for disabled passengers.Plastic folder, printed with sleeves and a pad of printed post it notes.tramways, the met, v/line, disability services, drivers -
 Ballarat Tramway Museum
Album - Postcards & Photographs - Vic Solomons and others - Australian Tramways, Vic Solomons, 2023
Contains 184 images of postcards and photographs collected primarily by Vic Solomons of Sydney, with others from the collection of Wal Jack and Warren Doubleday. Covers almost all of Australia's tramway systems. 1 Post Card Hay St Perth Looking East No 3 Unknown Perth 2 Post Card Cars 30 & 90 both on Route 19 pass in Barrack St looking South Perth WA 1935.02.18 Perth 3 Post Card Hay St Looking East Perth WA Unknown Perth 4 Post Card William St Perth WA Unknown Perth 5 Post Card Perth from Shaftsbury Hotel Unknown Perth 6 Post Card Hay St Perth WA Looking East Unknown Perth 7 Post Card Barrack St Perth Unknown Perth 8 Post Card Murray Views No 3 High St Showing Town Hall Fremantle WA Unknown Fremantle 9 Post Card High St Fremantle WA Unknown Fremantle 10 Post Card View of Bolder City Golden Mile in the Background (Section No 1) 1908.08.20 Kalgoolie 11 Post Card Hannan St Kalgoolie 1900.08.19 Kalgoolie 12 Post Card Hannan St Kalgoolie WA (No 2) Unknown Kalgoolie 13 Post Card Intersection Hannan & Maritana Sts Kalgoolie WA Unknown Kalgoolie 14 Post Card Hannan St Kalgoolie Unknown Kalgoolie 15 Post Card Lane Street Bolder City Unknown Kalgoolie 16 Post Card Hobart Double Deck Tram Unknown Hobart 17 Post Card Macquarie St Hobart Unknown Hobart 18 Photo Liverpool Street Hobart Unknown Hobart 19 Photo Hobart 21 Unknown Hobart 20 Photo Hobart 14 in Elizabeth St Hobart Unknown Hobart 21 Post Card Macquarie St Hobart Unknown Hobart 22 Post Card Macquarie St Hobart Tas Unknown Hobart 23 Photo Double Decker Tram 3 at G.P.O. Hobart Tas No 31 Unknown Hobart 24 Post Card Double Decker Tram 19 Hobart Tas A B Series No 24 Unknown Hobart 25 Photo Hobart Municipal Tramways Tas No 95 Unknown Hobart 26 Post Card Elizabeth St Hobart Unknown Hobart 27 Post Card Elizabeth St Hobart Unknown Hobart 28 Post Card Elizabeth St Hobart Unknown Hobart 29 Post Card Elizabeth St Hobart Tas Unknown Hobart 30 Post Card HMT 21 with crew at Beach Road Terminus Unknown Hobart 31 Post Card HMT 9 & another with crew at Beach Road Terminus. Front cover photo of Destination GPO 1921.01.00 Hobart 32 Post Card Cascade Road and Mount Wellington Hobart Unknown Hobart 33 Post Card Elizabeth St Hobart Unknown Hobart 34 Post Card Elizabeth St Hobart Unknown Hobart 35 Post Card Elizabeth St Hobart 1915.04.07 Hobart 36 Post Card Macquarie St Hobart Tas Unknown Hobart 37 Post Card Macquarie St showing Post Office Hobart 1908.03.12 Hobart 38 Post Card Hobart Municipal Tramways 21 Unknown Hobart 39 Post Card Elizabeth St Hobart Tas Unknown Hobart 40 Post Card Liverpool Street Hobart Unknown Hobart 41 Post Card Electric Tram Launceston Tas 446 W J Little Photo 1919.02.08 Launbceston 42 Post Card Launceston Tram no 3 1911.08.30 Launbceston 43 Post Card Launceston Tram no 3 passes tram No 1 Unknown Launbceston 44 Post Card Tram 6 at Trevallyn a popular suburb Launceston Tasmania Unknown Launbceston 45 Post Card Tram 7 at Trevallyn Road Terminus Launceston Tasmania Unknown Launbceston 46 Post Card Tram 4 in Brisbane St Launceston Unknown Launbceston 47 Post Card Tram 9 in Brisbane St Launceston Tasmania Unknown Launbceston 48 Post Card Camerom Street Launceston Tasmania Unknown Launbceston 49 Post Card Murray Views No 15 Jetty Road Glenelg Terminus 1962-02-08 Adelaide 50 Post Card Bay Tram at Jetty Road Terminus Glenelg SA Unknown Adelaide 51 Post Card Tram 3 in King William Street Adelaide S Aust Unknown Adelaide 52 Post Card Valentine Series No 3065 The Old Horse Tram Victor Harbour Unknown Victor Harbour 53 Post Card Bourke Street Melbourne with Cable Car Looking East 1904.04.25 Melbourne 54 Post Card Opening of New Electric Tramway Elsternwick 1913-11-13 Melbourne 55 Post Card Cable trams in Clarendon St Sth Melb Unknown Melbourne 56 Post Card Pall Mall from Charing Cross Bendigo Unknown Bendigo 57 Post Card Tram 4 & 7 pass at The Fountain and Mitchell Street Bendigo Vic Rose Series P 3198 Unknown Bendigo 58 Post Card M&MTB 133 at Charing Cross bound for Eaglehawk Bendigo Vic Murray Views No 45 Unknown Bendigo 59 Post Card Pall Mall Bendigo Vic Unknown Bendigo 60 Post Card Charing Cross & Mitchell St Bendigo Trams passing 1919.00.00 Bendigo 61 Post Card Pall Mall Looking East Unknown Bendigo 62 Post Card Electric Trams and City Hotel Bendigo Vic Unknown Bendigo 63 Post Card Moorabool Street Geelong V 23 Unknown Geelong 64 Post Card Murray Views No 3 Moorabool Street Geelong Vic Unknown Geelong 65 Post Card The Rose Series P 2487 Ryrie Street Geelong Vic Unknown Geelong 66 Post Card Southern Cross Series 2696 Ryrie Stret Geelong Vic Unknown Geelong 67 Post Card The Rose Series P 1490 Ryrie Street Geelong Vic 1920-03-04 Geelong 68 Post Card Valentine Series No 1568 Lower Sturt Street Ballarat Unknown Ballarat 69 Post Card Rose Series P 1710 Sturt Street Ballarat Victoria Unknown Ballarat 70 Post Card Sturt Street Ballarat Victoria Unknown Ballarat 71 Post Card Horse Tram In Sturt Street Ballarat 1905.11.10 Ballarat 72 Post Card Sturt Street Ballarat Looking North-West Unknown Ballarat 73 Post Card Shoppes Square Sturt Street Ballarat Looking North Unknown Ballarat 74 Post Card Junction Sturt and Lydiard Streets Ballarat 1909-09-01 Ballarat 75 Post Card The Electric Supply Co Souvenir Tram Ticket No 3085of the opening of Electric System August 18 1905 1905.08.18 Ballarat 76 Post Card Sturt Street Ballarat Victoria 1907.11.25 Ballarat 77 Post Card Off to the Gardens Electric Tram Ballarat Unknown Ballarat 78 Post Card Sturt Street Ballarat 1907.04.16 Ballarat 79 Post Card Sturt Street Ballarat Looking East Electric tram with Double Deck Trailer 1911.04.17 Ballarat 80 Post Card Sturt Street Ballarat Looking East Unknown Ballarat 81 Post Card Sturt Street Ballarat Looking West 1911.03.01 Ballarat 82 Post Card Town Hall and Sturt Street Ballarat Unknown Ballarat 83 Post Card Lydiard Street Ballarat 1906.11.23 Ballarat 84 Post Card Looking North along Adelaide Street from George Street Brisbane Sidues Series No 764 Unknown Brisbane 85 Post Card Looking South along Queen Street from the Creek Street Intersection Brisbane Qld Sirues Series No 1379 Unknown Brisbane 86 Post Card George Street from near Supreme Court Brisbane Unknown Brisbane 87 Post Card Queen and Eagle Streets Brisbane 1907.07.04 Brisbane 88 Post Card Queen Street showing His Majesty’s Theatre Brisbane Unknown Brisbane 89 Post Card Queen Street Treasury Building 1908.01.20 Brisbane 90 Post Card G P O and Queen Street Brisbane Unknown Brisbane 91 Post Card Queen Street Brisbane Looking from Wharf Street Unknown Brisbane 92 Post Card Customs House Brisbane 1905.02.16 Brisbane 93 Post Card Queen St Brisbane 1905.09.16 Brisbane 94 Post Card Queen St Brisbane 1907.11.19 Brisbane 95 Post Card Treasury Buildings Brisbane Unknown Brisbane 96 Post Card Queen and Eagle Streets Brisbane Unknown Brisbane 97 Post Card The Valley Corner Brisbane Unknown Brisbane 98 Post Card Brisbane Queen Street opposite General Post Office Unknown Brisbane 99 Post Card North Quay and Milton Beach Brisbane Q Unknown Brisbane 100 Post Card Victoria Bridge Brisbane South Side 1907.08.14 Brisbane 101 Post Card Victoria Bridge Brisbane Unknown Brisbane 102 Post Card Breakfast Creek Bridge Brisbane Q Unknown Brisbane 103 Post Card Melbourne Street Station South Brisbane Queensland Unknown Brisbane 104 Post Card General Post Office Queen Street Brisbane 1955.09.23 Brisbane 105 Post Card Customs House Brisbane 1904.11.04 Brisbane 106 Post Card Queen St Brisbane 1919.11.00 Brisbane 107 Post Card Queen St Brisbane Sidues Series No 627 Unknown Brisbane 108 Post Card Creek Street Brisbane Queensland Unknown Brisbane 109 Post Card Customs House and Garden Reach Brisbane Queensland 1910.00.08 Brisbane 110 Post Card Queen and Creek Streets Brisbane 1909.06.07 Brisbane 111 Post Card Queensland National Bank andd Queen Street Brisbane Queensland Unknown Brisbane 112 Post Card Queen Street and Treasury Buildings Brisbane 0000.09.07 Brisbane 113 Post Card Queen Street showing “Courier” Buildings Brisbane Unknown Brisbane 114 Post Card Intersection George & Roma Streets Brisbane Q 1916.05.11 Brisbane 115 Post Card Adelaide Street Brisbane Q Unknown Brisbane 116 Post Card G P O Queen Street Brisbane Q Unknown Brisbane 117 Post Card Treasury Building Brisbane 1906.03-20 Brisbane 118 Post Card Queen and Eagle Streets Brisbane 1907.02.01 Brisbane 119 Post Card Queen St Brisbane Unknown Brisbane 120 Post Card Queen St Brisbane Q Unknown Brisbane 121 Post Card Victoria Bridge Brisbane 1906.07.30 Brisbane 122 Post Card An Unusual View showing Head of Queen Street Victoria Bridge & South SideSuburbs Brisbane Q Unknown Brisbane 123 Post Card Petries Bight Brisbane Q Unknown Brisbane 124 Post Card South End Victoria Bridge Brisbane Q Unknown Brisbane 125 Post Card Customs House Brisbane Unknown Brisbane 126 Post Card Photo of toastrack car circa 1910 Unknown Brisbane 127 Post Card Treasury Buildings Brisbane Unknown Brisbane 128 Post Card East Street Rockhampton with Steam Tram & trailer Unknown Rockhampton 129 Post Card Post Office Rockhampton with steam tram Unknown Rockhampton 130 Post Card East Street Rockhampton with Steam Trams Rose Series P 7154 Unknown Rockhampton 131 Post Card William Street Rockhampton Rose Series P 7156 Unknown Rockhampton 132 Post Card Central East Street Rockhampton Q with Steam Trams Unknown Rockhampton 133 Photo Sturt St Ballarat Unknown Ballarat 134 Photo Bridge Street Ballarat Unknown Ballarat 135 Post Card George St Sydney Unknown Sydney 136 Post Card Elizabeth St Sydney Unknown Sydney 137 Post Card Railway Square Unknown Sydney 138 Post Card Sydney Harbor Bridge - pending receipt 139 Post Card Kings Cross - Mowbray Series with description on rear from C Roy G Field Unknown Sydney 140 Post Card Kings Cross - Mowbray Series with description on rear from C Roy G Field Unknown Sydney 141 Post Card Central Railway Station Sydney - Rose Series P6033 1954-01-26 Sydney 142 Post card William Street Darlinghurst looking towards City - Rose Series P6602 unknown Sydney 143 Post Card Circular Quay Sydney - Rose Series P6680 Unknown Sydney 144 Post Card View at Manly NSW - Rose Series B1003 Unknown Sydney 145 Post Card Hunter St Newcastle NSW - Rose Series P7843 Unknown Newcastle 146 Post Card Bank Corner Newcastle NSW - Mowbray Series No. 155 Unknown Newcastle 147 Post Card Hunter St Newcastle NSW Unknown Newcastle 148 Post Card Criterion Hotel Hunter St Newcastle NSW Unknown Newcastle 149 Photo Horse tram at Newtown Station 1894 to 1898 - PTC photo c1894 Newtown 150 Photo Steam tram motor No 3 at Railway Square 1879 1879 Sydney 151 Photo Railway steam tram c1900 with a horse drawn double deck bus c1900 Sydney 152 Photo Steam motor 5A and doubled deck bus Unknown Sydney 153 Photo Steam motor 53A with detail notes on rear 1922 Sydney 154 Photo Cable tram set at Milsons Point ferry terminal c1900 Sydney 155 Photo Early Sydney electric car - Ocean St - Rose Bay Unknown Sydney 156 Photo George St looking souoth c1905 c1905 Sydney 157 Photo Tram 165 at Circular Quay Unknown Sydney 158 Photo Tramcar ferry or transporter at The Spit Unknown Sydney 159 Photo tram 882 George St at Marti Place, 1937 1937 Sydney 160 Photo Tram 826 Railway Sq area Unknown Sydney 161 Photo Railway Sq in background, Broadway with double decker bus and toastrack car late 1930s Sydney 162 Photo Coupled St Pitt St? - photo Ben Parle Feb. 1950 Sydney 163 Photo Electric tram No. 2 - North Sydney with side trolley pole running Unknown Sydney 164 Photo George St - Horden's Corner Unknown Sydney 165 Photo George St at Martin Place c1920 Sydney 166 Photo Castlereagh St Sydney c1928 c1928 Sydney 167 Photo Railway Sqare c1920 c1920 Sydney 168 Photo Darling St Countereweight Unknown Sydney 169 Photo Trolley bus depot Unknown Sydney 170 Photo Trolley bus No. 14 Unknown Sydney 171 Photo Newcastle Railway Station with steam tram - Wharf Road?? Unknown Newcastle 172 Photo High St West Maitland - steam tram Unknown Maitland 173 Photo High St West Maitland - steam tram Unknown Maitland 174 Post Card Argent St near tram terminal Broken Hill NSW c1900 Broken Hill 175 postcard Argent St looking south Broken Hill - with Ken Magor's notes on rear Unknown Broken Hill 176 Photo Toronto - steam tram 61A Unknown Toronto 177 Photo 124A trial run 1911? Sutherland - Cronulla line 1911 Sutherland 178 Photo 103A at a tram stop Unknown Sydney 179 Photo Cable tram set at Crows Nest terminus grip car 12, trailer 22 Unknown Sydney 180 Photo Cable tram Queens Square Sydney 1903 Sydney 181 Photo cars 2078 and 2077 Chatswood late 1950s Sydney 182 Photo car 1877 Balmain area late 1950s Sydney 183 Photo Trolley bus - Rockdale destination Late 1950s Sydney 184 Photo Broken Hill steam tram - motor 18A North Tram Unknown Broken Hill 185 Photo Millars Point Sydney NSW - ferry/tram interchange, unknown Sydney All items imaged including the rear or back where there was writing of information. All files stored on the Museum's Photo Collections directory. Demonstrates through the medium of many images, Australian tramway systems and Ballarat's place in them.Album - heavy card covers, plastic lined with postcard or 6x4 photo sleeves.australia, tramways, postcards, photographs, steam trams, horse trams, cable trams, trolley buses -
 Melbourne Tram Museum
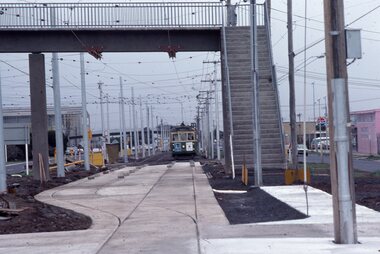
Photograph - Last day of original Essendon Airport tram terminus, Ron Scholten, 7-10-1976
The original line to the Essendon Aerodrome was constructed in 1943 to serve the airport and aircraft construction. It was funded by the Commonwealth Government. By 1976, patronage to the airport terminus in Vaughan St had dropped, the crossing of the highway to the Tullamarine Airport opened in 1970, was dangerous, and the highway needed to be widened. The new terminus was a short distance to the north between Mathews Ave and the Highway. This series of photographs show the last day of operations to the original terminus and the changeover, which was done in about 7 hours. No buses were required. It was done by workers of the Melbourne and Metropolitan Tramways Board. The line was later extended to Airport West. .1 - W5 789, (Essendon Airport Route 59) about to turn from Mathews Ave into Vaughan St. Has new track and footbridge in the foreground. .2 - W5 791 on the siding or spur at the airport terminus, the last tram to use this facility. .3 - W2 571, at the Airport terminus alongside Vaughan St on the last morning of the use of this terminus. The Bundy clock can be seen behind the pole on the lefthand side and the Brick passenger shelter. Shows buffer stops, and Forestair hanger behind. .4 - W2 595 turning from Vaughan St into Mathews Ave. Has the tram stop No. 55 in the view. .5 - W5 839 turning from Vaughan St into Mathews Ave. Shows the flashing yellow light that gave some protection to the trams. .6 - W2 247 about to turn into Vaughan St. Driver about to reboard the tram. Note the new copper trolley wire is up for the new track but has been pulled to the west side using rope. .7 - W5 805, turning from Mathews Ave into Vaughan St, to the old Essendon Airport terminus. Has a new track in the foreground, and the overhead for the curves is still in position. .8 - W6 991 turning from Vaughan St into Matthews Ave, at 855am, the last tram from the old terminus. The track gang has commenced work to remove the outbound curve. Would appear four passengers waiting at the tram stop, two with lunch bags. Note the cattle grid in the foreground between the rails. New rails on the ground on the left-hand side. See Reg Item 6163 for further photos of this event.Yields information about the last day of the operation of the original Essendon Airport tram line.Set of 8 Kodachrome cardboard mount colour slides of the relocation of the Essendon Airport tram terminus 7-10-1976, by Ron Scholten.All slides have detailed descriptions on the reartrams, tramways, essendon aerodrome, essendon airport, closure, new tramways, route 59, w5 789, w5 791, w2 571, w2 595, w5 839, w2 247, w5 805, w6 991, w2 class, w5 class, w6 class, mmtb, trackwork -
 Melbourne Tram Museum
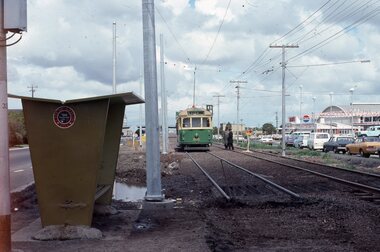
Photograph - Changing the Location of the Essendon Airport terminus, Ron Scholten, 7-10-1976
The original line to the Essendon Aerodrome was constructed in 1943 to serve the airport and aircraft construction. It was funded by the Commonwealth Government. By 1976, patronage to the airport terminus in Vaughan St had dropped, the crossing of the highway to the Tullamarine Airport opened in 1970, was dangerous, and the highway needed to be widened. The new terminus was a short distance to the north between Mathews Ave and the Highway. This series of photographs show the operation of a tram service during the changeover. Trams ran from the Niddrie crossover near Keilor Road to a temporary terminus just short of the worksite, with cars running "bang" road or the wrong way for one trip along either line. This would have been controlled by an Inspector at the Niddrie end. The work was done over a 7-hour period, including changing the overhead over. Work would have been completed after the changeover period. .1 - W5 800 at “temporary” Essendon Airport terminus, Cnr Mathews Ave, Vaughan St. after running “bang” road or the wrong way to this point from the Niddrie or Keilor Road crossover. Curves have been removed.. Has an Inspector chatting to a man with a hat standing alongside the tram. The shelter has a City of Keilor logo on it. .2 - W5 684, taken from the overbridge at the TAA stop - during the changeover of the tracks. Tram running “bang” road from Niddrie to the temporary terminus. .3 - SW5 787, temporary terminus in Mathews Ave, about to return to Niddrie as an “up” car on the “down” line. .4 - MMTB Track gang commissioning and placing rails at the new terminus with scrubber 10 waiting. Overhead in position with overhead for the curves partly removed. Mobile Crane on the left-hand side moving a formwork piece into position .5 - 10W cleaning new track at the new terminus. .6 - Rail Scrubber 10W at work cleaning head of rails where new concrete section. Has a TAA bus on the right side. .7 - W5 783 is about to be the first passenger tram to the terminus, at 3.50 pm About 20 workmen are completing the inbound or up track. .8 - W5 783 about to be the first passenger tram to the terminus, at 3.50 pm About 20 workmen are completing the inbound or up track.Yields information about the last day of the operation of the original Essendon Airport tram line and the works done for the new terminus.Set of 8 Kodachrome cardboard mount colour slides of the relocation of the Essendon Airport tram terminus 7-10-1976, by Ron Scholten. All slides have detailed descriptions on the rear trams, tramways, essendon aerodrome, essendon airport, closure, new tramways, route 59, mmtb, trackwork, w5 800, w5 684, sw5 787, scrubber 10w, w5 783, w5 class, sw5 class, taa airlines, city of keilor -
 Melbourne Tram Museum
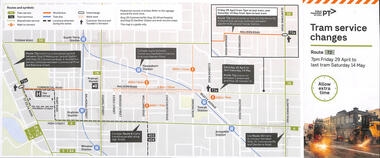
Pamphlet, Public Transport Victoria (PTV), Tram Service Changes, 2022
Pamphlet provided at tram stops giving details of the works and bus services for: .1 - route 72 track reconstruction between Chapel St and Orrong Road, in Malvern Road including the Orrong Road over rail line bridge - 29-4-2022 to 14-5-2022 .2 - All Collins and William St routes for the installation of a super stop in William St at Collins St - - 2-2-2022 to 6-2-2022Shows the methods that Yarra Trams and Public Transport Victoria customers are advised of changes due to track replacement works..1 - Pamphlet - DL, five fold DL - Tram service changes - route 72 - 29-4-2022 to 14-5-2022 .2 - Pamphlet - DL, four fold DL - changes in Collins and William Streets - 2-2-2022 to 6-2-2022tram works, track work, yarra trams, ptv, bridges, trams, tramways, route 72, malvern road, orrong road, super stops, collins st, william st -
 Melbourne Tram Museum
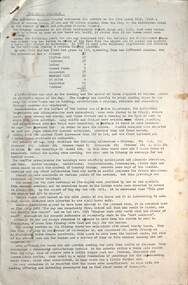
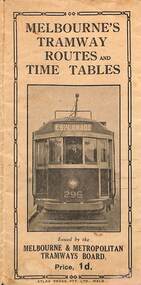
Map, Melbourne & Metropolitan Tramways Board (MMTB), Melbourne's tramway routes and timetables - MMTB, 1925
Map of the MMTB Tramway routes 1925 with a list of first and last cars, along with photographs of Wattle Park, Luna Park, and Studley Park. Provides information for the Prahran and Malvern lines, Hawthorn, Footscray, Essendon, Coburg, Kew, St Kilda, cable tram routes, and buses. Also provides information for passengers. The cover photo is of the front of W 296, with the destination of Esplanade. The map is dated by the opening of the line to West Brunswick as far as Albion St, the City Road to St Kilda line via Sturt St lines, and the electric line in Flemington Road which were all opened during mid to late 1925. See Reference. Shows a number of buildings and locations by a numbered reference list, including the Federal Parliament house. The map has advertisements around the outside of the map for Kiwi Shoe or boot polish.Yields information about the Melbourne tramway system in 1925 and demonstrates the methodology the MMTB used to provide information to travellers. Shows both cable and electric tram lines and the development of the Melbourne system.Map book - 15 fold paper titled "Melbourne's tramway routes and timetables"trams, tramways, mmtb, tramway maps, wattle park, studley park, timetables, cable trams, w class tram, tram 296, kiwi shoe polish -
 Melbourne Tram Museum
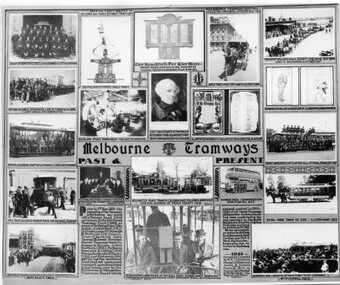
Photograph - Black and White, Melbourne & Metropolitan Tramways Board (MMTB), "Melbourne Tramways Past & Present", 1943
"Melbourne Tramways Past & Present" - set of photos, drawings and notes of (Left to Right, Top to Bottom), Cable tram Richmond Depot employees 1909, Grip mechanism, Photo of the WW1 Honour Board, a horse cab carrying revenue to a bank, Transporting a cable by horse, installing cable to the Windsor line by T Warr & Co 1891, Nicholson St Power House interior, Chief Magistrate of Port Phillip settlement 1836 to 1939 who lived in a house now occupied by Head Office Building, illuminated address to F B Clapp, retirement 1916, drawings by Hal Gye & David Low of J G Roberts Cable Manager, Official & Clerical Staff at Clifton Hill - last line to operate, Depot Employees at Clifton Hill at Final Stage Oct 1940, No. 1 tram becomes Museum piece for National Museum, Australias First Conductresses Aug 1941, Instructor G S Boardman, Decorated peace tram in celebration following armistice 1919, Double deck bus with Conductresses, Royal Park Zoo tram, Openings of PMTT 1910, text box history of the bodies that formed the MMTB, Peter Henry ABC Broadcaster 3-7-1940 on a cable tram, and opening of HTT in 1916. Original poster prepared by the MMTB in 1943 See Reg Item 2854 for a framed photograph and 6367 for another poster of the time - Melbourne tramways past and present poster. See Reg Items 6358, 6122, 6121, 6354 and 6774 for individual photographs.Yields information about the Melbourne tram system and its history to 1943Photograph - of a MMTB Poster titled "Melbourne Tramways Past & Present"tramways, trams, cable trams, richmond, honour board, cash transport, cable ropes, clifton hill, nicholson st, winding house, f b clapp, conductresses, peace tram, double deck buses, zoo horse tram, pmtt, htt, abc -
 Melbourne Tram Museum
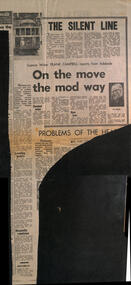
Newspaper, Herald Sun, "The Silent Line", 18-8-1969
Reports on a Science Congress in Adelaide and a speech by Robert Risson about future transport possible systems - all types such as conveyor belts, air cushion vehicles, magnetic cushions, pneumatic tubes, moving footpaths, jet-propelled vehicles, gas turbine and diesel electric buses. These are known as "gadgetbahns" mooted proposals that seldom come to commercial fruition. His main emphasis was on the future all-electric tram fleet that was proposed for Melbourne. Also notes underground systems such as San Francisco. Item by Science Writer Frank Campbell.Yields information about possible future transport systems - gadgetbahnsNewspaper clipping - "The Silent line" and "On the move the mod way" - The Herald "18-8-1969" tramways, trams, melbourne, public transport, future transport, transport systems, electric trams, all-electric trams, robert risson, gadgetbahns, underground tramways -
 Melbourne Tram Museum
Ephemera - VR 6d - Sandringham - Beaumaris - Motor Coach, Victorian Railways (VR), c1956
Ticket issued by the Victorian Railways for the Motor Coach (bus) replacement service on the former Sandringham to Beaumaris tram route. Issued for sections 1 to 4, price 6d. Note: The ticket number is also printed on the top or stub of the ticket. This section would normally be retained on the stub itself. The section of tram line from Black Rock to Beaumaris closed in 1931 and the section from Sandringham to Black Rock closed in 1956.Demonstrates the type of ticket used on the replacement Sandringham to Beaumaris bus service.Ticket - off white paper, black printing with green price - No. 126123vr, victorian railways, tickets, sandringham, beaumaris, buses -
 Melbourne Tram Museum
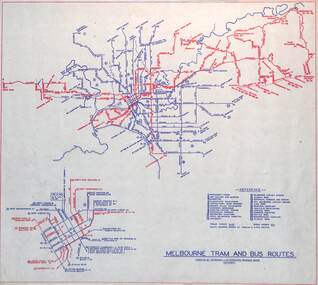
Map, Melbourne & Metropolitan Tramways Board (MMTB), "Melbourne tram and bus routes", c1961
Map showing MMTB tram and bus routes following the closure of the Point Ormond line on 22/10/1960 and before the closure of the Footscray lines on 10/3/1962. Shows route numbers at termini and along the route and points of interest in a reference table. Yields information the MMTB services c1961.Map - printed in two colours on paper. Two copies held.tramways, map, mmtb, tram, bus, routes -
 Linton and District Historical Society Inc
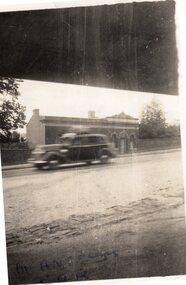
Photograph, Ansett Transport Going Through Linton, 1936, 1936
Very small, slightly blurry black and white photograph shows a large car driving through Linton, going past the Bank of New South Wales/Traquair House building. This car was the Ansett "bus" used on the Ballarat to Hamilton line.In biro across bottom left-hand corner (almost illegible): "Mr Ansett's car". In pencil on back: "1936"; "Ansett's Car".transport, ansett -
 Melbourne Tram Museum
Album - Charles Craig - part 1 of 2, 1950s to 1970s
Photo - see pdf file for further information. Number Brief Description CC1 S178 at Elsternwick level crossing track works CC2 Building East Preston Depot 1955 CC3 Camberwell depot – post WW2 – lots of trams and a black cat CC4 W2 584 and SW6 958 northbound – Chapel St and Brighton Road CC5 W2 357 – southbound, Chapel St Brighton Road CC6 Pascoe Vale Road, Raceday working – note the signal CC7 The Preston Workshops - The Argus, post WW2, 223, 647 et al CC8 923 or is it 922 being built at Preston – The Argus photo - CC8A 832 being positioned onto trucks at Preston after an overhaul – Argus Photo – see also CC306 CC9 Footscray depot` CC10 W5 797 in St Kilda Road during track works – 1950s CC11 W2 457 at Kew Post Office CC12 Wellington Parade – W2 432, 492 and 337 – special event CC13 Swan St line up of trams – football? Or other special event – Sinclair’s bus on the right side. CC14 W2 630 being washed at a depot – The Argus photo CC15 Royal Park line at Flemington Road – W2 355 and W5 786 CC16 Nicholson St track construction from a tram cab CC17 T181 on tour at Gordon St CC18 T181 on Maribyrnong Bridge CC19 Ditto at River St just off bridge CC20 As for CC18 CC21 At Raleigh Rd CC22 T181 at Footscray depot CC23 Track construction, Nicholson, just north of Gertrude CC24 Commissioning overhead Bourke St tram 988 CC25 Queens Parade – 997 and 994 CC26 Swapping trolley wheel to skid – commissioning CC27 Track construction in Gertrude St CC28 985 in Queens Parade running special CC29 997 in Queens Parade CC30 1033 at North Fitzroy – AETA Special CC31 Bourke St at Elizabeth St – has passengers on board CC32 W6 985, 996 Queens Parade, Mk 3 bus 333 CC33 As above CC34 Showing construction at Nicholson & Gertrude – Bourke St CC35 W2 223 on Burnley temporary bridge – VR track expansion CC36 W5 823 – ditto CC37 Tram on old bridge prior to removal CC38 W2 433 on temporary bridge with new bridge beams and old track CC39 Looking down showing temporary single track – Swan St CC40 Tait train passing under tram bridge CC41 SW6 on single line – off loading CC42 W2 547 at City Road Junction CC43 City Road Jtn – 1969 – 596 and 771 CC44 City Road Jtn – 1969 – 596 and 771 (same as CC45 438 in Flinders St CC46 355 somewhere CC47 552 somewhere CC47A 364 at Preston Workshops? CC48 W2 334 on Traverser – Preston Workshops CC49 Wellington pade – large line up of trams, c1950 925, and 611 CC50 W2 493 Franklin st – advertising for Savings Certificates CC51 Possibly 551 with advertising for fund raising for Blind institute CC52 249 at Hawthorn – Riversdale Junction – with a Tally Ho and Village Fair Aux. board CC53 MMTB Postcard of 511 CC54 Wattle Park terminus with Single line warning sign CC55 Wattle Park Duplication CC56 36 at Domain Junction – 833 CC57 36 at Domain Junction CC58 36 at Domain Junction with 810 and 833 CC59 36 in Swanston by Flinders St Station CC60 36 in Spencer St at A’Beckett CC61 36 crossing Collins St CC62 36 crossing Collins St CC63 36 northbound in St Kilda Road with Shrine in background CC64 36 northbound in Swanston St at Flinders St CC65 Postcard – Ballarat 36 in Domain Road CC66 Postcard - Stampshow – Hawthorn Horse tram CC67 Postcard - Stampshow – Peace cable tram CC68 Postcard - 1041 and cable car set 1 at Preston CC69 Postcard - Colins & Elizabeth – greetings from old Melbourne CC70 Postcard - Cable car set at Preston CC71 Postcard - Twentyman’s cable cars CC72 Postcard - Nu-color-vue – horse tram 256 CC73 Cable car set – Market & Flinders CC74 Cable trams at Twentymans’ in their shed CC75 Cable tram track at Bourke & Spencer prior to removal CC76 Cable tram bogie at Preston Workshops – used as a dolly CC77 Cable trams at Twentymans’ CC78 Postcard - Valentines – Bourke looking west from Swanston CC79 Postcard - Rose 3938 – Bourke at Swanston – the Leviathan building CC80 Postcard - Valentines – Elizabeth St looking south from Collins – No. 19 CC81 Postcard - Rose P4765 – Bourke St Melbourne CC82 Postcard - Rose 4090 – cable tram passing Parliament house CC83 Postcard - Valentines – GPO Elizabeth St CC84 Interior of cable trailer with clothing on a set CC85 Elizabeth St looking north CC86 Cigarette card - Collins St No. 41- WD HO Wills CC87 Postcard - Rialto building with cable set CC88 Postcard - Valentines - Swanston at Flinders looking north CC89 CC90 Q 150 Hanna St – dated on rear CC91 176 turning – photo ex Alan Jungworth CC92 161 on Princes Bridge – minimum fare 4d sign and Inspector CC93 459 at Point Ormond CC94 158 at Gordon St – side on view CC95 X 217 in Swanston St CC96 X 217 in Swanston St with an East Brighton destination CC97 T177 CC98 T177 Peel St – no destination roll – being transferred? CC99 X1 462 in Glenhuntly Road to Point Ormond CC100 X1 462 in Glenhuntly Road to Elsternwick Rly Station CC101 X1 462 in Glenhuntly Road to Point Ormond CC102 Q 150 Hanna St CC103 190 at Camberwell Depot CC104 T182 at Footscray CC105 X1 466 and W2 at Footscray CC106 190 at Camberwell Depot CC107 X1 467 Barkly St Footscray CC108 X2 679 turning into William St from La Trobe St CC109 X2 677 Glenhuntly Road with Point Ormond Destination CC110 Postcard T180 CC111 Postcard format – X1 467 on a truck – see also CC178 CC112 Postcard format – X1 467 at Wantirna South CC113 Q200 and SW6 896 at Thornbury – has labels on rear CC114 T177, Ballarat Road – has labels on rear CC115 T178 at Point Ormond CC116 Postcard X1 465 and 466 CC117 Postcard – X2 676 CC118 Postcard – TMSV X2 217 CC119 810 on temporary bridging – 24-12-67 CC120 W2 575 – Queens Parade junction in, still temporary bridging, substation under construction CC121 Forming Queens Parade Junction base slab CC122 W2 596 prior to tramway works – all tracks still in position CC123 It’s a mass of reinforcing – bridging being formed CC124 Looking north with substation being built CC125 Looking east with some rather tight curves, Wellington St still in use CC126 SW6 958 ex Wellington St with all tracks and signal box and buildings. CC127 Victoria Pde at Gisborne looking east – at least 4 cars CC128 SW6 893? With dash canopy lights and SW6 862 and a man with a newspaper CC129 SW6 894 on the S curves, with tram in Wellington St CC130 Similar photo CC131 W2 564 turning into Wellington St – the concrete tracks are not that old CC132 W2 552 running out of Wellington St CC133 W5 732 from Fitzroy St into St Kilda Road with next iteration in position – very wonky CC134 W5 764 turning into Fitzroy St CC135 SW6 947 turning from Wellington St CC136 W2 586 running out of High St CC137 W2 500 turning into Wellington St CC138 W2 543 in Wellington St inbound CC139 L103 with St Kilda Junction destination, and a tower truck on right CC140 Workmen – new track in Queensway in use CC141 Ditto CC142 L103 in Queensway, and another car in bound CC143 Looking east along Wellington St which has been taken out of use. Also a MMTB Roller CC144 W5 824 and a W2 and all types of wobbly temporary track CC145 W2 354 to High St CC146 Sw6 947 on the S bends CC147 W2 500 looking north – tram on the S bends CC148 SW6 896 leaving the S bend CC149 W2 357 and a MMTB City bus with trees/gardens on the side CC150 W5 817 Elliot Ave – see also CC302 CC151 W2 552 – note the large trolley bridge CC152 W2 550 at depot or workshops CC153 1B truck CC154 SW2 432 CC155 W2 155 at Glenhuntly CC156 SW6 937 on AETA tour? CC157 X2 677 on Footscray service – Ballarat Rd? CC158 W2 641 – High St Kew? CC159 SW6 847 – Power St Hawthorn CC160 Simpson St – big line up CC161 W2 546 truck No. 1? CC162 W2s at Glenhuntly depot CC163 No. 15 truck under 899 CC164 206 and other junk at Preston Workshops CC165 W in Swanston St Melbourne – Rose series card CC166 Y1 613 Batman Ave?? or William St at Collins CC167 Tram plans CC168 X 217 Swanston St – see also 95 and 96 CC169 217 in Swanston St – same as 95 CC169A 192 in St Kilda Road at Princes bridge CC170 192 in St Kilda Road at Princes bridge CC171 Bendigo 3 arriving Malvern depot – being unloaded CC172 Ditto CC173 T180 at a depot CC174 X1 463 wheel set CC175 C30 – dog car side view – close up CC176 C30 dog car CC177 206 and 30 at Preston Workshops CC178 X1 467 on a truck – see CC111 also CC179 42 CC180 42 at a depot, no destination box CC181 W2 556 1A type truck CC182 Flinders St Station – Rose Series CC183 W7 1035 Spring – Nicholson St CC184 W7 1022 MMTB Post Card CC185 Adelaide 178 – has on rear – R. Lilburn 4/82 CC186 Adelaide 175 – has on rear – R. Lilburn 4/82 CC187 Y1 610 on AETA tour CC188 Y1 610 on AETA tour with large group – Point Ormond CC189 AETA display – has GH55-32 in pencil on rear CC190 AETA display – has GH55-29 in pencil on rear CC191 Y1 610 on AETA tour with large group – Point Ormond CC192 VR 53 at Footscray CC193 VR cars 40 and 34 at Elwood wash dock CC194 W7 1024 as the 1970 Christmas tram CC195 Geelong – loading a set of 22E trucks CC196 Geelong 10 and 23 running an AETA special CC197 Geelong – AETA special CC198 Geelong 7 at Junction CC199 Geelong 10, in the city CC200 Geelong 33 with Belmont destination CC201 Geelong 15 Eastern Park destination 29-3-1948 CC202 Geelong 23 at Railway Station – 29-3-1948 CC203 Geelong 23 at Railway Station – 29-3-1948 CC204 Geelong – loading a bogie tram CC205 Geelong – loading a bogie tram CC206 Geelong 40 – loaded on truck CC207 Geelong 40 – on jacks CC208 Geelong 40 on jacks – 19 behind CC209 Geelong 38 with two workers on either side CC210 – 214 Australian Historic Tramways stamp folder and set CC215 Bendigo 17 at depot – has dup JBS on rear CC216 Bendigo 20, 29 bogie and straight sill car at Charing Cross CC217 Bendigo one man bogie Pall Mall CC218 Bendigo – Bogie 23, other cars and welding truck at depot CC219 Bendigo 7 with Quarry Hill destination CC220 Bendigo 21 with Lake Weerona destination CC221 ESCo 18 Ballarat CC222 Ballarat bogie 22 on AETA special CC223 Ditto CC224 Ballarat 34 at Stones Corner – R Lilburn CC225 Ballarat 15 in Bridge St – R Lilburn CC226 Ballarat 40 at Gardens – R Lilburn CC227 Ballarat 37 running out of depot – R Lilburn CC228 Postcard – Valentines – Sturt St with loaded horse tram trailer CC229 AETA Geelong tram tour ticket – 29-3-1948 CC230 Postcard – Geelong – Valentine 2114 – T&G building CC231 Postcard – PMTT ! – High St Malvern CC232 Postcard – Empire – Glenferrie Road, Malvern at Wattletree Rd CC233 Postcard Y469, MMTB CC234 Postcard Z2 Spring St CC235 Postcard – Z1 MMTB CC236 Postcard – Stamp Show W1 431 CC237 Postcard – Stamp show B2005 CC238 Postcard – Stamp show W6 982 CC239 Postcard – Valentines 1264 – Johnstone Park with tram in distance CC240 Postcard – Rose 10711 – Swanston and Lonsdale – Hospital and W232 CC241 Postcard – Rose 4827 – Fitzroy St St Kilda W2 362 and 548 CC242 Postcard – Valentines – 939 – St Kilda War Memorial, W and a R? CC243 Postcard – Valentines – 572 – St Kilda War Memorial, W 413 and 140? CC244 Postcard – Valentines – 938 – Uper and Lower Esplanade – L 104 CC245 Postcard – St Kilda Rd at Princes Bridge Y1 and W CC246 Postcard – Biscay BG82 – W5 814 - CC247 Postcard – Biscay 796112 – Bourke St looking west CC248 Postcard – Biscay 796109 – Bourke St looking east CC249 Postcard – Biscay 2AUS58 – Z5 Bourke St CC250 Postcard – Biscay BG 249 – Swanston St CC251 Postcard – National View – St Kilda Rd – shrine and Prince Henrys W2 405 CC252 Postcard – Nu color vue – 11 ML 156 – St Kilda Rd CC253 Postcard – Nu color vue – 11 ML 153 – Swanston St CC254 Postcard – Nu Color vue – Collins St 442 CC255 Postcard – Pitt card – Adelaide – H 364 at Victoria St CC256 Postcard – SPER L/P 154 CC257 Postcard – BTMS – 550 CC258 Postcard – SPER – Brisbane 295 CC259 Adelaide 131 at Burnside – has R Lilburn on card, c1911 CC260 Adelaide 194 CC261 Adelaide 235, with two crew, The News photo CC262 Rockhampton, outside post office – has source of photo details CC263 Sydney – 2086 and 2062 arriving Circular Quay CC264 Sydney – P class – Pitt St? CC265 Sydney – 1610 at Circular Quay CC266 Brisbane 99 and 468 CC267 Sydney with bridge behind CC268 Steam tram Paramatta Park – 103 CC269 Sydney – Museum Station =- Elizabeth St CC270 Sydney – weed burner 137S at a loop Demonstrates the work of Charles Craig in photography and collection of prints.Assembled album in a black presentation folder of 270 photographs from the Charles Craig Collection - 86 sleeves - part 1 of 2. All photographs have been scanned and placed on the Museum's G drive. A list of all photographs with details where possible has been compiled. Victorian Provincial, Launceston, Hobart and Sydney tram photos have been transferred to other Museums, image files retained.melbourne, tramways, tramcars, trams, charles craig, st kilda junction, trackworks