Showing 267 items
matching hands up for hands on
-
 Flagstaff Hill Maritime Museum and Village
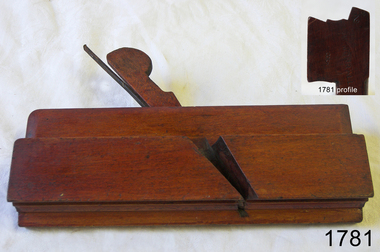
Tool - Complex Wood Plane, Late 19th to Early 20th century
A moulding plane is a specialised plane used for making the complex shapes found in wooden mouldings that are used to decorate furniture or other wooden objects. Traditionally, moulding planes were blocks of wear-resistant hardwood, often beech or maple, which were worked to the shape of the intended moulding. The blade or iron was likewise formed to the intended moulding profile and secured in the body of the plane with a wooden wedge. A traditional cabinetmakers shop might have many, perhaps hundreds, of moulding planes for the full range of work to be performed. Large crown mouldings required planes of six or more inches in width, which demanded great strength to push and often had additional peg handles on the sides, allowing the craftsman's apprentice or other workers to pull the plane ahead of the master who guided it. Company History: The firm of Alexander Mathieson & Sons was one of the leading makers of hand tools in Scotland. Its success went hand in hand with the growth of the shipbuilding industries on the Firth of Clyde in the nineteenth century and the emergence of Glasgow regarded as the "second city of the Empire". It also reflected the firm's skill in responding to an unprecedented demand for quality tools by shipyards, cooperage's and other industries, both locally and far and wide. The year 1792 was deemed by the firm to be that of its foundation it was in all likelihood the year in which John Manners had set up his plane-making workshop on Saracen Lane off the Gallowgate in the heart of Glasgow, not far from the Saracen's Head Inn, where Dr Johnson and James Boswell had stayed on their tour of Scotland in 1773. Alexander Mathieson (1797–1851) is recorded in 1822 as a plane-maker at 25 Gallowgate, but in the following year at 14 Saracen's Lane, presumably having taken over the premises of John Manners. The 1841 national census described Alexander Mathieson as a master plane-maker at 38 Saracen Lane with his son Thomas Adam working as a journeyman plane-maker. In 1849 the firm of James & William Stewart at 65 Nicolson Street, Edinburgh was taken over and Thomas was put in charge of the business, trading under the name Thomas A. Mathieson & Co. as plane and edge-tool makers. Thomas's company acquired the Edinburgh edge-tool makers Charles & Hugh McPherson and took over their premises in Gilmore Street. The Edinburgh directory of 1856/7 the business is recorded as being Alexander Mathieson & Son, plane and edge-tool makers at 48 Nicolson Street and Paul's Work, Gilmore Street. The 1851 census records indicate that Alexander was working as a tool and plane-maker employing eight men. Later that year Alexander died and his son Thomas took over the business. Under the heading of an edge-tool maker in the 1852/3 (Post-Office Glasgow Annual Directory) the firm is now listed as Alexander Mathieson & Son. By the early 1850s, the business had moved to 24 Saracen Lane. The directory for 1857/8 records that the firm had moved again only a few years later to East Campbell Street, also off the Gallowgate, and that through further diversification was also manufacturing coopers' and tinmen's tools. The ten-yearly censuses log the firm's growth and in 1861 Thomas was a tool manufacturer employing 95 men and 30 boys; in 1871 he had 200 men working for him and in 1881 300 men. By 1899 the firm had been incorporated as Alexander Mathieson & Sons Ltd, even though only Alexander's son Thomas appears ever to have joined the firm. A vintage tool made by a well-known firm made for other firms and individuals that worked in wood. The tool was used before routers and spindle moulders came into use after World War ll, a time when to produce a decorative moulding for a piece of furniture or other items this had to be accomplished by hand using one of these types of planes. A significant item from the mid to late 19th century that today is quite rare and sought after by collectors. It gives us a snapshot of how furniture was made predominately by hand and with tools that were themselves hand made shows the craftsmanship used to make such a unique item. Ogee Complex Moulding Plane Alex Mathieson & Son. Stamped W Worrel, (owner) & No 2.flagstaff hill, warrnambool, flagstaff-hill, flagstaff-hill-maritime-museum, maritime-museum, shipwreck-coast, flagstaff-hill-maritime-village, alexander mathieson & sons, complex moulding plane, carpenders tools, cabinet makers tools, wood working tools, wood planes -
 Flagstaff Hill Maritime Museum and Village
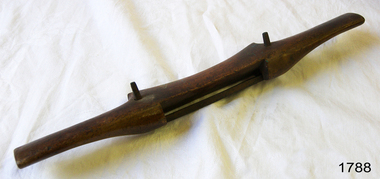
Tool - Spokeshave, Mathieson and Son, 1860 to 1910
A spokeshave is a hand tool used to shape and smooth woods in woodworking jobs such as making cart wheel spokes, chair legs, paddles, bows, and arrows. The tool consists of a blade fixed into the body of the tool, which has a handle for each hand. Historically, a spokeshave was made with a wooden body and metal cutting blade. With industrialization metal bodies displaced wood in mass-produced tools. Being a small tool, spokeshaves are not suited to working large surfaces. The name spokeshave dates back to at least the 16th century, though the early history of the tool is not well documented. The name spokeshave reflects the early use of the tool by wheel wrights. The first spokeshaves were made of wood usually beech with steel blades, before being largely superseded by the development of metal-bodied spokeshaves in the latter half of the 19th century, though many woodworkers still use wooden spokeshaves. Due to their widespread use and versatility vintage wooden spokeshaves remain commonly available and relatively low in price. Spokeshaves consist of a blade or iron secured to the body or stock of the tool, which has two handles – one for each hand. The bottom surface of the tool is called the sole. The blade can be removed for sharpening, and adjusted to vary the depth of the cut. An early design consisted of a metal blade with a pair of tangs to which the wooden handles were attached, as with a draw knife. Unlike a draw knife, but like a plane, spokeshaves typically have a sole plate that fixes the angle of the blade relative to the surface being worked. There are a wide variety of different types of spokeshave, suited to different trades and applications. Company History: The firm of Alexander Mathieson & Sons was one of the leading makers of hand tools in Scotland. Its success went hand in hand with the growth of the shipbuilding industries on the Firth of Clyde in the nineteenth century and the emergence of Glasgow regarded as the "second city of the Empire". It also reflected the firm's skill in responding to an unprecedented demand for quality tools by shipyards, cooperage's and other industries, both locally and far and wide. The year 1792 was deemed by the firm to be that of its foundation it was in all likelihood the year in which John Manners had set up his plane-making workshop on Saracen Lane off the Gallowgate in the heart of Glasgow, not far from the Saracen's Head Inn, where Dr Johnson and James Boswell had stayed on their tour of Scotland in 1773. Alexander Mathieson (1797–1851) is recorded in 1822 as a plane-maker at 25 Gallowgate, but in the following year at 14 Saracen's Lane, presumably having taken over the premises of John Manners. The 1841 national census described Alexander Mathieson as a master plane-maker at 38 Saracen Lane with his son Thomas Adam working as a journeyman plane-maker. In 1849 the firm of James & William Stewart at 65 Nicolson Street, Edinburgh was taken over and Thomas was put in charge of the business, trading under the name Thomas A. Mathieson & Co. as plane and edge-tool makers. Thomas's company acquired the Edinburgh edge-tool makers Charles & Hugh McPherson and took over their premises in Gilmore Street. The Edinburgh directory of 1856/7 the business is recorded as being Alexander Mathieson & Son, plane and edge-tool makers at 48 Nicolson Street and Paul's Work, Gilmore Street. The 1851 census records indicate that Alexander was working as a tool and plane-maker employing eight men. Later that year Alexander died and his son Thomas took over the business. Under the heading of an edge-tool maker in the 1852/3 (Post-Office Glasgow Annual Directory) the firm is now listed as Alexander Mathieson & Son. By the early 1850s, the business had moved to 24 Saracen Lane. The directory for 1857/8 records that the firm had moved again only a few years later to East Campbell Street, also off the Gallowgate, and that through further diversification was also manufacturing coopers' and tin men's tools. The ten-yearly censuses log the firm's growth and in 1861 Thomas was a tool manufacturer employing 95 men and 30 boys; in 1871 he had 200 men working for him and in 1881 300 men. By 1899 the firm had been incorporated as Alexander Mathieson & Sons Ltd, even though only Alexander's son Thomas appears ever to have joined the firm.A vintage tool made by a well-known firm made for other firms and individuals that worked in wood. The tool was used to shape various items mainly in use by wheel wrights. A significant vintage item from the mid to late 19th century that today is quite sought after by collectors. It gives us a snapshot of how trade people predominately worked materials such as wood by hand and with tools that were themselves hand made shows the craftsman's art of the time. Spokeshave with blade 4 inches wide.Mathieson and Son Glasgow. flagstaff hill, warrnambool, shipwrecked-coast, flagstaff-hill, flagstaff-hill-maritime-museum, maritime-museum, shipwreck-coast, flagstaff-hill-maritime-village, spokeshave, mathieson and son, carpentry tools, wheel wright tools -
 Flagstaff Hill Maritime Museum and Village
Domestic object - Plate
The Process of Making Pottery Decorating, Firing, Glazing, Making, Technical There is a rhythm and flow to clay. It can’t be done all at once! Even the making process! It can take weeks to get everything done, especially if you can only work on your pottery once a week! Even though we have three hour classes, it’s often just not enough time! Here is an overview of some of the processes so you have a bit more grasp on some of the technical stuff! Step One – Design There are SO many ideas out there for making stuff in clay! From delicate porcelain jewellery, through to heavy sculptural work and everything in between. Deciding your direction is sometimes not that easy – when you first start, try everything, you will naturally gravitate to the style that you enjoy! The options and variations are endless and can get a wee bit overwhelming too! Check in with me before you start to ensure your ideas will work, what order you might do things, how you could achieve the look you are seeking and any other technical data required! Step Two – Making Clay is thixotropic. This means that as you work with it, the clay first gets sloppier and wetter, before is begins to dry in the atmosphere. For most things, you simply can’t do all parts of the project at once. An example of work order might look like: Get last weeks work out from the shelves Prepare clay for today’s work – roll your clay, prepare balls for throwing, make the first stage of a pinch pot) Clean up last week’s work and put it on the shelf for bisque firing Check that you have any glazing to do – and do enough of it that you will have time to finish your main project Do the next step of your next project – there might be a further step that can’t be complete immediately, in that case, wrap your work well and put onto the shelves. Letting your work rest for a while can really help keep your work clean and professional looking. Many things require bagging under plastic to keep it ready for work the next week – put your name on the outside of the bag so you can find your work easily. We have stickers and markers. Consider how you want to decorate your work – coloured slip can be applied at a fairly wet stage (remembering that it will make your work even wetter!). Trying to apply slip to dry clay won’t work! If you want to do sgraffito – you will need to keep the work leather hard (a state of dryness where you can still work the clay with a little effort and a little water and care). Step Three – Drying Most of the time your work can go into the rack uncovered to let it dry out for the following week. If you want to continue forming or shaping you will need to double bag your work – put your work on a suitable sized bat and put the bat in a bag so the base of the bag is under the bat, then put another bag over the top of the work and tuck the top of the bag under the bat. If you want to trim (or turn) your thrown work the following week, it should also be double bagged. If your work is large, delicate, or of uneven thicknesses, you should lightly cover your work for drying. When considering the drying process, bare in mind the weather, humidity and wind! The hotter and dryer, the faster things dry and work can dry unevenly in the shelves – this can lead to cracking – another time to lightly cover your work for drying. Step Four – Trimming and Cleaning Up Your work is dry! It is called greenware now and it is at it’s most fragile! Handle everything with two hands. I often refer to soft hands – keep everything gentle and with your fingers spread as much as possible. Try to not pick up things like plates too much, and always with both hands! Before your work can be bisque fired it should be “cleaned up”. You work won’t go into the kiln if it has sharp edges – when glazed, sharp edges turn into razor blades! Use a piece of fly wire to rub the work all over – this will scratch a little so be light handed. Use a knife or metal kidney to scrape any areas that require a bit more dynamic treatment than the fly wire offers! Finally, a very light wipe over with a slightly damp sponge can help soften and soothe all of your edges and dags! Trimming thrown work: If you are planning to trim (or turn) your thrown work (and you should be), make sure you bag it well – your work should be leather hard to almost dry for easiest trimming. Use this step to finish the work completely – use a metal kidney to polish the surface, or a slightly damp sponge to give a freshly thrown look. Wipe the sponge around the rim after trimming, and check the inside of the pot for dags! Trimming slip cast work: Usually I will trim the rims of your work on the wheel the following day to make that stage easier, however you will still need to check your work for lumps and bumps. Last but not least – check that your name is still clearly on the bottom of your work. Step Five – Bisque Firing When the work is completely dry it can go into the bisque kiln. The bisque kiln is fired to 1000°C. This process burns off the water in the clay as well as some of the chemically bound water. The structure of the clay is not altered that much at this temperature. Inside the bisque kiln, the work is stacked a little, small bowl inside a larger bowl and onto a heavy plate. Smaller items like decorations or drink coasters might get stacked several high. Consideration is paid to the weight of the stack and shape of the work. A bisque kiln can fire about one and a half times the amount of work that the glaze kiln can fire. The firing takes about 10 hours to complete the cycle and about two days to cool down. Once it has been emptied the work is placed in the glaze room ready for you to decorate! Step Six – Glazing Decorating your work with colour can be a lot of fun – and time consuming! There are three main options for surface treatment at this stage: Oxide Washes Underglazes Glazes Washes and underglazes do not “glaze” the work – It will still need a layer of glaze to fully seal the clay (washes don’t need glaze on surfaces not designed for food or liquid as they can gloss up a little on their own). Underglazes are stable colourants that turn out pretty much how they look in the jar. They can be mixed with each other to form other colours and can be used like water colours to paint onto your work. Mostly they should have a clear glaze on top to seal them. Oxides are a different species – the pink oxide (cobalt) wash turns out bright blue for instance. They don’t always need a glaze on top, and some glazes can change the colour of the wash! The glazes need no other “glaze” on top! Be careful of unknown glaze interactions – you can put any combination of glaze in a bowl or on a plate, but only a single glaze on the outside of any vertical surface! Glazes are a chemical reaction under heat. We don’t know the exact chemicals in the Mayco glazes we use. I can guess by the way they interact with each other, however, on the whole, you need to test every idea you have, and not run the test on a vertical surface! Simply put, glaze is a layer of glass like substance that bonds with the clay underneath. Clay is made of silica, alumina and water. Glaze is made of mostly silica. Silica has a melting point of 1700°C and we fire to 1240°C. The silica requires a “flux” to help it melt at the lower temperature. Fluxes can be all sorts of chemicals – a common one is calcium – calcium has a melting point of 2500°C, however, together they both melt at a much lower temperature! Colourants are metal oxides like cobalt (blue), chrome (green through black), copper (green, blue, even red!), manganese (black, purple and pink) iron (red brown), etc. Different chemicals in the glaze can have dramatic effects. for example, barium carbonate (which we don’t use) turns manganese bright pink! Other elements can turn manganese dioxide brown, blue, purple and reddish brown. Manganese dioxide is a flux in and of itself as well. So, glazes that get their black and purple colours, often interact with other glazes and RUN! Our mirror black is a good example – it mixes really well with many glazes because it fluxes them – causes them to melt faster. It will also bring out many beautiful colours in the glazes because it’s black colouring most definitely comes from manganese dioxide! Glaze chemistry is a whole subject on it’s own! We use commercial Mayco glazes on purpose – for their huge range of colour possibilities, stability, cool interactions, artistic freedom with the ability to easily brush the glazes on and ease of use. We currently have almost 50 glazes on hand! A major project is to test the interactions of all glazes with each other. That is 2,500 test tiles!!!! I’m going to make the wall behind the wheels the feature wall of pretty colours! Step Seven – Glaze (Gloss or sometimes called “Glost”) Firing Most of the time this is the final stage of making your creation (but not always!) The glaze kiln goes to 1240°C. This is called cone 6, or midrange. It is the low end of stoneware temperatures. Stoneware clays and glazes are typically fired at cone 8 – 10, that is 1260 – 1290°C. The energy requirement to go from 1240°C to 1280°C is almost a 30% more! Our clay is formulated to vitrify (mature, turn “glass-like”) at 1240°, as are our glazes. A glaze kiln take around 12 hours to reach temperature and two to three days to cool down. Sometimes a third firing process is required – this is for decoration that is added to work after the glaze firing. For example – adding precious metals and lustres. this firing temperature is usually around 600 – 800°C depending upon the techniques being used. There are many students interested in gold and silver trims – we will be doing this third type of firing soon! After firing your work will be in the student finished work shelves. Remember to pay for it before you head out the door! There is a small extra charge for using porcelain clay (it’s more than twice the price of regular clay), and for any third firing process! Once your work has been fired it can not turn back into clay for millennia – so don’t fire it if you don’t like it! Put it in the bucket for recycling. https://firebirdstudios.com.au/the-process-of-making-pottery/Ceramics have evolved over thousands of years.White earthenware dinner plate. Crazing evident all over.Backstamped ‘Made in England S LTD’flagstaff hill, warrnambool, shipwrecked-coast, flagstaff-hill, flagstaff-hill-maritime-museum, maritime-museum, shipwreck-coast, flagstaff-hill-maritime-village, ceramics, tableware -
 Flagstaff Hill Maritime Museum and Village
Domestic object - Plate, Johnson Bros
The Process of Making Pottery Decorating, Firing, Glazing, Making, Technical There is a rhythm and flow to clay. It can’t be done all at once! Even the making process! It can take weeks to get everything done, especially if you can only work on your pottery once a week! Even though we have three hour classes, it’s often just not enough time! Here is an overview of some of the processes so you have a bit more grasp on some of the technical stuff! Step One – Design There are SO many ideas out there for making stuff in clay! From delicate porcelain jewellery, through to heavy sculptural work and everything in between. Deciding your direction is sometimes not that easy – when you first start, try everything, you will naturally gravitate to the style that you enjoy! The options and variations are endless and can get a wee bit overwhelming too! Check in with me before you start to ensure your ideas will work, what order you might do things, how you could achieve the look you are seeking and any other technical data required! Step Two – Making Clay is thixotropic. This means that as you work with it, the clay first gets sloppier and wetter, before is begins to dry in the atmosphere. For most things, you simply can’t do all parts of the project at once. An example of work order might look like: Get last weeks work out from the shelves Prepare clay for today’s work – roll your clay, prepare balls for throwing, make the first stage of a pinch pot) Clean up last week’s work and put it on the shelf for bisque firing Check that you have any glazing to do – and do enough of it that you will have time to finish your main project Do the next step of your next project – there might be a further step that can’t be complete immediately, in that case, wrap your work well and put onto the shelves. Letting your work rest for a while can really help keep your work clean and professional looking. Many things require bagging under plastic to keep it ready for work the next week – put your name on the outside of the bag so you can find your work easily. We have stickers and markers. Consider how you want to decorate your work – coloured slip can be applied at a fairly wet stage (remembering that it will make your work even wetter!). Trying to apply slip to dry clay won’t work! If you want to do sgraffito – you will need to keep the work leather hard (a state of dryness where you can still work the clay with a little effort and a little water and care). Step Three – Drying Most of the time your work can go into the rack uncovered to let it dry out for the following week. If you want to continue forming or shaping you will need to double bag your work – put your work on a suitable sized bat and put the bat in a bag so the base of the bag is under the bat, then put another bag over the top of the work and tuck the top of the bag under the bat. If you want to trim (or turn) your thrown work the following week, it should also be double bagged. If your work is large, delicate, or of uneven thicknesses, you should lightly cover your work for drying. When considering the drying process, bare in mind the weather, humidity and wind! The hotter and dryer, the faster things dry and work can dry unevenly in the shelves – this can lead to cracking – another time to lightly cover your work for drying. Step Four – Trimming and Cleaning Up Your work is dry! It is called greenware now and it is at it’s most fragile! Handle everything with two hands. I often refer to soft hands – keep everything gentle and with your fingers spread as much as possible. Try to not pick up things like plates too much, and always with both hands! Before your work can be bisque fired it should be “cleaned up”. You work won’t go into the kiln if it has sharp edges – when glazed, sharp edges turn into razor blades! Use a piece of fly wire to rub the work all over – this will scratch a little so be light handed. Use a knife or metal kidney to scrape any areas that require a bit more dynamic treatment than the fly wire offers! Finally, a very light wipe over with a slightly damp sponge can help soften and soothe all of your edges and dags! Trimming thrown work: If you are planning to trim (or turn) your thrown work (and you should be), make sure you bag it well – your work should be leather hard to almost dry for easiest trimming. Use this step to finish the work completely – use a metal kidney to polish the surface, or a slightly damp sponge to give a freshly thrown look. Wipe the sponge around the rim after trimming, and check the inside of the pot for dags! Trimming slip cast work: Usually I will trim the rims of your work on the wheel the following day to make that stage easier, however you will still need to check your work for lumps and bumps. Last but not least – check that your name is still clearly on the bottom of your work. Step Five – Bisque Firing When the work is completely dry it can go into the bisque kiln. The bisque kiln is fired to 1000°C. This process burns off the water in the clay as well as some of the chemically bound water. The structure of the clay is not altered that much at this temperature. Inside the bisque kiln, the work is stacked a little, small bowl inside a larger bowl and onto a heavy plate. Smaller items like decorations or drink coasters might get stacked several high. Consideration is paid to the weight of the stack and shape of the work. A bisque kiln can fire about one and a half times the amount of work that the glaze kiln can fire. The firing takes about 10 hours to complete the cycle and about two days to cool down. Once it has been emptied the work is placed in the glaze room ready for you to decorate! Step Six – Glazing Decorating your work with colour can be a lot of fun – and time consuming! There are three main options for surface treatment at this stage: Oxide Washes Underglazes Glazes Washes and underglazes do not “glaze” the work – It will still need a layer of glaze to fully seal the clay (washes don’t need glaze on surfaces not designed for food or liquid as they can gloss up a little on their own). Underglazes are stable colourants that turn out pretty much how they look in the jar. They can be mixed with each other to form other colours and can be used like water colours to paint onto your work. Mostly they should have a clear glaze on top to seal them. Oxides are a different species – the pink oxide (cobalt) wash turns out bright blue for instance. They don’t always need a glaze on top, and some glazes can change the colour of the wash! The glazes need no other “glaze” on top! Be careful of unknown glaze interactions – you can put any combination of glaze in a bowl or on a plate, but only a single glaze on the outside of any vertical surface! Glazes are a chemical reaction under heat. We don’t know the exact chemicals in the Mayco glazes we use. I can guess by the way they interact with each other, however, on the whole, you need to test every idea you have, and not run the test on a vertical surface! Simply put, glaze is a layer of glass like substance that bonds with the clay underneath. Clay is made of silica, alumina and water. Glaze is made of mostly silica. Silica has a melting point of 1700°C and we fire to 1240°C. The silica requires a “flux” to help it melt at the lower temperature. Fluxes can be all sorts of chemicals – a common one is calcium – calcium has a melting point of 2500°C, however, together they both melt at a much lower temperature! Colourants are metal oxides like cobalt (blue), chrome (green through black), copper (green, blue, even red!), manganese (black, purple and pink) iron (red brown), etc. Different chemicals in the glaze can have dramatic effects. for example, barium carbonate (which we don’t use) turns manganese bright pink! Other elements can turn manganese dioxide brown, blue, purple and reddish brown. Manganese dioxide is a flux in and of itself as well. So, glazes that get their black and purple colours, often interact with other glazes and RUN! Our mirror black is a good example – it mixes really well with many glazes because it fluxes them – causes them to melt faster. It will also bring out many beautiful colours in the glazes because it’s black colouring most definitely comes from manganese dioxide! Glaze chemistry is a whole subject on it’s own! We use commercial Mayco glazes on purpose – for their huge range of colour possibilities, stability, cool interactions, artistic freedom with the ability to easily brush the glazes on and ease of use. We currently have almost 50 glazes on hand! A major project is to test the interactions of all glazes with each other. That is 2,500 test tiles!!!! I’m going to make the wall behind the wheels the feature wall of pretty colours! Step Seven – Glaze (Gloss or sometimes called “Glost”) Firing Most of the time this is the final stage of making your creation (but not always!) The glaze kiln goes to 1240°C. This is called cone 6, or midrange. It is the low end of stoneware temperatures. Stoneware clays and glazes are typically fired at cone 8 – 10, that is 1260 – 1290°C. The energy requirement to go from 1240°C to 1280°C is almost a 30% more! Our clay is formulated to vitrify (mature, turn “glass-like”) at 1240°, as are our glazes. A glaze kiln take around 12 hours to reach temperature and two to three days to cool down. Sometimes a third firing process is required – this is for decoration that is added to work after the glaze firing. For example – adding precious metals and lustres. this firing temperature is usually around 600 – 800°C depending upon the techniques being used. There are many students interested in gold and silver trims – we will be doing this third type of firing soon! After firing your work will be in the student finished work shelves. Remember to pay for it before you head out the door! There is a small extra charge for using porcelain clay (it’s more than twice the price of regular clay), and for any third firing process! Once your work has been fired it can not turn back into clay for millennia – so don’t fire it if you don’t like it! Put it in the bucket for recycling. https://firebirdstudios.com.au/the-process-of-making-pottery/Ceramics have evolved over thousands of years.A white earthenware side plate with a gadroon edge. Has water marks and chips on front.‘Johnson Bros England Reg No 15587’flagstaff hill, warrnambool, shipwrecked-coast, flagstaff-hill, flagstaff-hill-maritime-museum, maritime-museum, shipwreck-coast, flagstaff-hill-maritime-village, johnson bros, ceramics, tableware -
 Flagstaff Hill Maritime Museum and Village
Domestic object - Plate, Alfred Meakin
The Process of Making Pottery Decorating, Firing, Glazing, Making, Technical There is a rhythm and flow to clay. It can’t be done all at once! Even the making process! It can take weeks to get everything done, especially if you can only work on your pottery once a week! Even though we have three hour classes, it’s often just not enough time! Here is an overview of some of the processes so you have a bit more grasp on some of the technical stuff! Step One – Design There are SO many ideas out there for making stuff in clay! From delicate porcelain jewellery, through to heavy sculptural work and everything in between. Deciding your direction is sometimes not that easy – when you first start, try everything, you will naturally gravitate to the style that you enjoy! The options and variations are endless and can get a wee bit overwhelming too! Check in with me before you start to ensure your ideas will work, what order you might do things, how you could achieve the look you are seeking and any other technical data required! Step Two – Making Clay is thixotropic. This means that as you work with it, the clay first gets sloppier and wetter, before is begins to dry in the atmosphere. For most things, you simply can’t do all parts of the project at once. An example of work order might look like: Get last weeks work out from the shelves Prepare clay for today’s work – roll your clay, prepare balls for throwing, make the first stage of a pinch pot) Clean up last week’s work and put it on the shelf for bisque firing Check that you have any glazing to do – and do enough of it that you will have time to finish your main project Do the next step of your next project – there might be a further step that can’t be complete immediately, in that case, wrap your work well and put onto the shelves. Letting your work rest for a while can really help keep your work clean and professional looking. Many things require bagging under plastic to keep it ready for work the next week – put your name on the outside of the bag so you can find your work easily. We have stickers and markers. Consider how you want to decorate your work – coloured slip can be applied at a fairly wet stage (remembering that it will make your work even wetter!). Trying to apply slip to dry clay won’t work! If you want to do sgraffito – you will need to keep the work leather hard (a state of dryness where you can still work the clay with a little effort and a little water and care). Step Three – Drying Most of the time your work can go into the rack uncovered to let it dry out for the following week. If you want to continue forming or shaping you will need to double bag your work – put your work on a suitable sized bat and put the bat in a bag so the base of the bag is under the bat, then put another bag over the top of the work and tuck the top of the bag under the bat. If you want to trim (or turn) your thrown work the following week, it should also be double bagged. If your work is large, delicate, or of uneven thicknesses, you should lightly cover your work for drying. When considering the drying process, bare in mind the weather, humidity and wind! The hotter and dryer, the faster things dry and work can dry unevenly in the shelves – this can lead to cracking – another time to lightly cover your work for drying. Step Four – Trimming and Cleaning Up Your work is dry! It is called greenware now and it is at it’s most fragile! Handle everything with two hands. I often refer to soft hands – keep everything gentle and with your fingers spread as much as possible. Try to not pick up things like plates too much, and always with both hands! Before your work can be bisque fired it should be “cleaned up”. You work won’t go into the kiln if it has sharp edges – when glazed, sharp edges turn into razor blades! Use a piece of fly wire to rub the work all over – this will scratch a little so be light handed. Use a knife or metal kidney to scrape any areas that require a bit more dynamic treatment than the fly wire offers! Finally, a very light wipe over with a slightly damp sponge can help soften and soothe all of your edges and dags! Trimming thrown work: If you are planning to trim (or turn) your thrown work (and you should be), make sure you bag it well – your work should be leather hard to almost dry for easiest trimming. Use this step to finish the work completely – use a metal kidney to polish the surface, or a slightly damp sponge to give a freshly thrown look. Wipe the sponge around the rim after trimming, and check the inside of the pot for dags! Trimming slip cast work: Usually I will trim the rims of your work on the wheel the following day to make that stage easier, however you will still need to check your work for lumps and bumps. Last but not least – check that your name is still clearly on the bottom of your work. Step Five – Bisque Firing When the work is completely dry it can go into the bisque kiln. The bisque kiln is fired to 1000°C. This process burns off the water in the clay as well as some of the chemically bound water. The structure of the clay is not altered that much at this temperature. Inside the bisque kiln, the work is stacked a little, small bowl inside a larger bowl and onto a heavy plate. Smaller items like decorations or drink coasters might get stacked several high. Consideration is paid to the weight of the stack and shape of the work. A bisque kiln can fire about one and a half times the amount of work that the glaze kiln can fire. The firing takes about 10 hours to complete the cycle and about two days to cool down. Once it has been emptied the work is placed in the glaze room ready for you to decorate! Step Six – Glazing Decorating your work with colour can be a lot of fun – and time consuming! There are three main options for surface treatment at this stage: Oxide Washes Underglazes Glazes Washes and underglazes do not “glaze” the work – It will still need a layer of glaze to fully seal the clay (washes don’t need glaze on surfaces not designed for food or liquid as they can gloss up a little on their own). Underglazes are stable colourants that turn out pretty much how they look in the jar. They can be mixed with each other to form other colours and can be used like water colours to paint onto your work. Mostly they should have a clear glaze on top to seal them. Oxides are a different species – the pink oxide (cobalt) wash turns out bright blue for instance. They don’t always need a glaze on top, and some glazes can change the colour of the wash! The glazes need no other “glaze” on top! Be careful of unknown glaze interactions – you can put any combination of glaze in a bowl or on a plate, but only a single glaze on the outside of any vertical surface! Glazes are a chemical reaction under heat. We don’t know the exact chemicals in the Mayco glazes we use. I can guess by the way they interact with each other, however, on the whole, you need to test every idea you have, and not run the test on a vertical surface! Simply put, glaze is a layer of glass like substance that bonds with the clay underneath. Clay is made of silica, alumina and water. Glaze is made of mostly silica. Silica has a melting point of 1700°C and we fire to 1240°C. The silica requires a “flux” to help it melt at the lower temperature. Fluxes can be all sorts of chemicals – a common one is calcium – calcium has a melting point of 2500°C, however, together they both melt at a much lower temperature! Colourants are metal oxides like cobalt (blue), chrome (green through black), copper (green, blue, even red!), manganese (black, purple and pink) iron (red brown), etc. Different chemicals in the glaze can have dramatic effects. for example, barium carbonate (which we don’t use) turns manganese bright pink! Other elements can turn manganese dioxide brown, blue, purple and reddish brown. Manganese dioxide is a flux in and of itself as well. So, glazes that get their black and purple colours, often interact with other glazes and RUN! Our mirror black is a good example – it mixes really well with many glazes because it fluxes them – causes them to melt faster. It will also bring out many beautiful colours in the glazes because it’s black colouring most definitely comes from manganese dioxide! Glaze chemistry is a whole subject on it’s own! We use commercial Mayco glazes on purpose – for their huge range of colour possibilities, stability, cool interactions, artistic freedom with the ability to easily brush the glazes on and ease of use. We currently have almost 50 glazes on hand! A major project is to test the interactions of all glazes with each other. That is 2,500 test tiles!!!! I’m going to make the wall behind the wheels the feature wall of pretty colours! Step Seven – Glaze (Gloss or sometimes called “Glost”) Firing Most of the time this is the final stage of making your creation (but not always!) The glaze kiln goes to 1240°C. This is called cone 6, or midrange. It is the low end of stoneware temperatures. Stoneware clays and glazes are typically fired at cone 8 – 10, that is 1260 – 1290°C. The energy requirement to go from 1240°C to 1280°C is almost a 30% more! Our clay is formulated to vitrify (mature, turn “glass-like”) at 1240°, as are our glazes. A glaze kiln take around 12 hours to reach temperature and two to three days to cool down. Sometimes a third firing process is required – this is for decoration that is added to work after the glaze firing. For example – adding precious metals and lustres. this firing temperature is usually around 600 – 800°C depending upon the techniques being used. There are many students interested in gold and silver trims – we will be doing this third type of firing soon! After firing your work will be in the student finished work shelves. Remember to pay for it before you head out the door! There is a small extra charge for using porcelain clay (it’s more than twice the price of regular clay), and for any third firing process! Once your work has been fired it can not turn back into clay for millennia – so don’t fire it if you don’t like it! Put it in the bucket for recycling. https://firebirdstudios.com.au/the-process-of-making-pottery/Ceramics have evolved over thousands of years.Earthenware dessert plate, cream colour. Made by Alfred Meakin, England. Backstamped ‘Alfred Meakin England’. flagstaff hill, warrnambool, shipwrecked-coast, flagstaff-hill, flagstaff-hill-maritime-museum, maritime-museum, shipwreck-coast, flagstaff-hill-maritime-village, alfred meakin, ceramics, earthenware, kitchenware -
 Flagstaff Hill Maritime Museum and Village
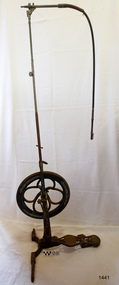
Equipment - Dentist Drill, Late 19th century
The design of this and other similar treadle powered dental engine (or dentist drill) was in common use by dentists from the 1870’s into the 1920's. When electricity became accessible to most communities the electrically powered dental engines began to take over from the treadle power. Over the ages teeth were extracted using picks and scissors and other gouging instruments. Bow drills, hand drills and even a "bur thimble" drill were later used to prepare cavities for filling. Some drills were made bendable by attaching flexible shanks between the metal bur and the handle, giving access to the teeth at the back of the mouth. Other mechanical devices were introduced along the way, such as clockwork drills, but they were hard to handle and inefficient. Over the centuries “dentistry has been performed by priests, monks and other healers. This was followed by barbers; the barber’s chair may well have been the precursor to the dental chair. “(SA Medical Heritage Society Inc.) In 1871 James Morrison patented the first commercially manufactured 'foot treadle dental engine', the first practica dental engine although others had been introduced as early as 1790 (by John Greenwood). Handmade steel burs or drills were introduced for dental handpieces, taking advantage of the significant increase in the speed of the drill. In 1891 the first machine-made steel burs were in use. The treadle drill reduced the time to prepare a cavity from hours to less than ten minutes. In 1876 the Samuel S. White Catalogue of Dentist Instruments listed a 12 ½ inch wheel diameter dental engine, with 14 bright steel parts, for sale at US $55 In today’s market, this is the equivalent to US $1200 approx. The specifications of that dental engine are very similar to the this one in our Flagstaff Hill Maritime Village’s collection. It is interesting to note that workings of a similar treadle dentist drill were used and modified to power a treadle spinning wheel of one of the volunteer spinners at Flagstaff Hill Maritime Village. The foot treadle dental engine was a milestone in dental history. “Historic importance of treadle powered machines; they made use of human power in an optimal way” (Lowtech Magazine “Short history of early pedal powered machines”) The invention of a machine to speed up the process of excavation of a tooth lead to the invention of new burs and drills for the handpieces, improving speed and the surgical process of dentistry. They were the fore-runner of today’s electrically powered dental engines. This treadle-powered dentist drill, or dentist engine, is made of iron and steel and provides power for a mechanical dental hand-piece that would be fitted with a dental tool. The drill has a three footed cast iron base, one foot being longer than the other two. A vertical C shaped frame is joined into the centre of the base, holding an axle that has a driving-wheel (or flywheel) and connecting to a crank. A slender, shoulder height post, made from telescoping pipes, joins into the top of this frame and is height adjusted by a hand tightened screw with a round knob. On the post just above the frame is a short metal, horizontal bar (to hold the hand-piece when it is not in use). A narrow tubular arm is attached to the top of the stand at a right angle and can move up and down. At the end of the arm is a firmly fixed, flexible rubber hose protected for a short distance by a sheath of thin metal. At the end of the hose there is a fitting where the drill’s hand-piece would be attached; a small, silver coloured alligator clip is also at the end. A treadle, or foot pedal, is hinged to the heel to the long foot of the base, and joined at the toe to the crank that turns the driving-wheel. There is a spring under the toe of the treadle. The metal driving-wheel has a wide rim. Touching the inside of the rim are four tubular rings that bulge towards the outside of the driving-wheel, away from the pole, and all meet at the hub of the axle. The axle is bulbous between the inside of the driving-wheel and the frame then passes through the frame and is attached on the other side. The driving-wheel has a groove around which a belt would sit. The belt would also fit around a pulley on the arm, at the top of the post. The pulley is joined to a rod inside the arm and this spins the drill's hand-piece and dental tool holder. The two shorter feet of the base are made from a long metal bar that has been curved outwards, and its centre is bolted to the base of the pole. Under the ends of the curved legs of the base are wedge shaped feet. The driving-wheel is decorated in light coloured paint on both sides, each side having three sets of floral decals evenly spaced around them, and each about a sixth of the wheel's circumference. Similar decoration is along the sides of the frame. The foot pedal has decorative cutout patterns in the centre of the foot and at the toe. On the long foot of the stand is some lettering with a fine, light coloured border around it. The lettering is hard to read, being a dark colour and flaking off. There are also remnants of fine, light coloured flourishes. The foot pedal has lettering of the maker’s trade mark cast into the metal at the ball of the foot. Lettering on the base is peeling and difficult to read. The foot pedal has a trade mark cast into it that looks like a combination of ‘C’ , ‘S’ , ‘A’, ‘R’. flagstaff hill, warrnambool, shipwrecked coast, flagstaff hill maritime museum, maritime museum, shipwreck coast, flagstaff hill maritime village, great ocean road, dentist, teeth, dental drill, dental engine, treadle drill, foot powered drill, treadle engine, orthodontics, dental surgery, james morrison -
 Flagstaff Hill Maritime Museum and Village
Domestic object - Jug
The Process of Making Pottery Decorating, Firing, Glazing, Making, Technical There is a rhythm and flow to clay. It can’t be done all at once! Even the making process! It can take weeks to get everything done, especially if you can only work on your pottery once a week! Even though we have three hour classes, it’s often just not enough time! Here is an overview of some of the processes so you have a bit more grasp on some of the technical stuff! Step One – Design There are SO many ideas out there for making stuff in clay! From delicate porcelain jewellery, through to heavy sculptural work and everything in between. Deciding your direction is sometimes not that easy – when you first start, try everything, you will naturally gravitate to the style that you enjoy! The options and variations are endless and can get a wee bit overwhelming too! Check in with me before you start to ensure your ideas will work, what order you might do things, how you could achieve the look you are seeking and any other technical data required! Step Two – Making Clay is thixotropic. This means that as you work with it, the clay first gets sloppier and wetter, before is begins to dry in the atmosphere. For most things, you simply can’t do all parts of the project at once. An example of work order might look like: Get last weeks work out from the shelves Prepare clay for today’s work – roll your clay, prepare balls for throwing, make the first stage of a pinch pot) Clean up last week’s work and put it on the shelf for bisque firing Check that you have any glazing to do – and do enough of it that you will have time to finish your main project Do the next step of your next project – there might be a further step that can’t be complete immediately, in that case, wrap your work well and put onto the shelves. Letting your work rest for a while can really help keep your work clean and professional looking. Many things require bagging under plastic to keep it ready for work the next week – put your name on the outside of the bag so you can find your work easily. We have stickers and markers. Consider how you want to decorate your work – coloured slip can be applied at a fairly wet stage (remembering that it will make your work even wetter!). Trying to apply slip to dry clay won’t work! If you want to do sgraffito – you will need to keep the work leather hard (a state of dryness where you can still work the clay with a little effort and a little water and care). Step Three – Drying Most of the time your work can go into the rack uncovered to let it dry out for the following week. If you want to continue forming or shaping you will need to double bag your work – put your work on a suitable sized bat and put the bat in a bag so the base of the bag is under the bat, then put another bag over the top of the work and tuck the top of the bag under the bat. If you want to trim (or turn) your thrown work the following week, it should also be double bagged. If your work is large, delicate, or of uneven thicknesses, you should lightly cover your work for drying. When considering the drying process, bare in mind the weather, humidity and wind! The hotter and dryer, the faster things dry and work can dry unevenly in the shelves – this can lead to cracking – another time to lightly cover your work for drying. Step Four – Trimming and Cleaning Up Your work is dry! It is called greenware now and it is at it’s most fragile! Handle everything with two hands. I often refer to soft hands – keep everything gentle and with your fingers spread as much as possible. Try to not pick up things like plates too much, and always with both hands! Before your work can be bisque fired it should be “cleaned up”. You work won’t go into the kiln if it has sharp edges – when glazed, sharp edges turn into razor blades! Use a piece of fly wire to rub the work all over – this will scratch a little so be light handed. Use a knife or metal kidney to scrape any areas that require a bit more dynamic treatment than the fly wire offers! Finally, a very light wipe over with a slightly damp sponge can help soften and soothe all of your edges and dags! Trimming thrown work: If you are planning to trim (or turn) your thrown work (and you should be), make sure you bag it well – your work should be leather hard to almost dry for easiest trimming. Use this step to finish the work completely – use a metal kidney to polish the surface, or a slightly damp sponge to give a freshly thrown look. Wipe the sponge around the rim after trimming, and check the inside of the pot for dags! Trimming slip cast work: Usually I will trim the rims of your work on the wheel the following day to make that stage easier, however you will still need to check your work for lumps and bumps. Last but not least – check that your name is still clearly on the bottom of your work. Step Five – Bisque Firing When the work is completely dry it can go into the bisque kiln. The bisque kiln is fired to 1000°C. This process burns off the water in the clay as well as some of the chemically bound water. The structure of the clay is not altered that much at this temperature. Inside the bisque kiln, the work is stacked a little, small bowl inside a larger bowl and onto a heavy plate. Smaller items like decorations or drink coasters might get stacked several high. Consideration is paid to the weight of the stack and shape of the work. A bisque kiln can fire about one and a half times the amount of work that the glaze kiln can fire. The firing takes about 10 hours to complete the cycle and about two days to cool down. Once it has been emptied the work is placed in the glaze room ready for you to decorate! Step Six – Glazing Decorating your work with colour can be a lot of fun – and time consuming! There are three main options for surface treatment at this stage: Oxide Washes Underglazes Glazes Washes and underglazes do not “glaze” the work – It will still need a layer of glaze to fully seal the clay (washes don’t need glaze on surfaces not designed for food or liquid as they can gloss up a little on their own). Underglazes are stable colourants that turn out pretty much how they look in the jar. They can be mixed with each other to form other colours and can be used like water colours to paint onto your work. Mostly they should have a clear glaze on top to seal them. Oxides are a different species – the pink oxide (cobalt) wash turns out bright blue for instance. They don’t always need a glaze on top, and some glazes can change the colour of the wash! The glazes need no other “glaze” on top! Be careful of unknown glaze interactions – you can put any combination of glaze in a bowl or on a plate, but only a single glaze on the outside of any vertical surface! Glazes are a chemical reaction under heat. We don’t know the exact chemicals in the Mayco glazes we use. I can guess by the way they interact with each other, however, on the whole, you need to test every idea you have, and not run the test on a vertical surface! Simply put, glaze is a layer of glass like substance that bonds with the clay underneath. Clay is made of silica, alumina and water. Glaze is made of mostly silica. Silica has a melting point of 1700°C and we fire to 1240°C. The silica requires a “flux” to help it melt at the lower temperature. Fluxes can be all sorts of chemicals – a common one is calcium – calcium has a melting point of 2500°C, however, together they both melt at a much lower temperature! Colourants are metal oxides like cobalt (blue), chrome (green through black), copper (green, blue, even red!), manganese (black, purple and pink) iron (red brown), etc. Different chemicals in the glaze can have dramatic effects. for example, barium carbonate (which we don’t use) turns manganese bright pink! Other elements can turn manganese dioxide brown, blue, purple and reddish brown. Manganese dioxide is a flux in and of itself as well. So, glazes that get their black and purple colours, often interact with other glazes and RUN! Our mirror black is a good example – it mixes really well with many glazes because it fluxes them – causes them to melt faster. It will also bring out many beautiful colours in the glazes because it’s black colouring most definitely comes from manganese dioxide! Glaze chemistry is a whole subject on it’s own! We use commercial Mayco glazes on purpose – for their huge range of colour possibilities, stability, cool interactions, artistic freedom with the ability to easily brush the glazes on and ease of use. We currently have almost 50 glazes on hand! A major project is to test the interactions of all glazes with each other. That is 2,500 test tiles!!!! I’m going to make the wall behind the wheels the feature wall of pretty colours! Step Seven – Glaze (Gloss or sometimes called “Glost”) Firing Most of the time this is the final stage of making your creation (but not always!) The glaze kiln goes to 1240°C. This is called cone 6, or midrange. It is the low end of stoneware temperatures. Stoneware clays and glazes are typically fired at cone 8 – 10, that is 1260 – 1290°C. The energy requirement to go from 1240°C to 1280°C is almost a 30% more! Our clay is formulated to vitrify (mature, turn “glass-like”) at 1240°, as are our glazes. A glaze kiln take around 12 hours to reach temperature and two to three days to cool down. Sometimes a third firing process is required – this is for decoration that is added to work after the glaze firing. For example – adding precious metals and lustres. this firing temperature is usually around 600 – 800°C depending upon the techniques being used. There are many students interested in gold and silver trims – we will be doing this third type of firing soon! After firing your work will be in the student finished work shelves. Remember to pay for it before you head out the door! There is a small extra charge for using porcelain clay (it’s more than twice the price of regular clay), and for any third firing process! Once your work has been fired it can not turn back into clay for millennia – so don’t fire it if you don’t like it! Put it in the bucket for recycling. https://firebirdstudios.com.au/the-process-of-making-pottery/The form of the jug has been in use for many centuries.Stoneware jug. Two tone brown glaze with pierced lip behind spout. Spout chipped.None.flagstaff hill, warrnambool, shipwrecked-coast, flagstaff-hill, flagstaff-hill-maritime-museum, maritime-museum, shipwreck-coast, flagstaff-hill-maritime-village, jug, ceramic jug -
 Yarra Glen & District Historical Society
Sepia postcards, Yarra Glen from the Healesville railway line
Sepia postcard with a view of Yarra Glen taken from the east on the railway line adjacent to the Healesville Rd. The view extends from the railway station to Point Pleasant and includes Victoria Hall, the Grand Hotel and Mrs Roberts' house.On back of postcard at the top "POST CARD". On the left hand side "THIS SPACE MAY BE USED FOR PRINTED OR WRITTEN MATTER". On the right hand side "ONLY THE ADDRESS TO BE WRITTEN HERE". In a box in the right hand corner "A HALF-PENNY STAMP TO BE PLACED HERE". Along the left hand margin "Ajax series. Printed in England". COPY 2: Also has handwritten on back "March 5th 1929 Mount Wise, Yarra Glen. Our dear Lorna Lesley, Melbourne. Just a [few]lines to wish you a happy birthday, fancy tomorrow you will be nine years old. It only seems like nine months since you were a wee baby. When you are just as old again you will be a young lady, quite grown up. Thank Mum for her letter this morning. It is very good to take the ladies out. Lots of love to you from all of us; Love to Dad & Mum too, Your loving Aunt F..." COPY 3: Also has handwritten on the back "To Dear Aunt Charlotte, Martha. Lottie & all the boys with love & best wishes for a Happy & prosperous New Year from Cousin. (In another hand and ink) G Keets Yarra Glen.hotel, yarra glen, railway line, point pleasant, grand hotel, victoria hall, post and rail fence, mt wise, mount wise -
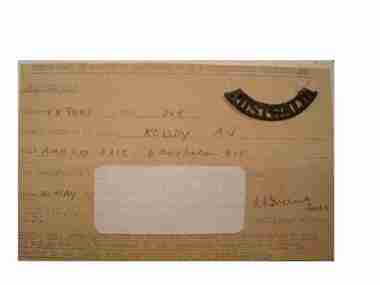 Red Cliffs Military Museum
Certificate, Certificate of Interrogation Questionniares, 14/5/1945 (exact)
There is some information hidden by the hand written information on a card in the middle of the certificate.A small card sized certificate belonging to A.J. Roddy with type written fields completed in ink by the interrogating officer. There is type written information outlining the requirements for the card holder. Card was produced by M19 and interrogation by Intelligence Officer 14 May 1945.Top of Card Type Written in Capitals: CERTIFICATE IN RESPECT OF COMPLETION OF MI9 INTERROGATION QUESTIONNAIRE./Left hand side: CERTIFIED THAT/ NUMBER (in ink) VX8007 RANK (ink) DVR./Name & Initials in BLOCKS (ink) RODDY AJ/Unit (ink) AMN Coy AASC 6 Australian Div/ has completed MI9/ Date (ink) 14 May (Typed) 45/ The Centre of the card is covered with a hand written note that states:- On arrival in England/ spent the first whole/ day in interrogation/ many Nazis were picked up by this method./ A.I.S. (I.S.9), ink Signature L.E. Friend Capt/C.M.F. Intelligence Officer./ Note. This Certifivate MUST be carefully retained by the individual with whom/ it refers and MUST be/ produced to the appropriate authorities on request,/ whether in the Middle East, North Africa or the United Kingdom.officer, certificate, interrogation, questionnaire, certified, intelligence -
 Ringwood and District Historical Society
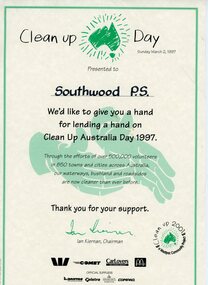
Certificate, Clean Up Austalia Day 1997 participation certificate
... Clean Up Australia Day, Sunday March 2, 1997. Presented... you a hand for lending a hand on Clean up Australia Day 1997 ...A4 pageClean Up Australia Day, Sunday March 2, 1997. Presented to Southwood P.S.. We'd like to give you a hand for lending a hand on Clean up Australia Day 1997 -
 City of Moorabbin Historical Society (Operating the Box Cottage Museum)
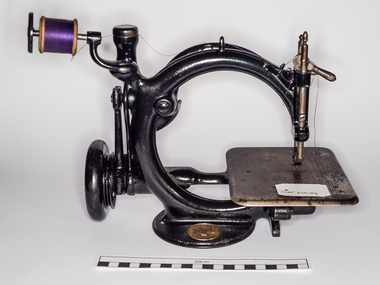
Functional object - Sewing machine, Wilcox & Gibbs, c1870
... , Rhode Island and this continued up until 1948. A special hand... was undertaken by Brown & Sharpe, Rhode Island and this continued up ...Willcox and Gibbs: Serial No. 158679. The Willcox & Gibbs Sewing Machine Company was founded in 1857 by James E. A. Gibbs and James Willcox and opened its London Office in 1859 at 135 Regent Street . By 1871 the Company's Chief Office for Europe was at 150 Cheapside, London, this office was later moved (post 1885) to 94 - 96 Wigmore Street, then 37 & 39 Moorgate Street (by 1891 to post 1907) and later 20 Fore Street, London . Right from the initial production the manufacturing of the Company's single thread, chain stitch machine was undertaken by Brown & Sharpe, Rhode Island and this continued up until 1948. A special hand crank mechanism was produced in England for the European market, but the general design of the Willcox & Gibbs remained essentially the same throughout its production. The only major improvement was in 1875 when the glass tension discs were replaced with an automatic tension device which ensured the machine could not get out of adjustment. In addition to the domestic hand and treadle machines the company produced a wide range of industrial models. The Company finally closed in 1973. This Willcox & Gibbs came complete with its wooden carry case. The machine was made in America in the late 1860's but it has the ornate hand crank produced at Coalbrookdale near Telford, England which was, in Victorian times, renown for producing high quality ornate iron castings. This machine has the glass tension discs which were used on domestic models until 1875. The Willcox & Gibbs badge is located on the rear of the base casting and it also has a deep wooden base. The cloth plate has various American patent dates, four dating between 1857 & 1860 relating to J. E. A. Gibbs, three dating between 1860 & 1864 relating to Chas H. Willcox (son of James Willcox), the machine was also licensed under five other patents including the infamous Elias Howe patent of 1846. There are only two English patents one for J. E. A Gibbs and the other for James Willcox. In 1887 a W & G Sewing Machine sold in England for 6 pounds , with its box and bits, at a time when the average wage was less than 10/- shillings per week. The early settlers of Moorabbin Shire had to be self sufficient making their own clothes, tableware, bed coverings, furnishings and equipment. The women were skilled dressmakers and craft workers.Willcox and Gibbs: Serial No. 158679. A single thread, chain stitch Sewing Machine with a special hand crank mechanism produced in England for the European market, and the glass tension discs which were used on domestic models until 1875. This Willcox & Gibbs came complete with its wooden carry case. The machine was made in America c1870 but it has the ornate hand crank produced at Coalbrookdale near Telford, England which was, in Victorian times, renown for producing high quality ornate iron castings. This machine has the glass tension discs which were used on domestic models until 1875. The Willcox & Gibbs badge is located on the rear of the base casting and it also has a deep wooden base. The Willcox & Gibbs badge is located on the rear of the base castingsewing machines, early settlers, pioneers, moorabbin, brighton, gibbs james, willcox james, willcox henry, new york, america, dressmaking, mateial, machine makers, wrought iron work, telford england -
 City of Moorabbin Historical Society (Operating the Box Cottage Museum)
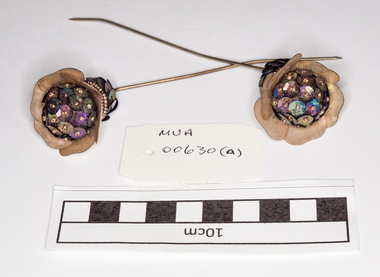
Jewellery, 2 lady's hat pins mauve, c1900
... of the pioneer families liked to dress up in their best hand made dresses ...A hat pin is a decorative pin for holding a hat to the head, usually by the hair that was styled in a Chignon or French Roll style and usually worn in a pair. They are typically around 20 cm in length, with the pinhead being the most decorated part. The hatpin was invented to hold veils in place, and was handmade. Birmingham, England was the centre of production when demand eventually outgrew the number that could be supplied by hand-making and they also began to be imported from France. In 1832, an American machine was invented to manufacture the pins, and they became much more affordable. During the 1880s, bonnets gave way to hats, some of which were very large and the popularity of hatpins soared. In the Victorian era, when appearance was everything, it just wouldn't do for a fashionable lady's hat to blow off in the wind. They remained a standard women's' accessory through the 1910s and were produced in a vast range of materials and types. Hat pin holder boxes were also produced. One of the most well-known makers of hatpins is silversmith Charles Horner, of Halifax, whose turn of the century jewellery company became a leader in the market by creating a series of mass-produced pins that were still of exceptional quality. As a result, thousands of Horner's pins are still on the market and on display in museums worldwide. Women of the 1920’s used hat pins as decoration on their Cloche hats that fitted snugly to their heads. The women of the pioneer families liked to dress up in their best hand made dresses and fashionable hats for Church gatherings and special occasions as a relief from the daily chores of hand washing, ironing with flat irons and cooking over open fires.2 lady's long steel hat pins with sequents in a flower design on mauve material bonnets, hats, veils, scarves, moorabbin, bentleigh, brighton, cheltenham, early settlers, pioneers, clasps, hairdressing, combs, steel pins, jewellery -
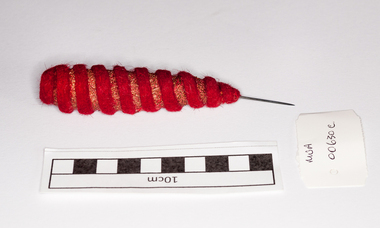
 City of Moorabbin Historical Society (Operating the Box Cottage Museum)
Jewellery, 1 lady's hat pin black, c1900
... families liked to dress up in their best hand made dresses ...A hat pin is a decorative pin for holding a hat to the head, usually by the hair that was styled in a Chignon or French Roll style and usually worn in a pair. They are typically around 20 cm in length, with the pinhead being the most decorated part. The women of the pioneer families liked to dress up in their best hand made dresses and fashionable hats for Church gatherings and special occasions as a relief from the daily chores of hand washing, ironing with flat irons and cooking over open fires. 1 long, lady's, steel, hat pin , padded and covered in black linen decorated with spherical shaped black sequins bonnets, hats, veils, scarves, moorabbin, bentleigh, brighton, cheltenham, early settlers, pioneers, clasps, hairdressing, combs, steel pins, jewellery -
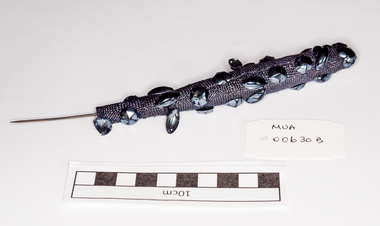
 City of Moorabbin Historical Society (Operating the Box Cottage Museum)
Jewellery, 1 lady's hat pin, c1900
... . The women of the pioneer families liked to dress up in their best ...See 00630 A A hat pin is a decorative pin for holding a hat to the head, usually by the hair that was styled in a Chignon or French Roll style and usually worn in a pair. They are typically around 20 cm in length, with the pinhead being the most decorated part. The women of the pioneer families liked to dress up in their best hand made dresses and fashionable hats for Church gatherings and special occasions as a relief from the daily chores of hand washing, ironing with flat irons and cooking over open fires. A short, lady's steel hat pin, padded and covered in red and gold felt in a spiral patternbonnets, hats, veils, scarves, moorabbin, bentleigh, brighton, cheltenham, early settlers, pioneers, clasps, hairdressing, combs, steel pins, jewellery -
 City of Moorabbin Historical Society (Operating the Box Cottage Museum)
Jewellery, 1 lady's hat pin, c1900
... The women of the pioneer families liked to dress up in their best ...See 00630 A A hat pin is a decorative pin for holding a hat to the head, usually by the hair that was styled in a Chignon or French Roll style and usually worn in a pair. They are typically around 20 cm in length, with the pinhead being the most decorated part The women of the pioneer families liked to dress up in their best hand made dresses and fashionable hats for Church gatherings and special occasions as a relief from the daily chores of hand washing, ironing with flat irons and cooking over open fires.A short steel lady's hat pin with a gold coloured metal ball at top with filigree decorationbonnets, hats, veils, scarves, moorabbin, bentleigh, brighton, cheltenham, early settlers, pioneers, clasps, hairdressing, combs, steel pins, jewellery -
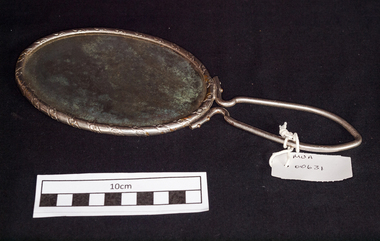 City of Moorabbin Historical Society (Operating the Box Cottage Museum)
Ornaments, lady's hand mirror, c1900
A lady's hand mirror usually lay on her dressing table and she used it when applying make up and styling her hair.A lady's small ,dressing table, silver plated, hand mirrormoorabbin, bentleigh, brighton, cheltenham, early settlers, pioneers, jewellery, mirrors -
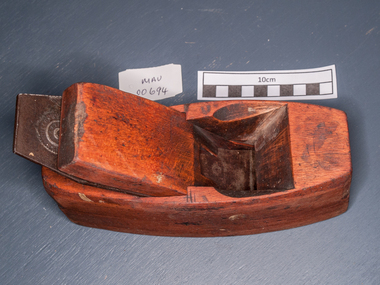 City of Moorabbin Historical Society (Operating the Box Cottage Museum)
Tools, hand made wood plane, c1880
A hand plane is a tool for shaping wood Hand planes are generally the combination of a cutting edge, such as a sharpened metal plate, attached to a firm body, that when moved over a wood surface, take up relatively uniform shavings, by nature of the body riding on the 'high spots' in the wood, and also by providing a relatively constant angle to the cutting edge, render the planed surface very smooth. A cutter which extends below the bottom surface, or sole, of the plane slices off shavings of wood. A large, flat sole on a plane guides the cutter to remove only the highest parts of an imperfect surface, until, after several passes, the surface is flat and smooth.The family of Mr Lamb were early settlers in Moorabbin Shire and had to be self reliant and made their own clothes and tools as they established homes and farms for their families.c1880 A hand made wood planeearly settlers, pioneers, market gardeners, moorabbin, bentleigh, brighton, cheltenham, tools -
 City of Moorabbin Historical Society (Operating the Box Cottage Museum)
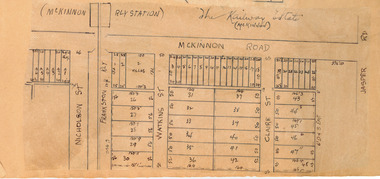
Plan - McKinnon Railway Estate, McKinnon, c 1921
At the end of World War One, there was a renewed interest in residential land and a number of estates opened up in the Municipality of Moorabbin. The train line from the city to Frankston was electrified in 1922 which intensified the sale in the municipality of Moorabbin, particularly land which was in the vicinity of the railway stations.Example of the progress of the Municipality of MoorabbinHand drawn plan of the McKinnon Railway Estate, McKinnonMcKinnon Railway Estate, McKinnon - hand drawn planmckinnon road, watkins street (now bent street), claire street, real estate, mckinnon, moorabbin -
 Bendigo Historical Society Inc.
Photograph - ELAINE SWANSON COLLECTION: ANZAC DAWN SERVICE 2015 RSL BENDIGO
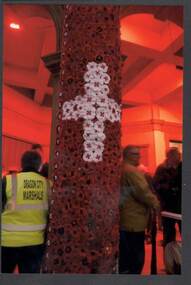
Close-up of poppy banner, showing detail of hundreds of poppies sewn onto backing. In middle of banner, white cross of white poppies to commemorate the WW1 nurses. Dragon City Marshals person on Left Hand side of image, two men visible on Right Hand side.Elaine Swansonbendigo, institutions, rsl bendigo, bendigo rsl, anzac -
 Bendigo Historical Society Inc.
Photograph - PORTRAIT OF A LADY
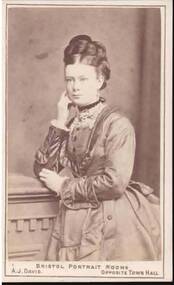
... and her hand up to her face. Her left hand is beside her right... resting on the cupboard and her hand up to her face. Her left hand ...Small, hip length portrait of a lady. She is standing beside a cupboard? With her right elbow resting on the cupboard and her hand up to her face. Her left hand is beside her right elbow. Her dress has long sleeves and lace at the collar and cuffs. Printed on the back in gold is the photographer's name and address. Also handwritten: - 'to Mrs Carson with my best love Angelina Moorhead. Sailors Gully. Feb 21st /7 5.'The Briston Portrait Rooms, A. J. Davis, 75 & 77 Swanston Street. Melbournephotograph, portrait, female, portrait of a lady, bristol portrait rooms, a j davis -
 Bendigo Historical Society Inc.
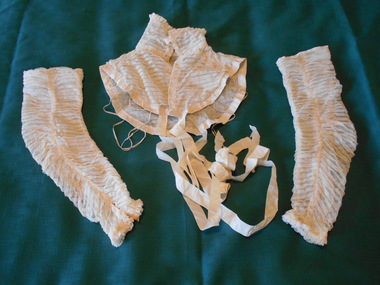
Clothing - HELEN MUSK COLLECTION: PINK SILK BODICE
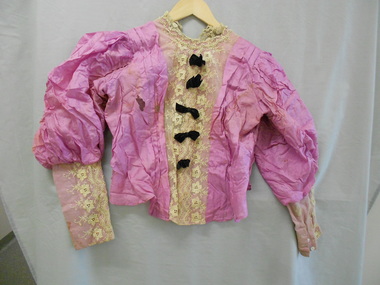
Long sleeved pink silk bodice lined with pink and mauve cotton fabric. Front of bodice made of pieces with a centre seam. Centre panel insert of cream coloured embroidered net narrowing from 28 cms across high neckline to 18 cms at waist. Five black velvet bows are attached vertically at centre front from below the throat, 6 cms apart. Velvet bows hand stitched to centre front. Front panel has rounded shape dipping below the waist. On either side of front insert are two wide vertical tucks Stand up collar of embroidered net (6 cms) has two pieces of wire inserted at LHS of back opening and in front of LH shoulder. Matching wire pieces on RHS are missing. Wire pieces are hand stitched in place. The bodice has a back opening fastened with six buttons and button holes plus a hook and eye at the top below the collar. One button is missing. Buttons are white with wheel spoke pattern. Strip of hemmed silk fabric is tied to the top buttonhole. Cotton lining consists of four pieces across the back and two pieces across the front with centre seam and two darts on either side. Full gathered set in sleeves from the shoulder are gathered into a tightly fitted 20 cm lower sleeve just below the elbow. The upper sleeve has a fitted lining of mauve cotton fabric shaped to the elbow and then forming the fitted sleeve along the lower arm. The fitted lower sleeves are covered with cream coloured embroidered net and have a 10 cm opening on outer edge fastened with three buttons and button holes. Hand and machine stitched.costume, female daywear, silk bodice -
 Bendigo Historical Society Inc.
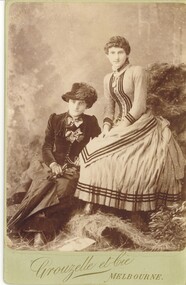
Photograph - HARRIS COLLECTION: PHOTO TWO FEMALES
... resemblance suggests Sisters. Right hand side. Pleated pale dress.... Right hand side. Pleated pale dress buttoned up front, closed ...Two seated young female studio photograph. Family resemblance suggests Sisters. Right hand side. Pleated pale dress buttoned up front, closed neck with silver chain necklace and locket. Left hand side girl. Dark dress , blouse top with bow below chin and one on chest. Buttoned boots of each girl can be seen. Printed on front. Grouzelle et Cie, Melbourne. Monogram on reverse. GFC.Grouzelle et Cie Melbournephotograph, person, female -
 Bendigo Historical Society Inc.
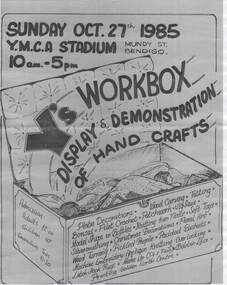
Document - Y.M.C.A., Y'S WORKBOX, DISPLAY & DEMONSTRATION OF HAND CRAFTS, 27 October 1985
Event, Bendigo Y.M.C.A., Y's Workbox, Display & Demonstration of Hand Crafts, at The Y.M.C.A. Stadium, Mundy Street, Bendigo, Sunday October 27, 1985, 10am - 5pm. Admission: Adults $2.00 , Children 50c, Devonshire Teas $1.20. Crafts include: Plate Decorations, Wood Carving, Tatting, Bonsai, Filet Crochet, Patchwork, Jigsaws, Model Ships in Bottles, Knitting from Fleece, Soft Toys, Silversmithing, Christmas Decorations, Floral Art, Wood Turning, Pickled People, Padded Baskets, Machine Embroidery, Applique, Knitting, Overlocking, Latchhook Rugs, Make-Up (TV & Films), Bobbin Lace, Printing, Golden North Centre.event, exhibition, bendigo y.m.c.a. -
 Port Melbourne Historical & Preservation Society
Photograph - Port Melbourne Uniting Hands up for Peace, Port Melbourne Uniting Church, Bridge Street, 1990s
... with sign "Port Melbourne Uniting Hands up for Peace"... Uniting Church with sign "Port Melbourne Uniting Hands up ...Coloured photograph of Port Melbourne Uniting Church with sign "Port Melbourne Uniting Hands up for Peace"religion - uniting church, peace sign -
The Ed Muirhead Physics Museum
Photograph, Optical Munitions, with Director
... a close up of hands handling equipment, same as in no 127.... and white photo showing a close up of hands handling equipment, same ...Part of a series entitled “Optical Munitions - School of Natural Philosophy, 1942-1945”. Black and white photo showing a close up of hands handling equipment, same as in no 127.In ink on lower left hand corner : “14” -
 Bendigo Historical Society Inc.
Clothing - MAGGIE BARBER COLLECTION: COLLAR AND DETACHED SLEEVES, Late 1800's
Clothing. Ladies' collar. Net fabric, entirely sewn into 'pin-tucks' .5 cm deep in the high stand-up collar, and increasing to 7.5 cm at the lower edge of the jabot front. Opening at the back, the jabot is fastened by nine metal hooks, and hand-stitched loops. Collar has a tightly gathered double frill of the tulle fabric, at neck and is held up right by five 'covered' 'bones'. The lower edge of the front and back is edged with a 1.5 cm wide silk fabric frill. Centre lower edge of back has two 59 cm long silk ribbon ties. This ribbon is also attached to the lower edge of the jabot 58 cm and 60 cm long - presumably for the wearer to tie firmly in place. Neckline seam is re-inforced and neatened by an organdie type fabric, hand-stitched in place. Two fine elastic loops (now perished) one 52 cm, one 58 cm would once have helped to hold the jabot in place, with the arms passing through the loops, to keep the jabot in place. Detached sleeves. Net fabric, entirely sewn into .5 cm tucks. Reaching from the wrist to above the elbow. A double net frill edges the wrists, where a 6.5 cm opening, fastens with metal hooks and hand-stitched loops. A cotton tape, .5 cm wide neatens and re-infrces this seam, and a row of chain stitch, in silk thread embellishes the outer side of the seam. Upper edge of the sleeve has a fine binding of silk ribbon.costume, female, cream tucked net collar and jabot -
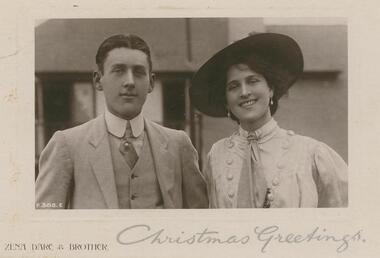 Bendigo Historical Society Inc.
Postcard - GLADYS DEAN COLLECTION: POSTCARD, 1906 - 1908
Photo mounted on backing card with clear protective film over image and card. Black and white image is of a man and woman photographed from the chest up, standing together. They are dressed formally, the man in a pale coloured suit with waistcoat and the woman in a pale coloured shirt with button detail. Both are wearing ties and she is wearing a dark coloured brimmed hat. The number P386E is printed in white in the lower left hand corner of the image. There is a white border varying between .2mm to .5mm around the photograph. The words Zena Dare & Brother are printed in sepia along the lower left hand edge of the backing card. The words Christmas Greetings have been written in silver on the right hand lower edge of the backing card. On reverse card is addressed to Miss Gladys Esmond McKenzie St Golden Square with a one penny stamp affixed post marked Melbourne.Rotary Photographic Plate Sunk Gem Series Rotary Photo EC. P 386Epostcard -
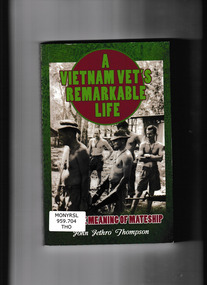 Monbulk RSL Sub Branch
Book, Brolga Publishing, A Vietnam vet's remarkable life : the true meaning of mateship, 2012
It's 1967 and Jethro is a 20-year-old Aussie lad who is about to take up his new posting in Vietnam. Five months later Jethro is on his way home in a medic chopper with a third of his body blown away: one leg is amputated, his right hand and half of his left hand - gone. And so begins Jethro's journey back to a whole life. This is the story of a wounded soldier and what happens to survivors.Ill, p.267.non-fictionIt's 1967 and Jethro is a 20-year-old Aussie lad who is about to take up his new posting in Vietnam. Five months later Jethro is on his way home in a medic chopper with a third of his body blown away: one leg is amputated, his right hand and half of his left hand - gone. And so begins Jethro's journey back to a whole life. This is the story of a wounded soldier and what happens to survivors.vietnam war 1961-1975 – australian involvement, vietnam war 1961-1975 – personal recollections – australia -
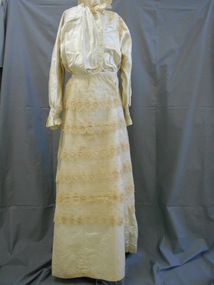 Bendigo Historical Society Inc.
Clothing - CREAM SATIN AND LACE WEDDING DRESS, 1850
High waisted bodice, with centre front seam, back opening fastened with metal press-studs, and finished on the right side, with ball-shaped pearl buttons sewn in pairs - six groups of two. A placket extends into the skirt at back, and is fastened with metal press-studs. Bodice is gathered onto skirt at waistline, and defined with a 1.5cm wide tape. An 8.5cm wide cotton lace frill is gathered around the high neckline. The wrist-length sleeves are an extension of the bodice and have a 4cm band, and 4cm wide gathered frill at the wrist. The sleeves are shaped from the high waistline, and also at the cuff edge. The skirt has an overlay of fine lace, made up of six X 17cm wide bands of lace, with a scalloped edge. No shoulder seams. Back opening and centre front seam indicate the cutting out layout of fabric. A one cm wide ribbon finishes the neckline, and the lace frill is hand stitched to the ribbon. Some seams are hand neatened. A 2.5cm wide flat bow finishes the back neckline.costume, female, cream satin and lace wedding dress -
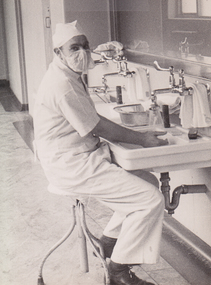 Royal Australasian College of Surgeons Museum and Archives
Photograph (item) - BK Rank scrubs up at the Heidelberg Military Hospital
Benjamin Rank was considered by many to be the father of plastic surgery in Australia. He was born on 14 January 1911 in Heidelberg, Victoria, where his father, Wreghitt Rank, owned a grain store and mill. His mother was Bessie née Smith. He was educated at Scotch College, Melbourne, and Ormond College, University of Melbourne, graduating with many honours and prizes. He did a two-year residency in the Royal Melbourne Hospital before going to London to specialise in surgery. There he did junior posts at St James' Hospital, Balham, but soon became fascinated by the new specialty of plastic surgery and was appointed assistant plastic surgeon at Hill End (Bart's EMS unit). Joining the Royal Australasian Army Medical Corps in 1940, he commanded their plastic surgical unit in Egypt. In 1942, he returned to Australia to set up a plastic and maxillofacial unit at Heidelberg Military Hospital. Among the patients treated there was one Flight Lieutenant John Gorton, who went on to become Prime Minister of Australia. In 1946 he was the first honorary plastic surgeon at the Royal Melbourne Hospital. He spent much time overseas and was instrumental in setting up the specialty of plastic surgery in India, for which he set up 'Interplast' - a charity supported by the Rotary Clubs to offer training and expertise to Asian and Pacific nations. He was the Sims Commonwealth Travelling Professor of the College in 1958, Moynihan lecturer in 1972, President of the British Association of Plastic Surgeons in 1965 and President of the Royal Australasian College of Surgeons from 1966 to 1968. He made important contributions to the study of Marjolin's ulcer, radiation carcinoma, and the transition from benign to malignant melanoma. He also made a major contribution to hand surgery, and his textbook Surgery of repair as applied to hand injuries (Livingstone, 1953) ran to four editions. He wrote extensively, including an autobiography, and was a talented painter. He was a tireless campaigner for no-fault motor accident insurance and was President of the St John Ambulance Association. He married Barbara Lyle Facy in 1938. They had one son Andrew, and three daughters, Helen, Julie and Mary (one of whom became a nurse). He died on 26 January 2002. Reference; https:livesonline.rcseng.ac.uk surgeon, sir benjamin rank, heidelberg military hospital, plastic surgery, royal melbourne hospital