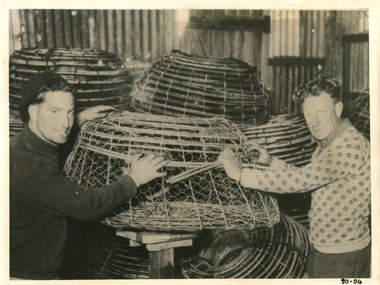
Showing 118 items matching "south wharf"
-
 Queenscliffe Maritime Museum
Instrument - Compass, bosun, South Western Marine Factors Ltd
Unused, part of collection donated by Chris WoodCompass, bosun in card box with stand in polystyrenecompass -
Queenscliffe Maritime Museum
Functional object - Bottle, earthenware
CAMBRIDGESHIRE (J. Marshall) was on voyage from Gravesend UK to Sydney, New South Wales with a cargo of general and a crew of 40, when she was lost off Cambridgeshire Reef Tasmania. Read more at wrecksite: https://www.wrecksite.eu/wreck.aspx?54312Earthenware bottle from the wreck of the Cambridgeshireshipwrecks, cabridgeshire, salvage, bottle -
 Queenscliffe Maritime Museum
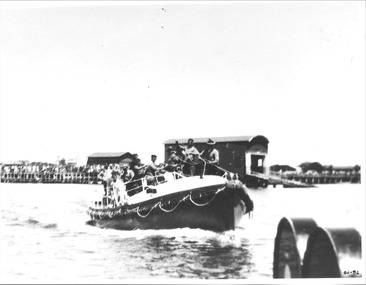
Photograph - Photo of the Lifeboat QUEENSCLIFFE under way at Fisherman's Pier, Photograph of lifeboat QUEENSCLIFFE, March 1936
The QUEENSCLIFFE lifeboatLifeboatsBlack & white photograph of the Lifeboat QUEENSCLIFFE under way at Fisherman's Pier, circa 1929-30 after the Lifeboat Shed was builtReverse - "QUEENSCLIFFE boatshed at the old Fisherman's Pier on the North end - Demolished pier about 1955 - before moved to new pier because of 'sanding' up & preventing clear launch (about 1947-49?) - on left is Ports & Harbour shed (on South arm of Fisherman's Pier - see 1986-184 - cabin to QUEENSCLIFFE added about 1935.community information, the queenscliffe lifeboat -
 Queenscliffe Maritime Museum
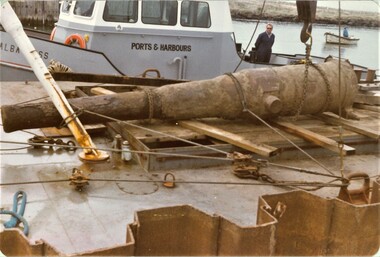
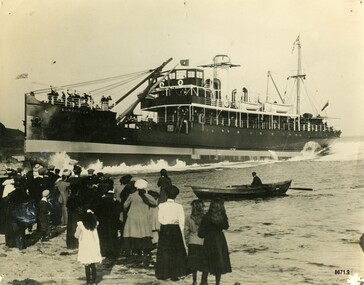
Photograph - Colour photo, 1980, of "disappearing gun" during transportation, Disappearing 12" Gun, 1980
Disappearing gun relocated to Queenscliffe Fort from South Channel Fort 1980Disappearing gun barrel being transported.Black & white 1908 photograph of Queenscliffe fishermen's catch on the pierReverse - " nil "historical references -
 Queenscliffe Maritime Museum
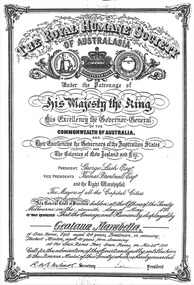
Certificate - Illuminated Address & Certification, Royal Humane Society certificate/citation for Geatana Marabella, dated 11 May 1911, 11 May 1911
Disappearing gun relocated to Queenscliffe Fort from South Channel Fort 1980Disappearing gun barrel being transported.Royal Humane Society Citation of 11 May 1911 for Geatana Marabella for 'courage & humanity'Reverse - " nil "historical references -
 Queenscliffe Maritime Museum
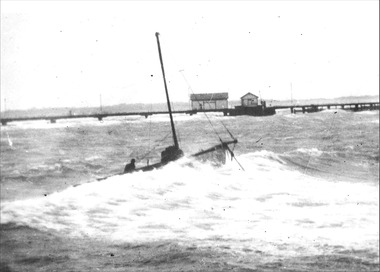
Photograph - Jurgens' Couta boat KARA, KARA, Jurgens' Couta boat, 1953
KARA Couta boatKARA Couta boat in a gale.KARA, Jurgens' Couta boat in SE gale in 1953Reverse - " late Arnold Jurgens fishing boat KARA / She was deliberately beached between the piers to save her from being wrecked like the P & H survey launch FLINDERS [refer 1985-146] / South East gale February 1953 "historical references, kara, couta boat -
 Queenscliffe Maritime Museum
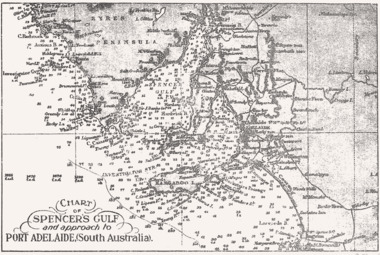
Map - B & W coastal map Spencer's Gulf & into Port Adelaide, South Australia, Coastal map of Port Adelaide South Australia showing Spencer's Gulf, Before donation in 1987
Australian coastal mapsAustralian coastal mapsB&W coastal 'soundings' map Spencer's Gulf & into Port Adelaide, South Australia., from an unknown book, pre-1987.Reverse " NIL "old maps of australian coast -
 Ballarat Tramway Museum
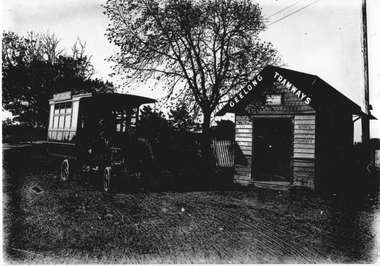
Photograph - Geelong MESCo Bus East Geelong, c1920
The photo shows the Melbourne Electric Supply Co. (MESCo), bus at the East Geelong terminus. MESCo operated the Geelong tram system from 1912 and opened the tram line to this location "East Geelong" in 1923. The terminus was at the Geelong Cemetery, with a wooden waiting room shelter with signage about the building being used for passengers only and prohibiting the posting of bills. The buses ran from the railway station and Moorabool St wharf from 1912 until they were replaced by trams in 1923. The bus is also seen in item 4315. Yields information about the operation of a bus by MESCo in Geelong.Black and white photograph - plain back.geelong, tramways, mesco, buses, east geelong, shelters -
 Ballarat Tramway Museum
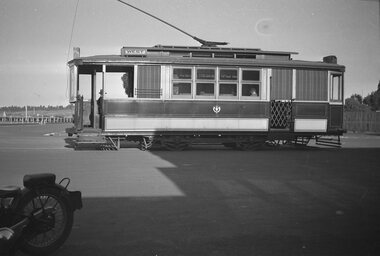
Negative, Wal Jack
Negative and Digital images of the Wal Jack Geelong Negative file of Geelong car at the Wharf terminus. Tram has the destination of West. Has the waterfront in the background. Based on other photos possibly June 1939. See also Reg Item 7813 for a similar photograph. Maybe the same tram.trams, tramways, geelong, wharf -
 Ballarat Tramway Museum
Negative, Wal Jack, Mar. 1939
Negative and Digital images of the Wal Jack Geelong Negative file of Geelong car at the Wharf terminus. Tram has the destination of West. Has the waterfront in the background. Based on other photos possibly June 1939. See also Reg Item 7812 for a similar photograph. Maybe the same tram. See Reg Item 5830 for the print of the photograph and that it was No. 5, March 1939.trams, tramways, geelong, wharf, tram 5 -
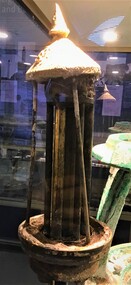 Queenscliffe Maritime Museum
Equipment - Sun valve
The light was powered by a kerosene lantern that had to be kept alight by the keepers until the introduction of bottled acetylene gas in 1925. The light operated for 111 years until 1985 when it was turned off for a trial period. It was never turned back on. A sun valve is a flow control activated by sunlight heat which automatically shuts off gas during daylight hours. Relic from the Hovell light run on acetylene from 1925 to 1985Sun valve from the Hovell Pile Lighthovell pile light, south channel, port phillip -
 Queenscliffe Maritime Museum
Photograph - Photograph of two Queenscliff fishermen
William Withers and Edward Ryan drowned near Point Lonsdale on 19 October 1954 when they tried to enter the Rip at Port Phillip Heads against an ebb tide with a strong south-west wind blowing. They were sailing a large crayfishing boat, the 'Robert John', returning with a load of crayfish from King Island.Photograph shows William (Bill) Withers and Edward Ryan who worked in the local Queenscliff and Victorian fishing industry. The commercial fishing industry developed in Queenscliff from the 1860s, with early fishing developing around the couta boat and barracouta fishing. Crayfishing and shark fishing also became important, especially as the supplies and popularity of barracouta as a commercial species waned. Local Queenscliff fishermen often fished outside Port Phillip into Bass Strait and had to navigate the dangerous entry to Port Phillip, known as 'The Rip', with its turbulent and variable water and weather conditions. This added to the everyday dangers of sailing faced by fishermen in their industry. The local fishermen often had the local knowledge of these waters, but the fishing community in Queenscliff also lived with the threat or fear that the Rip could rob them of one of their own. The entrance to Port Phillip with this Rip is the scene of many shipwrecks,often resulting in tragic loss of life or injuries, including passenger and cargo ships travelling to/from Melbourne and Geelong as well as accidents to local Queenscliff and Port Phillip sailors such as the fishermen or sea pilots. A B/W photograph of two Queenscliff fishermen, William (Bill) Withers and Edward Ryaninformation about photo and donation handwrittten on backfishermen, queenscliff fishermen, withers, william withers, ryan, edward ryan, robert john crayfish boat, shipwreck, port phillip -
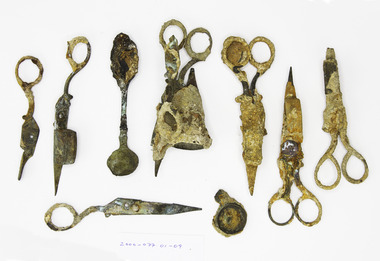 Queenscliffe Maritime Museum
Domestic object - Candlewick Trimmers
The 'Loch Ard' is a very significant wreck along the South Coast of Victoria. Many relics were recovered from the wreck and declared after the amnesty. 10 candle wick trimmers [3 incomplete] heavily encrusted after their recovery from the wreck of the 'Loch Ard'loch ard, diving -
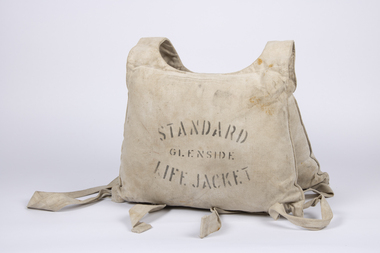 Queenscliffe Maritime Museum
Functional object - Lifejacket
Manufactured by Glenside Manufacturing of South Australia, this lifejacket was in use from 1945 to 1965 and was in use in WWII. Lifejacket in use during WWIIGlenside type lifejacket in use in WWIIStandard Glenside Lifejacket, Glenside Manufacturing Frewville SAlifejacket, ship relics, glenside manufacturing -
 Queenscliffe Maritime Museum
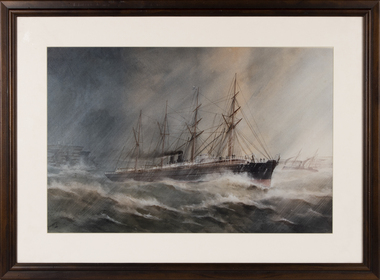
Print - Reproduction print, framed, AV Gregory, Ormus 1887
In 1883 The Orient Steam Navigation Co. Ltd., of London signed a contract with the Government of New South Wales, Australia to carry emigrants from the United Kingdom. The Company would be paid £15 per head for up to four hundred persons and £14 and 10 Shillings for numbers between four and six hundred persons per voyage.A reproduction print of a painting by AV Gregory of the vessel Ormus, 1887. The print is mounted under glass and framed in a dark brown timber frame.rms ormuz, reproduction print -
 Queenscliffe Maritime Museum
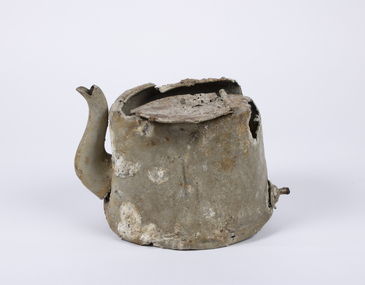
Domestic object - Teapot
In 1940, German minefields were laid in east and west Bass Strait which quickly claimed merchant ships Cambridge (British) and the City of Rayville (American). HMAS Goorangai had finished mine sweeping duties and after resupply was crossing from Queenscliff to Point Nepean to seek better anchorage due to impending bad weather. At around 20:30 on the 20th of November 1940 the 10,400-ton MV Duntroon was transiting the South Channel on her way to Sydney from Perth via Melbourne carrying 65 passengers and general and perishable cargo. It struck HMAS Goorangai forward of the funnel on the port side and cut her in two. At about 20:45 HMAS Goorangai sank in less than a minute resulting in the loss of her whole ship’s company, a complement of 24 officers and sailors.HMAS Goorangai was the first Royal Australian Navy (RAN) ship lost in WWII, the first RAN surface ship lost in wartime, and the first RAN surface ship lost with all hands. A memorial cairn was erected at Queenscliff in 1981 and a service of commemoration is held there every year.A severely damaged and corroded aluminium teapot recovered from the wreck of HMAS Goorangaihmas goorangai, wwii, collision at sea -
 Ballarat Tramway Museum
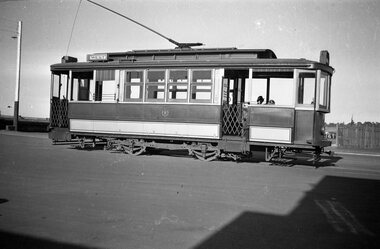
Photograph - Digital image of Geelong tram No. 2 at the Wharf terminus, c1920
The photograph shows Geelong No. 2, built by Duncan and Fraser of Adelaide in 1911 in its as-built configuration, c1920 at the Wharf terminus, known as the Moorabool Street Pier. The tram line was opened in 1912 and closed in 1940 when the track in Corio St was extended to the Beach terminus. There are a number of horse-drawn vehicles in the view with goods being loaded or unloaded on the ship moored on the right. The tramway was operated by the Melbourne Electric Supply Co. (MESCo). The photograph from the collection of Ken Magor was published in the Sydney Tramway Museum's magazine Trolley Wire in April 1981. The photo caption advises - "The steamship to the right is the Edina, a veteran Port Phillip steamer which was launched in 1854 and was not broken up until 1957." This tram is part of the collection at the Ballarat Tramway Museum.Yields information about Geelong No.2 and the Wharf terminus.Digital image of Geelong tram No. 2 at the Wharf terminus c1920. geelong, wharf, mesco, moorabool st pier, edina, tram 2 -
 Ballarat Tramway Museum
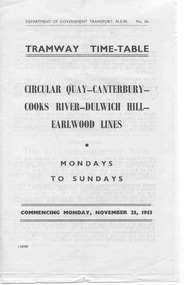
Ephemera - Timetable, Dept of Government Transport - NSW, Sydney Tramway Timetable - 1953 Sydney, 1953 and 1954
Paper - black and white. Alterations on separate pieces of paper in the book - 5 pages. 120.1 - Tramway timetable for Circular Quay - Canterbury - Cooks Rivers - Dulwich Hill - Earlwood lines, 1953. 120.2 - Altered journey for route, Circular Quay - Cooks River line - 1954 120.3 - Altered journey - Dulwich Hill, Glebe Point, Balmain, Lilyfield and Darling St. wharf - Canterbury lines - 1954. 120.4 - Altered journey (on trail) Circular Quay and Darling St. wharf and Canterbury lines - 1954. 120.5 - Additional and altered journeys - Circular Quay and Darling St. wharf lines - 1954 120.6 - Tram time table for Circular Quay - North Bondi line (via Bellevue Hill) including running times, sections and fares - July 26 1954.sydney, timetables -
 Ballarat Tramway Museum
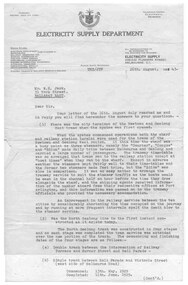
Document - Letter/s, State Electricity Commission of Victoria (SECV), Geelong tramlines - 1943, 1943
Letter giving information to a tramway historian about Geelong opening dates and how the wharf was arranged.Letter to W.Jack from SEC - electricity Supply Department (Melb) dated 26/8/1943, re opening of Geelong tram lines, dates, extensions, duplication, typed on both sides of foolscap sheet. Refers to an enclosed answering specific questions, not attached. Also gives information on how the trams were arranged for Geelong wharf service and the steamers ex Melbourne that were involved. Paper watermark - "SATISFAGA Bond"trams, tramways, geelong trams, opening, duplications, geelong wharf -
 Lakes Entrance Historical Society
Photograph - Footbridge, Jemmeson Edie, 1936
Also second copyBlack and white photograph of the incomplete footbridge over Cunninghame Arm. It shows the incomplete bridge almost at the south shore, and a view of town waterfront from Eastern Wharf to Myer Street corner. Man in rowboat almost on beach in foreground. Lakes Entrance Victoriawaterfront, bridges, room display, construction -
 Lakes Entrance Historical Society
Photograph - Lee Family, 1910 c
Black and white photograph of George and Catherine Lee and their youngest son David of The Hummocks on south side of Cunninghame Arm opposite Eastern Wharf Lakes Entrance Victoriagenealogy -
 Ballarat Tramway Museum
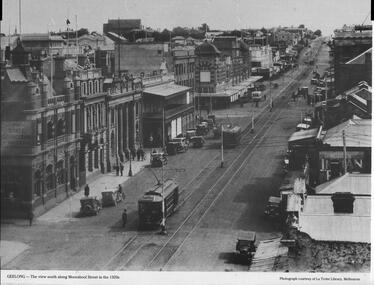
Photograph - Illustration, La Trobe Library, "Geelong - the view south along Moorabool Street", late 1920s
... . The two trams are going from the Wharf to Newtown and South.... The two trams are going from the Wharf to Newtown and South ...Photograph shows Moorabool St looking south from near Corio St Geelong. Shows the track junction with Malop St. Has Pengelley built tram 22 southbound with a Birney tram in front. The two trams are going from the Wharf to Newtown and South respectively. In the background is the State Savings Bank, The Geelong Library, Solomons store, and a building advert sign for Dr Morses Indian Root Pills. There are many motor cars, some horse-drawn vehicles, and one bus in the view. Photo, late 1920s, sourced from the La Trobe Library Melbourne.Yields information about Moorabool St Geelong late 1920s.Publish Black and white photograph with caption and source printed along bottom edge.ballarat, trams, tramways, geelong, tram 22, birney tramcars, moorabool st -
 Ballarat Tramway Museum
Album - Postcards & Photographs - Vic Solomons and others - Australian Tramways, Vic Solomons, 2023
Contains 184 images of postcards and photographs collected primarily by Vic Solomons of Sydney, with others from the collection of Wal Jack and Warren Doubleday. Covers almost all of Australia's tramway systems. 1 Post Card Hay St Perth Looking East No 3 Unknown Perth 2 Post Card Cars 30 & 90 both on Route 19 pass in Barrack St looking South Perth WA 1935.02.18 Perth 3 Post Card Hay St Looking East Perth WA Unknown Perth 4 Post Card William St Perth WA Unknown Perth 5 Post Card Perth from Shaftsbury Hotel Unknown Perth 6 Post Card Hay St Perth WA Looking East Unknown Perth 7 Post Card Barrack St Perth Unknown Perth 8 Post Card Murray Views No 3 High St Showing Town Hall Fremantle WA Unknown Fremantle 9 Post Card High St Fremantle WA Unknown Fremantle 10 Post Card View of Bolder City Golden Mile in the Background (Section No 1) 1908.08.20 Kalgoolie 11 Post Card Hannan St Kalgoolie 1900.08.19 Kalgoolie 12 Post Card Hannan St Kalgoolie WA (No 2) Unknown Kalgoolie 13 Post Card Intersection Hannan & Maritana Sts Kalgoolie WA Unknown Kalgoolie 14 Post Card Hannan St Kalgoolie Unknown Kalgoolie 15 Post Card Lane Street Bolder City Unknown Kalgoolie 16 Post Card Hobart Double Deck Tram Unknown Hobart 17 Post Card Macquarie St Hobart Unknown Hobart 18 Photo Liverpool Street Hobart Unknown Hobart 19 Photo Hobart 21 Unknown Hobart 20 Photo Hobart 14 in Elizabeth St Hobart Unknown Hobart 21 Post Card Macquarie St Hobart Unknown Hobart 22 Post Card Macquarie St Hobart Tas Unknown Hobart 23 Photo Double Decker Tram 3 at G.P.O. Hobart Tas No 31 Unknown Hobart 24 Post Card Double Decker Tram 19 Hobart Tas A B Series No 24 Unknown Hobart 25 Photo Hobart Municipal Tramways Tas No 95 Unknown Hobart 26 Post Card Elizabeth St Hobart Unknown Hobart 27 Post Card Elizabeth St Hobart Unknown Hobart 28 Post Card Elizabeth St Hobart Unknown Hobart 29 Post Card Elizabeth St Hobart Tas Unknown Hobart 30 Post Card HMT 21 with crew at Beach Road Terminus Unknown Hobart 31 Post Card HMT 9 & another with crew at Beach Road Terminus. Front cover photo of Destination GPO 1921.01.00 Hobart 32 Post Card Cascade Road and Mount Wellington Hobart Unknown Hobart 33 Post Card Elizabeth St Hobart Unknown Hobart 34 Post Card Elizabeth St Hobart Unknown Hobart 35 Post Card Elizabeth St Hobart 1915.04.07 Hobart 36 Post Card Macquarie St Hobart Tas Unknown Hobart 37 Post Card Macquarie St showing Post Office Hobart 1908.03.12 Hobart 38 Post Card Hobart Municipal Tramways 21 Unknown Hobart 39 Post Card Elizabeth St Hobart Tas Unknown Hobart 40 Post Card Liverpool Street Hobart Unknown Hobart 41 Post Card Electric Tram Launceston Tas 446 W J Little Photo 1919.02.08 Launbceston 42 Post Card Launceston Tram no 3 1911.08.30 Launbceston 43 Post Card Launceston Tram no 3 passes tram No 1 Unknown Launbceston 44 Post Card Tram 6 at Trevallyn a popular suburb Launceston Tasmania Unknown Launbceston 45 Post Card Tram 7 at Trevallyn Road Terminus Launceston Tasmania Unknown Launbceston 46 Post Card Tram 4 in Brisbane St Launceston Unknown Launbceston 47 Post Card Tram 9 in Brisbane St Launceston Tasmania Unknown Launbceston 48 Post Card Camerom Street Launceston Tasmania Unknown Launbceston 49 Post Card Murray Views No 15 Jetty Road Glenelg Terminus 1962-02-08 Adelaide 50 Post Card Bay Tram at Jetty Road Terminus Glenelg SA Unknown Adelaide 51 Post Card Tram 3 in King William Street Adelaide S Aust Unknown Adelaide 52 Post Card Valentine Series No 3065 The Old Horse Tram Victor Harbour Unknown Victor Harbour 53 Post Card Bourke Street Melbourne with Cable Car Looking East 1904.04.25 Melbourne 54 Post Card Opening of New Electric Tramway Elsternwick 1913-11-13 Melbourne 55 Post Card Cable trams in Clarendon St Sth Melb Unknown Melbourne 56 Post Card Pall Mall from Charing Cross Bendigo Unknown Bendigo 57 Post Card Tram 4 & 7 pass at The Fountain and Mitchell Street Bendigo Vic Rose Series P 3198 Unknown Bendigo 58 Post Card M&MTB 133 at Charing Cross bound for Eaglehawk Bendigo Vic Murray Views No 45 Unknown Bendigo 59 Post Card Pall Mall Bendigo Vic Unknown Bendigo 60 Post Card Charing Cross & Mitchell St Bendigo Trams passing 1919.00.00 Bendigo 61 Post Card Pall Mall Looking East Unknown Bendigo 62 Post Card Electric Trams and City Hotel Bendigo Vic Unknown Bendigo 63 Post Card Moorabool Street Geelong V 23 Unknown Geelong 64 Post Card Murray Views No 3 Moorabool Street Geelong Vic Unknown Geelong 65 Post Card The Rose Series P 2487 Ryrie Street Geelong Vic Unknown Geelong 66 Post Card Southern Cross Series 2696 Ryrie Stret Geelong Vic Unknown Geelong 67 Post Card The Rose Series P 1490 Ryrie Street Geelong Vic 1920-03-04 Geelong 68 Post Card Valentine Series No 1568 Lower Sturt Street Ballarat Unknown Ballarat 69 Post Card Rose Series P 1710 Sturt Street Ballarat Victoria Unknown Ballarat 70 Post Card Sturt Street Ballarat Victoria Unknown Ballarat 71 Post Card Horse Tram In Sturt Street Ballarat 1905.11.10 Ballarat 72 Post Card Sturt Street Ballarat Looking North-West Unknown Ballarat 73 Post Card Shoppes Square Sturt Street Ballarat Looking North Unknown Ballarat 74 Post Card Junction Sturt and Lydiard Streets Ballarat 1909-09-01 Ballarat 75 Post Card The Electric Supply Co Souvenir Tram Ticket No 3085of the opening of Electric System August 18 1905 1905.08.18 Ballarat 76 Post Card Sturt Street Ballarat Victoria 1907.11.25 Ballarat 77 Post Card Off to the Gardens Electric Tram Ballarat Unknown Ballarat 78 Post Card Sturt Street Ballarat 1907.04.16 Ballarat 79 Post Card Sturt Street Ballarat Looking East Electric tram with Double Deck Trailer 1911.04.17 Ballarat 80 Post Card Sturt Street Ballarat Looking East Unknown Ballarat 81 Post Card Sturt Street Ballarat Looking West 1911.03.01 Ballarat 82 Post Card Town Hall and Sturt Street Ballarat Unknown Ballarat 83 Post Card Lydiard Street Ballarat 1906.11.23 Ballarat 84 Post Card Looking North along Adelaide Street from George Street Brisbane Sidues Series No 764 Unknown Brisbane 85 Post Card Looking South along Queen Street from the Creek Street Intersection Brisbane Qld Sirues Series No 1379 Unknown Brisbane 86 Post Card George Street from near Supreme Court Brisbane Unknown Brisbane 87 Post Card Queen and Eagle Streets Brisbane 1907.07.04 Brisbane 88 Post Card Queen Street showing His Majesty’s Theatre Brisbane Unknown Brisbane 89 Post Card Queen Street Treasury Building 1908.01.20 Brisbane 90 Post Card G P O and Queen Street Brisbane Unknown Brisbane 91 Post Card Queen Street Brisbane Looking from Wharf Street Unknown Brisbane 92 Post Card Customs House Brisbane 1905.02.16 Brisbane 93 Post Card Queen St Brisbane 1905.09.16 Brisbane 94 Post Card Queen St Brisbane 1907.11.19 Brisbane 95 Post Card Treasury Buildings Brisbane Unknown Brisbane 96 Post Card Queen and Eagle Streets Brisbane Unknown Brisbane 97 Post Card The Valley Corner Brisbane Unknown Brisbane 98 Post Card Brisbane Queen Street opposite General Post Office Unknown Brisbane 99 Post Card North Quay and Milton Beach Brisbane Q Unknown Brisbane 100 Post Card Victoria Bridge Brisbane South Side 1907.08.14 Brisbane 101 Post Card Victoria Bridge Brisbane Unknown Brisbane 102 Post Card Breakfast Creek Bridge Brisbane Q Unknown Brisbane 103 Post Card Melbourne Street Station South Brisbane Queensland Unknown Brisbane 104 Post Card General Post Office Queen Street Brisbane 1955.09.23 Brisbane 105 Post Card Customs House Brisbane 1904.11.04 Brisbane 106 Post Card Queen St Brisbane 1919.11.00 Brisbane 107 Post Card Queen St Brisbane Sidues Series No 627 Unknown Brisbane 108 Post Card Creek Street Brisbane Queensland Unknown Brisbane 109 Post Card Customs House and Garden Reach Brisbane Queensland 1910.00.08 Brisbane 110 Post Card Queen and Creek Streets Brisbane 1909.06.07 Brisbane 111 Post Card Queensland National Bank andd Queen Street Brisbane Queensland Unknown Brisbane 112 Post Card Queen Street and Treasury Buildings Brisbane 0000.09.07 Brisbane 113 Post Card Queen Street showing “Courier” Buildings Brisbane Unknown Brisbane 114 Post Card Intersection George & Roma Streets Brisbane Q 1916.05.11 Brisbane 115 Post Card Adelaide Street Brisbane Q Unknown Brisbane 116 Post Card G P O Queen Street Brisbane Q Unknown Brisbane 117 Post Card Treasury Building Brisbane 1906.03-20 Brisbane 118 Post Card Queen and Eagle Streets Brisbane 1907.02.01 Brisbane 119 Post Card Queen St Brisbane Unknown Brisbane 120 Post Card Queen St Brisbane Q Unknown Brisbane 121 Post Card Victoria Bridge Brisbane 1906.07.30 Brisbane 122 Post Card An Unusual View showing Head of Queen Street Victoria Bridge & South SideSuburbs Brisbane Q Unknown Brisbane 123 Post Card Petries Bight Brisbane Q Unknown Brisbane 124 Post Card South End Victoria Bridge Brisbane Q Unknown Brisbane 125 Post Card Customs House Brisbane Unknown Brisbane 126 Post Card Photo of toastrack car circa 1910 Unknown Brisbane 127 Post Card Treasury Buildings Brisbane Unknown Brisbane 128 Post Card East Street Rockhampton with Steam Tram & trailer Unknown Rockhampton 129 Post Card Post Office Rockhampton with steam tram Unknown Rockhampton 130 Post Card East Street Rockhampton with Steam Trams Rose Series P 7154 Unknown Rockhampton 131 Post Card William Street Rockhampton Rose Series P 7156 Unknown Rockhampton 132 Post Card Central East Street Rockhampton Q with Steam Trams Unknown Rockhampton 133 Photo Sturt St Ballarat Unknown Ballarat 134 Photo Bridge Street Ballarat Unknown Ballarat 135 Post Card George St Sydney Unknown Sydney 136 Post Card Elizabeth St Sydney Unknown Sydney 137 Post Card Railway Square Unknown Sydney 138 Post Card Sydney Harbor Bridge - pending receipt 139 Post Card Kings Cross - Mowbray Series with description on rear from C Roy G Field Unknown Sydney 140 Post Card Kings Cross - Mowbray Series with description on rear from C Roy G Field Unknown Sydney 141 Post Card Central Railway Station Sydney - Rose Series P6033 1954-01-26 Sydney 142 Post card William Street Darlinghurst looking towards City - Rose Series P6602 unknown Sydney 143 Post Card Circular Quay Sydney - Rose Series P6680 Unknown Sydney 144 Post Card View at Manly NSW - Rose Series B1003 Unknown Sydney 145 Post Card Hunter St Newcastle NSW - Rose Series P7843 Unknown Newcastle 146 Post Card Bank Corner Newcastle NSW - Mowbray Series No. 155 Unknown Newcastle 147 Post Card Hunter St Newcastle NSW Unknown Newcastle 148 Post Card Criterion Hotel Hunter St Newcastle NSW Unknown Newcastle 149 Photo Horse tram at Newtown Station 1894 to 1898 - PTC photo c1894 Newtown 150 Photo Steam tram motor No 3 at Railway Square 1879 1879 Sydney 151 Photo Railway steam tram c1900 with a horse drawn double deck bus c1900 Sydney 152 Photo Steam motor 5A and doubled deck bus Unknown Sydney 153 Photo Steam motor 53A with detail notes on rear 1922 Sydney 154 Photo Cable tram set at Milsons Point ferry terminal c1900 Sydney 155 Photo Early Sydney electric car - Ocean St - Rose Bay Unknown Sydney 156 Photo George St looking souoth c1905 c1905 Sydney 157 Photo Tram 165 at Circular Quay Unknown Sydney 158 Photo Tramcar ferry or transporter at The Spit Unknown Sydney 159 Photo tram 882 George St at Marti Place, 1937 1937 Sydney 160 Photo Tram 826 Railway Sq area Unknown Sydney 161 Photo Railway Sq in background, Broadway with double decker bus and toastrack car late 1930s Sydney 162 Photo Coupled St Pitt St? - photo Ben Parle Feb. 1950 Sydney 163 Photo Electric tram No. 2 - North Sydney with side trolley pole running Unknown Sydney 164 Photo George St - Horden's Corner Unknown Sydney 165 Photo George St at Martin Place c1920 Sydney 166 Photo Castlereagh St Sydney c1928 c1928 Sydney 167 Photo Railway Sqare c1920 c1920 Sydney 168 Photo Darling St Countereweight Unknown Sydney 169 Photo Trolley bus depot Unknown Sydney 170 Photo Trolley bus No. 14 Unknown Sydney 171 Photo Newcastle Railway Station with steam tram - Wharf Road?? Unknown Newcastle 172 Photo High St West Maitland - steam tram Unknown Maitland 173 Photo High St West Maitland - steam tram Unknown Maitland 174 Post Card Argent St near tram terminal Broken Hill NSW c1900 Broken Hill 175 postcard Argent St looking south Broken Hill - with Ken Magor's notes on rear Unknown Broken Hill 176 Photo Toronto - steam tram 61A Unknown Toronto 177 Photo 124A trial run 1911? Sutherland - Cronulla line 1911 Sutherland 178 Photo 103A at a tram stop Unknown Sydney 179 Photo Cable tram set at Crows Nest terminus grip car 12, trailer 22 Unknown Sydney 180 Photo Cable tram Queens Square Sydney 1903 Sydney 181 Photo cars 2078 and 2077 Chatswood late 1950s Sydney 182 Photo car 1877 Balmain area late 1950s Sydney 183 Photo Trolley bus - Rockdale destination Late 1950s Sydney 184 Photo Broken Hill steam tram - motor 18A North Tram Unknown Broken Hill 185 Photo Millars Point Sydney NSW - ferry/tram interchange, unknown Sydney All items imaged including the rear or back where there was writing of information. All files stored on the Museum's Photo Collections directory. Demonstrates through the medium of many images, Australian tramway systems and Ballarat's place in them.Album - heavy card covers, plastic lined with postcard or 6x4 photo sleeves.australia, tramways, postcards, photographs, steam trams, horse trams, cable trams, trolley buses -
Glenelg Shire Council Cultural Collection
Work on paper, (Untitled - Port Fairy Wharf)
David Williams, betweeen 1990 and 2004 self-published 18 historical sketchbooks around Victoria. These and other projects involved the creation of over 5000 paintings. David Williams is a water colourist. His book for South-eastern Victoria around the Portland area was awarded the Victorian Government History Award in 2005. Special exhibitions of David William's paintings have been held in Eaglehawk, Echuca, Bright, Glen Waverley, Myrtleford, Wandiligong, Olinda and Point Lonsdale to assist community projects.Image of a wharf with boats moored up either side. To the right of the wharf are several large Norfolk Pines. In the foreground of the image is the front part of a boat with the letters 'Jot' in blue. It is roped to the side of the wharf.Bottom right - David Williams 2004 -
 Flagstaff Hill Maritime Museum and Village
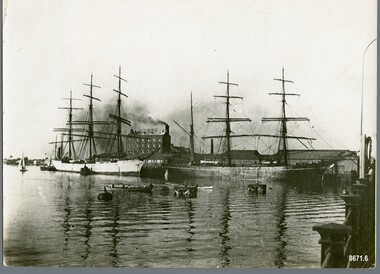
Photograph - Vessels, Sailing Ships, Circa 1910 - 1913
This photograph was one of ten photographs donated to Flagstaff Hill Maritime Museum and Village by Fred Trewartha. Frederick John Fox Trewartha (Fred) was a well-known Warrnambool businessman. He was born in Beeac near Geelong in 1920 and came to Warrnambool with his family as a very young child. He was apprenticed to his father John, as a saddler and later opened his own shop on Raglan Parade. He then moved into working with tarpaulins and canvases for the trucking industry. Fred was keenly interested in photography (and was a member of the Warrnambool Cine Club), yachting and boat building. He kept his yacht moored at Port Fairy for many years and participated in sailing events locally and interstate. He also built boats with his sons. He had the opportunity to meet many older sailors and it's thought this photo (and others in the set) may have been given to him by one of these men. Fred Trewartha died in 2016 in Warrnambool. There is some conflict re the identity of the ship in the foreground of this photograph. It has been identified as the "Dimsdale" by the original owner of this photograph and by the website "Photos of the Past" which have an identical copy of the photo, however the State Library of South Australia (who also have an identical copy of the photograph) have identified the date of the photograph as 1910 and the ship as the "Ainsdale". The "Dimsdale" and the "Lobo" were recorded several times in the local shipping news as being docked at the Port of Adelaide, at the same time, during the years 1912 and 1913, whereas the "Ainsdale" wasn't in Adelaide very often but was recorded as coming in and out of the Port of Adelaide in the years 1915 and 1916. On February 25th 1916, the two ships (the "Ainsdale" and "Lobo") were both in the Port of Adelaide at the same time, but the "Ainsdale" was loading at Outer Harbor and the "Lobo" was discharging timber at Corporation Wharf. The "Ainsdale" was owned by the same firm that had owned the "Dimsdale". The Dimsdale was a three masted steel ship built in 1890 by C. J. Bigger of Londonderry. It became notorious when it struck the Wonga Shoal lighthouse near Port Adelaide on the night of 17th November 1912, destroying the structure and killing two lighthouse keepers. The accident was investigated by the Marine Board, the Coroner, the Police Court, the Admiralty Court and by the Criminal Courts of South Australia where the Captain (John Jones) was charged with manslaughter and found "not guilty". The Dimsdale was sold to a Norwegian firm and its name was changed to "Kwango". It sank in 1915 near the Magdalen Islands in the Gulf of St. Lawrence. The "Lobo" was a well known "windjammer" trading from the Port of Adelaide to other parts of the world. For a number of years it was employed in the New Zealand and Tasmanian services, after which it made several voyages to North America. It was an iron barque of 945 tons, built at Sunderland in 1877 by Osbourne, Graham and Company. On October 18th 1916, the Lobo (owned by Walter and Morris, timber merchants) was on a voyage from Parapato (Mozambique) to New York with a cargo of mango bark and ebony, when it struck rocks and ran aground 30 miles east of the Angoche River in Portuguese East Africa. A detailed account of the incident, written by Mrs Murchison (the Captains wife who was on board with her two year old son) was published in the Adelaide newspaper "The Mail" on Saturday 9th December 1916. She, and several of the crew were put in a boat early in the morning and sent away from the wreck. Several hours later, they were joined by Captain Murchison and the remainder of the crew. They were in their small open boats for several hours before landing on a small uninhabited island where they remained for several days before being picked up by another vessel and taken back to Parapato. The captain was able to obtain a position on a steamer which took him and his wife and child back to England.This photograph is significant as a record of the world wide mercantile trade Australia was engaged in at the end of the nineteenth century and beginning of the twentieth century and as a record of the dangers faced by the crews of these ships.A black and white photograph showing two large sailing ships moored at a dock. There are industrial buildings in the background (one has smoke coming from its chimney) and several smaller craft (a rowing boat, two small boats that may be tugs and a little yacht) at the side of the ships. Pylons can be seen in the water and a metal fence is in the bottom right corner. On the back of the photo the words "Ship Dimsdale" and "Bk Lobo" are written diagonally across the top left corner in pencil. A beige paper label has been attached to the top right corner with the words "Dimsdale at Port Adelaide" and "Port Adelaide Historical Society may be interested" written in black ballpoint pen."Ship Dimsdale" / "Bk Lobo" ""Dimsdale" / at Port Adelaide" "- Port Adelaide Historical /Society may be / interested"warrnambool, dimsdale, lobo, barque lobo, port of adelaide, kwango, wonga shoal lighthouse, fred trewartha, ainsdale, frederick john fox trewartha, captain john jones, windjammer, iron barque, parapato -
 Flagstaff Hill Maritime Museum and Village
Photograph - Photograph of S. S. Eumeralla launch, 1908
This photograph was one of ten photographs donated to Flagstaff Hill Maritime Museum and Village by Fred Trewartha. Frederick John Fox Trewartha (Fred) was a well-known Warrnambool businessman. He was born in Beeac near Geelong in 1920 and came to Warrnambool with his family as a very young child. He was apprenticed to his father John, as a saddler and later opened his own shop on Raglan Parade. He then moved into working with tarpaulins and canvases for the trucking industry. Fred was keenly interested in photography (and was a member of the Warrnambool Cine Club), yachting and boat building. He kept his yacht moored at Port Fairy for many years and participated in sailing events locally and interstate. He also built boats with his sons. He had the opportunity to meet many older sailors and it's thought this photo (and others in the set) may have been given to him by one of these men. Fred Trewartha died in 2016 in Warrnambool. The Eumeralla (sometimes spelt Eumerella) was built in 1908 in Scotland by Messrs. Scott of Kinghorn on the Firth of Forth. It was a steel screw steamer and had been designed to meet the growing demand for a thoroughly up to date passenger and cargo steamer for the Melbourne to Portland service for John McIlwraith and Company in partnership with the Belfast, Koroit Steam Navigation Company and Howard Smith Company Ltd. This photograph appeared in the Leader (Melbourne) on Saturday 28th November 1908 with the headline "Launching the Eumeralla" and shows the ship being launched on October 10th, 1908, in Scotland. It was described as "Length, 190 feet; breadth, 30 feet; depth 15 feet". It went on to say it had a speed guaranteed at 11 knots and was expected in Melbourne by the following January. It could accommodate sixty saloon passengers and thirty in steerage and had electric light fitted throughout. While on the Melbourne to Portland service the Eumeralla had several mishaps. In 1909 it crashed into the breakwater at Portarlington, splintering the woodwork and leaving a gap of about 12 feet. On Saturday 9th August 1913, as it was leaving Warrnambool, it encountered heavy seas and a passenger (Frederick Mahoney) sustained fatal injuries after hitting his head on the bulwark - and the second mate was found dead after the water poured off the deck. Several other passengers were also injured. Between 1912 and 1913 it was used to carry passengers between Brisbane, Maryborough and Rockhampton before being sent back to Melbourne for an overhaul. In 1915 it was selected for the Winter service to run daily trips between Melbourne and Geelong. In 1925 it nearly sank in the Yarra (at Queens Wharf) when it developed a list and water entered the engine room. Firemen from the Eastern Hill Station, crew and wharf workers were able to stop it from sinking. Between 1928 and 1935 the Eumeralla was laid up in Hobson's Bay before being sold to a Chinese firm to be used on the short coastal run between Shanghai and Wen Chow. It was renamed "Mel Lee (Mow Lee) Number 2". It arrived on July 12th, 1935, at Tanghai (a small Chinese port to the south of Shanghai) with 400 local passengers. The population of the town turned out to welcome the new ship with a fireworks display which caused the passengers to rush across to the side of the ship nearest the scene. The steamer immediately listed to one side and sank.This photograph is significant because of its association with the coastal trader S.S. Eumeralla and its important contribution to trade along Victoria's West Coast in the early 20th century.Black and white photograph showing a crowd of people standing on a shore watching a steamer (the Eumeralla) being launched. The crew of the steamer are standing in the bow, waving at the crowd. A single oarsman is in a small rowboat nearby. On the back of the photograph, the name, address and telephone number of the donor is written in black, ballpoint pen. More writing, in cursive script (in blue ink) gives a brief description of the ship and the events depicted in the photograph.Name of donor, address and telephone number "S. S. Eumeralla / Built in Scotland / being launched/ in Scotland/ 1904"warrnambool, flagstaff hill maritime museum and village, great ocean road, portland, port fairy, eumeralla, s. s. eumeralla, eumerella, steamer eumeralla, john mcilwraith and company, belfast and koroit steam navigation company, howard smith ltd, portarlington, geelong, melbourne, mel lee no. 2, mow lee no. 2, tanghai, steamship, steamer, fred trewartha, frederick john fox trewartha -
 Lakes Entrance Historical Society
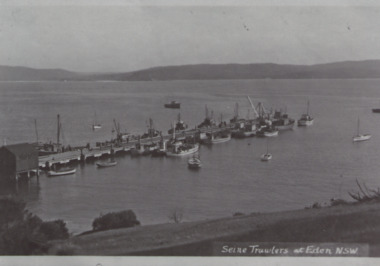
Postcard, Siene Trawlers Eden, 1945 c
... and other boats at long wharf Eden New South Wales... seine trawlers and other boats at long wharf Eden New South ...Also a black and white postcard Ashling Beach Eden N.S W. 05410.1 7 x 8 cmBlack and white copy of postcard showing seine trawlers and other boats at long wharf Eden New South WalesSeine Trawlers at Eden N.S.W.ships and shipping, waterways, township -
 Port of Echuca
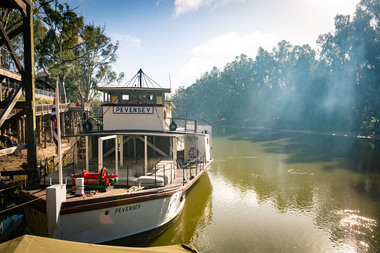
Functional object - Paddlesteamer, Permewan,Wright Co Ltd, P.S. Pevensey, 1910
PS Pevensey was the last vessel to be built on the Moama slipway in 1910. it was originally built as the barge Mascotte a year earlier. It is powered by a 20hp Marshall and Sons steam engine and was first used on the Murrumbidgee River where it collected wool bales and brought them back to Echuca where they were loaded onto trains and taken to Melbourne for shipping overseas. The PS Pevensey was named after the Pevensey Station on the Murrumbidgee River. In the 1950's it travelled to South Australia where it survived being burnt and sunk but continued to keep working in the agricultural industry. It was sold to the Port of Echuca in 1973 where it was restored over 3 years and is still the largest vessel operating from the Echuca Wharf. In 1982, it was temporarily renamed The Philadelphia, and starred in the TV mini series " All The River's Run" based on the books by Nancy Cato. In 1985 Prince Charles and Lady Diana visited Echuca and cruised on the PS Pevensey, although it was labelled PS Philadelphia for the occasion. It is the largest vessel operating from the Echuca wharf as it can carry 90 passengers or 120 tons of cargo. PS Pevensey is a Murray River paddle steamer from 1910 and was built at Moama in NSW opposite the Port of Echuca. It was one of the largest towing and cargo paddle steamers on the river and was known as "the great Clydesdale" of the river. PS Pevensey remained operating on the river until 1958 after a number of years lying dormant it was purchased in 1973 and restored at Echuca. It began operating again in 1976 and it is still taking trips. it is one of a small number that still operates in its cargo carrying layout and with its original reconditioned engine. Coming back to Echuca PS Pevensey brought Kevin Hutchinson OAM to work at the Port of Echuca for the rest of his life.A side wheeled paddle steamer. Originally built as a barge the barge Mascot in 1910. Rebuilt as the PS Pevensey a year later in 1911.Pevensey sign on the wheelhouse.wool bales, murrumbidgee river, all the rivers run, pevensey station, port of echuca wharf, prince charles and lady diana, the barge mascotte, kevin hutchinson.