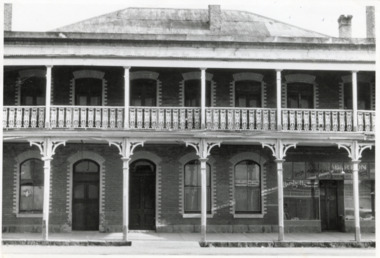
Showing 3133 items matching " circles"
-
 Flagstaff Hill Maritime Museum and Village
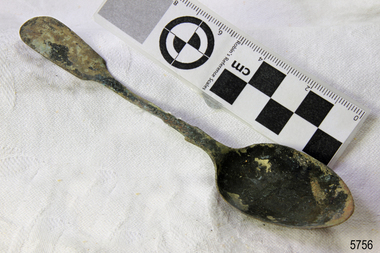
Domestic object - Spoon, c. 1878
Unrestored tea spoon from the wreck of the LOCH ARD. The spoon design has a flattened fiddle-back handle, with a thin stem or shank, flared collar, and elongated bowl. The spoons metallic composition is a thin layer of brass alloy which has partially corroded back to a nickel-silver base metal. HISTORY OF THE LOCH ARD The LOCH ARD belonged to the famous Loch Line which sailed many ships from England to Australia. Built in Glasgow by Barclay, Curdle and Co. in 1873, the LOCH ARD was a three-masted square rigged iron sailing ship. The ship measured 262ft 7" (79.87m) in length, 38ft (11.58m) in width, 23ft (7m) in depth and had a gross tonnage of 1693 tons. The LOCH ARD's main mast measured a massive 150ft (45.7m) in height. LOCH ARD made three trips to Australia and one trip to Calcutta before its final voyage. LOCH ARD left England on March 2, 1878, under the command of Captain Gibbs, a newly married, 29 year old. She was bound for Melbourne with a crew of 37, plus 17 passengers and a load of cargo. The general cargo reflected the affluence of Melbourne at the time. On board were straw hats, umbrella, perfumes, clay pipes, pianos, clocks, confectionary, linen and candles, as well as a heavier load of railway irons, cement, lead and copper. There were items included that intended for display in the Melbourne International Exhibition in 1880. The voyage to Port Phillip was long but uneventful. At 3am on June 1, 1878, Captain Gibbs was expecting to see land and the passengers were becoming excited as they prepared to view their new homeland in the early morning. But LOCH ARD was running into a fog which greatly reduced visibility. Captain Gibbs was becoming anxious as there was no sign of land or the Cape Otway lighthouse. At 4am the fog lifted. A man aloft announced that he could see breakers. The sheer cliffs of Victoria's west coast came into view, and Captain Gibbs realised that the ship was much closer to them than expected. He ordered as much sail to be set as time would permit and then attempted to steer the vessel out to sea. On coming head on into the wind, the ship lost momentum, the sails fell limp and LOCH ARD's bow swung back. Gibbs then ordered the anchors to be released in an attempt to hold its position. The anchors sank some 50 fathoms - but did not hold. By this time LOCH ARD was among the breakers and the tall cliffs of Mutton Bird Island rose behind the ship. Just half a mile from the coast, the ship's bow was suddenly pulled around by the anchor. The captain tried to tack out to sea, but the ship struck a reef at the base of Mutton Bird Island, near Port Campbell. Waves broke over the ship and the top deck was loosened from the hull. The masts and rigging came crashing down knocking passengers and crew overboard. When a lifeboat was finally launched, it crashed into the side of LOCH ARD and capsized. Tom Pearce, who had launched the boat, managed to cling to its overturned hull and shelter beneath it. He drifted out to sea and then on the flood tide came into what is now known as LOCH ARD Gorge. He swam to shore, bruised and dazed, and found a cave in which to shelter. Some of the crew stayed below deck to shelter from the falling rigging but drowned when the ship slipped off the reef into deeper water. Eva Carmichael had raced onto deck to find out what was happening only to be confronted by towering cliffs looming above the stricken ship. In all the chaos, Captain Gibbs grabbed Eva and said, "If you are saved Eva, let my dear wife know that I died like a sailor". That was the last Eva Carmichael saw of the captain. She was swept off the ship by a huge wave. Eva saw Tom Pearce on a small rocky beach and yelled to attract his attention. He dived in and swam to the exhausted woman and dragged her to shore. He took her to the cave and broke open case of brandy which had washed up on the beach. He opened a bottle to revive the unconscious woman. A few hours later Tom scaled a cliff in search of help. He followed hoof prints and came by chance upon two men from nearby Glenample Station three and a half miles away. In a state of exhaustion, he told the men of the tragedy. Tom returned to the gorge while the two men rode back to the station to get help. By the time they reached LOCH ARD Gorge, it was cold and dark. The two shipwreck survivors were taken to Glenample Station to recover. Eva stayed at the station for six weeks before returning to Ireland, this time by steamship. In Melbourne, Tom Pearce received a hero's welcome. He was presented with the first gold medal of the Royal Humane Society of Victoria and a £1000 cheque from the Victorian Government. Concerts were performed to honour the young man's bravery and to raise money for those who lost family in the LOCH ARD disaster. Of the 54 crew members and passengers on board, only two survived: the apprentice, Tom Pearce and the young woman passenger, Eva Carmichael, who lost all of her family in the tragedy. Ten days after the LOCH ARD tragedy, salvage rights to the wreck were sold at auction for £2,120. Cargo valued at £3,000 was salvaged and placed on the beach, but most washed back into the sea when another storm developed. The wreck of LOCH ARD still lies at the base of Mutton Bird Island. Much of the cargo has now been salvaged and some was washed up into what is now known as LOCH ARD Gorge. Cargo and artefacts have also been illegally salvaged over many years before protective legislation was introduced. One of the most unlikely pieces of cargo to have survived the shipwreck was a Minton porcelain peacock - one of only seven in the world. The peacock was destined for the Melbourne International Exhibition in 1880. It had been well packed, which gave it adequate protection during the violent storm. Today, the Minton peacock can be seen at the Flagstaff Hill Maritime Museum in Warrnambool. From Australia's most dramatic shipwreck it has now become Australia's most valuable shipwreck artefact and is one of very few 'objects' on the Victorian State Heritage Register. The LOCH ARD shipwreck is of State significance – Victorian Heritage Register S 417. Flagstaff Hill’s collection of artefacts from LOCH ARD is significant for being one of the largest collections of artefacts from this shipwreck in Victoria. It is significant for its association with the shipwreck, which is on the Victorian Heritage Register (VHR S417). The collection is significant because of the relationship between the objects, as together they have a high potential to interpret the story of the LOCH ARD. The LOCH ARD collection is archaeologically significant as the remains of a large international passenger and cargo ship. The LOCH ARD collection is historically significant for representing aspects of Victoria’s shipping history and its potential to interpret sub-theme 1.5 of Victoria’s Framework of Historical Themes (living with natural processes). The collection is also historically significant for its association with the LOCH ARD, which was one of the worst and best known shipwrecks in Victoria’s history. Unrestored tea spoon from the wreck of the LOCH ARD. The spoon design has a flattened fiddle-back handle, with a thin stem or shank, flared collar, and elongated bowl. The spoons metallic composition is a thin layer of brass alloy which has partially corroded back to a nickel-silver base metal. Approximately 35% of original electroplating remains, with some verdigris. Outlines of three makers marks are visible on the lower rear of handle (Circle, Circle, Diamond) and details of one are legible (Maltese Cross).flagstaff hill maritime museum, shipwreck coast, great ocean road, loch line, loch ard, mutton bird island, electroplated cutlery, loch ard shipwreck, nickel silver, william page & co, birmingham, brass plating, makers marks -
 Flagstaff Hill Maritime Museum and Village
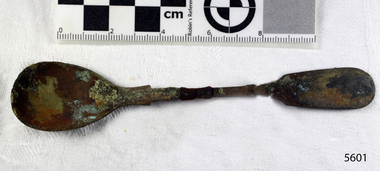
Spoon, circa 1878
This sugar spoon is from the wreck of the LOCH ARD, a Loch Line ship of 1,693 tons which sailed from Gravesend, London, on 2 March 1878 with 17 passengers and a crew of 36 under Captain George Gibbs. “The intention was to discharge cargo in Melbourne, before returning to London via the Horn with wool and wheat”. Instead, on 1 June 1878, after 90 days at sea, she struck the sandstone cliffs of Mutton Bird Island on the south west coast of Victoria, and sank with the loss of 52 lives and all her cargo. The manifest of the LOCH ARD listed an array of manufactured goods and bulk metals being exported to the Colony of Victoria, with a declared value of £53,700. (202 bills of lading show an actual invoice value of £68, 456, with insurance underwriting to £30,000 of all cargo). Included in the manifest is the item of “Tin hardware & cutlery £7,530”. This sugarspoon is one of 482 similar items of electro-plated cutlery from the LOCH ARD site, comprising spoons and forks of various sizes but all sharing the same general shape or design and metallic composition. 49 of these pieces display a legible makers’ mark — the initials “W” and “P” placed within a raised diamond outline, which is in turn contained within a sunken crown shape — identifying the manufacturer as William Page & Co of Birmingham. An electroplater’s makers’ marks, unlike sterling silver hallmarks, are not consistent identifiers of quality or date and place of manufacture. A similar line of five impressions was usually made to impress the consumer with an implication of industry standards, but what each one actually signified was not regulated and so they varied according to the whim of the individual foundry. In this case, the maker’s marks are often obscured by sedimentary accretion or removed by corrosion after a century of submersion in the ocean. However sufficient detail has survived to indicate that these samples of electro-plated cutlery probably originated from the same consignment in the LOCH ARD’s cargo. The generally common range of marks are drawn from 255 tea spoons, 125 dessert spoons, and 99 table forks. These marks are clearly visible in 66 instances, while the same sequence of general outlines, or depression shapes, is discernible in another 166 examples. Suggested trade names for William Page & Co’s particular blend of brass plating are ‘roman silver’ or ‘silverite’. This copper alloy polishes to a lustrous gold when new, discolouring to a murky grey with greenish hue when neglected. HISTORY OF THE LOCH ARD The LOCH ARD belonged to the famous Loch Line which sailed many ships from England to Australia. Built in Glasgow by Barclay, Curdle and Co. in 1873, the LOCH ARD was a three-masted square rigged iron sailing ship. The ship measured 262ft 7" (79.87m) in length, 38ft (11.58m) in width, 23ft (7m) in depth and had a gross tonnage of 1693 tons. The LOCH ARD's main mast measured a massive 150ft (45.7m) in height. LOCH ARD made three trips to Australia and one trip to Calcutta before its final voyage. LOCH ARD left England on March 2, 1878, under the command of Captain Gibbs, a newly married, 29 year old. She was bound for Melbourne with a crew of 37, plus 17 passengers and a load of cargo. The general cargo reflected the affluence of Melbourne at the time. On board were straw hats, umbrella, perfumes, clay pipes, pianos, clocks, confectionary, linen and candles, as well as a heavier load of railway irons, cement, lead and copper. There were items included that intended for display in the Melbourne International Exhibition in 1880. The voyage to Port Phillip was long but uneventful. At 3am on June 1, 1878, Captain Gibbs was expecting to see land and the passengers were becoming excited as they prepared to view their new homeland in the early morning. But LOCH ARD was running into a fog which greatly reduced visibility. Captain Gibbs was becoming anxious as there was no sign of land or the Cape Otway lighthouse. At 4am the fog lifted. A man aloft announced that he could see breakers. The sheer cliffs of Victoria's west coast came into view, and Captain Gibbs realised that the ship was much closer to them than expected. He ordered as much sail to be set as time would permit and then attempted to steer the vessel out to sea. On coming head on into the wind, the ship lost momentum, the sails fell limp and LOCH ARD's bow swung back. Gibbs then ordered the anchors to be released in an attempt to hold its position. The anchors sank some 50 fathoms - but did not hold. By this time LOCH ARD was among the breakers and the tall cliffs of Mutton Bird Island rose behind the ship. Just half a mile from the coast, the ship's bow was suddenly pulled around by the anchor. The captain tried to tack out to sea, but the ship struck a reef at the base of Mutton Bird Island, near Port Campbell. Waves broke over the ship and the top deck was loosened from the hull. The masts and rigging came crashing down knocking passengers and crew overboard. When a lifeboat was finally launched, it crashed into the side of LOCH ARD and capsized. Tom Pearce, who had launched the boat, managed to cling to its overturned hull and shelter beneath it. He drifted out to sea and then on the flood tide came into what is now known as LOCH ARD Gorge. He swam to shore, bruised and dazed, and found a cave in which to shelter. Some of the crew stayed below deck to shelter from the falling rigging but drowned when the ship slipped off the reef into deeper water. Eva Carmichael had raced onto deck to find out what was happening only to be confronted by towering cliffs looming above the stricken ship. In all the chaos, Captain Gibbs grabbed Eva and said, "If you are saved Eva, let my dear wife know that I died like a sailor". That was the last Eva Carmichael saw of the captain. She was swept off the ship by a huge wave. Eva saw Tom Pearce on a small rocky beach and yelled to attract his attention. He dived in and swam to the exhausted woman and dragged her to shore. He took her to the cave and broke open case of brandy which had washed up on the beach. He opened a bottle to revive the unconscious woman. A few hours later Tom scaled a cliff in search of help. He followed hoof prints and came by chance upon two men from nearby Glenample Station three and a half miles away. In a state of exhaustion, he told the men of the tragedy. Tom returned to the gorge while the two men rode back to the station to get help. By the time they reached LOCH ARD Gorge, it was cold and dark. The two shipwreck survivors were taken to Glenample Station to recover. Eva stayed at the station for six weeks before returning to Ireland, this time by steamship. In Melbourne, Tom Pearce received a hero's welcome. He was presented with the first gold medal of the Royal Humane Society of Victoria and a £1000 cheque from the Victorian Government. Concerts were performed to honour the young man's bravery and to raise money for those who lost family in the LOCH ARD disaster. Of the 54 crew members and passengers on board, only two survived: the apprentice, Tom Pearce and the young woman passenger, Eva Carmichael, who lost all of her family in the tragedy. Ten days after the LOCH ARD tragedy, salvage rights to the wreck were sold at auction for £2,120. Cargo valued at £3,000 was salvaged and placed on the beach, but most washed back into the sea when another storm developed. The wreck of LOCH ARD still lies at the base of Mutton Bird Island. Much of the cargo has now been salvaged and some was washed up into what is now known as LOCH ARD Gorge. Cargo and artefacts have also been illegally salvaged over many years before protective legislation was introduced. One of the most unlikely pieces of cargo to have survived the shipwreck was a Minton porcelain peacock - one of only nine in the world. The peacock was destined for the Melbourne International Exhibition in 1880. It had been well packed, which gave it adequate protection during the violent storm. Today, the Minton peacock can be seen at the Flagstaff Hill Maritime Museum in Warrnambool. From Australia's most dramatic shipwreck it has now become Australia's most valuable shipwreck artefact and is one of very few 'objects' on the Victorian State Heritage Register. The LOCH ARD shipwreck is of State significance – Victorian Heritage Register S 417. Flagstaff Hill’s collection of artefacts from LOCH ARD is significant for being one of the largest collections of artefacts from this shipwreck in Victoria. It is significant for its association with the shipwreck, which is on the Victorian Heritage Register (VHR S417). The collection is significant because of the relationship between the objects, as together they have a high potential to interpret the story of the LOCH ARD. The LOCH ARD collection is archaeologically significant as the remains of a large international passenger and cargo ship. The LOCH ARD collection is historically significant for representing aspects of Victoria’s shipping history and its potential to interpret sub-theme 1.5 of Victoria’s Framework of Historical Themes (living with natural processes). The collection is also historically significant for its association with the LOCH ARD, which was one of the worst and best known shipwrecks in Victoria’s history. Unrestored sugar spoon from the wreck of the LOCH ARD. The spoon design has a flattened fiddle-back handle, with a thin stem or shank, flared collar, and a shallow rounded bowl. The spoons metallic composition is a thin layer of brass alloy which has partially corroded back to a nickel-silver base metal. Small amount of concretion and verdigris, with only 10% of original plate remaining. Outlines of five makers marks are discernible on the lower rear of handle - Crown, Elipse,Circle, Circle, Diamond - but details are obscured.flagstaff hill, warrnambool, shipwrecked coast, flagstaff hill maritime museum, maritime museum, shipwreck coast, flagstaff hill maritime village, great ocean road, loch line, loch ard, captain gibbs, eva carmichael, tom pearce, glenample station, mutton bird island, loch ard gorge, electroplated cutlery, loch ard shipwreck, nickel silver, william page and co, birmingham brass plating, makers marks -
 Flagstaff Hill Maritime Museum and Village
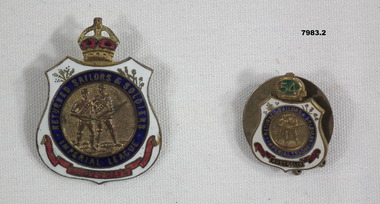
Badge - Set of Badges, circa 1940s
The donor, Ada Barclay, was a member of the Flying Angel Club, Missions to Seamen (which is now Mission to Seafarers) in Townsville and Sydney. One of the badges connects her with the Ladies' Harbour Lights Guild in Queensland. The Sanctuary Window and other items at Flagstaff Hill Maritime Village are part of the St Nicholas Seamen’s Church Williamstown Collection. The window is dedicated to the seamen from the Merchant Navy and was organised by a group of women, some of whom were also in the Ladies’ Harbour Lights Guild, dedicated to the care of seafarers across the world. The Sanctuary Window above the altar in Flagstaff Hill Maritime Village's St Nicholas Seamen’s Church’ is titled "Christ Showing the Helmsman the Way". This round, stained glass window was originally installed in the St Nicholas Seamen's Church at 139 Nelson Place, Williamstown, Victoria. The window was donated to St Nicholas Seamen’s Church as a memorial to the members of the Merchant Navy whose lives were lost in the Second World War, 1939-1945. The donor was the Williamstown Lightkeepers Auxiliary, an independent ladies association working with the Williamstown Missions to Seamen. Some of the members of this Auxiliary were also members of the Ladies’ Harbour Lights Guild. This set of badges is significant historically for its connection to the Merchant Navy organisation, the Ladies’ Harbour Lights Guild and the Flying Angels Club. Through this connection, the badges are also connected to the history of the St Nicholas Mission to Seamen's Church in Williamstown, established in 1857 to cater for the physical, social, and spiritual needs of seafarers. It originated in Bristol, England when a Seamen's Mission was formed in 1837. The connection of this set of badges to the Ladies’ Harbour Lights Guild and what is now the Mission to Seafarers, highlights the strong historical and continuing community awareness of the life of people at sea, their dangers and hardships, and their need for physical, financial, spiritual and moral support. Set of four metal and enamel badges pinned in a vertical row to a red ribbon. Each badge is connected with seafarers. Three badges have a crown on the top of a circular badge, a wreath around the circle and the letters "MN" in the centre. One of these also has "Australia" below the circle. The remaining badge has the words "The Ladies' Harbour Lights Guild" around the border on a blue background, and a blue flag in the centre on a gold background. The flag has a gold angelic figure on it. The figure has wings and is holding a book. "MN" "AUSTRALIA". "THE LADIES' HARBOUR LIGHTS GUILD" Badge 02 - "ANGUS & COOTE / SYDNEY" Badge 04 "MANAFOLD / BRISBANE"flagstaff hill, warrnambool, shipwrecked coast, flagstaff hill maritime museum, maritime museum, shipwreck coast, flagstaff hill maritime village, great ocean road, religion, sailors rest, bethel sailors’ church, bethel floating church, ladies’ harbour lights guild, missions to seamen victoria, mission to seafarers, flying angel’s club, st nicholas seamen's church williamstown collection, mission to seamen williamstown, st nicholas seamen’s church flagstaff hill, 139 nelson place williamstown, anglican church, ethel godfrey, alice sibthorpe, pin badge, lapel badge, merchant navy, flying angel mission sydney, angus & coote sydney, manafold brisbane -
 Bendigo Historical Society Inc.
Map - BILL ASHMAN COLLECTION: MAP OF BENDIGO
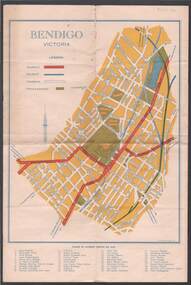
Map of Bendigo. Contains street of Bendigo with Places of Interest marked, Map of the Bendigo Area with Places of Interest marked, and on the centre page is Bendigo the Golden Gateway to the North. There is a map with circles around Bendigo and their distance from centre Bendigo. Circles go to a distance of 20 miles. Information includes General Information, Scenic Attractions, Industrial Activities, Industries already Established, Sporting Facilities - Bendigo and District, and Cultural Organizations. JCI shield on the left under the map. Also some brief information about Bendigo.sciences, instruments - general, scalebuoy, bill ashman collection - correspondence, map of bendigo, cambridge press, a r mcconnachie, bendigo junior chamber of commerce, bendigo city council -
 Clunes Museum
Badge
.1 LONG SERVICE BADGE 25YEARS IN READ ON WHITE BACKGROUND .2 LONG SERVICE BADGE 20 YEARS GOLD WRITING ON RED BACKGROUND .3 NAMETAG BADGE MRS. STEART IN BLACK ON GOLD BACKGROUND WITH BLACK FRAME, ROUND LIGHT BLUE CIRCLE BEHIND .4 NAMETAG BADGE BOB STEART ON GOLD IN BLACK WRITING WITH BLACK FRAME, LIGHT BLUE CIRCLE BEHIND .5 BADGE STATE OF VICTORIA EMBLEM GIRL GUIDES, DIAMOND SHAPED LIGHT BLUE WITH FIVE STARS AND A CROWN ON TOPgirl guides, steart, bob steart, enid steart -
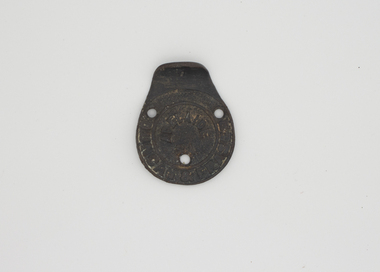
 Australian Army Museum of Western Australia
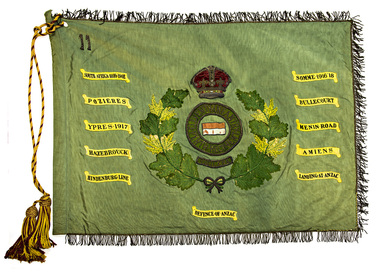
Regimental Colour - 11th Australian Infantry Regiment (Perth Regiment)
Presented by the Honourable Lord Mayor JT Franklin, CMG, MLC, JP, at a parade held at Karrakatta Camp on 7 April 1929. Consecrated by the Chaplain General COL Riley, OBE, VD, DD. With the re-activation of the Citizen Military Forces (CMF) following the Second World War, the 11th/44th Infantry Battalion (The City of Perth Regiment) was raised in 1948 as a linked battalion to carry on the identity and traditions of the pre-war 11th and 44th Battalions respectively. The King's and Regimental Colours formerly held by these two battalions were passed on to the new battalion who paraded them in rotation on ceremonial occasions. Under major reorganisation of the CMF in 1960, all individual infantry battalions that existed at the time within each State were amalgamated to form State regiments, taking effect from 1 July 1960. Thus from that date the 11/44th, 16th and 28th Infantry Battalions were amalgamated to form The Royal Western Australia Regiment. In September 1960, at a ceremonial parade held at Northam Camp, the Colours carried by all former battalions were handed over for safe keeping by the new regiment These former colours were subsequently laid up in the undercroft at the State War Memorial, King's Park on 29 November 1964. These were transferred to the Army Museum of WA in 1988 as part of the Bicentenary Colours Project. Dark green with gold fringe. In the centre the battalion colour patch of a brown over blue rectangle within a circle inscribed "ELEVENTH INFANTRY - PERTH REGIMENT". Beneath the circle a scroll inscribed with the regimental motto "VIGILANS". The whole surrounded with a wreath of Australian wattle and surmounted by the Crown. In the upper canton the Arabic numeral "11". Battle Honours emblazoned on the colour:- SOUTH AFRICA 1899-1902, SOMME 1916-18, POZIERES, BULLECOURT, YPRES 1917, MENIN ROAD, HAZEBROUCK, AMIENS, HINDENBURG LINE, LANDING AT ANZAC, DEFENCE OF ANZAC -
 Ballarat Tramway Museum
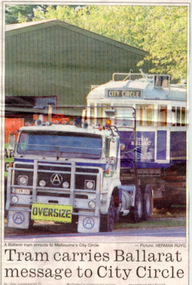
Newspaper, The Courier Ballarat, "Tram carries Ballarat message to City Circle", 24/02/1996 12:00:00 AM
Newspaper cutting from The Courier, Ballarat, Saturday 24/2/1996 of City of Ballarat Tram W4 671 leaving the depot on a low loader bound for Melbourne. Has front page colour photo of truck and tram at the rear of the depot in Gilles St. Tram has destination of 'City Circle'. Photo by Herman Ruyg. Accompanying item written by Ian Haberfield quoting Peter Hiscock about the tram and the running on the City Circle route in Melbourne. Also mentions Alan Brown, Public Transport Minister.trams, tramways, 671, btm, city of ballarat, city circle, melbourne -
 Bendigo Military Museum
Badge - BADGES - RSL
RSL badges of two different sizes relating to Imperial League pre WW2.1. Badge - White shield with crown on top with No. 54 on a green background.. Inscription within a blue circle and inside on gold background are two armed soldiers standing at ready. Banner along bottom of shield with "Australia" written on it. Two rings on back with no pins to attach. 2. Badge - White shield with crown on top. Inscription within a blue circle and inside on gold background are two armed soldiers standing at ready. Banner along bottom of shield with "Australia" written on it. On back is a round brass plate with two clips on back.1. Inscribed "Imperial League - Returned Sailors, Soldiers” At bottom "Australia". On back No. “B8396” and maker "W. Bishop" and "Copyright". 2. Same inscription as one. A no 54 in box on top.rsl badge, imprial league -
 Warrnambool and District Historical Society Inc.
Badge and Ribbon, Boxed gold metal with cream ribbon
This is a badge belonged to a member of the Freemasons Friendly Society. In Warrnambool the Lodge of St. John was founded in 1861. and the Masonic Temple in Kepler Street ( the building still extant) was opened in 1870.This badge is of some interest as it may have local provenance. .1 Brass badge attached by a hook to three brass pieces of varying shapes through which is threaded a cream ribbon. The badge has as its centre the star of David with fine text. Attached to the points of the star is a narrow circle with text. Outside the circle are nine protruding points ending in three clover shapes. At the base is an inverted horseshoe shaped appendage with a T and H interlocked. There is a pin attached to the top piece at the end of the ribbon.. .2 Composite hinged box lined with white and royal blue satin and text..1PEACE WISDOM TRUTH BEAUTY CONCORD STRENGTH DEO REGI FRATRIBUS HONOR FIDELITAS BENEVOLENTIA .2 (Stamp) CHAS R MARTIN The rest is faded -
 Melbourne Tram Museum
Pamphlet, Dept of Planning and Development, "Catch the City Circle", 1994
Pamphlet - DL 6 fold from A3 sheet, full colour titled "Catch the City Circle", detailing the City Circle tram, 1994 - has the original route by Spencer St - map shows various points and details the various locations.. Has contact details but no web site. Has the Victoria government, Better Cities and Public Transport Corporation Logos. See Reg Item 866, 2703 and 1337 for other versions. Second copy added 24-04-2019 from Bob Prentice Collection.trams, tramways, city circle, yarra trams, ptc -
 Melbourne Tram Museum
Leisure object - Model tram and presentation case, Cooee Concepts Pty Ltd, Model of Melbourne City Circle tram No. 1000, 2001
Model of Melbourne City Circle tram No. 1000 in a presentation cardboard box, made by Cooee Concepts Pty Ltd in China. Tram secured into the card box by two screws just behind the life guard. Made from plastic with trolley poles from metal (trolley poles can be moved) green roof, red and gold sides, black No. 15 trucks, advertising the Melbourne Open Tennis Court on the skyline advertising boards. The box has the side on view of a City Circle tram in the background.trams, tramways, models, city circle, cooee models, tram 1000 -
 Vision Australia
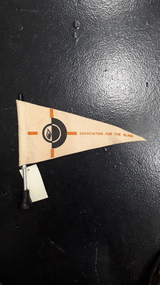
Flag - Object, Association for the Blind desk pennant, 1960-1969
A desk flag produced by the Association for the Blind, possibly for fundraising. A metal rod sits in a black rubber base, with a cream felt triangular pennant atop. On the pennant are the words 'Association for the Blind' in caramel coloured writing near the narrowing part of the triangle. Four small rectangles make a frame around the logo of black half circle with black flame outline inside joined with white circle, amidst black background above and below the arc.Cream felt flag with words 'Association for the Blind' in caramel, standing on black baseAssociation for the Blindassociation for the blind, fundraising -
 The Beechworth Burke Museum
Photograph - Two Photographs, Saunders, 1864-1972
Taken some time after 1864, these photographs depict the Star Hotel both directly (8674.1) and from the Hotel north west down Ford Street (8674.2). The images depict the building with its modern exterior, having settled for this brick form after several other building designs. The Star Hotel was the first hotel opened in Beechworth, and would go through a series of dramatic changes under its first three owners. The original timber structure was built by W.H. Neuber, though at the time it was only known as ‘The Beechworth Hotel’. The site was later purchased in 1855 by mining entrepreneur, and prolific business owner, John Alston “Six Stars” Wallace. He would go on to extend the established hotel, rebuilding much of it with weatherboard and a shingled roof, adding a two storey structure with a verandah and a theatre capable of supporting 400-500 people, which was often used for international performances. Renamed as the Star Hotel, it was the second in a chain franchise, eventually leading to the “Six Stars” moniker Wallace went by, with hotels at Rutherglen, Chiltern, Yackandandah, Bright, Snake Valley, and of course, Beechworth. Under his ownership, it developed into a popular location for merchants, wayfarers, and locals alike, with the help of his brother Peter as manager. Situated on a road once synonymous with Melbourne to Sydney roadtrips, and the allure of the gold mines, the popularity of the Star drew all manner of clientele from across the country. As such a central hub, the ‘Star Assembly Rooms’ were used as a meeting place for debates, discussions, festivities, and problem solving among the various working sects of the area. These meetings included shareholder discussions for prospecting companies, railway planning, council meetings, and discussions surrounding the interactions between European and Chinese miners, both good and bad. By late 1856, John had the Beechworth at auction through J.H. Grey & Co. It was most likely due to the high profile murder of the manager, Robert Murdoch, during an altercation in relation to a dine and dash event by a Swedish miner, Charles Jansen, who had been ‘excited by drink’ on November 17th. He had refused to pay for his meal and waiter James Mitchell failed to persuade him otherwise. Mitchell, or possibly Murdoch himself, forced him out as tempers and threats escalated. As the photos tell, there are a number of doors which may be entered through, and Jansen used an alternate entrance to access the building. Murdoch was investigating the noise when he encountered the furious man. He was subsequently stabbed with no warning by a small clasp knife, as he tried to stop the intrusion. His exclamations, "I’m stabbed, I’m stabbed!” alerting other occupants, and Jansen was restrained and arrested. Murdoch died the next day from his injuries, with the inquest carried out on the theatre stage. Some 3000 members of the town attended the funeral, and the Star hung black cloth in memory of Robert and his death. Afterwards, an auction caw the property pass to Messrs Robertson and Quirk, though would return shortly thereafter to Six Stars’ portfolio. Six Stars would later sell off his properties from 1862, with the Beechworth Star purchased by 1864 by John Sitch Clark. This allowed Clark to redevelop a significant portion of the Hotel, stripping a central section and constructing the brick structure that survives today, reopening the Star in July that year. It was after this time that our photographs were taken. Clark would later sell the property to Frank Mitchell, shortly before his own death. The next owner, Frederick Allen, lived on the property before the deed was sold to him in the 1880s. He would later sell the property to William Carroll in 1890, with proprietorship eventually moving to Mr. W.H. Porter, and transferring to a Mr. Marendaz by 1913 and Mr. Holly in 1915. Licensing disputes would arise 1917 between Margaret Carroll and a Mrs. McDonald, before it became delicenced some years prior to 1935. It was around this year that the property was bought by Mr. W.J. Pemberton at the meagre price of £500, down from the £13,000 Six Stars originally auctioned it for. It served as a Youth Hostel for a period of time around 1972, and currently the building serves as a private accommodation on the second floor, with shops taking up the ground floor level.These photographs of the Beechworth Star Hotel as they depict a form of Beechworth's first hotel, and also the site of a high profile murder. Two black and white rectangular photographs printed on matte photographic paper.8674.1 (reverse) Beechworth/ 734/ Tanswell’s Hotel [crossed out]/? Old Star/ Hotel,/[small pencil scratching]/ Saunders/ BMM 8674.1 8674.2 (reverse) Beechworth/ 60%[circled]/ Old Star Hotel/Building etc.,/ 12 ½ cm/ 3"[circled, arrows extending horizontally to edges]/[arrows extending top to bottom mid-right of reverse]/ Saunders/ 734[circled]/ BMM 867.2,/ [thin scribbled bordering around top, right, and bottom edges]star hotel, beechworth hotel, john alston wallace, ja wallace, john sitch clark, frederick allen, robert murdoch, meeting place, tragedy, theatre, mining town -
 Kiewa Valley Historical Society
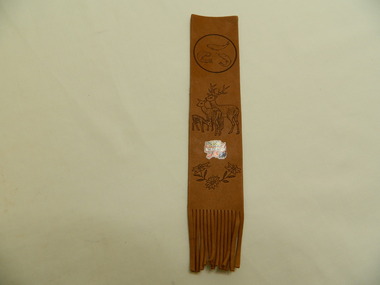
Bookmark - Souvenir, Mt Beauty
Bookmarks are sold as souvenirs to tourists to remind them of their holiday. Mt Beauty is a tourist town.Soft brown leather strap with circle around 3 fish at the top, 3 deer in the middle and 3 flowers at the bottom. Frilled at the bottom end. Between the deer and flowers is a coloured picture with 'Mt Beauty' across the middle.Mt Beautysouvenir. mt beauty. bookmark. tourism -
 Warrnambool and District Historical Society Inc.
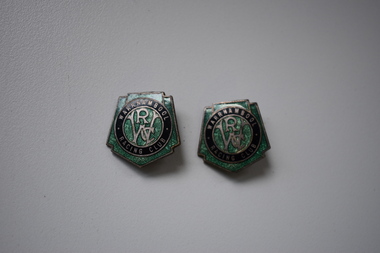
Badges, Stokes, Warrnambool Racing Club, 1950
These badges were issued to members of the Warrnambool Racing Club in 1950. Horse race meetings have been held in Warrnambool since the early days of settlement, with the Warrnambool Racing Club being established in 1854. Race meetings were first held on the site of the present day racecourse in the late 1850s. The chief event on the Warrnambool racing calendar is the annual three-day May Racing Carnival, with the main event being the well-known Warrnambool Grand Annual Steeplechase. These badges are retained as examples of badges of members of the Warrnambool Racing Club in the mid 20th century. .1 A shield-shaped metal badge with silver-coloured trim around the edges. There are initials in the centre of the badge and around these is a circle of blue with silver-coloured printing, all on a green background. There is a metal clip at the back. .2 as above .1 WRC Warrnambool Racing Club Not Transferable, Season 1950-51, Season ends July 31st 1951, B 297 .2 as above except that the number is B 124 warrnambool racing club, history of warrnambool, badge -
Glenelg Shire Council Cultural Collection
Domestic object - Bottle, n.d
Clear glass soft drink bottle. Embossed in circle. 'Jeffreys Bros Trade JB Mark Casterton' Rear 'THIS BOTTLE IS THE PROPERTY OF JEFFREYS BROS. CASTERTON' Measures Diameter top 2.5cm, Bottom 8cm, 30cm high -
Glenelg Shire Council Cultural Collection
Domestic object - Bottle, n.d
Clear glass soft drink bottle. Embossed in circle 'Jeffreys Bros Trade JB Mark Casterton' Rear 'THIS BOTTLE IS THE PROPERTY OF JEFFREYS BROS CASTERTON' Measures 23cm high Diameter top: 2cm Bottom: 6.2cmBack: Bottom: 'M608' M - embossed -
 Orbost & District Historical Society
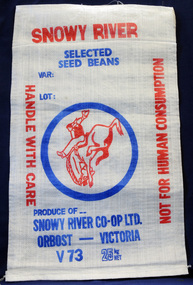
seed bag, mid 20th century
This unused bag would have been used by the snowy River Co-Op in Orbost during the 1960's-1970's to pack selected seed beans.Snowy River Seeds started life as a farmers' co-operative (Snowy River Co-op) in 1967. This item is significant because it was specially made for the seed bean industry which was a major industry in the Orbost district for over a century. A bag made of white woven synthetic material. It is unused. On the front is the logo for the Snowy River Co-Op Ltd - the 'man from Snowy River" in red print inside a blue circle. Other print is red and blue.On front: Produce of... Snowy River Co-Op Ltd Orbost - Victoria V73 25 kg NET snowy-river-co-op seed-bag -
 Flagstaff Hill Maritime Museum and Village
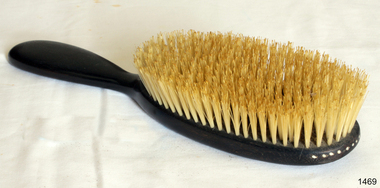
Domestic object - Clothes Brush, Early 20th century
Clothes brushes were a common household item, used particularly for removing lint and fluff woven fabrics. This clothes brush is an example of personal items used for grooming and care of clothes in the earlier part of the 20th century. Items of similar design are still used in modern times.Clothes brush, handle and back are one piece, made of dark brown-coloured ebony. the brush has with yellow bristles. Inscription on handle. Rounded tip of brush has indented white circles. Inscription on brush handle.Embossed "REAL EBONY"flagstaff hill, warrnambool, shipwrecked-coast, flagstaff-hill, flagstaff-hill-maritime-museum, maritime-museum, shipwreck-coast, flagstaff-hill-maritime-village, brush, clothes brush, grooming, personal item, ebony, real ebony -
 Flagstaff Hill Maritime Museum and Village
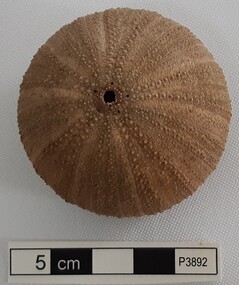
Animal specimen - Sea Urchin
This sea urchin shell was recovered from the wreck of the S.S. Casino (1882 – 1932) between the late 1960’s to early 1970’s. It is part of the John Chance Collection. The coastal trader SS Casino (1882–1932) had a run of almost 50 years along the coast of Western Victoria. She traded goods and food as well as carrying passengers from port to port on her many voyages. This vase may have been included in her cargo or could have been amongst the personal luggage of the people on board.The sea urchin shell is significant as an example of underwater animal life existing in Victoria the 1960s. It was recovered by John Chance, a diver from the wreck of the S.S. Casino in the 1960s-70s. Items that come from several wrecks along Victoria's coast have since been donated to the Flagstaff Hill Maritime Village’s museum collection by his family, illustrating this item’s level of historical value. The urchin is connected with the S.S. Casino, which played an historical role in Western Victoria, providing transport, communication and trade along the coast between Melbourne and Portland in the late 19th and the early 20th century, visiting the ports at Apollo Bay, Warrnambool and Belfast (Port Fairy). The S.S. Casino was the only regular trader with normal passenger accommodation along the West Coast and the only Western District steamship that was in service between 1854 and 1939, and to be represented in the Victorian Heritage Shipwreck register, and to have been wrecked in the Western District, and to have the wreck located, and to be accessible to divers. The wreck of the S.S. Casino, and its associated relics, is considered an important part of Victorian and Australian cultural heritage and is now protected as a Historic Shipwreck under State and Commonwealth Law in the Commonwealth Historic Shipwrecks Act (1976). Sea urchin, global shape, beige colour. Urchin has two naturally formed holes, the larger being the mouth. Ten segments radiate from top to bottom, each with a row of small white raised circles.flagstaff hill, warrnambool, flagstaff hill maritime museum, maritime museum, shipwreck coast, flagstaff hill maritime village, great ocean road, s.s. casino, john chance, west coast trader, apollo bay, sea urchin, south west victoria, sea life -
 Dutch Australian Heritage Centre Victoria
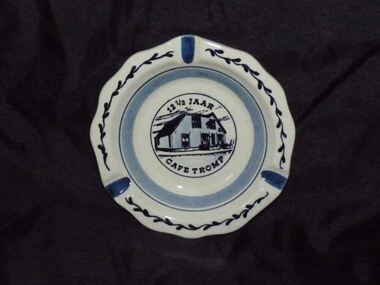
Ashtray (Asbakje)
Blue and white hand-painted ashtray with three shallow grooves on rim for resting cigarettes. The scalloped rim is also decorated with a blue catkin branch. In the centre circle is a picture of a cafe and the inscription "12 ½ Jaar Cafe Tromp".On the reverse is painted; "Handpainted Delft Blue made in Holland". -
 Tatura Irrigation & Wartime Camps Museum
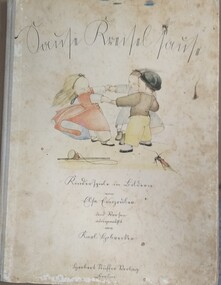
Book
Possession of former internee at camp 3. Brought with him from Jaffa, Palestine in 1941.Hard card covered story book with colour illustrations throughout. Has grey cloth spine. Cover features illustrations of 3 children holding hands/forming a circle. Title etc. in handwriting/German Gothic script.Peter Drescher, Tatura, 1942peter drescher, jaffa, palestine, internee books, german story books -
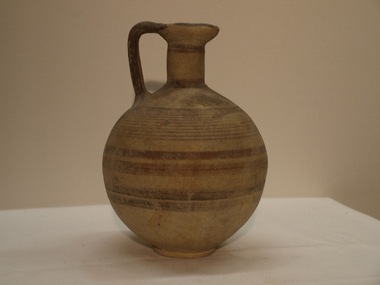 Hellenic Museum
Trefoil-Lipped Jug, 1050 - 600 BCE
Cypriot Bichrome Ware from Cypro-Geometric/Cypro-Archaic PeriodThe lip and double strap handle painted back, the narrow column neck with two bands at top and one at bottom, the shoulder with frieze of concentric circles, over set of lines, two red and two black bands below. cypriot -
 Ballarat Tramway Museum
Functional Object - Tramcar component, Duncan and Fraser, Window lifter, Duncan and Fraser, About 1887?
Made by Duncan and Fraser for fitting to horse-drawn tramcars and possibly other products of their Adelaide workshops. See also items 2172 and 8744 for other examples.Tramcar component, Duncan and Fraser, Window lifter Cast brass window lifter, with raised letters - "DUNCAN & FRASER" on outside &"ADELAIDE S.A." inside circle. Has three mounting holes & rolled top edge to give a finger hold. Of type used on horse trams.DUNCAN & FRASER ADELAIDE S.A.windows, duncan & fraser, ballarat, tramways, tramcars, horse trams, window furniture, tramcar component, btm, ballarat tramways -
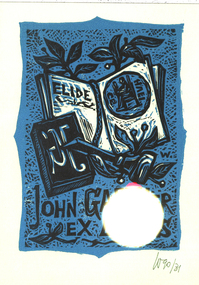 Federation University Art Collection
Bookplate, 'Ex Libris John Gartner'
John Gartner was a fine printer and publisher, an author, a noted philatelist, and also collector of Australian banknotes and coins. He was born on 16 July 1914 and was largely self-educated, leaving school at fourteen for work following the death of his father. Gartner developed a strong interest in the history of typography and printing and was apprenticed at the Advocate where his father had been a linotype operator. Aged 17, Gartner bought a hand press and some fonts of type, and in 1937 acquired a platen press from which he set and printed his private press books, published under the imprint of The Hawthorn Press. Gartner had a strong collection of Australian bookplates. He also looked at the work of artists overseas and commissioned personal plates. He subsequently built an international collection with preference for artists who printed from wood. His initial searches were in Belgium and Holland.(http://www3.slv.vic.gov.au/latrobejournal/issue/latrobe-84/t1-g-t7.html) Print shows an open book with the word ELIDE on the left hand page and a picture of a seated man framed by a circle on the right hand page. An engraving tool and wood block are in the foreground. Foliage protrudes from behind the book. W 90/31 in bottom right hand cornerkeith wingrove memorial trust, bookplate, australian bookplate design awards -
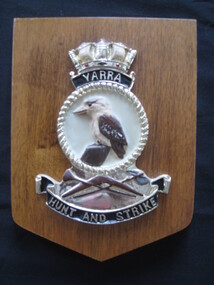 Lilydale RSL Sub Branch
Plaque - Ship's Plaque, HMAS Yarra
HMAS Yarra badge mounted on wooden plaque. Badge depicts crown with sails above the word "Yarra". Below which is a Kookaburra in a circle above a boomerang with crossed horn and axe (medieval), above the word "Hunt and Strike"Yarra/ Hunt and Strike -
 Lakes Entrance Historical Society
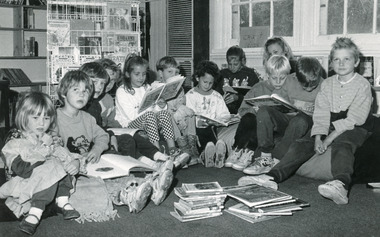
Photograph - Toorloo Arm School, Lakes Post Newspaper, 1992
Photo appeared in Lakes Post Newspaper 27 May 1992, page 11.Black and white photograph of eleven Toorloo Arm Primary School of 1992, taking part in M S Read-a-thon. Children are seated in a half circle on bean bags, with parent Karen Page. Toorloo Arm Victoriaschools, children, reading -
Melbourne Tram Museum
Newsletter, The Met, Public Transport Corporation, "CSE Newsletter - March 1995", Mar. 1995
Newsletter, A4 white paper, titled "CSE Newsletter - March 1995", outlining the role of the CSE Project Manager, training, City Circle, their role and relationship with the Met Train CSE's. Signed by Peter Winspur as Project Officer.trams, tramways, cse, customer service employees, city circle, tickets -
 Melbourne Tram Museum
Accessory - Paint Sample, The Met, Paint sample or paint chip sample or paint chi, 1980's - 2000
paint sample or paint chi from a tramcar showing various colours that had been applied over a number of years to the tramcar - shows about 12 different colours - green, undercoats, gold, city circle red.trams, tramways, paint, colour schemes, tramcars, city circle, the met -
 Tatura Irrigation & Wartime Camps Museum
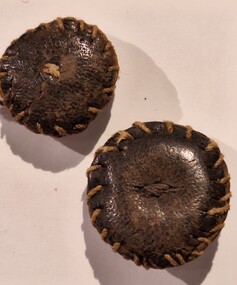
Buttons, Gertrud Streker, 1940's
Made by Gertrud Streker as an internee at camp 32 small leather buttons, made from old leather shoes. Each button is made of 2 circles of leather over sewn around the edges and thread in the centre where they have been sown onto a garment.gertrud streker, buttons, leather buttons, internee hand crafts