Showing 1735 items matching "street making"
-
 Flagstaff Hill Maritime Museum and Village
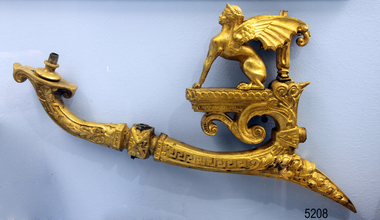
Functional object - Gas lamp wall bracket, Late 19th to early 20th Century
Gas lamps worked by heating something called a 'mantle' with a gas flame. The mantle then glowed brightly, lighting up the room. Lamps had either two chains, for a ceiling-mounted lamp or a tap for a wall-mounted burner to turn off the gas. These chains or taps could also adjust the flow of the gas and hence the brightness of the mantle. Before Carl Auer von Welsbach invented the gas mantle in the 1890s, all gas lights in homes and street lights had simple gas jets that pointed upwards. In the home, these lights were covered with glass globes and had an overall ornate look making the lamp ascetically pleasing and protecting the flame from being blown out. However, this arrangement was extremely inefficient: To get as much light as possible, the gas had to be turned fully up, resulting in large sheets of flame rising towards a ceiling. Also, because the lamp had to be point upwards, the illumination was directed upwards, i.e. at the ceiling rather than where it was needed. So the usable light for a given amount of gas was minimal but the invention of the gas mantle eventually changed this. It enabled gas lights to have a small flame and to direct their light downwards. The item is significant as it is part of a very ornate gas lamp wall bracket from the late 19th to early 20th century. Its provenance is currently unknown and at this time cannot be associated with a historical event, person or place and the item is assessed as a collective asset.Gas lamp wall bracket; part of a gas lamp. A single burner fancy wall mounted bracket, brass, ornate and decorative, featuring a Lamassu - figure with the body of a lion , wings of an eagle and human head. It was recovered from the wreck of the Loch ArdNoneflagstaff hill, warrnambool, flagstaff-hill, flagstaff-hill-maritime-museum, shipwreck-coast, flagstaff-hill-maritime-village, gas lamp, brass lamp, gas burner bracket, domestic artifact, gas lighting, gas lamp bracket -
 Flagstaff Hill Maritime Museum and Village
Domestic object - Plate
The Process of Making Pottery Decorating, Firing, Glazing, Making, Technical There is a rhythm and flow to clay. It can’t be done all at once! Even the making process! It can take weeks to get everything done, especially if you can only work on your pottery once a week! Even though we have three hour classes, it’s often just not enough time! Here is an overview of some of the processes so you have a bit more grasp on some of the technical stuff! Step One – Design There are SO many ideas out there for making stuff in clay! From delicate porcelain jewellery, through to heavy sculptural work and everything in between. Deciding your direction is sometimes not that easy – when you first start, try everything, you will naturally gravitate to the style that you enjoy! The options and variations are endless and can get a wee bit overwhelming too! Check in with me before you start to ensure your ideas will work, what order you might do things, how you could achieve the look you are seeking and any other technical data required! Step Two – Making Clay is thixotropic. This means that as you work with it, the clay first gets sloppier and wetter, before is begins to dry in the atmosphere. For most things, you simply can’t do all parts of the project at once. An example of work order might look like: Get last weeks work out from the shelves Prepare clay for today’s work – roll your clay, prepare balls for throwing, make the first stage of a pinch pot) Clean up last week’s work and put it on the shelf for bisque firing Check that you have any glazing to do – and do enough of it that you will have time to finish your main project Do the next step of your next project – there might be a further step that can’t be complete immediately, in that case, wrap your work well and put onto the shelves. Letting your work rest for a while can really help keep your work clean and professional looking. Many things require bagging under plastic to keep it ready for work the next week – put your name on the outside of the bag so you can find your work easily. We have stickers and markers. Consider how you want to decorate your work – coloured slip can be applied at a fairly wet stage (remembering that it will make your work even wetter!). Trying to apply slip to dry clay won’t work! If you want to do sgraffito – you will need to keep the work leather hard (a state of dryness where you can still work the clay with a little effort and a little water and care). Step Three – Drying Most of the time your work can go into the rack uncovered to let it dry out for the following week. If you want to continue forming or shaping you will need to double bag your work – put your work on a suitable sized bat and put the bat in a bag so the base of the bag is under the bat, then put another bag over the top of the work and tuck the top of the bag under the bat. If you want to trim (or turn) your thrown work the following week, it should also be double bagged. If your work is large, delicate, or of uneven thicknesses, you should lightly cover your work for drying. When considering the drying process, bare in mind the weather, humidity and wind! The hotter and dryer, the faster things dry and work can dry unevenly in the shelves – this can lead to cracking – another time to lightly cover your work for drying. Step Four – Trimming and Cleaning Up Your work is dry! It is called greenware now and it is at it’s most fragile! Handle everything with two hands. I often refer to soft hands – keep everything gentle and with your fingers spread as much as possible. Try to not pick up things like plates too much, and always with both hands! Before your work can be bisque fired it should be “cleaned up”. You work won’t go into the kiln if it has sharp edges – when glazed, sharp edges turn into razor blades! Use a piece of fly wire to rub the work all over – this will scratch a little so be light handed. Use a knife or metal kidney to scrape any areas that require a bit more dynamic treatment than the fly wire offers! Finally, a very light wipe over with a slightly damp sponge can help soften and soothe all of your edges and dags! Trimming thrown work: If you are planning to trim (or turn) your thrown work (and you should be), make sure you bag it well – your work should be leather hard to almost dry for easiest trimming. Use this step to finish the work completely – use a metal kidney to polish the surface, or a slightly damp sponge to give a freshly thrown look. Wipe the sponge around the rim after trimming, and check the inside of the pot for dags! Trimming slip cast work: Usually I will trim the rims of your work on the wheel the following day to make that stage easier, however you will still need to check your work for lumps and bumps. Last but not least – check that your name is still clearly on the bottom of your work. Step Five – Bisque Firing When the work is completely dry it can go into the bisque kiln. The bisque kiln is fired to 1000°C. This process burns off the water in the clay as well as some of the chemically bound water. The structure of the clay is not altered that much at this temperature. Inside the bisque kiln, the work is stacked a little, small bowl inside a larger bowl and onto a heavy plate. Smaller items like decorations or drink coasters might get stacked several high. Consideration is paid to the weight of the stack and shape of the work. A bisque kiln can fire about one and a half times the amount of work that the glaze kiln can fire. The firing takes about 10 hours to complete the cycle and about two days to cool down. Once it has been emptied the work is placed in the glaze room ready for you to decorate! Step Six – Glazing Decorating your work with colour can be a lot of fun – and time consuming! There are three main options for surface treatment at this stage: Oxide Washes Underglazes Glazes Washes and underglazes do not “glaze” the work – It will still need a layer of glaze to fully seal the clay (washes don’t need glaze on surfaces not designed for food or liquid as they can gloss up a little on their own). Underglazes are stable colourants that turn out pretty much how they look in the jar. They can be mixed with each other to form other colours and can be used like water colours to paint onto your work. Mostly they should have a clear glaze on top to seal them. Oxides are a different species – the pink oxide (cobalt) wash turns out bright blue for instance. They don’t always need a glaze on top, and some glazes can change the colour of the wash! The glazes need no other “glaze” on top! Be careful of unknown glaze interactions – you can put any combination of glaze in a bowl or on a plate, but only a single glaze on the outside of any vertical surface! Glazes are a chemical reaction under heat. We don’t know the exact chemicals in the Mayco glazes we use. I can guess by the way they interact with each other, however, on the whole, you need to test every idea you have, and not run the test on a vertical surface! Simply put, glaze is a layer of glass like substance that bonds with the clay underneath. Clay is made of silica, alumina and water. Glaze is made of mostly silica. Silica has a melting point of 1700°C and we fire to 1240°C. The silica requires a “flux” to help it melt at the lower temperature. Fluxes can be all sorts of chemicals – a common one is calcium – calcium has a melting point of 2500°C, however, together they both melt at a much lower temperature! Colourants are metal oxides like cobalt (blue), chrome (green through black), copper (green, blue, even red!), manganese (black, purple and pink) iron (red brown), etc. Different chemicals in the glaze can have dramatic effects. for example, barium carbonate (which we don’t use) turns manganese bright pink! Other elements can turn manganese dioxide brown, blue, purple and reddish brown. Manganese dioxide is a flux in and of itself as well. So, glazes that get their black and purple colours, often interact with other glazes and RUN! Our mirror black is a good example – it mixes really well with many glazes because it fluxes them – causes them to melt faster. It will also bring out many beautiful colours in the glazes because it’s black colouring most definitely comes from manganese dioxide! Glaze chemistry is a whole subject on it’s own! We use commercial Mayco glazes on purpose – for their huge range of colour possibilities, stability, cool interactions, artistic freedom with the ability to easily brush the glazes on and ease of use. We currently have almost 50 glazes on hand! A major project is to test the interactions of all glazes with each other. That is 2,500 test tiles!!!! I’m going to make the wall behind the wheels the feature wall of pretty colours! Step Seven – Glaze (Gloss or sometimes called “Glost”) Firing Most of the time this is the final stage of making your creation (but not always!) The glaze kiln goes to 1240°C. This is called cone 6, or midrange. It is the low end of stoneware temperatures. Stoneware clays and glazes are typically fired at cone 8 – 10, that is 1260 – 1290°C. The energy requirement to go from 1240°C to 1280°C is almost a 30% more! Our clay is formulated to vitrify (mature, turn “glass-like”) at 1240°, as are our glazes. A glaze kiln take around 12 hours to reach temperature and two to three days to cool down. Sometimes a third firing process is required – this is for decoration that is added to work after the glaze firing. For example – adding precious metals and lustres. this firing temperature is usually around 600 – 800°C depending upon the techniques being used. There are many students interested in gold and silver trims – we will be doing this third type of firing soon! After firing your work will be in the student finished work shelves. Remember to pay for it before you head out the door! There is a small extra charge for using porcelain clay (it’s more than twice the price of regular clay), and for any third firing process! Once your work has been fired it can not turn back into clay for millennia – so don’t fire it if you don’t like it! Put it in the bucket for recycling. https://firebirdstudios.com.au/the-process-of-making-pottery/Ceramics have evolved over thousands of years.White earthenware dinner plate. Crazing evident all over.Backstamped ‘Made in England S LTD’flagstaff hill, warrnambool, shipwrecked-coast, flagstaff-hill, flagstaff-hill-maritime-museum, maritime-museum, shipwreck-coast, flagstaff-hill-maritime-village, ceramics, tableware -
 Flagstaff Hill Maritime Museum and Village
Domestic object - Plate, Johnson Bros
The Process of Making Pottery Decorating, Firing, Glazing, Making, Technical There is a rhythm and flow to clay. It can’t be done all at once! Even the making process! It can take weeks to get everything done, especially if you can only work on your pottery once a week! Even though we have three hour classes, it’s often just not enough time! Here is an overview of some of the processes so you have a bit more grasp on some of the technical stuff! Step One – Design There are SO many ideas out there for making stuff in clay! From delicate porcelain jewellery, through to heavy sculptural work and everything in between. Deciding your direction is sometimes not that easy – when you first start, try everything, you will naturally gravitate to the style that you enjoy! The options and variations are endless and can get a wee bit overwhelming too! Check in with me before you start to ensure your ideas will work, what order you might do things, how you could achieve the look you are seeking and any other technical data required! Step Two – Making Clay is thixotropic. This means that as you work with it, the clay first gets sloppier and wetter, before is begins to dry in the atmosphere. For most things, you simply can’t do all parts of the project at once. An example of work order might look like: Get last weeks work out from the shelves Prepare clay for today’s work – roll your clay, prepare balls for throwing, make the first stage of a pinch pot) Clean up last week’s work and put it on the shelf for bisque firing Check that you have any glazing to do – and do enough of it that you will have time to finish your main project Do the next step of your next project – there might be a further step that can’t be complete immediately, in that case, wrap your work well and put onto the shelves. Letting your work rest for a while can really help keep your work clean and professional looking. Many things require bagging under plastic to keep it ready for work the next week – put your name on the outside of the bag so you can find your work easily. We have stickers and markers. Consider how you want to decorate your work – coloured slip can be applied at a fairly wet stage (remembering that it will make your work even wetter!). Trying to apply slip to dry clay won’t work! If you want to do sgraffito – you will need to keep the work leather hard (a state of dryness where you can still work the clay with a little effort and a little water and care). Step Three – Drying Most of the time your work can go into the rack uncovered to let it dry out for the following week. If you want to continue forming or shaping you will need to double bag your work – put your work on a suitable sized bat and put the bat in a bag so the base of the bag is under the bat, then put another bag over the top of the work and tuck the top of the bag under the bat. If you want to trim (or turn) your thrown work the following week, it should also be double bagged. If your work is large, delicate, or of uneven thicknesses, you should lightly cover your work for drying. When considering the drying process, bare in mind the weather, humidity and wind! The hotter and dryer, the faster things dry and work can dry unevenly in the shelves – this can lead to cracking – another time to lightly cover your work for drying. Step Four – Trimming and Cleaning Up Your work is dry! It is called greenware now and it is at it’s most fragile! Handle everything with two hands. I often refer to soft hands – keep everything gentle and with your fingers spread as much as possible. Try to not pick up things like plates too much, and always with both hands! Before your work can be bisque fired it should be “cleaned up”. You work won’t go into the kiln if it has sharp edges – when glazed, sharp edges turn into razor blades! Use a piece of fly wire to rub the work all over – this will scratch a little so be light handed. Use a knife or metal kidney to scrape any areas that require a bit more dynamic treatment than the fly wire offers! Finally, a very light wipe over with a slightly damp sponge can help soften and soothe all of your edges and dags! Trimming thrown work: If you are planning to trim (or turn) your thrown work (and you should be), make sure you bag it well – your work should be leather hard to almost dry for easiest trimming. Use this step to finish the work completely – use a metal kidney to polish the surface, or a slightly damp sponge to give a freshly thrown look. Wipe the sponge around the rim after trimming, and check the inside of the pot for dags! Trimming slip cast work: Usually I will trim the rims of your work on the wheel the following day to make that stage easier, however you will still need to check your work for lumps and bumps. Last but not least – check that your name is still clearly on the bottom of your work. Step Five – Bisque Firing When the work is completely dry it can go into the bisque kiln. The bisque kiln is fired to 1000°C. This process burns off the water in the clay as well as some of the chemically bound water. The structure of the clay is not altered that much at this temperature. Inside the bisque kiln, the work is stacked a little, small bowl inside a larger bowl and onto a heavy plate. Smaller items like decorations or drink coasters might get stacked several high. Consideration is paid to the weight of the stack and shape of the work. A bisque kiln can fire about one and a half times the amount of work that the glaze kiln can fire. The firing takes about 10 hours to complete the cycle and about two days to cool down. Once it has been emptied the work is placed in the glaze room ready for you to decorate! Step Six – Glazing Decorating your work with colour can be a lot of fun – and time consuming! There are three main options for surface treatment at this stage: Oxide Washes Underglazes Glazes Washes and underglazes do not “glaze” the work – It will still need a layer of glaze to fully seal the clay (washes don’t need glaze on surfaces not designed for food or liquid as they can gloss up a little on their own). Underglazes are stable colourants that turn out pretty much how they look in the jar. They can be mixed with each other to form other colours and can be used like water colours to paint onto your work. Mostly they should have a clear glaze on top to seal them. Oxides are a different species – the pink oxide (cobalt) wash turns out bright blue for instance. They don’t always need a glaze on top, and some glazes can change the colour of the wash! The glazes need no other “glaze” on top! Be careful of unknown glaze interactions – you can put any combination of glaze in a bowl or on a plate, but only a single glaze on the outside of any vertical surface! Glazes are a chemical reaction under heat. We don’t know the exact chemicals in the Mayco glazes we use. I can guess by the way they interact with each other, however, on the whole, you need to test every idea you have, and not run the test on a vertical surface! Simply put, glaze is a layer of glass like substance that bonds with the clay underneath. Clay is made of silica, alumina and water. Glaze is made of mostly silica. Silica has a melting point of 1700°C and we fire to 1240°C. The silica requires a “flux” to help it melt at the lower temperature. Fluxes can be all sorts of chemicals – a common one is calcium – calcium has a melting point of 2500°C, however, together they both melt at a much lower temperature! Colourants are metal oxides like cobalt (blue), chrome (green through black), copper (green, blue, even red!), manganese (black, purple and pink) iron (red brown), etc. Different chemicals in the glaze can have dramatic effects. for example, barium carbonate (which we don’t use) turns manganese bright pink! Other elements can turn manganese dioxide brown, blue, purple and reddish brown. Manganese dioxide is a flux in and of itself as well. So, glazes that get their black and purple colours, often interact with other glazes and RUN! Our mirror black is a good example – it mixes really well with many glazes because it fluxes them – causes them to melt faster. It will also bring out many beautiful colours in the glazes because it’s black colouring most definitely comes from manganese dioxide! Glaze chemistry is a whole subject on it’s own! We use commercial Mayco glazes on purpose – for their huge range of colour possibilities, stability, cool interactions, artistic freedom with the ability to easily brush the glazes on and ease of use. We currently have almost 50 glazes on hand! A major project is to test the interactions of all glazes with each other. That is 2,500 test tiles!!!! I’m going to make the wall behind the wheels the feature wall of pretty colours! Step Seven – Glaze (Gloss or sometimes called “Glost”) Firing Most of the time this is the final stage of making your creation (but not always!) The glaze kiln goes to 1240°C. This is called cone 6, or midrange. It is the low end of stoneware temperatures. Stoneware clays and glazes are typically fired at cone 8 – 10, that is 1260 – 1290°C. The energy requirement to go from 1240°C to 1280°C is almost a 30% more! Our clay is formulated to vitrify (mature, turn “glass-like”) at 1240°, as are our glazes. A glaze kiln take around 12 hours to reach temperature and two to three days to cool down. Sometimes a third firing process is required – this is for decoration that is added to work after the glaze firing. For example – adding precious metals and lustres. this firing temperature is usually around 600 – 800°C depending upon the techniques being used. There are many students interested in gold and silver trims – we will be doing this third type of firing soon! After firing your work will be in the student finished work shelves. Remember to pay for it before you head out the door! There is a small extra charge for using porcelain clay (it’s more than twice the price of regular clay), and for any third firing process! Once your work has been fired it can not turn back into clay for millennia – so don’t fire it if you don’t like it! Put it in the bucket for recycling. https://firebirdstudios.com.au/the-process-of-making-pottery/Ceramics have evolved over thousands of years.A white earthenware side plate with a gadroon edge. Has water marks and chips on front.‘Johnson Bros England Reg No 15587’flagstaff hill, warrnambool, shipwrecked-coast, flagstaff-hill, flagstaff-hill-maritime-museum, maritime-museum, shipwreck-coast, flagstaff-hill-maritime-village, johnson bros, ceramics, tableware -
 Flagstaff Hill Maritime Museum and Village
Domestic object - Plate, Alfred Meakin
The Process of Making Pottery Decorating, Firing, Glazing, Making, Technical There is a rhythm and flow to clay. It can’t be done all at once! Even the making process! It can take weeks to get everything done, especially if you can only work on your pottery once a week! Even though we have three hour classes, it’s often just not enough time! Here is an overview of some of the processes so you have a bit more grasp on some of the technical stuff! Step One – Design There are SO many ideas out there for making stuff in clay! From delicate porcelain jewellery, through to heavy sculptural work and everything in between. Deciding your direction is sometimes not that easy – when you first start, try everything, you will naturally gravitate to the style that you enjoy! The options and variations are endless and can get a wee bit overwhelming too! Check in with me before you start to ensure your ideas will work, what order you might do things, how you could achieve the look you are seeking and any other technical data required! Step Two – Making Clay is thixotropic. This means that as you work with it, the clay first gets sloppier and wetter, before is begins to dry in the atmosphere. For most things, you simply can’t do all parts of the project at once. An example of work order might look like: Get last weeks work out from the shelves Prepare clay for today’s work – roll your clay, prepare balls for throwing, make the first stage of a pinch pot) Clean up last week’s work and put it on the shelf for bisque firing Check that you have any glazing to do – and do enough of it that you will have time to finish your main project Do the next step of your next project – there might be a further step that can’t be complete immediately, in that case, wrap your work well and put onto the shelves. Letting your work rest for a while can really help keep your work clean and professional looking. Many things require bagging under plastic to keep it ready for work the next week – put your name on the outside of the bag so you can find your work easily. We have stickers and markers. Consider how you want to decorate your work – coloured slip can be applied at a fairly wet stage (remembering that it will make your work even wetter!). Trying to apply slip to dry clay won’t work! If you want to do sgraffito – you will need to keep the work leather hard (a state of dryness where you can still work the clay with a little effort and a little water and care). Step Three – Drying Most of the time your work can go into the rack uncovered to let it dry out for the following week. If you want to continue forming or shaping you will need to double bag your work – put your work on a suitable sized bat and put the bat in a bag so the base of the bag is under the bat, then put another bag over the top of the work and tuck the top of the bag under the bat. If you want to trim (or turn) your thrown work the following week, it should also be double bagged. If your work is large, delicate, or of uneven thicknesses, you should lightly cover your work for drying. When considering the drying process, bare in mind the weather, humidity and wind! The hotter and dryer, the faster things dry and work can dry unevenly in the shelves – this can lead to cracking – another time to lightly cover your work for drying. Step Four – Trimming and Cleaning Up Your work is dry! It is called greenware now and it is at it’s most fragile! Handle everything with two hands. I often refer to soft hands – keep everything gentle and with your fingers spread as much as possible. Try to not pick up things like plates too much, and always with both hands! Before your work can be bisque fired it should be “cleaned up”. You work won’t go into the kiln if it has sharp edges – when glazed, sharp edges turn into razor blades! Use a piece of fly wire to rub the work all over – this will scratch a little so be light handed. Use a knife or metal kidney to scrape any areas that require a bit more dynamic treatment than the fly wire offers! Finally, a very light wipe over with a slightly damp sponge can help soften and soothe all of your edges and dags! Trimming thrown work: If you are planning to trim (or turn) your thrown work (and you should be), make sure you bag it well – your work should be leather hard to almost dry for easiest trimming. Use this step to finish the work completely – use a metal kidney to polish the surface, or a slightly damp sponge to give a freshly thrown look. Wipe the sponge around the rim after trimming, and check the inside of the pot for dags! Trimming slip cast work: Usually I will trim the rims of your work on the wheel the following day to make that stage easier, however you will still need to check your work for lumps and bumps. Last but not least – check that your name is still clearly on the bottom of your work. Step Five – Bisque Firing When the work is completely dry it can go into the bisque kiln. The bisque kiln is fired to 1000°C. This process burns off the water in the clay as well as some of the chemically bound water. The structure of the clay is not altered that much at this temperature. Inside the bisque kiln, the work is stacked a little, small bowl inside a larger bowl and onto a heavy plate. Smaller items like decorations or drink coasters might get stacked several high. Consideration is paid to the weight of the stack and shape of the work. A bisque kiln can fire about one and a half times the amount of work that the glaze kiln can fire. The firing takes about 10 hours to complete the cycle and about two days to cool down. Once it has been emptied the work is placed in the glaze room ready for you to decorate! Step Six – Glazing Decorating your work with colour can be a lot of fun – and time consuming! There are three main options for surface treatment at this stage: Oxide Washes Underglazes Glazes Washes and underglazes do not “glaze” the work – It will still need a layer of glaze to fully seal the clay (washes don’t need glaze on surfaces not designed for food or liquid as they can gloss up a little on their own). Underglazes are stable colourants that turn out pretty much how they look in the jar. They can be mixed with each other to form other colours and can be used like water colours to paint onto your work. Mostly they should have a clear glaze on top to seal them. Oxides are a different species – the pink oxide (cobalt) wash turns out bright blue for instance. They don’t always need a glaze on top, and some glazes can change the colour of the wash! The glazes need no other “glaze” on top! Be careful of unknown glaze interactions – you can put any combination of glaze in a bowl or on a plate, but only a single glaze on the outside of any vertical surface! Glazes are a chemical reaction under heat. We don’t know the exact chemicals in the Mayco glazes we use. I can guess by the way they interact with each other, however, on the whole, you need to test every idea you have, and not run the test on a vertical surface! Simply put, glaze is a layer of glass like substance that bonds with the clay underneath. Clay is made of silica, alumina and water. Glaze is made of mostly silica. Silica has a melting point of 1700°C and we fire to 1240°C. The silica requires a “flux” to help it melt at the lower temperature. Fluxes can be all sorts of chemicals – a common one is calcium – calcium has a melting point of 2500°C, however, together they both melt at a much lower temperature! Colourants are metal oxides like cobalt (blue), chrome (green through black), copper (green, blue, even red!), manganese (black, purple and pink) iron (red brown), etc. Different chemicals in the glaze can have dramatic effects. for example, barium carbonate (which we don’t use) turns manganese bright pink! Other elements can turn manganese dioxide brown, blue, purple and reddish brown. Manganese dioxide is a flux in and of itself as well. So, glazes that get their black and purple colours, often interact with other glazes and RUN! Our mirror black is a good example – it mixes really well with many glazes because it fluxes them – causes them to melt faster. It will also bring out many beautiful colours in the glazes because it’s black colouring most definitely comes from manganese dioxide! Glaze chemistry is a whole subject on it’s own! We use commercial Mayco glazes on purpose – for their huge range of colour possibilities, stability, cool interactions, artistic freedom with the ability to easily brush the glazes on and ease of use. We currently have almost 50 glazes on hand! A major project is to test the interactions of all glazes with each other. That is 2,500 test tiles!!!! I’m going to make the wall behind the wheels the feature wall of pretty colours! Step Seven – Glaze (Gloss or sometimes called “Glost”) Firing Most of the time this is the final stage of making your creation (but not always!) The glaze kiln goes to 1240°C. This is called cone 6, or midrange. It is the low end of stoneware temperatures. Stoneware clays and glazes are typically fired at cone 8 – 10, that is 1260 – 1290°C. The energy requirement to go from 1240°C to 1280°C is almost a 30% more! Our clay is formulated to vitrify (mature, turn “glass-like”) at 1240°, as are our glazes. A glaze kiln take around 12 hours to reach temperature and two to three days to cool down. Sometimes a third firing process is required – this is for decoration that is added to work after the glaze firing. For example – adding precious metals and lustres. this firing temperature is usually around 600 – 800°C depending upon the techniques being used. There are many students interested in gold and silver trims – we will be doing this third type of firing soon! After firing your work will be in the student finished work shelves. Remember to pay for it before you head out the door! There is a small extra charge for using porcelain clay (it’s more than twice the price of regular clay), and for any third firing process! Once your work has been fired it can not turn back into clay for millennia – so don’t fire it if you don’t like it! Put it in the bucket for recycling. https://firebirdstudios.com.au/the-process-of-making-pottery/Ceramics have evolved over thousands of years.Earthenware dessert plate, cream colour. Made by Alfred Meakin, England. Backstamped ‘Alfred Meakin England’. flagstaff hill, warrnambool, shipwrecked-coast, flagstaff-hill, flagstaff-hill-maritime-museum, maritime-museum, shipwreck-coast, flagstaff-hill-maritime-village, alfred meakin, ceramics, earthenware, kitchenware -
 Flagstaff Hill Maritime Museum and Village
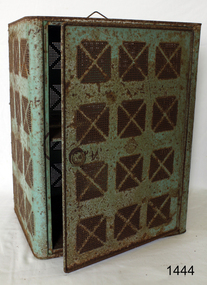
Domestic object - Food Safe, Willow Ware Pty Ltd, 1920s -1950
Willow started business in 1887 as a metal working company based in Melbourne Australia, making tinned biscuit and tea canisters. The outbreak of the First World War saw their manufacturing change to making armaments and essential packaging for the war effort. In the early 1920’s, the Willow brand was established. Making tin plated canisters and baking pans with the well-known Willow pattern, imprinted on them. Some other items in production at this time include billies, boilers, basins and Coolgardie safes. In the late 1950’s, the company ventured into plastics production. Stepping away from its very successful tin plating industry of more than 50 years. In 1965, the company name changed to Willow Ware Pty Ltd, to be more closely linked to its Willow brand. Willow Ware is still in business today. A food safe known as a “Coolgardie” meat storage made by an emerging Australian company no longer in bushiness. This item gives a snapshot into early Australian manufacturing specifically aimed at the Australian market.Safe metal kitchen food safe with 2 shelves, a hinged door and latch and a small swivel wire handle at the top. Painted light green, rusting.Willowwarrnambool, shipwrecked-coast, flagstaff-hill, flagstaff-hill-maritime-museum, maritime-museum, shipwreck-coast, flagstaff-hill-maritime-village, safe, food safe, meat safe, coolgardie safe, domestic object, kitchen object, willow ware, food preservation, kitchen safe -
 Flagstaff Hill Maritime Museum and Village
Freezer, circa 1930's
This ice cream freezer, manufactured in South Australia in the 1930's, was advertised to "keep the contents of the cream compartment frozen for many hours". It was promoted for use at picnics to keep salads cool. Its design is very similar to other freezers of The Frigid name which were made in 1939; those freezers were all one colour whereas this one is blue around the top and bottom of the barrel and cream in the centre with blue/green lettering. The process of making ice cream was to pack the outer chamber full with a combination of 3 parts ice cubes of about 1 inch (2.cm) to one part coarse salt, then pour into the chamber about 1 cup of cold water. After this, the ingredients for ice cream or sorbet were poured into the inner chamber, then attach the lid and turn The Frigid freezer upside down for about 40 minutes or until the right consistency is reached. Advice as given to open the freezer every 20 minutes and stir around the contents that were frozen against the sides of the inner chamber. The ingredients for the ice cream could include cream, sugar, vanilla and eggs. The label on the box of The Frigid shows the address of A Simpson and Son to be at Pirie Street, Adelaide. This address was used as early as 1876 and later catalogues, 1931 - 1960 still show this address. Alfred Simpson and his family emigrated from England, arriving in South Australia in 1849. He had already completed his apprenticeship as a tinplate worker but he tried various other occupations, including trying out the gold mines in Victoria, before he established himself as a tinsmith in 1853. His products included many agricultural items. His son, Alfred Muller Simpson, joined the business when he turned 21. In the 1860 Simpson's products included 'explosion proof' safes. In the late 1880's A Simpson and Son manufactured munitions and mines for the war. At the time of Alfred's death in 1891, A Simpson and Son had the largest metal manufacturing plant in Australia. From 1898 the company's reputation grew from the process of enamel plating with porcelain. During the First World War, Simpsons returned to the manufacture of munitions. Alfred M. Simpson's sons (Alfred Allen, known as Allen, and Fredrick Neighbour) joined the company when they finished their schooling. Allen was also associated with the Royal Geological Society over many years and when the CT Madigan surveyed Central Australia in 1929, the Simpson Desert was named in his honour. Cape Simpson in Antarctica is also named after him due to his assistance to Douglas Mawson. A new factory was opened at Dudley Park in the 1940s and the company began the manufacture of whitegoods. In 1963 A. Simpson and Son merged with Pope Industries to form Simpson Pope Holdings. Alfred Simpson became chairman of the board of Simpson Pope Holdings. The Simpson brand, now owned by Electrolux, continues to produce a variety of household appliances. (Reference: State Library of South Australia) A Simpson and Son was an early colonial business that has lasted well into the 20th century and the name Simpson is still associated with whitegoods. Freezer, 2 quart (1.8 litre) capacity, made by A Simpson and Son Ltd, marked "The Frigid". Cylinder shaped, constructed from enamelled sheet metal, has two catches one on the base and one on top. Inner cylinder for holding contents for freezing. Slightly rusted. Freezer is inside original cardboard box with yellow label showing manufacturer details. Circa 1930'sOutside of freezer is printed in blue"The Frigid". Box includes "THE "FRIGID" FREEZER" and branded "S & S" inside a circle.flagstaff hill, warrnambool, shipwrecked-coast, flagstaff-hill, flagstaff-hill-maritime-museum, maritime-museum, shipwreck-coast, flagstaff-hill-maritime-village, a. simpson & son limited, manufacturer, foundry, freezer, 2 quart freezer, portable freezer, kitchen appliance, the frigid, ice cream freezer, ice cream maker 1930's -
 Flagstaff Hill Maritime Museum and Village
Domestic object - Jug
The Process of Making Pottery Decorating, Firing, Glazing, Making, Technical There is a rhythm and flow to clay. It can’t be done all at once! Even the making process! It can take weeks to get everything done, especially if you can only work on your pottery once a week! Even though we have three hour classes, it’s often just not enough time! Here is an overview of some of the processes so you have a bit more grasp on some of the technical stuff! Step One – Design There are SO many ideas out there for making stuff in clay! From delicate porcelain jewellery, through to heavy sculptural work and everything in between. Deciding your direction is sometimes not that easy – when you first start, try everything, you will naturally gravitate to the style that you enjoy! The options and variations are endless and can get a wee bit overwhelming too! Check in with me before you start to ensure your ideas will work, what order you might do things, how you could achieve the look you are seeking and any other technical data required! Step Two – Making Clay is thixotropic. This means that as you work with it, the clay first gets sloppier and wetter, before is begins to dry in the atmosphere. For most things, you simply can’t do all parts of the project at once. An example of work order might look like: Get last weeks work out from the shelves Prepare clay for today’s work – roll your clay, prepare balls for throwing, make the first stage of a pinch pot) Clean up last week’s work and put it on the shelf for bisque firing Check that you have any glazing to do – and do enough of it that you will have time to finish your main project Do the next step of your next project – there might be a further step that can’t be complete immediately, in that case, wrap your work well and put onto the shelves. Letting your work rest for a while can really help keep your work clean and professional looking. Many things require bagging under plastic to keep it ready for work the next week – put your name on the outside of the bag so you can find your work easily. We have stickers and markers. Consider how you want to decorate your work – coloured slip can be applied at a fairly wet stage (remembering that it will make your work even wetter!). Trying to apply slip to dry clay won’t work! If you want to do sgraffito – you will need to keep the work leather hard (a state of dryness where you can still work the clay with a little effort and a little water and care). Step Three – Drying Most of the time your work can go into the rack uncovered to let it dry out for the following week. If you want to continue forming or shaping you will need to double bag your work – put your work on a suitable sized bat and put the bat in a bag so the base of the bag is under the bat, then put another bag over the top of the work and tuck the top of the bag under the bat. If you want to trim (or turn) your thrown work the following week, it should also be double bagged. If your work is large, delicate, or of uneven thicknesses, you should lightly cover your work for drying. When considering the drying process, bare in mind the weather, humidity and wind! The hotter and dryer, the faster things dry and work can dry unevenly in the shelves – this can lead to cracking – another time to lightly cover your work for drying. Step Four – Trimming and Cleaning Up Your work is dry! It is called greenware now and it is at it’s most fragile! Handle everything with two hands. I often refer to soft hands – keep everything gentle and with your fingers spread as much as possible. Try to not pick up things like plates too much, and always with both hands! Before your work can be bisque fired it should be “cleaned up”. You work won’t go into the kiln if it has sharp edges – when glazed, sharp edges turn into razor blades! Use a piece of fly wire to rub the work all over – this will scratch a little so be light handed. Use a knife or metal kidney to scrape any areas that require a bit more dynamic treatment than the fly wire offers! Finally, a very light wipe over with a slightly damp sponge can help soften and soothe all of your edges and dags! Trimming thrown work: If you are planning to trim (or turn) your thrown work (and you should be), make sure you bag it well – your work should be leather hard to almost dry for easiest trimming. Use this step to finish the work completely – use a metal kidney to polish the surface, or a slightly damp sponge to give a freshly thrown look. Wipe the sponge around the rim after trimming, and check the inside of the pot for dags! Trimming slip cast work: Usually I will trim the rims of your work on the wheel the following day to make that stage easier, however you will still need to check your work for lumps and bumps. Last but not least – check that your name is still clearly on the bottom of your work. Step Five – Bisque Firing When the work is completely dry it can go into the bisque kiln. The bisque kiln is fired to 1000°C. This process burns off the water in the clay as well as some of the chemically bound water. The structure of the clay is not altered that much at this temperature. Inside the bisque kiln, the work is stacked a little, small bowl inside a larger bowl and onto a heavy plate. Smaller items like decorations or drink coasters might get stacked several high. Consideration is paid to the weight of the stack and shape of the work. A bisque kiln can fire about one and a half times the amount of work that the glaze kiln can fire. The firing takes about 10 hours to complete the cycle and about two days to cool down. Once it has been emptied the work is placed in the glaze room ready for you to decorate! Step Six – Glazing Decorating your work with colour can be a lot of fun – and time consuming! There are three main options for surface treatment at this stage: Oxide Washes Underglazes Glazes Washes and underglazes do not “glaze” the work – It will still need a layer of glaze to fully seal the clay (washes don’t need glaze on surfaces not designed for food or liquid as they can gloss up a little on their own). Underglazes are stable colourants that turn out pretty much how they look in the jar. They can be mixed with each other to form other colours and can be used like water colours to paint onto your work. Mostly they should have a clear glaze on top to seal them. Oxides are a different species – the pink oxide (cobalt) wash turns out bright blue for instance. They don’t always need a glaze on top, and some glazes can change the colour of the wash! The glazes need no other “glaze” on top! Be careful of unknown glaze interactions – you can put any combination of glaze in a bowl or on a plate, but only a single glaze on the outside of any vertical surface! Glazes are a chemical reaction under heat. We don’t know the exact chemicals in the Mayco glazes we use. I can guess by the way they interact with each other, however, on the whole, you need to test every idea you have, and not run the test on a vertical surface! Simply put, glaze is a layer of glass like substance that bonds with the clay underneath. Clay is made of silica, alumina and water. Glaze is made of mostly silica. Silica has a melting point of 1700°C and we fire to 1240°C. The silica requires a “flux” to help it melt at the lower temperature. Fluxes can be all sorts of chemicals – a common one is calcium – calcium has a melting point of 2500°C, however, together they both melt at a much lower temperature! Colourants are metal oxides like cobalt (blue), chrome (green through black), copper (green, blue, even red!), manganese (black, purple and pink) iron (red brown), etc. Different chemicals in the glaze can have dramatic effects. for example, barium carbonate (which we don’t use) turns manganese bright pink! Other elements can turn manganese dioxide brown, blue, purple and reddish brown. Manganese dioxide is a flux in and of itself as well. So, glazes that get their black and purple colours, often interact with other glazes and RUN! Our mirror black is a good example – it mixes really well with many glazes because it fluxes them – causes them to melt faster. It will also bring out many beautiful colours in the glazes because it’s black colouring most definitely comes from manganese dioxide! Glaze chemistry is a whole subject on it’s own! We use commercial Mayco glazes on purpose – for their huge range of colour possibilities, stability, cool interactions, artistic freedom with the ability to easily brush the glazes on and ease of use. We currently have almost 50 glazes on hand! A major project is to test the interactions of all glazes with each other. That is 2,500 test tiles!!!! I’m going to make the wall behind the wheels the feature wall of pretty colours! Step Seven – Glaze (Gloss or sometimes called “Glost”) Firing Most of the time this is the final stage of making your creation (but not always!) The glaze kiln goes to 1240°C. This is called cone 6, or midrange. It is the low end of stoneware temperatures. Stoneware clays and glazes are typically fired at cone 8 – 10, that is 1260 – 1290°C. The energy requirement to go from 1240°C to 1280°C is almost a 30% more! Our clay is formulated to vitrify (mature, turn “glass-like”) at 1240°, as are our glazes. A glaze kiln take around 12 hours to reach temperature and two to three days to cool down. Sometimes a third firing process is required – this is for decoration that is added to work after the glaze firing. For example – adding precious metals and lustres. this firing temperature is usually around 600 – 800°C depending upon the techniques being used. There are many students interested in gold and silver trims – we will be doing this third type of firing soon! After firing your work will be in the student finished work shelves. Remember to pay for it before you head out the door! There is a small extra charge for using porcelain clay (it’s more than twice the price of regular clay), and for any third firing process! Once your work has been fired it can not turn back into clay for millennia – so don’t fire it if you don’t like it! Put it in the bucket for recycling. https://firebirdstudios.com.au/the-process-of-making-pottery/The form of the jug has been in use for many centuries.Stoneware jug. Two tone brown glaze with pierced lip behind spout. Spout chipped.None.flagstaff hill, warrnambool, shipwrecked-coast, flagstaff-hill, flagstaff-hill-maritime-museum, maritime-museum, shipwreck-coast, flagstaff-hill-maritime-village, jug, ceramic jug -
 Flagstaff Hill Maritime Museum and Village
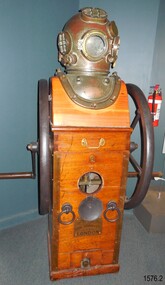
Equipment - Diving compressor and helmet, 1944
Siebe Gorman & Company Ltd was a British company that developed diving equipment and breathing equipment and worked on commercial diving and marine salvage projects. The company advertised itself as 'Submarine Engineers'. It was founded by Augustus Siebe, a German-born British engineer chiefly known for his contributions to diving equipment. Siebe Gorman traded as an engineering firm for over 180 years from 1819 to 1999. The early success of the business was due to its founder, the Prussian immigrant Christian 'Augustus' Siebe (1788-1872). For business reasons, he applied for and was granted British citizenship in 1856. He was a gifted engineer who was able to translate theoretical problems into practical, working products. During the industrial Victorian period, the business traded as 'A. Siebe' at 145 High Street Holborn London, but in 1828 new premises were acquired at 5 Denmark Street, Soho. The family firm produced a wide range of manufactured goods including paper-making machinery, measuring machinery, water pumps, refrigeration equipment, and diving apparatus. Augustus Siebe specialised in submarine engineering early on and the company gained a reputation for the manufacture of safe, reliable diving apparatus. Augustus Siebe is best remembered for the development and manufacture of the ‘closed’ Diving Dress based on the ideas of Charles and John Deane, George Edwards, and Charles Pasley. Apart from some small modifications to valves and diver communications, the basic 12 bolt ‘closed’ diving dress remained relatively unchanged after the 1870s. Later company successes were also based on innovation, with new products that could be successfully developed and manufactured to high standards. This was largely attributed to the inventive nature, foresight, engineering, and entrepreneurial skills of Robert Henry Davis (1870-1965). In 1882, RH Davis joined the company of 'Siebe & Gorman' as a young 11-year-old office boy and he was to remain with the company until he died in 1965. Augustus Siebe retired in 1869 and handed over the company to a new partnership of Henry H. Siebe (1830-1885) and William A. O'Gorman (1834-1904). The new firm traded as 'Siebe & Gorman' (1870-1879) from premises in and around Mason Street, Westminster Bridge Road, Lambeth, London. The two partners soon recognised the potential of R.H. Davis and in 1894, aged 24, he became General Manager of Siebe & Gorman. Davis increasingly ran the company until the surviving partner (W.A. Gorman) died in 1904. The firm was disposed of to the Vickers (armaments) family and a new company 'Siebe Gorman & Co. Ltd.' (1905-1998) was formed. Under the chairmanship of Albert Vickers, R.H. Davis was kept on as Managing Director, and the company forged ahead. However, after WW1, the Great Depression caused manufacturing output and share prices to slump. In 1924 Robert Davis made a deal with the Vickers Board and acquired control of the company through majority shares. Under his leadership, the Siebe Gorman Company flourished and within time, four of his sons also joined the firm. The company gained a worldwide reputation for the manufacture of diving apparatus, decompression and observation chambers, and safety breathing apparatus of all types for use on the land, in the air, and under the sea (including mine rescue, tunneling, aircraft, diving, submarine escape and in other hazardous environments). Close research and development links with the MOD (especially the Admiralty), also provided a lucrative outlet for the company products. In 1932, Robert Davis was knighted by King George V, principally for his invention of the ‘Davis Submerged Escape Apparatus’ (D.S.E.A.). Siebe Gorman essentially remained a family firm from the beginning (under A.Siebe) until it became a public company for the first time in 1952. However, following WW2, British manufacturing stagnated through stifled investment and post-war austerity, and there was little innovation. Siebe Gorman's fortunes began to decline as an aging Sir Robert Davis failed to invest, or change the company's business and management practices. In 1959, Siebe Gorman was acquired by the “Fairy Group” and the ailing Sir Robert was made Life President. Consequently, nothing changed and the slow decline continued until Sir Robert's death in March 1965. Around 1960, Siebe Gorman acquired the diving apparatus manufacturer C E Heinke, and for a brief period, it manufactured some diving equipment under the combined name of Siebe Heinke. Around 1964, Mr E. 'Barry' Stephens was appointed as the new Managing Director to modernise Siebe Gorman. Changes were made, including a move to a new factory in Wales in 1975. The new company concentrated on fire-fighting breathing apparatus and escape equipment, and the move coincided with the loss of many of the older, traditional craft skills. Between 1985 and 1998, Siebe expanded through acquisitions, and several other companies were acquired. The Siebe Gorman (diving apparatus) company has therefore traded as A. Siebe (1819-1870); Siebe & Gorman (1870-1879); Siebe Gorman & Co (1880-1904); Siebe Gorman & Co. Ltd (1905-1998). (For information regards the diving helmet & Frank King see Notes Section at the end of this document)The items are very significant as a snapshot into marine history and the development of diving equipment generally especially that used for salvage operations before and during WW2. The company that made the equipment was a leading inventor,developer and innovator of marine equipment with its early helmets and other items eagerly sought after today for collections around the world. The items in the Flagstaff Hill collection give us an insight as to how divers operated and the dangers they faced doing a very necessary and dangerous job. Frank Kings' diving helmet and compressor (communication pipe stored separately). Compressor is hand cranked. US Navy diving helmet, Mark V. Two maker's plates attached. Made in 1944.On rear "WATER SUPPLY" On front 'PATENT" " Logo: Images (Lion, Crown, Horse, Shield within an oval) "SIEBE, GORMAN & Co. Ltd. SUBMARINE ENGINEERS, LONDON.flagstaff hill, warrnambool, maritime museum, great ocean road, us navy diving helmet, commonwealth government salvage, diving helmet, marine salvage, frank king, diver, siebe. gorman & co ltd, submarine equipment, diving equipment, communication under water, hand cranked, diving compressor -
 Flagstaff Hill Maritime Museum and Village
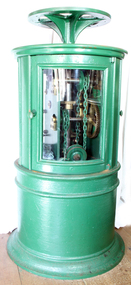
Machine - Dioptric Apparatus, mid 19th century
Before the introduction of electricity, lighthouses had a clockwork mechanism that caused the lens to rotate with a light source inside that was either powered by Kerosene or Colza oil. The mechanism consisted of a large weight attached by a cable through the centre of the lighthouse to the top where the cable wrapped around a barrel, drum or wheels that controlled the speed of the lights rotation by a clockwork mechanism. The keeper would crank the clockwork mechanism, which would lift the weight ready for the next cycle similar to an old grandfather clock mechanism. Once the weight lifted to its apex at the bottom of the first landing, the keeper would let it fall, which would pull on the cable, which would, in turn, operate a series of gears activating the rotation of the Fresnel optical lens, which would then rotate to create the lighthouse’s unique light speed of rotation characteristic. Creating a specific characteristic required a way to regulate the speed of the rotation, and was important as sailors could identify a particular light by its speed and time between flashes. The weight had to fall at a certain rate to create the proper rotation speed of the lens and a regulator within the mechanism accomplished this. History: From 1851, Chance Brothers became a major lighthouse engineering company, producing optical components, machinery, and other equipment for lighthouses around the world. James Timmins Chance pioneered placing lighthouse lamps inside a cage surrounded by Fresnel lenses to increase the available light output these cages, are known as optics and they revolutionised lighthouse design. Another important innovation from Chance Brothers was the introduction of rotating optics, allowing adjacent lighthouses to be distinguished from each other by the number of times per revolution the light flashes. The noted English physicist and engineer, John Hopkins invented this system while employed at Chance Brothers. Chance Brothers and Company was a glass works and originally based in Spon Lane, Smethwick, West Midlands England. The company became a leading glass manufacturer and a pioneer of British glass making technology. The Chance family originated in Bromsgrove as farmers and craftsmen before setting up a business in Smethwick near Birmingham in 1824. They took advantage of the skilled workers, canals and many other industrial advances taking place in the West Midlands at the time. Robert Lucas Chance (1782–1865), known as 'Lucas', bought the British Crown Glass Company's works in Spon Lane in 1824. The company specialised in making crown window glass, the company ran into difficulty and its survival was guaranteed in 1832 by investment from Chance's brother, William (1788 – 1856). William owned an iron factoring business in Great Charles Street, Birmingham. After a previous partnership that Lucas had dissolved in 1836, Lucas and William Chance became partners in the business which was renamed, Chance Brothers and Company. Chance Brothers invented many innovative processes and became known as the greatest glass manufacturer in Britain. In 1848 under the supervision of Georges Bontemps, a French glass maker from Choosy-le-Roi, a new plant was set up to manufacture crown and flint glass for lighthouse optics, telescopes and cameras. Bontemps agreed to share his processes that up to then had been secret with the Chance Brothers and stayed in England to collaborate with them for six years. In 1900 a baronetcy was created for James Timmins Chance (1814–1902), a grandson of William Chance, who had started the family business in 1771 with his brother Robert. Roberts grandson, James became head of Chance Brothers until his retirement in 1889 when the company became a public company and its name changed to Chance Brothers & Co. Ltd. Additional information: Lighthouses are equipped with unique light characteristic or flashing pattern that sailors can use to identify specific lighthouses during the night. Lighthouses can achieve distinctive light characteristics in a few different ways. A lighthouse can flash, which is when brief periods of light interrupt longer moments of darkness. The light can occult, which is when brief periods of darkness interrupt longer moments of light. The light can be fixed, which is when the light never goes dark. A lighthouse can use a combination of flashing, oscillating, or being fixed in a variety of combinations and intervals to create individual light characteristics. It is a common misconception that a lighthouse's light source changes the intensity to create a light characteristic. The light source remains constant and the rotating Fresnel lens creates the various changes in appearance. Some Fresnel lenses have "bulls-eye" panels create beams of light that, when rotated between the light and the observer, make the light appear to flash. Conversely, some lenses have metal panels that, when rotated between the light and the observer, make the light appear to go dark. This Dioptric clockwork apparatus used to turn a lighthouse optical lens is very significant as it is integral to a lighthouses operation, we can also look at the social aspect of lighthouses as being traditionally rich with symbolism and conceptual meanings. Lighthouses illustrate social concepts such as danger, risk, adversity, challenge and vigilance but they also offers guidance, salvation and safety. The glowing lamp reminds sailors that security and home are well within reach, they also symbolize the way forward and help in navigating our way through rough waters not just on the oceans of the world but in our personal lives be it financial, personal, business or spiritual in nature. Nothing else speaks of safety and security in the face of adversity and challenge quite the way a lighthouse does. Revolving dioptric clockwork apparatus used to turn a Fresnel optical lighthouse lens. A cylindrical cast metal pillar and cabinet painted green with 3 glass doors enclosing the top section. Inside the pillar/cabinet is a large clockwork mechanism used to turn and regulate a lighthouse light by means of weights and a chain attached to same. One door has the name "Adams Mare" in metallic dots similar to "Braille" to the inside edge of door frame.shipwrecked-coast, flagstaff-hill, flagstaff-hill-maritime-museum, flagstaff hill, maritime-museum, shipwreck-coast, warrnambool, flagstaff-hill-maritime-village, revolving dioptric mechanism, dioptric mechanism for lighthouse, lighthouse clockwork timing mechanism, acetylene lighthouse light mechanism, 19th century lighthouse mechanism, kerosene light, fresnel lenses, colza oil, chance brothers -
 Flagstaff Hill Maritime Museum and Village
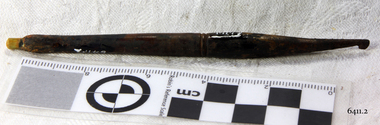
Functional object - Crochet Hook, Mid 19th Century
Crochet came from the Old French word crochet, meaning ‘small hook.’ This word comes from Croche. Croche comes from the Germanic word croc. Both mean hook and crochetage, which means a single stitch used to join separate pieces of lace together. People used this term in making French lace in the 1600s and the word crochet describes the hook and the craft. Evidence shows the starting point was the mid-1800s but as early as the late 16th and early 17th century, crocheted braiding was used in clothing and other products. Like on a man’s cape at the Victoria and Albert Museum. Crochet evolved in the early 1700s when stitching material on a tambourine reached Europe after going through India, Persia, North America, Turkey, North Africa and other places around the world. People removed the background fabric used for tambouring. The French named the new technique “crochet in the air.” In the early 1800s, shepherd’s knitting came about, along with the shepherd’s hook. It’s thicker than a modern crochet hook but still with a hooked end. By the mid-1800s, it became known as crochet or slip stitch crochet. In the 60s, the granny square and crocheted home ware appeared and became more popular.A significant domestic item used in crochet or craft work and recovered from the wreck of the Schomberg in the 1970s. For more information regard the wrecking of the Schomberg see note sect this document. The Schomberg has historical significance as one of the first luxurious ships built to bring emigrants to Australia. The collection of recovered artefacts from the Schomberg wreck and held at Flagstaff Hill Museum are significant because of their potential to interpret the story of the Schomberg and its passengers.Crochet hook made from Bovine Bone. It has two sections that screw apart. Recovered from the wreck of the Schomberg. Nonewarrnambool, shipwrecked-coast, flagstaff-hill, flagstaff-hill-maritime-museum, maritime-museum, shipwreck-coast, flagstaff-hill-maritime-village, schomberg, shipwrecked-artefact, clipper ship, black ball line, 1855 shipwreck, aberdeen clipper ship, captain forbes, peterborough shipwreck, ss queen, crochet hook, crocheterage, craft -
 Federation University Historical Collection
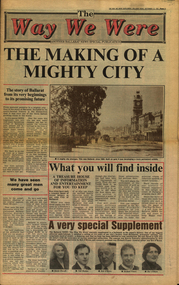
Newspaper - Ballarat News Special Publication, The Way We Were. The Making of a Mighty City, 1991, 12/09/1991
A Ballarat News Special Publication.36 page Special Ballarat News Publicationsupplement, mighty, ballarat, fiskin, aborigines, eureka stockade, james esmond, bank of australasia, ballarat fire brigade, penyweight hotel, academy of music, urquhart street primary school, star of the east mine, ballarat observatory, ballarat district hospital nurse training school, bank of victoria, shearers union, john valves, ballarat school of mines, ambulance, f.w. barnes, phoenix foundry, neil grant, naval cadets, australian timken, robert baird, ufs dispensaries, arch of victory, coliseum, messer and opie, wrld war two, wags school, eureka valves, olympic games at ballarat, bendix, eureka concrete, btv channel 6, sovereign hill, mars confectionary, ballarat bypass, south street, south street competitions, wireless air gunners school, sturt street -
 Federation University Historical Collection
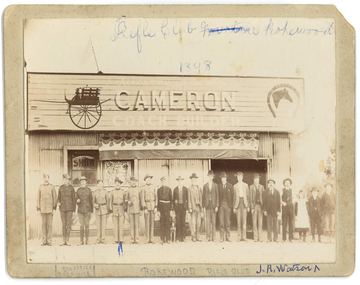
Photograph, Madeley Photo, Rokewood Rifle Club, 1898, 1898
In 1901 Cameron was captain of the Rokewood Rifle Club. John Cameron was a Rokewood blacksmith in 1902. John (Jack) Richard Watson was the son of Thomas Watson (10/11/1838 - 27/04/1920) and Emma Eliza Jane Phillips (25/05/1844 - 12/10/1925) and was born at Yendon on 16/12/1876 and died 11/10/1973 aged 96 at the Wimmera Base Hospital in Horsham while residing in Murtoa. Still a teenager Thomas reached Melbourne in the 1850's and found work helping to build the Spencer Street Bridge over the Yarra Yarra, as it was known then, before making his way to the Ballarat Goldfields. After being tricked out of a claim he sought work with the Victorian Railways, and later acquired a farm at Yendon. Emma Phillips was born in Geelong and had moved with her mother to Ballarat. Emma was a member of the Ballarat Philharmonic Orchestra and sang in the choir of St Pauls Church in East Ballarat, where they were married. Jack worked in the gold mining industry - firstly as a braceman at the New Kohinoor Mine at Sebastapol and then to a mine at Rokewood, both times following his older brother Frederick George. He later worked in 15 different mines before changing occupations. He was employed as an engine driver for the Murtoa Waterworks Trust at the Murtoa Power Station when he lost his lower left arm when it was caught in an engine belt in 1929. Jack married Edith Emma Yung (01/07/1887 - 05/10/1988 ) who was born at Allendale and died aged 101 at Wendouree after livivng most of her married life at Murtoa. They had five children all born in Murtoa: Richard Henry (Harry); Edith 'Alice'; Grace; Ernest Alfred (Alf) and Jonn Grenville (Gren). They were married at Yendon. Sepia photo of eighteen men and one girl. Eight are in uniform, and two are identified as Boer War soldiers. They all stand in front of Cameron Coach Builders showroom and workshop. The person fifth from the left is J.R. Watson.Front top Rifle Club (Murtoa - crossed out) Rokewod 1898; Lower LHS South Africa Boer War; C - Rokewood Rifle Club; Loer RHS J.R.Watson. Sign on Building: Agricultural & Mining & Smith above Cameron Coach Builder. Verso: Madeley Photo Corindhap plus a signature.corindhap, rokewood, rokewood rifle club, j.r. watson, cameron coach builder, john cameron, emma eliza jane phillips, thomas watson, john richard watson, edith emma watson -
 Glenelg Shire Council Cultural Collection
Photograph - Photograph - Steele Hall, 1969
Raymond Steele Hall is a former Australian politician. He was the premier of South Australia from 1968 until 1970.Back: Blue photographers stamp, 69/1655 in pencil "Steele Hall speaking Tarragal delivery, Adelaide" - blue birosteele hall, politician, premier south australia, politics, portland -
Glenelg Shire Council Cultural Collection
Photograph - Photograph - Visitors to the Port, n.d
Port of Portland Authority ArchivesBack: Maiden Voyage Presentation Ship's Captain with Laxkie - AWB blue biroport of portland archives -
Glenelg Shire Council Cultural Collection
Photograph - Photograph - Man making speech, n.d
Port of Portland Authority ArchivesBack: Blue photographers stamp 69/1663 in pencil Tarragal delivery Adelaide blue biroport of portland archives -
Glenelg Shire Council Cultural Collection
Photograph - Photograph - Theo Jarrett, n.d
Port of Portland Authority ArchivesBack: Adelaide Mr Jarrett - pencil Blue photographers stamp 69/'1647-pencilport of portland archives, theo jarrett, tug, tarragal, presentation -
 Glenelg Shire Council Cultural Collection
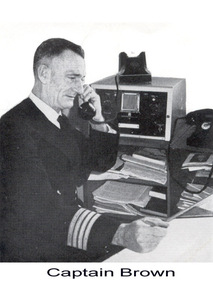
Photograph - Photograph - Captain Brown, Harbour Master, n.d
Port of Portland Authority archivesFront: (no inscriptions) Back: Capt Bown HM (blue pen, lower right)port of portland archives, captain brown -
Glenelg Shire Council Cultural Collection
Photograph - Photograph - making concrete slabs, Portland Harbour, n.d
Port of Portland Authority Archieves -
Glenelg Shire Council Cultural Collection
Photograph, n.d
Port of Portland Authority Archivesport of portland archives, event, speech -
Glenelg Shire Council Cultural Collection
Photograph - Photograph - Main Breakwater construction, Portland, n.d
Port of Portland Authority Archivesport of portland archives, main breakwater, construction, portland harbour, harbour development, battery point -
Glenelg Shire Council Cultural Collection
Photograph - Photograph - Main Breakwater construction, Portland, n.d
Port of Portland Authority Archivesport of portland archives, main breakwater, construction, harbour development -
Glenelg Shire Council Cultural Collection
Photograph - Photograph - Portland Harbour tug boat, n.d
Port of Portland Authority Archivesport of portland archives, portland harbour, kiama -
Glenelg Shire Council Cultural Collection
Photograph - Photograph - Lee Breakwater, Portland, n.d
Port of Portland Authority Archivesport of portland archives, lee breakwater, construction, concrete -
Glenelg Shire Council Cultural Collection
Photograph - Photograph - Lee Breakwater, Portland, n.d
Port of Portland Authority Archivesport of portland archives, henty beach, construction, fishermans breakwater, raft, marine, maritime -
Glenelg Shire Council Cultural Collection
Photograph - Photograph - Model Wave Pool, n.d
Port of Portland Authority Archivesport of portland archives, wave pool model -
Glenelg Shire Council Cultural Collection
Photograph - Photograph, n.d
Port of Portland Authority Archivesport of portland archives -
Glenelg Shire Council Cultural Collection
Photograph - Photograph - PHT Harman Dragline, n.d
Port of Portland Authority ArchiveBack: ? Monthly 2/12/57 - biro -
Glenelg Shire Council Cultural Collection
Photograph - Photograph - Road Making, n.d
Port of Portland Authority ArchivesBack: PHT purple stamp. '2/28 252 1.6.54 Breakwater Access Road Re-alignmentport of portland archives, battery point -
Glenelg Shire Council Cultural Collection
Photograph - Photograph - Portland Harbour, n.d
Port of Portland Authority Archivesport of portland archives, harbour, construction -
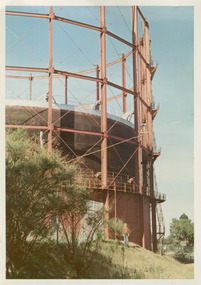 City of Moorabbin Historical Society (Operating the Box Cottage Museum)
Photographs, x3 Colour,, Highett Gasworks c1974, 1974
3 of 5 photographs of the Highett Gasworks c 1974 The Brighton Gas Company was established 1877 by local residents including Thomas Bent. Initially all went well for residents as gas light replaced kerosene lamps and street lights were installed. However disruption to supply, poor quality and failure to reach all house lead to dissatisfaction. Thomas Bent therefore began the Central Brighton and Moorabbin Gas Company 1885 and a price war ensued. This was unsustainable and the two companies amalgamated in 1877 supplying gas from the New Street Works site. 1930 this Company expanded to Highett where it had purchased 45 acres adjacent to the train line. 1927 a gas holder was built connected to the Brighton works 1936 construction began on a complete gas-making unit and the Highett Gasworks, Nepean Highway, began supply 1939. 1950 an extension program was completed. However by 1965 , with the discovery of Natural Gas offshore in Bass Strait, changes to Gas distribution were apparent. At first some of the facilities at Highett were used to distribute the gas piped from Sale, Gippsland. However after conversion of 450,000 homes to Natural Gas the Highett site was redundant. The gasometers were removed 1978. Moorabbin Council obtained part of the land for public recreation purposes. ( Dr. G Whitehead KCC Historian ) c2012 the Moorabbin Justice Centre / Magistrates Court of Victoria was built and further development of the area for apartments proceeds. The establishment of the Brighton Gas Company 1877 and the Highett Gasworks 1885 brought bright lighting to houses, businesses and streets in Moorabbin Shire and cooking ovens and heating improved the living conditions of residents. 3 x Colour photographs of the Highett Gasworks c1970bass strait gas, highett gasworks, brighton gasworks 1877, central brighton and moorabbin gas company 1885, whitehead dr. graham, magistrates court of victoria, horse drawn carts, toll gates brighton, motor cars 1900, steam engines, early settlers, bentleigh, parish of moorabbin, city of moorabbin, county of bourke, moorabbin roads board, shire of moorabbin, henry dendy's special survey 1841, were j.b.; bent thomas, o'shannassy john, king richard, charman stephen, highett william, ormond francis, maynard dennis, market gardeners, vineyards, orchards