Showing 1173 items
matching bendigo railway
-
 Ballarat Tramway Museum
Photograph - Illustration/s, Windsor Publications, Bendigo Birney 30
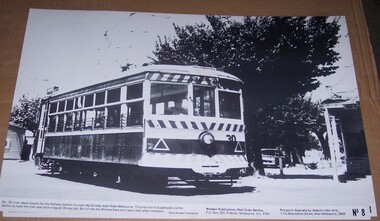
Large print illustration of SEC Bendigo Birney No. 30 ex depot running out to the Railway station on a Sunday prior to running to Eaglehawk. No. 8 of a series of illustrations. Caption notes that Birney's no longer do this job - photo possible mid to late 1960's. Photo Windsor Publications. Two copies held. Printed on heavy cardboard with a gloss sheet.On rear of copy 1, letters "TBT"trams, tramways, birney, bendigo, windsor publications -
 Ballarat Tramway Museum
Negative, Travis Jeffrey, 17/06/1962 12:00:00 AM
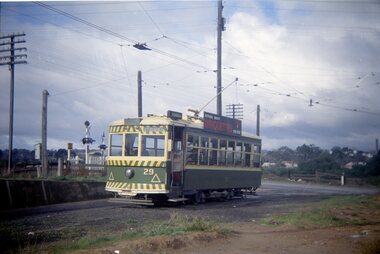
Colour Negative No. N395, of Bendigo Birney No. 29 at North Bendigo terminus. Trolley pole yet to be turned. Has railway level crossing lights in the background. Tram has a Briquettes roof advertisement. Photo possibly 17/6/1962. Colour laser printed copy of image stored in box 73. Image scanned at hi res 27/5/2020 and image updated.In red pen on folder that contained negative, "NR70B" and "17 Jun 62". trams, tramways, bendigo, north bendigo, tram 29 -
 Ballarat Tramway Museum
Ephemera - Ticket/s, Victorian Railways, ARHS tour to Farewell Bendigo, 1972
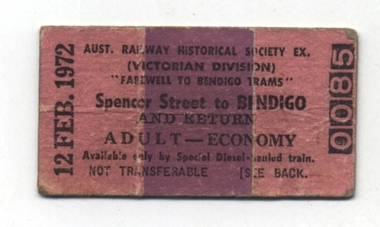
Has a strong association with the tours to mark the closure of the Bendigo Tramway system and Graeme Breydon.Edmondson pasteboard railway ticket, No. 0085, dated 12 Feb. 1972, for use on an ARHS tour to Farewell Bendigo prior to the closure of the system. Ticket base is pink with a thick purple stripe, which is printed in landscape format. Ticket number in reverse. Adult - Economy, available on the day of travel only and on the special train. On the rear of the ticket is the reserved seat and carriage number. Ticket used by Graeme Breydon on the day of the tour. See History of the Object for further details. Two copies held. trams, tramways, arhs, tmsv, tickets, closure -
 Ballarat Tramway Museum
Map, Royal Automobile Club of Victoria, "Bendigo District Map - RACV", c1971
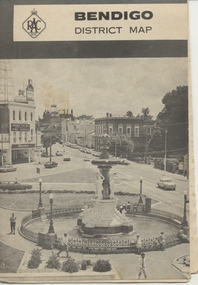
... RACV Railways in ink on the Bendigo Outlet map, "3/4" along ...Printed street map titled "Bendigo District Map", published by the RACV, showing the central part of Bendigo, Bendigo Outlets, streets, principal attractions, Bendigo and district maps and information, and a list of sporting and entertainment facilities. Has the tram lines shown dotted, only shows the full extent of the Golden Square line. The main map has the number "0171" in the bottom left hand corner, indicating the publication date.in ink on the Bendigo Outlet map, "3/4" along bottom edge.trams, tramways, map, bendigo, racv, railways -
 Ballarat Tramway Museum
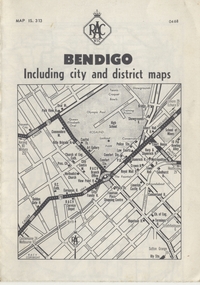
Map, Royal Automobile Club of Victoria, "Bendigo Including city and district maps - RACV", c1968
... RACV Railways in ink on the Bendigo Outlet map, has various ...Printed street map titled "Bendigo Including city and district maps", published by the RACV, showing the central part of Bendigo on the front cover, Bendigo Outlets and notes on the city itself. Has the tram lines shown dotted, only shows the full extent of the Golden Square line. Inside has a district road map. The front cover has the number "0468" in the bottom left hand corner, indicating the publication date.in ink on the Bendigo Outlet map, has various notes showing the location of crossing loops on and off the map and the location of the tram depot itself.trams, tramways, map, bendigo, racv, railways -
 Ballarat Tramway Museum
Photograph - Digital image Set of 20
Set of 20 digital images of Bendigo Tramways, 1972 at or before closure while on a tram tour by Stuart Lodington. .1 - No. 28 and 5 at Eaglehawk terminus .2 - No. 28 leaving Charing Cross and travelling into View St with Armstrong Type Service building in background and Firestone Advertisements. .3 - No. 29 with Eaglehawk Town Hall and Post Office in background. .4 - No. 26 and 29 at start of double track, High St Eaglehawk .5 - No. 29 leaving Eaglehawk with shops in the background, Foodland, J. Bests .6 - No. 29 and 23 crossing Manchester Loop with Manchester Arms Hotel in the background and an old poppet head. .7 - No. 29 at ditto with poppet head in the background. .8 - No. 28 and two other trams at the Quarry Hill terminus. .9 - No. 29 in High St Bendigo with the Cathedral and Golden Gate Hotel in the background. .10 - No. 3 with destination Eaglehawk, in bound Carpenter St? .11 - No. 29 following a single trucker through a loop or the end of the double track near the depot. .12 - No. 23?, at Eaglehawk terminus, with Eaglehawk Town Hall in the background. .13 - Birney tram crossing the bridge at the Depot entrance - No. 29 .14 - No. 29 on the Eaglehawk line? .15 - as for .13 .16 - No. 29 entering the depot. .17 - No. 23, inbound from Eaglehawk, at Jobs Gully Loop with the railway overbridge in the background. .18 - No. 28 and two other trams (see also Reg Item 4982) for the same tram tour at Myrtle St. Loop. .19 - No. 21 with North Bendigo on the destination approaching the Golden Square terminus. .20 - No. 7 at Golden Square terminustrams, tramways, bendigo, eaglehawk, quarry hill, golden square, depot, tram 5, tram 29, tram 28, tram 26, tram 23, tram 7, tram 21 -
 Ballarat Tramway Museum
Photograph - Digital image Set of 20, 1971-72
Set of 20 digital images of Bendigo Tramways, 1972 at or before closure while on a tram tour by Stuart Lodington. .1 - No. 7 at Golden Square terminus .2 - ditto .3 - No. 26 in bound on the Eaglehawk line with a crossing loop behind. .4 - Birney crossing the bridge by the tram depot. .5 - No. 29 running a special on the Eaglehawk line with a HBA billboard in the background. .6 - No. 29 with a driver walking in front of the tram at the above location. .7 - No. 29 on the Eaglehawk line .8 - ditto waiting for a tram at Manchester Loop with poppet head in the background. .9 - No. 29 on the Eaglehawk line .10 - Eaglehawk Town Hall at night. .11 - No. 7 at the depot junction in McCrae St, with Golden Square destination. .12 - No. 29 with the Camp Hotel Eaglehawk in the background. Also a Newsagent with The Sun, The Bendigo Advertiser and The Age signs on the building, High St .13 - No. 29 Mt Korong Rd, with the railway overbridge in the background. .14 - interior photo of Birney tram roof .15 - interior view of controls of Birney at Eaglehawk .16 - No. 29 outbound at the Depot Junction McCrae St. .17 - No. 18 at the Eaglehawk terminus .18 - close up view of No. 29 front. .19 - No. 29 in Nolan St, crossing the bridge, outbound. .20 - No. 18 at the Eaglehawk terminus with the Eaglehawk Town Hall, Post Office in the background. Has a circus banner on the side.trams, tramways, bendigo, eaglehawk, quarry hill, golden square, depot, mccrae st, nolan st, tram 7, tram 26, tram 29, tram 18 -
 Ballarat Tramway Museum
Photograph - Digital image Set of 20, 16/04/1972 12:00:00 AM
Set of 20 digital images of Bendigo Tramways, of the last running day of the Eaglehawk to Quarry Hill line 16 April 1972, .1 - No. 24 outbound to Eaglehawk .2 - No. 3? at Manchester Loop .3 - No. 24 outbound to Eaglehawk .4 - bogie tram crossing the rail over bridge from Eaglehawk .5 - No. 18 in View St .6 - No. 24 outbound to Eaglehawk .7 - No 18 at Eaglehawk with destination roll being changed, and shopping centre in the background. .8 - No. 24 crossing the railway overbridge, going to Eaglehawk .9 - No. 3 outbound to Eaglehawk .10 - No. 24 crossing the railway overbridge, going to Eaglehawk .11 - No. 3 and 24 crossing at Long Gully .12 - No. 18 at Eaglehawk with Leo A Hughes photographer building in the background and a CFA truck passing the tram. Tram SEC roof advertisement and a banner for "German -?- Circus" at Eaglehawk and dates. .13 - No. 3 inbound on the Eaglehawk line. .14 - No. 18 outbound to Eaglehawk .15 - ditto .16 - No. 18 at Eaglehawk terminus with the Mechanics Institute in the background. .17 - No. 24 at the Eaglehawk terminus .18 - No 24 at the intersection with Taylor St .19 - No. 24 at the Eaglehawk terminus .20 - dittotrams, tramways, bendigo, eaglehawk, long gully, manchester loop, tram 24, tram 18, tram 3 -
 Ballarat Tramway Museum
Photograph - Digital image Set of 20, 16/04/1972 12:00:00 AM
Set of 22 digital images of Bendigo Tramways, of the last running day of the Eaglehawk to Quarry Hill line 16 April 1972, .1 - No. 3 and 24 crossing at Long Gully .2 - No. 3 turning at the Cricket ground, Barnard and View Sts, inbound to the City and Quarry Hill .3 - No. 3 in bound to the City and Quarry Hill, Long Gully area .4 - No. 18 inbound to the City and Quarry Hill crossing the railway bridge from Eaglehawk. .5 - Manchester Loop .6 - No. 18 inbound to the City and Quarry Hill crossing the railway bridge from Eaglehawk. .7 - No. 18 about to enter Jobs Gully Loop .8 - No. 3 about to turn at the Cricket ground, Barnard and View Sts inbound to the City and Quarry Hill .9 - No. 3 turning at the Cricket ground, Barnard and View Sts, inbound to the City and Quarry Hill .10 - No. 18 at Eaglehawk terminus with the Mechanics Institute in the background. .11 - No. 3 in bound, Ironbark area. .12 - No. 3 at Long Gully Loop .13 - No. 3 outbound to Eaglehawk. .14 - No. 18 at Eaglehawk with German circus banner on tram .15 - No. 18 on the Eaglehawk line at Jobs Gully Loop .16 - No. 24 outbound to Eaglehawk at Taylor St .17 - No. 18 inbound to the City and Quarry Hill crossing the railway bridge from Eaglehawk. .18 - No. 3 at Manchester Loop .19 - No. 18 at Eaglehawk terminus .20 - No. 18 at Eaglehawk with German circus banner on tram .21 - bogie tram at Long Gully Loop. .22 - No. 24 outbound to Eaglehawk at Taylor Sttrams, tramways, bendigo, eaglehawk, long gully, jobs gully, manchester loop, tram 24, tram 18, tram 3 -
 Ballarat Tramway Museum
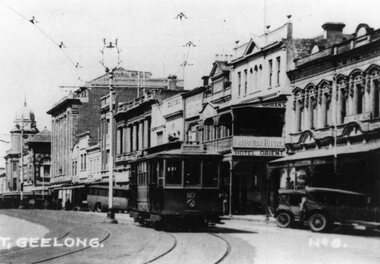
Photograph - Black & White Photograph/s - set of 2, late 1920's, early 1930's
Yields information about the appearance of Geelong's Birney trams during the 1940's.Black and White Photograph of Geelong No. 10, Malop St, travelling north west to the railway station, during the late 1920s, between Gheringhap and Moorabool St. Tram has the destination of "Station", with the National Mutual, Moran's Hotel Orient in the background. Melbourne Bitter advertisement on the hotel. A number of soft top cars parked in the street. Photo probably from a postcard, has the words "T. Geelong. No. 8" along part of the bottom edge. Photo from the Peter Duckett Collection. For a close up of the tram itself see Reg Item 5822. 4335.1 - Black and White print contained within the Wal Jack Bendigo and Geelong Album, see Reg Item 5003 for more details. Added 7/8/2013. This item is the larger image of the two.On rear, stamped in black ink "Photo supplied from P.W. Duckett Collection, All Rights Reserved, 69 Howitt Rd. Nth Caulfield 3161." In hand writing on the rear "47)" in top left hand corner. In the body of the photograph "Malop St travelling NW to Station, between Gheringhap and Moorabool Sts." 4335.1 - in ink on rear. "Geelong No. 10 Original Condition, photo about 1930" and "Please Return"trams, tramways, geelong, malop st, mesco, tram 10 -
 Ballarat Tramway Museum
Photograph - Black & White Photograph/s - set of 2, Wal Jack, 28/02/1962 12:00:00 AM
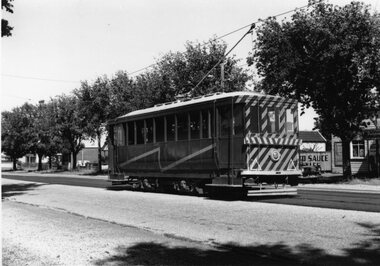
Yields information about Bendigo trams, the Golden Square route in the early 1960's prior to fitting dash canopy lighting.Black and white print of the Ballarat Scrubber tram, at the Bell Street loop, 28/2/1962, Photo by Wal Jack. Two copies. Photo print courtesy of Port Dock Railway Museum, now the National Railway Museum. See worksheet 4311 for letter and details of prints sent to Bill Scott, 19/10/2001. Any photo credit to mention NRM Collection. .1 - same photograph with Doug Colquhoun stamp on rear - see image i2..1 - On rear of copy 1"SEC Ballarat / Scrubber car /Bell St loop / 28/2/62 2125 / Wal Jack " In the top right hand corner "74)" .2 - On rear has Douglas Colquhoun stamp with photograph details - see image i2 trams, tramways, scrubber tram, bell st, tram scrubber -
 Ballarat Tramway Museum
Photograph - Black & White Photograph/s, Doug Colquhoun, 25/04/1960 12:00:00 AM
Yields information about one of Geelong's trams.Black and white print of Bendigo No. 20, enroute to Golden Square. Photo by Doug Colquhoun 25/4/1960. Two copies. Trams has a front dash advertisement for Hutton's hams and roof advertisements for D. J. Osborn Plumbing Service and Bendigo Motor Co. Photo print courtesy of Port Dock Railway Museum, now the National Railway Museum. See worksheet 4311 for letter and details of prints sent to Bill Scott, 19/10/2001. Any photo credit to mention NRM Collection.On rear of copy 1"SEC Bendigo / 20 / Golden Square / 25/5/60 2121 / D A Colquhoun " Copy 2 "DAC" in ink, bottom right hand corner.trams, tramways, bendigo, golden square, tram 20 -
 Ballarat Tramway Museum
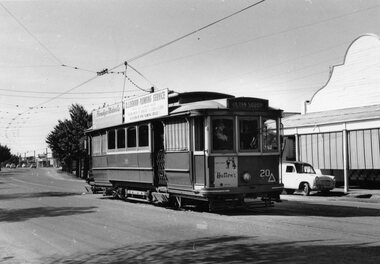
Photograph - Black & White Photograph/s, Doug Colquhoun, 16/05/1971 12:00:00 AM
Yields information about Bendigo's trams in the early 1970's and the Eaglehawk terminus.Black and white print of Bendigo 28 at the Golden Square terminus. Two copies. Photo by Doug Colquhoun, 16/5/1971. Trams has the destination of Nth Bendigo and roof advertisements for Briquettes. Also has the Golden Square hotel in the background. Photo print courtesy of Port Dock Railway Museum, now the National Railway Museum. See worksheet 4311 for letter and details of prints sent to Bill Scott, 19/10/2001. Any photo credit to mention NRM Collection.On rear of copy 1 "SEC Bendigo / 28 /Golden Square / 16/5/71 4187 / D.A. Colquhoun" . Copy 2 "DAC" in ink, bottom right hand corner.trams, tramways, golden square, tram 28 -
 Ballarat Tramway Museum
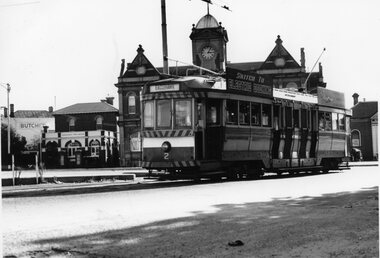
Photograph - Black & White Photograph/s, Doug Colquhoun, 16/05/1971 12:00:00 AM
Yields information about Ballarat's trams during the late 1950's and the Kenney Murray offices.Black and white print of Bendigo 2 at the Eaglehawk terminus. Two copies. Photo by Doug Colquhoun, 16/5/1971. Trams has the destination of Eaglehawk and two roof advertisements for Electric cooking. Also has the Eaglehawk Town Hall, Eaglehawk Post Office in the background. Photo print courtesy of Port Dock Railway Museum, now the National Railway Museum. See worksheet 4311 for letter and details of prints sent to Bill Scott, 19/10/2001. Any photo credit to mention NRM Collection.On rear of copy 1 "SEC Bendigo / 2 /Eaglehawk / 16/5/71 4203 / D.A. Colquhoun" . Copy 2 "DAC" in ink, bottom right hand corner.trams, tramways, eaglehawk, tram 2 -
 Ballarat Tramway Museum
Photograph - Black & White Photograph/s, Doug Colquhoun, 24/05/1959 12:00:00 AM
Yields information about Bendigo Trust's trams in the late 1970's and the depot.Black and white print of Ballarat 39 at the Gardens Loop terminus. Two copies. Photo by Doug Colquhoun, 24/3/1959. In the background are the Trees of the Gardens, and the tram stop. Photo print courtesy of Port Dock Railway Museum, now the National Railway Museum. See worksheet 4311 for letter and details of prints sent to Bill Scott, 19/10/2001. Any photo credit to mention NRM Collection.On rear of copy 1 "SEC Ballarat / 39/ Lake Wendouree / 24/3/59 5536 / D.A. Colquhoun" . Copy 2 "DAC" in ink, bottom right hand corner.trams, tramways, wendouree parade, gardens loop, tram 39 -
 Ballarat Tramway Museum
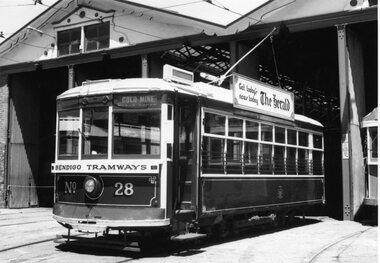
Photograph - Black & White Photograph/s, Doug Colquhoun, 25/01/1978 12:00:00 AM
Yields information about Bendigo Trust's trams in the late 1970's and the depot.Black and white print of Bendigo Trust 28 at the depot. Two copies. Photo by Doug Colquhoun, 25/1/1978. The tram is in the Bendigo Trust "Talking Tram" livery, with a The Herald" roof advertisement. It has the destination of Gold Mine. Photo print courtesy of Port Dock Railway Museum, now the National Railway Museum. See worksheet 4311 for letter and details of prints sent to Bill Scott, 19/10/2001. Any photo credit to mention NRM Collection.On rear of copy 1 "Bendigo Tramways / 28 / Depot / 25/1/1978 6526 / D.A. Colquhoun" . Copy 2 in pencil on left hand edge "Bendigo Trust Car 28 depot 26.1.79 Douglas Colquhoun"trams, tramways, bendigo trust, depot, tram 28 -
 Ballarat Tramway Museum
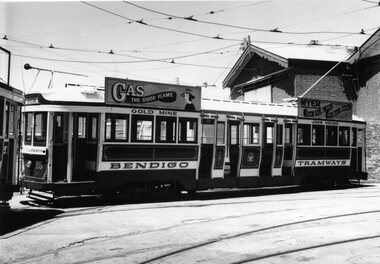
Photograph - Black & White Photograph/s, Doug Colquhoun, 25/01/1978 12:00:00 AM
Yields information about Bendigo trams, ladies fashions in the late 1950's.Black and white print of Bendigo Trust 25 at the depot. Two copies. Photo by Doug Colquhoun, 25/1/1978. The tram is in the Bendigo Trust "Talking Tram" livery, with two Roof Advertisements "Gas the Good Flame" and Myers/ Tram has the destination of "Special" Photo print courtesy of Port Dock Railway Museum, now the National Railway Museum. See worksheet 4311 for letter and details of prints sent to Bill Scott, 19/10/2001. Any photo credit to mention NRM Collection.On rear of copy 1 "Bendigo Tramways / 25 / Depot / 25/1/1978 6529 / D.A. Colquhoun" . Copy 2 in ink "DAC" in the bottom right hand corner.trams, tramways, bendigo trust, depot, tram 25 -
 Ballarat Tramway Museum
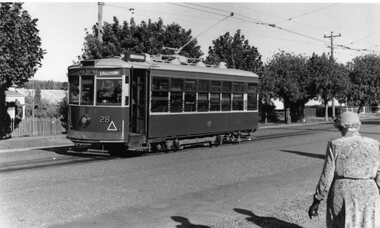
Photograph - Black & White Photograph/s, Wal Jack, 12/04/1959 12:00:00 AM
Yields information about Ballarat's trams, and the City centre area and motor vehicles late 1950's.Black and white print of Bendigo 28 at the Quarry Hill terminus, 12/4/1959, photo by Wal Jack. Has a lady walking across to the tram - dressed in gloves and hat. Tram has the destination of Eaglehawk. Photo print courtesy of Port Dock Railway Museum, now the National Railway Museum. See worksheet 4311 for letter and details of prints sent to Bill Scott, 19/10/2001. Any photo credit to mention NRM Collection.On rear of copy "SEC Bendigo #28 / Quarry Hill terminus / 12/4/59 / Wal Jack photo / National Railway Museum.trams, tramways, bendigo, quarry hill, tram 28 -
 Ballarat Tramway Museum
Ephemera, Wal Jack, Wal Jack notebook, 1940's
... , Bendigo, Geelong and other cities tramways and railways. Trams ...Demonstrates Wal Jack's records, hand written in a recycled notebook. Note - several sheets have been cut from the book - appear to be done before use by Wal. The crossed out sheets have not been imaged - these have been transferred by Wal to Reg Item 5507 and re-ordered. Image 30 shows a sample of a crossed out page. See related documents for a pdf file of the contents. Scan No. BTM5623iX Page No. Title or Subject Notes 1 Front 2 Inside Cover Addresses for Jack McLean, John Buckland Trooper Larsen Inside front cover. 3 1 Note re NSWT steam tram motor, MMTB PCC import issues, Peter Duckett seeking info and Photo of Julien’s battery tram on test in Melbourne 4 2 MMTB No. 8, 4, photos, Tyrell’s of Sydney photos, Perth 63 dimensions and MMTB plans for Domain Road & St Kilda Rd Jtn. 5 3 Notes re NSWGR P32, VR locos at Wodonga 13/10/1941, SAR V Class V143, SAR locos – W and Wx 6 4 NSW Private locos, Woy Woy quarry and AGL at Mortlake 5 Blank 6 Blank 7 7 First cable trams – links to photos T154, 29, 154 (Adelaide) 8 8 T156, Powelltown, Ray Pearson Negs 9 9 QR B18 ¼ locos, Ray Pearson’s scrap book, PMTT Zeppelin style trams, MMTB T class locations and 178/179 rebuilding. 10 10 Hawthorn horse tramway, VR Black Rock terminus sketch 11 11 NSW Tramways, Ryde, MMTB L class, Geelong tramway notes 12 12 Locomotive “Ballarat” in WA, Brisbane and various contacts. 13 13 Notes re VR News – 1943, H class, derailments, max speeds, Koondrook tramway and Geelong level crossing. Individual typed sheets pasted onto page – loose within book. 14 to 17 14/17 List of MMTB trams to 877 and work trams Some errors noted. 18 18 Newspaper cutting – Tram Record Day revenue (Brisbane 10/1943), Steam Trams at Journey’s end – Sydney – 6/1943 list of equipment being sold by Sydney Ferries, at Parramatta, 6/1943. MMTB Tram crossings in Melbourne, list of Sydney photos sent to Wal. Cuttings and Individual typed sheets pasted onto page. 19 19 Midland locos WA, VR open wagon stencils and a siding at Mt. Evelyn. Individual typed sheets pasted onto page. 20 20 Note re Sydney four wheel tourist trams and Hawthorn Max. Traction cars locations c1945. 21 to 23 21/23 Notes on Geelong Bogie trams and carrying flags for declaration of Newtown and Chilwell as a city – 1/10/1949 (See also Reg Item 5641) 24 to 26 24/26 Notes on Wellington Corporation Tramcars 37 27 Kelburn – Karoi cable line Wellington 28 to 29 28/29 Auckland Tramway Board tramcars notes 30/31 Blank 30 32/33 Notes on Ballarat tramcars – ESCo Crossed out 34/37 Ditto – SEC Crossed out 38 Music for the people notes Crossed out 39 Notes on Ballarat trams with tail lights Crossed out 40/43 Notes on Ballarat bogie trams Crossed out 44/45 Notes on SEC tram controllers, dead man and truck lengths. Crossed out 31 45 List of Ballarat Destination roll – Dec 1949 32, 33 46/47 Notes on Bendigo Bogie Trams – 1940’s 34 48 Bendigo Destination roll on a Birney tram Easter 1950, notes on tram tail lights and fares on the Bendigo system. 49 Blank – though headed “Bendigo Birney Trams” 50 Notes trams used on special days in Ballarat Crossed out 51 Ditto and No. 24 and 23 Crossed out 52 Ditto, 15, 11, 23 and Gold tram Crossed out 53 Notes on 34 caused delays, 5/1950, and use of 23 as gold tram Crossed out 54 Notes on repair to track at Sturt and Drummond 6/1951 Crossed out - see Reg Item 7720. 55 Notes on track work in Ballarat early 1950’s Crossed out 56/57 Notes on 33, 37, pay as you enter signs and 1953 special workings Crossed out 58/60 Notes trams used on special days in Ballarat Crossed out 61/64 Blank 35 65 “Salute to the Cable Tram” – transcription of text from Truck and Bus Transportation (July 1948) 36, 37 66/67 Continued from above and list cable tram routes, opening, closing, length and route colours. 38 68 List of photos in Truck and Bus Transportation, Anniversary Issue July 1948 of cable trams. 69 Blank 39 70 Notes on Brunswick TT, Fitzroy TT colours, Adelaide Service trams and MMTB route lengths. 40 71 Notes on HTT colours, tramcars, PMTT trams and colours and NMETL colours, trams and route destination signs 41 72 Notes on MMTB routes, cable and other Melbourne tram disposals, and sale of cable trams and storage at Brunswick. 42 73 Blank - page was headed Lugarno, Switzerland and Italian border 42 Handwritten sheet – photos to get – R. Field and Peter Duckett. 43, 44 74/75 Listing of trains on all lines leaving Ballarat and days run. 45 77 Listing of negatives sent to K. Rogers in 1944 and list of MMTB Max. Traction bogie trams 117 to 138 and disposal 46 77 Listing of MMTB trams, - appears to be something to do with photos or negs held. 47 78 Listing of Ray’s (Pearson) negs /photos of Brisbane trams and other railway photos. 79 Blank 48 80 Prices of pine timber in 4/1942, list of photos “I want”, notes re VR Train length, Ironbark Gully bridge, 3817 in Harden smash 7/1948 and 1948 Ballarat destination roll. Partly crossed out. Rear Cover. Has a strong association with Wal Jack, his work to collect and record both railway and tramway information. Yields information about tramways in Ballarat, Bendigo, Geelong and other cities tramways and railways.Grey covered book with black binding containing 40 lined sheets (80 pages) with handwritten notes with the front cover partly cut out and the words "Jewellery & Engraving" book written in. Contains some newspaper clippings and pasted typed notes as listed below. The image number of each sheet is given. See individual pdf files. trams, tramways, mmtb, ballarat, bendigo, sydney, brisbane, railways, geelong, new zealand, victorian railways, sec, esco -
 Ballarat Tramway Museum
Magazine, Australian Railway and Locomotive Historical Society, "ARLHS Bulletin", 1943
Yields information about the tramways of Bendigo and the Geelong tramways and has a strong association with well known tramway enthusiasts of the era., Yields information about the tramways of Bendigo and the Geelong tramways and has a strong association with well known tramway enthusiasts of the era.Set of 12 Australian Railway and Locomotive Historical Society Bulletins for the period Jan 1943 to December 1943. Each page has been stencil duplicated. Index sheets for the journals at the front of the documents. March 1943 - pages 29 to 32 has an article "The Tramways of Bendigo - Bendigo Tramway Company Limited" written by Wal Jack. Has a large full page map prepared by C. C. Singleton. March 1943 - page 40 - has a short item on the St Kilda Brighton Tramway - three new tramcars (VR type). Item from the Journal of Victorian Model Railway Society" July 1943 - page 1 to 4, has an article "The Tramways of Geelong" - author not given, though probably largely Wal Jack. Has a large full page map prepared by C. C. Singleton. The Jan to June issues are loose, while the July to December issues have been hole punched and held together with a metal binder.museums bendigo, vr trams, geelong -
 Ballarat Tramway Museum
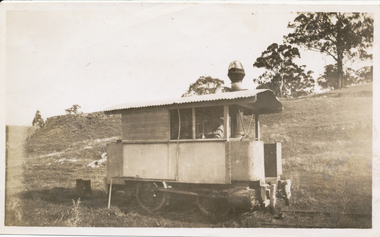
Photograph - Former Bendigo Steam motors at David Mitchell Estate, Ray Pearson, c1930
... photographs of former Bendigo steam motor No. 2 at the David Mitchell ...Two black and white photographs of former Bendigo steam motor No. 2 at the David Mitchell estate railway, Lilydale district, photographed c1930. Reference Light railways 208, August 2009, page 9.Yields information about a former Bendigo steam motor.Black and White copy print contained within the Wal Jack Bendigo and Geelong Album, see Reg Item 5003 for more details. .1 - On rear in ink "Steam motor from the Bendigo steam tramway's (rebuilt). This was taken at the David Mitchell Estate at Lilydale used to run to the Mt Evelyn about 6 miles. Broken up after this photo was taken" Similar notes on rear of Ken Magor collections with the additional detail of photographer - Ray Pearson.trams, tramways, bendigo, steam trams, light railways, tram 2 -
 Ballarat Tramway Museum
Photograph - Black & White Photograph/s, c1895
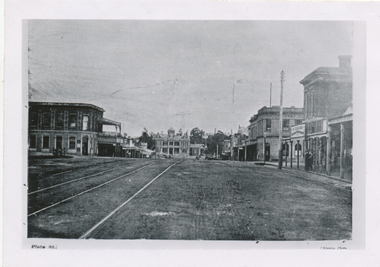
Black and White copy print contained within the Wal Jack Bendigo and Geelong Album, see Reg Item 5003 for more details. Copy photograph of a photograph from a book (Plate 1) showing a view along High St Eaglehawk, looking west, c1895. Shows buildings on both sides of the street. Has name J. Nimmon? or Ninnis (see btm 4372) in the bottom right hand corner. See also Reg item 5729 for a similar photograph. .1 - On rear in ink "Steam track tracks, Eaglehawk. (So much for the AETA boys who believe steam service did not cross the railway on the level!). In bottom right hand corner is "P. W. Duckett" trams, tramways, bendigo, high st, eaglehawk, steam trams -
 Ballarat Tramway Museum
Photograph - Black & White Photograph/s, 1901
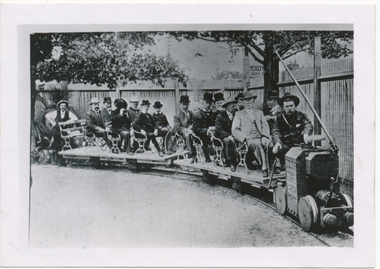
Black and White copy print contained within the Wal Jack Bendigo and Geelong Album, see Reg Item 5003 for more details. Copy photograph of demonstration electric locomotive (narrow gauge) hauled vehicles at the Gold Jubilee Exhibition in 1901. See page 80 of Keith Kings, Bendigo Tramways, ARHS 1972 for further details. Image 5783i3 reproduces this page. .1 - On rear in ink "Electric railway demonstrated at Gold Jubilee Exhibition Bendigo 1901". In bottom right hand corner "P.W. Duckett". trams, tramways, bendigo, exhibitions -
 Ballarat Tramway Museum
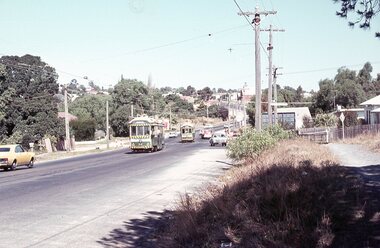
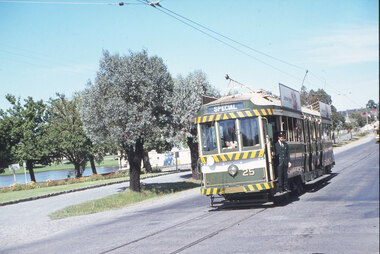
Slide - 35mm slide/s - set of 10, Campbell Duncan, Jan. 1971
Set of 10 Ferraniacolor slides - cardboard mounts taken on either 10/1/71 or 16/1/71. .1 - Birney No. 30, Golden Square line, inbound near Cathedral with car yard in background. .2 - ditto, with Cathedral gardens in background. .3 - single trucker, with two SEC roof adverts, entering Nolan St enroute to North Bendigo. Shows the driver sitting in a side on shot. A 4 square store in the background, with a fading advert for "Peeled Tomatoes". .4 - No. 6 turning from Nolan St into McCrae St with 4 square store in background. .5 - No. 26 at Quarry Hill with cemetery in background. .6 - No. 6 at the North Bendigo Terminus .7 - No. 26 outbound to Eaglehawk on the Railway Overbridge, Mt Korong Road. .8 - No. 17 (inbound to City and Quarry Hill) and another bogie crossing at a loop on the Eaglehawk line. Both trams have SEC roof adverts. The driver of the outbound car is boarding the tram. Based on .9, it is No. 3 at Long Gully. .9 - No. 3 waiting at Long Gully Loop . .10 - No. 26 at Quarry Hill terminus, with destination of Eaglehawk.In ink on slide: .1 - "1/2 mile out on Golden Square line - 10/1/71 (Sun)." .2 - "1/2 mile out on Golden Square line - 10/1/71" .3 - "Has just rounded curve near lake Weeroona on North Bendigo line - 10/1/71 (Sun)." .4 - "16/1/71" .5 - " 10/1/71 (Sun)." .6 - "North Bendigo terminus, 16/1/71 (Sat)" .7 - "10/1/71 (Sun) c 3pm" .8 - "Cross Eaglehawk line - 10/1/71 (Sun)." .9 - "Jackson St Loop on E'Hk line awaiting up - 10/1/71 " .10 - "Quarry Hill terminus Bendigo - - 10/1/71"tramways, trams, bendigo, golden square, high st, nolan st, north bendigo, quarry hill, long gully, railway bridge, tram 30, tram 6, tram 26, tram 17, tram 3 -
 Ballarat Tramway Museum
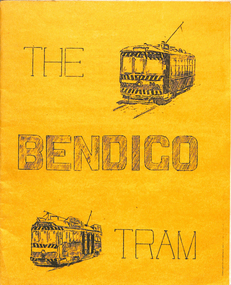
Book, Written by A. Weston and typed by Geoff Clark, "The Bendigo Tram", 1971
Produced by the North Sydney Boys High School Railway club, prior to the closure of the Bendigo system - little else written and published at the time about the history and details of the system. A very good booklet for the time - produced entirely by the wax cut stencil process. Has a strong association with the people who prepared the document. Lower significance as not directly associated with Ballarat.Twenty page booklet on the history, operation and tramcars of Bendigo, produced by the Nth Sydney Boys High School Railway Club in September 1971. Printed on a wax cut stencil process, with green covers, drawings, maps, track layout, fleet list, gives tentative closure dates, route descriptions, sketches, stapled on edge. Title "The Bendigo Tram". Inside front cover notes written by A. Weston and typed by Geoff Clark. See Reg item 302 for the Ballarat version.trams, tramways, bendigo -
 Ballarat Tramway Museum
Photograph - Black & White Photograph/s
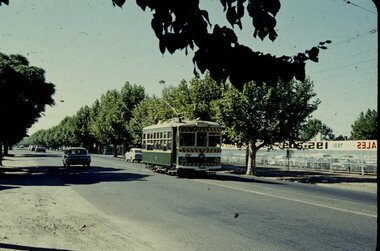
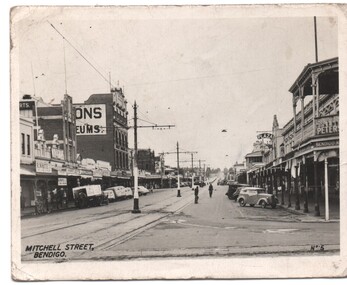
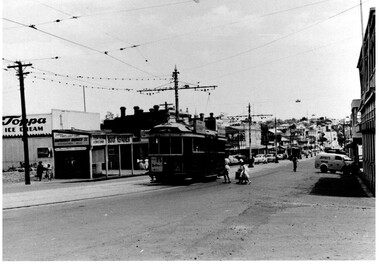
Black and white photograph, reproduced for sale, of Mitchell St Bendigo looking east towards the Railway Station. Has the title "Mitchell Street Bendigo" in the bottom left hand corner and " No. 5" in the bottom right hand corner. Shows the tramway overhead, track, centre poles. Photo early 1950's. trams, tramways, bendigo, mitchell st -
 Ballarat Tramway Museum
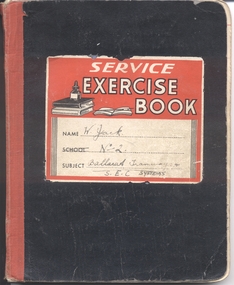
Document - Exercise Book, Wal Jack, "No. 2 - Ballarat Tramways & S.E.C. Systems"
Has a strong association with a Ballarat Tramway and railway enthusiast and yields information about Ballarat and other SEC systems.Service Exercise Book, black covers, with label, red binding titled "No. 2 - Ballarat Tramways & S.E.C. Systems" lined pages, four sections each of 14 sheets, (112 pages), stitched bound. Contains the following items: 5486 - Ballarat Horse Trams - James - 19/6/1937 5487 - Ballarat Electric Trams - James - 24/9/1937 5488 - Ballarat Car stock, notes on destinations, multiple lists 5489 - Geelong Trams list - 2 pages + 1 list after Bendigo article 5590 - Bendigo Trams list 5591 - Bendigo Trams article 5592 - three pages of newspaper clippings of 1889 or historical reprints. Also contained Reg Item 5493 to 5505, as listed on the "List of loose items in W. Jack No. 2 Exercise Book" - these have been separated out.trams, tramways, ballarat, bendigo, geelong, tramways, sec -
 Ballarat Tramway Museum
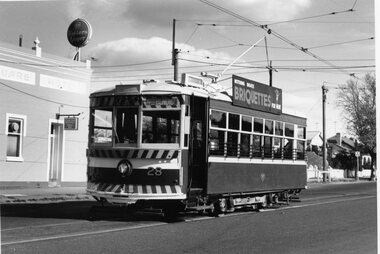
Photograph - Black & White, Bendigo 3 climbing Mitchell St, late 1950's
Black and White photograph, of Bendigo 3 climbing Mitchell St, near the Railway Station with the Destination of Quarry Hill. Has a Hutton's Ham ad on the front drivers panel and two rood ads. In the background are Sandhurst Dairies shop advertising Toppa Ice Cream, a boot repairer and a van marked Jeffreys Bread parked on the north side of Mitchell St. Nearing the point where the double track became single - see the signal wire insulators in the overhead. Printed on Fujichrome paper. Two copies held."TMSV Sales" stamp on rear. On rear of in ink 'HTT16 = MM N 102 = Geel 32 = BED 3"trams, tramways, bendigo, mitchell st, quarry hill, overhead, tram 3 -
 Ballarat Tramway Museum
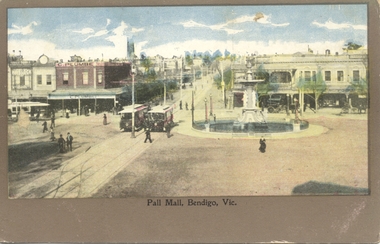
Postcard, Pall Mall Bendigo, early 1900's
Postcard, coloured, Pall Mall Bendigo, looking east towards the Railway Station. Has three trams in the view, along with the fountain. Has C. Plumbe store on the north east corner of the intersection. Title "Pall Mall, Bendigo Vic." Note the small space for a message under the image. On rear, undivided back, with "Post card", "Address to be written on this side" and position for stamp. In the top left hand corner, has "Ian Barkla's" hand stamp. Ian Barkla stamptrams, tramways, bendigo, pall mall -
 Ballarat Tramway Museum
Slide - 35mm slide/s - set of 20, Eldon Hogan, 22/05/1971 12:00:00 AM
Set of 20 35mm Agfa colour blue and white plastic mount slide - featuring photos taken during an Association of Railway Enthusiasts Tour by Eldon Hogan. Folder had the date "22/5/1971" on it. Scanned on the Canon scanner at the depot 15/12/2005 at the time of the installation of the scanner. .1 - No. 25 in Nolan St with Lake Weeroona in the background. .2 - Three Birneys at the Depot junction, 30 and 29 with Conoles Hotel, McCrae St in the background. .3 - No. 5 in front of the Shamrock Hotel, Pall Mall .4 - No. 29 in front of the Shamrock Hotel with Stonemasons sign in the background. .5 - No. 18 ditto .6 - No. 30 and another Birney at the Quarry Hill terminus .7 - No. 24 southbound High St at the Violet St intersection with a "Mine Open" sign in the foreground and the Cathedral in the background. .8 - No. 19 at the Golden Square terminus, with the Golden Square Hotel in the background. .9 - No. 29 - side on view, North Bendigo line? Thunder St? .10 - No. 30 crossing the railway overbridge, inbound from Eaglehawk with a number of photographers in the foreground. .11 - No. 29? ditto .12 - No. 5 outbound - side on view, Thunder St, North Bendigo line? .13 - No. 29 and 30 at the intersection of High St and Brazier St with Church or School hall in the background. .14 - ditto .15 - ditto .16 - No. 25 and the two Birneys at the Eaglehawk terminus. .17 - No. 29 and two other trams at ditto .18 - No. 30 and 19 adjacent to the Lake View Hotel, McCrae St .19 - No. 5 and 25 crossing on the Eaglehawk Line, Ironbark? .20 - No. 29 at Quarry Hilltramways, trams, bendigo, lake weeroona, pall mall, golden square, eaglehawk, quarry hill, tram 25, tram 30, tram 29, tram 5, tram 18, tram 19, tram 24, tram 25