Showing 20824 items matching "m-j-almond"
-
 8th/13th Victorian Mounted Rifles Regimental Collection
Photograph - 'old' VMR soldiers
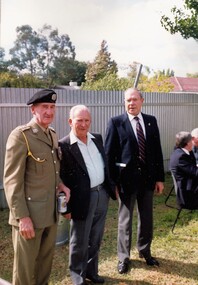
All three men had a long association with 8/13 Victorian Mounted Rifles. John Neale served in RAN during WWII; post war he joined 8/13 VMR as a trooper in 1948. He rose through the ranks to command the regiment in 1972-76, and later became Honorary Colonel. Ron Almond served in WWII; following the war he joined the Regular Army and served several postings to the Cadre Staff of 8/13 VMR including a post as Regimentla Sergeant Major. He also served with the Australian Army Training Team in South Vietnam. Bill Woolford served in the Royal Marines in WWII; post war he migrated to Australia joining the Victoria Police and was posted to Wodonga. He joined 8/13 VMR and served as Squadron Sergeant Major 'A' Squadron.Colour photograph of Colonel John Neale and former 8th/13th Victorian Mounted Rifles soldiers Ron Almond and Bill Woolford at Buna Barracks 29 April 1990neale, almond, woolford, vmr, albury, aattv, buna barracks -
 Ringwood and District Historical Society
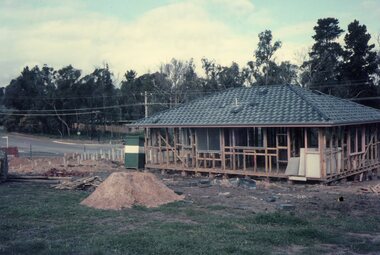
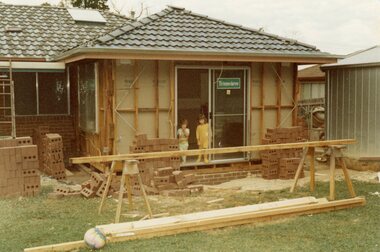
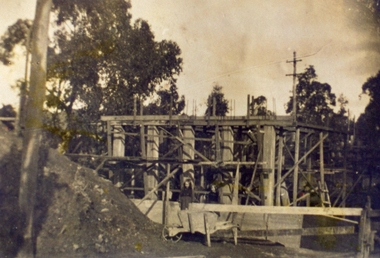
Photograph, Building the Mitchell house at 168 Oban Road, North Ringwood circa 1973
Rear view of the house, partially completed. On the left is the corner of Cormistom Road and Florence Avenue onto Oban Road. The house is still there today (2024).Taken by Roy J Mitchell -
 Ringwood and District Historical Society
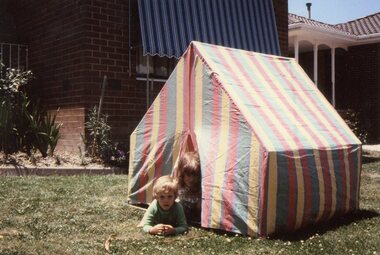
Photograph, Children on front lawn of the Mitchell house at 168 Oban Road, North Ringwood circa 1983
The house is still there today (2024).Taken by Roy J Mitchell -
 Ringwood and District Historical Society
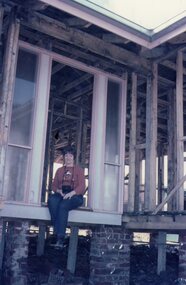
Photograph, Marian Mitchell at the Mitchell house at 168 Oban Road, North Ringwood circa 1973
The house is partially completed. The house is still there today (2024).Taken by Roy J Mitchell -
 Ringwood and District Historical Society
Photograph, Adding a room onto the Mitchell house at 168 Oban Road, North Ringwood in February 1979
Near the corner of Cormistom Road and Florence Avenue onto Oban Road. The house is still there today (2024).Taken by Roy J Mitchell -
 Coal Creek Community Park & Museum
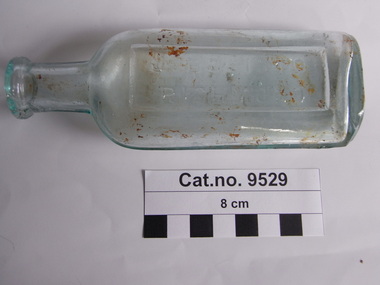
Bottle, glass
Aqua tinted clear glass bottle, oval in section, with embossed text on panel on one side.On side 'J. BOSISTO', 'RICHMOND'.eucalypotus oil, richmond -
 Kew Historical Society Inc
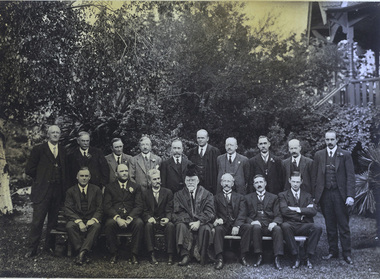
Photograph, J E Barnes, Kew Becomes a City, 1921, 1921
This is a smaller version of the large framed photograph donated to the new City of Kew by Cr Wishart. The framed photograph was hung in the Walpole Street Town Hall. Presumably, each of the Councillors in the portrait was presented with a smaller version.This photograph was donated by a descendant of the Kellett family. This picture, like it framed counterpart, is historically significant as a record of a major civic event in Kew's history. It is also aesthetically significant as the last official photograph taken by the photographer Josiah Earl Barnes before his death in the same year.Kew Becomes a City, 1921. Small photograph mounted on card of the official portrait of the Mayor and Councillors of Kew in 1921. Josiah Earl Barnes, the photographer, posed the group in front of the Jubilee Rotunda in the Alexandra Gardens in Cotham Road, Kew. At the centre of the group in mayoral robes is the then mayor of Kew, Cr. F.G.A. Barnard. This was to be the last major commission by the Council for J.E. Barnes, who had been responsible for creating the series of 19th Century portraits of former mayors that was displayed in the Kew Town Hall in Walpole Street.J. E. Barnes / Photoj.e. barnes, kew (victoria), kew city council, alexandra gardens, f.g.a. barnard -
 Pyrenees Shire Council
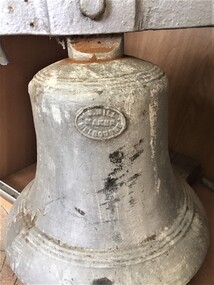
J. Mill, Lexton School Bell, 1878
When Lexton School closed in 2001 the bell was brought to the Community Centre. Commissioned for 12 pounds in 1878significant to the Pyrenees Shire and Lexton communitycast gun metal bell Maker J. Mill Melbourne -
 Melbourne Legacy
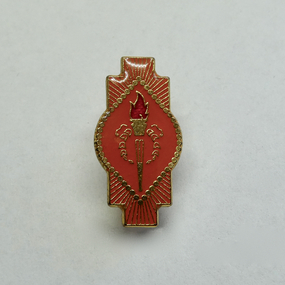
Badge, Legacy Appeal Badge - $2
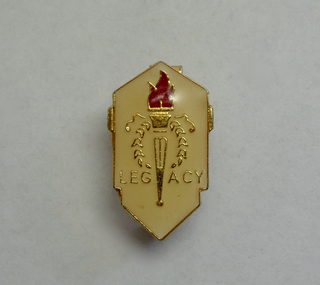
An example of badges issued by Legacy for fundraising during the Legacy Appeal and Badge Week. The donation value was $2. The date is not known. The badge of Legacy is the Torch and Wreath of Laurel. The Torch signifies the undying flame of service and sacrifice of those who gave their lives for their country. The Wreath of Laurel is the symbol of our remembrance of them. Example of Legacy badges that were sold up to raise money for Legacy's work. Legacy Appeal badge with the Legacy torch, it is gold with white enamel around a torch and around the word Legacy with red enamel in the flame. It is an elongated hexagonal shapeOn the reverse 'A J Parkes / $2'.legacy appeal, fundraising, badge week -
 Melbourne Legacy
Badge, Legacy Appeal Badge - $5
An example of badges issued by Legacy for fundraising during the Legacy Appeal and Badge Week. The donation value was $5. The date is not known. The badge of Legacy is the Torch and Wreath of Laurel. The Torch signifies the undying flame of service and sacrifice of those who gave their lives for their country. The Wreath of Laurel is the symbol of our remembrance of them. Example of Legacy badges that were sold up to raise money for Legacy's work. Legacy Appeal badge with the Legacy torch, it is gold with orange enamel around a torch with red enamel in the flame. It is an elongated pentagon shape.On the reverse 'A J Parkes / $5'.legacy appeal, fundraising, badge week -
 Melbourne Legacy
Badge, Legacy Appeal Badge - $5
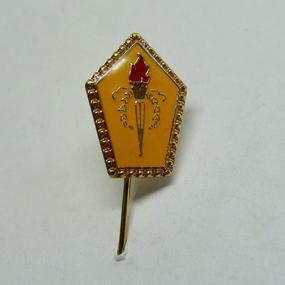
An example of badges issued by Legacy for fundraising during the Legacy Appeal and Badge Week. The donation value was $5. The date is not known. It is the same style as a $5 badge but has a stick pin rather than a clasp. The badge of Legacy is the Torch and Wreath of Laurel. The Torch signifies the undying flame of service and sacrifice of those who gave their lives for their country. The Wreath of Laurel is the symbol of our remembrance of them. Example of Legacy badges that were sold up to raise money for Legacy's work. Legacy Appeal pin with the Legacy torch, it is gold with orange enamel around a torch with red enamel in the flame. It is an elongated pentagon shape on a stick pin.On the reverse 'A J Parkes / $5'.legacy appeal, fundraising, badge week -
 Melbourne Legacy
Badge, Legacy Appeal Badge - $20
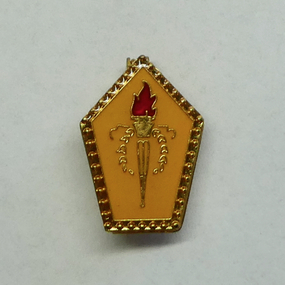
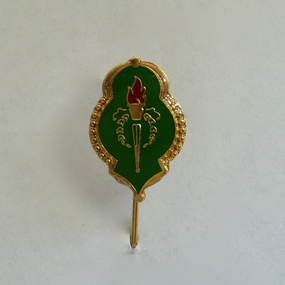
An example of badges issued by Legacy for fundraising during the Legacy Appeal and Badge Week. The donation value was $20. The date is not known. The badge of Legacy is the Torch and Wreath of Laurel. The Torch signifies the undying flame of service and sacrifice of those who gave their lives for their country. The Wreath of Laurel is the symbol of our remembrance of them. Example of Legacy badges that were sold up to raise money for Legacy's work. Legacy Appeal pin with the Legacy torch, it is gold with green enamel around a torch with red enamel in the flame. It is a decorative oval shape.On the reverse 'A J Parkes / $20'.legacy appeal, fundraising, badge week -
 Melbourne Legacy
Badge, Legacy Appeal Badge - $25
An example of badges issued by Legacy for fundraising during the Legacy Appeal and Badge Week. The donation value was $25. The date is not known. There are two of these in the collection. The badge of Legacy is the Torch and Wreath of Laurel. The Torch signifies the undying flame of service and sacrifice of those who gave their lives for their country. The Wreath of Laurel is the symbol of our remembrance of them. Example of Legacy badges that were sold up to raise money for Legacy's work. Legacy Appeal badge with the Legacy torch, it is gold with orange enamel around a torch with red enamel in the flame. On the reverse 'A J Parkes / $25'.legacy appeal, fundraising, badge week -
 Geoffrey Kaye Museum of Anaesthetic History
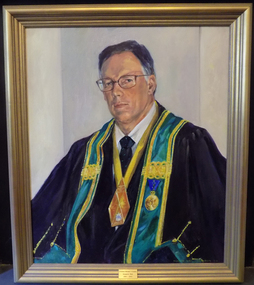
Painting - Portrait, Gary Lee-Gaston OAM, Portrait of Professor Michael J Cousins, 2003
This is a portrait of Professor Michael Cousins in his role as Dean of the Faculty of Pain Medicine at ANZCA (1999 - 2002). The portrait was unveiled at a College ceremony/meeting on 30 July 2003. The portrait was commissioned by FPM to mark the Deanship of Prof Cousins. Gary Lee Gaston is an Australian visual artist who was born in 1938. He is a painter, teacher and sculptor. He has exhibited in Adelaide and is a fellow of the Royal South Australian Art Society.Professor Michael Cousins was instrumental in the establishment of the faculty of pain medicine and was its first Dean from 1999 - 2002.Oil on canvas painting of the Faculty of Pain Medicine Dean, Professor Michael Cousins set in a plain gold wooden frame.hand written on the reverse in black ink - 762 x 632 / VM24 OIL liNen •stamped on reverse in black ink: CENTRAL ARTISTS SUPPLIES / 45 Osmond Terrace / Norwood SA 5067 / Phone/Fax: 8364 2088 •hand written on reverse in black ink: GARY LEE-GASTON / O.A.M F.R.S.A.S.A. •hand written on reverse in balck ink: PROFESSOR COUSINS 2003 / A.M. MB BS MD (SYD.) FFPMANZCA. FANZCA. FRCA. •engraved onto brass plaque on front of frame: Professor Michael J. Cousins / Inaugural Dean / 1999 - 2002 •inscribed on lower right hand side of painting: artist's signatureprofessor michael cousins, faculty of pain medicine, gary lee gaston, royal south australian art society., commissioned portrait -
 Linton and District Historical Society Inc
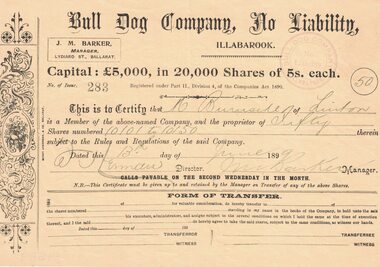
Share Certificate, BERRY ANDERSON, Bull Dog Company, Illabarook, 1899, 1899
Found in the loft of Bank of NSW in 1980s.Bull Dog Company, No Liability, Illabarook -share certificate with purple ink stamp in the name of M. Burnside - Linton.Text: " Bull Dog Company, No Liability, / ILLABAROOK. " "50-M. Burnside Linton - fifty-10101 TO 10150 13th June (189)9 W H?erman J M Barker".bull dog mining company, illabarook, j. m. barker, m. burnside -
 Rutherglen Historical Society
Certificate - Prize Certificate Rutherglen Agricultural Society, 1921 (Exact)
All three certificates won by J G Scott. 32.3 Certificate for Bouquet of Wild Flowers, Beige.Prize certificate for Rutherglen Agricultural Society 1921, printed in black on beige card, with decorative printed edging, Certificate won by Scott, J G. for Bouquet of Wild Flowers.On front of card: "1921 / Rutherglen Agricultural Society / Thirty Eighth Annual Exhibition / Wednesday, October 19th, 1921 / Certificate / Section 25, Class 29 / For Bouquet of Wild Flowers / M J. Scott / H.J. Furze, Secretary / T. Drenen, Printer, Rutherglen"rutherglen show, rutherglen agricultural society, flower show, j g scott -
 Flagstaff Hill Maritime Museum and Village
Domestic object - Bowl, J & G Meakin, Late 19th or early 20th Century
The Process of Making Pottery Decorating, Firing, Glazing, Making, Technical There is a rhythm and flow to clay. It can’t be done all at once! Even the making process! It can take weeks to get everything done, especially if you can only work on your pottery once a week! Even though we have three hour classes, it’s often just not enough time! Here is an overview of some of the processes so you have a bit more grasp on some of the technical stuff! Step One – Design There are SO many ideas out there for making stuff in clay! From delicate porcelain jewellery, through to heavy sculptural work and everything in between. Deciding your direction is sometimes not that easy – when you first start, try everything, you will naturally gravitate to the style that you enjoy! The options and variations are endless and can get a wee bit overwhelming too! Check in with me before you start to ensure your ideas will work, what order you might do things, how you could achieve the look you are seeking and any other technical data required! Step Two – Making Clay is thixotropic. This means that as you work with it, the clay first gets sloppier and wetter, before is begins to dry in the atmosphere. For most things, you simply can’t do all parts of the project at once. An example of work order might look like: Get last weeks work out from the shelves Prepare clay for today’s work – roll your clay, prepare balls for throwing, make the first stage of a pinch pot) Clean up last week’s work and put it on the shelf for bisque firing Check that you have any glazing to do – and do enough of it that you will have time to finish your main project Do the next step of your next project – there might be a further step that can’t be complete immediately, in that case, wrap your work well and put onto the shelves. Letting your work rest for a while can really help keep your work clean and professional looking. Many things require bagging under plastic to keep it ready for work the next week – put your name on the outside of the bag so you can find your work easily. We have stickers and markers. Consider how you want to decorate your work – coloured slip can be applied at a fairly wet stage (remembering that it will make your work even wetter!). Trying to apply slip to dry clay won’t work! If you want to do sgraffito – you will need to keep the work leather hard (a state of dryness where you can still work the clay with a little effort and a little water and care). Step Three – Drying Most of the time your work can go into the rack uncovered to let it dry out for the following week. If you want to continue forming or shaping you will need to double bag your work – put your work on a suitable sized bat and put the bat in a bag so the base of the bag is under the bat, then put another bag over the top of the work and tuck the top of the bag under the bat. If you want to trim (or turn) your thrown work the following week, it should also be double bagged. If your work is large, delicate, or of uneven thicknesses, you should lightly cover your work for drying. When considering the drying process, bare in mind the weather, humidity and wind! The hotter and dryer, the faster things dry and work can dry unevenly in the shelves – this can lead to cracking – another time to lightly cover your work for drying. Step Four – Trimming and Cleaning Up Your work is dry! It is called greenware now and it is at it’s most fragile! Handle everything with two hands. I often refer to soft hands – keep everything gentle and with your fingers spread as much as possible. Try to not pick up things like plates too much, and always with both hands! Before your work can be bisque fired it should be “cleaned up”. You work won’t go into the kiln if it has sharp edges – when glazed, sharp edges turn into razor blades! Use a piece of fly wire to rub the work all over – this will scratch a little so be light handed. Use a knife or metal kidney to scrape any areas that require a bit more dynamic treatment than the fly wire offers! Finally, a very light wipe over with a slightly damp sponge can help soften and soothe all of your edges and dags! Trimming thrown work: If you are planning to trim (or turn) your thrown work (and you should be), make sure you bag it well – your work should be leather hard to almost dry for easiest trimming. Use this step to finish the work completely – use a metal kidney to polish the surface, or a slightly damp sponge to give a freshly thrown look. Wipe the sponge around the rim after trimming, and check the inside of the pot for dags! Trimming slip cast work: Usually I will trim the rims of your work on the wheel the following day to make that stage easier, however you will still need to check your work for lumps and bumps. Last but not least – check that your name is still clearly on the bottom of your work. Step Five – Bisque Firing When the work is completely dry it can go into the bisque kiln. The bisque kiln is fired to 1000°C. This process burns off the water in the clay as well as some of the chemically bound water. The structure of the clay is not altered that much at this temperature. Inside the bisque kiln, the work is stacked a little, small bowl inside a larger bowl and onto a heavy plate. Smaller items like decorations or drink coasters might get stacked several high. Consideration is paid to the weight of the stack and shape of the work. A bisque kiln can fire about one and a half times the amount of work that the glaze kiln can fire. The firing takes about 10 hours to complete the cycle and about two days to cool down. Once it has been emptied the work is placed in the glaze room ready for you to decorate! Step Six – Glazing Decorating your work with colour can be a lot of fun – and time consuming! There are three main options for surface treatment at this stage: Oxide Washes Underglazes Glazes Washes and underglazes do not “glaze” the work – It will still need a layer of glaze to fully seal the clay (washes don’t need glaze on surfaces not designed for food or liquid as they can gloss up a little on their own). Underglazes are stable colourants that turn out pretty much how they look in the jar. They can be mixed with each other to form other colours and can be used like water colours to paint onto your work. Mostly they should have a clear glaze on top to seal them. Oxides are a different species – the pink oxide (cobalt) wash turns out bright blue for instance. They don’t always need a glaze on top, and some glazes can change the colour of the wash! The glazes need no other “glaze” on top! Be careful of unknown glaze interactions – you can put any combination of glaze in a bowl or on a plate, but only a single glaze on the outside of any vertical surface! Glazes are a chemical reaction under heat. We don’t know the exact chemicals in the Mayco glazes we use. I can guess by the way they interact with each other, however, on the whole, you need to test every idea you have, and not run the test on a vertical surface! Simply put, glaze is a layer of glass like substance that bonds with the clay underneath. Clay is made of silica, alumina and water. Glaze is made of mostly silica. Silica has a melting point of 1700°C and we fire to 1240°C. The silica requires a “flux” to help it melt at the lower temperature. Fluxes can be all sorts of chemicals – a common one is calcium – calcium has a melting point of 2500°C, however, together they both melt at a much lower temperature! Colourants are metal oxides like cobalt (blue), chrome (green through black), copper (green, blue, even red!), manganese (black, purple and pink) iron (red brown), etc. Different chemicals in the glaze can have dramatic effects. for example, barium carbonate (which we don’t use) turns manganese bright pink! Other elements can turn manganese dioxide brown, blue, purple and reddish brown. Manganese dioxide is a flux in and of itself as well. So, glazes that get their black and purple colours, often interact with other glazes and RUN! Our mirror black is a good example – it mixes really well with many glazes because it fluxes them – causes them to melt faster. It will also bring out many beautiful colours in the glazes because it’s black colouring most definitely comes from manganese dioxide! Glaze chemistry is a whole subject on it’s own! We use commercial Mayco glazes on purpose – for their huge range of colour possibilities, stability, cool interactions, artistic freedom with the ability to easily brush the glazes on and ease of use. We currently have almost 50 glazes on hand! A major project is to test the interactions of all glazes with each other. That is 2,500 test tiles!!!! I’m going to make the wall behind the wheels the feature wall of pretty colours! Step Seven – Glaze (Gloss or sometimes called “Glost”) Firing Most of the time this is the final stage of making your creation (but not always!) The glaze kiln goes to 1240°C. This is called cone 6, or midrange. It is the low end of stoneware temperatures. Stoneware clays and glazes are typically fired at cone 8 – 10, that is 1260 – 1290°C. The energy requirement to go from 1240°C to 1280°C is almost a 30% more! Our clay is formulated to vitrify (mature, turn “glass-like”) at 1240°, as are our glazes. A glaze kiln take around 12 hours to reach temperature and two to three days to cool down. Sometimes a third firing process is required – this is for decoration that is added to work after the glaze firing. For example – adding precious metals and lustres. this firing temperature is usually around 600 – 800°C depending upon the techniques being used. There are many students interested in gold and silver trims – we will be doing this third type of firing soon! After firing your work will be in the student finished work shelves. Remember to pay for it before you head out the door! There is a small extra charge for using porcelain clay (it’s more than twice the price of regular clay), and for any third firing process! Once your work has been fired it can not turn back into clay for millennia – so don’t fire it if you don’t like it! Put it in the bucket for recycling. https://firebirdstudios.com.au/the-process-of-making-pottery/This bowl was made by renowned pottery company J & G Meakin of England. The firm was established in the mid-1800's. The bowl is an example of kitchenware used in the 19th century and still in use today.Bowl; white ceramic, round and tapering inwards towards base. Made by J and G Meakin England.On base, 'Ironstone China Reg SOL 391413' with symbolflagstaff hill, flagstaff hill maritime museum and village, warrnambool, maritime museum, maritime village, great ocean road, shipwreck coast, mixing bowl, food preparation, j & g meakin, pottery, stoke-on-trent, kitchen equipment, ceramic -
 Flagstaff Hill Maritime Museum and Village
Bowl, J & G Meakin
Large white ironstone china bowl. Made by J & G Meakin. Hanley England. 15' in diameter.flagstaff hill, warrnambool, shipwrecked-coast, flagstaff-hill, flagstaff-hill-maritime-museum, maritime-museum, shipwreck-coast, flagstaff-hill-maritime-village, china bowl, bowl -
 Clunes Museum
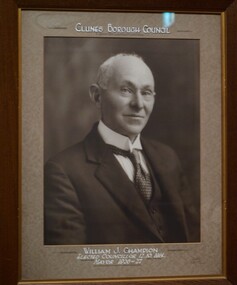
Photograph, HORNBY STUDIO - BALLARAT, C1926
IT IS ON PERMANENT LOAN FROM HEPBURN SHIRE COUNCIL.CR. W. J. CHAMPION WAS ELECTED COUNCILLOR TO CLUNES BOROUGH COUNCIL IN 1914 AND WAS MAYOR 1926-27. THE PHOTOGRAPH ORIGINALLY HUNG IN THE CLUNES TOWN HALL DURING HIS TERM AS MAYOR.PHOTOGRAPH OF CR. WILLIAM J. CHAMPION - FRAMED.CLUNES BOROUGH COUNCIL WILLIAM J. CHAMPION. ELECTED COUNCILLOR 12.10.1914. MAYOR 1926-27. HORNBY STUDIOS BALLARATlocal history, photography, photographs, councillors & officers -
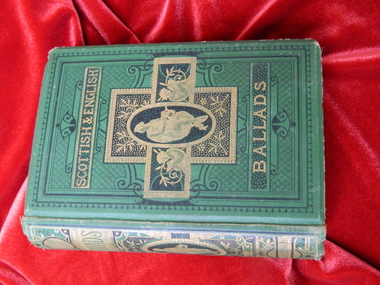 Ballarat Clarendon College
Book prize, Ballads: Scottish and English
The beautiful book was gifted to a Miss M Muir in 1878 for Good Conduct and General Proficiency while a student at F J Thomas' Lyons Street Grammar School (for more information see Golden Heritage p31,40). The Ballarat College (Girls School) register lists a Maggie Muir as enrolling in 1881, the year F J Thomas’ school closed. It seems reasonable to consider Maggie Muir and Miss M Muir as one person. Mid green cloth bound book with elaborate gold lettering and illustration on cover and spineBook plate inside front cover: Ballarat Ladies College / in connection with the Ballarat Grammar School / Christmas 1878 / V class / Prize / for / Good conduct and general proficiency / awarded to / Miss M Muir / F J Thomas Principal. maggie-muir, book prize, ballarat grammar school, f j thomas, 1878 -
 Orbost & District Historical Society
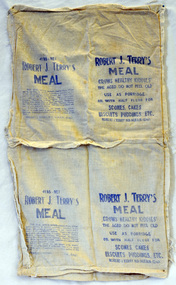
pillow case, c. 1930 - 1950
Presumed to have been made by the family of Mrs. Jean Snow who donated this item. This is a classic example of the tradition of "making do" , of creating new uses for older items or bits of scrap. A pillow case made from four porridge bags which have been opened out and stitched together. The name of the porridge manufacturer is evident on the pillow case, Robert J Terry.Robert J Terry N D M B A N (Eng)pillow- case making-do depression-creativity -
 Peterborough History Group
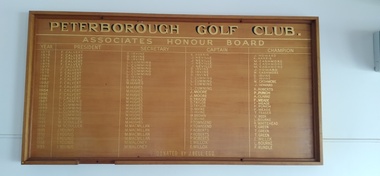
Memorabilia - Peterborough Golf Club Associates Honour Board & Women's Golf Honour Board
This board, starting in 1972, records the names of women members in the time when they were considered Associates. It lists the name of each President, Captain, Secretary and Champion for each year. The second board records the same information but is now known as the Women's Golf Peterborough. PRESIDENT 1972 - 1976 F. Calvert, 1977 J. Moore, 1978 – 1986 F. Calvert, 1987 – 1992 L. Cumming, 1992 – 1994 M. Scouller, 1995 – 1999 I. Younis SECRETARY 1972 – 1974 D. Irvine, 1975 – 1979 L. Cumming, 1980 – 1981 D. Irvine, 1982 – 1993 M. Hughes, 1994 – 1997 M. Macmillan, 1998 – 1999 M. Maloney CAPTAIN 1972 K. Harris, 1973 – 1976 J. Neville, 1977 – 1979 D. Irvine, 1980 – 1983 L. Cumming, 1984 – 1985 J. Moore, 1986 – 1988 D. Taylor, 1989 – 1990 D. Irvine, 1991 M. Brown, 1992 D. Irvine, 1993 – 1994 P. Townsend, 1995 – 1997 P. Roberts, 1998 – 1999 E. Willox CHAMPION 1972 J. Howard, 1973 K. Harris, 1974 M. Cashmore, 1975 M. Cashmore, 1976 M. Cashmore, 1977 J. Howard, 1978 M. Cashmore, 1979 D. Irvine, 1980 D. Irvine, 1981 M. Cashmore, 1982 J. Howard, 1983 R. Roberts, 1984 P. Punch, 1985 A. Clarke, 1986 F. Meade, 1987 F. Meade, 1988 P. Punch, 1989 F. Meade 1990 T. Fraser, 1991 V. Beer, 1992 L. Bourke, 1993 R. Whitehead, 1994 F. Green, 1995 F. Green, 1996 F. Green, 1997 E. Willox, 1998 L. Bourke, 1998 F. RundleLarge rectangular wooden honour board with gold printing of namesList of names of chronologically of the President, Secretary, Capt and Champion for each year. Donated by J. Bell Esq Second board was donated by the Estate of Mervyn J Murnane -
 Mission to Seafarers Victoria
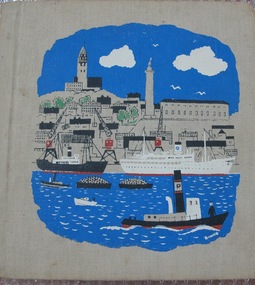
Album - Photograph album, Allan Charles Quinn, Ports of call with M/S 'Mongabarra' on African trip 16th June - Dec 1950 ( Voyage starts and ends in Sweden), 1950
The item tells the story of Allan Quinn's voyage to Africa on a round trip departing returning to Gothenburg aboard the Merchant Ship Mongabarra.. The album preserves a 1950s perspective of a Merchant Seaman and his experience of the respective Ports at that time. The Collection is especially useful when viewed along with contemporary Quinn family correspondence.Album with metal spiral spine and beige fabric cover with gouache printed colour design featuring Gothenburg landmarks. Photograph album contains 25 pages of b/w photos . In Aqua coloured ink on the inside front cover is a handwritten itinerary / index of the 25 ports visited on the voyage on adhered sheet of paper. Inscription: Title (see above)/ follows with Header line: " Port Country Arrived Departed / 1. Gothenberg.../ 16. Bel Congo.../25. Gothenburg / Signed off in Gothenburg 12 December 1950" album, photos, mongabarra, 1950, ms mongbarra, gothenburg, sweden, seafaring life -
 Ringwood and District Historical Society
Notebook, Burnside, Marie, Ringwood - Short Notes on its Development 1857-1963: Original manuscript and photos by Mrs. M Burnside, >1963
Notes made by Marie Burnside with the co-operation of the R.H.R.G. for the book entitled 'Ringwood - Short notes on it's development 1857 - 1963.'1. Stenographers notebook 15pp used. Lemon coloured cover with red printing.; 2. Patterned covered book - with pasted in typewritten pages and pictures. +Additional Keywords: Burnside, Marie -
 Ringwood and District Historical Society
Photograph, Warrandyte Road Bridge over Mullum Mullum Creek, Ringwood with the higher bridge being erected. Date probably in the 1920s. Taken by M. McGivern
Digital photograph -
 Warrnambool and District Historical Society Inc.
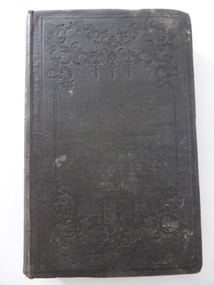
Book, Work of the English Puritan Divines - M Henry, Early 1840s
This book was given in 1847 to E. Callender by an unknown person (‘C.E –‘). There is a reference in the Warrnambool Examiner newspaper to an Adam Callander, a Port Fairy baker whose wife Alice committed suicide in 1870 and, more importantly, a reference to a Miss Callender arriving as a ship passenger to Warrnambool in July 1854. There is a record of Eliza Callender marrying Peter McFarlane in 1858. The book may have been a New Years’ Day present or a birthday present or a presentation to someone leaving England to migrate to Australia. This book is kept because of its inscription and its early date (1847 – some months before Warrnambool was founded). Further research may reveal the extent of the book’s significance. This is hard cover book of 320 pages. The cover is dark brown with embossed scrolls on the front cover and gold lettering on the spine. The book has eight chapters, including a biography of the author, Matthew Henry, and two black and white sketches. On the first page is the stamp of the Warrnambool and District Historical Society. The inscription is handwritten in black ink. The cover is slightly stained.‘To E. Callender with kind love from C.E- (the last letter is not clear – it could be an ‘E’ or a ‘D’ or merely a decorative flourish) ‘1st January 1847’ e. callender, warrnambool, work of the english puritans divine -
 Kiewa Valley Historical Society
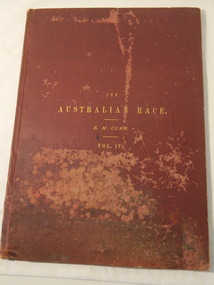
Book & Map - Australian Aborigines' Language, The Australian Race Vol. IV by Edward M. Curr, 1887
This book is the fourth volume of the Australian Race which was printed by the Government printer. The other 3 volumes cover the origin, languages, customs, place of landing in Australia, and the routes by which it spread itself over that continent. This book and map indicate an interest in the Aboriginal Race of Australia during the late 1880s.A local family owned this book indicating an interest in the Aborigines of Australia. The languages of Aboriginal tribes throughout Australia can be compared with those tribes of the Kiewa Valley adding (confirming) to the information sourced from alternative sources.Large thin brownish book with gold embossed title on front cover. 45 pages with blank cover pages. Each page has 8 columns giving the aboriginal word of each tribe giving a comparitive vocabulary of selected English words. Fold out map inserted in flap at rear. It is a map of Continental Australia, showing the routes by which the Aboriginal race spread itself throughout the continent.aborigines; first people of australia; aboriginal language; aboriginal tribes; kiewa valley -
 Kiewa Valley Historical Society
Book - School Text - Arithmetic, MacMillan and Co. Ltd, An Arithmetic for Schools by S. L. Loney, M. A, 1918
This book covers all areas of Arithmetic for senior students. It has a lot of detail and is well set out. A variety of books would have been comparatively limited at the turn of the century when this book was published. H. L. Tonkin may have been a student or teacher from the Kiewa Valley circa 1918.Hard covered stained, faded greyish / blue book. Title embossed (in gold) on spine only and difficult to read.H. L. Tonkin (and more - too hard to read) - in pencil on first page. Pencil lines inside back cover.education, mathematics, arithmetic, school, h. l. tonkin -
 Kiewa Valley Historical Society
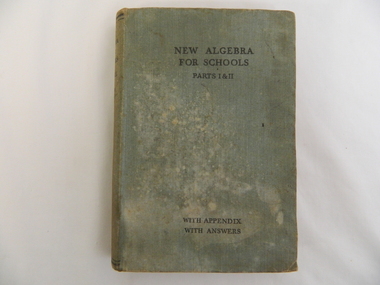
Book - Pupil Text Book, New Algebra for Schools by Clement V. Durell, M. A, 1930
This book has been reprinted many times during the 1930s and 1940s.This book may have been used by a student in the Kiewa Valley as it was donated to the KVHS. Parts 1 and 11 With Appendix With Answers. Stained pale green hard covered book with black writing on cover and spine. 'Bell' on spine.algebra, mathematics, education, schools -
 Kiewa Valley Historical Society
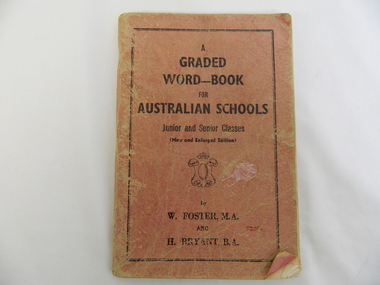
Book - School Text Book, A Graded Word Book for Australian Schools by W. Foster, M. A. and H. Bryant B. A
Spelling books were used in the Primary and Secondary schools during the 1950s. This book enabled the student to progress at his/her own pace. Roy Davies grew up and lived in the Kiewa Valley at Tawonga.Small faded red soft covered book with black writing on cover inside a border of a thin black line. In black: Junior and Senior Classes"Roy Davies 4B 1957". Inside cover page "accompanied, achievement, affair" hand written on inside title page.spelling, school, student, roy davies, education, mt beauty, tawonga