Showing 10279 items
matching classism
-
 Melbourne Tram Museum
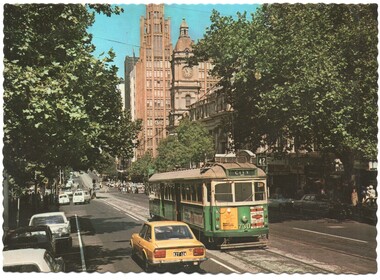
Postcard, Biscay Greetings, Collins St east of Russell St, mid 1970's
Colour postcard divided back - Biscay Greetings, of an photo looking west along Collins St east of Russell St with SW5 730 on a route 42 westbound. Has the Town Hall and National Mutual building in the background. Back has space for name and address, stamp and a message and details of the postcard. Produced by Biscay Greetings, possibly mid 1970's. Card No. BG119 has serrated edges. 2637.1 - same photograph, different publisher - "scanscene international" photo by R Bell. - From the Keith Kings Collection.trams, tramways, postcards, collins st, w5 class, tram 730 -
 Melbourne Tram Museum
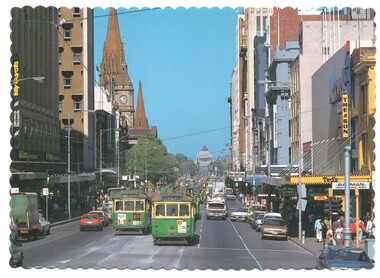
Postcard, Biscay Greetings, Swanston St from near Bourke St, mid 1970's
Colour postcard divided back - Biscay Greetings, of an photo looking southwards along Swanston St from near Bourke St with trams 685 and 772 running routes 64 and 8 respectively. Has Ted's Camera store, The Sun, Batman books and Billy Guyatts stores signs in the photograph. Back has space for name and address, stamp and a message and details of the postcard. Produced by Biscay Greetings, possibly mid 1970's. Card No. BG 249 with a serrated edge. 2nd copy added 15/9/2020.trams, tramways, postcards, swanston st, w5 class, tram 685, tram 772 -
 Melbourne Tram Museum
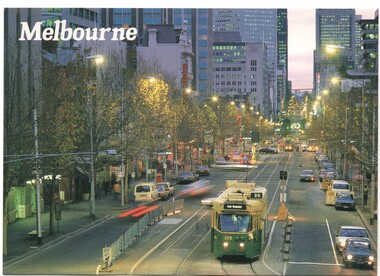
Postcard, Biscay Greetings, Bourke St into Spring St, mid 1980's
Colour postcard divided back - Biscay Greetings, of Z3 225 turning from Bourke St into Spring St. Route 96, East Brunswick. Looking down the west of Bourke St at dusk with the many buildings etc in the background. Back has space for name and address, stamp and a message and details of the postcard. Produced by Biscay Greetings, possibly mid 1990's. Card No. BG 277. 2nd copy added 30/8/2020 Image also used in Reg Item 5129.trams, tramways, postcards, bourke st, z class, melbourne, tram 225 -
 Melbourne Tram Museum
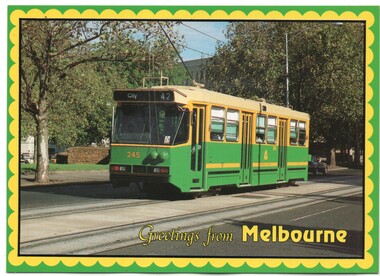
Postcard, Biscay Greetings, A 245 on a route 42, mid to late 1980's
Colour postcard divided back - Biscay Greetings, series of featuring A 245 on a route 42, possibly in the Kew area, has a gardens background and the City of Kew offices. Has an extensive note on rear about the tram and its type. Back has space for name and address, stamp and a message and details of the postcard. Produced by Biscay Greetings, possibly mid to late 1980's. Card No. BG201 2nd copy added 28/8/2020.trams, tramways, postcards, kew, a class, route 42, tram 245 -
 Melbourne Tram Museum
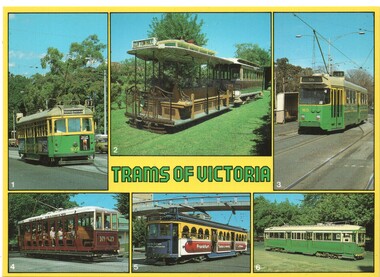
Postcard, Biscay Greetings, "Trams of Victoria", mid 1980's
Colour postcard divided back - Biscay Greetings, series of 6 photographs of trams, card titled "Trams of Victoria", featuring W6 977, Les Twentyman's cable tram set, Z3 160, Bendigo 17, W7 1024 (Lufthansa - March 1980 - see http://vicsig.net/index.php?page=trams&article=adtrams access 20-12-17) and Ballarat 38. Back has space for name and address, stamp and a message and details of the postcard. Produced by Biscay Greetings, possibly mid 1980's. Card No. BG193 2nd copy added 15/9/2020.trams, tramways, postcards, cable trams, advertising trams, bendigo, ballarat, w6 class, w7 class, z3 class, tram 977, tram 160, tram 17, tram 1024, tram 38 -
 Melbourne Tram Museum
Negative, Bruce Herbert, "MMTB Trams - Hawthorn and Dandenong Road", 11/04/1976 12:00:00 AM
Negative folder - made by SAGA Japan, containing 8 no. 120 film negatives 60mm x 90mm of MMTB Trams at the intersection of Hawthorn and Dandenong Road 11 April 1976, marked "Test Film" and stamped "347". .1 - Harris Train at ? .2 - 901 - route 64, City .3 - 959 - route 69 - Kew Cotham Road - with a CP Air advert .4 - Tramway Emergency Vehicle .5 - 947 - route 64 Three negs not scanned.trams, tramways, sw6 class, dandenong rd, hawthorn rd, route 64, route 69, r10 vehicle, railways, tram 901, tram 959, tram 947, aec, mmtb -
 Melbourne Tram Museum
Negative, Bruce Herbert, "Melbourne Trams - Hawthorn and Dandenong Road", 18/07/1976 12:00:00 AM
Negative folder - made by SAGA Japan, containing 11 no. 120 film negatives 60mm x 60mm of Melbourne Trams at the intersection of Hawthorn and Dandenong Road 18 Jul 1976, stamped "359". .1 - Harris train at Malvern station area. .2 - Neerim Road Caulfield level crossing .3 - Caulfield - Glenhuntly sidings .4 - 899, route 69, Kew Cotham Road, with an Army advert. .5 - ditto, out of focused. .6 - 905 route 64 .7 - 1021 - route 64 - has a Kodak advert. .8 - 805, Dandenong Road, route 64 .9 - 904 route 64 .10 - W2 331? running a special Three megs not scanned.trams, tramways, sw6 class, dandenong rd, hawthorn rd, route 64, route 69, w2 class, railways, tram 899, tram 905, tram 1021, tram 904, w7 class, w5 class, mmtb -
 Melbourne Tram Museum
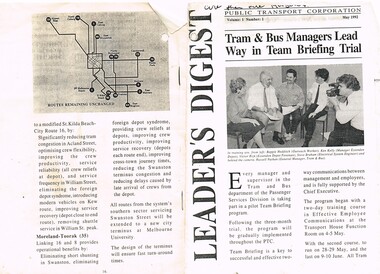
Document - Photocopy, Public Transport Corporation (PTC), "Leader's Digest", May. 1992
Photocopy of a newsletter to Public Transport Corporation staff, May 1992, titled "Leader's Digest", Vol 1 and No. 1 (unknown if any more published), with a photo of a group of five people undergoing a team briefing. Original document 16 pages, but only a few copied, principally about the proposed Tram Cross - Linking and Route Restructure proposals. Follows the Tram and Bus Strategic Review Committee of April 1991. Looks at West Coburg - Carnegie, West Preston - South Melbourne, Bundoora - East Brunswick, Mont Albert to Port Melbourne, North Balwyn - City - East Burwood, Footscray - West Maribyrnong to Glen Iris via Swan St St, Moonee Ponds - West Maribyrnong, Kew Cotham Road - William St - St Kilda and Moreland - Toorak. Has a map of the routes remaining unchanged. See Also Reg Items 344, 1545 and 2332 for related materials.trams, tramways, w class, reports, melbourne, ptc, tram depot, operations -
 Melbourne Tram Museum
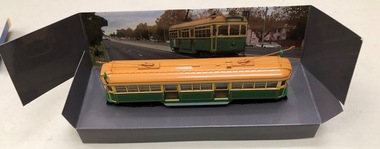
Leisure object - Model tram and presentation case, Cooee Concepts Pty Ltd, Model of Melbourne W7 1027, 2001
Model of Melbourne W7 1027 in a presentation cardboard box, made by Cooee Concepts Pty Ltd in China. Tram secured into the card box by two screws just behind the life guard. Made from plastic with trolley poles from metal (trolley poles can be moved) light brown or gold roof, green and yellow sides, black No. 15 truck The box sides provides details of the tram, scale and a photo of a tram running in the street. Box details the tram as a W6, but its number and history detail it as a W7.trams, tramways, models, cooee models, w7 class, tram 1027 -
 Melbourne Tram Museum
Leisure object - Model tram and presentation case, Cooee Concepts Pty Ltd, Model of ex Melbourne W6 976, in use as Bendigo "ninesevensix", c2010
Model of ex Melbourne W6 976, in use as Bendigo "ninesevensix" in a presentation cardboard box, made by Cooee Concepts Pty Ltd in China. Tram secured into the card box by two screws just behind the life guard. Made from plastic with trolley poles from metal (trolley poles can be moved) light black roof, red and gray sides, black No. 15 truck The box sides provides details of the tram, scale and a photo of a tram and its use in Bendigo firstly as a Cafe Tram then as a Restaurant Tram.trams, tramways, models, bendigo, restaurant tram, cooee models, w6 class, tram 976 -
 Melbourne Tram Museum
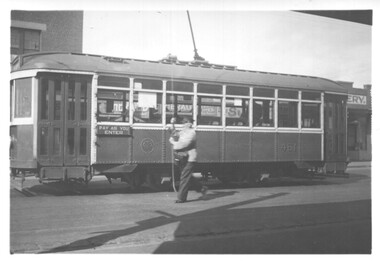
Photograph - Black and white - X1 461 Ballarat Road terminus
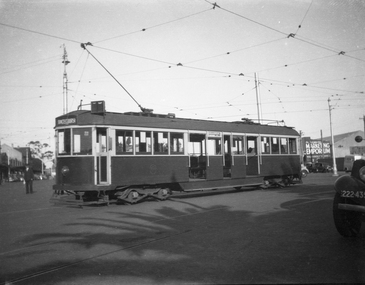
Photograph of X1 461 at the Ballarat Road terminus with the driver turning the trolley pole. The tram has a "Pay as you enter sign" sign. The driver who drove the tram one man collecting fares has a summer jacket on and is carrying the ticket bag without a ticket wallet - Fare Box tram. All fares were 2 1/2d or 2d tickets sold in lots of six tickets. See item 876 Sections and Fares Book. The driver's trousers do not appear to have a red seem. The tram carried Fare Boxes 9/1930 to 6/1936. This line closed on 10-3-1962 and the tram was subsequently scrapped.Yields information about tram 461 and tramway operations.Black and white photograph on paper.trams, tramways, ballarat road, tram 461, footscray, one-man trams, x1 class -
 Melbourne Tram Museum
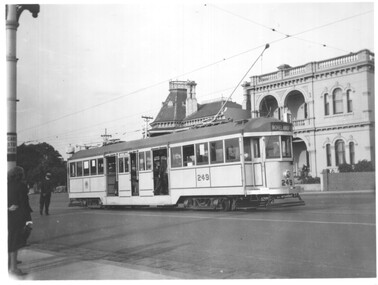
Photograph - Black and white - tram 249 Luna Park Jubilee and negative, 1938
Photograph of W2 249 painted in silver and blue for the silver Jubilee of Luna Park 1938. Tram has the destination of Moreland, route 15. The photo is taken at the intersection Fitzroy St and The Esplanade. There is a compulsory tram stop sign on the left side of the photo. Photo also in item 4601, TAP73. This view has not been cropped. Photo by either Peter Duckett or Ray Pearson. The tram is now owned by the Sydney Tramway Museum and was painted a burgundy colour to promote a heritage tram line in Canberra in 2001. See item 5602. Demonstrates a specially painted tram for a Luna Park event.Black and white photograph on Kodak Velox paper.trams, tramways, w2 class, tram 249, luna park, the esplandade -
 Melbourne Tram Museum
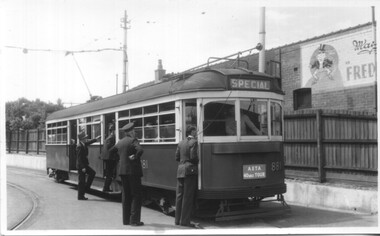
Photograph - Set of 5 Black & White - First AETA tour, 15-2-1947
Set of five photographs of the first Australian Electric Traction Association (AETA) tram tour of Melbourne on 15/2/1947. See page 8 of the March 1947 issue of "Tram Tracks" for details of the tour and the MMTB Crew. 1 - SW6 881 about to leave Glen Huntly Depot 2 - Crossing Balaclava Junction 3 - Crossing the Kooyong railway level crossing in Glenferrie Road - has the railway signal box and gates in view. 4 - Turning into Riversdale Road from Glenferrie Road with the Stotts Business College building in the background. 5 - Just to the east of Yarra River Bridge in Swan Street with the Burnley Gardens on the right.Yields information about the first AETA tram tour in 1947Set of 5 Black and white photograph on paper. Two copies of each held.Each one of the set has a photographers file stamp on the rear, but no details filled in.trams, tramways, aeta, tram tours, tram 881, sw6 class, glen huntly, kooyong level crossing, glenferrie road, riversdale road, burnley, hawthorn, balaclava junction, glen huntly depot, hawthorn road, swan st -
 Melbourne Tram Museum
Photograph - Set of two colour prints of L class 102 on a tram tour, Bill Kingsley, July 1974
Set of two photographs, possibly during a Footscray Technical College tour in July 1974. Such tours were arranged by Bill Kingsley. 1 - L 102 at Brunswick Depot. Note the destination of "Fawkner" - which was used to link with bus services at various times of the day between North Coburg and Fawkner station - see reference. 2 - ditto turning from Pilkington St into Barkly St North Fitzroy, part of the single track Holden St. line.Yields information about the use of L class trams.Set of two colour prints, Kodak paper with date of July 1974 on rear.Location and tour notestrams, tramways, l class, tram 102, pilkington st, barkly street, bill kingsley., brunswick depot -
 Melbourne Tram Museum
Photograph - Domain Junction interchange, Bill Kingsley, 13/10/1971
Set of six photographs showing Domain Interchange or Junction including trams and buses in St Kilda Road. Photos by Bill Kingsley who lectured in Civil & Traffic Engineering at Footscray Technical College. These would have been taken to show how an interchange functions. Dated on an envelope with negatives as 13/10/1971. 1 - Tram stop showing shelter, SW6 886 (City) and Melbourne Brighton Bus No. 660 (City, route 602). Tram 886 had adverts for Ferris car radios and Sony electronics. 2 - W2 550 (City no route number) arriving at the stop with passengers waiting. 3 - Two Melbourne Brighton buses (routes 601 and 602) with a long line of outbound trams in the background. 4 - Inspectors cabin with W2 428 and W2 324 (City, route 67) 5 - SW6 897 (City route 3) with Inspectors cabin and Domain Road in the background. 6 - Bunch of seven southbound trams between Domain Road, tailed by W2 574 (Malvern Burke Rd, Route 5).Yields information about the Domain Interchange / JunctionSet of six black and white photographs and associated 35mm negatives."Domain Intersection" on rear of each print.trams, tramways, bill kingsley., domain interchange, st kilda road, domain road, w2 class, sw6 class, melbourne brighton bus line, buses, tram 886, tram 550, tram 428, tram 324, tram 897, tram 574 -
 Melbourne Tram Museum
Photograph - Albert Road and Clarendon St South Melbourne, Bill Kingsley, 13/10/1971
Set of four black and white photos by Bill Kingsley of trams in South Melbourne: 1 - SW6 895 (Sth Melbourne & St Kilda Beach, Route 12) outbound in Albert Road. Tram has advertisements for Robo 2 min auto car wash, and Norton makes Bear Tape. 2 - W2 639 (Sth Melbourne & St Kilda Beach, Route 12) outbound in Albert Road. Tram has advertisements for Tolleys Brandy. In the background is the former South Melbourne Football ground. 3 - W5 773 (City-Brunswick St, route 12), turning from Albert Road into Clarendon St. Tram has advertisements for Sprint soft drink and HMV sound systems. 4 - Photo of Bill KIngsley's well-known VR Combi van.Yields information about the Albert Road tram servicesSet of four black and white photographs and associated 35mm negatives.Location on the rear of each print.trams, tramways, bill kingsley., albert road, clarendon st, route 12, sw6 class, w5 class, w2 class, tram 895, tram 639, tram 773, vr combi, south melbourne, south melbourne football ground -
 Melbourne Tram Museum
Negative - Copy - W5 808 The Esplanade St Kilda, Ray Pearson
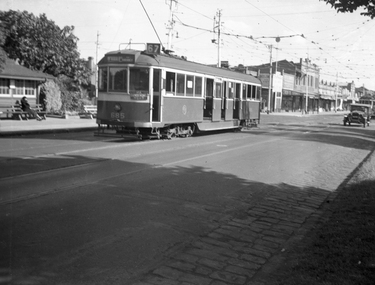
Copy negative of a photograph of W5 808 in The Esplanade St Kilda near the corner with Fitzroy St. The tram entered service on 23/12/1937. The tram appears in a very new condition. The tram has the destination of Moreland. Photo considered to be post WW2Yields information about W5 808 soon after construction.Copy negative of a black and white photographtramcars, tramways, tram 808, st kilda, the esplanade, w5 class, moreland -
 Melbourne Tram Museum
Negative - Copy - Y1 611 Wattle Park, Ray Pearson, early 1930s
Copy negative of a photograph of Y1 611 at the Wattle Park terminus in Riversdale Road, prior to the construction of the shops that were built behind the tram. The driver is standing in the open doorway. The tram line to the Wattle Park terminus opened in 1928. The tram entered service in 1930. Photo early 1930s.Yields information about W5 808 soon after construction.Copy negative of a black and white photographtramcars, tramways, wattle park, y1 class, riversdale road, tram 611 -
 Melbourne Tram Museum
Negative - Copy - W5 811 Caulfield Racecourse loop, late 1940s
Copy negative of a photograph of tram W5 811 turning from the railway underpass at the Caulfield Railway Bridge into the former Railway Avenue. Part of this track was removed during1983 and changed arrangements provided for Caulfield Race traffic. An inspector is standing behind the tram on the left hand side of the photo. On the right side is the Caulfield Marketing Emporium. Based on depot listings and a Glen Huntly run number in the back cab, photo is dated to the late 1940s.Yields information about the Caulfield Racecourse loopCopy negative of a black and white photographtramcars, tramways, w5 class, tram 811, racecourse, caulfield, dandenong road -
 Melbourne Tram Museum
Negative - Copy - L 101 Balaclava Junction Hawthorn Road Caufield, early 1940s
Copy negative of a photograph of L 101 Balaclava Junction Hawthorn Road Caufield, with a destination of Glenhuntly Depot. The tram was fitted with a route number boxes in June 1939, which provides a date era for the tram, but is yet to have its drop centre floor raised. Behind the tram is the shelter at this location along with a sign stating the trams could be taken to Balaclava, St Kilda Beach and Caulfield, along with a tram stop sign and an End Section sign.Yields information about the use of L class trams.Copy negative of a black and white photographtramways, caulfield, l class, tram 101, hawthorn road, shelters, signs, trams -
 Melbourne Tram Museum
Negative - Copy - CW5 685 Hawthorn Road, Balaclava Junction, early to mid 1940s
Black and white photograph of CW5 685 in Hawthorn Road with Caulfield Park in the background, just before Balaclava Junction. Tram has white strips on the bumper and under the cab windows. Photo during the early to mid 1940's. Tram has an Auxiliary board "Via Dandenong Rd" and showing, Route 67. At the time, Route 67 ran from St Kilda ran from Balaclava Junction to St Kilda, Acland St via Dandenong Road. Ceased in 1955. See 3599 for a poor print.Yields information about the use of L class trams.Copy negative of a black and white photographtramcars, tramways, caulfield, hawthorn road, cw5 class, balaclava junction, route 67., tram 685 -
 Melbourne Tram Museum
Photograph - Colour prints - last day of Hawthorn tram depot operations - set of 2, 14/2/1965
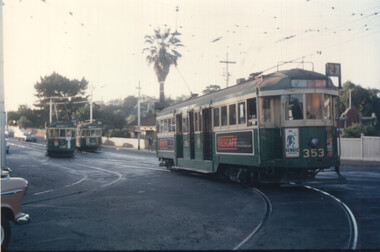
Set of two colour prints taken on the last day of operation, of the Hawthorn Tram depot as a running depot in the evening. The photographer is not known. Possibly a copy print. 1 - looking at operations in Wallen Road with W2 353 (Hawthorn route 27) returning to the depot and two W2s (possibly 330 and 332) shunting in Wallen Road. 2 - SW6 855 and SW6 848 are on roads 5 and 6 in the "new" shed at Hawthorn. The depot ceased as a running shed on 14/2/1965. Yields information about the last day of Hawthorn tram depot as a running depot.Set of two colour prints - printed on Kodak Royal paper.trams, tramways, sw6 class, w2 class, last day, hawthorn tram depot, wallen road, tram 353, tram 855, tram 848 -
 Melbourne Tram Museum
Photograph - Set of five colour prints - last day of Footscary - AETA tour, 10/2/1962
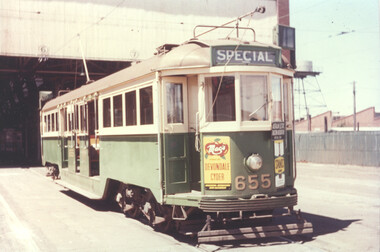
Colour prints show the trams used by the AETA (Australian Electric Traction Association) on 10/2/1962 to mark the closure of the local routes at Footscray. 1 - W3 655 at South Melbourne depot 2 - W3 655 shunting at Moonee Ponds Junction 3 - W4 670 followed by W3 655 crossing the Maribyrnong Road Bridge. 4 - The two trams at Footscray Station 5 - At Footscray tram depot with local cars. See item 3992 for other photographs. Yields information about the AETA tour to mark the closure of the Footscray local system. Set of five Colour print on Kodak Royal paper.trams, tramways, w3 class, w4 class, tram 655, tram 670, footscray, maribyrnong road, moonee ponds junction, south melbourne depot, footscray depot, leeds st, aeta -
 Melbourne Tram Museum
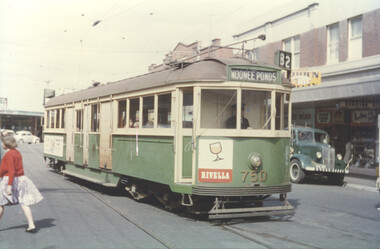
Photograph - Set of two photos - route 82 cars on the day of the closure of the Footscray local routes, 10/2/1962
Colour prints showing two of the service cars running route 82 on the day of the closure of the Footscray local routes 10-2-1962: 1 - W5 750 (Moonee Ponds, route 82) at the Footscray terminus in Leeds St. 2 - VR 52 (Moonee Ponds, route 82) turning from Ballarat Road into Gordon St.Yields information about route 82 service cars on the day of the closure of the Footscray local routes. Set of two Colour print on Kodak Royal paper.trams, tramways, ballarat road, leeds st, footscray, w5 class, vr class, tram 52, tram 750 -
 Melbourne Tram Museum
Photograph - Set of six colour prints - last day of local Footscary lines, 10/2/1962
Colour prints showing some of the trams used on the last day of local Footscray services. 1 - X1 459 - picking up a passenger in Ballarat Road - has a service station in the background and the Footscray Hospital 2 - X1 459 and another X2 in Leeds St Footscray. 3 - X1 467, and another X1 and X2 677 at Footscray Tram depot for the AETA tour. (Reference provides information that X2 468 was the second car) 4 - X1 468 with the destination of Williamstown Road turning into Leeds St from Hopkins St 5 - X2 677 and two X1s at Footscray Station in Leeds St. - on the AETA tour. 6 - X2 678 turning from Ballarat Road into Droop St showing the "Ballarat Road" destination. Note Kinnears Rope works building behind the tram.Yields information about the AETA tour to mark the closure of the Footscray local system. Set of six Colour print on Kodak Royal paper.trams, tramways, footscray, ballarat road, leeds st, x1 class, x2 class, aeta tours, tram 459, tram 678, tram 467, tram 468, tram 677, mmtb, footscray depot -
 Melbourne Tram Museum
Photograph - Colour print - Freight Car 17 at Hawthorn Depot, early 1965
Colour print showing Freight Car 17 on No. 1 Road at Hawthorn Depot prior to its closure as a running shed. The tram is advertising Sunkist Peas. Alongside the tram is W2 324 (Hawthorn Depot, Route 80) No. 17 was converted from NMETL No. 13 and this tram is now on display at the Museum. See Reference. Photo most likely taken shortly before the depot closed as a running shed. The depot ceased as a running shed on 14/2/1965. Yields information about the last days of Hawthorn tram depot as a running depot and the use of the Freight car.Colour print - printed on Kodak Royal paper.trams, tramways, w2 class, tram 17, tram 324, freight car, sunkist peas, mmtb, v class, hawthorn depot -
 Melbourne Tram Museum
Photograph - Set of 8 colour prints - Moomba trams, c2000
Set of 8 colour prints of trams in a Moomba Parade taken in St Kilda Road. Not known which year - c2000. For the 2002 Program - see Item 1329. Trams were modified for a series of Moomba Events. The last Parade featuring trams was in 2002 and the trams were subsequently disposed of. 1 - Kitchen Tram - could be SW5 795 2 - Antarctica tram, - W6 984 with a friendly whale. 3 - Silk Road tram - SW5 800 4 - Islander Tram SW6 899 5 - Trailer tram 6 - Nirvana tram 7 & 8 - Pedal tram 1042 Yields information about trams used in a Moomba Parade.Set of 8 Colour prints - printed on Kodak Professional paper.trams, tramways, moomba, tram parade, tram 1042, tram 899, tram 800, tram 984, tram 795, sw5 class tram, w6 class, sw6 class, st kilda road -
 Melbourne Tram Museum
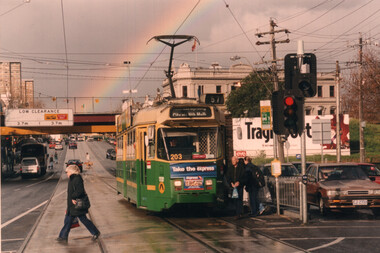
Photograph - Colour Print - Racecourse Road - Z3 203 with a rainbow
Colour print of Z3 203 (Route 57) at the Newmarket Plaza shopping centre, stop in Racecourse Road. The tram is in The Met/PTC colour scheme. In the background are the Douta Galla Hotel, the Newmarket Station railway overbridge and a rainbow. Photo c2000.Yields information about the use of the use of Z3 trams on route 57.Colour print - printed on Kodak Professional paper.trams, tramways, z3 class, tram 203, racecourse road, newmarket, route 57 -
 Melbourne Tram Museum
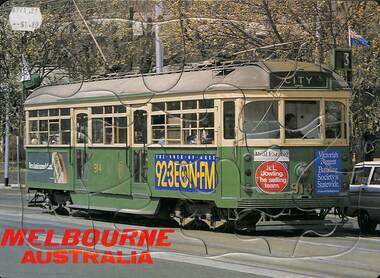
Souvenir - Jigsaw puzzle - tram SW6 914, 1970s
Sold as a souvenir of a Melbourne tram - 17 piece within a outer fixed part. Features SW6 914 (Route 3, City), MMTB colour scheme with adverts for VB Beer, 92.3 EON.FM, K L Dowling real estate and Statewide Building Society.Demonstrates souvenirs of Melbourne trams.Jigsaw puzzle - stamped featuring a photo of SW6 914, wrapped in a cellophane sheet. Has a label on rear "Made in Hong Kong" and a price label on the front "$1.80". Has "Melbourne Australia" printed in the bottom left hand corner.trams, tramways, jigsaw puzzle, souvenirs, melbourne, sw6 class, tram 914 -
 Melbourne Tram Museum
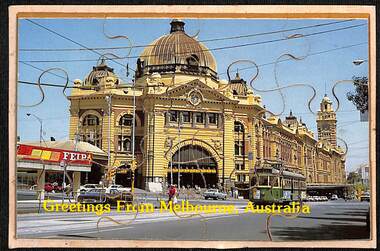
Souvenir - Jigsaw puzzle - tram SW6 Flinders St station, 1970s
Sold as a souvenir of a Melbourne tram - Features a SW6 tram on route 48. The Princes Bridge station building is on the left hand side of the photo. Has the words "Greetings from Melbourne Australia" on the bottom edge.Demonstrates souvenirs of Melbourne trams.Jigsaw puzzle - stamped featuring a photo of an SW6 905?, 12 wooden pieces glued to a postcard size backing piece. The bottom right hand corner is loose.trams, tramways, jigsaw puzzle, souvenirs, melbourne, sw6 class, flinders st station, flinders st