Showing 1236 items matching "ballarat station"
-
 Ballarat Tramway Museum
Photograph - Black & White Photograph/s, 1955 or 1956
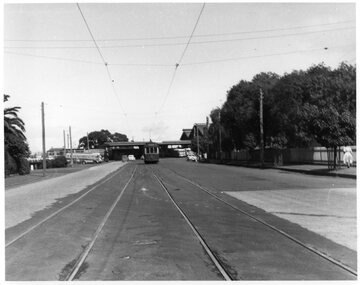
Black and white photograph of Geelong Pengelley tram No. 19 in Railway Terrace inbound to the City area. See also Reg. Item 2800 for the tram at the station terminus. Photo shows the fence along the south side of the Railway goods yard. Photo taken 1955 or 1956.tramways, trams, geelong, railway station, railway terrace, tram 19 -
 Ballarat Tramway Museum
Photograph - Black & White Photograph/s, 1955 or 1956
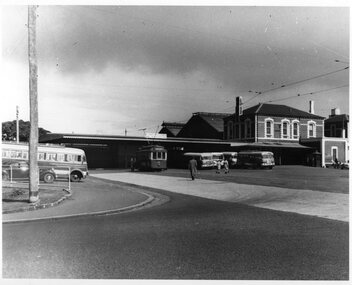
Black and white photograph of Geelong Pengelley tram No. 18 or 19 in Railway Terrace, changing ends at the station terminus. See also Reg. Item 2792 for a photo of the tram inbound to the city in Railway Terrace. Photo taken 1955 or 1956 and shows a number of buses in the station forecourt. Note the phone box in the right hand side of the photograph.tramways, trams, geelong, railway station, railway terrace, tram 19, tram 18 -
 Ballarat Tramway Museum
Functional object - Destination Roll, State Electricity Commission of Victoria (SECV), " Geelong" (black background), 1950's
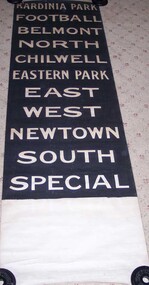
Yields information and demonstrates aspects about Geelong's destination rolls used in trams up to 1956 when the system closed.Destination roll - white lettering on black background used in Geelong until 1956. Painted on white linen. Missing at least two destinations (Station and Beach) and top over run of roll. Side destination roll or narrow roll fitted to Butter box cars and similar. See image for destination list. See Reg Item 4122 for a bogie car roll, full length and has more destinations.tram, trams, geelong, destination roll -
 Ballarat Tramway Museum
Newspaper, The Courier Ballarat, "The Case for Sunday Trams", 7/05/1953 12:00:00 AM
Newspaper clipping from The Courier, Ballarat, Thurs 7 May 1953 about the provision of additional tram crews to handle patronage on Sunday morning from the railway station and during the Begonia Festival. Item follows a statement by an official of the Ballarat Division of the Tramways Employees Association. Noted that the SEC did not wish to operate the Provincial tramways. Image added 27-11-2016begonia festival, tram services, unions, conductors -
 Ballarat Tramway Museum
Document - Photocopy, "Progress in Ballarat", May 1936
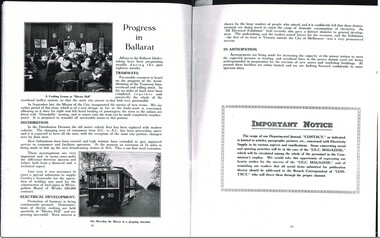
Features a photo of a cooking lesson in Electra Hall and the Mayor of Ballarat driving No. 30, following its conversion to the Ballarat style of trams in September the previous year at the time of the inauguration of the new rolling stock. Notes the progress in Ballarat in the last 18 months, reconditioning of the tram lines, the "new" trams, the changeover from DC to AC, new sub-stations, distribution networks and electrical development, including work at the power station. Has an "Important Notice" advising readers of the scope of the Departmental Journal "CONTACT" and its relationship with the social and sporting activities magazine "SEC MAGAZINE". See Reg Item 3011 for a print of the photo of No. 30. Record revised 3/4/2019 to add digital images with those from Andrew Cook CD and to include an item titled "A Page from Geelong" about a fractured pole, two minutes of silence and the impact on power generation and a thankyou letter. Demonstrates the reporting and promotion of SEC activities to its staff and public in Ballarat.Photocopy of an article in the State Electricity Commission of Victoria Magazine, Contact, Vol 1, No. 1, May 1936 titled "Progress in Ballarat". trams, tramways, sec, ballarat, electricity supply, tramcars, power station, electra hall, geelong, poles -
 Ballarat Tramway Museum
Slide - 35mm slide/s, Bob Wilson, Mar. 1972
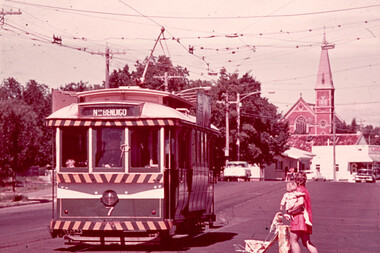
White cardboard mount, 35mm slide, from the Association of Railway Enthusiast's film strip titled "Provincial Tramway Film Strip" of Bendigo No. 7 inbound in High St. Tram has the destination of North Bendigo and is entering the Fire Station Loop. Has Golden Square Uniting Church in background. The film strip notes (Reg. Item 2560), provided the following caption details: "Despite their age and decrepitude the provincial trams provided a useful service to the end. Here No. 7 inbound from "GOLDEN SQUARE" waits for a Mother and infant to board while a pair of juvenile eyes watch from the front window. Mar. '72 (Bob Wilson)" See image btm2584p.tif for high level scan of image. Stamped on base of slide "11793" and written in ink on top edge "No. 8 Golden Square line Bendigo"tramways, trams, are, film strip, high st, fire station loop, passengers, tram 7 -
 Ballarat Tramway Museum
Slide - 35mm slide/s, Graham Evans, Apr. 1972
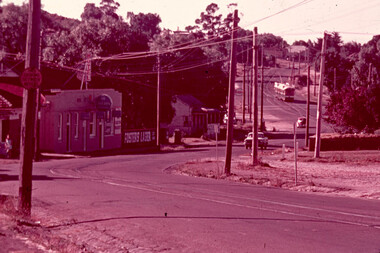
White cardboard mount, 35mm slide, from the Association of Railway Enthusiast's film strip titled "Provincial Tramway Film Strip" of a Bogie car at Long Gully Loop, in the far distance, with a Hotel and the ESSO service station in between. Has Fosters Lager and Carlton signs on hotel. Note sign on the closet pole - "No standing between Notices". The film strip notes (Reg. Item 2560), provided the following caption details: "Meandering roadway and centre road track were a feature of the long "EAGLEHAWK" line. Here an inbound car negotiates the Long Gully Loop. - April '72 (Graham Evans)" See image btm2593p.tif for high level scan of image. Stamped on base of slide "11803" and written in ink on top edge "Eaglehawk line"tramways, trams, are, film strip, long gully, eaglehawk -
 Ballarat Tramway Museum
Slide - 35mm slide/s, Travis Jeffrey, c1961
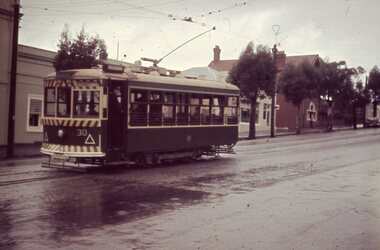
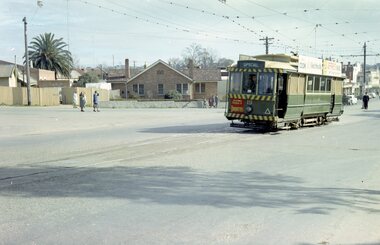
Agfa plastic mount (blue base, white cover) with a photo of Bendigo No. 30 in Mitchell St, just before start of the double track section, c1962. Photo taken during a rainy day. Tram has destination of Eaglehawk. Note SEC crewman standing by door and the passengers looking towards the gutter at the railway station stop. Apparently picking up passengers ex the train on a Sunday. See Other Information regarding a possible date of the slide."BES 1" in penciltramways, trams, bendigo, mitchell st, tram 30 -
 Ballarat Tramway Museum
Slide - 35mm slide/s, Travis Jeffrey, late 1960's or early 1970's
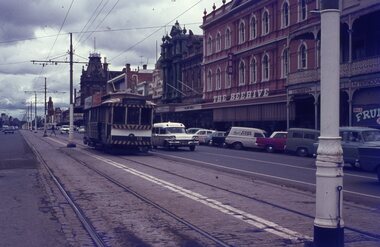
Agfa plastic mount (blue base, white cover) with a photo of Bendigo No. 19 in Pall Mall, nearing Charing Cross. Tram has the destination of Golden Square Photo taken late 1960's early 1970's. Photo has the Beehive, the Shamrock Hotel in the background. Radio station 3BO can be seen on the Beehive building. No. 19 has two SEC roof advertisements. Note the point bar on the pole on the right hand side of the photograph."BES 35" in penciltramways, trams, bendigo, pall mall, beehive building, tram 19 -
 Ballarat Tramway Museum
Slide - 35mm slide/s, Keith Kings, 29/09/1956 12:00:00 AM
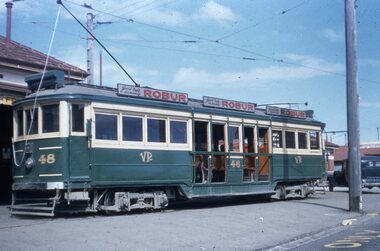
Kodak Ektachrome slide, white cardboard mount, of VR No. 48 at Sandringham Railway Station on 29/9/1956. Photograph by Keith Kings. Tram has three individual Robur Tea advertisements mounted on the roof.On top of slide is photographers stamp and slide no K(y)(102). On sides are letters "28/2/62'. On base are words 'V.R. 48 at Sandringham Railway Station'.tramways, trams, vr, sandringham, tram 48 -
 Ballarat Tramway Museum
Slide - 35mm slide/s, Keith Kings, 23/10/1955 12:00:00 AM
Kodak Ektachrome slide, white cardboard mount, of VR No. 50 approaching or arriving at Sandringham Railway Station on 23/10/1955. Photograph by Keith Kings. Tram has three individual Robur Tea advertisements mounted on the roof. Note the four red PMG telephone boxes on the station forecourt.On top of slide is photographers stamp and slide no K(c)(58). On sides are letters "23/10/55'. On base are words 'V.R. 50 approaching Sandringham Railway Station".tramways, trams, vr, sandringham, tram 50 -
 Ballarat Tramway Museum
Photograph - Colour Photograph/s - set of 8, Carolyn Dean, 22/11/2000 12:00:00 AM
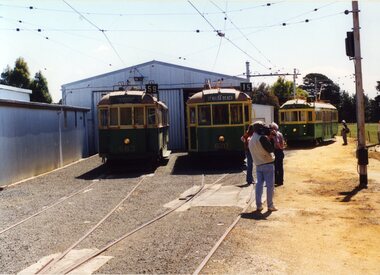
Set of eight colour prints of the Ballarat COTMA Conference 2000 visits to the MTPA depot at Haddon, the township of Clunes and to CMR Muckleford Photographed on 22/11/2000 at Haddon and on 23/11/2000 at Clunes and Muckleford. Photographs by Carolyn Dean. .1 - No. 663, 670 and 407 at Haddon MTPA depot .2 - COTMA delegates at Haddon BBQ .3 - No. 407 on operating track at Haddon .4 - Clunes war memorial .5 - Clunes township main street .6 - Muckleford station nameboard .7 - J549 at Muckleford station .8 - ditto Printed on Kodak paper.On rear of each print is "263.3 or .4, or .5" and date "22.11.00" or "23.11.00" in ink.btm, haddon, cotma, muckleford, clunes, tram 663, tram 670, tram 407 -
 Ballarat Tramway Museum
Photograph - Illustration/s, Windsor Publications, Bendigo Birney 30
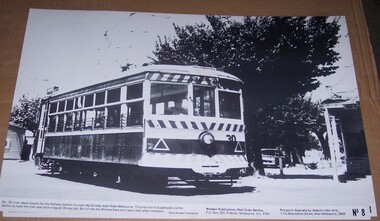
Large print illustration of SEC Bendigo Birney No. 30 ex depot running out to the Railway station on a Sunday prior to running to Eaglehawk. No. 8 of a series of illustrations. Caption notes that Birney's no longer do this job - photo possible mid to late 1960's. Photo Windsor Publications. Two copies held. Printed on heavy cardboard with a gloss sheet.On rear of copy 1, letters "TBT"trams, tramways, birney, bendigo, windsor publications -
 Ballarat Tramway Museum
Negative, Travis Jeffrey, 5/08/1962 12:00:00 AM
Colour Negative No. N405, of the Bendigo No. 19, showing SPECIAL, arriving at the railway station, in Mitchell St with the double track centre of the road poles in the background. Tram has two SEC roof advertisements and a Briquette dash canopy ad on the front of the tram. Photo taken possibly on 5/8/1962. Colour laser printed copy of image stored in box 73. Original negative hires scan and image updated 28/5/2020.In red pen on folder that contained negative, "NR88B" and "5 Aug 62". trams, tramways, bendigo, railway station, mitchell st, tram 19 -
 Ballarat Tramway Museum
Negative, Travis Jeffrey, 5/08/1962 12:00:00 AM
Colour Negative No. N406, of the Bendigo No. 7, showing Quarry Hill, crossing over the railway bridge, in Mitchell St with the railway bridge structure in the background. Tram has a Castrol Oil roof advertisement. Photo taken possibly on 5/8/1962. Colour laser printed copy of image stored in box 73. Original negative hires scan and image updated 28/5/2020.In red pen on folder that contained negative, "NR96B" and "5 Aug 62". trams, tramways, bendigo, railway station, mitchell st, tram 7 -
 Ballarat Tramway Museum
Negative, Travis Jeffrey, 5/08/1962 12:00:00 AM
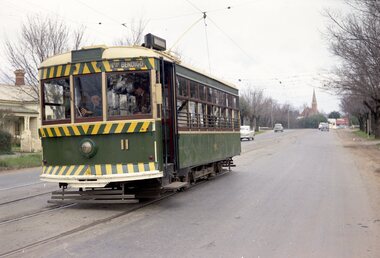
Colour Negative No. N409, of the Bendigo No 11 leaving the Fire Station loop in High St, inbound. Tram has the destination of North Bendigo. Photo taken possibly on 5/8/1962. Colour laser printed copy of image stored in box 73. Original negative hires scan and image updated 28/5/2020.In red pen on folder that contained negative, "NR93B" and "5 Aug 62". On bottom of folder, "SEC Bendigo Colour" - handwritten at time of sorting by WAD. trams, tramways, bendigo, high st, fire station loop, tram 11 -
 Ballarat Tramway Museum
Map, Ministry of Transport, "Melbourne Public Transport Map" - "No. 12", 1982
Pocket size - folded - public transport map of Melbourne, printed in colour on paper, showing public transport services in greater Melbourne, including ticketing information, travelcards and an index of localities. The Central zone area shown in detail. On the rear, route numbers and line maps of tram routes and train lines or services and fare zones. The first map with the new three zone system of fares. Includes private bus routes. Printed 1982 by Government Printer. Issue No. 12.On inside, a circle route around Flinders, Queen, Little Collins and Swanston St in blue felt pen and arrow in blue ink. On the rear, a sketch map showing the location Charles St, Mantell St and William Road, and a circle around Upfield station.trams, tramways, melbourne, map, routes -
 Ballarat Tramway Museum
Photograph - Digital image Set of 10, 19/02/2011 12:00:00 AM
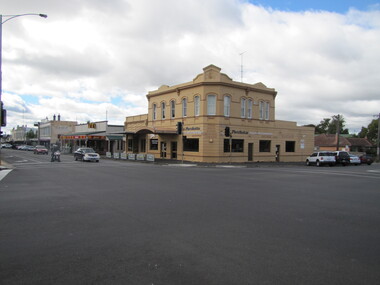
Yields information about the 2011 appearance of Hospital Corner.Set of 10 digital images of Hospital Corner, taken by Warren Doubleday on 19-2-2011 for use in BTM web presentation - Hospital Corner. .1 - SE Corner - La Porchetta's .2 - NE Corner - Shell service station .3 - Looking across to SE corner .4 - Looking across to SW corner - Celebrations store .5 - looking across to NW corner and Hospital .6 - ditto .7 - ditto .8 - Drummond St signage on western side .9 - Celebrations store on SW corner .10 - Davis bus turning from Drummond into Lydiard Sts.trams, tramways, hospital corner, drummond st, sturt st, davis buses -
 Ballarat Tramway Museum
Photograph - Digital image Set of 20, 9/12/1972 12:00:00 AM
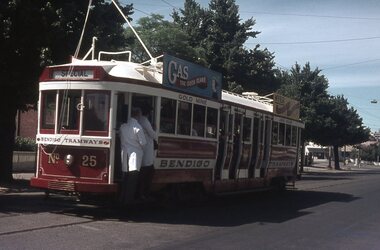
Set of 21 digital images of Bendigo Tramways, at the re-opening of the Bendigo tramways by the Bendigo Trust on 9/12/1972by Stuart Lodington. All trams in the first Bendigo Trust colours. .1 - No. 25 with Gas and Myer roof advertisements .2 - No. 30 with 3BO roof advert and a BP service station in the background. .3 - SEC single trucker at the Mine with a large "Tram Tours" sign on the front of the tram .4 - ditto .5 - No. 19 with a large group of passengers, Bendigo Motor Co and Sandhurst roof advertisements .6 - No. 30 in McCrae St .7 - view of opening march with band .8 - No. 19 in opening parade .9 - Opening Parade in High St with cathedral in the background .10 - No. 30 in Nolan St crossing bridge .11 - ditto .12 - No. 25 at the mine .13 - No. 30 leaving the mine .14 - No. 30 ditto with BCTV roof advert. .15 - Charing Cross with cenotaph, The Beehive building and Ezywalkin shoes and Coca Cola adverts .16 - No. 19 southbound in High St with City Centre Motel building in the background. .17 - No. 30 returning from North Bendigo .18 - No 25 in High St after leaving Gold Mine .19 - No. 30 at the Mine .20 - No. 30 in Nolan St .21 - No. 30 with 3BO roof advert and a BP service station in the background.trams, tramways, bendigo, north bendigo, charing cross, bendigo trust, central deborah, tram 25, tram 30, tram 19 -
 Ballarat Tramway Museum
Photograph - Digital image Set of 8, 21/08/1971 12:00:00 AM
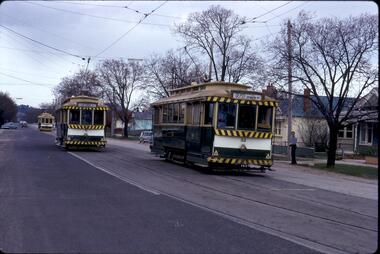
Yields information about the SEC Ballarat trams in the months before the closure of the SEC Tramway system. Yields information about the streetscape. Set of 8 Digital images, scanned from slides by Graeme Cleak, scanning by Peter Winspur 9/2011. .1 - Slide FS14 - No. 31 and 32 crossing at the High St Loop in Macarthur St. Tram 31 has the destination of Victoria St. Geoff Dean and his mini on the right hand side of the photograph. Another depot bound single trucker in the photograph, .2 - Slide FS3 - 31 outbound in Victoria St, with St Alipius church in the background. .3 - Slide FS5 - No. 31, and four other trams, some running special at Sturt and Lydiard Sts during the ARHS tour of that day. Has the ANZ Bank and SEC offices in the background. .4 - Slide FS9 - Nos. 39, 26 and two other trams in Lydiard St for the ARHS tour with Reid's Palace, Macleod & Co and J.J. Collier buildings in the background along with other buildings in Lydiard St North. Taken from the Provincial Hotel. .5 - Slide FS11 - No. 26 northbound showing Special running through the level crossing at Ballarat with the Kennedy Murray General Carrier in the background. Taken from the Provincial Hotel. .6 - Slide FS13 - No. 32 turning from Sturt St into Drummond Street North showing Depot via Drummond North, with the Southern Cross Hotel, Rimmington Bros and J.A, Malpass(?) buildings in the background. .7 - Slide FR35 - night shot of No. 17 (with Twin Lakes sign) and No. 32 in Nos 3 and 4 roads at the depot. .8 - Slide FR34 - night shot of the front of the depot - as above and No. 43 on "0" road. All photos 21-8-1971 trams, tramways, railway station, macarthur st, victoria st, sturt st, lydiard st north, level crossings, depot, tram 31, tram 32, tram 39, tram 26, tram 17, tram 43 -
 Ballarat Tramway Museum
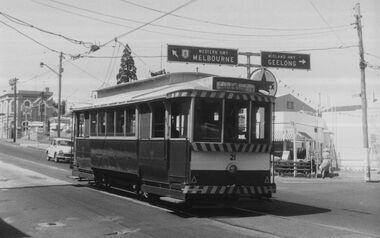
Photograph - Digital image, c1971
Yields information about Ballarat streetscape and its trams in the closing days of the SEC tramway system.Digital image from a black and white print of tram 21 at the intersection of Bridge, Victoria Streets and Main Road, inbound to the Gardens via Sturt St West. Has the Caltex service station, the Munster Arms Hotel in the background. CRB Road signage for Melbourne and Geelong over the tram. At Stones Corner. Photo by Marc Dahlstrom c1971. On rear is the Marc Dahlstrom stamp.trams, tramways, bridge st, victoria st, main st, stones corner, tram 21 -
 Ballarat Tramway Museum
Photograph - Digital image, c1971
Yields information about Ballarat streetscape and its trams in the closing days of the SEC tramway system.Digital image from a black and white print of tram 40 southbound in Lydiard St North to Sebastopol with Reid's Palace and John Macleod and Company buildings in the background. Railway station signal gantry in the view. Photo by Marc Dahlstrom c1971.On rear is the Marc Dahlstrom stamp.trams, tramways, lydiard st nth, tram 40 -
 Ballarat Tramway Museum
Photograph - Digital image, c1971
Yields information about Ballarat streetscape and its trams in the closing days of the SEC tramway system.Digital image from a black and white print of tram 11 outbound in Lydiard St North, crossing the railway level crossing. Has the Reid's Palace building and the railway station and signal gantry in the background. The tram has a "Bliss Bombs" (Make Bliss not Love) roof advertisement and a Twin Lakes sign. Photo by Marc Dahlstrom c1971. On rear is the Marc Dahlstrom stamp.trams, tramways, lydiard st, railway station, level crossings, tram 11 -
 Ballarat Tramway Museum
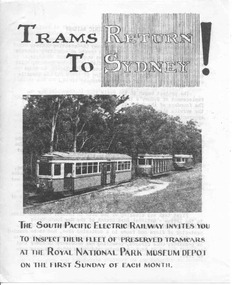
Pamphlet, South Pacific Electric Railway, "Trams Return to Sydney", 1961
Folded foolscap sheet, printed, titled "Trams Return to Sydney", with a photo of three trams on the Royal Park line at Loftus, c1961, prior to actual operation of the trams. Provides notes on the site, SPER, progress and plans. On rear has a plan of the area relative to Sutherland station.trams, tramways, sper, sydney trams -
 Ballarat Tramway Museum
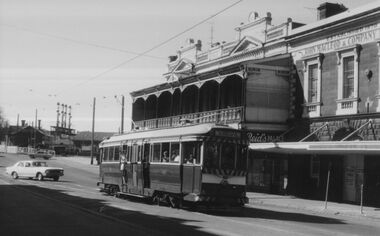
Photograph - Black & White Photograph/s - set of 2, late 1920's, early 1930's
Yields information about the appearance of Geelong's Birney trams during the 1940's.Black and White Photograph of Geelong No. 10, Malop St, travelling north west to the railway station, during the late 1920s, between Gheringhap and Moorabool St. Tram has the destination of "Station", with the National Mutual, Moran's Hotel Orient in the background. Melbourne Bitter advertisement on the hotel. A number of soft top cars parked in the street. Photo probably from a postcard, has the words "T. Geelong. No. 8" along part of the bottom edge. Photo from the Peter Duckett Collection. For a close up of the tram itself see Reg Item 5822. 4335.1 - Black and White print contained within the Wal Jack Bendigo and Geelong Album, see Reg Item 5003 for more details. Added 7/8/2013. This item is the larger image of the two.On rear, stamped in black ink "Photo supplied from P.W. Duckett Collection, All Rights Reserved, 69 Howitt Rd. Nth Caulfield 3161." In hand writing on the rear "47)" in top left hand corner. In the body of the photograph "Malop St travelling NW to Station, between Gheringhap and Moorabool Sts." 4335.1 - in ink on rear. "Geelong No. 10 Original Condition, photo about 1930" and "Please Return"trams, tramways, geelong, malop st, mesco, tram 10 -
 Ballarat Tramway Museum
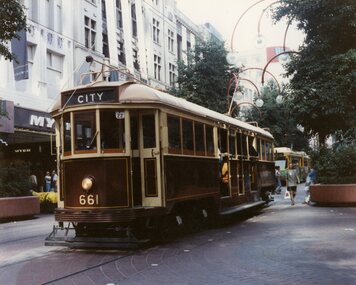
Photograph - Black & White Photograph/s - set of 3, William. F. Scott, 1989
Yields information about the appearance of Geelong's trams and the railway station area and the conversion to a one-man tram.Set of three colour photographs of BTPS owned W3 661 operating in Bourke St Melbourne. Presumed taken at the same time as the front cover of the annual report, 1988-1989 - 29/4/1989. Has Myer building in the background. .2 - ditto - crossing an articulated tram. .3 - westbound in Bourke Street with the Priceline Centrepoint building in the background and Medicare office. Printed on Kodak paper.In pencil on the rear "William F Scott".trams, tramways, btps, bourke st, yapper tours, tram 661 -
 Ballarat Tramway Museum
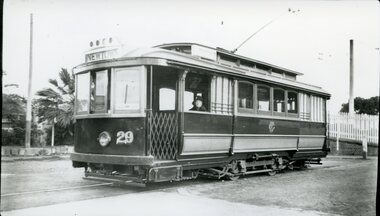
Photograph - Black & White Photograph/s, Geelong No. 29 at the Railway station, c1930
Black and White Photograph of Geelong No. 29 at the Railway station, c19?? Has the destination of Newtown, a MESCo logo on the side panel and on the side of the truck, a tow bar.In hand writing on the rear "24)" in top left hand corner. In the body of the photograph "at Railway Station" and along bottom edge a "William Scott" address label and "WFS / Geelong Heritage Centre"trams, tramways, geelong, railway station, mesco, tram 29 -
 Ballarat Tramway Museum
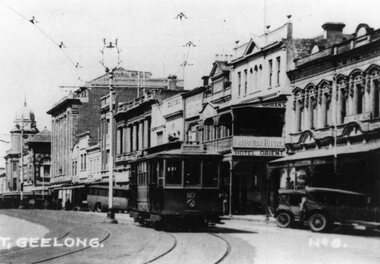
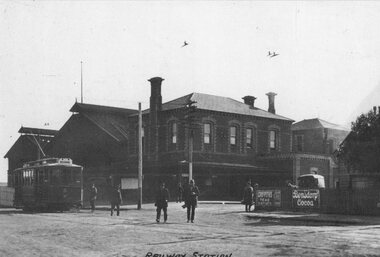
Photograph - Geelong No. 5 at the Railway Station, 1915
Photo of Geelong No.5 at the Railway Station, c 1915, Railway station in the background, prior to the extension and the construction of the awning over No. 1 platform area. Has title "Railway Station" along the bottom edge. In the view are signs for Griffiths teas and Bensdorp Cocoa. On the rear "Geelong Historical Post Card Series No. 9 Railway station with No. 5 Tramcar ready to depart for West Geelong 1915" Publisher not known. See also Reg item 4408 for another reproduction of this photograph. Illustration has been cut from a magazine.Yields information about Geelong Railway Station and tram No. 5 in 1915.Sepia-toned print of a postcard and an illustration of the same photograph.trams, tramways, geelong, railway station, tram 5 -
 Ballarat Tramway Museum
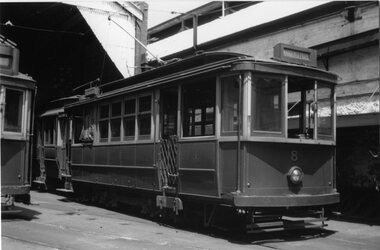
Photograph - Black & White Photograph/s, John Radcliffe, 11/01/1956 12:00:00 AM
Yields information about the appearance of the Geelong Railway station and the tramcar 5 in 1915.Black and White Photograph of Geelong No.8 at the depot, with the destination of Kardinia Park. Shows the tramcar in detail. Photo by John Radcliffe, 11/1/1956.In hand writing on the rear " 41) / Geelong Trmys, depot view 3 days after the fist closures." Along the bottom edge "William Scott" address label and "J.C. Radcliffe 11.1.1956"trams, tramways, geelong, depot, tram 8 -
 Ballarat Tramway Museum
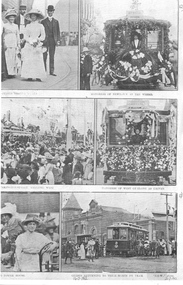
Photograph - Black & White Photograph/s - set of 3, H.L. Potter and NOW Magazine, 14/03/1912 12:00:00 AM
Yields information about the Geelong Railway Station and Geelong's tramcars, c1915.Black and white reproduction photograph of a page from the Now Magazine, 21.3.1912 issue featuring photographs of the opening of the Geelong Tramways on the 14.3.1912. 4407.1 - features 6 photographs: Guests at the Works, Mayoress of Newtown at the wheel; Pakington St Geelong West, Mayoress of West Geelong at Driver, Guests at the Power house, and Guess returning to their homes by Tram (see 4407.3) 4407.2 - Reproduction from page 15, NOW Magazines, News of the Week, of the first car leaving the sheds - Mayoress of Geelong Driving, H.L. Potter photograph. Two copies 4407.3 - separate print bottom photo titled "Guests returning to their homes by Tram" Note each of the trams driven by the respective mayoresses, were decorated differently. Some printed on Hewlett Packard paper.4407.1 - on the front in ink "12) other side of page" "12)", "13)1" and "14.3.1912" and "21.3.1912" along the bottom edge. On rear "12) top rt hand pic only ie Newtown car" and "13)1 Bottom rt hand pic only ie guests going home". Also has a "William Scott" address label. 4407.2 - On the front in ink "NOW Magazine, issue 21.3.1912 (News of the Week magazine Geelong", "14.12.1912" and on rear "11" and a "William Scott" address label. 4407.3 - On the front in ink "News of the Week, a Geelong magazines / opening day 14.3.1912", and "issue 21.3.1912" and "13)2" in top right hand corner. On the rear "13)2 same as 13)1 bottom right hand corner only, Guests going home" and a "William Scott" address label..trams, tramways, geelong, first tram, opening, newtown, tram 4