Showing 5050 items matching "portrait photograph"
-
 The Beechworth Burke Museum
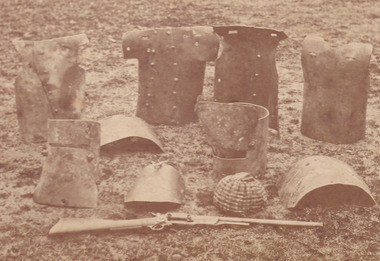
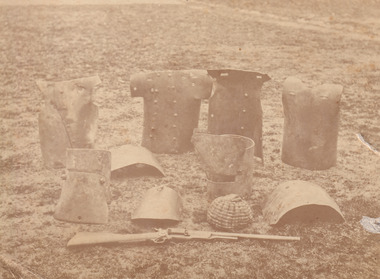
Photograph, James Bray, 1880
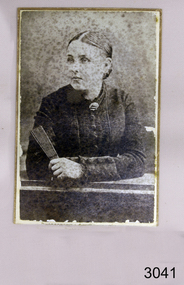
... This photograph is a cabinet portrait commissioned... as a "Cabinet Portrait". This refers to a photograph mounted on a hard ...This photograph was taken by James Bray who worked as a professional photographer in Camp Street Beechworth from 1870-1891. He was one of four men who photographed the Kelly gang after the siege in Glenrowan in 1880. He is also renowned for his previous work photographing members of the Kelly gang. The photograph depicts pieces of the Kelly gang's armour crafted from plough mouldboards which are arranged on the ground. The exact relation of each piece of armour to the Kelly members was unclear for many years following the siege because the suits were disassembled without documentation and rearranged by guesswork. It was through photographs like this one, which depict the armour very soon after the siege that enabled researchers, in 2002, to reunite each of the suits with their correct pieces. This image is identified as a "Cabinet Portrait". This refers to a photograph mounted on a hard piece of cardboard. They are larger and thicker than the Carte de Visite and gradually replaced the latter in popularity after the 1860s. Identifying features of the Cabinet Portrait is on the front of the image which is generally embossed (or printed) with the details of the photographer. In the case of this image, James Bray is identified as photographer. The image is yellow in tone which compliments the gold coloured mount of the photograph. This photograph is part of the Burke Museum "Kelly album" which includes a significant collection of photographs and artefacts connected to Ned Kelly and the Kelly Gang. Ned Kelly and his gang have become ingrained in Australian popular culture and thus many museums, art galleries and private collections house material connected to the Kelly story which allows the events and people to be researched and interpreted. Artefacts and photographs pertaining to the Kelly gang are particularly valuable for Australian museums. This particular photograph is significant for its connection to Beechworth photographer James Bray who is responsible for many images depicting members of the Kelly gang. The photograph is also of artistic significance as an example of a Cabinet Portrait dating to 1880. This image was commissioned by the police shortly after the defeat of the Kelly gang at Glenrowan. The armour was collected and placed on the ground for photography. No care was taken to retain the correct grouping of the armour and therefore, the identity of each piece to the correct owner was unclear for many years. Photographs of the armour taken at the time, like this one, helped researchers to reconstruct the correct armour and identify which pieces belonged to which member of the Kelly gang which is significant for Australian history. This photograph has the capacity to provide important information about the construction of the armour used by the Kelly gang at Glenrowan and importantly dates to 1880.This photograph is a cabinet portrait commissioned by the police depicting the Kelly armour arranged on the ground at Glenrowan following the siege by Ned Kelly and the Kelly gang in 1880. The armour includes helmets, breastplates a rifle and the inner knitted helmet worn by Ned Kelly. kelly album -
 The Beechworth Burke Museum
Photograph, James Bray, 1880
This photograph was taken by James Bray who worked as a professional photographer in Camp Street Beechworth from 1870-1891. He was one of four men who photographed the Kelly gang after the siege in Glenrowan in 1880. He is also renowned for his previous work photographing members of the Kelly gang. The photograph depicts pieces of the Kelly gang's armour crafted from plough mouldboards which are arranged on the ground. The exact relation of each piece of armour to the Kelly members was unclear for many years following the siege because the suits were disassembled without documentation and rearranged by guesswork. It was through photographs like this one, which depict the armour very soon after the siege that enabled researchers, in 2002, to reunite each of the suits with their correct pieces. This image is identified as a "Cabinet Portrait". This refers to a photograph mounted on a hard piece of cardboard. They are larger and thicker than the Carte de Visite and gradually replaced the latter in popularity after the 1860s. Identifying features of the Cabinet Portrait is on the front of the image which is generally embossed (or printed) with the details of the photographer. In the case of this image, James Bray is identified as photographer. The image is yellow in tone which compliments the gold coloured mount of the photograph.This photograph is part of the Burke Museum "Kelly album" which includes a significant collection of photographs and artefacts connected to Ned Kelly and the Kelly Gang. Ned Kelly and his gang have become ingrained in Australian popular culture and thus many museums, art galleries and private collections house material connected to the Kelly story which allows the events and people to be researched and interpreted. Artefacts and photographs pertaining to the Kelly gang are particularly valuable for Australian museums. This particular photograph is significant for its connection to Beechworth photographer James Bray who is responsible for many images depicting members of the Kelly gang. The photograph is also of artistic significance as an example of a Cabinet Portrait dating to 1880. This image was commissioned by the police shortly after the defeat of the Kelly gang at Glenrowan. The armour was collected and placed on the ground for photography. No care was taken to retain the correct grouping of the armour and therefore, the identity of each piece to the correct owner was unclear for many years. Photographs of the armour taken at the time, like this one, helped researchers to reconstruct the correct armour and identify which pieces belonged to which member of the Kelly gang which is significant for Australian history. This photograph has the capacity to provide important information about the construction of the armour used by the Kelly gang at Glenrowan and importantly dates to 1880.Sepia rectangular photograph printed on cardReverse: Mrs. E. E. Smith / Loch St. / Beechworth / 1880 / JAMES E. BRAY / Photographer / BEECHWORTH / R. & M. HARVEY / AUTHORISED NEWSAGENTE / AND GIFT SHOP / BEECHWORTH PHONE 114 / (upside down) P/C Neg / 41 --np of armour & / (torn sticker with)fle. Ned Kellys Riflekelly album, ned kelly, kelly armour, armour, rifle -
 The Beechworth Burke Museum
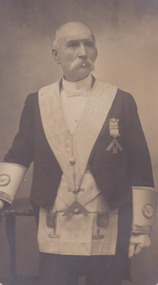
Photograph
This photograph, taken by Courtney’s Thelma Studios in Wangaratta, depicts Sergeant Arthur Loftus Maule Steele standing in the regalia of the Masonic Lodge. Before his death, Steele was a long term member of the St John’s Lodge of Masons where he was a Past Master and held office of treasurer for over thirty years. He was also a dedicated member of the Church of England and was an Electoral Inspector for Wangaratta. Steele was Sergeant of Police in Wangaratta for much of his life. He was one of 17 children born to Captain Robert Ball Steele and Mary Babington in Tours, France, in 1839. His parents were travelling at the time and soon after settled in Donegal, Ireland. At the age of 12, Steele was sent to the Military Academy of Dublin where he passed his examinations and prepared to enter the British Army. Steele met a bother of Robert O’Hara Burke and was advised to travel to Australia and join as a police cadet. Steele took the advice and travelled to Australia, arriving in Melbourne at the age of 17. He spend some time in a variety of employment including working as a clerk for the White Star Line. He entered the Victorian Police force in 1856. By 1864, Steele married Ruth Ingram Ballinger at Snowy Creek and worked at Omeo until being promoted to the mining centre of Beechworth, taking charge of the Yackandandah Station. Steele and Ballinger had ten children. Steele is well known in Victorian history for a variety of reasons, the most famous being the role he played in capturing Edward “Ned” Kelly at Glenrowan on the 28th June 1880. He also arrested Frank Neville (for the murder of a local resident Mr Nicholls) and Patrick Sheehan (first person to be executed in the Beechworth Gaol 1865 for the murder of James Kennedy at Rowdy Flat Yackandandah). He later worked on the case of Bridget Mepham (charged with the murder of her sister) at Wangaratta and retired from the Police force on the 1st of August 1896. In this retirement, Steele was a keen horticulturalist who enjoyed observing the habits and growth of new varieties cared for in his conservatory. Steele passed away in February 1914. This image has the potential to support current research on Sergeant Steele, the Masonic Lodge and photography during the c.1890s. Sergeant Steele is a well-researched member of the Victorian Police force and is known primarily for his involvement with the Kelly Gang. Therefore, depictions of Steele through photography can help to provide essential information about Steele outside of the Police force. This image has the capacity to inform about Steele’s involvement with the Masonic Lodge in Wangaratta. Therefore, it is important for what it can reveal regarding historic and social aspects. The Burke Museum is home to a large collection of Kelly centred photographs. The study of these photographs in connection to those in other museums have the ability to further current understanding on important figures and events in this historic occasion.Black and White rectangular photograph printed on matte photographic paper and mounted on an oval boardObverse: Courtney's Thelma Studios/ Wangaratta Reverse: 2747portrait, ned kelly, uniform, policeman, wangarratta, sergeant, steele, 1880, photograph, oval, black and white, sergeant steele, arthur loftus maule steele, arthur steele, wangaratta, beechworth -
 The Beechworth Burke Museum
Photograph
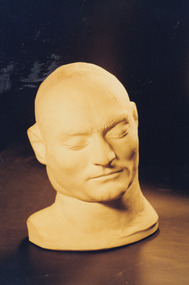
A death mask is a plaster or wax mould made of a human face shortly after death (around 30 minutes after the execution). The intention was to capture the likeness of the individual and maintain their facial expression and features before these became distorted in death. They differ from their counterparts the life masks which were made to preserve the likeness of an individual while alive. Death masks were often replicated and sold to various institutions and private buyers. Death masks were created for a variety of reasons. Organisations like museums and scientific institutes collected these masks to support the study of phrenology. Phrenology is the study of the conformation of a skull in an effort to understand the mental faculties and traits of an individual. This was undertaken in a period in which it was argued that the shape of a head could provide detailed knowledge into personality. In addition, death masks were also created to aid effigy making, as tools for sculpture and as objects of veneration. Death masks were often placed on display as objects of curiosity. Edward “Ned” Kelly was convicted of murder on the 29th of October 1880 and executed by hanging on the 11th of November that same year. In the 1800s it was common practice for authorities to make a death mask of an executed criminal. In Kelly’s case, there were multiple copies made of his death mask, one of which is in the collection of the Burke Museum. Copies of the official death Mask (attributed to Maximilian Kreitmayer) have been made by artists including Max Meldrum (1875-1955). It depicts the head, neck and partial right shoulder of Ned Kelly. Whilst generally considered to be a ‘pseudoscience’ today, phrenology and the study of the reception and use of artefacts like Ned Kelly’s death mask, can provide valuable insight into a past era’s views of personality and the human body. This mask presents a unique three-dimensional depiction of Ned Kelly shortly after his execution which is unlike any other depiction of him. It can provide vital information as to the use of death masks in Victoria and their popularity in the 1800s. These masks were mostly done of criminals and used for exhibition purposes alongside phrenological study. Phrenologist AS Hamilton used Kreitmayer’s replication of the mask (displayed in Kreitmayer’s Bourke Street waxworks the day after Kelly’s death) to report a detailed phrenological analysis on Ned Kelly and concluded from his research that the deceased had an “enormous self-esteem”. Portraits of living people represent the way they themselves and/or the artists wished themselves to be remembered. The death mask contrasts this and therefore, creates a likeness of a person in their entirety and not just an ideal representation. Therefore, the study of such artefacts and their history of use and disuse can provide interesting information valuable to understanding the past. Colour rectangular photograph printed on gloss photographic paper.Obverse: Reverse: AGFA kelly album, ned kelly, death mask, kreitmayer, old melbourne gaol, phrenology, craneology, 1800s, pseudoscience, burke musuem, max meldrum -
 The Beechworth Burke Museum
Photograph, 1877
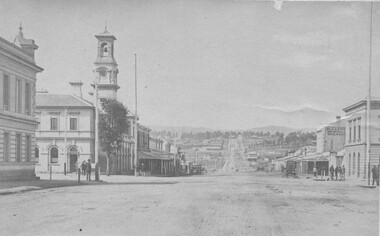
Taken in Beechworth 1867, this photograph depicts the Bank of Victoria on the corner of Camp and Ford Street. This building was erected in 1867 to replace the former bank that was destroyed by a fire on the same site. This classical style structure was designed by architects Smith and Johnson who designed many of the public buildings in Melbourne and Victoria. Arthur Ebden Johnson, 1821–1895 and Alfred Louis Smith, 1830–1907 were appointed as the Bank of Victoria's architects who, in-conjunction with the Branch in Beechworth, also completed branches in Wangaratta and Bendigo. This photograph was taken and produced by the American and Australasian Photographic Company which was founded by Beaufoy Merlin joined by his assistant, Charles Bayliss and Augustus Clinton, and operated between 1866-1873. The company traveled throughout Victoria and New South Wales before establishing a portrait studio in Sydney. There is no apparent connection to America. Sepia rectangular photograph. Image is printed on matte photographic paper and has a white border.Reverse: 1997.2727 (in pencil) Bank of Victoria / Beechworth / 1877 (in pen) Harvey Collection American & Australasian / Photographic Company / Victoria Branch / C. Bayless, Manager No 56beechworth, bank of victoria, american and australasian photographic company, 1877, c.bayless, harvey collection, arthur ebden johnson, alfred louis smith, smith and johnson -
 The Beechworth Burke Museum
Photograph, American and Australasian Photographic Company, 1875
Taken in Beechworth 1875, this photograph depicts the Camp Street intersection looking east. This photograph was taken and produced by the American and Australasian Photographic Company which was founded by Beaufoy Merlin joined by his assistant, Charles Bayliss and Augustus Clinton, and operated between 1866-1873. The company traveled throughout Victoria and New South Wales before establishing a portrait studio in Sydney. There is no apparent connection to America. Black and white rectangular postcard. The image is printed on matte photographic paper and is mounted on cardboard. Obverse: NO INSCRIPTION Reverse: 1997.2726 A02726 BEECHWORTH ABOUT 1875 Harvey Collection American & Australasian Photographic company. Victoria Branch. C. BAYLISS, Manager. NO.59 Extra copies may be had by sending Number to present Address.beechworth, burke museum, camp street, 1875, charles bayliss -
 The Beechworth Burke Museum
Photograph, American and Australasian Photographic Company, c1870
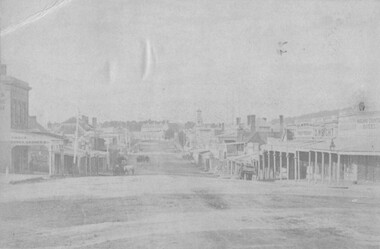
Taken in Beechworth c1870, this photograph depicts Ford Street taken from Church Street looking towards the Old Beechworth Gaol. This photograph was taken and produced by the American and Australasian Photographic Company which was founded by Beaufoy Merlin joined by his assistant, Charles Bayliss and Augustus Clinton, and operated between 1866-1873. The company traveled throughout Victoria and New South Wales before establishing a portrait studio in Sydney. There is no apparent connection to America. Black and white rectangular postcard. The image is printed on matt photographic paper and mounted on cardboard. Obverse: NO INSCRIPTION Reverse: 5570 33 Beechworth about 1870 American & Australian Photographic Company. Victoria Branch. C. BAYLISS, Manager No. 62 Extra Copies may be had by sending Number to present Address. beechworth, ford street, old beechworth goal -
 The Beechworth Burke Museum
Photograph, c1885
This carte de visite was taken of Hiram Crawford in fire brigade uniform taken by Stewart & CO., Melbourne. Hiram Crawford was Captain of the Beechworth Volunteer Fire Brigade for twenty-five years. Hiram arrived in Australia at the age of 21 in August 1853. He mined for short time at Back Creek Bendigo, then went to the Ovens where he sought gold in Spring Creek, Buckland and 3 Mile. After moving to Albury for 18 months he married Anna, moved to Woolshed and was there for two years mining gold. After discovering his fortune he formed Crawford and Co. Coaching Lines in Beechworth in late 1856. It was this company which became the longest surviving coaching business in the State of Victoria. Hiram and Anna had two daughters. Anna died in March 1862 and in May Hiram left from Melbourne to return to the United States on a visit. Hiram married Martha Foster during this visit and returned to Australia in March 1863. With his coach line established, and leaving it under management, he moved around the north east of Victoria establishing and building shops and the Star Hotel and Theatre in Chiltern in 1866. In 1869 he moved to Melbourne for a few years in which time he built the Eastern Arcade in Bourke Street. In 1876 the family returned to Beechworth for a few years eventually moving to Everton where Hiram grew hops, tobacco, fruit trees and established the largest lemon orchard at that time in Australia. Hiram spent a considerable amount of his time helping to develop the North East of the State not only in his private endeavours but as a public figure. Among his many achievements a few are listed - Councillor, Mayor of Chiltern and Beechworth, President of the Shire on two occasions, Director of many mining companies, Inaugural Chairman and Director of the Beechworth Gas Company roles he held for over 20 years, Foundation member of Beechworth Pottery, Committee member of the Beechworth Hospital, Captain/Superintendent of the Vol. Fire Brigade for over 20 years, Foundation, Life member of and on the State Fire Brigade Board for many years, President of the North Eastern Railway League in Chiltern On a personal level Hiram was involved in lodges including St. Johns #14, Beechworth. and had several grazing properties in the Ovens area. He had the Forest Park Hotel at Carboor, the Creamery at Carboor, and grazing land on which the Milawa Creamery was built during his ownership. He was a committee member for 3 committees duirng the 1888 International Exhibition in Melbourne. Hiram had many voyages around the world studying irrigation, hop growing, tobacco growing and drying. During his retirement in Melbourne Hiram purchased many properties in the Elsternwick area and acted as an Estate Agent. After the death of his second wife Martha, Hiram married for the third time in 1912 to Sophia Maude Heatley. Crawford and Co continued until 1921. [Taken from HighCountryHeritage.com.au]Black and white reproduction of a studio portrait of Hiram Crawford in fire brigade uniform, printed on gloss photographic paper and bordered with a white frame.Badge on uniform sleeve reads: CAPTAIN / BVFB Obverse: AB/ Stewart & CO./ Melbourne Reverse: Hiram Collection/ BMM2435burke museum, emergency services, beechworth, carte de visite, black and white, fire brigade, hiram crawford, stewart & co., melbourne. -
 The Beechworth Burke Museum
Photograph
Taken in the late 1800s, depicted is a portrait of Charles Sherwood Stratton (professionally known as General Tom Thumb). He is dressed in a formal suit. Charles Sherwood Stratton was an American performer who traveled with the Barnum & Bailey Circus. The show was founded by Phineas Taylor (P. T.) Barnum in 1871. Charles participated in various acts including singing, dancing, miming, and celebrity impersonations. He gained international fame for his successful career and small physical stature. Charles performed in Australia in August 1870. He was joined by his touring party as part of the Barnum & Bailey Circus "Round the World" tour. The "Australian Tom Thumb", real name John David Armstrong, made his "audaciously competitive" stage debut alongside Charles when the circus performed at the Prahran Popular Entertainments in Melbourne. Charles, P. T. Barnum and the circus inspired the popular musical drama film, "The Greatest Showman" (2017).The photograph is historically significant due to Stratton's status and legacy as an internationally renowned performer. Furthermore, the record relates to the history of performance in Victoria during the late nineteenth century. It illustrates the type of entertainment that was enjoyed by the public during this time. Black and white rectangular photograph printed on matte photographic paper.Reverse: 3712 /entertainment, entertainment album, general tom thumb, circus, performance, arts, recreation, lavinia warren stratton, charles sherwood stratton, 1800s, portrait, p. t. barnum, barnum & bailey circus -
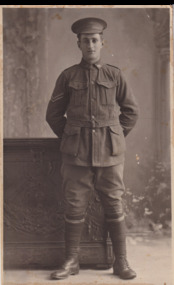
 The Beechworth Burke Museum
Photograph
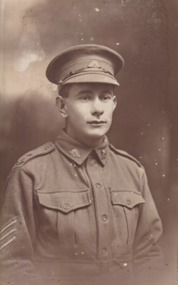
It is believed this photograph was taken in the early 1900s during World War I. Depicted is a 19 year old male soldier named Thomas "Tom" Lacey, who was a resident of Beechworth, Victoria. He is dressed in an Australian military uniform and posing inside a photographic portrait studio.The record is historically significant due to its connection to World War I. This conflict is integral to Australian culture as it was the single greatest loss of life and the greatest repatriation of casualties in the country's history. Australia’s involvement in the First World War began when Britain and Germany went to war on 4 August 1914. The first significant Australian action of the war was the Australian Naval and Military Expeditionary Force’s (ANMEF) landing on Rabaul on 11 September 1914. The ANMEF took possession of German New Guinea at Toma on 17 September 1914 and of the neighbouring islands of the Bismarck Archipelago in October 1914. On 9 November 1914, the Royal Australian Navy made a major contribution when HMAS Sydney destroyed the German raider SMS Emden. On 25 April 1915, members of the Australian Imperial Force (AIF) landed on Gallipoli in Turkey with troops from New Zealand, Britain, and France. This began a campaign that ended with an evacuation of allied troops beginning in December 1915. The next year, Australian forces fought campaigns on the Western Front and in the Middle East. The record has strong research potential. This is due to the ongoing public and scholarly interest in war, history, and especially the ANZAC legend, which is commemorated annually on 25 April, known as ANZAC Day.Sepia rectangular photograph printed on paper.Reverse: 3417.1 /military album, wwi, world war i, thomas lacey, tom lacey, soldier, australian army, war -
 The Beechworth Burke Museum
Postcard
Taken on an unknown date, depicted is a portrait of a young, unidentified male soldier. He is dressed in an Australian military uniform. It is believed that this soldier was part of The Australian Imperial Force during World War I. This can be inferred by the chevron rank insignia visible on the uniform. The placement of this insignia on the sleeve of the right arm suggests that this soldier was either a Warrant Officer or a Non-Commissioned Officer (NCO). Specifically, the number of chevron stripes - here, there are three - are believed to signify a Sergeant ranking. The man in this photograph is also wearing a 'Rising Sun' collar badge on his coat. Australia, unlike most other Commonwealth countries, did not adopt metal regimental badges during the First World War. All units were issued with the Australian Army General Service Badge, better known as the 'Rising Sun’ badge. This insignia is almost always identified with the Australian Imperial Force.The record is historically significant due to its connection to World War I. This conflict is integral to Australian culture as it was the single greatest loss of life and the greatest repatriation of casualties in the country's history. Australia’s involvement in the First World War began when the Australian government established the Australian Imperial Force (AIF) in August 1914. Immediately, men were recruited to serve the British Empire in the Middle East and on the Western Front. The first significant Australian action of the war was the Australian Naval and Military Expeditionary Force’s (ANMEF) landing on Rabaul on 11 September 1914. The ANMEF took possession of German New Guinea at Toma on 17 September 1914 and of the neighbouring islands of the Bismarck Archipelago in October 1914. On 25 April 1915, members of the AIF landed on Gallipoli in Turkey with troops from New Zealand, Britain, and France. This specific event holds very strong significance within Australian history. The record has strong research potential. This is due to the ongoing public and scholarly interest in war, history, and especially the ANZAC legend, which is commemorated annually on 25 April, known as ANZAC Day.Sepia rectangular postcard printed on card.Reverse: CARD / JAS.C.CRADDEN, / 182 PITT ST, SYDNEY. / Cecil Johnson / BMM2640.1 /military album, wwi, world war i, postcard, australian army, australian imperial force, aif, sergeant, warrant officer, non-commissioned officer, portrait -
 The Beechworth Burke Museum
Postcard
Taken on an unknown date, depicted is a full-length portrait of a young, unidentified male soldier. He is dressed in an Australian military uniform. It is believed that this soldier was part of The Australian Imperial Force during World War I. This can be inferred by the chevron rank insignia visible on the uniform. The placement of this insignia on the sleeve of the right arm suggests that this soldier was either a Warrant Officer or a Non-Commissioned Officer (NCO). Specifically, the number of chevron stripes - here, there are two - are believed to signify a Corporal rank. The man in this photograph is also wearing a 'Rising Sun' collar badge on his coat. Australia, unlike most other Commonwealth countries, did not adopt metal regimental badges during the First World War. All units were issued with the Australian Army General Service Badge, better known as the 'Rising Sun’ badge. This insignia is almost always identified with the Australian Imperial Force.The record is historically significant due to its connection to World War I. This conflict is integral to Australian culture as it was the single greatest loss of life and the greatest repatriation of casualties in the country's history. Australia’s involvement in the First World War began when the Australian government established the Australian Imperial Force (AIF) in August 1914. Immediately, men were recruited to serve the British Empire in the Middle East and on the Western Front. The first significant Australian action of the war was the Australian Naval and Military Expeditionary Force’s (ANMEF) landing on Rabaul on 11 September 1914. The ANMEF took possession of German New Guinea at Toma on 17 September 1914 and of the neighbouring islands of the Bismarck Archipelago in October 1914. On 25 April 1915, members of the AIF landed on Gallipoli in Turkey with troops from New Zealand, Britain, and France. This specific event holds very strong significance within Australian history. The record has strong research potential. This is due to the ongoing public and scholarly interest in war, history, and especially the ANZAC legend, which is commemorated annually on 25 April, known as ANZAC Day.Black and white rectangular postcard printed on card.Reverse: Mendelssohn & Co., / Swanston St., Melbourne / POST CARD / KODAK / CORRESPONDENCE / ADDRESS ONLY / AUSTRAL / AUSTRAL / KODAK / BMM 2640.3 /military album, world war i, wwi, corporal, portrait, soldier, australian imperial force, aif, postcard, uniform -
 The Beechworth Burke Museum
Postcard
Taken on an unknown date, depicted is a portrait of a young, unidentified male soldier. He is dressed in an Australian military uniform. It is believed that this soldier was part of The Australian Imperial Force during World War I. This can be inferred by the chevron rank insignia visible on the uniform. The placement of this insignia on the sleeve of the right arm suggests that this soldier was either a Warrant Officer or a Non-Commissioned Officer (NCO). Specifically, the number of chevron stripes - here, there are two - are believed to signify a Corporal rank. The man in this photograph is also wearing a 'Rising Sun' collar badge on his coat. Australia, unlike most other Commonwealth countries, did not adopt metal regimental badges during the First World War. All units were issued with the Australian Army General Service Badge, better known as the 'Rising Sun’ badge. This insignia is almost always identified with the Australian Imperial Force.The record is historically significant due to its connection to World War I. This conflict is integral to Australian culture as it was the single greatest loss of life and the greatest repatriation of casualties in the country's history. Australia’s involvement in the First World War began when the Australian government established the Australian Imperial Force (AIF) in August 1914. Immediately, men were recruited to serve the British Empire in the Middle East and on the Western Front. The first significant Australian action of the war was the Australian Naval and Military Expeditionary Force’s (ANMEF) landing on Rabaul on 11 September 1914. The ANMEF took possession of German New Guinea at Toma on 17 September 1914 and of the neighbouring islands of the Bismarck Archipelago in October 1914. On 25 April 1915, members of the AIF landed on Gallipoli in Turkey with troops from New Zealand, Britain, and France. This specific event holds very strong significance within Australian history. The record has strong research potential. This is due to the ongoing public and scholarly interest in war, history, and especially the ANZAC legend, which is commemorated annually on 25 April, known as ANZAC Day.Sepia rectangular postcard printed on card.Reverse: BMM 2640.4 / P RD / Write here for Inland Postage on /military album, aif, australian imperial force, corporal, war, wwi, world war i, rising sun, badge, uniform, military -
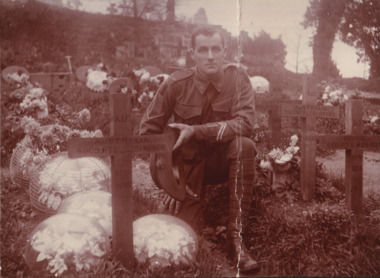 The Beechworth Burke Museum
Photograph
Taken on an unknown date, depicted is a portrait of a young, unidentified male soldier kneeling beside a grave in a cemetery. He is dressed in an Australian military uniform. The cemetery pictured is the Arnos Vale Cemetery in Bristol, United Kingdom. There are multiple crosses marking graves in this photograph, all marked in memory of different soldiers who fought with the Australian Imperial Force (AIF) during World War I. It is believed that the soldier who is kneeling was also part of the Australian Imperial Force. This can be inferred by the chevron rank insignia visible on the uniform. The placement of this insignia on the sleeve of the right arm suggests that this soldier was either a Warrant Officer or a Non-Commissioned Officer (NCO). Another signifier of the Australian Imperial Force uniform are the three inverted chevron stripes positioned on the lower part of the left sleeve, near the wrist. These are called Good Conduct Stripes and were worn by Warrant Officers and NCOs. This patch consisted of a single chevron stripe for each year of military service meeting certain requirements of good conduct. Additionally, the man in this photograph is also wearing a 'Rising Sun' collar badge on his coat. Australia, unlike most other Commonwealth countries, did not adopt metal regimental badges during the First World War. All units were issued with the Australian Army General Service Badge, better known as the 'Rising Sun’ badge. This insignia is almost always identified with the Australian Imperial Force. Furthermore, the grave that this unidentified soldier is kneeling next to is the resting place of Private John James (J. J.) Simpson. He was born in Stanley, Victoria in 1883. He enlisted in the Australian Imperial Force in Melbourne, Victoria on 12 July, 1915, with the service number 4909. John James Simpson was then posted to the 60th Company Depot at Seymour for military recruit training. John James Simpson was reported wounded in action in France on 19 July, 1916. He was admitted to 13th General Hospital, France with gunshot wounds to his legs. From Boulogne, France, he traveled to the United Kingdom aboard the Hospital Ship 'St. Denis' for medical care. Upon arrival, he was admitted to 2nd Southern General Hospital, Bristol, England on 27 July, 1916. John James Simpson passed away from his wounds on 1 August, 1916. He was 33 years old.The record is historically significant due to its connection to World War I. This conflict is integral to Australian culture as it was the single greatest loss of life and the greatest repatriation of casualties in the country's history. Australia’s involvement in the First World War began when the Australian government established the Australian Imperial Force (AIF) in August 1914. Immediately, men were recruited to serve the British Empire in the Middle East and on the Western Front. The first significant Australian action of the war was the Australian Naval and Military Expeditionary Force’s (ANMEF) landing on Rabaul on 11 September 1914. The ANMEF took possession of German New Guinea at Toma on 17 September 1914 and of the neighbouring islands of the Bismarck Archipelago in October 1914. On 25 April 1915, members of the AIF landed on Gallipoli in Turkey with troops from New Zealand, Britain, and France. This specific event holds very strong significance within Australian history. The record has strong research potential. This is due to the ongoing public and scholarly interest in war, history, and especially the ANZAC legend, which is commemorated annually on 25 April, known as ANZAC Day.Sepia rectangular photograph printed on matte photographic paper mounted on card.Obverse: A.I.F. / AUSTRALIA / 441, PTE.T. / T (?) / 26B (?) / 6.1.17 / (?) / LANGTON RD. / ST. ANNES PK. / BRISTOL / A.I.F. / AUSTRALIA. / 708, GNR B.L.CRAWFORD. / FR / 5 D.A.C. / 13.2.17 / A.I.F. / AUSTRALIA. / 4481, P (?) D.MORRIS. / (?) / 31.12.(?) / A.I.F. / AUSTRALIA. / 4909, PTE J.J.SIMPSON. / 608(?) / 1.8.16 / Winchester / LANGTON RD. / ST. ANNES PK / BRISTOL / Reverse: 2641 /military album, military, war, world war i, wwi, australian imperial force, aif, j. j. simpson, uniform, cemetery -
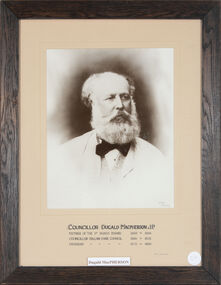 Ballan Shire Historical Society
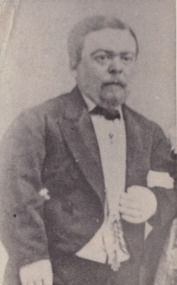
Photograph - Macpherson, Dugald J.P, Framed portrait of Councillor Dugald Macpherson J.P
Sepia photograph, mounted on fawn cardboard in a very dark timber frameCouncillor Dugald Macpherson J.P. Member of the Road Board 1862 - 1864 Councillor Ballan Shire Council 1864 -1873 President 1875 - 1880 Colart - Melbourne Merv Quinn 1992ballan shire councillor, •ballan shire president, •ballan road board, macpherson dugald -
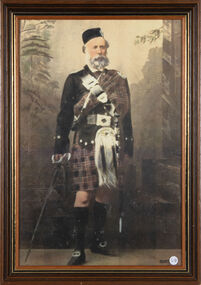 Ballan Shire Historical Society
Photograph - Macpherson, Dugald, Portrait of Dugald Macpherson
... and gold trim. Portrait of Dugald Macpherson Photograph Macpherson ...Full length coloured photograph of Dugald Macpherson of Bungeeltap in traditional Highland regalia, mounted under glass in a light brown wooden frame with black and gold trim.Dugald Macpherson original owner of Bungeeltap.macpherson dugald, ballan, bungeeltap -
 Flagstaff Hill Maritime Museum and Village
Photograph, late 19th century
Loch Ard was bound for Melbourne in 1878 loaded with passengers and cargo when it ran into a rocky reef at the base of Mutton Bird Island, near Port Campbell. Of the 54 crew members and passengers on board, only two survived: an apprentice, Tom Pearce and a young woman passenger, Eva Carmichael, who lost all of her family in the tragedy. The wreck of Loch Ard still lies at the base of Mutton Bird Island and much of the cargo has been salvaged. Some was washed up into what is now known as Loch Ard Gorge following the shipwreck. Cargo and artefacts have also been illegally salvaged over many years before protective legislation was introduced. The photograph is significant for its association with the wreck of the Loch Ard. This wreck has been protected as a Historic Shipwreck since 11 March 1982, under the Commonwealth Historic Shipwrecks Act (1976) Flagstaff Hill’s collection of artefacts from Loch Ard is significant for being one of the largest collections of artefacts from this shipwreck in Victoria. It is significant for its association with the shipwreck, which is on the Victorian Heritage Register. The collection is significant because of the relationship between the objects, as together they have a high potential to interpret the story of the Loch Ard. The Loch Ard collection is archaeologically significant as the remains of a large international passenger and cargo ship. The Loch Ard collection is historically significant for representing aspects of Victoria’s shipping history and its potential to interpret sub-theme 1.5 of Victoria’s Framework of Historical Themes (living with natural processes). The collection is also historically significant for its association with the Loch Ard, which was one of the worst and best known shipwrecks in Victoria’s history. The Loch Ard collection meets the following criteria for assessment: Criterion A: Importance to the course, or pattern, of Victoria’s cultural history. Criterion B: Possession of uncommon, rare or endangered aspects of Victoria’s cultural history. Criterion C: Potential to yield information that will contribute to an understanding of Victoria’s cultural history. Photograph of Miss Eva Carmichael holding a book seated at a desk. Oval gilt framed portrait in a green container edged with gilt. Reverse has piece of tape centre left and right. Also has printed maker’s information. Printed by the Photographic Society of Victoria, Melbourne.Printed brown text “PHOTOGRAPHIC / SOCIETY OF VICTORIA / MELBOURNE / REGISTERED COPYRIGHT / JULY 24th 878” and “NONE ARE GENUINE UNLESS WITH / SIGNATURES THUS” and “PRESIDENT / VICE PRESIDENT / SECRETARY” flagstaff hill, warrnambool, shipwrecked-coast, flagstaff-hill, flagstaff-hill-maritime-museum, maritime-museum, shipwreck-coast, flagstaff-hill-maritime-village, loch ard shipwreck, miss eva carmichael, loch ard survivor -
 Flagstaff Hill Maritime Museum and Village
Photograph - Portrait, Arthur & Son, photographers, Miss Carmichael, 1878
... handwritten below the photograph. Miss Carmichael Photograph Portrait ...Miss Eva Carmichael, the subject of the photograph, was one of only two survivors from the wreck of the Loch Ard, wrecked on Mutton Bird Island near Port Campbell, Victoria, on June 1st, 1878..The photograph holds great significance for its connection to Eva Carmichael, one of two survivors from the wreck of the Loch Ard. It is also significant for its connection to the Loch Ard, one of the most tragic shipwrecks in Victoria's coastline and listed on the Historic Shipwreck Register.Photographic portrait mounted on brown cardboard of Miss Eva Carmichael. Miss Carmichael is standing near an upholstered chair and rests wth both hands upon a masonry pillar. Behind her is a balustrade in the classic style common to that period. The background consists of a large tree giving the impression of a garden setting. It was produced at the studio of Arthur & Son, Mount Gambier, 1878. Inscriptions handwritten below the photograph. Handwritten in white "Miss Carmichael" Stamped "Arthur & Son / MOUNT GAMBIER"flagstaff hill, warrnambool, shipwrecked-coast, flagstaff-hill, flagstaff-hill-maritime-museum, maritime-museum, shipwreck-coast, flagstaff-hill-maritime-village, photograph, shipwreck loch ard, eva carmichael, portrait, arthur & son, mount gambier, loch ard, shipwreck, mutton bird island -
 Flagstaff Hill Maritime Museum and Village
Photograph - Portrait, late 19th century
... The Young Hero Schottische Photograph of Tom Pearce Photograph of Mr ...This photograph is of Tom Pearce, one of only 2 survivors from the shipwreck LOCH ARD. Loch Ard was bound for Melbourne in 1878 loaded with passengers and cargo when it ran into a rocky reef at the base of Mutton Bird Island, near Port Campbell. Of the 54 crew members and passengers on board, only two survived: an apprentice, Tom Pearce and a young woman passenger, Eva Carmichael, who lost all of her family in the tragedy. Coleman Jacobs composed the music “The Young Hero Schottische” and dedicated it, by permission, to Mr. Thomas R. (Tom) Pearce. The sheet music was published in 1878 by the Messieurs Roberts, professors of dancing etc. Melbourne. It was on sale for 3/- (3 shillings) and in aid of the “LOCH ARD” fund. [This is Coleman Jacobs’ only surviving musical work Coleman Jacobs, accomplished pianist, musical performer, singer, composer, professor of music and music teacher, was born in 1827 and died on 4 July 1885, aged 58 years. Coleman Jacobs was buried in the Melbourne Cemetery (grave 461, Church of England section).] The wreck of Loch Ard still lies at the base of Mutton Bird Island and much of the cargo has been salvaged. Some was washed up into what is now known as Loch Ard Gorge following the shipwreck. Cargo and artefacts have also been illegally salvaged over many years before protective legislation was introduced. The photograph is significant for its association with the wreck of the Loch Ard. This wreck has been protected as a Historic Shipwreck since 11 March 1982, under the Commonwealth Historic Shipwrecks Act (1976) Flagstaff Hill’s collection of artefacts from Loch Ard is significant for being one of the largest collections of artefacts from this shipwreck in Victoria. It is significant for its association with the shipwreck, which is on the Victorian Heritage Register. The collection is significant because of the relationship between the objects, as together they have a high potential to interpret the story of the Loch Ard. The Loch Ard collection is archaeologically significant as the remains of a large international passenger and cargo ship. The Loch Ard collection is historically significant for representing aspects of Victoria’s shipping history and its potential to interpret sub-theme 1.5 of Victoria’s Framework of Historical Themes (living with natural processes). The collection is also historically significant for its association with the Loch Ard, which was one of the worst and best known shipwrecks in Victoria’s history. The Loch Ard collection meets the following criteria for assessment: Criterion A: Importance to the course, or pattern, of Victoria’s cultural history. Criterion B: Possession of uncommon, rare or endangered aspects of Victoria’s cultural history. Criterion C: Potential to yield information that will contribute to an understanding of Victoria’s cultural history. Photograph of Mr Tom Pearce dressed in a uniform with a medal pinned on it. Standing with his arm resting on a masonry pillar.flagstaff hill, warrnambool, shipwrecked coast, flagstaff hill, flagstaff hill maritime museum, maritime museum, shipwreck coast, flagstaff hill maritime village, loch ard shipwreck, tom pearce, thomas r pearce, eva carmichael, mutton bird island, loch ard survivor, loch ard hero, coleman jacobs, the young hero schottische, photograph of tom pearce -
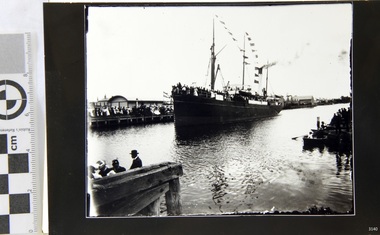
 Flagstaff Hill Maritime Museum and Village
Photograph
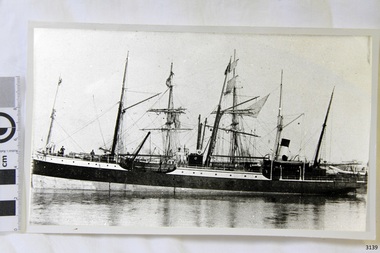
... collection has a photograph of a portrait of Captain Chapman.... Flagstaff Hill’s collection has a photograph of a portrait ...Black and White photograph of vessel S.S. Casino in calm water, taken 1882-1932. The coastal trader has light rigging and steam funnel, lifeboat on side, two men on deck. Background shows other ships. The S.S. Casino was a passenger and freight steamer built in Dundee, Scotland, in 1882 for the Newcastle and Hunter River Steam Navigation Company of N.S.W. She weighed 425 tons gross with a length of 160.4 feet, beam of 24.1 feet and depth of 10.2 feet. She had saloon accommodation for 35 people, forecabin for 25 more people, and she carried 300 tons of cargo. While on her delivery journey on May 30th 1882 the S.S. Casino called in at the Port of Warrnambool for coal ., narrowly escaping going ashore in gale force winds due to the quick action of the pilot. At that time, still at anchor, she impressed the directors of the Belfast and Koroit Steam Navigation Company so much that they bought her immediately; she was ideal for trade in along the West Coast of Victoria. (Belfast is the original name for Port Fairy, South West Victoria. The Belfast and Koroit Steam Navigation Company was first managed by Messers. Saltau and Osburne and after the passing of Mr. Osburne, by produce merchants Messers H. Sautau and Sons, whose had a hay and corn store and shipping agency was on the corner of Liebig and Koroit Streets in Warrnambool. ) The S.S. Casino became “the most famous steamer to operate in Victorian waters along the West Coast” by author Jack Loney. Captain Boyd was her first Master, followed by Captain Chapman, who stayed with her 1890 until 1924. Captain W. Robertson followed for a short term, then Captain Middleton then took command 1925 - 1932. The S.S. Casino had several mishaps during her life. One was on 3rd January 1898 when she collided with the S.S. Flinders in Apollo Bay with minor damage. Another was on 24th October 1924 when she grounded on a reef at Point Hawdon near Grey River and most of her cargo (of Christmas goods) had to be dumped into the sea. Then in February 1929 she was ‘holed’ when she struck a submerged object as she entered Lady Bay, Warrnambool. On the morning of 10th July 1932, after attempting to berth at Apollo Bay jetty in heavy seas, Captain Middleton decided to take her out into the bay and wait until the seas abated. It was not realised that the anchor used to steady her as she manoeuvred to her berth had pierced her hull. She put about and headed for the beach but sank. Captain Middleton and nine others lost their lives; nine people were rescued including the two female passengers . Captain Middleton had been in charge of the S.S. Casino for seven years. He was the first ship’s Master to lose his life through shipwreck in the West Coast trade. In the years following the turn of the century the S.S. Casino remained the only regular trader with normal passenger accommodation along the West Coast. From 1882 she had made at least 2,500 voyages on the one run. Flagstaff Hill’s collection has a photograph of a portrait of Captain Chapman, , a ship model of the S.S. Casino that shows both forms of power under which she sailed, steam and sail. The ship is painted green and flies three flags. The inscription across the case of the ship model, incorrectly dated, tells the sad story of the wreck of the ship and the loss of lives on July 10th 1932 at Apollo Bay. A print in the Collection show S.S. Casino underway in heavy sea off Point Lonsdale, another two photographs show her at the Port of Warrnambool, leaving from the Breakwater in Lady Bay and another identifies the S.S. Casino as a ship from the Belfast and Koroit Steam Navigation Company. (Belfast is the original name for the township of Port Fairy). This photograph was taken 1882-1932. It is significant because of its association with the coastal trader S.S. Casino and its significance to trade along Victoria's West Coast in the late 19th and early 20th century. The wreck of the S.S. Casino is considered an important part of Victorian and Australian cultural heritage and as such has been declared and protected as an Historic Shipwreck under State and Commonwealth Law in the Commonwealth Historic Shipwrecks Act (1976). Black and White photograph of vessel S.S. Casino in calm water, taken 1882-1932. The coastal trader has light rigging and steam funnel, lifeboat on side, two men on deck. Background shows other ships.flagstaff hill, warrnambool, shipwrecked coast, flagstaff hill maritime museum, maritime museum, shipwreck coast, flagstaff hill maritime village, great ocean road, newcastle and hunter river steam navigation company, belfast and koroit steam navigation company, h. sautau and sons, s.s. casino, west coast trader s.s. casino, victorian coastal trader, captain boyd, captain w. robertson, captain chapman, captain middleton, apollo bay shipwreck, s.s. casino at lady bay warrnambool, saltau and osburne -
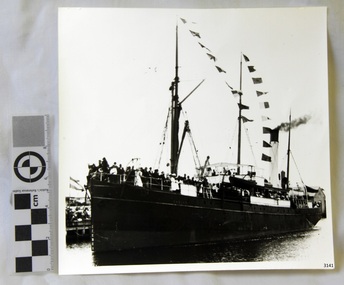
 Flagstaff Hill Maritime Museum and Village
Photograph
... . Flagstaff Hill’s collection has a photograph of a portrait.... Flagstaff Hill’s collection has a photograph of a portrait ...Black and White Photograph of S.S Casino arriving in port, taken 1930-1932. Decks are laden with men and women , crowd of waving people along the river bank, smoke coming from funnel. Warehouse and homes in the background. The S.S. Casino was a passenger and freight steamer built in Dundee, Scotland, in 1882 for the Newcastle and Hunter River Steam Navigation Company of N.S.W. She weighed 425 tons gross with a length of 160.4 feet, beam of 24.1 feet and depth of 10.2 feet. She had saloon accommodation for 35 people, forecabin for 25 more people, and she carried 300 tons of cargo. While on her delivery journey on May 30th 1882 the S.S. Casino called in at the Port of Warrnambool for coal ., narrowly escaping going ashore in gale force winds due to the quick action of the pilot. At that time, still at anchor, she impressed the directors of the Belfast and Koroit Steam Navigation Company so much that they bought her immediately; she was ideal for trade in along the West Coast of Victoria. (Belfast is the original name for Port Fairy, South West Victoria. The Belfast and Koroit Steam Navigation Company was first managed by Messers. Saltau and Osburne and after the passing of Mr. Osburne, by produce merchants Messers H. Sautau and Sons, whose had a hay and corn store and shipping agency was on the corner of Liebig and Koroit Streets in Warrnambool. ) The S.S. Casino became “the most famous steamer to operate in Victorian waters along the West Coast” by author Jack Loney. Captain Boyd was her first Master, followed by Captain Chapman, who stayed with her 1890 until 1924. Captain W. Robertson followed for a short term, then Captain Middleton then took command 1925 - 1932. The S.S. Casino had several mishaps during her life. One was on 3rd January 1898 when she collided with the S.S. Flinders in Apollo Bay with minor damage. Another was on 24th October 1924 when she grounded on a reef at Point Hawdon near Grey River and most of her cargo (of Christmas goods) had to be dumped into the sea. Then in February 1929 she was ‘holed’ when she struck a submerged object as she entered Lady Bay, Warrnambool. On the morning of 10th July 1932, after attempting to berth at Apollo Bay jetty in heavy seas, Captain Middleton decided to take her out into the bay and wait until the seas abated. It was not realised that the anchor used to steady her as she manoeuvred to her berth had pierced her hull. She put about and headed for the beach but sank. Captain Middleton and nine others lost their lives; nine people were rescued including the two female passengers . Captain Middleton had been in charge of the S.S. Casino for seven years. He was the first ship’s Master to lose his life through shipwreck in the West Coast trade. In the years following the turn of the century the S.S. Casino remained the only regular trader with normal passenger accommodation along the West Coast. From 1882 she had made at least 2,500 voyages on the one run. Flagstaff Hill’s collection has a photograph of a portrait of Captain Chapman, , a ship model of the S.S. Casino that shows both forms of power under which she sailed, steam and sail. The ship is painted green and flies three flags. The inscription across the case of the ship model, incorrectly dated, tells the sad story of the wreck of the ship and the loss of lives on July 10th 1932 at Apollo Bay. A print in the Collection show S.S. Casino underway in heavy sea off Point Lonsdale, another two photographs show her at the Port of Warrnambool, leaving from the Breakwater in Lady Bay and another identifies the S.S. Casino as a ship from the Belfast and Koroit Steam Navigation Company. (Belfast is the original name for the township of Port Fairy). This photograph is significant because of its association with the coastal trader S.S. Casino 1882-1932 and its significance to trade along Victoria's West Coast in the late 19th and early 20th century. The wreck of the S.S. Casino is considered an important part of Victorian and Australian cultural heritage and as such has been declared and protected as an Historic Shipwreck under State and Commonwealth Law in the Commonwealth Historic Shipwrecks Act (1976). Black and White Photograph of S.S Casino arriving in port, taken 1930-1932. Decks are laden with men and women , crowd of waving people along the river bank, smoke coming from funnel. Warehouse and homes in the background. flagstaff hill, warrnambool, shipwrecked coast, flagstaff hill maritime museum, maritime museum, shipwreck coast, flagstaff hill maritime village, great ocean road, newcastle and hunter river steam navigation company, belfast and koroit steam navigation company, h. sautau and sons, s.s. casino, west coast trader s.s. casino, victorian coastal trader, captain boyd, captain w. robertson, captain chapman, captain middleton, apollo bay shipwreck, s.s. casino at lady bay warrnambool, saltau and osburne -
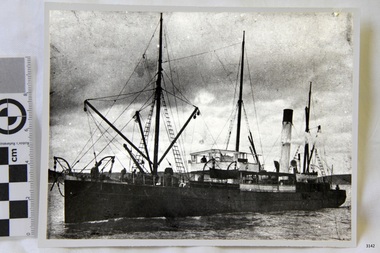
 Flagstaff Hill Maritime Museum and Village
Photograph
... . Flagstaff Hill’s collection has a photograph of a portrait.... Flagstaff Hill’s collection has a photograph of a portrait ...Black and White Photograph of S.S Casino arriving in Port. Taken 1930-1932. People on the deck and on the river banks waving. Smoke coming from funnel. The S.S. Casino was a passenger and freight steamer built in Dundee, Scotland, in 1882 for the Newcastle and Hunter River Steam Navigation Company of N.S.W. She weighed 425 tons gross with a length of 160.4 feet, beam of 24.1 feet and depth of 10.2 feet. She had saloon accommodation for 35 people, forecabin for 25 more people, and she carried 300 tons of cargo. While on her delivery journey on May 30th 1882 the S.S. Casino called in at the Port of Warrnambool for coal ., narrowly escaping going ashore in gale force winds due to the quick action of the pilot. At that time, still at anchor, she impressed the directors of the Belfast and Koroit Steam Navigation Company so much that they bought her immediately; she was ideal for trade in along the West Coast of Victoria. (Belfast is the original name for Port Fairy, South West Victoria. The Belfast and Koroit Steam Navigation Company was first managed by Messers. Saltau and Osburne and after the passing of Mr. Osburne, by produce merchants Messers H. Sautau and Sons, whose had a hay and corn store and shipping agency was on the corner of Liebig and Koroit Streets in Warrnambool. ) The S.S. Casino became “the most famous steamer to operate in Victorian waters along the West Coast” by author Jack Loney. Captain Boyd was her first Master, followed by Captain Chapman, who stayed with her 1890 until 1924. Captain W. Robertson followed for a short term, then Captain Middleton then took command 1925 - 1932. The S.S. Casino had several mishaps during her life. One was on 3rd January 1898 when she collided with the S.S. Flinders in Apollo Bay with minor damage. Another was on 24th October 1924 when she grounded on a reef at Point Hawdon near Grey River and most of her cargo (of Christmas goods) had to be dumped into the sea. Then in February 1929 she was ‘holed’ when she struck a submerged object as she entered Lady Bay, Warrnambool. On the morning of 10th July 1932, after attempting to berth at Apollo Bay jetty in heavy seas, Captain Middleton decided to take her out into the bay and wait until the seas abated. It was not realised that the anchor used to steady her as she manoeuvred to her berth had pierced her hull. She put about and headed for the beach but sank. Captain Middleton and nine others lost their lives; nine people were rescued including the two female passengers . Captain Middleton had been in charge of the S.S. Casino for seven years. He was the first ship’s Master to lose his life through shipwreck in the West Coast trade. In the years following the turn of the century the S.S. Casino remained the only regular trader with normal passenger accommodation along the West Coast. From 1882 she had made at least 2,500 voyages on the one run. Flagstaff Hill’s collection has a photograph of a portrait of Captain Chapman, , a ship model of the S.S. Casino that shows both forms of power under which she sailed, steam and sail. The ship is painted green and flies three flags. The inscription across the case of the ship model, incorrectly dated, tells the sad story of the wreck of the ship and the loss of lives on July 10th 1932 at Apollo Bay. A print in the Collection show S.S. Casino underway in heavy sea off Point Lonsdale, another two photographs show her at the Port of Warrnambool, leaving from the Breakwater in Lady Bay and another identifies the S.S. Casino as a ship from the Belfast and Koroit Steam Navigation Company. (Belfast is the original name for the township of Port Fairy). This photograph is significant because of its association with the coastal trader S.S. Casino 1930 -1932 and its significance to trade along Victoria's West Coast in the late 19th and early 20th century. The wreck of the S.S. Casino is considered an important part of Victorian and Australian cultural heritage and as such has been declared and protected as an Historic Shipwreck Black and White Photograph of S.S Casino arriving in Port. Taken 1930-1932. People on the deck and on the river banks waving. Smoke coming from funnel.flagstaff hill, warrnambool, shipwrecked coast, flagstaff hill maritime museum, maritime museum, shipwreck coast, flagstaff hill maritime village, great ocean road, newcastle and hunter river steam navigation company, belfast and koroit steam navigation company, h. sautau and sons, s.s. casino, west coast trader s.s. casino, victorian coastal trader, captain boyd, captain w. robertson, captain chapman, captain middleton, apollo bay shipwreck, s.s. casino at lady bay warrnambool, saltau and osburne -
 Flagstaff Hill Maritime Museum and Village
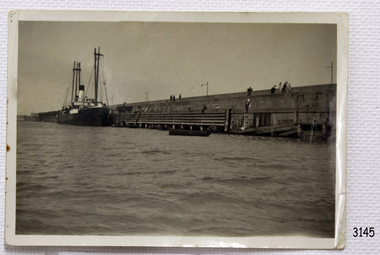
Photograph
... . Flagstaff Hill’s collection has a photograph of a portrait... collection has a photograph of a portrait of Captain Chapman ...Black and White Photograph of S.S Casino taken 1930-1932. Ship has men on deck and a man at the helm. Hills and the shore can be seen in the background. The S.S. Casino was a passenger and freight steamer built in Dundee, Scotland, in 1882 for the Newcastle and Hunter River Steam Navigation Company of N.S.W. She weighed 425 tons gross with a length of 160.4 feet, beam of 24.1 feet and depth of 10.2 feet. She had saloon accommodation for 35 people, forecabin for 25 more people, and she carried 300 tons of cargo. While on her delivery journey on May 30th 1882 the S.S. Casino called in at the Port of Warrnambool for coal ., narrowly escaping going ashore in gale force winds due to the quick action of the pilot. At that time, still at anchor, she impressed the directors of the Belfast and Koroit Steam Navigation Company so much that they bought her immediately; she was ideal for trade in along the West Coast of Victoria. (Belfast is the original name for Port Fairy, South West Victoria. The Belfast and Koroit Steam Navigation Company was first managed by Messers. Saltau and Osburne and after the passing of Mr. Osburne, by produce merchants Messers H. Sautau and Sons, whose had a hay and corn store and shipping agency was on the corner of Liebig and Koroit Streets in Warrnambool. ) The S.S. Casino became “the most famous steamer to operate in Victorian waters along the West Coast” by author Jack Loney. Captain Boyd was her first Master, followed by Captain Chapman, who stayed with her 1890 until 1924. Captain W. Robertson followed for a short term, then Captain Middleton then took command 1925 - 1932. The S.S. Casino had several mishaps during her life. One was on 3rd January 1898 when she collided with the S.S. Flinders in Apollo Bay with minor damage. Another was on 24th October 1924 when she grounded on a reef at Point Hawdon near Grey River and most of her cargo (of Christmas goods) had to be dumped into the sea. Then in February 1929 she was ‘holed’ when she struck a submerged object as she entered Lady Bay, Warrnambool. On the morning of 10th July 1932, after attempting to berth at Apollo Bay jetty in heavy seas, Captain Middleton decided to take her out into the bay and wait until the seas abated. It was not realised that the anchor used to steady her as she manoeuvred to her berth had pierced her hull. She put about and headed for the beach but sank. Captain Middleton and nine others lost their lives; nine people were rescued including the two female passengers . Captain Middleton had been in charge of the S.S. Casino for seven years. He was the first ship’s Master to lose his life through shipwreck in the West Coast trade. In the years following the turn of the century the S.S. Casino remained the only regular trader with normal passenger accommodation along the West Coast. From 1882 she had made at least 2,500 voyages on the one run. Flagstaff Hill’s collection has a photograph of a portrait of Captain Chapman, , a ship model of the S.S. Casino that shows both forms of power under which she sailed, steam and sail. The ship is painted green and flies three flags. The inscription across the case of the ship model, incorrectly dated, tells the sad story of the wreck of the ship and the loss of lives on July 10th 1932 at Apollo Bay. A print in the Collection show S.S. Casino underway in heavy sea off Point Lonsdale, another two photographs show her at the Port of Warrnambool, leaving from the Breakwater in Lady Bay and another identifies the S.S. Casino as a ship from the Belfast and Koroit Steam Navigation Company. (Belfast is the original name for the township of Port Fairy). This ohotograph is significant because of its association with the coastal trader S.S. Casino 1882-1932 and its significance to trade along Victoria's West Coast in the late 19th and early 20th century. The wreck of the S.S. Casino is considered an important part of Victorian and Australian cultural heritage and as such has been declared and protected as an Historic Shipwreck under State and Commonwealth Law in the Commonwealth Historic Shipwrecks Act (1976). Black and White Photograph of S.S Casino taken 1932-1932. Ship has men on deck and a man at the helm. Hills and the shore can be seen in the background.flagstaff hill, warrnambool, shipwrecked coast, flagstaff hill maritime museum, maritime museum, shipwreck coast, flagstaff hill maritime village, great ocean road, newcastle and hunter river steam navigation company, belfast and koroit steam navigation company, h. sautau and sons, s.s. casino, west coast trader s.s. casino, victorian coastal trader, captain boyd, captain w. robertson, captain chapman, captain middleton, apollo bay shipwreck, s.s. casino at lady bay warrnambool, saltau and osburne -
 Flagstaff Hill Maritime Museum and Village
Photograph
... collection has a photograph of a portrait of Captain Chapman.... Flagstaff Hill’s collection has a photograph of a portrait ...Black and White Photograph of S.S Casino taken 1930-1932. The Casino is berthed at the Warrnambool Breakwater, either loading or unloading. A person is attending a container at the bottom of a ramp between ship to Breakwater. People are sitting or standing on the Breakwater. The S.S. Casino was a passenger and freight steamer built in Dundee, Scotland, in 1882 for the Newcastle and Hunter River Steam Navigation Company of N.S.W. She weighed 425 tons gross with a length of 160.4 feet, beam of 24.1 feet and depth of 10.2 feet. She had saloon accommodation for 35 people, forecabin for 25 more people, and she carried 300 tons of cargo. While on her delivery journey on May 30th 1882 the S.S. Casino called in at the Port of Warrnambool for coal ., narrowly escaping going ashore in gale force winds due to the quick action of the pilot. At that time, still at anchor, she impressed the directors of the Belfast and Koroit Steam Navigation Company so much that they bought her immediately; she was ideal for trade in along the West Coast of Victoria. (Belfast is the original name for Port Fairy, South West Victoria. The Belfast and Koroit Steam Navigation Company was first managed by Messers. Saltau and Osburne and after the passing of Mr. Osburne, by produce merchants Messers H. Sautau and Sons, whose had a hay and corn store and shipping agency was on the corner of Liebig and Koroit Streets in Warrnambool. ) The S.S. Casino became “the most famous steamer to operate in Victorian waters along the West Coast” by author Jack Loney. Captain Boyd was her first Master, followed by Captain Chapman, who stayed with her 1890 until 1924. Captain W. Robertson followed for a short term, then Captain Middleton then took command 1925 - 1932. The S.S. Casino had several mishaps during her life. One was on 3rd January 1898 when she collided with the S.S. Flinders in Apollo Bay with minor damage. Another was on 24th October 1924 when she grounded on a reef at Point Hawdon near Grey River and most of her cargo (of Christmas goods) had to be dumped into the sea. Then in February 1929 she was ‘holed’ when she struck a submerged object as she entered Lady Bay, Warrnambool. On the morning of 10th July 1932, after attempting to berth at Apollo Bay jetty in heavy seas, Captain Middleton decided to take her out into the bay and wait until the seas abated. It was not realised that the anchor used to steady her as she manoeuvred to her berth had pierced her hull. She put about and headed for the beach but sank. Captain Middleton and nine others lost their lives; nine people were rescued including the two female passengers . Captain Middleton had been in charge of the S.S. Casino for seven years. He was the first ship’s Master to lose his life through shipwreck in the West Coast trade. In the years following the turn of the century the S.S. Casino remained the only regular trader with normal passenger accommodation along the West Coast. From 1882 she had made at least 2,500 voyages on the one run. Flagstaff Hill’s collection has a photograph of a portrait of Captain Chapman, , a ship model of the S.S. Casino that shows both forms of power under which she sailed, steam and sail. The ship is painted green and flies three flags. The inscription across the case of the ship model, incorrectly dated, tells the sad story of the wreck of the ship and the loss of lives on July 10th 1932 at Apollo Bay. A print in the Collection show S.S. Casino underway in heavy sea off Point Lonsdale, another two photographs show her at the Port of Warrnambool, leaving from the Breakwater in Lady Bay and another identifies the S.S. Casino as a ship from the Belfast and Koroit Steam Navigation Company. (Belfast is the original name for the township of Port Fairy). This object is significant because of its association with the coastal trader S.S. Casino 1882-1932 and its significance to trade along Victoria's West Coast in the late 19th and early 20th century. The wreck of the S.S. Casino is considered an important part of Victorian and Australian cultural heritage and as such has been declared and protected as an Historic Shipwreck under State and Commonwealth Law in the Commonwealth Historic Shipwrecks Act (1976). Black and White Photograph of S.S Casino taken 1930-1932. The Casino is berthed at the Warrnambool Breakwater, either loading or unloading. A person is attending a container at the bottom of a ramp between ship to Breakwater. People are sitting or standing on the Breakwater.flagstaff hill, warrnambool, shipwrecked coast, flagstaff hill maritime museum, maritime museum, shipwreck coast, flagstaff hill maritime village, great ocean road, newcastle and hunter river steam navigation company, belfast and koroit steam navigation company, h. sautau and sons, s.s. casino, west coast trader s.s. casino, victorian coastal trader, captain boyd, captain w. robertson, captain chapman, captain middleton, apollo bay shipwreck, s.s. casino at lady bay warrnambool, saltau and osburne -
 Flagstaff Hill Maritime Museum and Village
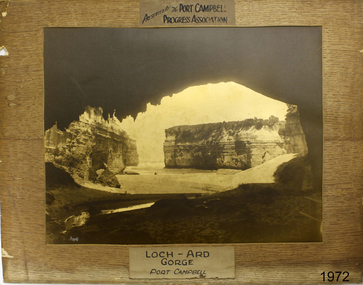
Photograph - Coastal Scene, Foyle Photographic Studio, Loch Ard Gorge Port Campbell, 1889-1919
The photograph shows the popular tourist attraction, Loch Ard Gorge, which is located along the Great Ocean Road in Victoria, near Port Campbell. The gorge is named after the famous sailing ship, the LOCH ARD, that was wrecked there in 1878. Only two of the 54 passengers and crew survived. FOYLE “Foyle” written on the photograph is the name of Foyle’s Photographic studio. At the time of the photograph, the studio was owned by both Charles and Lilian Foyle (sometimes known as Lillian or Lily), either of whom could have taken this photograph. They also worked together at a later date on the photographs, sketches and paintings of the famous and historical Pioneers’ Honour Board, which is currently on view in the Warrnambool Library. Foyles Photography was the studio of James Charles Foyle. He owned “Foyle’s Photo Card Studios” in Liebig St, Warrnambool, which operated between 1889 – 1919. A letter to the editor (by Mr Edward Vidler) in the Melbourne Argus, 3rd August 1907, mentions that in that year Warrnambool would celebrate the 60th anniversary of its proclamation as a town, and that talented local artist Miss Lily Foyle would paint 200 portraits in watercolour of the pioneers who settled in the district prior to 1860. The Pioneer Honour Board can still be seen on display in the Warrnambool Library. In the Warrnambool Standard, Dec. 1917, “Mr Foyle’s studio was awarded the contract to decorate rail cars on newly opened Trans-Continental railway, assisted by his sister, Miss Findlay.” HISTORY OF THE LOCH ARD The LOCH ARD belonged to the famous Loch Line which sailed many ships from England to Australia. Built-in Glasgow by Barclay, Curdle and Co. in 1873, the LOCH ARD was a three-masted square-rigged iron sailing ship. The ship measured 262ft 7" (79.87m) in length, 38ft (11.58m) in width, 23ft (7m) in depth and had a gross tonnage of 1693 tons. The LOCH ARD's main mast measured a massive 150ft (45.7m) in height. LOCH ARD made three trips to Australia and one trip to Calcutta before its final voyage. LOCH ARD left England on March 2, 1878, under the command of Captain Gibbs, a newly married, 29-year-old. She was bound for Melbourne with a crew of 37, plus 17 passengers and a load of cargo. The general cargo reflected the affluence of Melbourne at the time. Onboard were straw hats, umbrella, perfumes, clay pipes, pianos, clocks, confectionary, linen and candles, as well as a heavier load of railway irons, cement, lead and copper. There were items included that intended for display in the Melbourne International Exhibition in 1880. The voyage to Port Phillip was long but uneventful. At 3 am on June 1, 1878, Captain Gibbs was expecting to see land and the passengers were becoming excited as they prepared to view their new homeland in the early morning. But LOCH ARD was running into a fog which greatly reduced visibility. Captain Gibbs was becoming anxious as there was no sign of land or the Cape Otway lighthouse. At 4 am the fog lifted. A man aloft announced that he could see breakers. The sheer cliffs of Victoria's west coast came into view, and Captain Gibbs realised that the ship was much closer to them than expected. He ordered as much sail to be set as time would permit and then attempted to steer the vessel out to sea. On coming head-on into the wind, the ship lost momentum, the sails fell limp and LOCH ARD's bow swung back. Gibbs then ordered the anchors to be released in an attempt to hold its position. The anchors sank some 50 fathoms - but did not hold. By this time LOCH ARD was among the breakers and the tall cliffs of Mutton Bird Island rose behind the ship. Just half a mile from the coast, the ship's bow was suddenly pulled around by the anchor. The captain tried to tack out to sea, but the ship struck a reef at the base of Mutton Bird Island, near Port Campbell. Waves broke over the ship and the top deck was loosened from the hull. The masts and rigging came crashing down knocking passengers and crew overboard. When a lifeboat was finally launched, it crashed into the side of LOCH ARD and capsized. Tom Pearce, who had launched the boat, managed to cling to its overturned hull and shelter beneath it. He drifted out to sea and then on the flood tide came into what is now known as LOCH ARD Gorge. He swam to shore, bruised and dazed, and found a cave in which to shelter. Some of the crew stayed below deck to shelter from the falling rigging but drowned when the ship slipped off the reef into deeper water. Eva Carmichael had raced onto the deck to find out what was happening only to be confronted by towering cliffs looming above the stricken ship. In all the chaos, Captain Gibbs grabbed Eva and said, "If you are saved Eva, let my dear wife know that I died like a sailor". That was the last Eva Carmichael saw of the captain. She was swept off the ship by a huge wave. Eva saw Tom Pearce on a small rocky beach and yelled to attract his attention. He dived in and swam to the exhausted woman and dragged her to shore. He took her to the cave and broke and opened the case of brandy, which had washed up on the beach. He opened a bottle to revive the unconscious woman. A few hours later Tom scaled a cliff in search of help. He followed hoof prints and came by chance upon two men from nearby Glenample Station three and a half miles away. In a state of exhaustion, he told the men of the tragedy. Tom returned to the gorge while the two men rode back to the station to get help. By the time they reached LOCH ARD Gorge, it was cold and dark. The two shipwreck survivors were taken to Glenample Station to recover. Eva stayed at the station for six weeks before returning to Ireland, this time by steamship. In Melbourne, Tom Pearce received a hero's welcome. He was presented with the first gold medal of the Royal Humane Society of Victoria and a £1000 cheque from the Victorian Government. Concerts were performed to honour the young man's bravery and to raise money for those who lost family in the LOCH ARD disaster. Of the 54 crew members and passengers on board, only two survived: the apprentice, Tom Pearce and the young woman passenger, Eva Carmichael, who lost all of her family in the tragedy. Ten days after the LOCH ARD tragedy, salvage rights to the wreck were sold at auction for £2,120. Cargo valued at £3,000 was salvaged and placed on the beach, but most washed back into the sea when another storm developed. The wreck of LOCH ARD still lies at the base of Mutton Bird Island. Much of the cargo has now been salvaged, and some of it was washed up into what is now known as LOCH ARD Gorge. Cargo and artefacts have also been illegally salvaged over many years before protective legislation was introduced. One of the most unlikely pieces of cargo to have survived the shipwreck was a Minton porcelain peacock - one of only nine in the world. The peacock was destined for the Melbourne International Exhibition in 1880. It had been well packed, which gave it adequate protection during the violent storm. Today, the Minton peacock can be seen at the Flagstaff Hill Maritime Museum in Warrnambool. From Australia's most dramatic shipwreck it has now become Australia's most valuable shipwreck artefact and is one of very few 'objects' on the Victorian State Heritage Register.Flagstaff Hill’s collection of artefacts from LOCH ARD is significant for being one of the largest collections of artefacts from this shipwreck in Victoria. It is significant for its association with the shipwreck, which is on the Victorian Heritage Register (VHR S417). The collection is significant because of the relationship between the objects, as together they have a high potential to interpret the story of the LOCH ARD. The LOCH ARD collection is archaeologically significant as the remains of a large international passenger and cargo ship. The LOCH ARD collection is historically significant for representing aspects of Victoria’s shipping history and its potential to interpret sub-theme 1.5 of Victoria’s Framework of Historical Themes (living with natural processes). The collection is also historically significant for its association with the LOCH ARD, which was one of the worst and best-known shipwrecks in Victoria’s history. Foyle's photographs date from the late 19th century to the early 20th century, representing a time of growth in the Warrnambool district and a time when the still relatively new technology of photography was more available to the community.Photograph of Loch Ard Gorge. This sepia coloured rectangular photograph is mounted on a brown cardboard backing that has a wood grain pattern. The photograph has an inscription above it, below it, and in the bottom left corner. It was made for the purpose of a presentation by the Port Campbell Progress Association. Printed above the photograph "PRESENTED BY THE PORT CAMPBELL / PROGRESS ASSOCIATION". Printed below the photograph "LOCH ARD GORGE / PORT CAMPBELL". Hand written on bottom left corner "Foyle". flagstaff hill, warrnambool, shipwrecked coast, flagstaff hill maritime museum, maritime museum, shipwreck coast, flagstaff hill maritime village, great ocean road, loch line, loch ard, captain gibbs, eva carmichael, tom pearce, glenample station, mutton bird island, loch ard gorge, photograph, port campbell, port campbell progress association, foyle photograph, foyle photographic studio warrnambool, warrnambool photo studio -
 Flagstaff Hill Maritime Museum and Village
Photograph
... . Flagstaff Hill’s collection has a photograph of a portrait.... Flagstaff Hill’s collection has a photograph of a portrait ...The S.S. Casino was a passenger and freight steamer built in Dundee, Scotland, in 1882 for the Newcastle and Hunter River Steam Navigation Company of N.S.W. She weighed 425 tons gross with a length of 160.4 feet, beam of 24.1 feet and depth of 10.2 feet. She had saloon accommodation for 35 people, forecabin for 25 more people, and she carried 300 tons of cargo. While on her delivery journey on May 30th 1882 the S.S. Casino called in at the Port of Warrnambool for coal ., narrowly escaping going ashore in gale force winds due to the quick action of the pilot. At that time, still at anchor, she impressed the directors of the Belfast and Koroit Steam Navigation Company so much that they bought her immediately; she was ideal for trade in along the West Coast of Victoria. (The Belfast and Koroit Steam Navigation Company was first managed by Messers. Saltau and Osburne and after the passing of Mr. Osburne, by produce merchants Messers H. Sautau and Sons, whose had a hay and corn store and shipping agency was on the corner of Liebig and Koroit Streets in Warrnambool. ) The S.S. Casino became “the most famous steamer to operate in Victorian waters along the West Coast” by author Jack Loney. Captain Boyd was her first Master, followed by Captain Chapman, who stayed with her 1890 until 1924. Captain W. Robertson followed for a short term, then Captain Middleton then took command 1925 - 1932. The S.S. Casino had several mishaps during her life. One was on 3rd January 1898 when she collided with the S.S. Flinders in Apollo Bay with minor damage. Another was on 24th October 1924 when she grounded on a reef at Point Hawdon near Grey River and most of her cargo (of Christmas goods) had to be dumped into the sea. Then in February 1929 she was ‘holed’ when she struck a submerged object as she entered Lady Bay, Warrnambool. On the morning of 10th July 1932, after attempting to berth at Apollo Bay jetty in heavy seas, Captain Middleton decided to take her out into the bay and wait until the seas abated. It was not realised that the anchor used to steady her as she manoeuvred to her berth had pierced her hull. She put about and headed for the beach but sank. Captain Middleton and nine others lost their lives; nine people were rescued including the two female passengers . Captain Middleton had been in charge of the S.S. Casino for seven years. He was the first ship’s Master to lose his life through shipwreck in the West Coast trade. In the years following the turn of the century the S.S. Casino remained the only regular trader with normal passenger accommodation along the West Coast. From 1882 she had made at least 2,500 voyages on the one run. Flagstaff Hill’s collection has a photograph of a portrait of Captain Chapman, , a ship model of the S.S. Casino that shows both forms of power under which she sailed, steam and sail. The ship is painted green and flies three flags. The inscription across the case of the ship model, incorrectly dated, tells the sad story of the wreck of the ship and the loss of lives on July 10th 1932 at Apollo Bay. A print in the Collection show S.S. Casino underway in the heavy sea off Point Lonsdale, another two photographs show her at the Port of Warrnambool, leaving from the Breakwater in Lady Bay and another identifies the S.S. Casino as a ship from the Belfast and Koroit Steam Navigation Company. (Belfast is the original name for the township of Port Fairy).This photograph of Captain Capman is significant because of its association with the coastal trader S.S. Casino and its significance to trade along Victoria's West Coast in the late 19th and early 20th century. The wreck of the S.S. Casino is considered an important part of Victorian and Australian cultural heritage and as such has been declared and protected as an Historic Shipwreck under State and Commonwealth Law in the Commonwealth Historic Shipwrecks Act (1976). Photograph of Captain Chapman of the "S.S.Casino", mounted on card board. flagstaff hill, warrnambool, shipwrecked coast, flagstaff hill maritime museum, maritime museum, shipwreck coast, flagstaff hill maritime village, great ocean road, newcastle and hunter river steam navigation company, belfast and koroit steam navigation company, h. sautau and sons, s.s. casino, west coast trader s.s. casino, victorian coastal trader, captain boyd, captain w. robertson, captain chapman, captain middleton, apollo bay shipwreck, s.s. casino at lady bay warrnambool, saltau and osburne -
 Flagstaff Hill Maritime Museum and Village
Theodolite, Troughton & Simms, Mid 19th Century
The theodolite was sold by T. Gaunt & Co. of Melbourne, a manufacturer, importer and retailer of a wide variety of goods including jewellery, clocks and watches, navigational and measuring instruments, dinnerware, glassware and ornaments. Thomas Gaunt photograph was included in an album of security identity portraits of members of the Victorian Court, Centennial International Exhibition, Melbourne, 1888. (See further details below.) History for Troughton & Simms: Edward Troughton & William Simms established a scientific instrument making business in London in 1826. Edward Troughton (1756-1835) had previously had his own scientific instrument business, inherited from his father. His achievement's included a transit telescope for Greenwich Observatory (1816) and the precision surveying instruments for the Ordnance Survey of Britain, Ireland and India. William Simms (1793-1860) had trained as a goldsmith and began to gain work dividing circles on fine astronomical instruments. When William Simms died in 1860, the business was taken over by his son James and nephew William. Troughton & Simms shop in Fleet Street became the hub of the finest scientific instrument made in London, in a period in which there was an expanding demand for precision instruments, for astronomy, surveying and precision measurement. They made instruments for Greenwich Observatory, for imperial surveys and exploring expeditions. When fire destroyed the Houses of Parliament in 1834, the firm was commissioned to create new standard lengths, this required 10 years of testing against the remaining old measurements. Troughton and Simms made several of the main instruments for Melbourne Observatory, including an 18 inch azimuth used of the Geodetic Survey, portable transit instrument (circa 1850), zenith sector (1860), a 4.5 inch equatorial telescope (1862), an 8 inch equatorial telescope (1874) spectroscope (1877) and an 8 inch transit instrument in (1884). While the firm had an excellent reputation for quality the company exasperated many of its customers with delays of years in delivering some instruments. History for Thomas Gaunt: Thomas Ambrose Gaunt (1829 – 1890) was a jeweller, clock maker, and manufacturer of scientific instruments, whose head office and showroom were at 337–339 Bourke Street, Melbourne, Victoria, Australia. Thomas Gaunt established Melbourne's leading watchmaking, optical and jewellery business during the second half of the 19th century. Gaunt arrived in Melbourne in 1852, and by 1858 had established his own business at 14 Little Bourke Street. Around 1869 he moved to new premises in Bourke Street on the corner of Royal Arcade, Gaunt's shop quickly became a Melbourne institution. Gaunt proudly advertised that he was 'The only watch manufacturer in the Australian colonies'. While many watches and clocks may have had Gaunt's name on the dial, few would have been made locally. Gaunt did make some watches for exhibitions, and perhaps a few expensive watches for wealthy individuals. Gaunt's received a telegraph signal from Melbourne Observatory each day to correct his main clock and used this signal to rate and repair ship's chronometers and good quality watches. Thomas Gaunt also developed a department that focused on scientific instrumentation, making thermometers and barometers (from imported glass tubes), telescopes, surveying instruments and microscopes. Significance: With the rapid urban expansion, one of the most important needs of the new colony was to survey and map the landscape of the Australian Colony’s interior. Theodolites, such as this one, made by Troughton and Simms, who were significant scientific instrument makers of the 19th century were instrumental to the colony's surveyors and would have played an important part in their everyday work. This transit theodolite remains of national significance due to its pioneering role in Australian science and its association with Australia's earliest surveyors and astronomers. It is also significant for its association with nineteenth-century surveying instruments and instrument makers. Theodolite, Vernier repetition theodolite with enclosed horizontal circle (of about 130 mm diameter). Vertical circle exposed and somewhat corroded (diameter about 115 mm). Plate level 20" per division. Altitude bubble 20" per division. Horizontal and vertical circle intervals 20". Original (blue/grey) paint. Altitude bubble setting screw disabled. Tribrach allows movement of theodolite by 15 mm inside tribrach (for centering).Inscribed on the inner mounting plate,“Specially made in England for T Gaunt & Co Melbourne” and inscribed a little lower “Troughton & Simms London”flagstaff hill, warrnambool, shipwrecked-coast, flagstaff-hill, flagstaff-hill-maritime-museum, maritime-museum, shipwreck-coast, flagstaff-hill-maritime-village, theodolite, t. gaunt & co, troughton & simms, scientific instrument, measuring instrument, surveyor's instrument -
 Flagstaff Hill Maritime Museum and Village
Barometer, 1858-1869
The barometer was either made or sold by T. Gaunt & Co. of Melbourne, a manufacturer, importer and retailer of a wide variety of goods including jewellery, clocks and watches, navigational and measuring instruments, dinnerware, glassware and ornaments. Thomas Gaunt photograph was included in an album of security identity portraits of members of the Victorian Court, Centennial International Exhibition, Melbourne, 1888. (See below for further details.) Admiral Fitzroy Pattern Barometer History: The stick mercury barometer was named after Admiral Robert Fitzroy of the Royal Navy (1805-1865) for his detailed instructions on how to interpret the weather, which were included with the instrument. Fitzroy was the captain of the HMS Beagle, also a weather forecaster to Charles Darwin and the second Governor of New Zealand. He developed many different types of barometers and was the first person to introduce the science of weather forecasting to the British Isles. A local manufacturer of scientific instruments, Thomas Gaunt, produced the barometer that was adapted for the southern hemisphere by Robert Ellery, the State Astronomer based at the Melbourne Observatory. In the original sale catalogue for Gaunt's, the item is described as "Gaunt's Fitzroy Barometers" and it was priced from 25/- to ₤9.9s. History of Thomas Gaunt: Thomas Gaunt established Melbourne's leading watchmaking, optical and jewellery business during the second half of the 19th century. Gaunt arrived in Melbourne in 1852, and by 1858 had established his own business at 14 Little Bourke Street. Around 1869 he moved to new premises in Bourke Street on the corner of Royal Arcade. Gaunt's shop quickly became a Melbourne institution. Gaunt proudly advertised that he was 'The only watch manufacturer in the Australian colonies'. While many watches and clocks may have had Gaunt's name on the dial, few would have been made locally. Gaunt did make some watches for exhibitions, and perhaps a few expensive watches for wealthy individuals. Gaunt's received a telegraph signal from Melbourne Observatory each day to correct his main clock and used this signal to rate and repair ship's chronometers and good quality watches. His main horological manufacturing was directed at turret clocks for town halls, churches and post offices. These tended to be specific commissions requiring individualised design and construction. He made the clock for the Melbourne Post Office lobby, to a design by Government Astronomer Robert Ellery, and won an award at the 1880-81 Melbourne International Exhibition for his turret clock for the Emerald Hill Town Hall. He became well known for his installation of a chronograph at Flemington Racecourse in 1876, which showed the time for the race, accurate to a quarter of a second. The firm also installed the clockwork and figures for Gog and Magog in the Royal Arcade. Thomas Gaunt also developed a department that focused on scientific instrumentation, making thermometers and barometers (from imported glass tubes), telescopes, surveying instruments and microscopes. Another department specialised in electroplating for trophies, awards and silverware, and the firm manufactured large amounts of ecclesiastical gold ware and silverware, for the church including St Patrick's Cathedral. There are no records that disclose the number of employees in the firm, but it was large enough for Gaunt to hold an annual picnic for the watchmakers and apprentices at Mordialloc from 1876; two years previously they had successfully lobbied Gaunt to win the eight hour day. Gaunt's workforce was reportedly very stable, with many workers remaining in the business for 15 to 30 years. Gaunt's wife Jane died on September 1894, aged 64. They had one son and six daughters, but only three daughters survived to adulthood. Two became nuns at the Abbotsford Convent and one daughter, Cecelia Mary Gaunt (died 28 July 1941), married William Stanislaus Spillane on 22 September 1886 and had a large family. Gaunt died at his home in Coburg, Victoria, leaving an estate valued at ₤41,453. The business continued as T. Gaunt & Co. after his death. The barometer is historically significant as an example of the work of Melbourne’s leading scientific instrument maker, Thomas Gaunt. The barometer has social significance as an example of the type of scientific equipment that Thomas Gaunt expanded his horology business into producing. Further social significance lies in the fact that Robert Ellery, the Government Astronomer who designed the local version of the barometer, had a direct connection with the Melbourne Athenaeum founded in 1839 as the Melbourne Mechanics' Institution. Its purpose was "the diffusion of literary, scientific and other useful information". There are also records of a T Gaunt as a subscription and committee member of this the Athenaeum organisation during the 1870s and 1880s which may be Thomas Gaunt, unfortunately still unverified.Stick mercury barometer known as the Admiral Fitzroy Barometer. It comprises an oblong wooden case with glass front panel, ornate pediment, barometer with bulb cistern (empty of fluid), cleaning brush with printed instructions for interpreting information given by the gauge affixed to left and right face of instrument. Includes a thermometer. The barometer appears to be intact. Adapted to the Southern Hemisphere. Special remarks by Admiral Fitzroy. Made by Thomas Gaunt, Melbourne. Manufacturer's details are on back of wooden casing. Rear has upper and lower brass screw plates for securing to vertical surface."Manufactured by Thomas Gaunt, 14 Little Bourke Street, Melbourne. "flagstaff hill, warrnambool, shipwrecked-coast, flagstaff-hill, flagstaff-hill-maritime-museum, maritime-museum, shipwreck-coast, flagstaff-hill-maritime-village, barometer, admiral fitzroy, thomas gaunt, thomas gaunt of melbourne, clockmaker, admiral fitzroy barometer, barometer instructions, gaunt’s fitzroy barometer, gaunt’s of melbourne, gog and magog designer, horological manufacturer, meteorological instrument, melbourne athenaeum, melbourne mechanics' institution, melbourne observatory time signal, robert ellery government astronomer, scientific instrument, stick mercury barometer, thermometer, weather forecast, t gaunt & co -
 Phillip Island and District Historical Society Inc.
Photograph - Portrait, William and Annie McFee Diamond anniversary, 1934
... . William and Annie McFee Diamond anniversary Photograph Portrait ...McFee family were pioneers on Phillip island. William married Annie Aspinall in 1874.B & W photo of William and Annie McFee standing outside behind a 2 tier decorated cake.William and Annie McFee Diamond wedding H W Hanton Chemist Coweswilliam mcfee, annie mcfee, photograph, annie aspinall -
 Phillip Island and District Historical Society Inc.
Photograph, Harry Bradley - Phillip Island Identity
Harry Bradley was a local Identity. Born in Yorkshire, England, 8/4/1916. Joined the Australian Army 19/5/1941 living in Cowes Phillip Island Victoria.Historical491-01: Harry Bradley an Australia Army Portrait - WWII 491-02: Harry Bradley & Ted Walton, very close fishing mates 491-03: Original House of Bradleys, opposite Race Track?? Ford Vehicle. Now Beachcomber Estate 491-04: Harry Bradley working on the 1st Phillip Island Bridge 491-05: Harry Bradley's parents - Father - Edwin and Mother who was killed by a bull 491-06: Harry Bradley - Equal 1st Competition at the Lang Lang Gun Club 491-07: Elsford Guest House - Post Card 491-08: Map of Phillip Island - Post Card Also DVD supplied with 491-01 to 06 on it.As Above with Harry's details listed on 491-01harry bradley, ted walton, edwin bradley, lang lang gun club, elsford guest house, phillip island map