Showing 2252 items matching "tram routes"
-
 Ballarat Tramway Museum
Photograph - Digital image, Ken Magor, 28/12/1950 12:00:00 AM
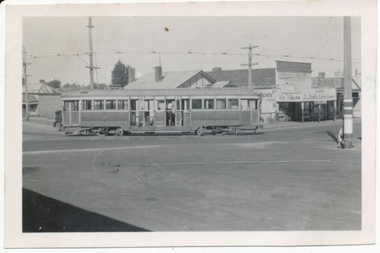
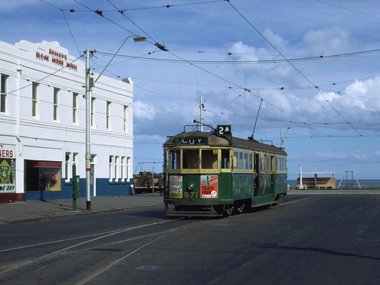
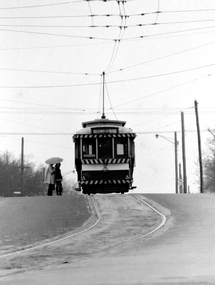
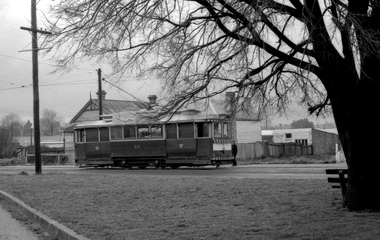
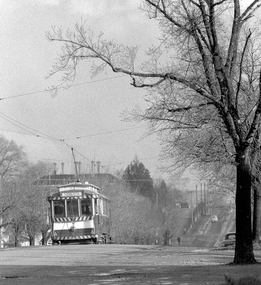
... into Barkly St on the Mt Pleasant route. Trams tramways Mt Pleasant ...Yields information about the early use of Ballarat's bogie trams and the curve from Main Rd into Barkly St on the Mt Pleasant route.Digital image from the Wal Jack Ballarat Album of Ballarat 35 turning from Barkly St Mount Pleasant route into Main Road, 28-12-1950. Photo by Ken Magor. Shows the shops behind the tram - Milk bar - diary - advertising ice cream, Robur tea, fruits and confectionery. See image i2 for rear of photograph.On rear in ink "No. 35 from Mount Pleasant turning out of Barkly St into Main Street 28-12-50" and Ken Magor stamp with Neg No. "1901" written in.trams, tramways, mt pleasant, barkly st, main road, tram 35 -
 Ballarat Tramway Museum
Photograph - Digital image, Wal Jack, 21/10/1951 12:00:00 AM
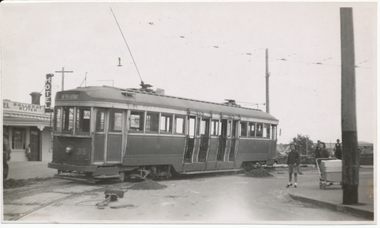
... into Barkly St on the Mt Pleasant route following track work. Trams ...Yields information about the early use of Ballarat's bogie trams and the curve from Main Rd into Barkly St on the Mt Pleasant route following track work.Digital image from the Wal Jack Ballarat Album of Ballarat 35 turning into Barkly St Mount Pleasant route from Main Road, 21-10-1951, Wal notes say testing new outside curve following renewal. Wal gives time as 3pm Sunday. Note the hotel behind the tram, rare to see this in a photograph and the young lady with a large pram. See image i2 for rear of photograph. See image i3 for hi res scan of print. See image i4 for hi res scan of negative See Reg Item 7740 for a photograph of the work.On rear in ink "SEC Ballarat No. 35 as special testing new outside curve (96lb rails), Main Rd into Barkly St, Ballarat East, Sunday 3pm 21st October 1951" In top right hand corner is Wal Jack stamp with negative number "T24/PC" written in.trams, tramways, mt pleasant, barkly st, main road, trackwork, tram 35 -
 Ballarat Tramway Museum
Slide - 35mm slide/s - set of 10, Eldon Hogan, mid 1960's to early 1970's
Set of 10 Agfa Plastic mounted slides - from the Eldon Hogan collection - possibly on an ARE Bendigo tours - mid 1960's (black destination rolls) and late 1960's or early 1970's. Scanned on the Canon scanner at the depot 15/12/1971 at the time of the installation of the scanner. .1 - No. 24 in bound along High St Bendigo with the discovery of gold monument in the foreground, Golden Sq route. .2 - ditto .3 - No. 26 outbound at the above location. .4 - No. 24 at the corner of Short St and High St, with the Technical college building? in the background. .5 - No. 26 at ditto, outbound for Golden Square. .6 - No. 24, High St Bendigo, with the Cathedral in the background. Tram has two Johnnie Walker Whiskey roof advertisements. .7 - Three trams, Pall Mall, Charing Cross, with the Beehive building in the background. Trams have SEC roof advertisement. .8 - ditto with Coca Cola ad on the Beehive building, turning around. .9 - No. 29 and a bogie tram at the Golden Square terminus with Billy Rodda's Golden Square Hotel in the background. Just past the tram is a large truck carrying boxes. .10 - Nos, 18, a bogie tram, 21 and 29 at the Quarry Hill terminus. tramways, trams, bendigo, tram 18, tram 24, tram 26, tram 21, tram 29 -
 Ballarat Tramway Museum
Slide - 35mm slide/s - set of 11, Eldon Hogan, mid 1960's to early 1970's
Set of 11 Agfa Plastic mounted slides - from the Eldon Hogan collection - featuring an ARE tour with Nos. 21, 29 and 25 to Bendigo, mid 1960's. Scanned on the Canon scanner at the depot 15/12/1971 at the time of the installation of the scanner. .1 - four trams at Charing Cross - includes 19 and 25. .2 - 21 and 25 at the depot junction. .3 - 21 and 29 Quarry Hill route? .4 - 29 ditto .5 - 24 at Golden Square terminus - photo taken from the city side - note all the little shops and buildings on the left hand side of the photograph. .6 - 29, 21 and 25 at Eaglehawk .7 - 29 - side on view - Eaglehawk line? .8 - ditto with 21 .9 - 29 - North Bendigo line? - side on view .10 - 29 and 21 - vacant paddocks - Eaglehawk line .11 - 29 crossing the railway overbridge, Eaglehawk line, in bound. Trams have SEC roof advertisements. tramways, trams, bendigo, eaglehawk, charing cross, golden square, tram 21, tram 29, tram 25, tram 19 -
 Ballarat Tramway Museum
Photograph - Digital image, Aug. 1968
Yields information about one of the Museum's tram when it was Melbourne and the South Melbourne Beach terminus in 1968.Digital Image of MMTW W4 671 (now a BTM Tram) at the South Melbourne Beach terminus, August 1968. Photo Dick Jones via Carolyn Cleak 28/6/2010 (Trams Down Under email dated 28/6/2010). Reilly's Bleak House Hotel in the background. Note the Bundy Clock. Tram has the destination of City and showing route number 2A. This is a later photo of South Melbourne Beach terminus, with yet another view of a W4, this time 671 in August 1968. Must have been getting toward the end of the W4's by that time. The hotel verandah had gone by this time and the bundy clock had been moved. Use photo only with Dick Joni's OK.trams, tramways, south melbourne beach, mmtb, w class trams, tram 671 -
 Ballarat Tramway Museum
Photograph - Digital image, 1970s
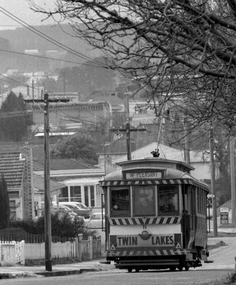
... the Mt Pleasant route and Barkly St. Trams tramways Barkly St Mt ...Yields information about the Mt Pleasant route and Barkly St.Digital image, black and white, of No. 11 in bound in Barkly St Mount Pleasant about to turn into Main St. Tram has a Twin Lakes Sign. Photo taken by Peter Bruce 1970's and 1971, prior to the closure of the Ballarat tramway system. Peter's Title of image: "No. 11 Barkly St"trams, tramways, barkly st, mt pleasant, tram 11 -
 Ballarat Tramway Museum
Photograph - Digital image, Peter Bruce, "No. 11 Mt Pleasant", 1970s
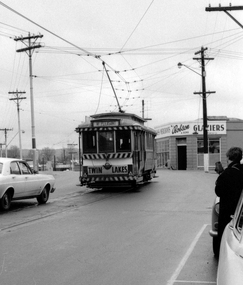
... the Mt Pleasant route and Barkly St. Trams tramways Barkly St Mt ...Yields information about the Mt Pleasant route and Barkly St.Digital image, black and white, of No. 11 in Barkly St, out bound to Mt Pleasant. Tram has a Twin Lakes sign. Photo taken by Peter Bruce 1970's and 1971, prior to the closure of the Ballarat tramway system. Peter's Title of image: "No. 11 Mt Pleasant" trams, tramways, barkly st, mt pleasant, tram 11 -
 Ballarat Tramway Museum
Photograph - Digital image, Peter Bruce, "No. 11 Setting down.", 1970s
... the Mt Pleasant route and Barkly St. Trams tramways Barkly St Mt ...Yields information about the Mt Pleasant route and Barkly St.Digital image, black and white, of No. 11 in Barkly St, out bound to Mt Pleasant setting down passengers. Tram has a Twin Lakes sign. Mini Minor motor car in the front of the tramcar. Photo taken by Peter Bruce 1970's and 1971, prior to the closure of the Ballarat tramway system. Peter's Title of image: "No. 11 Setting down."trams, tramways, barkly st, mt pleasant, tram 11 -
 Ballarat Tramway Museum
Photograph - Digital image, 1970s
... the Mt Pleasant route and Main St. Trams tramways Mt Pleasant ...Yields information about the Mt Pleasant route and Main St.Digital image, black and white, of No. 11 in Main St Ballarat, running out to Mt Pleasant. Tram has a Twin Lakes sign. Robson Glaziers shop in the background. Photo taken by Peter Bruce 1970's and 1971, prior to the closure of the Ballarat tramway system. Peter's Title of image: "No. 11 turns out of Barkly St" (not correct location)trams, tramways, mt pleasant, main st, tram 11 -
 Ballarat Tramway Museum
Photograph - Digital image, 1970s
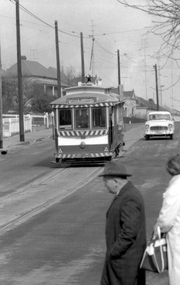
... the Victoria St route and Bakery Hill. Trams tramways Victoria St ...Yields information about the Victoria St route and Bakery Hill.Digital image, black and white, of No. 13 climbing Bakery Hill towards Princess St on the Victoria St route, in Victoria St, with two people waiting for the tram to pass. Photo taken by Peter Bruce 1970's and 1971, prior to the closure of the Ballarat tramway system. Peter's Title of image: "No. 13 Victoria St"trams, tramways, victoria st, bakery hill, tram 13 -
 Ballarat Tramway Museum
Photograph - Digital image, Peter Bruce, "No. 14 Sturt", 1970s
... of the Victoria St route.. Trams tramways Sturt St Victoria St tram 14 ...Yields information about Sturt St between Lydiard St and Grenville St, part of the Victoria St route..Digital image, black and white, of No 14 descending the Sturt St hill to Grenville St, enroute to Victoria St. Photo taken by Peter Bruce 1970's and 1971, prior to the closure of the Ballarat tramway system. Peter's Title of image: "No. 14 Sturt"trams, tramways, sturt st, victoria st, tram 14 -
 Ballarat Tramway Museum
Photograph - Digital image, Peter Bruce, "No. 26 Sturt and Grenville", 1970s
... the bottom end of Sturt St and the Victoria St route. Trams tramways ...Yields information about the bottom end of Sturt St and the Victoria St route.Digital image, black and white, of No. 26, at the bottom of the Sturt St hill prior to crossing Grenville St, enroute to Victoria St. Note the conductor talking to the driver. Owen Williams, ANZ and Crockers in the view. Photo taken by Peter Bruce 1970's and 1971, prior to the closure of the Ballarat tramway system. Peter's Title of image: "No. 26 Sturt and Grenville"trams, tramways, sturt st, grenville st, victoria st, tram 26 -
 Ballarat Tramway Museum
Photograph - Digital image, 1970s
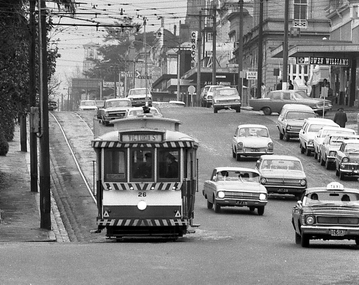
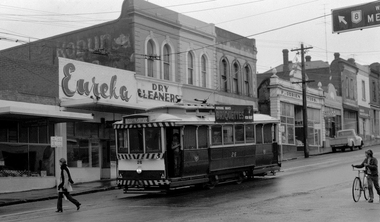
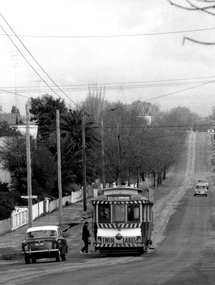
... the Bakery St Hill on the Victoria St route. Trams tramways Stones ...Yields information about the Bakery St Hill on the Victoria St route.Digital image, black and white, of No. 26 at Stones Corner, junction of Bridge, Victoria and Main St, Bakery Hill. No the young girl in slacks walking in front of the tram, the boy wheeling the bike down the street and the young boy standing in the front door of the tram. In the background is Eureka Dry Cleaners, an old Robur tea ad on a building, F. O'Brien Motors. The tram has the destination of Gardens via Sturt St West and a SEC Briquettes Roof advert. Photo taken by Peter Bruce 1970's and 1971, prior to the closure of the Ballarat tramway system. Peter's Title of image: "No. 26 Victoria and Bridge"trams, tramways, stones corner, bakery hill, victoria st, bridge st, tram 26 -
 Ballarat Tramway Museum
Photograph - Digital image, 1970s
... the Mt Pleasant route and Main St. Trams tramways Main St Mt ...Yields information about the Mt Pleasant route and Main St.Digital image, black and white, of No. 30 outbound to Mt Pleasant in Main St Ballarat, Humffray St. Photo taken by Peter Bruce 1970's and 1971, prior to the closure of the Ballarat tramway system. Peter's Title of image: "No. 30 Bridge and Main"trams, tramways, main st, mt pleasant, tram 30 -
 Ballarat Tramway Museum
Photograph - Digital image, 1970s
... the Mt Pleasant Route. Trams tramways Barkly St Mt Pleasant tram ...Yields information about the Mt Pleasant Route.Digital image, black and white, of No. 30 in Barkly St, bound for Mt Pleasant, picking up a passenger/s Tram has a SEC Everything's under control in my all electric kitchen" roof advertisement. Photo taken by Peter Bruce 1970's and 1971, prior to the closure of the Ballarat tramway system. Peter's Title of image: "No. 30 makes the stop".trams, tramways, barkly st, mt pleasant, tram 30 -
 Ballarat Tramway Museum
Photograph - Digital image, 1970s
... the Mt Pleasant route. Trams tramways Barkly St Mt Pleasant tram ...Yields information about the Mt Pleasant route.Digital image, black and white, of No. 30 inbound along Barkly St, Mt Pleasant about to stop to pick up passengers. Tram has the destination of Gardens via Drummond Nth. Photo taken by Peter Bruce 1970's and 1971, prior to the closure of the Ballarat tramway system. Peter's Title of image: "No. 30 Mt Pleasant".trams, tramways, barkly st, mt pleasant, tram 30 -
 Ballarat Tramway Museum
Photograph - Digital image, 1970s
... the Mt Pleasant route and Barkly St. Trams tramways Barkly St Mt ...Yields information about the Mt Pleasant route and Barkly St.Digital image, black and white, of No. 30 in bound along Barkly St, Mt Pleasant. Tram has a Twin Lakes sign and destination of Gardens via Drummond Nth. Tram picking up passenger at rear door, while a Vanguard motor car waits. Photo taken by Peter Bruce 1970's and 1971, prior to the closure of the Ballarat tramway system. Peter's Title of image: "No. 31 and Vanguard"trams, tramways, barkly st, mt pleasant, tram 31 -
 Ballarat Tramway Museum
Photograph - Digital image, 1970s
... the Mt Pleasant route and Barkly St. Trams tramways Mt Pleasant ...Yields information about the Mt Pleasant route and Barkly St.Digital image, black and white, of No. 31 in Barkly St, Mt Pleasant. Photo taken by Peter Bruce 1970's and 1971, prior to the closure of the Ballarat tramway system. Peter's Title of image: "No. 31 over the hill"trams, tramways, mt pleasant, barkly st, tram 31 -
 Ballarat Tramway Museum
Photograph - Digital image Set of 3, Peter Bruce, "No. 32 Lydiard St North", 1970s
... the Lydiard St North Route, and the landscape. Trams tramways Lydiard ...Yields information about the Lydiard St North Route, and the landscape.Digital image, black and white, set of three images of No. 32 in Lydiard St North, taken with a telephoto lens at various locations. Photo taken by Peter Bruce 1970's and 1971, prior to the closure of the Ballarat tramway system. Peter's Title of image: "No. 32 Lydiard St North"trams, tramways, lydiard st north, tram 32 -
 Ballarat Tramway Museum
Photograph - Digital image, Peter Bruce, "No. 39 approaching Sebas", 1970s
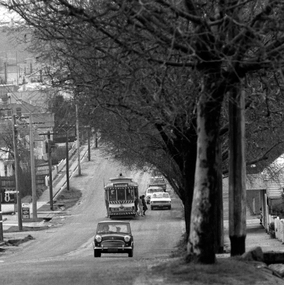
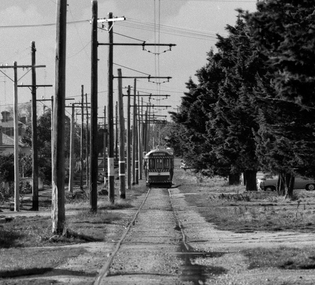
Yields information about the Sebastopol route and area near the terminus.Digital image, black and white, of No. 39 in Albert St Sebastopol, north of the Sebastopol terminus. Shows the condition of the track and the number of poles in the section. Taken with a telephoto lens. Photo taken by Peter Bruce 1970's and 1971, prior to the closure of the Ballarat tramway system. Peter's Title of image: "No. 39 approaching Sebas"trams, tramways, sebastopol, tram 38 -
 Ballarat Tramway Museum
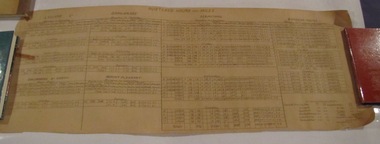
Document - Roster, Electric Supply Co. of Vic (ESCo), "Rostered hours and Miles", 1910's?
Yields information about the details the rosters for crews during the ESCo era and how the tram service operated. Further work on the sign on / off times and knowledge of timetables could determine the date.Single large rolled sheets which has been hand written detailing the Rostered Hours and Miles for crews during the ESCo era. Gives details for the Lydiard St, Drummond St North, Orphanage, Mount Please, Sebastopol and Gardens routes for Monday to Thursday, Fridays, Saturdays and Sundays rosters listing run number, sign on/off, rostered hours, total, number of trips, rostered miles, garden miles total miles and average speed. In the bottom right hand corner is a list of distances for the Gardens routes. Possible 1910's given Reg Item 4738, which can in the same set of donations. trams, tramways, ballarat, rosters, employees, shifts, timetables, esco -
 Ballarat Tramway Museum
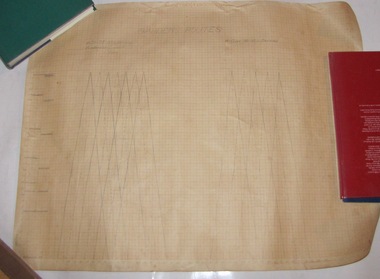
Document - Roster, Electric Supply Co. of Vic (ESCo), "Gardens Routes", 1910's?
Yields information about the planning options that were used for formulate garden routes timetables at various service levels.Single rolled graph sheet which has two sets of runs drawn on it, showing the Gardens via Convent and Ripon St routes from Grenville showing how the tram service would operate and where the trams crossed each other. One graph set shows a 6 car, 7.5 min service and the other a four 10 minute service. Gives the miles and minutes. Would have been used to prepare rosters and timetables. Possible 1910's given Reg Item 4738, which can in the same set of donations. trams, tramways, ballarat, rosters, shifts, timetables -
 Ballarat Tramway Museum
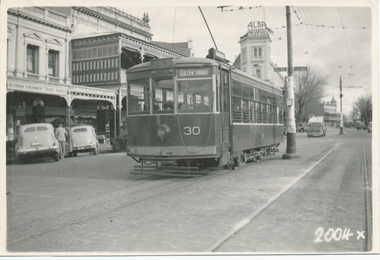
Photograph - Black & White Photograph/s, Jun. 1949
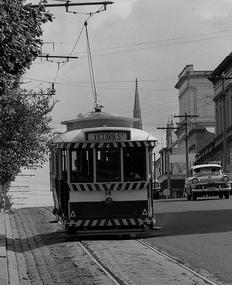
Black and White print contained within the Wal Jack Bendigo and Geelong Album, see Reg Item 5003 for more details. Photo of Bendigo Birney No. 30 in High St Bendigo at the end of the double track line en route to Golden Square. Wal's album notes date the photo as June 1949. In the background is the Victorian Government Tourist Bureau and an advertising sign for "Alba Motor Spirit" Has the number "2004X" written in white ink on the negative. Printed on Ilford paper. On rear in pencil "468"trams, tramways, bendigo, birney, high st, tram 30 -
 Ballarat Tramway Museum
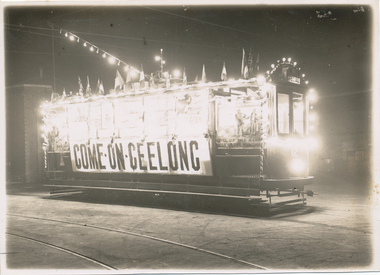
Photograph - Black & White Photograph/s, Jul. 1915
Black and White print contained within the Wal Jack Bendigo and Geelong Album, see Reg Item 5003 for more details. Photo of Geelong No. 12 at the Geelong depot July 1915, decorated and used by the National Defence Association as a recruiting tram. Has many lights and flags on the tram and the words "Come on Geelong" on the sides. See Inscriptions for further details. No details as to photographer or source. On rear in pencil "National Defence Association Recruiting car. This contained a brass band which played along the various routes. A speaker travelled with the car. The tram would stop at predetermined positions to allow of appeal for recruits." "July 1915".trams, tramways, geelong, decorated trams, world war 1, tram 12 -
 Ballarat Tramway Museum
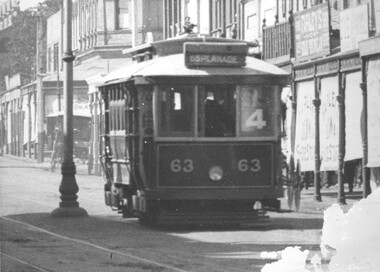
Photograph - Digital image, late 1910's
Yields information about a PMTT tramcar that was sold to Ballarat and an operating member of the BTM fleet.Digital Image of Prahran and Malvern Tramway Trust, Maximum Traction tramcar No. 63 in Glenferrie Road, with destination of Esplanade and Route No. 4 in the window of the tram. Tram later became Ballarat No. 18. In the background are shops, centre poles and blinds on the shops, indicating a summer's day perhaps. Detail from a Rose Series postcard. Possibly late 1910's. See image 2 for original enlarged postcard and high res images. Advised by Mal Rowe that he obtained from the Bob Prentice collection. trams, tramways, pmtt, glenferrie rd, tram 63, tram 18 -
 Ballarat Tramway Museum
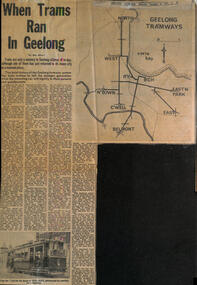
Newspaper, Geelong Advertiser, "When trams ran in Geelong", 9/10/1971
Newspaper cutting titled "When trams ran in Geelong" written by Max White. Looks at the development of the tramway system in Geelong, MESCo, operation, take over by the SEC and finally closure. Notes the use of coloured route lights, conductresses, and how the system was shut down in stages. Has a photo of Geelong 7 supplied by Bob Prentice.Yields information about the history of the Geelong tramway system.Newspaper clipping newsprint - Geelong Advertiser 9/10/1971tramways, geelong, closure, belmont, mesco, local history -
 Ballarat Tramway Museum
Map - Public Transport Map - Bus, Ministry of Transport, Ballarat, Bendigo & Geelong, 1977
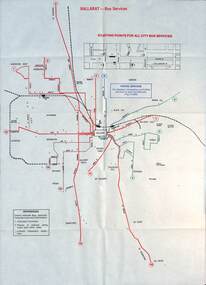
Set of three maps, c1977 show the bus routes for each of Ballarat, Bendigo and Geelong along with railways. Provides information on each route, summary timetables, who operated the route and places of interest. Published by the Ministry of Transport in conjunction with the Transport Regulation Board, Bus Proprietors Association and VicRail. By comparison with the posters issued at the time of tram closure, can see the changes made to the routes in each city. See item 6813 for Ballarat, 6812 for Geelong, and 6814 for Bendigo.Demonstrates a public transport map published by the Ministry of Transport.Set of three 10 fold maps printed in colour to pocket size.On each map "7/77" in ink.buses, maps, ballarat, bendigo, geelong, timetables, railways -
 Ballarat Tramway Museum
Photograph - Black & White Photograph/s, c1920
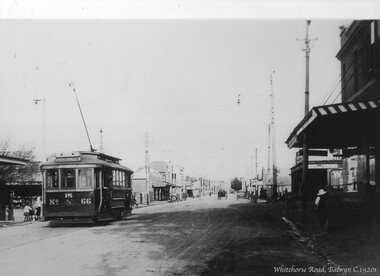
Yields information about MMTB No. 66 which later became Geelong No. 28.Black and white photograph - copy photograph from a postcard of MMTB or PMTT 66 outbound in Whitehorse Road Balwyn. Tram has the destination of Mont Albert, route 15. In the background is the Balwyn shopping centre. The tram became Geelong No. 25 and then Geelong 28 in 1951. See April 1981 issue of Trolley Wire. In the bottom right hand corner titled "Whitehorse Road, Balwyn C1920s"trams, tramways, whitehorse road, balwyn, pmtt, mmtb, j class, geelong, tram 66 -
 Ballarat Tramway Museum
Negative, Wal Jack, early 1950's
... . prior to the 1/12/1952 route reorganisation, when Newtown Trams... Parade Ballarat Ballarat goldfields Trams tramways Geelong ...Negative and Digital images of the Wal Jack Geelong Negative file of Geelong No. 1 at the Newton terminus, corner of Aphasia St and Shannon Ave. The house in the background remains in position. The tram has the destination of Station. Note the sign on the left hand side "Major STOP Road". Early !950's. prior to the 1/12/1952 route reorganisation, when Newtown Trams went to Eastern Park. trams, tramways, geelong, newtown, aphasia st, tram 1 -
 Ballarat Tramway Museum
Negative, Wal Jack, early 1950's
... leaving West. The tram has the destination of Beach... Parade Ballarat Ballarat goldfields Trams tramways Geelong ...Negative and Digital images of the Wal Jack Geelong Negative file of Geelong No. 8 possibly in Pakington St after leaving West. The tram has the destination of Beach. Early !950's. prior to the 1/12/1952 route reorganisation, when West trams went to Beach or Station trams, tramways, geelong, pakington st, tram 8