Showing 1541 items
matching route 8
-
 Melbourne Tram Museum
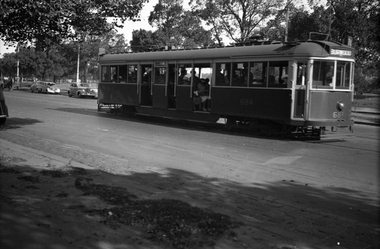
Negative, Wal Jack, 10/02/1941 12:00:00 AM
Black and white negative, by Wal Jack, of No.CW5 684 Batman Ave on its way to Burwood. Has the Yarra River and the Gardens in the background. The tram is well loaded. Photo dated 10-2-1941 in the Wal Jack album along with details of the location.trams, tramways, batman ave, cw5 class, burwood, tram 684, route 74, mmtb -
 Melbourne Tram Museum
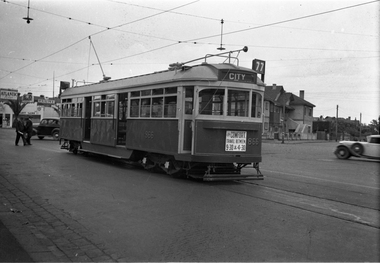
Negative, Wal Jack, 16/02/1941 12:00:00 AM
Black and white negative, by Wal Jack, of No. SW6 866 at the route 77 terminus Chapel St and Brighton Road. Tram has dash canopy lighting. In the background is a service station, selling Atlantic Petrol, Plume and Pax. Also visible is a Beauty Salon. Photo dated 16-2-1941 in the Wal Jack album along with details of the location.trams, tramways, sw6 class, route 77, chapel st, brighton road, tram 866 -
 Melbourne Tram Museum
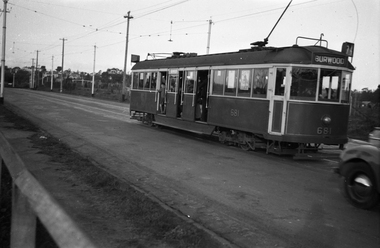
Negative, Wal Jack, 1/09/1941 12:00:00 AM
Black and white negative, by Wal Jack, of CW5 681, (Burwood, Route 74) in Swan St Burnley, prior to crossing the Yarra River. Photo dated 1-9-1941 in the Wal Jack album along with details of the location.trams, tramways, burnley, cw5 class, swan st, route 74, tram 681 -
 Melbourne Tram Museum
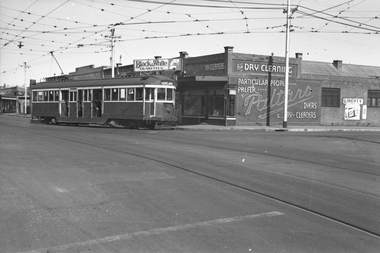
Negative, Wal Jack, 21/08/1941 12:00:00 AM
Black and white negative, by Wal Jack, of W2 442 (Moreland, Route 15) with Paltaro Dry cleaners in the background and a shop selling Black and White Cigarettes and advert for the Liberty Theatre in Lygon St. Photo dated 21-8-1941 in the Wal Jack album along with details of the location.trams, tramways, holmes st, moreland road, w2 class, moreland, route 15, tram 442 -
 Melbourne Tram Museum
Negative, Wal Jack, 19/01/1941 12:00:00 AM
Black and white negative, by Wal Jack, of W2 238 (Hawthorn Route 27) and W2 625 (Spencer St?, Route 40) at Hawthorn Bridge Junction, Church St and Burwood Road, Hawthorn. In the background is the Hawthorn West Primary School. Photo dated 19-1-1941 in the Wal Jack album along with details of the location.trams, tramways, hawthorn bridge, church st, burwood road, route 40, route 27, w2 class, tram 238, tram 625 -
 Melbourne Tram Museum
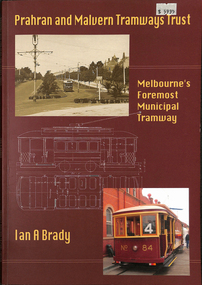
Book, Ian Brady, "Prahran and Malvern Tramways Trust - Melbourne's Foremost Municipal Tramway", 2011
Book - 96 pages + Card covers, perfect bound, titled "Prahran and Malvern Tramways Trust - Melbourne's Foremost Municipal Tramway", Ian Brady, published by Transit Australia Publishing, 2011. Has map and Table of contents, - background to the PMTT, its planning, construction, Alexander Cameron, Dandenong Road, Kew, Beach, tramcars, timetables, routes and personnel. Includes many photographs.trams, tramways, pmtt, transit australia, melbourne, new tramway, construction -
 Melbourne Tram Museum
Pamphlet, Yarra Trams, "Passenger Bulletin - Track works in Mt Alexander Road and Fletcher St Route 59", May. 2007
Pamphlet - A4 sheet single sided, titled "Passenger Bulletin - Track works in Mt Alexander Road and Fletcher St Route 59" for dates 26/5 to 27/5 2007, published by Yarra Trams, gives details of bus replacement and tram stops.trams, tramways, yarra trams, essendon, trackwork -
 Melbourne Tram Museum
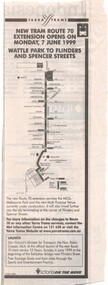
Newspaper, The Age, "New Tram route 70 Extension opens on Monday 7 June 1999 - Wattle Park to Flinders and Spencer St", 5/06/2020 12:00:00 AM
Newspaper clipping from The Age, 5/6/1999? titled "New Tram route 70 Extension opens on Monday 7 June 1999 - Wattle Park to Flinders and Spencer St". Has a map of the new service and an invite for people to attend the formal opening on 6/6/1999 by Robin Cooper, Minister for Transport. This route deviation saw the closure of the Batman Ave terminus.trams, tramways, route 70, batman ave, closure, opening, spencer st -
 Melbourne Tram Museum
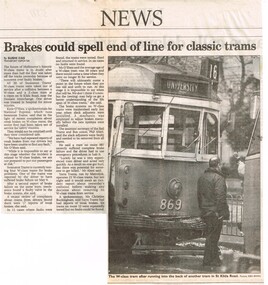
Newspaper, The Age, "Brakes could spell the end of line for classic trams", 2/06/2000 12:00:00 AM
Newspaper clipping from The Age, (2/6/2000?), about an accident in St Kilda Road when a W class tram collided with a Z class tram. Article reports on the withdrawal of W class trams by Swanston St tram immediately. Titled "Brakes could spell the end of line for classic trams" Hugh Waldron's Transit Australia notes (Reg Item 5359 for June 2000) reports "After an accident between “SW6” 869 and “Z1” 75 at about 4pm on Thursday 1st June 2000 all Swanston “W” class trams were instructed to shunt at the closest crossover and return special to the Depot. " Article buy Sushi Das and photo by Ken Irwin of the front of Sw5 869 (University route 16). Quotes from Kevin O'Shea of National Express (Swanston Trams), Phil Alteri (RTBU) and Christine Buckingham of Yarra Tramstrams, tramways, w class, sw5 class, accidents, route 16, st kilda rd, tram 869 -
 Melbourne Tram Museum
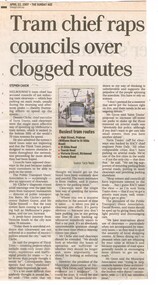
Newspaper, The Age, "Tram chief raps councils over clogged routes", 22/04/2007 12:00:00 AM
Newspaper clipping from The Age, 22/4/2007 titled "Tram chief raps councils over clogged routes "written by Stephen Cauchi. about issues with clearways. Quotes Dennis Cliche, Yarra Trams CEO, Jim Betts, Director of Public Transport, Dick Gross President of the MAV, Peter Daly RACV and Daniel Bower PTUA. Concerned with the length of journeys, Think Tram, traffic light priority.trams, tramways, traffic lights, congestion, public transport, car parks -
 Melbourne Tram Museum
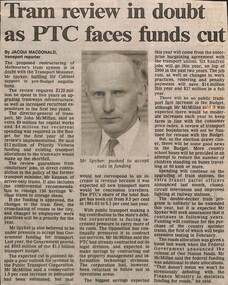
Newspaper, The Age, "Tram review in doubt as PTC faces funds cut", "Tramway plan offers reform at a price", "Report criticises run-down trams", 1992
.1 - Newspaper clipping, The Age 3/8/1992, titled "Tram review in doubt as PTC faces funds cut", written by Jacqui Macdonald Transport Reporter, with a photo of Mr Spyker, Transport Minister. Quotes Mr John McMillan, DG of Transport, re issues of getting cabinet support for planned upgrades, storage of W class trams, unions, conductors, work practices, cross linking of tram routes, rail and buses. .2 - Editorial, The Age, 2/7/1992 - titled "Tramway plan offers reform at a price" - about the proposed plan to restructure the public transport system, W class trams, operations and the revolt against scratch tickets. .3 - Newspaper clipping - The Age - 3/4/1992 titled "Report criticises run-down trams" abort the report by Workshops director John Barry, the condition of W class trams, stored B class trams, sub-stations and maintenance.trams, tramways, budgets, ptc, unions, w class, b class, public transport, funding, operations, scratch tickets -
 Melbourne Tram Museum
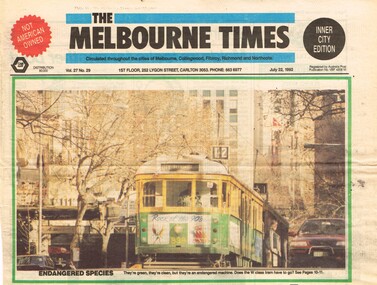
Newspaper, The Melbourne Times, "When W stands for Wedundant", 22/07/1992 12:00:00 AM
Set of three Newspaper clippings from The Melbourne Times, 22/7/1992 about the withdrawal of the W class trams. .1 - Front page - with a colour photo of W5 838, Route 12 in Swanston St - Endangered Species. .2 - Page 10 with the headline "When W stands for Wedundant", report of the PTC Strategic Review Committee - too many trams, Peter Spyker Minster, cut from 258 Operational trams to 111, cost of overhauls, National Trust views, quotes Dr Michael Wilmot, availability of the cars. .3 - continuation on page 11 - comparison with Z class, operation of various trams on routes, importance to have a modern tram fleet as well - survey results.trams, tramways, w class, swanston st, w5 class, operations, national trust, withdrawn trams, z class, overhauls, tram 838 -
 Melbourne Tram Museum
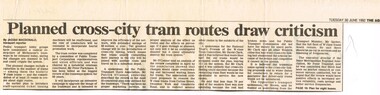
Newspaper, The Age, "Planned cross - city tram routes draw criticism", "Coalition pledges efficiency review of tramways plan", "System hit by years of Neglect" "A new tramway game of nought's and crosses", 14/06/1992 12:00:00 AM
Set of three Newspaper clippings about the proposed cross linking of Melbourne tram routes, written by Jacqui Macdonald and Claude Forrell. .1 - The Age, 30/6/1992 - by Jacqui Macdonald, titled "Planned cross - city tram routes draw criticism", PTC review, W class trams, conductors, PTUA Patrick O'Connor, National Trust David Clark, Opposition Alan Brown and Peter Spyker all commented. Noted by one body a lack of research and surveys. .2 - The Age 1/7/1992 - two items - "Coalition pledges efficiency review of tramways plan", about the plan prepared by the Strategic Review Committee chaired by Peter Parkinson, workplace reforms, cross linking of tram routes, release of the review report the previous day by Peter Spyker. Also quotes Union Secretary Lou DiGregorio and PTUA. The second item - "System hit by years of Neglect" - comments about the report and The Met ticket dispute. Item has a map showing the proposed routes. .3 - The Age 1/7/1992 - "A new tramway game of nought's and crosses" - Claude Forrell - looking at the savings of the plan, conductors, union consent, Government and Coalition attitudes to the proposal of cross linking routes. finances.trams, tramways, operations, transport, public transport, unions, finances, maps, tram routes, w class, national trust, ptua, conductors -
 Melbourne Tram Museum
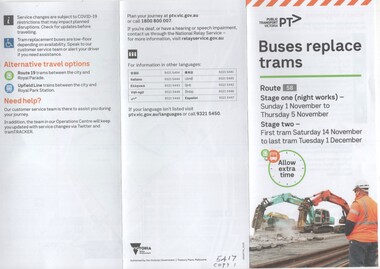
Pamphlet, Public Transport Victoria (PTV), "Buses replace trams - Route 58", Nov. 2020
Pamphlet - 3 fold DL, titled "Buses replace trams - Route 58", published by PTV about the replacement of trams on route 58, during the reconstruction of Royal Park trackwork between 14/11 and 1/12/2020. Has a map of the replacement services. Has PTV and Victorian Government logos. two copies held.trams, tramways, route 58, trackwork, bus replacement, royal park -
 Melbourne Tram Museum
Pamphlet, Yarra Trams, "Spring into Collins on Route 48 - Your new service to Victoria Harbour, Docklands", Sep. 2009
Pamphlet - 2 fold DL - titled "Spring into Collins on Route 48 - Your new service to Victoria Harbour, Docklands", September 2009, includes changes to Collins St services, route 70, map, with a listing of service frequencies.trams, tramways, collins st, victoria harbour, route 48, new tramway, docklands -
 Melbourne Tram Museum
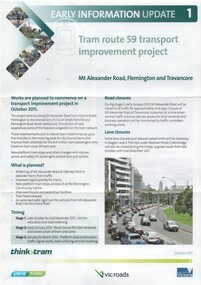
Pamphlet, VicRoads, "Tram route 59 transport improvement project", Oct. 2011
Pamphlet - 3 fold DL - titled "Tram route 59 transport improvement project", Early information update 1, detailing with a plan changes to Mount Alexander Road, Flemington and Travencore, Oct. 2011. Gives details of the staging, roadworks and timing. Has the Yarra Trams, VicRoads, Think Tram and Victorian Government logos.trams, tramways, mount alexander road, route 59, trackwork, road works -
 Melbourne Tram Museum
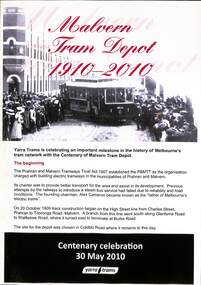
Pamphlet, Yarra Trams, "Malvern Tram Depot 1910 - 2010", "Key dates - mostly opening dates of routes", May. 2010
Set of two pamphlets associated with the centenary of the Malvern Tram Depot in 2010. .1 - A4 full colour on gloss paper, titled "Malvern Tram Depot 1910 - 2010", advising of the background and date of the celebrations - 30/5/2010. Gives details of the opening, routes and the depot today. .2 - A4 printed on non glass paper, titled "Key dates - mostly opening dates of routes", list dates from 1910 to 1920, with a photo of a painting by Graham Lee of bogie car 26, side elevations of a single trucker and bogie car, and a map from "Feeding and Filling" book of the PMTT system.Has "May 95" in ink in top right hand corner.trams, tramways, pmtt, centenary, malvern depot, map, dates, lists, tram 26 -
 Melbourne Tram Museum
Map, Ministry of Transport, "Melbourne Your guide public transport", 1980
Fold out map (27 sections 9 across x 3 deep), coloured of Melbourne's Tram and Bus routes, route numbers, rail lines, detailed for the central part of Melbourne and insert section for Frankston. On rear description of routes, private bus routes and map of Melbourne metro lines. Has contact details for bookings and lost property etc. Priced 30c No. 11 Dated 1980 on rear .1 - 1 as above, blue cover, No. 10, also dated 1980.trams, tramways, melbourne, map, tram & bus services, railways, mmtb, minister for transport -
 Melbourne Tram Museum
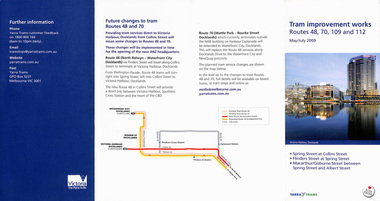
Pamphlet, Yarra Trams, "Tram improvement works routes 48, 70, 109 and 112", "Tram service changes St Kilda Road - tram track renewal", 2008 and 2012
,1 - pamphlet - 4 fold DL, titled "Tram improvement works routes 48, 70, 109 and 112" - May and July 2008 - installation of curves at Wellington Parade, Spring and Flinders St and for Spring Macarthur and Collins St along with tram stop works. Has a map and project details. .2 - Pamphlet - 3 fold DL - "Tram service changes St Kilda Road - tram track renewal" - April 2012 - between commercial road and Domain Interchange. Has map. Both have State Govt and Yarra trams logos.trams, tramways, trackwork, new tramway, spring st, flinders st, junction, collins st, wellington parade, macarthur st, st kilda road, domain interchange, commercial road -
 Melbourne Tram Museum
Negative, Wal Jack, 4/01/1943 12:00:00 AM
Black and white negative, by Wal Jack, of maximum traction tram E41 on the turning loop at St Kilda with the O'Donnell Gardens in the background. Tram has the destination of Kew Cotham Road, route 69. The driver is standing at the front of the tram. Photo dated 4-1-43 in the Wal Jack album along with details of the location and the tramcar.trams, tramways, st kilda, the esplanade, route 69, carlisle st, e class, tram 41 -
 Melbourne Tram Museum
Negative, Wal Jack, 24/07/1944 12:00:00 AM
Black and white negative, by Wal Jack, of W2 638 (Route 42) in Whitehorse Road crossing Burke Road, Camberwell, with SW6 883 (City Route 7) at the terminus. Note the curves in front of the tram which allowed for cars to turn from Whitehorse Road Westbound into Burke Road. Note the conductor standing in the doorway. Photo dated 24-7-1944 in the Wal Jack album along with details of the location and the tramcar.trams, tramways, balwyn, whitehorse road, burke road, w2 class, sw6 class, tram 638, tram 883 -
 Melbourne Tram Museum
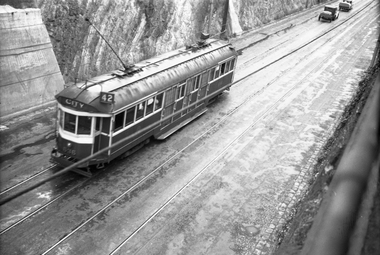
Negative, Wal Jack, c1942
Black and white negative, by Wal Jack, of W2 636 (City route 42) in the Barkers Road cutting on a wet day. In front of the tram appears to be two cars with trailers. Photo not dated in the Wal Jack album. Possibly 14-9-42 based on other similar photos.trams, tramways, barkers road, w2 class, route 42, tram 636 -
 Melbourne Tram Museum
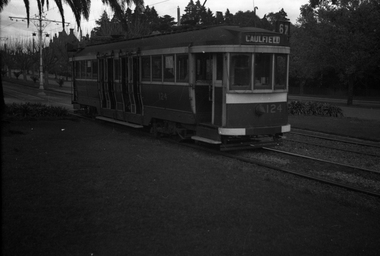
Negative, Wal Jack, 14/09/1942 12:00:00 AM
Black and white negative, by Wal Jack, of N124 (Caulfield, route 67) in Dandenong Road. See also Reg Item 5460 for similar photographs. Photo dated 14-9-1942 in the Wal Jack album along with details of the location and the tramcar.trams, tramways, dandenong road, n class, route 67, caulfield, tram 124 -
 Melbourne Tram Museum
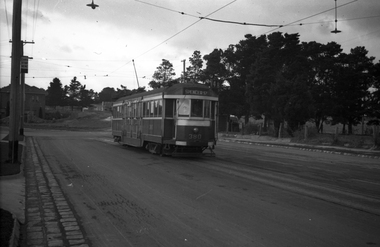
Negative, Wal Jack collection, c1944
Black and white negative, by Wal Jack?, of E 45 (St Kilda Beach, via Dandenong Road, Route 67) northbound in Hawthorn Road near intersection with Inkerman St. The building on the former remain in position. Advert for Turf Virginia Cigarettes. Photo not dated in the Wal Jack album. Possibly 14-9-42 based on other similar photos.trams, tramways, e class, hawthorn road, route 67, tram 45 -
 Melbourne Tram Museum
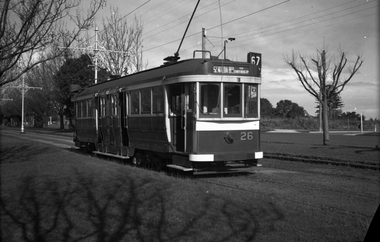
Negative - Set of 2 - Maximum Traction bogie trams Dandenong Road, Wal Jack, c1944
.1 - Black and white negative, by Wal Jack, of C 26 (St Kilda Beach via Dandenong road, Route 67), westbound in Dandenong Road. Appears to be a new sub-division on the other side of the road. .2 - ditto - C 35, note the building in front of the tram in the centre median strip. Photo not dated in the Wal Jack album. Possibly 14-9-42 based on other similar photos.trams, tramways, c class, dandenong road, route 67, tram 35, tram 26, world war ii -
 Melbourne Tram Museum
Negative, Wal Jack, 4/01/1943 12:00:00 AM
Black and white negative, by Wal Jack, of maximum traction tram N 118 (Kew Cotham Rd Route 69) and possibly CW5 682 passing. The driver of 118 has his handles and point bar in hand while attending to the pole. N 118 is on turning loop track at the intersection of Carlisle St and The Esplanade. Photo dated 4-1-43 in the Wal Jack album along with details of the location and the tramcar.trams, tramways, st kilda, the esplanade, route 69, carlisle st, n class, tram 118, cw5 class, tram 682, world war ii -
 Melbourne Tram Museum
Negative, Wal Jack, 1943
Black and white negative, by Wal Jack, of W2 380 (Spencer St Route 48) during 1943 at the North Balwyn terminus. Photo dated 1943 in the Wal Jack album along with details of the location and the tramcar.trams, tramways, w2 class, north balwyn, route 48, tram 380 -
 Melbourne Tram Museum
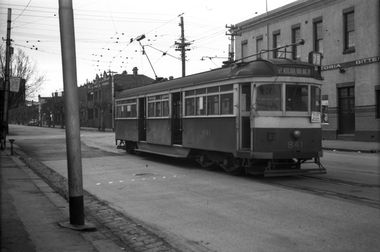
Negative, Wal Jack, 23/07/1944 12:00:00 AM
Black and white negative, by Wal Jack, of SW5 841 (St Kilda Beach, Route 79) at the North Richmond terminus Church and Victoria Sts North Richmond. the tram. Photo shows the curve from Victoria St. In the background is the Hotel advertising Victoria Bitter. Photo dated 23-7-1944 in the Wal Jack album along with details of the location and the tramcar.trams, tramways, church st, north richmond, route 79, sw5 class, tram 841 -
 Melbourne Tram Museum
Negative, Wal Jack, 15/03/1945 12:00:00 AM
.1 - Black and white negative, by Wal Jack, of scrubber 5 at the Maribyrnong River terminus. The cross over is in front of the tram. In the background is a shop advertising Robur Tea. Also reversing is W5 804 (City via North Melbourne Route 54). Note the tram stop sign by the house and the bus stop sign on the other side of the road, along with "end of section" signs. Photo dated 15-3-1945 in the Wal Jack album along with details of the location and the tramcar.trams, tramways, maribyrnong rd, scrubber tram, work trams, w5 class, tram stops, tram 5, tram 804 -
 Melbourne Tram Museum
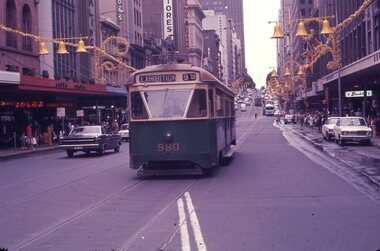
Slide - Set of 4, Les Fordham, Dec. 1963
Set of four hanimount light brown 35mm slides - December 1963 taken by Les Fordham. .1 - PCC Class 980 (Exhibition Route 95) eastbound in Bourke St between Elizabeth and Swanston St's - has Coles Stores, London Stores, Myer and Buckley's stores in the background along with Christmas decorations. .2 - view looking west from near Swanston St .3 - W2 415 southbound in Swanston St with a traffic policeman on duty. A W7 (route 88) is waiting to cross. Has the Royal Mail House, The Leviathan building in the background. .4 - 1002 (Route 88) waiting to cross Swanston St. In the background is Douglas Trading, Southern Cross Hotel,trams, tramways, bourke st, route 95, christmas, police, route 88, tram 980, tram 1002, w7 class, pcc class, w2 class, exhibition, swanston st, tram 415, mmtb