Showing 2188 items
matching tram 6
-
 Ballarat Tramway Museum
Photograph - Digital image Set of 10, Tony Smith, 1971
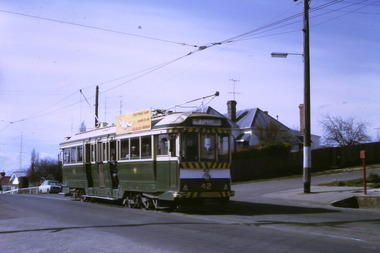
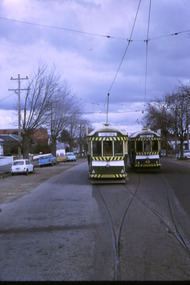
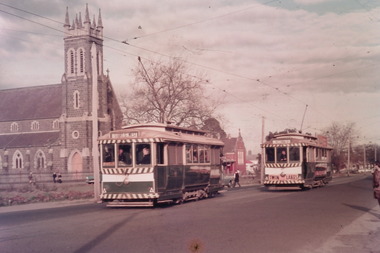
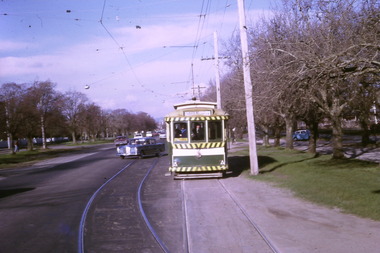
Yields information about Ballarat Tramways and trams prior to the closure of the tramway system.Set of 10 digital images of Ballarat trams prior to closure, scanned from original slides by Tony Smith, 1971 prior to closure of the system. .1 - 42 in Barkly St - at top of hill, outbound to Mt Pleasant. Note the fire alarm on the right hand side of the photo. .2 - 42 and 21 crossing at Grant St Loop, Barkly St, Mt Pleasant. 42 outbound, 21 inbound. .3 - 34 and 21 crossing at Parker St Loop, with Ballarat College in the background. 42 in bound to City and Mt Pleasant, 21 showing Sturt St. West. .4 - 21, Wendouree Parade at the south end of the old parking loop. .5 - 42 and 21 crossing at Gardens Loop. 42 showing Mt Pleasant, 21 Gardens via Sturt St West. .6 - ditto .7 - 41 showing Special at intersection of Ripon St and Sturt St with a single trucker tram ex View Point waiting to turn into Sturt St. 41 has two Johnnie Walker Whiskey roof advertisements. .8 - Two single truckers - not well focused - 21? and 13? crossing at Mill St loop, has the hospital in the background. Conductor leaning out of the door on the outbound tram. .9 - 42, bogie tram and a single trucker at the City terminus (Sturt and Lydiard Sts). Has a group of SEC trammies standing alongside the tram. Has Racey's store and the SEC offices in the background. 42 has a briquettes roof advert. .10 - 34 in Sturt St, at the City terminus, with passengers getting onto the tram. Has the Town Hall, Myers store, Gemmola's Pharmacy in the background. Tram has the destination of Gardens via Drummond St. Nth. Has two trammies (crews) standing alongside the tram stop sign.trams, tramways, sturt st west, barkly st, grant st, parker st loop, sturt st, view point, ripon st, mill st loop, crews, town hall, tram 42, tram 21, tram 34, tram 41, tram 42 -
 Ballarat Tramway Museum
Photograph - Digital image Set of 10, Tony Smith, 1971
... at the Sebastopol terminus. 41 showing Special. .6 - two bogies trams (41... showing Special. .6 - two bogies trams (41, 35?) and single ...Yields information about Ballarat Tramways and trams prior to the closure of the tramway system.Set of 10 digital images of Ballarat trams prior to closure, scanned from original slides by Tony Smith, 1971 prior to closure of the system. .1 - 35 and 43 crossing at Urquhart St, Drummond St Sth. 35 outbound to Sebastopol, 43 to Lydiard St Nth. .2 - 35 in Lydiard St North, about to turn into Sturt St, with the Commonwealth Bank and National Mutual, Craig's Hotel in the background. Note the tram stop signs on the pole nearest to the Post Office. Tram has destination of Sebastopol. .3 - 39 and 41 at Grey St Loop, on a wet day. 39 showing Lydiard St Nth, 41 Special. .4 - two bogie trams (35?) and 41? Albert St, south of Grey St Loop. .5 - two bogies trams (41 and 35?) and a single trucker at the Sebastopol terminus. 41 showing Special. .6 - two bogies trams (41, 35?) and single trucker at the Grey St Loop, waiting for another bogie tram to arrive. Has a "Bounds" running alongside the tram. On a wet muddy day. .7 - two single truckers crossing at Gregory St loop, Lydiard St. Nth. - photo out of focus. .8 - 35 and single trucker crossing at ditto. .9 - 39 and another bogie tram waiting for two other trams to meet at Gregory St. loop. .10 - two single truckers crossing at the King St loop, Victoria St - out of focus and over exposed.trams, tramways, urquhart st, drummond st sth, lydiard st nth, sturt st, albert st, sebastopol, grey st loop, gregory st, king st, tram 35, tram 43, tram 39, tram 41 -
 Ballarat Tramway Museum
Photograph - Digital image Set of 10, Tony Smith, 1971
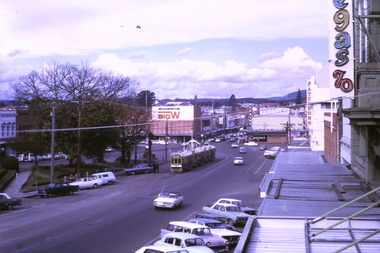
Yields information about Ballarat Tramways and trams prior to the closure of the tramway system.Set of 10 digital images of Ballarat trams prior to closure, scanned from original slides by Tony Smith, 1971 prior to closure of the system. The following photos have suffered colour change and showing some deterioration - fungal growth. .1 - 13 (Sturt St West) and 27 (Victoria St with Twin Lakes sign) crossing at King St loop with St Alipius church in the background. .2 - 13 (Sturt St West) and 17? (Mt Pleasant) crossing at Parker St loop, with the Ballarat College in the background. .3 - Single trucker, inbound, approaching the Parker St Loop, showing Mt Pleasant. .4 - 30 in Sturt St, descending the hill to Grenville St, with other trams in the background, including Woolworths Big W and the Dickins Store. Also has the 8 hour monument. 30 showing City. .5 - 37 running Special, no passengers, crossing Lydiard St Nth, heading for Grenville St. Has the Titanic bandstand, Mechanics Institute in the background. .6 - 33 and three other single truckers in the City Loop - has the Ballarat Gas Co and other buildings in the background. .7 - 37 showing Special passing 33 and other trams parked in the City Loop. Has Dickins, Ballarat Gas Co, Edmonds, Patersons store in the background. .8 - 17 crossing Lydiard St Nth in Sturt St. 17 has destination of Gardens via Drummond Nth, and a Twin Lakes sign. Includes the T&G sign in the background. .9 - 31, a single trucker and bogie tram crossing at Depot loop, Wendouree Parade - 31 showing Victoria St. .10 - 17 waiting in Gardens Loop, showing Mt Pleasant.trams, tramways, king st, victoria st, sturt st west, sturt st, grenville st, city loop, gardens loop, wendouree parade, tram 13, tram 27, tram 30, tram 37, tram 33, tram 17, tram 31 -
 Ballarat Tramway Museum
Photograph - Digital image Set of 10, Tony Smith, 1971
Yields information about Ballarat Tramways and trams prior to the closure of the tramway system.Set of 10 digital images of Ballarat trams prior to closure, scanned from original slides by Tony Smith, 1971 prior to closure of the system. The following photos have suffered colour change and showing some deterioration - fungal growth. .1 - 35 (Sebastopol), with the Town Hall and Gemmola's chemist in the background. Tram waiting at the tram stop. .2 - 27 at Victoria St loop, showing Gardens via Drummond St Nth. .3 - 35 at Armstrong St inbound showing Lydiard St Nth. Has the Commonwealth bank in the background. .4 - 32 westbound in Sturt St between Dawson and Lyon Streets, tram has the destination of Gardens via Drummond Nth. Has the Town Hall and other buildings in the background. .5 - 17 inbound at Dawson St. Tram has destination of Mt Pleasant. .6 - 39 picking up passengers at the tram stop on the west side of Dawson St. Has the Ritzy cafe and the Golden City hotel in the background. Tram appears to be well loaded with lady passengers and has a "Everything under my control in my all electric kitchen" SEC roof ad. .7 - 37 using the Dawson St crossover - has St Patricks Cathedral in the background. .8 - 21 entering the depot with Lake Wendouree in the background. .9 - 11 sitting in 0 road at the depot. .10 - 41 at the depot on 2 road. Tram has two Johnny Walker Whiskey roof adverts.trams, tramways, sturt st, victoria st, dawson st, lake wendouree, wendouree parade, depot, tram 35, tram 27, tram 32, tram 17, tram 39, tram 37, tram 21, tram 11, tram 41 -
 Ballarat Tramway Museum
Photograph - Digital image Set of 10, Tony Smith, 1971
Yields information about Ballarat Tramways and trams prior to the closure of the tramway system.Set of 10 digital images of Ballarat trams prior to closure, scanned from original slides by Tony Smith, 1971 prior to closure of the system. .1 - 13 at the Parker St loop, Sturt St west waiting for another tram to arrive - Mercedes Benz car pull out around the stationary tramcar. .2 - 13 and another single trucker at the City terminus, north side of Sturt St. Note the conductor in the distance with a point bar about to hop onto the tram turning into Lydiard St North. Has the Post Office in the background. .3 - 26 arriving at the City stop, with the Mechanics Institute and Cooks Provide Hotel in the background. Tram has destination of Gardens via Drummond St North. .4 - 33 and 12 in Lydiard St Nth at Sturt St. 33 (Lydiard St Nth), 12 (Sebastopol). Has the post office and other buildings in the background .5 - 12 and 26 at city stop, south side with Town Hall and Myers in the background. 12 has destination of Sebastopol. .6 - 12 at intersection of Drummond St and Sturt St with Mobil petrol station in background and ad for Marshall batteries. Has the tram stop sign on the left hand side. Tram has destination of Sebastopol and a Twin Lakes sign. .7 - 30 northbound in Drummond St south at Sturt St about to turn into Sturt St. Has destination of Lydiard St Nth. Has the Southern Cross hotel in the background. .8 - 31 turning from Drummond St North into Sturt St, en route to Victoria St with the Shell service station in the background. Hospital Corner. Tram has roof advertisements for Johnnie Walker whisky. .9 - 30 and 31 (from above photos) in Sturt St. .10 - Tony Smith standing on the doorstep of 26 at Mt Pleasant terminus. Has the store in the background with The Sun and Robur tea adverts. trams, tramways, parker st loop, sturt st west, sturt st, conductors, drummond st, hospital corner, mt pleasant, tram 13, tram 26, tram 12, tram 30, tram 33 -
 Ballarat Tramway Museum
Photograph - Digital image Set of 10, Tony Smith, 5/09/1971 12:00:00 AM
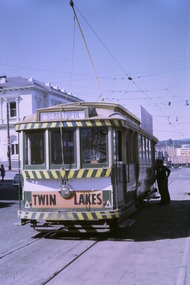
Yields information about Ballarat Tramways and trams prior to the closure of the tramway system.Set of 10 digital images of Ballarat trams prior to closure, scanned from original slides by Tony Smith, 1971 prior to closure of the system. This set of slides, possibly on the last weekend of Mt Pleasant services - closure took place on 5/9/1971. . .1 - 17 at the City terminus, north side. Tram showing the destination of Sebastopol and has a Twin Lakes sign. .2 - 26 at the city terminus, south side with Geommola's Pharmacy and Kodak Film advert and Town Hall in the background. .3 - 43 at the City terminus, north side, with destination of Mt Pleasant. Has a number of men at the tram stop. .4 - 14 leaving Bridge St, crossing Grenville St into Sturt St, with destination of City. Has the Dickins and Woolworths Big W store in the background. .5 - 43 at Mt Pleasant terminus with conductor boarding the tram. Tram has destination of Gardens via Sturt St West. In the background is the corner store with adverts for The Sun, Womens Weekly, Coca Cola and Robur Tea. .6 - 43 and 26 Barkly St, about to arrive at the Grant St loop. Both trams inbound. .7 - 43, 26 and 27 at Grant St loop. .8 - 12 (Lydiard St Nth) and another bogie tram at the city terminus north with the Town Hall in the background. .9 - 39 outbound in Barkly St to Mt Pleasant - note the new bus stop signs on either side of the tram. 10 - 27 (City) and 26 turning from Barkly St into Main St with the Ampol petrol station, a general store advertising Escort cigarettes and The Age in the background . On the right hand side is a fish and chips shop advertising crays and drinks.trams, tramways, sturt st, city, grenville st, bridge st, mt pleasant, barkly st, grant st, main st, closure, tram 17, tram 26, tram 43, tram 14, tram 12, tram 27, tram 39 -
 Ballarat Tramway Museum
Photograph - Digital image Set of 10, Tony Smith, 5/09/1971 12:00:00 AM
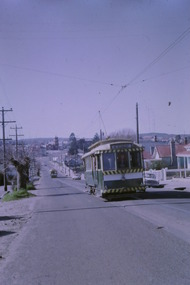
Yields information about Ballarat Tramways and trams prior to the closure of the tramway system.Set of 10 digital images of Ballarat trams prior to closure, scanned from original slides by Tony Smith, 1971 prior to closure of the system. This set of slides, possibly on the last weekend of Mt Pleasant services - closure took place on 5/9/1971. .1 - 13 outbound in Barkly St, Mt Pleasant - with another single trucker and the Ballarat Fire Station in the background. .2 - Bogie tram and single trucker at Grant St Loop. Has the Mobile service station on the right hand side. Note the family sitting on the steps of a house on the left side watching proceedings. .3 - 14 (Mt Pleasant) and 39 ditto. .4 - 27? and 39 crossing at the Morrison St loop. .5 - 14 and another single trucker at Mt Pleasant terminus. Has the corner store in the background with adverts for Robur Tea, Womens Weekly and Coca Cola. .6 - 39 and two single truckers at the Mt Pleasant terminus. .7 - View looking south along Ripon St from Mair St, with power station buildings on the right hand side. Shows the power distribution poles on the street. .8 - Scrubber tram on 0 road with tennis court alongside. .9 - 40 running special in Wendouree Parade, near the Haddon St intersection. .10 - 40 turning from Macarthur St into Drummond St Nth.trams, tramways, mt pleasant, barkly st, grant st, victoria park, sturt st west, ripon st, view st, depot, wendouree parade, drummond st nth, macarthur st, closure, tram 14, tram 39, tram 13, tram 26, tram scrubber, 40 -
 Ballarat Tramway Museum
Photograph - Digital image Set of 9, Tony Smith, 19/09/1971 12:00:00 AM
Yields information about Ballarat Tramways and trams prior to the closure of the tramway system.Set of 9 digital images of Ballarat trams prior to closure, scanned from original slides by Tony Smith, 1971 prior to closure of the system. This set of slides appears to be the last day of operations - 19/9/1971 .1 - 40 south bound in Lydiard St Nth, at the Gregory St Loop. .2 - 40 after passing through the loop .3 - 42, north bound in Lydiard St. North at Macarthur St. .4 - 42 southbound at the Railway station level crossing with the Kennedy Murray Pty Ltd General Carriers building at the station yard in the background. .5 - 42 southbound in Lydiard St North after crossing the railway - taken from the signal box (B) with Reids Palace in the background and the Provincial Hotel. .6 - 35 northbound after passing through the level crossing. .7 - bogie tram crossing the tracks with Ballarat Railway Station in the background. .8 - bogie tram entering the double track section in Lydiard St with Reids Palace in the background. Note the new bus stop bay. .9 - 35 and another bogie in Sturt St, with the Town Hall, Golden Star Chinese Cafe and Georges Fish & Chip shop in the background.trams, tramways, lydiard st nth, gregory st, level crossings, ballarat railway station, sturt st, closure, tram 40, tram 42, tram 35 -
 Ballarat Tramway Museum
Photograph - Digital image Set of 10, Tony Smith, 19/09/1971 12:00:00 AM
Yields information about Ballarat Tramways and trams prior to the closure of the tramway system.Set of 10 digital images of Ballarat trams prior to closure, scanned from original slides by Tony Smith, 1971 prior to closure of the system. This set of slides appears to be the last day of operations - 19/9/1971 .1 - Photo taken from Cooks Hotel balcony overlooking three bogie trams parked in the City Loop with Big W and Dickins store in the background. .2 - 42 in Albert St, showing destination of Sebastopol, though could be north bound near Ophir St. .3 - 42 crossing Ophir St to the north. .4 - 42 (Lydiard St Nth), 34 (Sebastopol) crossing at the Bell St loop .5 - 42, 35 and another bogie tram at ditto - note the neat line of photographers and one person (bounding) around. .6 - 34 and 35 leaving the Grey St loop southbound. .7 - 34 and 35 southbound in Albert St passing the Borough of Sebastopol Town Hall .8 - 34 nearing the Sebastopol terminus in Albert St .9 - 35 ditto .10 - 35 ditto after passing the camera looking towards the terminus.trams, tramways, sturt st, sebastopol, albert st, city loop, ophir st, bell st, grey st, borough of sebastopol, closure, tram 42, tram 34, tram 35 -
 Ballarat Tramway Museum
Photograph - Digital image Set of 7, Tony Smith, 19/09/1971 12:00:00 AM
Yields information about Ballarat Tramways and trams prior to the closure of the tramway system.Set of 7 digital images of Ballarat trams prior to closure, scanned from original slides by Tony Smith, 1971 prior to closure of the system. This set of slides appears to be the last day of operations - 19/9/1971 .1 - 34 at the Sebastopol terminus - shows the trolley pole guide in the overhead. .2 - 34 and another bogie tram at Sebastopol with the driver and conductor posing with a family. Also note the bus stop sign on the pole by the front tram. .3 - 35 at the Sebastopol terminus .4 - 39 southbound in Drummond St south at the Bell St loop .5 - 39 passing roadworks in Bell St. .6 - 37 parked in city Loop showing Special .7 - front end of an ex HTT bogie tram in Sturt St, with Gear Chemist and Edments Hartleys store in the background.trams, tramways, sebastopol, trolley wire, albert st, drummond st, bell st, closure, tram 34, tram 35, tram 39 -
 Ballarat Tramway Museum
Photograph - Black & White Photograph/s, Dave Macartney, 29/06/1968 12:00:00 AM
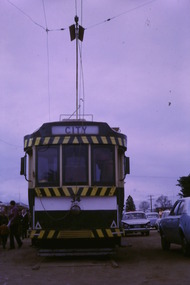
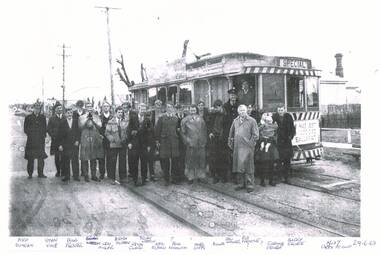
Has a strong association with a number of well known tram enthusiasts, some of whom were involved in tram preservation and the event to celebrate No. 27's million miles in Ballarat (not that it was correct at the time).Photocopy of a black and white photograph of Ballarat 27 at the Grey St loop with a large number of tramway enthusiasts standing in front of the tram. The tram is carrying its "Million mile banner" - 29-6-1968. Photograph on the day of the TMSV tour to celebrate the event. Written on the bottom of the sheet are the names and position on the photograph.See Key associations for hand written names and position. trams, tramways, tours, grey st loop, sebastopol, special trams, tram 27 -
 Ballarat Tramway Museum
Photograph - Black & White Photograph/s, Lloyd Rogers, 21/03/1962 12:00:00 AM
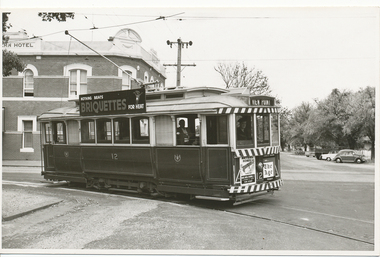
Yields information about the appearance of tram No. 12 in the early 1960's and the Sturt St streetscape.Black and white photograph of Ballarat tram 12 turning from Sturt St into Ripon St with the destination of View Point. Dated 21/3/1962. Printed on Agfa Gevaert paper in a postcard format. No. 12 has a roof advert for SEC Briquettes, and dash panel adverts for Mutual Homes and The Age. In the background is the Western Hotel. Photo by Lloyd Rogers.In ink "Ballarat car 12 on View Point Road 21/3/1962 and 6/25". In pencil: "12 - ex 71 J"trams, tramways, sturt st, ripon st, view point, tram 12 -
 Ballarat Tramway Museum
Photograph - Black & White Photograph/s, Lloyd Rogers, 21/03/1962 12:00:00 AM
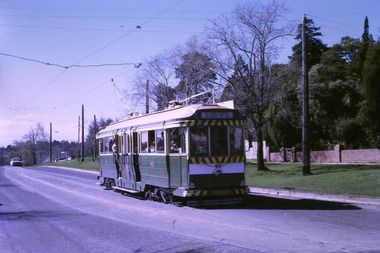
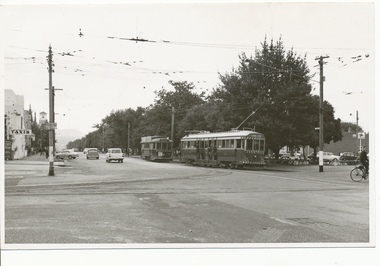
Yields information about the appearance of trams at Hospital corner in the early 1960's and the Sturt St streetscape.Black and white photograph of Ballarat tram 30 and 34 in Sturt St, at Drummond St or Hospital corner. Dated 21/3/1962. Printed on Agfa Gevaert paper in a postcard format. Has a taxis sign and ????? No. 30 has a dash panel advert for The Age newspaper and two roof adverts. Photo by Lloyd Rogers.In ink "Ballarat cars 30 & 34 in Sturt St during morning peak 21/3/1962 and 6/43".trams, tramways, sturt st, hospital corner, drummond st, tram 30, tram 34 -
 Ballarat Tramway Museum
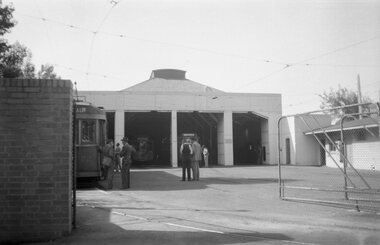
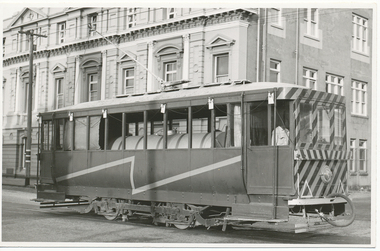
Photograph - Black & White Photograph/s, Lloyd Rogers?, pre 1960's
Yields information about the appearance of the SEC depot late 1950's.Black and white photograph of the front of the SEC Ballarat depot from outside the depot with some of the gates open. Has a number of people standing in the depot yard. Pre 1960's as the tram does not appear to have any dash canopy lighting. Negative of photograph held. Photo by Lloyd Rogers? Negative scanned at hi res 4/6/2020 and image updated.In pencil on the rear "Ballarat".trams, tramways, wendouree parade, depot -
 Ballarat Tramway Museum
Photograph - Black & White Photograph/s, Lloyd Rogers, 21/03/1962 12:00:00 AM
Yields information about the appearance of the Scrubber Tram.Black and white photograph of the Ballarat Scrubber tram, north bound in Lydiard St Dated 21/3/1962. Printed on Agfa Gevaert paper in a postcard format. In the background is Ludbrook House Photo by Lloyd Rogers.In ink "Ballarat scrubber car in Lydiard St early morning 21/3/1962 and 6/42"trams, tramways, scrubber tram, lydiard st, scrubber -
 Ballarat Tramway Museum
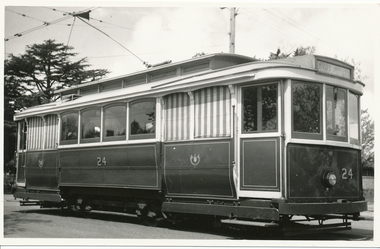
Photograph - Black & White Photograph/s, 1948?
Yields information about the appearance of SEC tram No. 24 in late 1940's - the best photograph so far of this tram.Black and white photograph of the Ballarat 24 - 3/4 front on view, late 1948? Appears to have been photographed at Victoria St terminus. Tram has the destination of Gardens via Sturt St. Note the pan in the overhead to assist the trolley pole positioning at night. Negative of photograph held. Printed on Agfa Bravira paper. Negative scanned at hi res 4/6/2020 and image updated added as i4.In pencil, "Ballarat late 1940's (late 1940's crossed out) and 1948? written in and in bottom left hand corner "ex M?"trams, tramways, victoria st, overhead, tram 24 -
 Ballarat Tramway Museum
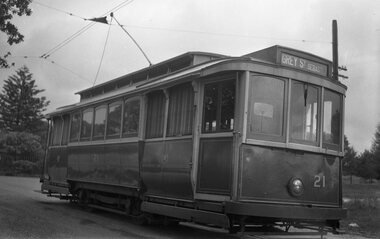
Negative, mid 1940's
Yields information about the appearance of SEC tram No. 21 in the mid 1940's.Black and white negative of No. 21, at the Lydiard St North terminus? (No buildings in background) Tram has the destination of Grey St Sebastopol. Note the pan in the overhead to assist the trolley pole positioning at night. Negative scanned at hi res 4/6/2020 and image updated.trams, tramways, lydiard st nth, overhead, tram 21 -
 Ballarat Tramway Museum
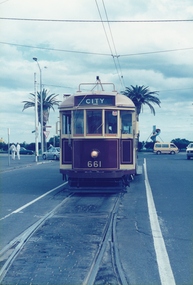
Photograph - Colour Photograph/s - set of 13, Lloyd Rogers, 30/04/1989 12:00:00 AM
Yields information about the appearance of the operation of BTPS tram No. 661 in Melbourne on a tour.Set of 13 colour prints of BTPS / BTM tram No. 661 in Melbourne on a BTPS tour 30-4-1989. All photos by Lloyd Rogers, on AGFA paper. All have a photo number on rear and captions - see images 14 to 19. .1 - At Sth Melbourne Beach terminus. .2 - MMTB Paying fares dated Dec. 1968 in four languages inside tram. .3 - 661 and 878 at Brunswick Depot .4 - Y612 partly derailed at Brunswick .5 - 661, 8789 and 612 at Brunswick .6 - 661 at Batman Avenue .7 - Batman Avenue .8 - from the window looking forwards - reserved track. .9 - at South Melbourne Beach terminus with Bleak House in the background and an Advert for Swan Premium beer. .10 - ditto with Vopas Centre building in the background and an advert advertising Volvo motor cars - Swedish Lifesavers. .11 - ditto .12 - interior view of tram .13 - At Batman Ave with the shop on the railway side in the view.See images i14 to i19 for rear of photos.trams, tramways, melbourne, batman ave, brunswick depot, south melbourne beach, tram 661, tram 612, tram 878 -
 Ballarat Tramway Museum
Photograph - Colour Photograph/s - set of 8, Lloyd Rogers, Mar. 1984
Yields information about the operation by the Begonia Festival and in particular when 661 was repainted.Set of 8 colour prints of BTPS trams during the 1984 Begonia Festival, just after the repainting of 661 has been completed. Each print has two small copies of the main photo on the right hand side. Printed on Sakuracolor paper. .1 - 661, 27 and 38 at the depot .2 - 661 at St Aidans drive with the parking fee collectors in the view. Interior cab view showing controller, brake handle and pressure gauge. .3 - crossing 14 at the loop. .4 - 661 and 27 at the depot .5 - interior view of No. 14 .6 - interior view of depot with 28 and 26 being rebuilt in the view. .7. - interior view of 661 .8 - interior view of 661 with the tram being swept out. trams, tramways, begonia festival, btm, depot, wendouree parade, tram 661, tram 27, tram 38, tram 14, tram 28, tram 26 -
 Ballarat Tramway Museum
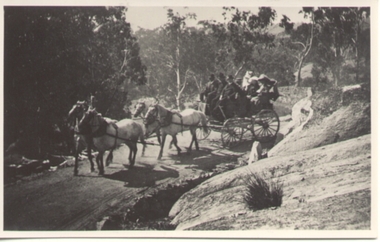
Photograph - Black & White Photograph/s, c1900
Black and white photograph of a horse drawn coach with four horses and 6 people on Bright to Mount Buffalo road. Early 1900's?On rear in red ink "Bright to Mt Buffalo and return, 22 miles each way"trams, tramways, horse drawn vehicle -
 Ballarat Tramway Museum
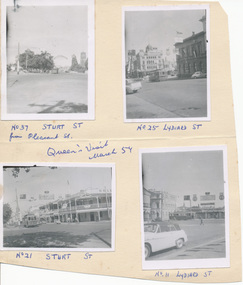
Photograph - Digital image, Wal Jack, Mar. 1954
Yields information on the decorations and tramcars and street scenes at the time of the Queens visit to Ballarat.Digital image from the Wal Jack Ballarat Album of a series of four small black and white photographs taken during the Queen Elizabeth II visit to Ballarat, March 1954. Captions under each photograph in ink. 1 - No. 37 at Pleasant St, looking east along Sturt St. - see Neg 993 2 - No. 25 at Lydiard St with the National Mutual Building in the background - see Neg 991. 3 - No. 21 - Sturt St at Dawson St with Golden City Hotel in the background - see Neg 992 4 - No. 17 Lydiard St taken from the railway station car park - see also Reg Item 5300 for a better photograph and Wal's notes on rear which says No. 17, not 11 - see Neg 994 All photographs include some of the decorations for the Royal Visit. Photographer - not stated, but sheet in Wal's handwriting. May not be Wal Jack based on the negative size, smaller than 120 which Wal used at the time. See image i2 for rear of photograph. See image i3 for hi res scan of print. See image i4 for hi res scan of negative N993 See image i5 for hi res scan of negative N994 See image i6 for hi res scan of negative N995 See image i7 for hi res scan of negative N996 On rear of the Manila sheet which has been cut from another sheet are "No. 11 Victoria St terminus 25-6-57".trams, tramways, royal visit, lydiard st, pleasant st, sturt st, tram 37, tram 25, tram 21, tram 17 -
 Ballarat Tramway Museum
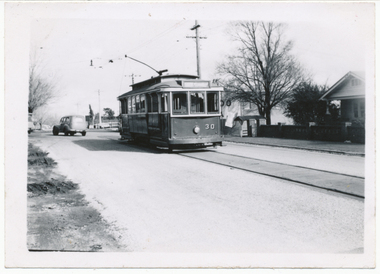
Photograph - Digital image, Wal Jack, 29/06/1955 12:00:00 AM
Yields information the appearance of the SEC tramcar No. 30 and the Mt Pleasant tram terminus during the reconstruction of the bridge over Canadian Creek.Digital image from the Wal Jack Ballarat Album of No. 30 at the Barkly St terminus, Mt Pleasant, 29-6-1955. Wal has the album notes of "standby car". Was provided to enable the service in Barkly St during the reconstruction of the Canadian Creek bridge during June-July 1955, see Reg Item 5157 as well and 5301, 5302 and 5305. See image i2 for rear of photograph. See image i3 for hi res scan of print. See image i4 for hi res scan of negativeon rear of photo in ink, "SEC Ballarat, No. 30 at Barkly St terminus (out of use). Mt Pleasant 29-6-55" In the top right hand corner is the W.Jack stamp but no negative number.trams, tramways, mt pleasant, barkly st, canadian creek, tram 30 -
 Ballarat Tramway Museum
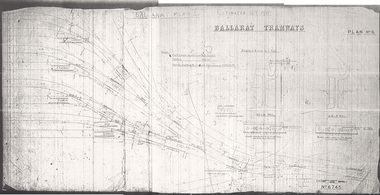
Drawing, Original by Hadfield's and print by Warren Doubleday, "Ballarat Plan 6", 1995
Yields information about a new depot for Ballarat - the track plan proposed but not followed through for ESCo. Gives the layout and the proposed manufacturer Hadfield's.Print made from a microfilm using a microfilm printer, of "Ballarat Plan 6", a drawing showing trackwork for a new tram depot proposed for the ESCo owned property near the power house. Shows an 8 track tram depot in association with existing Wendouree Parade trackwork. Prepared by Hadfield's Sheffield, drawing No. 6745 as Plan No. 6. Gives details of the proposed rail weights - 90lb and 83lb and location details. Drawing held as one complete assembled print and two part prints. The assembled print was scanned. Note not printed at full size. See Alan Bradley article on the Power Station and power supply to Ballarat.depot, trackwork, ballarat, esco, hadfield's -
 Ballarat Tramway Museum
Photograph - Digital image Set of 3, Wal Jack, early 1951
Digital image from the Wal Jack Ballarat Album of a photograph of MMTB No. 35, later to become Ballarat 40, at the rear of the depot after delivery to Ballarat on 30-6-1951. Photo by Wal Jack. Still has white bumpers and steps from war time blackout period. See image i2 for rear of photograph. See image i3 for hi res scan of print. See image i4 for hi res scan of negative 5205.1 - another view of the tram at the depot - see image i5 5205.2 - possibly the tram being delivered. The negative was located adjacent to 5205.1. Out of focus - see image i6. 5205i3 - similar photograph to i1 at the rear of the depot, on size 125 negative - see image i7.On rear of photograph in ink "SEC Ballarat No. 35 (ex MMTB C35) on new line rear of depot Wendouree 30-6-51. Stored outside until it was altered and repainted No."trams, tramways, bogie trams, delivery of tramcars, depot, tram 35, tram 40 -
 Ballarat Tramway Museum
Photograph - Digital image, Wal Jack, 14/03/1960 12:00:00 AM
Yields information about the appearance of railway level crossing and Ballarat station in 1960.Digital image from the Wal Jack Ballarat Album of a photograph of No. 21 at the gates at Ballarat Railway station while R734 shunts onto the 1.40pm Horsham Passenger train, 14-3-1960. Photo Wal Jack. See image i2 for rear of photograph.On rear of photograph in ink "VR , SEC, Ballarat No. 21 tram newly painted waiting at rail gates Ballarat Rly Station. R734 4-6-4 backing on 1.40pm Horsham Passenger Train 14-3-60" and in top right hand corner, Wal Jack stamp with "2899" written in.trams, tramways, lydiard st, railway station, level crossings, tram 21 -
 Ballarat Tramway Museum
Photograph - Colour Print/s - set of 9, Earl Ewers, 6/10/2011 12:00:00 AM
Yields information about BTM activities, AGM and repainting of No. 33.Set of nine coloured photographs taken by Earl Ewers Oct. 2011. .1 - No. 18 at St Aidans Drive - 6-10-11 .2 - ditto at Depot Junction .3 - No. 33 being prepared for repainting - Alan Snowball .4 - ditto .5 - BTM AGM - 38 at Gardens Loop 23-10-2011 with Richard Gilbert and Graeme Cleak in the view. .6 - as for .3 .7 - BTM AGM - Richard Gilbert speaking, with Peter Winspur, Greg Rodgers, Carolyn Cleak. .8 - ditto .9 - BTM AGM - 38 at Gardens Loop, with Austin Brehaut.Earl has written captions on the rear of the photograph in green ink.trams, tramways, btm, agm, repainting, tram 18, tram 33, tram 38 -
 Ballarat Tramway Museum
Photograph - Digital image, Wal Jack, 6/10/1960 12:00:00 AM
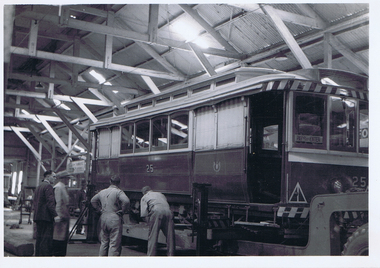
Yields information about the loading and departure of Ballarat No. 25 to Bendigo in 1960.Digital image from the Wal Jack Ballarat Album of a photograph of No.25 being loaded onto the Yellow Express Low Loader within the depot - 6-10-1960. Has Les Denmead standing alongside. See image i2 for rear of photograph. See image i3 for hi res scan of print. See image i4 for hi res scan of negative. See Reg Items 1478, 5241, 5242, 7759 and 7766 for a series of 5 photos of this event.On rear of photograph in ink "SEC, Ballarat Loading No. 25 for Bendigo onto Yellow Express Loader - Wendouree Depot Ballarat 6-10-1960." and in top Right hand corner Wal Jack stamp with "T255" written in.trams, tramways, transporting trams, yellow express, bendigo, moving trams, tram 25 -
 Ballarat Tramway Museum
Photograph - Digital image, Wal Jack, 6/10/1960 12:00:00 AM
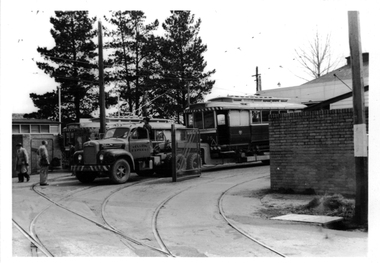
Yields information about the loading and departure of Ballarat No. 25 to Bendigo in 1960.Digital image from the Wal Jack Ballarat Album of a photograph of No.25 loaded onto the Yellow Express Low Loader outside the depot - 6-10-1960. See image i2 for rear of photograph. See image i3 for hi res scan of print. See image i4 for hi res scan of negative See Reg Items 1478, 5241, 5242, 7759 and 7766 for a series of 5 photos of this event.On rear of photograph in ink "SEC, Ballarat Loading No. 25 on Loader for Bendigo in depot yards Wendouree 6-10-1960." and in top Right hand corner Wal Jack stamp with "T256" written in.trams, tramways, transporting trams, yellow express, bendigo, moving trams, tram 25 -
 Ballarat Tramway Museum
Photograph - Digital image, Wal Jack, 6/10/1960 12:00:00 AM
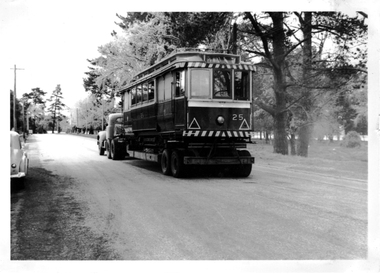
Yields information about the loading and departure of Ballarat No. 25 to Bendigo in 1960.Digital image from the Wal Jack Ballarat Album of a photograph of No.25 in Wendouree Parade, departing for Bendigo 6-10-1960, Photo Wal Jack. See image i2 for rear of photograph.On rear of photograph in ink "SEC, Ballarat Loading No. 25 on Yellow Express road transport en route to Bendigo near Wendouree depot 6-10-1960." and in top Right hand corner Wal Jack stamp with "T258" written in.trams, tramways, transporting trams, yellow express, bendigo, wendouree parade, moving trams, tram 25 -
 Ballarat Tramway Museum
Photograph - Digital image, Wal Jack, 6/01/1951 12:00:00 AM
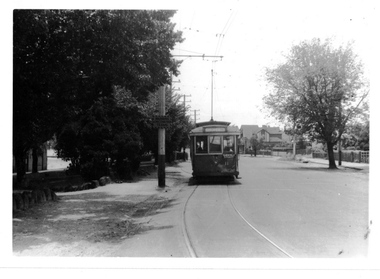
Yields information about the streetscape in Wendouree Parade near Webster St.Digital image from the Wal Jack Ballarat Album of a photograph of the No. 11 in Wendouree Parade, near Webster St, View Point line, 6-1-1951, Photo by Wal Jack. The tram has the destination of City and an auxiliary board saying "Grenville Street" . Note the "Warning Oncoming Trams" sign adjacent to the tram. See image i2 for rear of photograph. See image i3 for hi res scan of print. See image i4 for hi res scan of negativeOn rear of photograph in ink "SEC, Ballarat No. 11 in Wendouree Pde near Webster St, View Point Line 6-1-51" and Wal Jack stamp in top right hand corner with number "T1277" written in.trams, tramways, view point, webster st, wendouree parade, tram 11