Showing 1444 items matching " hawthorn rd"
-
 Camberwell Historical Society
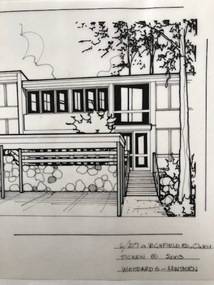
Drawing (series) - Architectural drawing, 6/217A Highfield Road, Camberwell, 2003
artist, architectural drawings, margaret picken, camberwell, housesartist, architectural drawings, margaret picken, camberwell, houses -
 Camberwell Historical Society
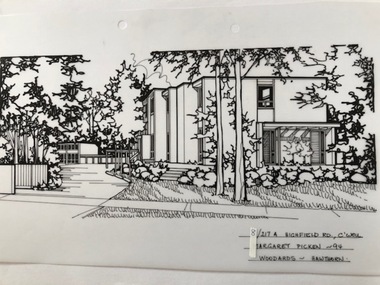
Drawing (series) - Architectural drawing, 8/217A Highfield Road, Camberwell, 1994
artist, architectural drawings, margaret picken, camberwell, housesartist, architectural drawings, margaret picken, camberwell, houses -
 Camberwell Historical Society
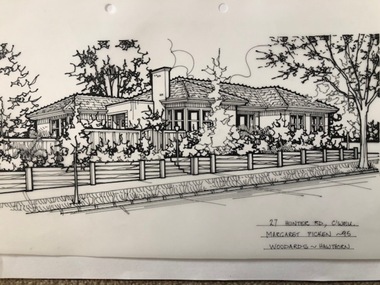
Drawing (series) - Architectural drawing, 27 Hunter Road, Camberwell, 1995
artist, architectural drawings, margaret picken, camberwell, housesartist, architectural drawings, margaret picken, camberwell, houses -
 Camberwell Historical Society
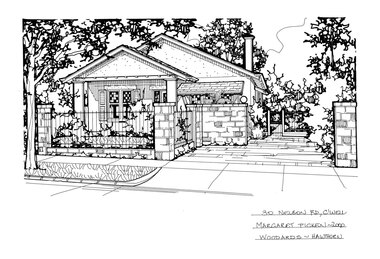
Drawing (series) - Architectural drawing, 30 Nelson Road, Camberwell, 2000
artist, architectural drawings, margaret picken, camberwell, housesartist, architectural drawings, margaret picken, camberwell, houses -
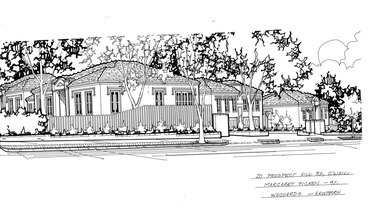 Camberwell Historical Society
Drawing (series) - Architectural drawing, 20 Prospect Hill Road, Camberwell, 1992
artist, architectural drawings, margaret picken, camberwell, housesartist, architectural drawings, margaret picken, camberwell, houses -
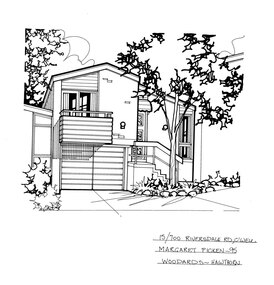 Camberwell Historical Society
Drawing (series) - Architectural drawing, 15/700 Riversdale Road, Camberwell, 1995
artist, architectural drawings, margaret picken, camberwell, housesartist, architectural drawings, margaret picken, camberwell, houses -
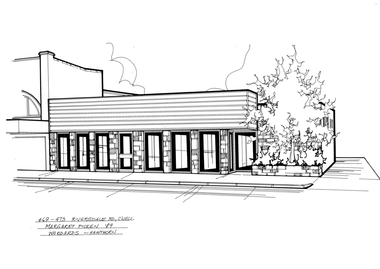 Camberwell Historical Society
Drawing (series) - Architectural drawing, 469-473 Riversdale Road, Camberwell, 1989
artist, architectural drawings, margaret picken, camberwell, housesartist, architectural drawings, margaret picken, camberwell, houses -
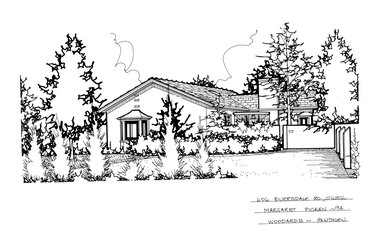 Camberwell Historical Society
Drawing (series) - Architectural drawing, 606 Riversdale Road, Camberwell, 1994
artist, architectural drawings, margaret picken, camberwell, housesartist, architectural drawings, margaret picken, camberwell, houses -
 Camberwell Historical Society
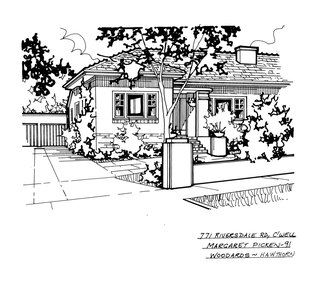
Drawing (series) - Architectural drawing, 771 Riversdale Road, Camberwell, 1991
artist, architectural drawings, margaret picken, camberwell, housesartist, architectural drawings, margaret picken, camberwell, houses -
 Camberwell Historical Society
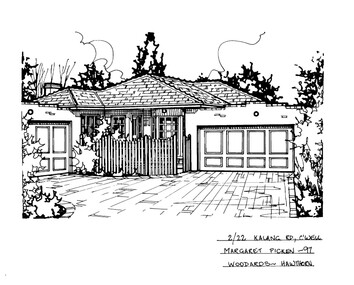
Drawing (series) - Architectural drawing, 2/22 Kalang Road, Camberwell, 1997
artist, architectural drawings, margaret picken, camberwell, housesartist, architectural drawings, margaret picken, camberwell, houses -
 Camberwell Historical Society
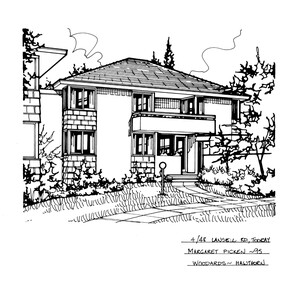
Drawing (series) - Architectural drawing, 4/48 Lansell Crescent, Camberwell, 1995
artist, architectural drawings, margaret picken, camberwell, housesartist, architectural drawings, margaret picken, camberwell, houses -
 Camberwell Historical Society
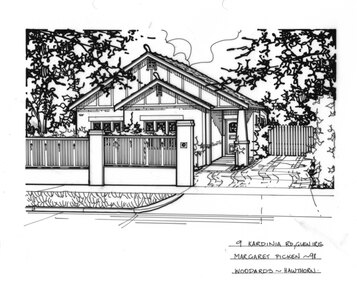
Drawing (series) - Architectural drawing, 9 Kardinia Road, Glen Iris, 1998
artist, architectural drawings, margaret picken, camberwell, housesartist, architectural drawings, margaret picken, camberwell, houses -
 Camberwell Historical Society
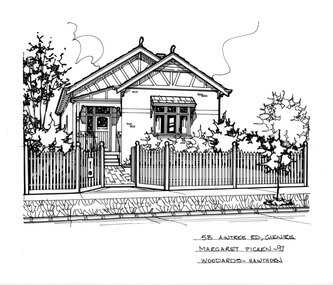
Drawing (series) - Architectural drawing, 58 Aintree Road, Glen Iris, 1997
artist, architectural drawings, margaret picken, camberwell, housesartist, architectural drawings, margaret picken, camberwell, houses -
 Camberwell Historical Society
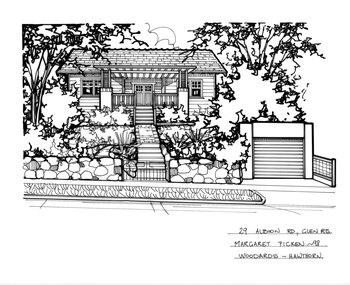
Drawing (series) - Architectural drawing, 29 Albion Road, Glen Iris, 1998
artist, architectural drawings, margaret picken, camberwell, housesartist, architectural drawings, margaret picken, camberwell, houses -
 Camberwell Historical Society
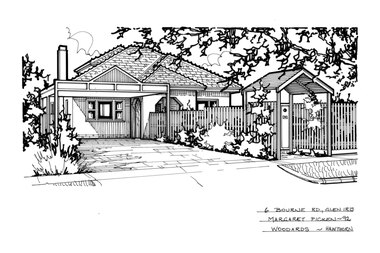
Drawing (series) - Architectural drawing, 6 Bourne Road, Glen Iris, 1992
artist, architectural drawings, margaret picken, camberwell, housesartist, architectural drawings, margaret picken, camberwell, houses -
 Camberwell Historical Society
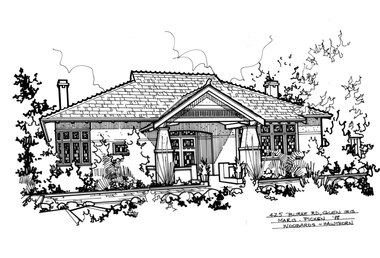
Drawing (series) - Architectural drawing, 425 Burke Road, Glen Iris, 1988
artist, architectural drawings, margaret picken, camberwell, housesartist, architectural drawings, margaret picken, camberwell, houses -
 Victorian Railway History Library
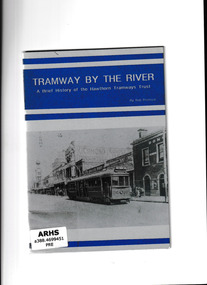
Booklet, Tramway Publications, Tramway by the river : a brief history of the Hawthorn Tramways Trust, 1993
The Hawthorn Tramways Trust was established in 1914, and merged with the Melbourne and Metropolitan Tramways Board in 1920. The Hawthorn line operated via Bridge Road, Richmond. Horse drawn trams were withdrawn in 1916 prior to the introduction of cable trams. The booklet provides technical details about this line, as well as photographs.Ill, maps, p.17.non-fictionThe Hawthorn Tramways Trust was established in 1914, and merged with the Melbourne and Metropolitan Tramways Board in 1920. The Hawthorn line operated via Bridge Road, Richmond. Horse drawn trams were withdrawn in 1916 prior to the introduction of cable trams. The booklet provides technical details about this line, as well as photographs.tramways - melbourne, trams - melbourne - history -
 Melbourne Tram Museum
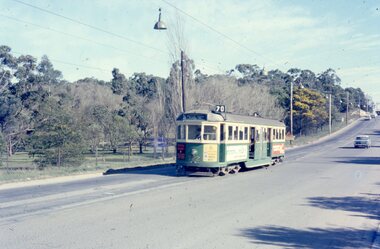
Photograph - Four colour slides - Wattle Park Single Line, Warren Doubleday, 1-8-1970
Set of four photographs taken at the time of the conversion of the Wattle Park route, in Riversdale Road from single line to double track between Warragul Road and the terminus, alongside Wattle Park itself. Yields information on the single line operation of the Wattle Park line prior the conversion to double track operation.Set of four colour Anscochrome slides, of single line operations on the Wattle Park line. .1 - W5 722 on Wattle Park single line, Sat. p.m. .2 - W2 388 meets W2 344 on Wattle park loop - shows the commencement of roadworks. .3 - SW5 853 from the park .4 - W5 738 at Warragul Road - shows the gates to Wattle park and the Caltex Service Station sign.Has photographers slide numbers on each slide.wattle park, route 70, riversdale rd, w2 class, w5 class, sw5 class, trackwork, tram 722, tram 388, tram 853, tram 738, trams, tramways -
 Melbourne Tram Museum
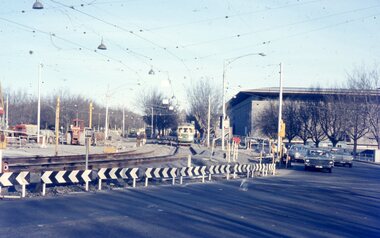
Photograph - Two colour slides - St Kilda Road Trackworks, 1-8-1970
Set of two colour slides showing the intersection of St Kilda Road, City Road and Sturt St. City Road at the start of work to lower City Road under St Kilda Road. The tracks along Sturt St had been diverted by Nolan St (now Southbank Blvd). The photo shows that only one of the tracks had been brought into use, the other still under construction. Photography by Warren Doubleday.Yields information on the start of the works to lower City Road under St Kilda Road 1-8-1970Set of two Anscochrome colour slides, of trackwork to place City Road under St Kilda Road. .1 - SW6 959 on St.-Kilda Rd deviation - shows the Arts Centre and the scale of the deviation. The former tracks into City Road and Sturt St can be seen in the foreground. .2 - SW6 878 - shows the Arts Centre, YMCA building the intersection with City Road and Sturt StHas photographers slide numbers on each slide.st kilda rd, trackworks, city rd, sturt st, sw6 class, tram 959, tram 878, tramways, track -
 Melbourne Tram Museum
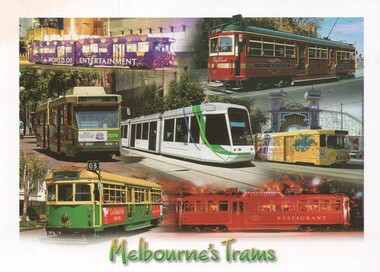
Postcard - Seven panel Melbourne tram photographs, Nucolorvue Publishing, Melbourne's Trams, 2001
Postcard featuring seven Melbourne tramcars - B2 2111 in an all-over advertising livery for Crown "World of Entertainment" in 2001, SW6 957 City Circle, B2 2070 (Bundoora), C1 2004, B2 2019 (2001) advertising Luna Park outside Luna Park, W7 1005 (Toorak Glenferrie Rd, route 8) and an SW6 tram as one of the Restaurant trams. Nu-Color-Vue number 11ML580, NCV 13584Yields information about seven different types of Melbourne trams around 2001.Postcard colour - seven panel Melbourne tram photographs - Nu-Color-Vuetrams, tramways, tramcar restaurant, luna park, w7 class tram, sw6 class tram, b class tram, c1 class tram, advertising trams, tram 2111, tram 957, tram 2020, tram 2004, tram 2019, tram 1005 -
 Melbourne Tram Museum
Photograph - Photo card Melbourne album sheets 1920c
Part of an album of photo cards - cigarette card size - that depicted Melbourne and other country towns c1920. Sheet 1 - Melbourne - Elizabeth St, Collins St, Spring St, St Kilda Rd, Swanston St, Princes Bridge and Exhibition buildings. Sheet 2 - Healesville, Lorne, Brighton, Albury, Bendigo, Woori Yallock and Queenscliff - three cards have been removed prior to acquisition. Sheet 3 - Queen Victoria Gardens, Alexandra Avenue, Exhibition Gardens, St Kilda Road, Botanic Gardens - three cards have been removed prior to acquisition.Set of three album sheets containing up to 9 small printed photos on each sheet of Melbourne and some country towns.melbourne, victoria, tramways, gardens -
 Melbourne Tram Museum
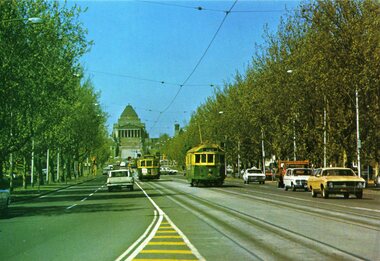
Postcard - Shrine of Remembrance, St Kilda Road and W class trams, National View by Murfett Publishing, 1970c
National View postcard of Shrine of Remembrance, St Kilda Road and W class trams W2 257? route 3 inbound in St Kilda Road with two other Ws outbound. Photo c1970Yields information about St Kilda Road early 1970sPostcard - by National View by Murfett Pty Ltd - divided back with title and publisher details. Card No. P1020-4trams, tramways, w class, w2 class, st kilda rd, shrine of remembrance -
 Melbourne Tram Museum
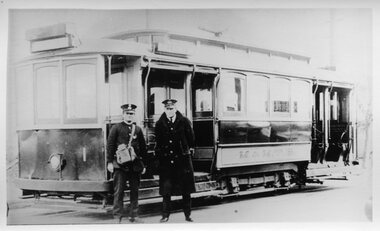
Photograph - Black and White - A Class Tram No. 1 at terminus (possibly Ballarat Road), about 1925
Photo shows one of the A class tramcars, No. 1, originally built for The Prahran & Malvern Tramway Company in 1910-11, then transported to the isolated Footscray System in 1923-24. Most were withdrawn between 1928 and 1931. Possibly at the Ballarat Rd terminus. Also shows the crew, Conductor and Driver in MMTB Uniforms. Collected by Keith Kings.Yields information about the original Melbourne A class trams and MMTB Uniforms.Black and White photograph of MMTB A Class Tram No 1. On rear in ink - "MMTB A - No. 1 terminus at Ballarat Road (?)" KS Kings Collection (about 1925), 1920s.tramways, trams, class, tram 1, pmtt, crews, uniforms -
 Melbourne Tram Museum
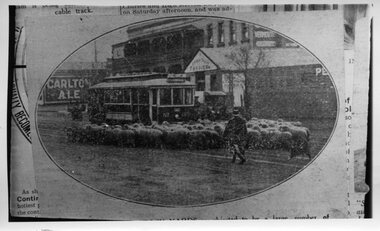
Photograph - Black and White - MMTB M Class tram 185 - Newspaper photo, MMTB M Class Tram 125 in Newmarket - Newspaper photo, Early 1920s
Image shows sheep crossing Racecourse Rd hindering a travelling tram M185. Has either the Newmarket Hotel or the Pastrol Hotel in the background.Early days of effect of markets on tramways MMTB M class tram 185 in Racecourse Road Newmarket, delayed by sheep neat the Saleyards.tramways, trams, m class trams, sheep, racecourse rd, tram 185, hotels -
 Melbourne Tram Museum
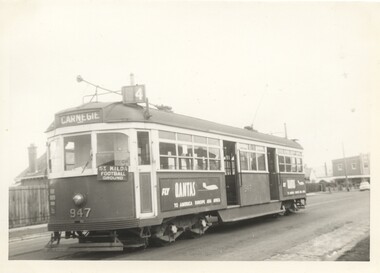
Photograph - SW6 947 Glen Huntly Road at Railway Road at the end of the double track prior of the turn into the single track of Truganini Road Carnegie, Bob Lilburn, 1960
Photo shows SW6 class tram 947 (Carnegie Route 4) in Truganini Rd Carnegie. The tram has an auxiliary board advising that it is serving the St Kilda Football Ground. Also has adverts for Qantas - to America, Europe, Asia Africa.Demonstrates the use of auxiliary boards to advise passengers the locations that the tram was serving.Photograph - SW6 947 Truganini Road Carnegiein ink on rear - MMTB - SW6 947 Truganini Rd Carnegie About 1960 R Lilburn phototramways, carnegie, st kilda football ground, qantas, sw6 class, tram 947, trams, route 4, mmtb -
 Melbourne Tram Museum
Album - Charles Craig - part 1 of 2, 1950s to 1970s
Photo - see pdf file for further information. Number Brief Description CC1 S178 at Elsternwick level crossing track works CC2 Building East Preston Depot 1955 CC3 Camberwell depot – post WW2 – lots of trams and a black cat CC4 W2 584 and SW6 958 northbound – Chapel St and Brighton Road CC5 W2 357 – southbound, Chapel St Brighton Road CC6 Pascoe Vale Road, Raceday working – note the signal CC7 The Preston Workshops - The Argus, post WW2, 223, 647 et al CC8 923 or is it 922 being built at Preston – The Argus photo - CC8A 832 being positioned onto trucks at Preston after an overhaul – Argus Photo – see also CC306 CC9 Footscray depot` CC10 W5 797 in St Kilda Road during track works – 1950s CC11 W2 457 at Kew Post Office CC12 Wellington Parade – W2 432, 492 and 337 – special event CC13 Swan St line up of trams – football? Or other special event – Sinclair’s bus on the right side. CC14 W2 630 being washed at a depot – The Argus photo CC15 Royal Park line at Flemington Road – W2 355 and W5 786 CC16 Nicholson St track construction from a tram cab CC17 T181 on tour at Gordon St CC18 T181 on Maribyrnong Bridge CC19 Ditto at River St just off bridge CC20 As for CC18 CC21 At Raleigh Rd CC22 T181 at Footscray depot CC23 Track construction, Nicholson, just north of Gertrude CC24 Commissioning overhead Bourke St tram 988 CC25 Queens Parade – 997 and 994 CC26 Swapping trolley wheel to skid – commissioning CC27 Track construction in Gertrude St CC28 985 in Queens Parade running special CC29 997 in Queens Parade CC30 1033 at North Fitzroy – AETA Special CC31 Bourke St at Elizabeth St – has passengers on board CC32 W6 985, 996 Queens Parade, Mk 3 bus 333 CC33 As above CC34 Showing construction at Nicholson & Gertrude – Bourke St CC35 W2 223 on Burnley temporary bridge – VR track expansion CC36 W5 823 – ditto CC37 Tram on old bridge prior to removal CC38 W2 433 on temporary bridge with new bridge beams and old track CC39 Looking down showing temporary single track – Swan St CC40 Tait train passing under tram bridge CC41 SW6 on single line – off loading CC42 W2 547 at City Road Junction CC43 City Road Jtn – 1969 – 596 and 771 CC44 City Road Jtn – 1969 – 596 and 771 (same as CC45 438 in Flinders St CC46 355 somewhere CC47 552 somewhere CC47A 364 at Preston Workshops? CC48 W2 334 on Traverser – Preston Workshops CC49 Wellington pade – large line up of trams, c1950 925, and 611 CC50 W2 493 Franklin st – advertising for Savings Certificates CC51 Possibly 551 with advertising for fund raising for Blind institute CC52 249 at Hawthorn – Riversdale Junction – with a Tally Ho and Village Fair Aux. board CC53 MMTB Postcard of 511 CC54 Wattle Park terminus with Single line warning sign CC55 Wattle Park Duplication CC56 36 at Domain Junction – 833 CC57 36 at Domain Junction CC58 36 at Domain Junction with 810 and 833 CC59 36 in Swanston by Flinders St Station CC60 36 in Spencer St at A’Beckett CC61 36 crossing Collins St CC62 36 crossing Collins St CC63 36 northbound in St Kilda Road with Shrine in background CC64 36 northbound in Swanston St at Flinders St CC65 Postcard – Ballarat 36 in Domain Road CC66 Postcard - Stampshow – Hawthorn Horse tram CC67 Postcard - Stampshow – Peace cable tram CC68 Postcard - 1041 and cable car set 1 at Preston CC69 Postcard - Colins & Elizabeth – greetings from old Melbourne CC70 Postcard - Cable car set at Preston CC71 Postcard - Twentyman’s cable cars CC72 Postcard - Nu-color-vue – horse tram 256 CC73 Cable car set – Market & Flinders CC74 Cable trams at Twentymans’ in their shed CC75 Cable tram track at Bourke & Spencer prior to removal CC76 Cable tram bogie at Preston Workshops – used as a dolly CC77 Cable trams at Twentymans’ CC78 Postcard - Valentines – Bourke looking west from Swanston CC79 Postcard - Rose 3938 – Bourke at Swanston – the Leviathan building CC80 Postcard - Valentines – Elizabeth St looking south from Collins – No. 19 CC81 Postcard - Rose P4765 – Bourke St Melbourne CC82 Postcard - Rose 4090 – cable tram passing Parliament house CC83 Postcard - Valentines – GPO Elizabeth St CC84 Interior of cable trailer with clothing on a set CC85 Elizabeth St looking north CC86 Cigarette card - Collins St No. 41- WD HO Wills CC87 Postcard - Rialto building with cable set CC88 Postcard - Valentines - Swanston at Flinders looking north CC89 CC90 Q 150 Hanna St – dated on rear CC91 176 turning – photo ex Alan Jungworth CC92 161 on Princes Bridge – minimum fare 4d sign and Inspector CC93 459 at Point Ormond CC94 158 at Gordon St – side on view CC95 X 217 in Swanston St CC96 X 217 in Swanston St with an East Brighton destination CC97 T177 CC98 T177 Peel St – no destination roll – being transferred? CC99 X1 462 in Glenhuntly Road to Point Ormond CC100 X1 462 in Glenhuntly Road to Elsternwick Rly Station CC101 X1 462 in Glenhuntly Road to Point Ormond CC102 Q 150 Hanna St CC103 190 at Camberwell Depot CC104 T182 at Footscray CC105 X1 466 and W2 at Footscray CC106 190 at Camberwell Depot CC107 X1 467 Barkly St Footscray CC108 X2 679 turning into William St from La Trobe St CC109 X2 677 Glenhuntly Road with Point Ormond Destination CC110 Postcard T180 CC111 Postcard format – X1 467 on a truck – see also CC178 CC112 Postcard format – X1 467 at Wantirna South CC113 Q200 and SW6 896 at Thornbury – has labels on rear CC114 T177, Ballarat Road – has labels on rear CC115 T178 at Point Ormond CC116 Postcard X1 465 and 466 CC117 Postcard – X2 676 CC118 Postcard – TMSV X2 217 CC119 810 on temporary bridging – 24-12-67 CC120 W2 575 – Queens Parade junction in, still temporary bridging, substation under construction CC121 Forming Queens Parade Junction base slab CC122 W2 596 prior to tramway works – all tracks still in position CC123 It’s a mass of reinforcing – bridging being formed CC124 Looking north with substation being built CC125 Looking east with some rather tight curves, Wellington St still in use CC126 SW6 958 ex Wellington St with all tracks and signal box and buildings. CC127 Victoria Pde at Gisborne looking east – at least 4 cars CC128 SW6 893? With dash canopy lights and SW6 862 and a man with a newspaper CC129 SW6 894 on the S curves, with tram in Wellington St CC130 Similar photo CC131 W2 564 turning into Wellington St – the concrete tracks are not that old CC132 W2 552 running out of Wellington St CC133 W5 732 from Fitzroy St into St Kilda Road with next iteration in position – very wonky CC134 W5 764 turning into Fitzroy St CC135 SW6 947 turning from Wellington St CC136 W2 586 running out of High St CC137 W2 500 turning into Wellington St CC138 W2 543 in Wellington St inbound CC139 L103 with St Kilda Junction destination, and a tower truck on right CC140 Workmen – new track in Queensway in use CC141 Ditto CC142 L103 in Queensway, and another car in bound CC143 Looking east along Wellington St which has been taken out of use. Also a MMTB Roller CC144 W5 824 and a W2 and all types of wobbly temporary track CC145 W2 354 to High St CC146 Sw6 947 on the S bends CC147 W2 500 looking north – tram on the S bends CC148 SW6 896 leaving the S bend CC149 W2 357 and a MMTB City bus with trees/gardens on the side CC150 W5 817 Elliot Ave – see also CC302 CC151 W2 552 – note the large trolley bridge CC152 W2 550 at depot or workshops CC153 1B truck CC154 SW2 432 CC155 W2 155 at Glenhuntly CC156 SW6 937 on AETA tour? CC157 X2 677 on Footscray service – Ballarat Rd? CC158 W2 641 – High St Kew? CC159 SW6 847 – Power St Hawthorn CC160 Simpson St – big line up CC161 W2 546 truck No. 1? CC162 W2s at Glenhuntly depot CC163 No. 15 truck under 899 CC164 206 and other junk at Preston Workshops CC165 W in Swanston St Melbourne – Rose series card CC166 Y1 613 Batman Ave?? or William St at Collins CC167 Tram plans CC168 X 217 Swanston St – see also 95 and 96 CC169 217 in Swanston St – same as 95 CC169A 192 in St Kilda Road at Princes bridge CC170 192 in St Kilda Road at Princes bridge CC171 Bendigo 3 arriving Malvern depot – being unloaded CC172 Ditto CC173 T180 at a depot CC174 X1 463 wheel set CC175 C30 – dog car side view – close up CC176 C30 dog car CC177 206 and 30 at Preston Workshops CC178 X1 467 on a truck – see CC111 also CC179 42 CC180 42 at a depot, no destination box CC181 W2 556 1A type truck CC182 Flinders St Station – Rose Series CC183 W7 1035 Spring – Nicholson St CC184 W7 1022 MMTB Post Card CC185 Adelaide 178 – has on rear – R. Lilburn 4/82 CC186 Adelaide 175 – has on rear – R. Lilburn 4/82 CC187 Y1 610 on AETA tour CC188 Y1 610 on AETA tour with large group – Point Ormond CC189 AETA display – has GH55-32 in pencil on rear CC190 AETA display – has GH55-29 in pencil on rear CC191 Y1 610 on AETA tour with large group – Point Ormond CC192 VR 53 at Footscray CC193 VR cars 40 and 34 at Elwood wash dock CC194 W7 1024 as the 1970 Christmas tram CC195 Geelong – loading a set of 22E trucks CC196 Geelong 10 and 23 running an AETA special CC197 Geelong – AETA special CC198 Geelong 7 at Junction CC199 Geelong 10, in the city CC200 Geelong 33 with Belmont destination CC201 Geelong 15 Eastern Park destination 29-3-1948 CC202 Geelong 23 at Railway Station – 29-3-1948 CC203 Geelong 23 at Railway Station – 29-3-1948 CC204 Geelong – loading a bogie tram CC205 Geelong – loading a bogie tram CC206 Geelong 40 – loaded on truck CC207 Geelong 40 – on jacks CC208 Geelong 40 on jacks – 19 behind CC209 Geelong 38 with two workers on either side CC210 – 214 Australian Historic Tramways stamp folder and set CC215 Bendigo 17 at depot – has dup JBS on rear CC216 Bendigo 20, 29 bogie and straight sill car at Charing Cross CC217 Bendigo one man bogie Pall Mall CC218 Bendigo – Bogie 23, other cars and welding truck at depot CC219 Bendigo 7 with Quarry Hill destination CC220 Bendigo 21 with Lake Weerona destination CC221 ESCo 18 Ballarat CC222 Ballarat bogie 22 on AETA special CC223 Ditto CC224 Ballarat 34 at Stones Corner – R Lilburn CC225 Ballarat 15 in Bridge St – R Lilburn CC226 Ballarat 40 at Gardens – R Lilburn CC227 Ballarat 37 running out of depot – R Lilburn CC228 Postcard – Valentines – Sturt St with loaded horse tram trailer CC229 AETA Geelong tram tour ticket – 29-3-1948 CC230 Postcard – Geelong – Valentine 2114 – T&G building CC231 Postcard – PMTT ! – High St Malvern CC232 Postcard – Empire – Glenferrie Road, Malvern at Wattletree Rd CC233 Postcard Y469, MMTB CC234 Postcard Z2 Spring St CC235 Postcard – Z1 MMTB CC236 Postcard – Stamp Show W1 431 CC237 Postcard – Stamp show B2005 CC238 Postcard – Stamp show W6 982 CC239 Postcard – Valentines 1264 – Johnstone Park with tram in distance CC240 Postcard – Rose 10711 – Swanston and Lonsdale – Hospital and W232 CC241 Postcard – Rose 4827 – Fitzroy St St Kilda W2 362 and 548 CC242 Postcard – Valentines – 939 – St Kilda War Memorial, W and a R? CC243 Postcard – Valentines – 572 – St Kilda War Memorial, W 413 and 140? CC244 Postcard – Valentines – 938 – Uper and Lower Esplanade – L 104 CC245 Postcard – St Kilda Rd at Princes Bridge Y1 and W CC246 Postcard – Biscay BG82 – W5 814 - CC247 Postcard – Biscay 796112 – Bourke St looking west CC248 Postcard – Biscay 796109 – Bourke St looking east CC249 Postcard – Biscay 2AUS58 – Z5 Bourke St CC250 Postcard – Biscay BG 249 – Swanston St CC251 Postcard – National View – St Kilda Rd – shrine and Prince Henrys W2 405 CC252 Postcard – Nu color vue – 11 ML 156 – St Kilda Rd CC253 Postcard – Nu color vue – 11 ML 153 – Swanston St CC254 Postcard – Nu Color vue – Collins St 442 CC255 Postcard – Pitt card – Adelaide – H 364 at Victoria St CC256 Postcard – SPER L/P 154 CC257 Postcard – BTMS – 550 CC258 Postcard – SPER – Brisbane 295 CC259 Adelaide 131 at Burnside – has R Lilburn on card, c1911 CC260 Adelaide 194 CC261 Adelaide 235, with two crew, The News photo CC262 Rockhampton, outside post office – has source of photo details CC263 Sydney – 2086 and 2062 arriving Circular Quay CC264 Sydney – P class – Pitt St? CC265 Sydney – 1610 at Circular Quay CC266 Brisbane 99 and 468 CC267 Sydney with bridge behind CC268 Steam tram Paramatta Park – 103 CC269 Sydney – Museum Station =- Elizabeth St CC270 Sydney – weed burner 137S at a loop Demonstrates the work of Charles Craig in photography and collection of prints.Assembled album in a black presentation folder of 270 photographs from the Charles Craig Collection - 86 sleeves - part 1 of 2. All photographs have been scanned and placed on the Museum's G drive. A list of all photographs with details where possible has been compiled. Victorian Provincial, Launceston, Hobart and Sydney tram photos have been transferred to other Museums, image files retained.melbourne, tramways, tramcars, trams, charles craig, st kilda junction, trackworks -
 Melbourne Tram Museum
Photograph - Black and White - L106 St Kilda Road at City Road, John Alfred, Nov. 1954
Photo shows L class 106 and possibly 105 at the intersection of City Road and St Kilda Road. Yields information about the use of the L class tram in Melbourne during the mid 1950sPhotograph - Black and White - L106 St Kilda Road at City Road. Printed on satin paper.Has details on rear in ink and John Alfred Stamp. Dated Nov. 1954.tramways, tramcars, l class, tram 106, st kilda road, city rd -
 Melbourne Tram Museum
Photograph - Black and White - W6 965 reversing at Elsternwick, John Alfred
Photo shows - W6 965 (route 4, City) reversing at Elsternwick, using the Point Ormond leg of the triangle of the intersection at the intersection with Brighton Road and Glenhuntly Rd, due to the work to replace the Elsternwick level crossing. Dated 2-10-1960.Yields information about alterations to tram services during a level crossing removal project.Photograph - Black and White - W6 965 reversing at ElsternwickHas details typed on rear, date stamp and John Alfred Stamp. tramways, tramcars, w6 class, elsternwick, brighton road, glenhuntly road, tram 965, route 4 -
 Melbourne Tram Museum
Photograph - Black and White - trams 661 and 675 Elsternwick, John Alfred, 1960
Black and white photograph of trams W3 661 (Route 4 Carnegie) and X2 675 (Point Ormond) , Glenhuntly Road, Elsternwick Station, during the lowering of the railway line, 1960. Photo by John Alfred. Yields information about alterations to tram services during a level crossing removal project.Photograph - Black and White - trams 661 and 675 ElsternwickHas details handwritten on rear, and John Alfred Stamp. tramways, tramcars, glenhuntly rd, level crossing, elsternwick, tram 661, tram 675, w3 class, x2 class, point ormond -
 Melbourne Tram Museum
Album - Geoff Grant Photos, Geoff Grant, mid 1950s
Photo - see pdf file for further information. Number Brief Description GAG1 51 Sandringham GAG2 50 Sandringham GAG3 50 side Sandringham GAG4 Depot Sandringham_ GAG5 426 Camberwell Depot GAG6 822 St Kilda Rd GAG7 496 St Kilda Rd GAG8 347 Caulfield GAG9 440 Princes Bridge GAG10 190 Camberwell GAG11 190 Camberwell GAG12 Ys Camberwell GAG13 Interior Camberwell Depot GAG14 921 Camberwell GAG15 613 Camberwell Depot GAG16 613 front Camberwell Depot GAG17 887 Bourke St opening_ GAG18 888 Victoria St North Richmond GAG19 888 Victoria Pde GAG20 888 887 Malvern Depot GAG21 888 887 Malvern Depot GAG22 888 Victoria Pde GAG23 1033 North Fitzroy Depot GAG24 957 1033 Bourke St GAG25 1033 Nicholson St East Brunswick GAG26 1001 East Preston Depot GAG27 980 East Preston Depot GAG28 980 Dandenong Rd GAG29 Tower wagons Bourke St at Swanston St GAG30 Tower wagons Nicholson St GAG31 988 tower wagons Nicholson St GAG32 988 tower wagons Bourke St at Russell St GAG33 Albion Tower wagon Clifton Hill GAG34 988 tower wagon Bourke St at Russell St GAG35 988 East Preston Depot GAG36 Cleaner 7 Bourke St GAG37 988 turning from Nicholson St into Victoria Pde GAG38 991 Bourke St GAG39 View down Bourke St from 988 GAG40 988 Nicholson St GAG41 988 Smith St GAG42 988 High St GAG43 988 testing overhead Bourke St GAG44 1003 Nicholson St into Gertrude St GAG45 988 Clifton Hill GAG46 988 Nicholson St GAG47 988 1003 Nicholson St GAG48 988 Bourke St looking west from Elizabeth St GAG49 988 Bourke St looking east from Swanston St GAG50 988 1003 and tower wagons Nicholson St GAG51 988 Clifton Hill GAG52 988 East Preston Depot GAG53 190 Etched saloon door window Yields infomation about VR Tramways, Bourke Street trams and AETA tours. Geoff Grant was a Herald Sun photographer.Assembled album in a black presentation folder of 53 photographs from the Geoff Grant Collection - 27 sleeves All photographs have been scanned and placed on the Museum's G drive. A list of all photographs with details where possible has been compiled. tramways, trams, sandingham, camberwell depot, bourke st, new tramways, tower wagons, tours, victoria parade, east preston, aeta tours